I’ll admit it: Compiling and installing OpenCV 3 on macOS Sierra was a lot more of a challenge than I thought it would be, even for someone who has a compiled OpenCV on hundreds of machines over his lifetime.
If you’ve tried to use one of my previous tutorials on installing OpenCV on your freshly updated Mac (Sierra or greater) you likely ran into a few errors, specifically with the QTKit.h
header files.
And even if you were able to resolve the QTKit problem, you likely ran into more issues trying to get your CMake command configured just right.
In order to help resolve any issues, problems, or confusion when installing OpenCV with Python bindings on macOS Sierra (or greater) I’ve decided to create two hyper-detailed tutorials:
- This first tutorial covers how to install OpenCV 3 with Python 2.7 bindings on macOS.
- My second tutorial will come next week where I’ll demonstrate how to install OpenCV 3 with Python 3.5 bindings on macOS.
I decided to break these tutorials into two separate blog posts because they are quite lengthy.
Furthermore, tuning your CMake command to get it exactly right can be a bit of a challenge, especially if you’re new to compiling from OpenCV from source, so I wanted to take the time to devise a foolproof method to help readers get OpenCV installed on macOS.
To learn how to install OpenCV with Python 2.7 bindings on your macOS system, keep reading.
macOS: Install OpenCV 3 and Python 2.7
The first part of this blog post details why I am creating a new tutorial for installing OpenCV 3 with Python bindings on the Mac Operating System. In particular, I explain a common error you may have run across — the QTKit.h
header issue from the now deprecated QTKit library.
From there, I provide super detailed instructions on how to install OpenCV 3 + Python 2.7 your macOS Sierra system or greater.
Avoiding the QTKit/QTKit.h file not found error
In the Mac OSX environment the QTKit (QuickTime Kit) Objective-C framework is used for manipulating, reading, and writing media. In OSX version 10.9 (Mavericks) QTKit was deprecated (source).
However, it wasn’t until the release of macOS Sierra that much of QTKit was removed and instead replaced with AVFoundation, the successor to QTKit. AVFoundation is the new framework for working with audiovisual media in iOS and macOS.
This created a big problem when compiling OpenCV on Mac systems — the QTKit headers were not found on the system and were expected to exist.
Thus, if you tried to compile OpenCV on your Mac using my previous tutorials your compile likely bombed out and you ended up with an error message similar to this:
fatal error: 'QTKit/QTKit.h' file not found #import <QTKit/QTKit.h> ^ 1 error generated. make[2]: *** [modules/videoio/CMakeFiles/opencv_videoio.dir/src/cap_qtkit.mm.o] Error 1 make[1]: *** [modules/videoio/CMakeFiles/opencv_videoio.dir/all] Error 2 make: *** [all] Error 2
Even more problematic, both the tagged releases of OpenCV v3.0 and v3.1 do not include fixes to this issue.
That said, the latest commits to the OpenCV GitHub repo do address this issue; however, a new tagged release of v3.2 has yet to be released.
That said, I’m happy to report that by using the latest commit to OpenCV’s GitHub we can install OpenCV on macOS Sierra and greater.
The trick is that we need to use the HEAD
of the repo as opposed to a tagged release.
Once OpenCV 3.2 is released I’m sure the QKit to AVFoundation migration will be included, but until then, if you want to install OpenCV 3 on your macOS system running Sierra or later, you’ll need to avoid using tagged releases and instead compile and install the development version of OpenCV 3.
How do I check my Mac Operating System version?
To check your Mac OS version click the Apple icon at the very top-left corner of your screen in the menu then select “About this Mac”.
A window should then pop up, similar to the one below:
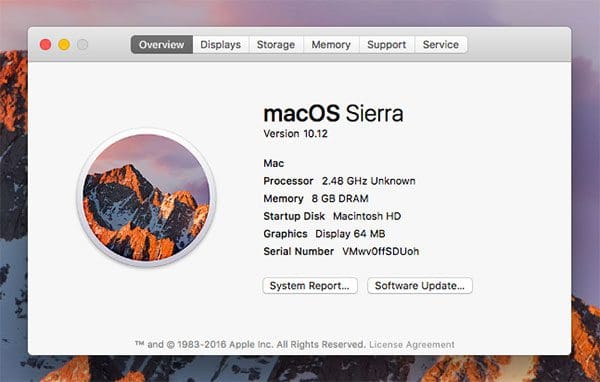
If you are running macOS Sierra or greater, you can use this tutorial to help you install OpenCV 3 with Python 2.7 bindings.
If you are using an older version of the Mac Operating System (Mavericks, Yosemite, etc.), please refer to my previous tutorials.
Step #1: Install Xcode
Before we can even think about compiling OpenCV, we first need to install Xcode, a full blown set of software development tools for the Mac Operating System.
Register for an Apple Developer account
Before downloading Xcode you’ll want to register with the Apple Developer Program (it’s free). If you have an existing Apple ID (i.e., what you use to sign in to iTunes with) this is even easier. Simply provide some basic information such as name, address, etc. and you’ll be all set.
From there, the easiest way to download Xcode is via the App Store. Search for “Xcode” in the search bar, select it, and then click the “Get” button:
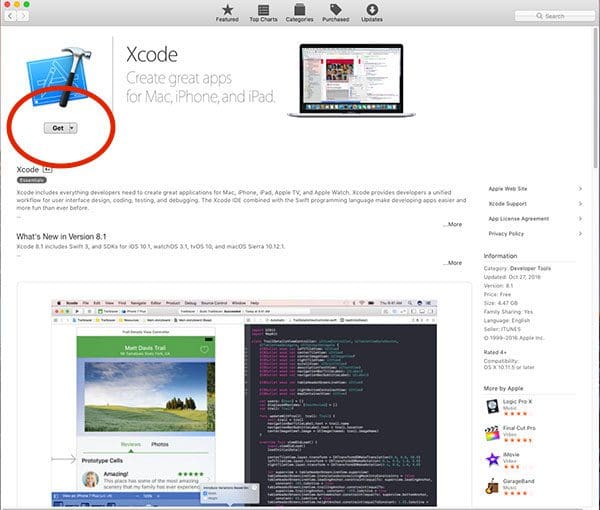
Xcode will then start to download and install. On my machine the download and install process took approximately 30 minutes.
Accept the Apple Developer license
Assuming this is the first time you’ve installed or used Xcode, you’ll need to accept the developer license (otherwise, you can skip this step). I prefer using the terminal whenever possible. You can use the following command to accept the Apple Developer License:
$ sudo xcodebuild -license
Scroll to the bottom of the license and accept it.
Install Apple Command Line Tools
Finally, we need to install the command line tools. These tools include packages such as make, GCC, clang, etc. This is absolutely a required step, so make sure you install the command line tools:
$ sudo xcode-select --install
After you enter the command above a window will pop up confirming that you want to install the command line tools:
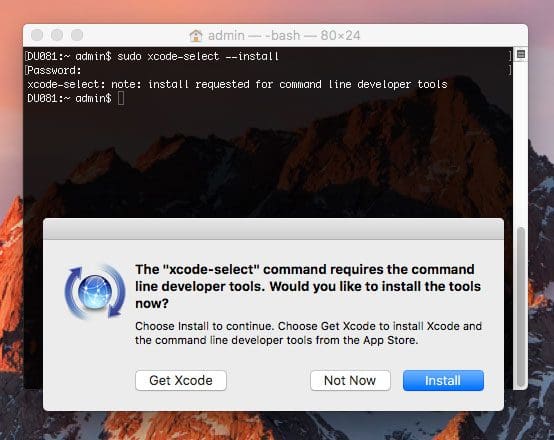
Click “Install” and the Apple Command Line Tools will be downloaded and installed on your system. This should take less than 5 minutes.
Step #2: Install Homebrew
We are now ready to install Homebrew, a package manager for macOS. Think of Homebrew as similar equivalent to apt-get for Ubuntu and Debian-based systems.
Installing Homebrew is simple. Simply copy and paste the command underneath the “Install Homebrew” section of the Homebrew website (make sure you copy and paste the entire command) into your terminal:
$ /usr/bin/ruby -e "$(curl -fsSL https://raw.githubusercontent.com/Homebrew/install/master/install)"
Once Homebrew is installed you should update it to ensure the most recent package definitions are downloaded:
$ brew update
The last step is to update our ~/.bash_profile
file. This file may exist on your system already or it may not. In either case, open it with your favorite text editor (I’ll use nano
in this case):
$ nano ~/.bash_profile
And insert the following lines at the bottom of the file (if ~/.bash_profile
does not exist the file will be empty, so simply insert the following lines):
# Homebrew export PATH=/usr/local/bin:$PATH
The above snippet updates your PATH
variable to look for binaries/libraries along the Homebrew path before searching your system path.
After updating the file save and exit the editor. I have included a screenshot of my ~/.bash_profile
below:
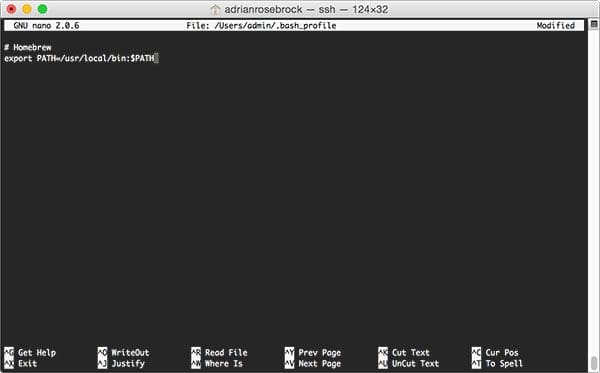
You should then use the source
command to ensure the changes to your ~/.bash_profile
file are manually reloaded:
$ source ~/.bash_profile
This command only needs to be executed once. Whenever you login, open up a new terminal, etc., your .bash_profile
will will automatically be loaded and sourced for you.
Step #3: Setup Homebrew for Python 2.7 and macOS
In general, you do not want to develop against the system Python as your main interpreter. This is considered bad form. The system version of Python should (in an ideal world) serve only one purpose — support system operations.
Instead, you’ll want to install your own version of Python that is independent of the system one. Installing Python via Homebrew is dead simple:
$ brew install python
Note: This tutorial covers how to install OpenCV 3 with Python 2.7 bindings on macOS. Next week I’ll be covering OpenCV 3 with Python 3 bindings — if you want to use Python 3 with OpenCV on macOS, please refer to next week’s blog post.
After the install command finishes we just need to run the following command to complete the Python installation:
$ brew linkapps python
To confirm that we are using the Homebrew version of Python rather than the system version of Python you should use the which
command:
$ which python /usr/local/bin/python
Important: Be sure to inspect the output of the which
command! If you see /usr/local/bin/python
then you are correctly using the Hombrew version of Python.
However, if the output is /usr/bin/python
then you are incorrectly using the system version of Python. If this is the case then you should ensure:
- Homebrew installed without error.
- The
brew install python
command completed successfully. - You have properly updated your
~/.bash_profile
file and reloaded the changes usingsource
. This basically boils down to making sure your~/.bash_profile
looks like mine above in Figure 4.
Step #4: Install virtualenv, virtualenvwrapper, and NumPy
We are now ready to install three Python packages: virtualenv and virtualenvwrapper, along with NumPy, used for numerical processing.
Installing virtualenv and virtualenvwrapper
The virtualenv
and virtualenvwrapper
packages allow us to create separate, independent Python environments for each project we are working on. I’ve mentioned Python virtual environments many times before, so I won’t rehash what’s already been said. Instead, if you are unfamiliar with Python virtual environments, how they work, and why we use them, please refer to the first half of this blog post. There is also an excellent tutorial on the RealPython.com blog that takes a deeper dive into Python virtual environments.
To install virtualenv
and virtualenvwrapper
, just use pip
:
$ pip install virtualenv virtualenvwrapper
After these packages have been installed we once again need to update our ~/.bash_profile
file:
# Virtualenv/VirtualenvWrapper source /usr/local/bin/virtualenvwrapper.sh
After updating, your ~/.bash_profile
should look similar to mine below:
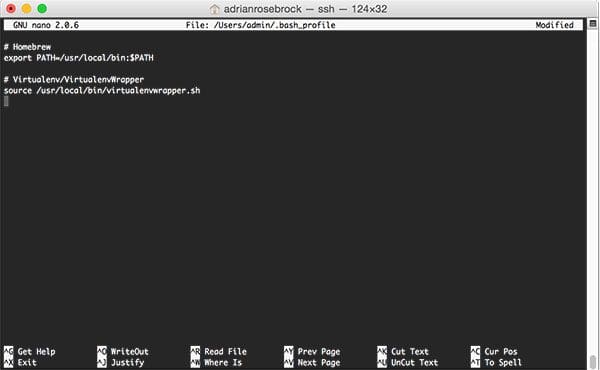
Save and exit your text editor, followed by refreshing your environment using the source
command:
$ source ~/.bash_profile
Again, this command only needs to be executed once. Whenever you open up a new terminal the contents of your .bash_profile
file will be automatically loaded for you.
Creating your Python virtual environment
Assuming the above commands completed without error, we can now use the mkvirtualenv
command to create our Python virtual environment. We’ll name this Python virtual environent cv
:
$ mkvirtualenv cv
This command will create a Python environment that is independent from all other Python environments on the system (meaning this environment has its own separate site-packages
directory, etc.). This is the virtual environment we will be using when compiling and installing OpenCV.
The mkvirtualenv
command only needs to be executed once. If you ever need to access this virtual environment again, just use the workon
command:
$ workon cv
To validate that you are in the cv
virtual environment, simply examine your command line — if you see the text (cv)
preceding the prompt, then you are in the cv
virtual environment:
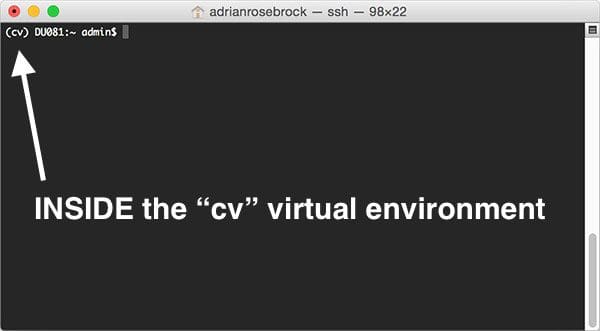
Otherwise, if you do not see the cv
text, then you are not in the cv
virtual environment:
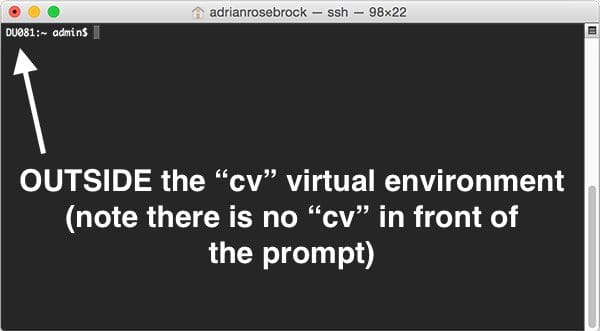
To access the cv
virtual environment simply use the workon
command mentioned above.
Install NumPy
The last step is to install NumPy, a scientific computing package for Python.
Ensure you are in the cv
virtual environment (otherwise NumPy will be installed into the system version of Python rather than the cv
environment) and then install NumPy using pip
:
$ pip install numpy
Step #5: Install OpenCV prerequisites using Homebrew
OpenCV requires a number of prerequisites, all of which can be installed easily using Homebrew.
Some of these packages are related to tools used to actually build and compile OpenCV while others are used for image I/O operations (i.e., loading various image file formats such as JPEG, PNG, TIFF, etc.)
To install the required prerequisites for OpenCV on macOS, just execute these commands:
$ brew install cmake pkg-config $ brew install jpeg libpng libtiff openexr $ brew install eigen tbb
Step #6: Download the OpenCV 3 source from GitHub
As I mentioned at the top of this tutorial, we need to compile OpenCV from the latest commit, not a tagged release. This requires us to download the OpenCV GitHub repo:
$ cd ~ $ git clone https://github.com/opencv/opencv
Along with the opencv_contrib repo:
$ git clone https://github.com/opencv/opencv_contrib
Step #7: Configuring OpenCV 3 and Python 2.7 via CMake on macOS
In this section I detail how to configure your OpenCV 3 + Python 2.7 on macOS Sierra build using CMake.
First, I demonstrate how to setup your build by creating the build
directory.
I then provide a CMake build template that you can use. This template requires you to fill in two values — the path to your libpython2.7.dylib
file and the path to your Python.h
headers.
I will help you find and determine the correct values for these two paths.
Finally, I provide an example of a fully completed CMake command. However, please take note that this command is specific to my machine. Your CMake command may be slightly different due to the paths specified. Please read the rest of this section for more details.
Setting up the build
In order to compile OpenCV 3 with Python 2.7 support for macOS we need to first set up the build. This simply amounts to changing directories into opencv
and creating a build
directory:
$ cd ~/opencv $ mkdir build $ cd build
OpenCV 3 + Python 2.7 CMake template for macOS
In order to make the compile and install process easier, I have constructed the following template OpenCV 3 + Python 2.7 CMake template:
$ cmake -D CMAKE_BUILD_TYPE=RELEASE \ -D CMAKE_INSTALL_PREFIX=/usr/local \ -D OPENCV_EXTRA_MODULES_PATH=~/opencv_contrib/modules \ -D PYTHON2_LIBRARY=YYY \ -D PYTHON2_INCLUDE_DIR=ZZZ \ -D PYTHON2_EXECUTABLE=$VIRTUAL_ENV/bin/python \ -D BUILD_opencv_python2=ON \ -D BUILD_opencv_python3=OFF \ -D INSTALL_PYTHON_EXAMPLES=ON \ -D INSTALL_C_EXAMPLES=OFF \ -D BUILD_EXAMPLES=ON ..
Looking at this template I want to point out a few things to you:
BUILD_opencv_python2=ON
: This indicates that we want to build Python 2.7 bindings for our OpenCV 3 install.BUILD_opencv_python3=OFF
: Since we are compiling Python 2.7 bindings we need to explicitly state that we do not want Python 3 bindings. Failure to include these two switches can cause problems in the CMake configuration process.PYTHON2_LIBRARY=YYY
: This is the first value you need to fill in yourself. You will need to replaceYYY
with the path to yourlibpython2.7.dylib
file (I will help you find it in the next section).PYTHON2_INCLUDE_DIR
: This is the second value you will need to fill in. You need to replaceZZZ
with the path to yourPython.h
headers (again, I’ll help you determine this path).
Determining your Python 2.7 library and include directory
Let’s start by configuring your PYTHON2_LIBRARY
value. This switch should point to our libpython2.7.dylib
file. You can find this file within many nested subdirectories of /usr/local/Cellar/python/
. To find the exact path to the libpython2.7.dylib
file, just use the ls
command along with the wildcard asterisk:
$ ls /usr/local/Cellar/python/2.7.*/Frameworks/Python.framework/Versions/2.7/lib/python2.7/config/libpython2.7.dylib /usr/local/Cellar/python/2.7.12_2/Frameworks/Python.framework/Versions/2.7/lib/python2.7/config/libpython2.7.dylib
Take note of the output of this command — this is the full path to your libpython2.7.dylib
file and will replace YYY
in the CMake template above.
Next, let’s determine the PYTHON2_INCLUDE_DIR
. This path should point to the Python.h
headers used to generate our actual OpenCV + Python 2.7 bindings.
Again, we’ll use the same ls
and wildcard trick here to determine the proper path:
$ ls -d /usr/local/Cellar/python/2.7.*/Frameworks/Python.framework/Versions/2.7/include/python2.7/ /usr/local/Cellar/python/2.7.12_2/Frameworks/Python.framework/Versions/2.7/include/python2.7/
The output of the ls -d
command is our full path to the Python.h
headers. This value will replace ZZZ
in the CMake template.
Filling in the CMake template
Now that you’ve determined the PYTHON2_LIBRARY
and PYTHON2_INCLUDE_DIR
values you need to update the CMake command with these values.
On my particular machine the full CMake command looks like this:
$ cmake -D CMAKE_BUILD_TYPE=RELEASE \ -D CMAKE_INSTALL_PREFIX=/usr/local \ -D OPENCV_EXTRA_MODULES_PATH=~/opencv_contrib/modules \ -D PYTHON2_LIBRARY=/usr/local/Cellar/python/2.7.12_2/Frameworks/Python.framework/Versions/2.7/lib/python2.7/config/libpython2.7.dylib \ -D PYTHON2_INCLUDE_DIR=/usr/local/Cellar/python/2.7.12_2/Frameworks/Python.framework/Versions/2.7/include/python2.7/ \ -D PYTHON2_EXECUTABLE=$VIRTUAL_ENV/bin/python \ -D BUILD_opencv_python2=ON \ -D BUILD_opencv_python3=OFF \ -D INSTALL_PYTHON_EXAMPLES=ON \ -D INSTALL_C_EXAMPLES=OFF \ -D BUILD_EXAMPLES=ON ..
However, please do not copy and paste my exact CMake command — make sure you have used the instructions above to properly determine your PYTHON2_LIBRARY
and PYTHON2_INCLUDE_DIR
values.
Once you’ve filled in these values execute your cmake
command and your OpenCV 3 + Python 2.7 build will be configured.
As an example, take a look at the Python 2
section of the output from my configuration:
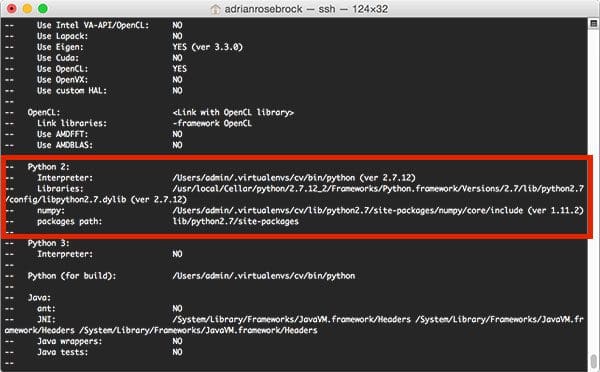
You’ll want to make sure that:
- The
Interpreter
points to the Python binary in yourcv
virtual environment. Libraries
points to yourlibpython2.7.dylib
file.- The
numpy
version being utilized is the one you installed in yourcv
virtual environment.
Step #8: Compile and install OpenCV on macOS
Assuming you cmake
command exited without error and your Python 2
section is properly configured, you can now compile OpenCV:
$ make -j4
The -j
switch controls the number of parallel processes to compile OpenCV. We normally set this to the number of available cores/processors on our machine. Since I’m on a quad-core system, I use -j4
.
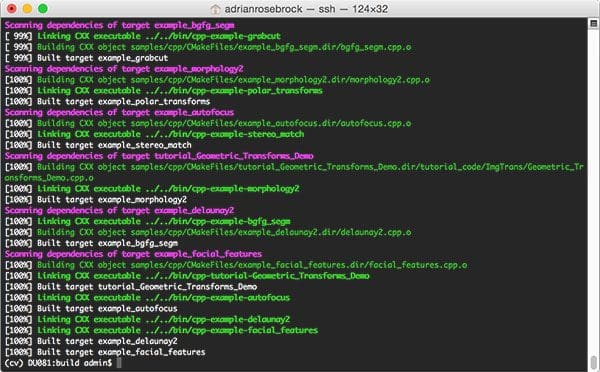
OpenCV can take awhile to compile (30-90 minutes) depending on the speed of your machine. A successful compile will end with a 100% completion:
Assuming that OpenCV compiled without error, you can now install it on your macOS system:
$ sudo make install
Step #9: Sym-link your OpenCV 3 + Python 2.7 bindings
After running make install
you should now see a file named cv2.so
in /usr/local/lib/python2.7/site-packages
:
$ cd /usr/local/lib/python2.7/site-packages/ $ ls -l cv2.so -rwxr-xr-x 1 root admin 3694564 Nov 15 09:20 cv2.so
The cv2.so
file is your actual set of OpenCV 3 + Python 2.7 bindings.
However, we need to sym-link these bindings into our cv
virtual environment. This can be accomplished using the following commands:
$ cd ~/.virtualenvs/cv/lib/python2.7/site-packages/ $ ln -s /usr/local/lib/python2.7/site-packages/cv2.so cv2.so $ cd ~
Step #10: Testing your OpenCV install on macOS
To verify that your OpenCV 3 + Python 2.7 installation on macOS is working:
- Open up a new terminal.
- Execute the
workon
command to access thecv
Python virtual environment. - Attempt to import the Python + OpenCV bindings.
Here are the exact steps to test the install process:
$ workon cv $ python Python 2.7.12 (default, Oct 11 2016, 05:20:59) [GCC 4.2.1 Compatible Apple LLVM 8.0.0 (clang-800.0.38)] on darwin Type "help", "copyright", "credits" or "license" for more information. >>> import cv2 >>> cv2.__version__ '3.1.0-dev' >>>
Note: Take note of the -dev
in the cv2.__version__
. This indicates that we are using the development version of OpenCV and not a tagged release. Once OpenCV 3.2 is released these instructions can be updated to simply download a .zip of the tagged version rather than having to clone down the entire repositories.
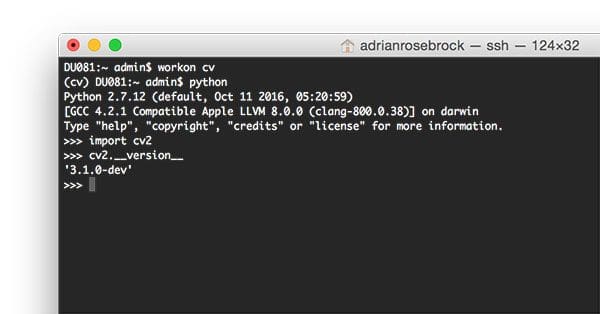
I’ve also included a screenshot below that utilizes these same steps. As you can see, I can access my OpenCV 3 bindings from Python 2.7 shell on macOS Sierra:
Congratulations, you have installed OpenCV 3 with Python 2.7 bindings on your macOS system!
So, what’s next?
Congrats! You now have a brand new, fresh install of OpenCV on your macOS system — and I’m sure you’re just itching to leverage your install to build some awesome computer vision apps…
…but I’m also willing to bet that you’re just getting started learning computer vision and OpenCV, and probably feeling a bit confused and overwhelmed on exactly where to start.
Personally, I’m a big fan of learning by example, so a good first step would be to have some fun and read this blog post on detecting cats in images/videos. This tutorial is meant to be very hands-on and demonstrate how you can (quickly) build a Python + OpenCV application to detect the presence of cats in images.
And if you’re really interested in leveling-up your computer vision skills, you should definitely check out my book, Practical Python and OpenCV + Case Studies. My book not only covers the basics of computer vision and image processing, but also teaches you how to solve real-world computer vision problems including face detection in images and video streams, object tracking in video, and handwriting recognition.
So, let’s put that fresh install of OpenCV 3 on your macOS system to good use.
What's next? We recommend PyImageSearch University.
84 total classes • 114+ hours of on-demand code walkthrough videos • Last updated: February 2024
★★★★★ 4.84 (128 Ratings) • 16,000+ Students Enrolled
I strongly believe that if you had the right teacher you could master computer vision and deep learning.
Do you think learning computer vision and deep learning has to be time-consuming, overwhelming, and complicated? Or has to involve complex mathematics and equations? Or requires a degree in computer science?
That’s not the case.
All you need to master computer vision and deep learning is for someone to explain things to you in simple, intuitive terms. And that’s exactly what I do. My mission is to change education and how complex Artificial Intelligence topics are taught.
If you're serious about learning computer vision, your next stop should be PyImageSearch University, the most comprehensive computer vision, deep learning, and OpenCV course online today. Here you’ll learn how to successfully and confidently apply computer vision to your work, research, and projects. Join me in computer vision mastery.
Inside PyImageSearch University you'll find:
- ✓ 86 courses on essential computer vision, deep learning, and OpenCV topics
- ✓ 86 Certificates of Completion
- ✓ 115+ hours of on-demand video
- ✓ Brand new courses released regularly, ensuring you can keep up with state-of-the-art techniques
- ✓ Pre-configured Jupyter Notebooks in Google Colab
- ✓ Run all code examples in your web browser — works on Windows, macOS, and Linux (no dev environment configuration required!)
- ✓ Access to centralized code repos for all 540+ tutorials on PyImageSearch
- ✓ Easy one-click downloads for code, datasets, pre-trained models, etc.
- ✓ Access on mobile, laptop, desktop, etc.
Summary
In this blog post I demonstrated how to install OpenCV 3 with Python 2.7 bindings on macOS Sierra and above.
Next week I’ll have a second tutorial, this one covering OpenCV 3 with Python 3.5 bindings on macOS.
For more OpenCV install tutorials on other operating systems (such as Ubuntu, Raspbian, etc.), please refer to this page where I provide additional links and resources.
But before you go
If you’re interested in learning more about OpenCV, computer vision, and image processing be sure to enter your email address in the form below to be notified when new blog posts + tutorials are published!
Join the PyImageSearch Newsletter and Grab My FREE 17-page Resource Guide PDF
Enter your email address below to join the PyImageSearch Newsletter and download my FREE 17-page Resource Guide PDF on Computer Vision, OpenCV, and Deep Learning.
George Profenza
OMG! Sooooo frustratingly long-winded with Sierra. Still sticking to 10.11.5 for now.
Thank you for sparing us the headaches Adrian
Adrian Rosebrock
It’s a pain, but it’s getting easier. It will get much easier once OpenCV 3.2 is released.
Mark
Worked like a charm!
Adrian Rosebrock
Glad to hear it Mark, congrats on getting OpenCV installed on Sierra!
A K
Thank you for this great tutorial! This is exactly what I was searching on your blog during the Thanksgiving break ….looks like an early Christmas gift. Looking forward to next week’s Python 3.5 tutorial.
Adrian Rosebrock
Thank you for the kind words, comments like these make it worth writing these blog posts 🙂
Claudiu
I’ve had problems with step #7 for some reason it wouldn’t have the correct output like your screenshots. I found a github issue where other people had that and wanted to mention it that I just had to delete the build directory and run `cmake` again about 3-4 times until it gave me the right results (if anyone else runs into that problem)
Besides that everything else worked perfectly, thank you again!
Monkey
Thanks for the suggestion, I came across the same problem and now fixed it
Yoni Fihrer
Thank you for this fix!!!
During step 7, I get the specific path for libpython2.7.dylib and use that for the cmake, but it still come back at YYY. (I did it once without finding the correct filepath)
Thanks again
Adrian Rosebrock
It sounds like you might be copying and pasting the template into the command line rather than the updated path. If you’re still getting an issue try deleting the
build
directory, re-creating, and then re-running the CMake command with the paths updated.Bill Rodriguez
Adrian, I am pretty sure I followed all the steps properly and in my Cmake list I have python2=ON and python3=OFF as you stated. However when I run the Cmake list the error comes up that I need python3. What silly mistake have I made?
Thanks,
Bill
Adrian Rosebrock
Hey Bill, what do you mean by a CMake error that lists you “need” Python 3? The sections you should be most concerned about are the “Python 2” and “Python 3” output sections of CMake that I have included in Figure 8.
Schi
Hey Adrian,
short question, what are your reasons to use pip & virtuellenv vs anaconda? Friends of mine using anaconda for an virtuell environment and thought I also want to give it a try, but as I’m a noob, I’m afraid I won’t be able to do execute your instructions and using anaconda. So any thoughts about why you don’t use it?
And also what would be your recommendation to a total beginner?
Thanks,
Schi
Adrian Rosebrock
Personally, I don’t like the Continuum company. A few years ago I had a pretty big falling out with them over business I would rather not discuss. There is nothing wrong with Anaconda, it’s a good deal — but I won’t recommend using it. I personally think virtualenv is easier to use and gives you more control in the long run.
Tom de Ruiter
Hey! Great work, kudos!
It seems I get stuck on step #7. Here I get the following response that Python2 has no libraries. It literally has a parameter ‘NO’ where normally the path would have been. Also, python2 is included in the unavailable array in the opencv modules.
Any idea how to fix?
Adrian Rosebrock
Hey Tom — if the parameter says “NO” then you do not have the correct path for the Library. You’ll want to double check your libpython2.7.dylib path. Also make sure you are in the “cv” virtual environment prior to executing CMake.
Tom de Ruiter
Aha, I checked it a dozen times but couldn’t figure it out. Turned out that I messed up the virtual environments and used the old cmake parameters which were not initialized good. After reinstalling and deleting all environments I had a successful install! Thanks!
Adrian Rosebrock
Congrats on resolving the issue Tom, nice job! 🙂
Pedro Martins
I felt into the same problem on step #7 and couldn’t figure out how to solve it. To reinstall the cv virtual environment was the solution. Thanks Tom!
Mehmet Aydemir
I have the same problem, can i learn how do you do that? I messed up
Xiao
I followed the step 7 and I got the same results with the compiling output showing that NO for the libraries… I check my path for the file multiple times and I was in the cv environment to execute the command. Do you happen to know what could be the problem?
UPDATE:
I solved my problem by adding sudo … Thank you for making the post. It is really useful.
Adrian Rosebrock
You needed to add “sudo” to the CMake command? That doesn’t seem right. I would be curious to know more about any other commands you executed or if you are compiling OpenCV on a shared system of some sort.
LibingMao
Hey,Adrian.
Great work.During step 7,i use my own file path replace yours.I have no errer in cmake but when i run make -j4 i still get the QTKit error.I double check the results from the cmake. The python2 is the same as yours.So i am confused now.
Adrian Rosebrock
You’re still getting the QTKit error? Can you confirm that you are using macOS Sierra? Are you using a fresh install of Sierra? Or an upgraded version?
LibingMao
My Sierra version is 10.12.1.
Adrian Rosebrock
Did you upgrade to Sierra? Or is this a fresh install of Sierra? If you upgraded, I would wipe the drive and start fresh.
yasir
I’ am still getting the qkit error in Sierra 10.12.2 (16C68)
Adrian Rosebrock
Try compiling and installing OpenCV from a fresh install of macOS Sierra on your system. I can’t be sure, but if you’ve upgraded your system multiple times you may have some legacy cruft on your system causing the error (that is my best guess).
Jacob
So is the best solution for OSX users to avoid the QTKit problem (I’m on El Capitan) to update to Sierra and follow this tutorial?
Thanks!
Adrian Rosebrock
El Capitan is sort of in “no mans land”. You are between Yosemite and Sierra, and unfortunately it’s hard to tell what state your system could be in. I would either downgrade to Yosemite or upgrade to Sierra.
rick
I for the life of me cannot get the cmake template output to match all three requirements for python 2:
1. The Interpreter points to the Python binary in your cv virtual environment.
— check
2. Libraries points to your libpython2.7.dylib file.
–nope
3. The numpy version being utilized is the one you installed in your cv virtual environment.
–nope
nor is it even listing my packages path.
I have tried starting with a fresh and following EXACTLY every step of this guide to no avail.
Can I just continue on without worrying about it?
Adrian Rosebrock
The “Libraries” is the most important part. You’ll want to make sure that you have that properly configured.
Yue Liu
Hi Adrian, I got same issue. I followed all the steps and put in the library path via using your trick to get YYY and ZZZ, but still got no “Libraries” listed. What could be possibly be the reason? Thanks a lot!
Adrian Rosebrock
Without physical access to your machine I’m not sure what the exact error could be. I would suggest replacing the library path with
$(python-config --prefix)
inside the CMake command and seeing if this resolves the issue.Alex
I am having the same behaviour, and nothing before had worked.
Adrian Rosebrock
If you are having trouble configuring CMake, try to install OpenCV via Homebrew.
Fanglin
$(python-config –prefix) works for me. I used your blog solution and got no “Libraries”, but this command can identify it.
Adrian Rosebrock
Thanks for sharing Fanglin!
Emanuele Palma
Hey,Adrian.
Great work. I follow all the procedures correctly but when I launch make -j4, it gets to 100% and gets stuck to this line here:
[100%] Built target example_facial_features
entering a loop of Id mex sh clang. It doesn’t end the make step and so I cannot go on.
What do you think the problem may be?
Adrian Rosebrock
This sounds like a race condition of some sort by using 4 threads/cores for compiling. I would do a
make clean
followed by justmake
to compile with a single core — that should resolve the issue.Michael
All steps were ok, until
Step #9
In:
cd /usr/local/lib/python2.7/site-packages/
there is no cv2.so
…
Adrian Rosebrock
Did you forget to run
make install
? This would account for the lack ofcv2.so
file. You should also check your CMake output and make sure your Python 2.7 section matches mine, otherwise your OpenCV bindings may have not been built.Jonathan
I too was missing the cv2.so file when I came across step #9. My output after completing step 7 for the Python 2 section were mostly “NO” not exactly sure what happened here or where I went wrong. Whats the best fix for this or where should I begin the process over again? Also, if I do need to start from a certain point, does anything need to be deleted before I do so and how?
Thanks!
Adrian Rosebrock
You shouldn’t have to start from scratch. I would delete your “build” directory, re-create it, and then re-run CMake. It’s likely that your paths to the Python libraries are incorrect so you’ll need to manually determine them using the “ls” command. Also, make sure you are in the “cv” virtual environment before running the “cmake” command.
Alex
The same with me.
Bhushan
were you able to resolve this issue ? I am facing the same issue; no “cv2.so” file present. Everything went fine though.
TienLe
Because you are not in cv virtual environment.
– Delete the build
– Use the command $ workon cv
– Than reinstall opencv
abhijith e m
in step 8
$ make -j4
make: *** No targets specified and no makefile found. Stop.
this message occurs why?
Adrian Rosebrock
This is likely because CMake exited with an error. Go back to the CMake step and check to see if there were any errors.
Marc Streeter
I had the same problem, and Adrian was right: the CMake had exited in error. In my case, it erred because I had to update the *OpenCV 3 + Python 2.7 CMake template* (displayed below is what it this website has currently at the time of this writing)
“`
$ cmake -D CMAKE_BUILD_TYPE=RELEASE \
-D CMAKE_INSTALL_PREFIX=/usr/local \
-D OPENCV_EXTRA_MODULES_PATH=~/opencv_contrib/modules \
-D PYTHON2_LIBRARY=YYY \
-D PYTHON2_INCLUDE_DIR=ZZZ \
-D PYTHON2_EXECUTABLE=$VIRTUAL_ENV/bin/python \
-D BUILD_opencv_python2=ON \
-D BUILD_opencv_python3=OFF \
-D INSTALL_PYTHON_EXAMPLES=ON \
-D INSTALL_C_EXAMPLES=OFF \
-D BUILD_EXAMPLES=ON ..
“`
The `OPENCV_EXTRA_MODULES_PATH` had to be updated to match the path on my machine to the `opencv_contrib` repo that was cloned in *Step #6: Download the OpenCV 3 source from GitHub*. After that, you should be able to do step 8 again, doing the `make -j4` command, on a clean `build` folder and proceed from there without issue.
Adrian Rosebrock
I’ll also add that you’ll want to update the template Marc posted above, replacing YYY and ZZZ with the correct library and include paths.
abhijith e m
great finally it worked…
i tried several times using the sourse code provided in opencv.org but it was failure. but yours was perfect thankyouuu….
Adrian Rosebrock
Nice job getting OpenCV installed! 🙂
Swaroop
I’m getting this error when I’m trying to install virtualenvwrapper, it says the following
-bash: /usr/local/bin/virtualenvwrapper.sh: No such file or directory
I followed the same procedure, can you please help me?
Adrian Rosebrock
It seems likely that you either (1) did not update your
.bash_profile
file correctly and update it or (2) virtualenv/virtualenvwrapper did not install correctly. I would start by double-checking that these packages are installed viapip freeze
.Ishani
I’m facing the same problem. Did you get to a solution?
Héctor
One question, in the part “Filling in the CMake template” how can we edit text inside the build directory?
Adrian Rosebrock
Hey Hector — can you clarify what you mean by “edit text inside the build directory”? I’m not sure what you mean.
David44
I think you can use any text editor, such as TextEdit on Mac, to first copy the template, then found the right values for your computer, then use the editor to make the changes. In the end you have a modified Cmake command to be executed from your Mac terminal.
This has nothing to do with the build directory, it’s just to modify the command so that it has correct folder information so Cmake can be executed correctly.
Jake
Hey man I messed up step 7 and did not fill in the blanks for the template. How do I revert and try again? Run the whole thing from step 1?
Thanks again, great tutorial!
Sylvain
Hey Adrian, thank you very much for this tutorial, it helped me a lot. At step 7: when I copied past your template with my path parameters, I had to add the missing “\” otherwise it didn’t work properly (using python 2.7.13 on Sierra)
Adrian Rosebrock
Hey Sylvain — where is the missing “\” in the tutorial? I’d be happy to update it.
smather
Instead of being loaded from /usr/local/bin/python, which python returns /Library/Frameworks/Python.framework/Versions/2.7/bin/python
I have the correct config line in the .bash_profile file.
Any ideas about how to fix this?
Adrian Rosebrock
Have you ran
source ~/.bash_profile
after updating the file or opening a new terminal? There may also be a typo in your.bash_profile
file.Lindsay Rawitscher
I am getting stuck on step 7. I believe I have done everything correctly regarding the path names and can’t seem to figure out where I am going wrong. Any help would be appreciated! I have pasted my own pathnames into the template, not copied it directly.
Adrian Rosebrock
Hey Lindsay — what is the error you are getting? Without knowing your error message myself and other PyImageSearch readers cannot help out.
Brian
I am getting stuck on step number 7 as well. Once I execute the cmake command with the proper directories pasted into the template, the Python 2 section in the output only includes information for the interpreter. It says nothing about libraries or numpy. I think I have the same problem as rick did above.
I tried to proceed anyways, and unsurprisingly it did not work. There is no file named cv2.so in:
/usr/local/lib/python2.7/site-packages
I am sure I have followed this tutorial exactly, and this is a completely fresh install of Sierra. Any ideas about what to do?
Brian
I solved this by wiping my drive and reinstalling sierra, then trying again from scratch. I still don’t know what went wrong, I did everything the same the second time. At least it works now!
Adrian Rosebrock
Congrats on resolving the error, Brian! When it comes to installing OpenCV I normally recommend a fresh install of macOS.
Chris Gonzales
I had a similar issue to this. The problem is further up in the spew from cmake:
— Could NOT find PythonLibs: Found unsuitable version “2.7.10”, but required is exact version “2.7.13” (found /usr/lib/libpython2.7.dylib)
User “Ideoforms” had the correct answer at https://github.com/pybind/pybind11/issues/99 where you have to add the following to your cmake command:
-DPYTHON_LIBRARY=$(python-config –prefix)/lib/libpython2.7.dylib -DPYTHON_INCLUDE_DIR=$(python-config –prefix)/include/python2.7
After that, the output looked like it was supposed to. I’m still going through the opencv build, so no guarantees there won’t be any further problems
MaximeDi
That fixed it for me.
I just had to write “– prefix” instead of “-prefix”.
Thank you!
Fanglin
Works for me as well.
Conno
Hi Adrian, thank you very much for helping us installing OpenCV.
I perform exactly as you explain steps #1- #3 but then after updating ~/.bash_profile, sourcing it, it still get an output of usr/bin/python for which python. I have tried so many times and I am stuck. What could I try besides doing the steps over and over? Is there a way to delete everything and start over again?
Adrian Rosebrock
When it comes to installing OpenCV on macOS I recommend a clean, fresh install of the operating system. This ensures there are no legacy paths (perhaps from other libraries you previously installed) that might be causing problems. As far as debugging, I would ensure that the Homebrew Python was actually installed by manually changing directory to
/usr/local/bin
and ensuring you find the “python” binary there.Mateo Molina
I have the very same problem, I performed steps #1 – #3 but I get stuck on the which python, I still get /usr/bin/python. I checked the bash.profile, reinstall homebrew and I even formatted my computer and reinstalled macOS High Sierra. I checked manually the directory and Python is installed there, just where it has to be. I’m assuming that the only problem is that the system is not recognizing the Python that homebrew installed, or that is not recognizing the change on the bash_profile (I restarted my computer in the process). I don’t know what else I can do, and it’s a problem I’m getting since last year. I really hope you can help me, this tutorial had been very useful for some friends of mine, and I’m trusting you my last hope. Thanks for the tutorials by the way.
Adrian Rosebrock
This is actually how Homebrew handles Python versions now. It’s a “feature” not a “bug”. The solution is easy. Just specify either “python2” or “python3” in your commands. You can verify this via the “which” command:
Since both Homebrew and macOS High Sierra have introduced a number of changes I will be writing a new blog post on how to install OpenCV on macOS and will be publishing it this May.
William
The same happened to me. This worked out:
export PYTHONPATH=”${PYTHONPATH}/usr/local/lib/python2.7/site-packages:/usr/lib/python2.7/site-packages”
But I not using virtualenv.
Adrian Rosebrock
Thanks for sharing William, but I will also reiterate on this comment — if you are using a Python virtual environment, don’t use this as it will mess up your Python path inside the environment.
Sidharth Sadani
Hi Adrian,
Thank you so much for this. Worked in one go perfectly.
Just one pointer, I got really confused whether I should stay in the cv environment while beginning the OpenCV installation or should I go back to the main env. Before reading your post till the end, and I know I might sound like a novice, which I am at OpenCV, I did not know that there are bindings established between OpenCV and python during installation. So you might just want to reiterate to stay in the ‘cv’ environment at the beginning of the OpenCV installation.
But otherwise, perfect. I loved it. I’m new to working on a Mac, and I’m sure I would’ve stumbled around a lot to set this up, if not for your post. So thanks for taking the effort.
Adrian Rosebrock
Thank you for the feedback Sidharth, I appreciate it. I’ll certainly keep this in mind for future OpenCV install tutorials.
Bhavik Patel
Just a suggestion. I would strongly encourage you to include warning signs or prompts in your install process for those that already have a version of python installed or use pip instead of homebrew. It can be extremely problematic installing multiple version of python and it nearly impossible to track down install errors.
Adrian Rosebrock
Hey Bhavik — pip and Homebrew are both unrelated. Homebrew is a library package manager for the OSX/macOS system while pip is strictly for Python packages. As for installing Homebrew via Python, that shouldn’t cause any issues with previous Python versions as long as your PATH variable is properly set.
Darian
Hey Adrian,
I successfully installed opencv after a few glitches – but when I open up IDLE on my computer and import cv2, I’m getting an error “No module named ‘cv2′”. I thought maybe because I was using a Python 3.5.1 IDLE that this was a problem, but I used a 2.7 version of IDLE as well and no dice. What can I do to use the opencv packages in IDLE?
Thanks so much.
Adrian Rosebrock
I assume you are referring to the GUI version of IDLE? If so, the GUI version does not respect virtual environments. I would suggest using either (1) the command line IDLE or (2) Jupyter Notebooks from within your virtual environments.
Tarek Mansour
Hey Adrian,
Thanks a lot for this! I am getting stuck on step 7. I followed the instructions pretty well and I got the right path to run cmake but python2 shows only an interpreter field (no libraries or numpy fields). Any insight?
Thanks!
Adrian Rosebrock
Hey Tarek — if you’re only getting an Interpreter field then there is an error in your CMake configuration. To resolve the NumPy field, make sure you’re in the “cv” virtual environment an then install NumPy. Regarding the “Libraries” you’ll want to determine this path manually on your machine (yours will likely be different than mine). Use
ls
and auto-complete to help you determine the correct path.Tarek Mansour
Figured it out! The problem was that my ~/.bash_profile had other lines before the homebrew line and this messed it up. The solution was to comment out everything/delete everythin and then add our homebrew lines!
Thanks again!
Adrian Rosebrock
Great job resolving the issue Tarek!
Paul
Thanks for this guide!
Was struggling a lot with installing OpenCV for Sierra and this worked extremely smoothly!
Adrian Rosebrock
Great job getting OpenCV installed Paul!
Joonas Mankki
Hi Adrian,
Thanks for the detailed guide! I too got stuck on #7 getting NO Libraries. The issue was that my Homebrew Python was version 2.7.13 but the python in my virtualenv was 2.7.10 so the libraries were not compatible. The cmake-command seems to use libraries from Homebrew but the interpreter from virtualenv so the versions of the two must match. The solution for me was to create the virtualenv using the command “mkvirtualenv -p /usr/local/bin/python cv” to use the same python version as the Homebrew.
Other than that I had no issues, thanks for taking the time to write this guide!
Adrian Rosebrock
Thanks for sharing Joonas! And congrats on getting OpenCV installed.
Wingman Shen
Dear Adrian, Thank you so much for your excellent guide and I have now installed cv2 properly on my Mac!
I run into the same “mismatch” issue as Joonas posted and struggled it for sometime on my own and eventually re-discovered the same solution as he posted. I wish I had seen his post before my struggle.
To help future readers of your guide, could you please add a note in Step #4 about this mismatch problem and the “-p” solution? Thanks again for your great effort.
Adrian Rosebrock
Congrats on getting OpenCV installed on your system, Wingman! Nice job!
I’ll also be doing updated install posts in the future to help resolve this issue.
Chris
As always thanks so much for being an awesome hub for the opencv community. I had a quick question regarding working with different frameworks in conjunction with virtual environments. I am trying to work with the matplotlib library and am able to install it fine using pip and making sure it works. The issue is matplotlib GUI features tend to break when working in a virtual environment. I have looked up some stuff online but haven’t been able to sort it out in your particular build and was wondering if you would have any insight on how best to work around this issue
Adrian Rosebrock
Hey Chris — what is the specific GUI issue you’re running into with matplotlib?
Andy
At step 7, the output of my cmake command is not showing anything about libraries. It only gives the path to the interpreter (which worked out correctly), but no numpy or library
Andy
BTW, I’m sure that numpy was installed in (CV)… any tips?
Adrian Rosebrock
To ensure NumPy has been installed, access your Python virtual environment and then run “pip freeze”. You should see NumPy in the output if NumPy indeed installed:
quinten de wilde
Ok my laptop build failed because I did wrong cmake settings in the begin. My Imac is succeeding so far.
Do I really need to do a fresh new installation (of osx) or is there another way to find all files in the installation en delete them to do a new installation (Opencv).
Adrian Rosebrock
I would simply delete your “build” directory, re-create it, and then re-run CMake.
quinten de wilde
Amazing post !! Got it to work!
Adrian Rosebrock
Congrats, great job!
Ye Tao
Hi Adrian,
Thank you so much for this tutorial. I’m a new programmer in MAC and opencv. I’m encountering a really silly problem.
I’m stuck at step#7. The path of Python2 libraries cannot be defined. The directory was correct because when I type “ls + directory”, it shows the correct one (I also searched them stage by stage and it was correct). Then I change the python2_libraries using cmake, it shows “Cmake Error: The source directory does not exist.”
I also added ” ..” by the end of the command, it still doesn’t work.
Thank you in advance.
Ye Tao
Hi Adrian, opencv has been installed. Thank you so much for the great help!
Adrian Rosebrock
Congrats on getting OpenCV installed!
Aravind
Hi adrian, may i know what is the difference between the installation process you documented here and this simpler version. Thanks so much for all the articles, love them!
Adrian Rosebrock
The gist is that the simpler version with Homebrew doesn’t require you to manually edit your CMake command. Homebrew attempts to create the CMake command itself based on your Python versions, then compiles and installs OpenCV for you.
Pulkit Kumar
Hey Adrian,
Firstly thanks for an excellent tutorial. This is clearly the best available on the internet.
I am facing a problem at step 9 as my cv2.so file has not been made. I went up to see my cmake output and i saw that under Python2 only my interpreter was listed and the rest three outputs are missing. Could you please help me out as to where am i going wrong?
Thanks in advance
Adrian Rosebrock
Please see my reply to “Jonathan” above. Make sure you are in the “cv” virtual environment and double-check your paths to your Python libraries via the “ls” command.
Shashank
Adrian, I have a issue. I followed these steps and they worked perfectly. But now when I open my python shell and try to import cv2 or numpy or any of these libraries which are installed in my virtual environment, they give me an error. I understand that’s how its supposed to be but can you help me as to how should I access my virtual env through my python shell ? I can’t run the workon cv command as I do when I’m on my terminal.
Adrian Rosebrock
Can you clarify what you mean by your “python shell”? You should run “workon cv” before you access your Python shell:
From there you’ll be able to import OpenCV, NumPy, etc.
Thibault
Hi, thanks again for this excellent and brilliant tutorial. I am stuck at the step 9 with cv2.so not existing while it seems everyhting runs perfectly.
I noticed in the cmake that I do not see numpy library displayed while it is clearly installed in “cv” version and user python version: This is what I get.
— Python 2:
— Interpreter: /Users/Mac/.virtualenvs/cv/bin/python2.7 (ver 2.7.13)
Do you think that may cause the issue?
Thanks again, Thibault
Adrian Rosebrock
I would double-check that NumPy is indeed installed into you
cv
virtual environment:You should see NumPy in the list of output packages installed.
S
Thanks Adrian for the brilliant tutorial!
I’m having exactly the same issue as Thibault.
had no problem at any other step. cv2.so seems to be missing…
Sumaiya Asif
Very specific and very helpful! Thank you for taking the time to write this up and helping others who are having trouble 🙂
Adrian Rosebrock
Thanks Sumaiya, I’m happy you enjoyed the post! 🙂
Marc Streeter
Open CV 3.2 has been released, using the above instructions still work, after cloning both repo’s all you have to do is enter each directory and do `git checkout 3.2.0` and follow instructions like normal
Jose Antonio
Works perfectly fine with OpenCV 3.2.0-dev and Python 2.7.13
Thank you very much
Adrian Rosebrock
Congrats on getting OpenCV installed Jose!
Michelle Morales
Hey Adrian, Thank you so much for this awesome and informative post! I am also having trouble on Step #8 when I run: make -j4
I receive the following error:
/Users/morales/opencv/modules/python/src2/cv2.cpp:6:10: fatal error: ‘Python.h’ file not found
#include
Any insight into what the issue might be?
Michelle Morales
Looks like I had a typo in my path to python. I was able to download it successfully.
Thanks again for the tutorial, it was super helpful!
Adrian Rosebrock
Congrats on resolving the issue Michelle!
David Sixela
Can you please explain how you solved this issue? i’m getting the same error
Allie
I was wondering if you could help me with the installation of OpenCV on my Mac (Sierra). I have been struggling for two days and am very close! But I keep getting this error at step 7. Maybe you would be able to lead me in the right direction.
‘CMake Error at 3rdparty/ippicv/downloader.cmake’
Allie
More specifically, ‘Unknown CMake command “ocv_download”.’
Adrian Rosebrock
I would suggest double-checking your internet connection. CMake is trying to download an external file for the build. Make sure you have a strong internet connection when doing this.
Srivani
I am getting fatal error: ‘opencv2/highgui/highgui_c.h’ error after $ make -j4
I have Seria OS,, any one had the same issues please help me
haffj
Hi,
Great tutorial it helped me install opencv3.2.0 with python3.6.1.
However I’m having very poor performances with the speed of processing of opencv on my computer (macOs Sierra 10.12.3) and I want to know if it’s due to my system or to the version of opencv I use. As an example it takes about 300 sec to cv2.detectMultiscale to execute on a single image, whereas the same script only needs a few milliseconds on another computer (MacOs El Capitan 10.11.6) with opencv3.1.0
So I tried to download the 3.1.0 version and follow the tutorial but I had the QtKit error.
Is it possible to fix it?
Adrian Rosebrock
This tutorial will help you resolve the QTKit issue.
As for the
cv2.detectMultiScale
issue, that is very strange. How large is your input image?Joe
I am having trouble with step 4. I have followed steps 1-3 meticulously. Would anyone happen to know what would return this error?:
/Library/Frameworks/Python.framework/Versions/2.7/Resources/Python.app/Contents/MacOS/Python: No module named virtualenvwrapper
virtualenvwrapper.sh: There was a problem running the initialization hooks.
If Python could not import the module virtualenvwrapper.hook_loader,
check that virtualenvwrapper has been installed for
VIRTUALENVWRAPPER_PYTHON=/usr/local/bin/python and that PATH is
set properly.
I am running version 10.12.4 Sierra and cannot get this to work for the life of me! Any help would be greatly appreciated.
Lucas Alves
Could you solve this problem? I am having the same one.
It would be good to know news from you.
Adrian Rosebrock
Try overwriting the Python sym-link in Homebrew:
$ brew link --overwrite python
Sal Valdes
I’m also getting the message “No module named virtualenvwrapper”.
So far the only deviation I’ve had from the tutorial is that brew installs python at a different location: /usr/local/opt/python/libexec/bin/python
Adrian Rosebrock
Hey Sal — try this:
$ pip3 install virtualenv virtualenvwrapper
And from there supply the full Python version in the command line, either “python2” or “python3”.
Bill Behenna
I have the same problem
Richard
Thanks so much for the tutorial. Usually with these sort of installations there’s a whole bunch of problems even when given a step-by-step guide. But this one had zero problems for me.
Adrian Rosebrock
Fantastic, I’m glad to hear it Richard! Congrats on getting OpenCV installed.
Yiliang
Hi Adrian,
After the cmake step following your instructions, it shows that libraries = No. Where can it be wrong?
Thank you
Adrian Rosebrock
Either your
PYTHON2_LIBRARY
orPYTHON2_INCLUDE_DIR
paths are incorrect. Double-check these paths using the instructions I detailed in this tutorial.Alex
Thanks a lot. It worked well until when I try to read and save video. Always back “can’t save” and “!!! BUG: The current event queue and the main event queue are not the same. Events will not be handled correctly. This is probably because _TSGetMainThread was called for the first time off the main thread.” Maybe the ffmpeg didn’t link with opencv. I have no idea to solve it. Hope you can help me. And I want to make sure whether from step5 is all in cv environment or not?
Adrian Rosebrock
Hi Alex — I’m not sure regarding your error message, I haven’t encountered that error before. And yes, for simplicity, make sure you are in the “cv” virtual environment for the tutorial.
Jake Hadar
Very helpful write-up Adrian, thanks for this!
Anyone having cmake issues, make sure you cd into build/ before running
Jake
Adrian Rosebrock
Thanks Jake!
Ayman
This is an amazing tutorial ! Thanks Adrian
On a different note, I need to reinstall opencv with the ffmpeg flag (i.e. openccv –ffmpeg) so that I can read AVI and MP4 videos properly, may I ask which step should I repeat to make that happen ?
Thanks !
Ayman
Also, will I need to rerun the sum-link bindings step ?
Adrian Rosebrock
If you need to compile OpenCV with FFMPEG support I would suggest installing FFMPEG via Homebrew and then re-compiling. Alternatively, you could install OpenCV via Homebrew and use the
--with-ffmpeg
switch.Chris
Worked perfectly! Thanks for putting this together in such detail – excellent!
Adrian Rosebrock
Congrats on getting OpenCV installed Chris, nice job!
Erick Del Orbe
Although this looks like a great tutorial I achieved the same thing using the brew command:
brew tap homebrew/science
brew install opencv3 –with-contrib –with-cuda –with-ffmpeg –with-tbb –with-qt5
At the end it gives you the command for python bindings which is:
echo /usr/local/opt/opencv3/lib/python2.7/site-packages >> /usr/local/lib/python2.7/site-packages/opencv3.pth
Adrian Rosebrock
Hi Erick — I would also suggest that you refer to my OpenCV install with Homebrew tutorial. This tutorial is meant for readers who want to compile OpenCV from source.
Edgar Acosta
Following this procedure I have a problem: When I run the $cmake. according to step 7. I replace what suggested, the paths: Python Library and Python Include Dir. So CMAKE finished with no Problems, and then I run $make j4. When finished I check the existence of cv2.so. and it is MISSING! is not in the directory. Checking the output of $cmake. I realized that in the section Python 2: in Libraries, it says NO. it supposed that the Path to libraries shall be there. But is missing. The other Parameters are OK
Any idea of whats wrong?
Adrian Rosebrock
If the “Libraries” section is “NO”, then double-check the path you supplied. Use the
ls
commands like I suggested in the post to help you determine these paths.Kyle
Hi Adrian,
I’m still not sure how I to find the exact path to my libpython2.7.dylib file. When you say, “just use the ls command along with the wildcard asterisk” — what should I be typing in the terminal?
$ ls * which would literally be the ls command along with the wildcard asterisk doesn’t work.
Then I tried using: $ ls /usr/local/Cellar/python/2.7.* and that didn’t work either.
I’m lost… thank you for any help!
Adrian Rosebrock
Hi Kyle — to start, make sure you have installed Python via Homebrew. You can validate this using the instructions earlier in the blog post. Secondly, I’m not sure what you mean by the “command doesn’t work”. Are you getting an error of some sort? Is the path invalid? If the path is invalid, I think you need to double-check your Python install.
Alfredo
Hi! A comment, use:
brew link python
not “linkapps” because it will be deprecated.. I put link and it worked 🙂
Thank’s for the tutorial!
Adrian Rosebrock
Thanks for sharing Alfredo!
margas
Hi Adrian! I would like to thank you for this great tutorial! I have managed to install opencv and python successfully on my Mac. But I face a problem. When I try to develop some code that has as an output a pop up window it seems that everything is working properly except of the pop up window. I can see the tree dots that represent minimise, closure etc but no the rest of the pop up window. Do you have any idea why?
Adrian Rosebrock
Just to clarify, did you use this tutorial when compiling and installing OpenCV? It sounds like there is an issue with the GUI backend compiled with OpenCV.
margas
So what do i have to do? Yes i followed this tutorial.
Adrian Rosebrock
Without physical access to your machine, I’m not sure what the exact error is. Can you try installing XQuartz, then re-compiling and re-installing OpenCV?
Sai Sudheer
Hi all,
I NEED SOME HELP !!
From the step 7, I accidentally copied the CMAKE Template as it is and ran it. Now
In Python 2, the path in Libraries is showing YYY. Please help me to get rid of this.
Adrian Rosebrock
Simply delete your
build
directory, re-recreate it, and re-run CMake.Carlos Villegas
Hi Adrian.
Great tutorial, but I have been stucked in step #7 for several hours.
After execute the cmake template with the libraries and directories ok then appear the follow message:
Configuring incomplete, errors occurred!
See also “/Users/villegascarlos/opencv/build/CMakeFiles/CMakeOutput.log”.
See also “/Users/villegascarlos/opencv/build/CMakeFiles/CMakeError.log”.
Any suggestions??
Adrian Rosebrock
Hi Carlos — you are receiving that error message because there was a problem with CMake. Scroll up through the CMake output to find the error.
Nice.Y
I have the same problem with you. Have you solved it? 🙂
Sid
Struggled a bit with setting up on Sierra but finally worked.
Thanks Adrian!
Adrian Rosebrock
Congrats on getting OpenCV installed, Sid — nice job!
David Foster
Hi Adrian,
Thanks for your awesome series of blog posts on openCV – they’re super helpful.
However, I’m in a bit of a dilemma. If I install the bleeding edge 3.2.0 version of openCV on mac Sierra (python 2.7) I run into this error when using waitKey
https://github.com/opencv/opencv/issues/5874
The workaround is to revert to 3.0.0 – but then I run into the QTKit error, for which the solution is to use 3.2.0!
What should I do? If you can provide any guidance it would be much appreciated.
Thanks,
Adrian Rosebrock
I personally haven’t ran into this issue before, so I’m not sure regarding the best course of action. You mentioned installing the bleeding edge version of 3.2.0. Does the same issue happen if you use
git checkout
to checkout the tagged 3.2 release?Eric So
Hello David,
I am having a similar problem with videowriting. I tried cv 3.2.0 (python 2.7.13)both with and without virtualenv and they have problems of their own. Did you find a solution for this?
Thanks!
Murthy
Hi Adrian,
Thanks for the blog on installing CV2 on Mac. This worked for me…my previous attempts failed miserably and I started fresh by reinstalling Mac OS and then following the instructions in this blog.
Adrian Rosebrock
Congrats on getting OpenCV installed Murthy, great job! 🙂
Satvik
Thanks a lot! It took a lot of time. Dont miss any step and make sure every step is correct.
Adrian Rosebrock
Congrats on getting OpenCV installed Satvik, nice job!
Phillip
Hi Adrian,
Thank you for this tutorial it is very helpful!
I just have a quick question regarding the final step. When I type in the command: “cv2.__version__” it returns ‘3.3.0-rc’. Is this an issue?
Thank you,
-Phillip
Adrian Rosebrock
That simply means that you are running the 3.3 “Release Candidate”. It’s not a “true release”, just a “candidate” for a release. It potentially could have a few bugs, but likely no more than previous versions.
Phillip
Okay great, thank you for the quick response!
Fatma
Hi Adrian
I also got the ‘3.3.0-rc’ version instead of ‘3.1.0-dev’ how can I get the ‘3.1.0-dev’ version instead ?
Thank you very much
Adrian Rosebrock
After you clone down the Git repos for both “opencv” and “opencv_contrib”, you’ll want to checkout the “3.1” branch (I suggest using tagged versions instead of the dev versions):
Do the same for “opencv_contrib” as well.
Nice.Y
I have followed the first 7 steps, when I did $ make -j4, I got the error”fatal error: ‘QTKit/QTKit.h’ file not found”.So how can I solve this?
Thanks very much 🙂
Adrian Rosebrock
Please take a look at the “Avoiding the QTKit/QTKit.h file not found error” section of this post. It sounds like you might not be running macOS Sierra (or greater).
Nice.Y
Hi, Adrian
I’m sure that I’m running macOS Sierra. And I noticed that in this post, you said “the trick is that we need to use the HEAD of the repo as opposed to a tagged release”. I’m not quite understand what it means.
Thank you very much 🙂
Adrian Rosebrock
I would suggest reading up on
git
and the difference between tagged releases and the HEAD of repositories. This StackOverflow thread does a nice job.Chris Z
After I installed virtualenv virtualenvwrapper and changed bash_profile, I run source ~/.bash_profile and I got this:
-bash: /usr/local/bin/virtualenvwrapper.sh: No such file or directory
Adrian Rosebrock
This might be an issue with your Python + Homebrew install. Take a look at this solution.
Chris Z
Hi Adrian,
I guess this solution does not solve the problem that I am still using python from the system. I think it may be because of the update of brew. Now brew probably installs python in a different path
Eason Wang
Good work. But when I try to follow these step to install OpenCV3.3 with Python 2.7. I run into some problems. The first one is by running “which python” I cannot “/usr/local/bin/python” anyway. Did you validate this method for OpenCV 3.3? Thank you!
Adrian Rosebrock
This method will work with OpenCV 3.3. However, to updates to how Homebrew handles Python make it a bit more complicated. Because of this, I’ll be releasing an updated OpenCV 3.3 + macOS install tutorial on Friday, September 29th 2017. Please check the blog post then and you’ll find updated instructions.
muhammad
the updated blog was really beneficial. thanks Adrian
Daniel
In Step #3: Setup Homebrew for Python 2.7 and macOS.
I already followed the description above.
However, the output is still /usr/bin/python. I tried so many times, do you have any ideas? thank you ??
Adrian Rosebrock
What is the output of:
Are those two correct?
Daniel
Yep! It shows /usr/local/bin/python2
Does it mean that I need to add 2 after python in the following steps?
Thank you!
Adrian Rosebrock
Thank you for the clarification.
I would suggest explicitly setting your Python version inside your
~/.bash_profile
, like this:From there, supply the
-p
switch tomkvirtualenv
when you create your Python virtual environment:$ mkvirtualenv -p python2
BSR
Hi Adrian,
Thank you for the fix with adding 2 at the end of the export line in bash file.
But when I proceed with the installation I face an issue while cross checking with the Step 7 output,
– I don’t see the (python 2: /python 3:) section below open (CL: section) from the output of step 7
Also when I proceed with the installation everything goes smooth without any error, but anyways when I try to find the cv2.so file I don’t see the file present.
I made sure I’m using the Make command in the virtual environment
I’m installing on a new MacBook Air, with High Sierra
Thank you
Adrian Rosebrock
If your Python 2 or Python 3 section is not filled out correctly then OpenCV will not compile the bindings. Unfortunately I do not have a High Sierra machine so I cannot replicate the issue. I will try to get one of my cloud instances up and running with High Sierra so I can give it a try. I’ll also create a dedicated blog post for High Sierra. I’m sorry I don’t know what the issue is off the top of my head!
Daniel
My terminal showed -bash: pip: command not found when I type:
pip install virtualenv virtualenvwrapper…
Adrian Rosebrock
Pip should be installed by default here. Can you please confirm which version of Python you are using?
Dylan
Any idea why I would be receiving this error during Step #7 (When running cmake) ? I don’t think I missed a step. Currently running macOS Sierra Version 10.12.6, and checked out opencv 3.1.0 and opencv-contrib 3.1.0 with python 2.7.14.
fatal error: ‘OpenCL/cl.h’ file not found
Adrian Rosebrock
It sounds like you have OpenCL installed on your system. Was OpenCL used for a different project? I would suggest trying to disable OpenCL during the compile. I’m not sure what the CMake flag is, but I think it’s
-D WITH_OPENCL=OFF
. I hope that helps!Rich
Hi Adrian. I really enjoy your tutorials on Pi. And I successfully installed opencv on my pi following your tutorials. Thanks.
Now I also like to have opencv on my Mac Sierra 10.12, I folow this tutorial, I run into trouble on step 3. I insterted export PATH=/usr/local/bin:$PATH to the ~/.bash_profile file, and I double checked the file, the path is written. However, when I use which python, it shows /usr/bin/python
rather than /usr/local/bin/python, How to fix this? Thanks
Adrian Rosebrock
Hi Rich. Try updating your
~/.bash_profile
to explicitly set theVIRTUALENVWRAPPER_PYTHON
path to/usr/local/bin/python3
.# virtualenv and virtualenvwrapper
export VIRTUALENVWRAPPER_PYTHON=/usr/local/bin/python3
source /usr/local/bin/virtualenvwrapper.sh
Elle
Hi Adrian,
Great tutorial so far but I ran into a problem on step 4.
virtualenvwrapper.sh was installed not in the given directory but as a side package for python2. In the python2 sidepackage directory is no .sh file but other virtualenvwrapper files. I don’t know what to do at this point thus it would be great if you have any idea what to do?
Thanks in advance!! 🙂
Adrian Rosebrock
Hi Elle — unfortunately without access to your machine I’m not sure what the exact error is. I’m sorry I couldn’t be of more help here!
S
had no errors while installing until #6, but I don’t see the following in the output of #7’s Python2 section:
Libraries points to your libpython2.7.dylib file.
The numpy version being utilized is the one you installed in your cv virtual environment.
It only gives :
Python2:
Interpreter: /path/to/virtualenvpthon/
the numpy works fine in the cv virtual environment, but @ #10, there is no “cv2.so” file.
Is anyone having the same issue?
Any clue would be much appreciated.
Thanks!
(btw, this is on MacOS Sierra 10.12.6)
Adrian Rosebrock
You would need the entire Python 2 section to be correctly filled in order for the
cv2.so
file to be built. I would suggest using the self-configuring CMake command I put together in this blog post.Tima
hi Adrian I formatted my laptop it’s (Mac air mid 2012 updated to high sierra 10.13.1)
however ,I’m now stuck at step 3 when the which python command still at /usr/bin/python
and when I check it after formatting the python package file still at main library python 2.7
and the package.pth has this
/System/Library/Frameworks/Python.framework/Versions/2.7/Extras/lib/python
/System/Library/Frameworks/Python.framework/Versions/2.7/Extras/lib/python/PyObjC
what should I do I formatted my Mac 3 time and it still didn’t change
is there any other way to shift the file directory to usr/ local/lib or should I reinstall Sierra
and thanks a lot
Adrian Rosebrock
Can you try
which python2
? Homebrew changed the Python install formula so I believe you need to specifypython2
orpython3
.Tima
Hi Adrian, Thanks to the sky
I tried many times to download python 2.7 ,then switch to python 3 tutorial and it work fine now.
I have another question, at step8 if compiling opencv by j4 on 2 core Mac with 4GB and i5 intel core , is it gonna cause problem at future ?
And Thanks Again
Adrian Rosebrock
No, it will not cause a problem in the future. The “-j” flag of the “make” command simply controls the number of threads used during the compile process.
Samaritan
At step 7, I have given this command :
cmake -D CMAKE_BUILD_TYPE=RELEASE \
> -D CMAKE_INSTALL_PREFIX=/usr/local \
> -D OPENCV_EXTRA_MODULES_PATH=~/opencv_contrib/modules \
> -D PYTHON2_LIBRARY=/usr/local/Cellar/python/2.7.14_2/Frameworks/Python.framework/Versions/2.7/lib/python2.7/config/libpython2.7.dylib \
> -D PYTHON2_INCLUDE_DIR=/usr/local/Cellar/python/2.7.14_2/Frameworks/Python.framework/Versions/2.7/include/python2.7/ \
> -D PYTHON2_EXECUTABLE=$VIRTUAL_ENV/bin/python \
> -D BUILD_opencv_python2=ON \
> -D BUILD_opencv_python3=OFF \
> -D INSTALL_PYTHON_EXAMPLES=ON \
> -D INSTALL_C_EXAMPLES=OFF \
> -D BUILD_EXAMPLES=ON ..
The library and include dir paths are both verified and it exists. But when I run it, I get this error:
CMake Error: The source directory “/usr/local/Cellar/python/2.7.14_2/Frameworks/Python.framework/Versions/2.7/include” does not appear to contain CMakeLists.txt.
Specify –help for usage, or press the help button on the CMake GUI.
Thank you
Samaritan
I figured it out myself. Haha . I was running the command from a different directory. I had to run it in the build directory.
Anyways, great tutorial! Thank You.
Adrian Rosebrock
Congrats on resolving the issue 🙂
Phil
Do you have the equivalent tutorial for Python3? I followed the steps above, but even though I provided the correct value for PYTHON3_INCLUDE_DIR to CMAKE, it doesn’t find my python3 libs. (CMAKE output says Libraries: NO, and numpy: NO, even though numpy is installed for python3). Wondering what I’m doing wrong…
Phil
I ran through the tutorial, CMake worked fine, and make -j4 exited correctly, but when I try to import cv2, I get “No module named cv2”. Any tips?
Phil
Bit of extra info. Even though make completed with no errors, there is no file cv2.so in /usr/local/lib/python2.7/site-packages
Phil
Ah crap. I skipped a step (“sudo make install”. Obviously pretty important). Please ignore this whole thread.
Adrian Rosebrock
Congrats on resolving the issue Phil!
Chris Elliott
Oct 2018 update: I ran this, but had difficulties finding these
-D PYTHON2_LIBRARY=YYY \
-D PYTHON2_INCLUDE_DIR=ZZZ \
My python had them under
python@2
like this
ls -d /usr/local/Cellar/python@2/2.7.*/Frameworks/Python.framework/Versions/2.7/include/python2.7/
Adrian Rosebrock
Thanks for coming back and sharing this Chris.
Sergio
Hi Adrian, do you have a tutorial of how to archive what you show in the first picture of the post?… thank you !
Adrian Rosebrock
Hey Sergio, I’m not sure what you mean. Could you elaborate a bit?
Mehdi
Hi,
The output of of my “cmake” step only shows Python 2 Interpreter info. No dependencies etc. Also my cv2.__version__ is not the -dev version. I tried git checkout with different versions. Although it changes the output of cmake, it does not really resolve the above 2 issues. Will appreciate your help.
Adrian Rosebrock
Please use this updated macOS install tutorial.