Today’s blog post is a followup to a tutorial I did a couple of years ago on finding the brightest spot in an image.
My previous tutorial assumed there was only one bright spot in the image that you wanted to detect…
…but what if there were multiple bright spots?
If you want to detect more than one bright spot in an image the code gets slightly more complicated, but not by much. No worries though: I’ll explain each of the steps in detail.
To learn how to detect multiple bright spots in an image, keep reading.
Looking for the source code to this post?
Jump Right To The Downloads SectionDetecting multiple bright spots in an image with Python and OpenCV
Normally when I do code-based tutorials on the PyImageSearch blog I follow a pretty standard template of:
- Explaining what the problem is and how we are going to solve it.
- Providing code to solve the project.
- Demonstrating the results of executing the code.
This template tends to work well for 95% of the PyImageSearch blog posts, but for this one, I’m going to squash the template together into a single step.
I feel that the problem of detecting the brightest regions of an image is pretty self-explanatory so I don’t need to dedicate an entire section to detailing the problem.
I also think that explaining each block of code followed by immediately showing the output of executing that respective block of code will help you better understand what’s going on.
So, with that said, take a look at the following image:
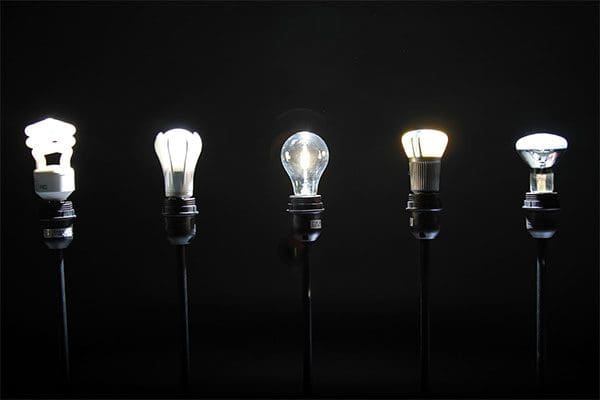
In this image we have five lightbulbs.
Our goal is to detect these five lightbulbs in the image and uniquely label them.
To get started, open up a new file and name it detect_bright_spots.py
. From there, insert the following code:
# import the necessary packages from imutils import contours from skimage import measure import numpy as np import argparse import imutils import cv2 # construct the argument parse and parse the arguments ap = argparse.ArgumentParser() ap.add_argument("-i", "--image", required=True, help="path to the image file") args = vars(ap.parse_args())
Lines 2-7 import our required Python packages. We’ll be using scikit-image in this tutorial, so if you don’t already have it installed on your system be sure to follow these install instructions.
We’ll also be using imutils, my set of convenience functions used to make applying image processing operations easier.
If you don’t already have imutils
installed on your system, you can use pip
to install it for you:
$ pip install --upgrade imutils
From there, Lines 10-13 parse our command line arguments. We only need a single switch here, --image
, which is the path to our input image.
To start detecting the brightest regions in an image, we first need to load our image from disk followed by converting it to grayscale and smoothing (i.e., blurring) it to reduce high frequency noise:
# load the image, convert it to grayscale, and blur it image = cv2.imread(args["image"]) gray = cv2.cvtColor(image, cv2.COLOR_BGR2GRAY) blurred = cv2.GaussianBlur(gray, (11, 11), 0)
The output of these operations can be seen below:
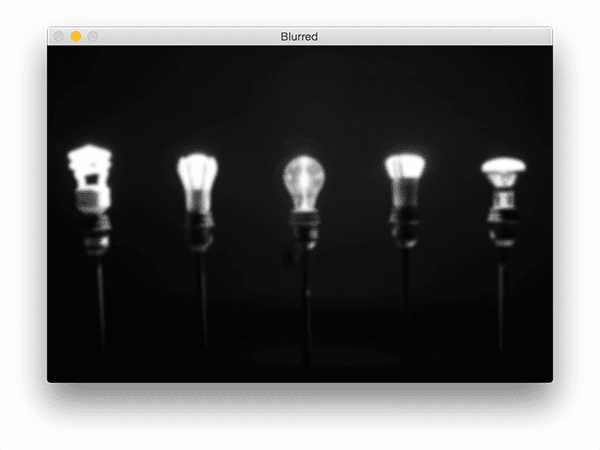
Notice how our image
is now (1) grayscale and (2) blurred.
To reveal the brightest regions in the blurred image we need to apply thresholding:
# threshold the image to reveal light regions in the # blurred image thresh = cv2.threshold(blurred, 200, 255, cv2.THRESH_BINARY)[1]
This operation takes any pixel value p >= 200 and sets it to 255 (white). Pixel values < 200 are set to 0 (black).
After thresholding we are left with the following image:
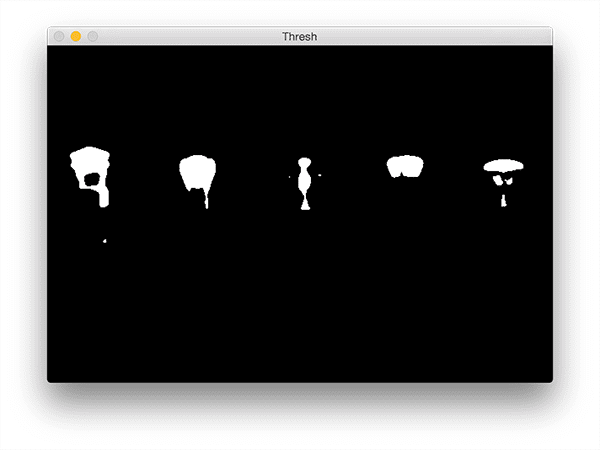
Note how the bright areas of the image are now all white while the rest of the image is set to black.
However, there is a bit of noise in this image (i.e., small blobs), so let’s clean it up by performing a series of erosions and dilations:
# perform a series of erosions and dilations to remove # any small blobs of noise from the thresholded image thresh = cv2.erode(thresh, None, iterations=2) thresh = cv2.dilate(thresh, None, iterations=4)
After applying these operations you can see that our thresh
image is much “cleaner”, although we do still have a few left over blobs that we’d like to exclude (we’ll handle that in our next step):
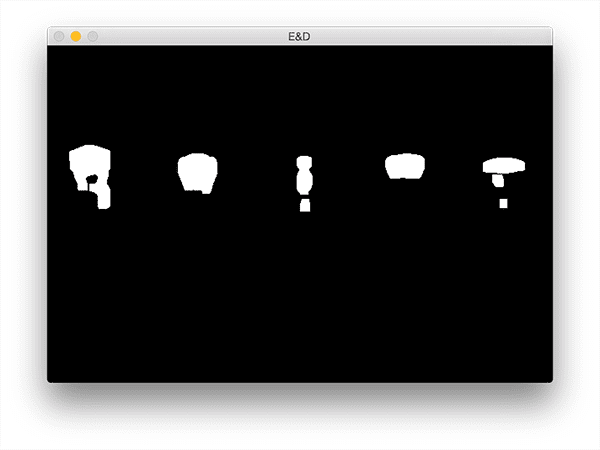
The critical step in this project is to label each of the regions in the above figure; however, even after applying our erosions and dilations we’d still like to filter out any leftover “noisy” regions.
An excellent way to do this is to perform a connected-component analysis:
# perform a connected component analysis on the thresholded # image, then initialize a mask to store only the "large" # components labels = measure.label(thresh, neighbors=8, background=0) mask = np.zeros(thresh.shape, dtype="uint8") # loop over the unique components for label in np.unique(labels): # if this is the background label, ignore it if label == 0: continue # otherwise, construct the label mask and count the # number of pixels labelMask = np.zeros(thresh.shape, dtype="uint8") labelMask[labels == label] = 255 numPixels = cv2.countNonZero(labelMask) # if the number of pixels in the component is sufficiently # large, then add it to our mask of "large blobs" if numPixels > 300: mask = cv2.add(mask, labelMask)
Line 32 performs the actual connected-component analysis using the scikit-image library. The labels
variable returned from measure.label
has the exact same dimensions as our thresh
image — the only difference is that labels
stores a unique integer for each blob in thresh
.
We then initialize a mask
on Line 33 to store only the large blobs.
On Line 36 we start looping over each of the unique labels
. If the label
is zero then we know we are examining the background region and can safely ignore it (Lines 38 and 39).
Otherwise, we construct a mask for just the current label
on Lines 43 and 44.
I have provided a GIF animation below that visualizes the construction of the labelMask
for each label
. Use this animation to help yourself understand how each of the individual components are accessed and displayed:
Line 45 then counts the number of non-zero pixels in the labelMask
. If numPixels
exceeds a pre-defined threshold (in this case, a total of 300 pixels), then we consider the blob “large enough” and add it to our mask
.
The output mask
can be seen below:
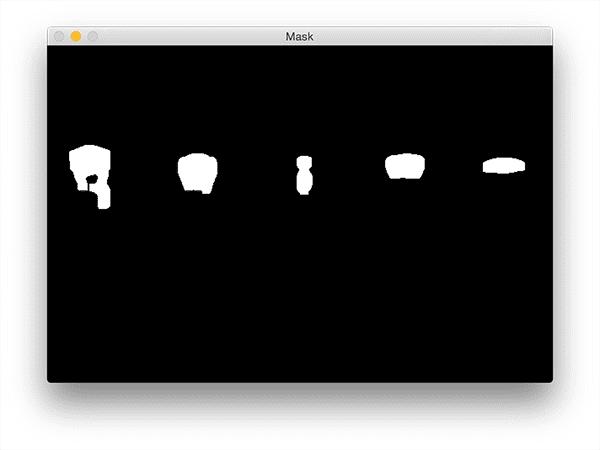
Notice how any small blobs have been filtered out and only the large blobs have been retained.
The last step is to draw the labeled blobs on our image:
# find the contours in the mask, then sort them from left to # right cnts = cv2.findContours(mask.copy(), cv2.RETR_EXTERNAL, cv2.CHAIN_APPROX_SIMPLE) cnts = imutils.grab_contours(cnts) cnts = contours.sort_contours(cnts)[0] # loop over the contours for (i, c) in enumerate(cnts): # draw the bright spot on the image (x, y, w, h) = cv2.boundingRect(c) ((cX, cY), radius) = cv2.minEnclosingCircle(c) cv2.circle(image, (int(cX), int(cY)), int(radius), (0, 0, 255), 3) cv2.putText(image, "#{}".format(i + 1), (x, y - 15), cv2.FONT_HERSHEY_SIMPLEX, 0.45, (0, 0, 255), 2) # show the output image cv2.imshow("Image", image) cv2.waitKey(0)
First, we need to detect the contours in the mask
image and then sort them from left-to-right (Lines 54-57).
Once our contours have been sorted we can loop over them individually (Line 60).
For each of these contours we’ll compute the minimum enclosing circle (Line 63) which represents the area that the bright region encompasses.
We then uniquely label the region and draw it on our image
(Lines 64-67).
Finally, Lines 70 and 71 display our output results.
To visualize the output for the lightbulb image be sure to download the source code + example images to this blog post using the “Downloads” section found at the bottom of this tutorial.
From there, just execute the following command:
$ python detect_bright_spots.py --image images/lights_01.png
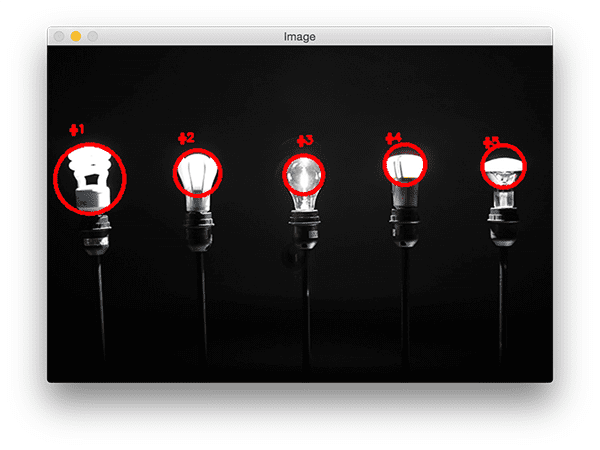
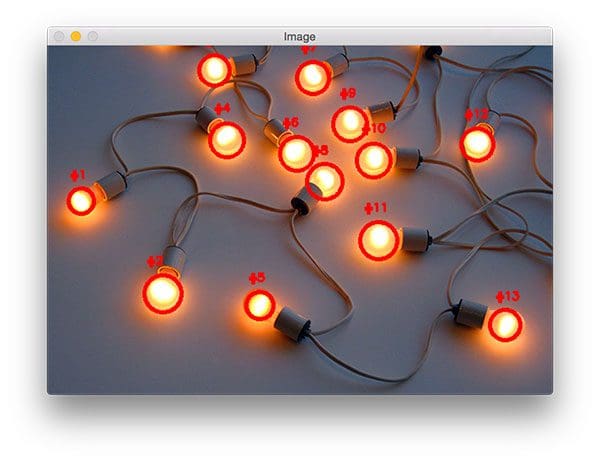
You should then see the following output image:
Notice how each of the lightbulbs has been uniquely labeled with a circle drawn to encompass each of the individual bright regions.
You can visualize a a second example by executing this command:
$ python detect_bright_spots.py --image images/lights_02.png
This time there are many lightbulbs in the input image! However, even with many bright regions in the image our method is still able to correctly (and uniquely) label each of them.
What's next? We recommend PyImageSearch University.
84 total classes • 114+ hours of on-demand code walkthrough videos • Last updated: February 2024
★★★★★ 4.84 (128 Ratings) • 16,000+ Students Enrolled
I strongly believe that if you had the right teacher you could master computer vision and deep learning.
Do you think learning computer vision and deep learning has to be time-consuming, overwhelming, and complicated? Or has to involve complex mathematics and equations? Or requires a degree in computer science?
That’s not the case.
All you need to master computer vision and deep learning is for someone to explain things to you in simple, intuitive terms. And that’s exactly what I do. My mission is to change education and how complex Artificial Intelligence topics are taught.
If you're serious about learning computer vision, your next stop should be PyImageSearch University, the most comprehensive computer vision, deep learning, and OpenCV course online today. Here you’ll learn how to successfully and confidently apply computer vision to your work, research, and projects. Join me in computer vision mastery.
Inside PyImageSearch University you'll find:
- ✓ 84 courses on essential computer vision, deep learning, and OpenCV topics
- ✓ 84 Certificates of Completion
- ✓ 114+ hours of on-demand video
- ✓ Brand new courses released regularly, ensuring you can keep up with state-of-the-art techniques
- ✓ Pre-configured Jupyter Notebooks in Google Colab
- ✓ Run all code examples in your web browser — works on Windows, macOS, and Linux (no dev environment configuration required!)
- ✓ Access to centralized code repos for all 536+ tutorials on PyImageSearch
- ✓ Easy one-click downloads for code, datasets, pre-trained models, etc.
- ✓ Access on mobile, laptop, desktop, etc.
Summary
In this blog post I extended my previous tutorial on detecting the brightest spot in an image to work with multiple bright regions. I was able to accomplish this by applying thresholding to reveal the brightest regions in an image.
The key here is the thresholding step — if your thresh
map is extremely noisy and cannot be filtered using either contour properties or a connected-component analysis, then you won’t be able to localize each of the bright regions in the image.
Thus, you should take care to assess your input images by applying various thresholding techniques (simple thresholding, Otsu’s thresholding, adaptive thresholding, perhaps even GrabCut) and visualizing your results.
This step should be performed before you even bother applying a connected-component analysis or contour filtering.
Provided that you can reasonably segment the light regions from the darker, irrelevant regions of your image then the method outlined in this blog post should work quite well for you.
Anyway, I hope you enjoyed this blog post!
Before you go, be sure to enter your email address in the form below to be notified when future tutorials are published on the PyImageSearch blog.
Download the Source Code and FREE 17-page Resource Guide
Enter your email address below to get a .zip of the code and a FREE 17-page Resource Guide on Computer Vision, OpenCV, and Deep Learning. Inside you'll find my hand-picked tutorials, books, courses, and libraries to help you master CV and DL!
Rajeev Ratan
Another excellent tutorial!
Adrian Rosebrock
Thanks Rajeev! Have an awesome day 🙂
Chris
Hi Adrian,
Thanks for yet another great tutorial. The code runs fine with no errors but only displays the original images without the red circles or numbers. Any thoughts as to why?
Thanks!
Adrian Rosebrock
Hey Chris — are you using the code downloaded via the “Downloads” section of the blog post? Or are you copying and pasting the code as you go along? The reason I ask is because it sounds like contours are not being detected in your image for whatever reason. Trying inserting a few debug statements like
print(len(cnts))
to ensure at least some of the contours are being detected.Bento
I have downloaded via the”Downloads” section but still it only display the original image. i tried insert print(len(cnts)) and the result is 1. do you know where is the problem?
Adrian Rosebrock
It definitely sounds like an issue during either the (1) thresholding step or (2) contour extraction step. Which version of OpenCV are you using?
James
Same exact issue and I can not make it work. My opencv version is 2.
Adrian Rosebrock
Go back to the thresholding step and ensure that each of the regions are properly thresholded (i.e., your throughout output matches mine). Again, it sounds like something strange is happening with the thresholding or the contour extraction process.
Alvin
Do you have a repo on github?
Adrian Rosebrock
Here is a link to my GitHub account where I maintain libraries such as imutils and color-transfer:
https://github.com/jrosebr1
The code for this particular blog post can be obtained by using the “Downloads” section of the tutorial.
Robin Kinge
Broken Link?
Another excellent tutorial.
Adrian Rosebrock
The link should be working now, please give it another try.
Lenny Lemor
Hi, how fast is it? Can I use this for tracking some laser spots?
Regards
Adrian Rosebrock
This method is very fast since it’s based on thresholding for segmentation followed by optimized connected-component analysis and contour filtering. It can certainly be used in real-time semi-real-time environments for reasonably sized images.
Tamilmaran
Hi Adrian,
Is that any other ways to segment the bright spots from the RGB image, based on wavelength range of the lights
Osman
Hey Adrian! Nice tutorial. Can this be used (if altered) with a WebCam to detect fire? Thanks
Adrian Rosebrock
Detecting smoke and fire is an active area of research in computer vision and image processing. We typically use machine learning methods combined with feature extraction methods (or deep learning) to make an approach like this work across a variety of lighting conditions, environments, etc. I would not recommend using this method directly to detect fire as you would likely obtain many false-positives.
John
Hi Adrian,
Thanks so much for sharing your knowledge.
Question, how can I make it so that I can detect which light is turned off. In other word, can the label be static? 1, 2, 3, 4, 5 => 1, 2, 5 meaning bulb 3 and 4 are off. Assuming the lights are stationary.
Adrian Rosebrock
You can do this, but you would have to start with the lights in a fixed position and all of them “on”. Once you’ve determined the ROI for each light just loop over each of the ROIs (no need to detect them each time) and compute the mean of the grayscale region. If the mean is low (close to black) then the light is off. If the mean is high (close to white) then the light is on.
Joel
Thank you for sharing this tutorial. The result was great using a satellite image of the U.S. at night.
Adrian Rosebrock
Fantastic, I’m glad to hear it Joel! 🙂
Izru
Hello Adrian , it’s Really but i face some Problem. I can’t install SKiImage on My Raspberry Pi 3 i can’t measure anything Please help me.
thank you in Advance
Adrian Rosebrock
You can install scikit-image via:
$ pip install -U scikit-image
Is there a particular error message you are running into?
Bartosz Bartoszewski
Dear Adrian, I face the same problem as Izru.
Got all the steps done for installation of opencv. When I try to install scikit, my pi3b gets to a point “Running setup.py bdist_wheel for scipi …” Then after an hour or two it hangs.
I can tell it’s hanging as I’ve left it yday for the night, when I turned the screen the system clock was stopped at +1 hour after leaving it to finsh, mouse/kbd not responding. So I had to pull the plug.
I’ve followed all steps for installation of opencv on my version of pi3b, all packages are up to date.
Adrian Rosebrock
It sounds like the system might be locking up for some strange reason. I would suggest trying this command and seeing if it helps:
$ pip install scikit-image --no-cache-dir
Also be sure to check the power settings on the Pi and ensuring that it’s not accidentally going into sleep mode.
Bartosz Bartoszewski
Hey Adrian,
Many thanks for taking interest in my problem and a blazing fast reply. I’ve actually solved it myself. While the install was running for the nth time I noticed that the system got very unresponsive even though no significant CPU load was present, so I checked the available memory and voila… The system was running out of swap-file space, I’ve had the default setting of 100MB out of the box. After changing this to 1024MB the next run was done within 40-50 minutes.
Adrian Rosebrock
Thanks for sharing your solution Bartosz!
Jeff Ward
I had to change line 38 from “`if label == 0:“` to “`if label < 0:“`
I didn't dig further than http://scikit-image.org/docs/dev/api/skimage.measure.html#skimage.measure.label to try to find the cause for differing starting indexes despite the `thresh` array starting at zero.
Mark
I am also getting an error line 38
I tried the edit you suggested (i.e. label == 0:) but got the error shown below, any thoughts?
if label < 0:
^
TabError: inconsistent use of tabs and spaces in indentation
Adrian Rosebrock
Hey Mark — make sure you are using the “Downloads” section of the post to download the code rather than copying and pasting from the tutorial. This should help resolve any issues related to whitespacing.
Mark
Thanks Adrian, I only saw your reply now, this is exactly what it was, apologies for troubling you over such a trivial issue, thanks for taking the time to answer my question anyway, i’ll be clicking download from now on, instead of copying and pasting 🙂
Adrian Rosebrock
I’m happy to hear the issue was resolved 🙂
Jehad Mohamed
You can solve this particular error by simply selecting your whole code and untabify in the format tool of the idle
Mark
Note: I resolved the issue I flagged above, it seems it was simply an indentation error caused because I used Tab instead of 4 spaces to correct to code format after I had pasted it into my IDE.
Alec edwards
Hey is there anyway you could use this find rocks in the sand that are whiter than the sand!? I’m trying to use this code, but it’s not working
Adrian Rosebrock
If the rocks are whiter than the sand itself you might want to try simple thresholding.
Célia
Hi Adrian, thanks for this great tutorial.
Have you ever encountered problems with the skimage module not having measure.label?
I guess maybe I am using a wrong version of skimage? But can’t find how to solve it..
Do you have any advice?
Thanks in advance
Adrian Rosebrock
Hey Célia — can you run
pip freeze
and let us know which version of scikit-image you are running?zara
scikit-image==0.9.3
Same error i am also getting.
Command python setup.py egg_info failed with error code 1 in /tmp/pip_build_rashmi/scikit-image
Storing debug log for failure in /home/zara/.pip/pip.log
Adrian Rosebrock
It looks like you’re running an old version of scikit-image. Try upgrading:
$ pip install --upgrade scikit-image
Tobias
Hi Adrian, great tutorial really helpful, thanks.
Is there a way this could be used to give the coordinates of bright spots in an image for a tracking application?
thanks
Tobias
Adrian Rosebrock
The (x, y)-coordinates and bounding box are already given by Line 62, so I’m not sure what you’re asking?
Tobias
I thought that was the case, but when i try to append onto a list I only get one set of coordinates, not the 5 I would expect.
Adrian Rosebrock
Make sure you are appending the coordinates to the list right after the bounding box is computed — it sounds like there might be a logic error in your code.
Tobias
Thanks, that sorted it
ankit pitroda
hello Sir,
Awesome work did by you.
I am looking for multiple dark points in the images.
can you suggest me for the same?
Adrian Rosebrock
I would suggest inverting your image so that dark spots are now light and apply the same techniques in this tutorial.
Ankiit Pitroda
this is awesome, you are superhuman.
thanks
Adrian Rosebrock
You are very kind, Ankiit 🙂
Alex
Hello. I need a little help: I cannot understand the structure of line 11. Can you explain me?
Adrian Rosebrock
Hi Alex — are you referring to the argument parsing code? If so, be sure to read up on command line arguments before continuing.
Antonios Kats
Hi Adrian,
You’ re doing an excellent job !
I have a simple question – you might have answered it a million times 😉
thresh = cv2.threshold(blurred, 200, 255, cv2.THRESH_BINARY)[1]
I’m wondering what the [1] stands for ?
Thanks in advance,
Antonios
Adrian Rosebrock
The
cv2.threshold
function returns a 2-tuple of the threshold value T and the thresholded image. Since we only need the second entry in the tuple, we grab it via [1]. If you’re interested in learning more about the basics of image processing, computer vision, and OpenCV, be sure to refer to my book, Practical Python and OpenCV.Julian
Hey Adrian, great tutorial, I’m working on a similar project right now but my approach is to use the connectedComponentsWithStats function of OpenCV 3. It would be nice to know what are the advantages/disadvantages of using the scikit-image library approach instead of the already built-in function of OpenCV.
Adrian Rosebrock
There really aren’t any disadvantages of using the built-in function with OpenCV. The main reason I used scikit-image for this is prior to OpenCV 3 there was no connected-component analysis function with Python bindigns.
Mike
Hi there,
Awesome work as always! Keep it up, buddy.
I am struggling for the past 2 weeks to detect glossy/shiny/bright spots or areas in image and video. I have applied the technique you suggested above using C++.
While I am getting good results in some of the cases, others are slightly off.
Here’s an example: https://imgur.com/a/truur This is a relatively good result but I have no idea how to improve it and why it does find so many bright spots on the curtain even though there’s nothing shiny there.
I have been tuning and playing around with the model’s parameters such as (gaussian radius, threshold etc) day and night but I’m not getting very good results so I am thinking maybe the approach is wrong for my purposes. I hope you can give me some direction on this matter
All best!
Adrian Rosebrock
Hey Mike, thanks for the comment. I know this isn’t going to help for this particular project but I want to make sure others read it — computer vision algorithms will struggle to detect glossy, reflective regions. When a camera captures an image it’s detecting the light bounced off the object back into the lens. Glossy, reflective objects will distort the capture and make them hard to detect.
In your particular instance you have light-colored regions that are lighter than the rest of the image. Unfortunately you cannot do much about this other than consider semantic segmentation if at all possible.
Federica
Hello, would it be possible to detect real time changes through a webcam and execute certain actions based on what leds are on?
Adrian Rosebrock
Sure. Simple motion detection would help determine when a change in the video stream happens and from there you can take appropriate action.
Scarlett Zheng
Hi Adrian ,thank you for your great sharing. I’ve had some problems recently. It maybe like one from Mike. But I am not sure. I want to find the image that exists violent sunlight(or exposure field) in many images . Have you some ideas ? Can you share with me? I am trying to convert RGB to HSL and use the method ( from the tutorial of Finding the Brightest Spot in an Image using Python and OpenCV) . Then set a threshold of area to define the image. But I don’t have a satisfying result.
Adrian Rosebrock
What does “violent sunlight” mean in this context?
Mehdi cheher
Hi Adrian , i was running this code and i had this error and i didn’t find solution for it so f you know how to fix it please help me :
gray = cv2.cvtColor(image, cv2.COLOR_BGR2GRAY)
…
error: (-215) scn == 3 || scn == 4 in function cvtColor
Thanks in advance 😀
Adrian Rosebrock
Your path to “cv2.imread” is incorrect and the function is returning “None”. You can read more about NoneType errors in OpenCV here. My guess is that you did not properly pass the command line argument to the script. Be sure to read up on command line arguments.
Patrick Lin
Hi Adrian,
Excellent tutorial and thanks for sharing!
Question:
1. If I apply this method to panorama images, what aspects should I pay attention to?
2. What are the limitations of this method? Is this method only applied to high dark contrast?
Thanks.
Adrian Rosebrock
1. This method will work with panorama images.
2. There are a number of limitations with this method but the biggest one is false-positives due to glare or reflection where the object appears (in the image) to be significantly brighter than it actually is. If you’re working with in an unconstrained environment with lot’s of relfection or glare I would not recommend this method.
Aman Agrawal
Hi Adrian, another excellent tutorial!
I just had one question. This might be a naive one, since I have just begun learning.
What is the need for blurring the picture before moving onto the rest of the process? Also, what could be the other possible reasons when one might have to blur the picture before proceeding further?
Adrian Rosebrock
Blurring reduces high frequency noises. I discuss why we apply blurring, how to apply it, and the other fundamentals of computer vision and image processing inside Practical Python and OpenCV. Be sure to take a look, I think it could really help you with your studies.
chitra lalawat
Hey!
In the image you’ve got only two colors to deal with… I have an image and I want to calculate only the blue marks inside it… I’ll be happy if u guide me a little..
Adrian Rosebrock
Both of the objects are blue? If so, all you should need is some basic color thresholding.
Biswa
Hi Adrian,
The blog was very nice and understandable.
Currently, I have a use case to find the origin of smoke. For example, if my image is having a smoke from a long distance from the mountain how I can square that originated portion of smoke. Could you please help with this.
Adrian Rosebrock
Smoke detection is an active area of research that is far from solved. I would start by reading this paper.
Pramit Mazumdar
Hello Adrian,
Thanks for the simple explanation. It really helped. Just wanted to ask another follow-up question.
1. Can we get the member pixel coordinates for each of the minimum bounding circles?
I guess, we have to do something with the “cnts”, but not sure exactly what to be done to know which pixels are within Circle-1. Or is there any cv2 function for finding member pixels for each contour?
Adrian Rosebrock
I’m not sure what you mean by “member pixels”. Could you elaborate?
Adrian Rosebrock
Hi Christian — congrats on working on your senior project, that’s awesome! I’m sure you are excited to graduate. Auburn is also a great school, I hope you enjoyed your time there.
As far as citation goes, please include (1) my name, (2) the name of the article you are citing, and (3) a link back to the original blog post.
Asad Ali
Hello,
Could this model be used to detect dark spots in a bright image as well?
Regards,
Asad
Adrian Rosebrock
Yes, you could just invert the input image and you would be able to detect dark spots as well.
Asad Ali
Hello,
I am looking to find black spots on a white background.
I am inverting the image as you have suggested earlier in the comments.
I have confirmed the image is being inverted properly.
But I get the following error
ValueError: not enough values to unpack (expected 2, got 0)
from line
—> 66 cnts = contours.sort_contours(cnts)[0]
Any suggestion would be appreciated, thanks.
Asad
Adrian Rosebrock
Check the length of the “cnts” array. It sounds like there are no contours being detected.
Hamizan
Hello,
I am getting this error:( AttributeError: module ‘imutils’ has no attribute ‘grab_contours’). Is there any solution to this?
Hamizan
I found the solution. I just copied paste your imutils folder from github and paste it to my site-packages. Somehow my initial imutils does not have grab_contours function.
Adrian Rosebrock
You were using an older version of imutils. You need to upgrade it via:
$ pip install --upgrade imutils
Meet Thosar
Thanks a lot for your great tutorials.
I am new to python but you explain all concepts very nicely. This makes task easier for newbies.
I combined bubble sheet with OMR and this tutorial to create User Identification bubble sheet with little changes. It worked like charm.
Thanks once again
Adrian Rosebrock
Congrats on a successful project!
ShubhamG.
You’re a lifesaver, thank you for the great tutorial!
Adrian Rosebrock
Thanks, I’m glad it helped you!
rishav sapahia
Getting ValueError: not enough values to unpack (expected 2, got 0) error on line 57 of the code, which points to line 25 of the sort_contours file cnts = contours.sort_contours(cnts)[0] . I have used the code you have given in downloads section and all my libraries are updated . I am using MAC OS with python3.6
Adrian Rosebrock
Which version of OpenCV are you using?
Arsenis
Hello Adrian as always top quality tutorials.
I am using your point view to detect bright spots in an image, and i am having a problem with it due to the fact that they are being considered noise. I tried to fix this problem with the cv2.erode, cv2.dilate and fixed many issues, but i am still having some problems with some images. What would you recomend to fix this problem ?
Thank you for your time
Adrian Rosebrock
It sounds like your preprocessing steps need to be updated. Without knowing exactly what your image looks like but I would suggest blurring followed by morphological operations, probably a black hat or white hat. I would also suggest working through the PyImageSearch Gurus course or Practical Python and OpenCV to help you learn the basics as well.
Arsenis
Thank you for your quick answer Adrian,
I fixed the issue, the problem was in the preprocessing.
Keep up the great work.
Adrian Rosebrock
Congrats on resolving the issue!
Niklas Schuster
Great Tutorial
But how am I able to show the labels individually like you did in your gif animation? I tried cv2.imshow in the [for label in np.unique(labels):]-loop but it seems like that always gives me the last found bright spot. (which i really dont understand since it should loop through the labels one by one..right? )
Thank you for your time
Gaurav Pujar
You are god!!
Adrian Rosebrock
Thanks Gaurav.
Artem Dranoshhuk
Hello Adrian as always great tutorial
I using you code to detect small lights on image (car headlights).
It’s turns out that measure.label always give me 0, even without erode and GaussianBlur.
How can I fix that?
Thank you in Advance.
Vaz Chan
Hey Adrian,
I’m a bit new to OpenCV, so any help would be great.
I have a live video feed with 5 adjacent LEDs that randomly switch between red or green. I want to be able to detect these LEDs, number them (as you have), and pick the numbers which are red from them at any given time.
What would be the changes I’d need to make, to detect either red/green lights, and then pick the red from those selected ones.
I’ll be subscribing to your crash course, and any help would be appreciated.
Adrian Rosebrock
Hey Vaz — it would be helpful to see your images first. Perhaps send me an email and I can take look?
Eve
Hello. Great tutorial! Would it be possible to detect sun glares in an image using this method? Any alterations to the code you would recommend or maybe an alternative method if this would not work for detecting sun glares? Thanks.
anon
So i have this code working with a webcam currently. I am wanting to use it outdoors but it is currently picking up the sky. How could i work around that?
Hidayat
Hello Mr.Adrian, i want to make wet hand detector using bright spot method, so i using camera to detect hand. To detect the wetness of my hands, I put the lamp next to the camera, I think the reflection of the light beam on a wet hand can provide input to the camera. is it possible to use this method?
hope someone can help me
Gaurav
Hey Adrian,
I was working on a project where I need to add glossiness/shininess/matte texture to lips.
I was looking for some generic OpenCV based solution but no good results are achieved
Can you please help me with how can I apply glossiness/shininess to an image.
TIA!
Adrian Rosebrock
That sounds like a good use case for transparent overlays and alpha blending.
Akash
Hey Adrian
I am using your tutorials for one of my project and I want to detect stains/dirt spots on a dish plate/bowl.I performed pyramid mean shift filtering and Otsu’s thresholding for finding the contour,however I’m stuck on how to find the stain marks.
What would you recommend to fix this problem ?
Thank you for your time
Adrian Rosebrock
It’s hard to say without seeing example images of what you’re working with first. Depending on the complexity of the image/levels of contrast you may instead need to look into instance segmentation algorithms.
Akash
Thank you for your suggestion.which of the listed course would you suggest subscribing for computer vision and deep learning applications as i would be working more on this.
Is it possible to for me to share the image to your mail ?
Adrian Rosebrock
I would suggest my book, Deep Learning for Computer Vision with Python, which covers deep learning applied to computer vision applications in detail.
After you purchase you will have access to my email address and we can continue the conversation there.
Ciro
great job, i will buy your book shortly. but speaking of this, I wanted to ask you a favor would you help me a lot with my project, where is there a function or a way to understand the difference in brightness? so as to assign 1 to maximum brightness and 0 to lowest brightness.
Adrian Rosebrock
Take a look at min-max normalization as that should achieve what you want.
Rusj
Hi Adrians, thankyou so much for your kindness and generousity.
I am a beginner, and
I wonder how it can draw a curve. to select the result (may it be along the contour ) instead of a circle ?
How can it be done?
Btw, sorry for my bad english.
Ali Qadar
Hi Adrian,
I have applied this code on Night time vehicles detection, it works fine for some frames. I was thinking to cluster detected blobs in each frame and track their position using Kalman filter. I would highly appreciate if you can give me some hints or suggestions especially on clustering part. The thing in my mind is that clustering process should group detected blobs and compare them against the blobs detected in the next frame based on Kalman filter prediction of the position of the previous blob.
I know eventually I had to get rid of Thresholding but this is a really good start to get hands dirty for starting on complex project like the one I mentioned in the first line. Hats of to you for this great tutorial.