I said it in last week’s blog post and I’ll say it again here today — I am not, by any stretch of the imagination, a GUI developer.
I think my aversion to GUI development started back in early-High school when I was teaching myself Java; specifically, how to write Java applets (remember what god damn nightmares applets were?) utilizing javax
and Swing.
It was a dark time in my life.
I was sick often and missed a lot of school.
There were a great deal of family problems going on.
And I had yet to mature from an adolescent into an adult, stuck in the throes of puberty — an awkward teenage boy, drunk on apathy, while simultaneously lacking any direction or purpose.
At that point in my (early) programming career, I turned to Java and GUI development in a last-ditch effort to escape, much like a heroin addict turns to a spoon and a needle for a few minutes of relief, only for the world to come crashing back down once the initial high wears off.
You see, I found developing GUI applications fun. It was addictive. And it was quite the departure from the all-too-familiar command line interfaces.
But that “fun” came at a price.
Lengthly code blocks to accomplish even minutely simple tasks. Strange compile errors. And spending all-nighters trying to resolve race conditions, callback hell, and threading nightmares that not even an experienced seamstress could untangle.
Since then, I’ve always (mentally) correlated GUI development with painful, trying times. It’s a door that I honestly haven’t opened since…until now.
In this blog post, I’m going to confront my troubled past and write a bit of code to display a video feed with OpenCV and Tkinter. Ultimately, this GUI application will allow us to create a “Photo Booth” of sorts, letting us save frames from our video stream to disk at the click of a button.
As you’ll find out, I kinda-sorta failed, but I wanted to share my experience with you — hopefully more experienced GUI developers can help point me in the right direction.
Displaying a video feed with OpenCV and Tkinter
I’m going to go ahead and assume that you have already read last week’s blog post on using OpenCV with Tkinter. Inside this tutorial, I detailed what Tkinter is, how to install it, and how to write a simple Tkinter GUI application that can display images loaded via OpenCV.
Today we are going to build on the knowledge gained from last week’s post, as well as incorporate some special techniques discussed in earlier blog posts — specifically, how to access video streams in an efficient, threaded manner.
Note: I think my desire to utilize threaded streams is what ultimately caused problems with this application. As I’ve read from other sources, Tkinter doesn’t place nice with threads.
Mocking up the Photo Booth App
As we did in last week’s post, let’s start by creating a mockup of our application. Below you can see the main screen of our GUI application:
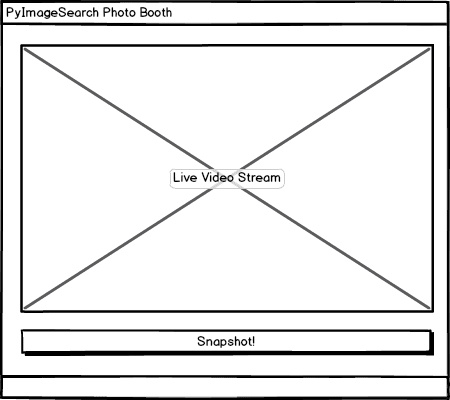
This screen has two elements. The first, at the bottom, is our Snapshot! button. Every time this button is clicked, the current frame read from the video stream will be stored on disk.
The second element, placed directly above the first, is a live display of the video stream itself.
Our goal is to write Python + OpenCV + Tkinter code to continuously poll frames from our video stream, update the live display, and then handle writing the current frame to file when the snapshot button is clicked.
Creating the Photo Booth App
Now that we’ve created the mockup of our project, let’s go ahead and get started coding the GUI. Open up a new file, name it photoboothapp.py
, and insert the following code:
# import the necessary packages from __future__ import print_function from PIL import Image from PIL import ImageTk import Tkinter as tki import threading import datetime import imutils import cv2 import os
Lines 2-10 handle importing our required Python packages. We need PIL
for the Image
class, which is what the ImageTk
and Label
classes require in order to display an image/frame in a Tkinter GUI.
We’ll also need Python’s threading
package to spawn a thread (separate from Tkinter’s mainloop
), used to handle polling of new frames from our video stream.
The datetime
module will be used to construct a human-readable timestamp filename for each frame that we save to disk.
Lastly, we’ll need imutils, my collection of convenience functions used to make working with OpenCV easier. If you don’t already have imutils
installed on your system, let pip
install the package for you:
$ pip install imutils
Let’s move on to the definition of our PhotoBoothApp
class:
class PhotoBoothApp: def __init__(self, vs, outputPath): # store the video stream object and output path, then initialize # the most recently read frame, thread for reading frames, and # the thread stop event self.vs = vs self.outputPath = outputPath self.frame = None self.thread = None self.stopEvent = None # initialize the root window and image panel self.root = tki.Tk() self.panel = None
Line 13 defines the constructor to our PhotoBoothApp
class. This constructor requires two arguments — vs
, which is an instantiation of a VideoStream
, and outputPath
, the path to where we want to store our captured snapshots.
Lines 17 and 18 store our video stream object and output path, while Lines 19-21 perform a series of initializations for the most recently read frame
, the thread
used to control our video polling loop, and stopEvent
, a thread.Event
object used to indicate when the frame pooling thread should be stopped.
We then initialize the root
Tkinter window and the panel used to display our frame in the GUI (Lines 24 and 25).
We continue the definition of our constructor below:
# create a button, that when pressed, will take the current # frame and save it to file btn = tki.Button(self.root, text="Snapshot!", command=self.takeSnapshot) btn.pack(side="bottom", fill="both", expand="yes", padx=10, pady=10) # start a thread that constantly pools the video sensor for # the most recently read frame self.stopEvent = threading.Event() self.thread = threading.Thread(target=self.videoLoop, args=()) self.thread.start() # set a callback to handle when the window is closed self.root.wm_title("PyImageSearch PhotoBooth") self.root.wm_protocol("WM_DELETE_WINDOW", self.onClose)
Lines 29-32 create our Snapshot! button, that when clicked, will call the takeSnapshot
method (which we’ll define later in this example).
In order to continuously poll frames from our video stream and update the panel
in our GUI, we need to spawn a separate thread that will be used to monitor our video sensor and grab the the most recently read frame (Lines 36-38).
Finally, we set a callback to handle when our window is closed so we can perform cleanup operations and (ideally) stop the video polling thread and release any resources (unfortunately, this didn’t work as I intended it to in practice).
Next up, let’s define the videoLoop
function, which as the name suggests, monitors our video stream for new frames:
def videoLoop(self): # DISCLAIMER: # I'm not a GUI developer, nor do I even pretend to be. This # try/except statement is a pretty ugly hack to get around # a RunTime error that Tkinter throws due to threading try: # keep looping over frames until we are instructed to stop while not self.stopEvent.is_set(): # grab the frame from the video stream and resize it to # have a maximum width of 300 pixels self.frame = self.vs.read() self.frame = imutils.resize(self.frame, width=300) # OpenCV represents images in BGR order; however PIL # represents images in RGB order, so we need to swap # the channels, then convert to PIL and ImageTk format image = cv2.cvtColor(self.frame, cv2.COLOR_BGR2RGB) image = Image.fromarray(image) image = ImageTk.PhotoImage(image) # if the panel is not None, we need to initialize it if self.panel is None: self.panel = tki.Label(image=image) self.panel.image = image self.panel.pack(side="left", padx=10, pady=10) # otherwise, simply update the panel else: self.panel.configure(image=image) self.panel.image = image except RuntimeError, e: print("[INFO] caught a RuntimeError")
As I said at the top of this blog post — I’m not a GUI developer and I have very little experience with Tkinter. In order to get around a RunTime
exception that Tkinter was throwing (likely due to threading), I resorted to really ugly try/except
hack to catch the RunTime
error. I tried to resolve the bug, but after a few hours of not getting anywhere, I eventually threw in the towel and resorted to this hack.
Line 51 starts a loop that will be used to read frames from our video sensor. This loop will continue until the stopEvent
is set, indicating that the thread should return to its parent.
Lines 54 and 55 read the frame
from our video stream and resize it using the imutils
library.
We now need to perform a bit of formatting on our image. To start, OpenCV represents images in BGR order; however, PIL expects images to be stored in RGB order. To resolve this, we need to swap the channels by calling cv2.cvtColor
. From there, we convert the frame
to PIL/Pillow format, followed by ImageTk
format. The ImageTk
format is required when displaying images in a Tkinter window.
If our panel
is not initialized, Lines 65-68 handle instantiating it by creating the Label
. We take special care on Line 67 to store a reference to the image
, ensuring that Python’s garbage collection routines do not reclaim the image
before it is displayed on our screen.
Otherwise, if the panel
has already been initialized, we simply update it with the most recent image
on Lines 71-73.
Now, let’s take a look at the takeSnapshot
callback:
def takeSnapshot(self): # grab the current timestamp and use it to construct the # output path ts = datetime.datetime.now() filename = "{}.jpg".format(ts.strftime("%Y-%m-%d_%H-%M-%S")) p = os.path.sep.join((self.outputPath, filename)) # save the file cv2.imwrite(p, self.frame.copy()) print("[INFO] saved {}".format(filename))
When the “Snapshot!” button is clicked, the takeSnapshot
function is called. Lines 81-83 generate a filename for the frame
based on the current timestamp.
We then save the frame
to disk on Line 86 by making a call to cv2.imwrite
.
Finally, we can define our last method, onClose
:
def onClose(self): # set the stop event, cleanup the camera, and allow the rest of # the quit process to continue print("[INFO] closing...") self.stopEvent.set() self.vs.stop() self.root.quit()
This function is called when we click the “X” in the GUI to close the application. First, we set the stopEvent
so our infinite videoLoop
is stopped and the thread returns. We then cleanup the video stream pointer and allow the root
application to finish closing.
Building the Photo Booth driver
The last step in creating our Photo Booth is to build the driver script, used to initialize both the VideoStream
and the PhotoBoothApp
. To create the driver script, I’ve added the following code to a file named photo_booth.py
:
# import the necessary packages from __future__ import print_function from pyimagesearch.photoboothapp import PhotoBoothApp from imutils.video import VideoStream import argparse import time # construct the argument parse and parse the arguments ap = argparse.ArgumentParser() ap.add_argument("-o", "--output", required=True, help="path to output directory to store snapshots") ap.add_argument("-p", "--picamera", type=int, default=-1, help="whether or not the Raspberry Pi camera should be used") args = vars(ap.parse_args()) # initialize the video stream and allow the camera sensor to warmup print("[INFO] warming up camera...") vs = VideoStream(usePiCamera=args["picamera"] > 0).start() time.sleep(2.0) # start the app pba = PhotoBoothApp(vs, args["output"]) pba.root.mainloop()
Lines 9-14 handle parsing the command line arguments of our script. The first command line argument, --output
, is required. The --output
switch is simply the path to where we want to store our output snapshots.
We then have --picamera
, an optional switch used to indicate whether the Raspberry Pi camera module should be used or not. By default, this value will be -1, indicating that our builtin/USB webcam should be used. We can specify a value > 0 if we want to utilize the Pi camera. You can learn more about this parameter and how to use it in conjunction with the VideoStream
class in this blog post.
Lines 18 and 19 initialize our VideoStream
and allow the camera sensor to warmup.
Finally, Lines 22 and 23 start the PhotoBoothApp
.
Running our Photo Booth
To run our photo booth application, make sure you have the necessary libraries and packages installed (as detailed in the previous blog post). After you’ve ensured your system is configured properly, execute the following command:
$ python photo_booth.py --output output
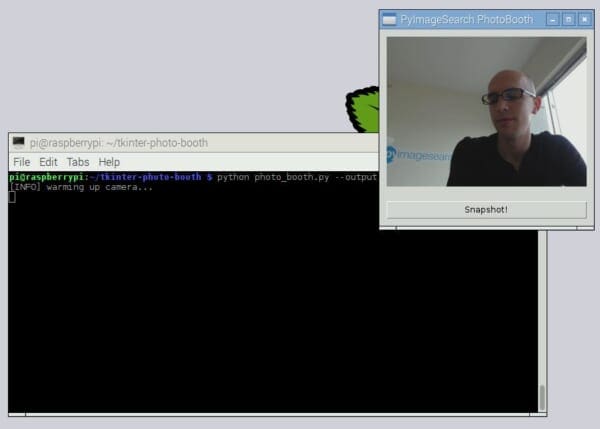
After the camera sensor warms up, you should see the following display:
Notice how our GUI contains both the live stream from our webcam along with the button used to trigger a snapshot.
After clicking the snapshot button, I can see that my output
directory contains the photo I just took:
Below I have included a short video to demonstrate the Photo Booth application:
What the hell are these errors?
As I alluded to at the top of this blog post, the Photo Booth application wasn’t a complete success. Without utilizing the try/except
block in the videoLoop
function of PhotoBoothApp
, closing the application results in the following RunTime
exception:
I think this is because the panel
object is garbage-collected before the thread finishes executing, but I’m not entirely sure (again, I’m not very familiar with Tkinter).
The second error happens intermittently, but again, also occurs during the window close:
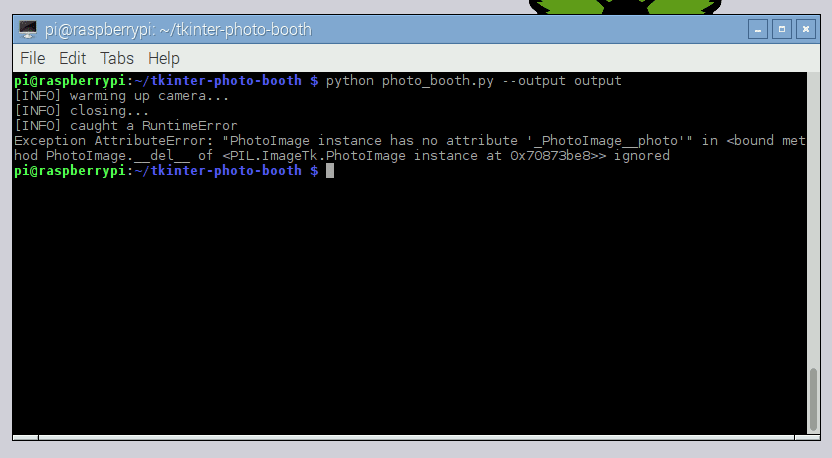
As you can see, I am getting an AttributeError
error. It doesn’t happen all the time, only some of the time, so I’m pretty convinced that this must be a threading problem of some sort. A bit of research online has led me to believe that Tkinter doesn’t play nice with threading, but I’m not 100% sure if this is the exact issue or not.
Either way, I’ve decided to put this project to bed for now and let the more experienced GUI developers take over — I’ve had enough of Tkinter for the next few months.
What's next? I recommend PyImageSearch University.
76 total classes • 90 hours of on-demand code walkthrough videos • Last updated: May 2023
★★★★★ 4.84 (128 Ratings) • 16,000+ Students Enrolled
I strongly believe that if you had the right teacher you could master computer vision and deep learning.
Do you think learning computer vision and deep learning has to be time-consuming, overwhelming, and complicated? Or has to involve complex mathematics and equations? Or requires a degree in computer science?
That’s not the case.
All you need to master computer vision and deep learning is for someone to explain things to you in simple, intuitive terms. And that’s exactly what I do. My mission is to change education and how complex Artificial Intelligence topics are taught.
If you're serious about learning computer vision, your next stop should be PyImageSearch University, the most comprehensive computer vision, deep learning, and OpenCV course online today. Here you’ll learn how to successfully and confidently apply computer vision to your work, research, and projects. Join me in computer vision mastery.
Inside PyImageSearch University you'll find:
- ✓ 76 courses on essential computer vision, deep learning, and OpenCV topics
- ✓ 76 Certificates of Completion
- ✓ 90 hours of on-demand video
- ✓ Brand new courses released regularly, ensuring you can keep up with state-of-the-art techniques
- ✓ Pre-configured Jupyter Notebooks in Google Colab
- ✓ Run all code examples in your web browser — works on Windows, macOS, and Linux (no dev environment configuration required!)
- ✓ Access to centralized code repos for all 500+ tutorials on PyImageSearch
- ✓ Easy one-click downloads for code, datasets, pre-trained models, etc.
- ✓ Access on mobile, laptop, desktop, etc.
Summary
In this blog post, I delved into my troubled past and faced my fears — building GUI applications.
I discussed how to build a simple Photo Booth application that reads frames from a live stream via OpenCV (in a threaded, efficient manner) and then displays the stream to our Tkinter GUI. Upon clicking a button in the GUI, the current frame is then saved to disk.
However, this application wasn’t a complete success.
I ran into two different types of errors — a RunTime
error and an AttributeError
exception. I resolved the RunTime
error by hacking together an ugly try/except
block, but the AttributeError
exception is still perplexing to me, due to its intermittent nature. If you know the solution to this problem, please leave a comment in the comments section at the bottom of this post.
To be honest, I’m not sure if I’ll be doing more OpenCV + Python + GUI applications in the future. It was neat to build one or two, but my interests in computer vision are more focused on the actual processing and understanding of images, not the development of full-fledged GUIs surrounding these applications.
That said, I could be convinced to write some tutorials on how to build web applications surrounding computer vision algorithms — that’s something I’m actually good at, have done a lot of in the past, and even enjoy to a degree.
Be sure to leave your comments and suggestions in the comments section at the bottom of this post — and be sure to signup for the PyImageSearch Newsletter using the form below!
See you next week.
Download the Source Code and FREE 17-page Resource Guide
Enter your email address below to get a .zip of the code and a FREE 17-page Resource Guide on Computer Vision, OpenCV, and Deep Learning. Inside you'll find my hand-picked tutorials, books, courses, and libraries to help you master CV and DL!
I hadn’t thought about using Tkinter with OpenCV like this. I had played with Tkinter many years ago.
I think I have some of the same aversions as you when it comes to developing a GUI. I was required to do some of that in the later part of my career, but for the most part I was fortunate to work only on code.
Personally, I would be interested to see what you might do with a web app. However, since I do enjoy the code, I’m fine without it so do not count this as a vote for it. I’m just talking. 🙂
I find your blog most enjoyable. I hope to actually use some of your techniques in future projects. (Actually one will be for an existing project. It’s already in the list of issues on GitHub.)
I won’t post a link to my projects here, but if you follow the link to my blog you will find links to them – at least the open source projects (of course).
Thanks for all the time and effort you put into giving away information! We are also of like minds on that.
Thanks for the comment Leland — if you have any suggestions for a CV web app, please let me know.
Please i wanted to create a face detection and recognition system using opencv and Tkinter can I get any help with the codes and direction
This tutorial will help you with Tkinter. For face recognition you can follow my face recognition guides.
Adrian, please do a web app tutorial!! I think that because more things are in the cloud and we’re moving to online apps, it would be a great tutorial. You might even enjoy it! 🙂
What type of web app tutorial would you like to see?
Thanks for yet another excellent tutorial.
As for web app sample, how about a simple Magic Mirror app on the web? Something like this :
http://lifehacker.com/build-a-magic-mirror-with-a-raspberry-pi-and-an-old-mon-1750468358
but without using a mirror.
The magic mirror projects are really neat, I enjoy seeing them. Although most magic mirror projects don’t incorporate computer vision (unless face recognition is attempted).
Another great post! As for the webapp I think some sort of interactive editing or filtering would be interesting to visualize the effects of parameter tweaking.
Thanks for the suggestions Tucker!
Hello Adrian and thanks for the GUI tutorials!
I am now trying to understand how Tkinter works, as I have to use it for some programs which I implemented. My programs are connected to live stream from a normal, Logitech camera, therefore I followed your tutorial to see how I can make a button – If I press the button, I would like the camera to be accessed. To be noticed that I never seen or tried to build a gui before.
So, I tried to make your program run, I have 2 different files: photoboothapp.py and photo_booth.py. I tried to run each of them, the first one runs with no error but it does nothing and the second one gives me the error : ‘ImportError: No module named pyimagesearch.photoboothapp’ . It is because this line: ‘from pyimagesearch.photoboothapp import PhotoBoothApp’.
How can I make it run to see the live stream?
Thanks in advance!
Make sure you download the source code to this blog post using the “Downloads” section. The .zip contains all source files and shows you how to organize the project. It also includes examples on how to execute the Python script via the command line.
Hello Adrian
I am Working with OpenCV and Tkinter in my raspberry,but when it matters, _imagingtk from PIL gives me the following error “can not import name _imagingtk”
perhaps some solution?
As I’ve mentioned in the blog post, I’m no expert in GUI development or Tkinter. Please see the other comments in this post and this one for any guidance.
I have successfully used wxPython with openCV to perform real-time image processing. That is really easy to set up and get running 🙂
Nice job Ian, thanks for sharing.
Did anyone experience a laggy video output running on OS X 10.11.5?
I have no issues running it in the virtual machine or natively in Windows.
But on OSX 10.11.5, a strange behavior is observed.. when i move my mouse, the video moves continously.. when i stop moving the mouse, the video stopped, and just “freeze” there.
Any similar encounter by anyone?
me too!
yup me too.
Same issue Lagging big time.
Also, app crashes after like 90 seconds or so.
Anyone ?
Do not familiar with Tkinter, I think this is because you try to manipulate GUI from non-GUI thread(also called main thread) . All widgets and user interface must be handled from the main thread, this means all of the user interfaces act like some sort of consumer.
This is not a problem of Tkinter but the limitation of most of the OS, even the mighty Qt5 library also suffered from this issue(thanks to queue connection of Qt,communication between threads become very intuitive).
The other problem may cause by the non thread safe api :
Like stopEvent.is_set() and stop(). If they are not thread safe, we have to to lock them, else some sort of weird issues may(not must) emerge.
Great guide. However I am trying to show video at 800×480 (native resolution of the LCD attached to my RPi2). Once I set the VideoStream resolution to that, the framerate drops a lot (~5 FPS).
Using the following command:
vs = VideoStream(usePiCamera=True, resolution=(800, 480), framerate=30).start()
If there some way to increase performance or is this inherent to the method used to get the stream into Tkinter?
Thanks!
Unfortunately, as your resolution increases your frame rate will drop. More data = more time to send the data from your camera to the Python script. It’s a problem of I/O latency.
That’s what I figured. Thanks for confirming it. It is unfortunate that I cannot use the video feed in a Tkinter widget.
I resorted to using the camera preview and having it move to the correct position in the Tk frame as needed. Not ideal, but I get the full framerate.
Example:
camera.start_preview(fullscreen=False, window=(posx, posy, width, height))
Still seeing if there is any way to show widgets above the preview without using the picamera overlay feature, as it does not support RGBa, only RGB.
Hi Adrian, Thank you very much for your tutorials, I have been following your tutorial for a month, and really learned a lot.
I guess the AttributeError exception is because you created an independent threading of videoLoop(), and in the function videoLoop(), you read the image from vs, which is another independent threading. While you close the GUI, the vs threading closes before the videoLoop threading (I am not sure). From the code from others, I found that it’s no need to use a new threading to display the video stream in Tkinter, So I tried to modify your code in this way:
1. Comment the 37th and 38th line of your code
2. add self.videoLoop() just after the former 38th line
3. change the “while not” in line 51 to “if not”
4. add this line “self.panel.after(10, self.videoLoop)” to the last of the function videoLoop().
And now, the AttributeError disappears.
Nice, thanks for sharing Charles!
Thank you, Charles! I tried your changes and haven’t seen the Attribute Error or the Runtime Error since.
can you please send me the corrected code,i tried the changes but the errors continue
I made these changes and it did get rid of the error, but the window no longer opens now. I am using a picamera, is there something different I need to do?
Thanks for this nice tutorial!
Got it to work in OS X, the only catch is that when the mouse is idle, the image won’t update. I’ve seen in a couple of comments above that some people are experiencing the same issue.
I don’t know why, but I’ve found openCV to be a bit, not buggy, but slow and snappy in OS X. Sometimes just closing the Python interpreter and re-opening fixes it. I haven’t tried with C++/Java yet.
Anyway thanks a lot for your tutorials – I’ve been following a few of them so far – great explanations and examples!
Thanks for sharing your experience with the mouse issue!
Hi, thank you so much for this tutorial!!!
I managed to run everthing using a picamera and even fliped it using another one of your tutorials, but the problem I have is that I can’t find where the snapshots are stored. No error appears and even the terminal message with the file name shows correctly, but I can’t find the files. Can you help me?
Also I had to change the line 3 of the driver:
from pyimagesearch.photoboothapp import PhotoBoothApp)
to
from photoboothapp import PhotoBoothApp
to make it work. Do you think this has something to do with it?
Regarding your second question (Line 3), I had updated the
__init__.py
file to create a “shortcut” for the import. If you download the code to this blog post using the “Downloads” section you can compare your directory structure to mine and see the change I made to__init__.py
. If you run into errors like this I always suggest downloading the code and comparing.As for your first question, you actually provide the output path for the snapshots via the
--output
switch (Line 10). If you use the exact command like I do in this post:$ python photo_booth.py --output output
The snapshots will be stored in the
output
directory. If you are running this code on your machine (and haven’t downloaded my code) you’ll need to create theoutput
directory before executing the script.Thank you so much. Everything is working fine now.
I wanted to ask you another thing:
I also added a print option and is working fine as well but I wanted to use the module “import cups” for some other features and I get the error message “No module named cups”.
The weird thing is I have already installed it (“sudo apt-get install python-cups”) and it works well outside of the virtual enviorment (workon cv) but I get the error when I’m inside. Do you know how could I fix this?
You need to install your “cups” package into the Python virtual environment. For example:
Hi Adrian! I’m really enjoyed this post. I have been going through your OpenCv tutorials and am learning so much. You are a saint for helping out us newbies!
I want to use your tutorial from this blog post to help me create a program that does focus stacking. It is working out well so far, except when I take pictures it will sometimes save the images with 640×480 resolution and sometimes at a lower resolution 350×320. Is there a way to set the resolution that the images are saved at?
Thank you!!
Hey Katelin — that is some very strange behavior. I’m honestly not sure why the resolution would change. Once the
VideoStream
object is instantiated it utilizes thepicamera
library to actually access the Raspberry Pi camera. If you continue to receive resolution errors I would post on the picamera GitHub.Hi Adrian! I wanted to thank you for this post. I have been looking for something to do with streaming the video of my raspberry pi and this makes it very user friendly.
I downloaded the zip source code directly and unzipped. I wanted to know if it mattered where the files were saved directly (including the imutils) outside the scope of the downloaded files.
Thank you
You can save the files wherever you want on your system. As long as you don’t move the code actually inside the source directory you’ll be perfectly fine.
where can I download the source code I do not see a way to download it
There is a “Downloads” form below the “Summary” section of this post.
Hey im having errors with Runtime in the except function line 75, and it doesnt seem to work. May I know what version of python did you used ? 2 or 3
I used Python 2.7 for this. If you’re getting an exception use the
traceback
library to determine where the exact error is being thrown.Hi!!
The code can used in python 3?
if i want to do it with ip camera- is it possible ? can you help me with it? Thanks!
I have not tried using this code with Python 3 — I couldn’t get Tkinter + Python 3 to place nice together so I had to use Python 2.7.
Ok Thanks!
What about IP camera? Do you think it’s possible?
It’s absolutely possible. It’s been a long time since I’ve worked with IP cameras so I don’t have any direct advice other than to work with the
cv2.VideoCapture
function. I’ll try to do a IP camera tutorial in the future.Great! i will love that 🙂
Thanks!
the code is working and it save the image after pressing button but can’t display the video capture and this error appear
TclError: out of stack space (infinite loop?)
Exception AttributeError: “‘PhotoImage’ object has no attribute ‘_PhotoImage__photo'” in <bound method PhotoImage.__del__ of > ignored
what can i do ??
Erratum
Tkinter doesn’t place nice with threads -> Tkinter doesn’t play nice with threads
Hi Adrian
Any advice how to load an rtsp stream??
I haven’t worked with RTSP streams and OpenCV before, but I’ll consider this for a future blog post.
Hi Adrian.
As always your posts and explanations are pretty cool. My question here is if there’s a way to do this with the Raspberry Pi camera, because I saw on the video that you used a webcam, how can I achieve this with the Raspberry Pi Camera?
Yes. Please see Line 18:
vs = VideoStream(usePiCamera=args["picamera"] > 0).start()
Supply a command line argument of
–picamera 1
will use the Raspberry Pi camera module instead of a USB/webcam camera.HI Adrian,
Can you give a little more detail on this. I have tried but can’t seem to get this code to work with the Pi camera. I have it to the point where it will open the window with no image.
Thanks
Are you referring to the command line arguments? If so, see this blog post. Otherwise I’m not sure what your question is.
I’ve rewrote application a little bit for better understanding:
http://stackoverflow.com/questions/32342935/using-opencv-with-tkinter/43159588#43159588
Dzmitry’s code works, I had to use:
>import tkinter as tk<
Still having problems with errors on the pyimagecode, hopefully Adrian will have some ideas.
Hello Adrian,
That’s a very interesting project. Thanks for sharing! I am interested in live video feed but from a dslr camera and I couldn’t find any tutorial that explains how to do this. This works only for webcam?
I have never tried to stream directly from a DSLR camera. This tutorial is meant for usage with webcams.
Hey Adrian, instead of dealing with threading you could use the ‘after’ command of Tkinter to refresh the widget with a new frame of the video. I have found that this way the number of errors is reduced and exiting the program goes a lot smoother. Thank you for making such amazing blog posts. You have no idea how much your posts have helped me and others. I hope you keep making amazing content like this.
Thanks for the comment Sumeet! And I’m happy to hear that the PyImageSearch blog has helped you 🙂
Hi Adrian,
How can I group two screens of two raspberry pi and command them remotely from my laptop? It’s possible? Please, help me! Give me a tip!
I’m not sure what you mean by grouping two screens. Perhaps just use VNC?
Hi I follow the tutorial but when I run it, the webcam does not appear in the GUI?. what can went wrong?
Hi Adrian, Thank you for posting such a great tutorial. If I read your post right, the Runtime Error is not due to Python garbage collection but the limit of Tkinter.
1. Tkinter is not thread safe in multi-thread environment. The mainloop of Tkinter is always trying to take control of all thread. When you call a function in a Tkinter widget from the spawn thread, Tkinter is trying to locate the mainloop in the caller thread but it’s not there. So the Runtime Error raised.
2. My solution is simply based on the fact that the Python queue is designed to work with threading module to exchange information among threads. If we let the polling thread keep feeding a FIFO queue, instead of calling widget function to update, then Tkinter would be happy to poll the FIFO queue periodically in its mainloop. Updating panel in mainloop is not a problem.
Thanks for sharing, Yang Ye!
Hi Adrian,
I did your tutorial and like always this is great!
I have a doubt when i close the windows my camera still on, do you know how can i turn off?
Regards,
When you close a Tkinter window make sure you cleanup any OpenCV camera pointers. The
onClose
function should handle this for you. If it’s not I’m not sure what the problem would be — I would suggest inserting some “print” statements into your code to help with debugging.Hello Sir thank you for your post but i have just one doubt.
Is it possible to use height and width arguement together in imutils.resize() function ? because when i am using them it only make changes as per first arguement, no matter whether it is height or width, it takes only first arguement to make changes. So please tell me about this.
One More thing i want to ask how to increase size of images captured as normal size given by this app is around 100kb only but i want the size near about 300-400kb for better image quality
1. Are you referring to changing the aspect ratio of the image? If so, use
cv2.resize
directly.2. I’m not sure what you mean by your second question. You can’t “improve” on the image quality captured from your camera sensor. You could try saving the image to disk in a lossless image file format such as PNG to improve the quality of the saved frames though.
yep Sir i want to change the aspect ratio. to display image panel in rectangular form(with different width and height values) instead of displaying in square form(with same width and height).
I’m having the same issue. How would you set the dimensions to a rectangle? Thank you.
Sorry, I’m not a Tkinter expert. I would suggest reading through the docs or reaching out to the developers.
Hello adrian..thank you for sharing awesome tutorial.
I want to add other botton to gui for filename..i prefer to write filename by my own instead of timestamp,i have no idea for it.could you belp me??
thank you in advance
Hey Drail, thanks for the comment. I’m not an expert in Tkinter GUI development so unfortunately my advice here is pretty limited. Take a look at the file dialog documentation for the TKinter library. I hope that helps point you in the right direction!
Can we display sequence of images stored in a specific folder one after other in a same window like a video? Using tkinter GUI …
Sure. Just use the imutils.list_images function to loop over all input images in a directory, load them one by one, and then put them in the GUI.
I want to do this using picamera .can you help me adrian?
This code already works with the Raspberry Pi camera module. Just supply the
--picamera 1
switch when executing the script.Hello, attempting to use your code on a Raspi with camera, have this error, anyone have an idea?
$ python photo_booth.py
…
except RuntimeError, e:
^
SyntaxError: invalid syntax
Make sure you are using the “Downloads” section of this blog post and not copying and pasting the code. My guess here is that you introduced a syntax error during the copy and paste.
My second guess is that you are using Python 3 in which:
except RuntimeError, e
Needs to be changed to:
except RuntimeError as e
Hello,
name= self_photo.name
photoimage object has no attribute photoimage _photo in tkinter?
Thank you.
Hey,
Thanks for the solid framework. This really helped me get started with creating a camera video recording GUI.
I’ve made many modifications to create my app, but you should be able to fix your runtime error by including this line:
self.thread.join()
before your self.root.quit() on line 95.
It syncs up the looping thread with the main thread (note this is a blocking call) so you can close without a runtime error.
I’m running 8 threads in my app (for various reasons) and have no issues as long as I .join() each thread (in the correct order since they’re blocking calls) after I’m done using it.
Best of luck and thanks for your help!
Thanks for sharing!
First, congrats. You are a very handsome couple and I wish you the very best.
Second, I tried your code in here, but am aiming for an object-oriented full GUI application. After reading your warnings above, I searched the web, trying various solutions, finally getting one on Stack Overflow that finally worked. It was only then I noticed that you had written THAT as well. Thanks again, even when you are not the answer in this tutorial, you eventually are the answer.
For anyone else, read the part about command lines and run the training on your own environment… it will save you MUCH weeping and gnashing of teeth.
Thanks Bob, I really appreciate the kind words 🙂 I’m happy you were able to complete your project.
Hi Adrian. I am a Korean university student.
Translator is in use…. I’m sorry:( I am using your information very useful.
Thank you very much.
https://www.youtube.com/watch?v=Q23K7G1gJgY&t=63s
I want to put the sleepiness detection video inside the tkinter.
Can you give me some advice?
I’m not much of a GUI developer but if you’re interested in using OpenCV + TKinter together refer to this tutorial.
Hi man! Great tutorial! About that main loop error you were getting, I did a little searching around, and I think it’s because you’re referencing Tkinter from another thread seperate from the main thread. Tkinter is not really easy to use in a multithreaded way. The recommended way I found is to write all gui code in a single thread, and have all writers write to a queue object, from which tk can read. I don’t know if that will slow the video stream down, but I thought I would let you know seeing none of the comments above said anything about it..
Thanks for the additional insight, Sangramjit. Myself and other readers appreciate it. I’m not much of a GUI developer so my implementation probably needs some work.
Hi Adrian,
Can you please help me to change the parameters of the pi camera such as brightness, contrast, iso etc. when Using this code?
Take a look at Raspberry Pi for Computer Vision where I cover how to change the camera properties of both the PiCamera as well as USB/built-in cameras.