I’ll be honest with you.
I’m not much of a GUI developer.
Never was one, never will be.
I enjoy creating the occasional user interface with HTML + CSS, or hacking up a WordPress plugin to make it more aesthetically pleasing — but writing full-fledged GUIs was never something I enjoyed.
That said, I do try my best to write about what you, the PyImageSearch audience wants to hear. And over the past few months, I’ve received a bunch of emails asking about Python GUI libraries, which ones to use, and more specifically, how to integrate OpenCV with Tkinter to display an image in a Tkinter panel.
I normally respond with:
I’m not a GUI developer, so trust me, you don’t want my advice on this. But if you’re looking to build GUIs with Python, look into Qt, Tkinter, and Kivy (if you want to build mobile/natural user interfaces).
All that said, I eventually received enough emails regarding OpenCV + Tkinter integration that it piqued my interest and I had to give it a try.
Over the next two blog posts, I’ll be playing around with Tkinter, developing some simple user interfaces, and sharing my code/experiences with you. I’ve emphasized playing around here because these are by no means production applications (and more than likely) not great examples of GUI development practices.
Like I said, I don’t pretend to be a GUI developer — I just want to share my experiences with you.
Using OpenCV with Tkinter
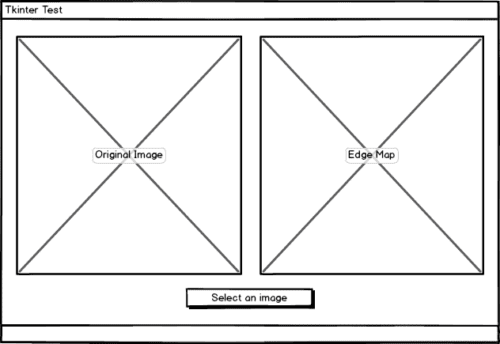
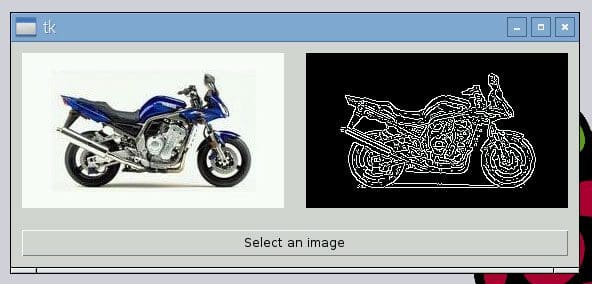
In this tutorial, we’ll be building a simple user interface using the Tkinter Python library. This user interface will allow us to click a button, triggering a file chooser dialog to select a file from disk. We’ll then load the selected image using OpenCV, perform edge detection, and finally display both the original image and edge map in our GUI.
I’ve included a rough wireframe of the first mockup below:
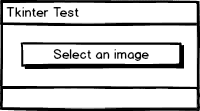
When first loaded, our application when contain only a button that allows us to load an image from disk.
After clicking this button, we’ll be allowed to navigate our file system and select an image to be processed. We’ll then display the original image and edge map in the GUI.
What is Tkinter?
If you haven’t heard of Tkinter before, Tkinter is a thin object-oriented layer around Tcl/Tk. One of the benefits of using Tkinter, is that with it installed on your system, you can run any Python GUI applications that leverage Tcl/Tk.
In the very rare occurrences that I’ve needed to develop a GUI application for Python, I tend to use Qt, but since it’s been a good 3-4 years since I’ve last used Tkinter, I thought I would give it another shot.
Installing Tkinter
I personally struggled to get Tkinter installed and configured properly on my OSX machine, so I decided to revert to using Ubuntu/Raspbian.
Note: If you have any good tutorials for installing Tkinter and Tcl/Tk on OSX, please leave the links in the comments section of this blog post.
While I struggled to get Tkinter installed on OSX, installing on Ubuntu/Raspbian was a breeze, requiring only a call to apt-get :
$ sudo apt-get install python-tk python3-tk python-imaging-tk
From there, Tkinter was installed without a hitch.
You should also make sure you have Pillow, a simple Python-based imaging library installed as well since Tkinter will need it for displaying images in our GUI:
$ pip install Pillow
I validated my installation by firing up a Python shell and importing PIL/Pillow, Tkinter, and my OpenCV bindings:
$ python
>>> import PIL
>>> import Tkinter
>>> import cv2
>>>
Note: I’m assuming that you already have OpenCV installed on your system. If you need help configuring, compiling, and installing OpenCV, please see this page where I’ve compiled a list of OpenCV installation instructions for a variety of systems.
Writing our OpenCV + Tkinter application
We are now ready to write our simple GUI application. Open up a new file, name it tkinter_test.py , and insert the following code:
# import the necessary packages
from Tkinter import *
from PIL import Image
from PIL import ImageTk
import tkFileDialog
import cv2

def select_image():
	# grab a reference to the image panels
	global panelA, panelB

	# open a file chooser dialog and allow the user to select an input
	# image
	path = tkFileDialog.askopenfilename()
Lines 2-6 import our required Python packages. We’ll need Tkinter to access our GUI functionality, along with both the Image and ImageTk classes from PIL/Pillow to display the image in our GUI. The tkFileDialog allows us to browse our file system and choose an image to process. Finally, we import cv2 for our OpenCV bindings.
Line 8 defines our select_image function. Inside this function, we grab a global reference to panelA and panelB , respectively. These were be our image panels. An image panel, as the name suggests, is used to take an image and then display it in our GUI.
The first panel, panelA , is for the original image we will load from disk, while the second panel, panelB , will be for the edge map we are going to compute.
A call to tkFileDialog.askopenfilename on Line 14 opens a file chooser dialog, which we can use to navigate our file system and select an image of our choosing.
After selecting an image, our program continues:
	# ensure a file path was selected
	if len(path) > 0:
		# load the image from disk, convert it to grayscale, and detect
		# edges in it
		image = cv2.imread(path)
		gray = cv2.cvtColor(image, cv2.COLOR_BGR2GRAY)
		edged = cv2.Canny(gray, 50, 100)

		# OpenCV represents images in BGR order; however PIL represents
		# images in RGB order, so we need to swap the channels
		image = cv2.cvtColor(image, cv2.COLOR_BGR2RGB)

		# convert the images to PIL format...
		image = Image.fromarray(image)
		edged = Image.fromarray(edged)

		# ...and then to ImageTk format
		image = ImageTk.PhotoImage(image)
		edged = ImageTk.PhotoImage(edged)
Line 17 ensures that a file was selected and that we did not click the “Cancel” button. Provided that a path was selected, we load the image from disk, convert it to grayscale, and then detect edges using the Canny edge detector (Lines 20-22). I’ve hardcoded the thresholds to the Canny edge detector as a matter of simplicity, but you could also use the auto_canny function from the imutils package to compute the edge map without supplying any parameters. You can read more about the auto-canny function here.
In order to display our images in the Tkinter GUI, we first need to change the formatting. To start, OpenCV represents images in BGR order; however PIL/Pillow represents images in RGB order, so we need to reverse the ordering of the channels (Line 26).
From there, we can convert image and edged from OpenCV format to PIL/Pillow format (Lines 29 and 30). And then finally convert the PIL/Pillow images to ImageTk format (Lines 33 and 34).
We are now ready to add the images to our GUI:
		# if the panels are None, initialize them
		if panelA is None or panelB is None:
			# the first panel will store our original image
			panelA = Label(image=image)
			panelA.image = image
			panelA.pack(side="left", padx=10, pady=10)

			# while the second panel will store the edge map
			panelB = Label(image=edged)
			panelB.image = edged
			panelB.pack(side="right", padx=10, pady=10)

		# otherwise, update the image panels
		else:
			# update the pannels
			panelA.configure(image=image)
			panelB.configure(image=edged)
			panelA.image = image
			panelB.image = edged
If the respective panels are None , we need to initialize them (Lines 37-46). First, we create an instance of Label for each image. Then, we take special care to include panel.image = image .
Why is this so important?
To prevent Python’s garbage collection routines from deleting the image!
Without storing this reference, our image will essentially be deleted and we will be unable to display it to our screen.
Otherwise, we can assume that our image panels have already been initialized (Lines 49-54). In this case, all we need to do is call configure on each of the panels and then update the reference to the image objects.
The last step is to write the code that actually initializes, creates, and starts the GUI process:
# initialize the window toolkit along with the two image panels
root = Tk()
panelA = None
panelB = None

# create a button, then when pressed, will trigger a file chooser
# dialog and allow the user to select an input image; then add the
# button the GUI
btn = Button(root, text="Select an image", command=select_image)
btn.pack(side="bottom", fill="both", expand="yes", padx="10", pady="10")

# kick off the GUI
root.mainloop()
Line 57 initializes the root Tkinter window, while Lines 58 and 59 initialize our two image panels.
We then create a button and add it to our GUI on Lines 64 and 65. When clicked, this button will trigger our file chooser, allowing us to navigate our file system and select an image from disk.
Finally, Line 68 kicks-off the actual main loop of the GUI.
Running our OpenCV + Tkinter GUI
To run our OpenCV + Tkinter application, just execute the following command:
$ python tkinter_test.py
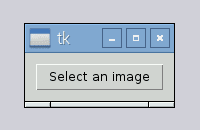
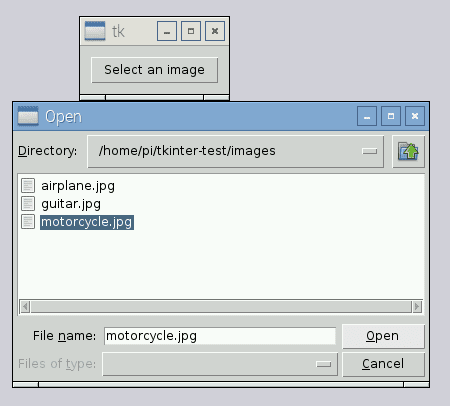
At first, all our GUI should contain is the button we click to select an image from disk:
After clicking the button, we are presented with a file chooser:
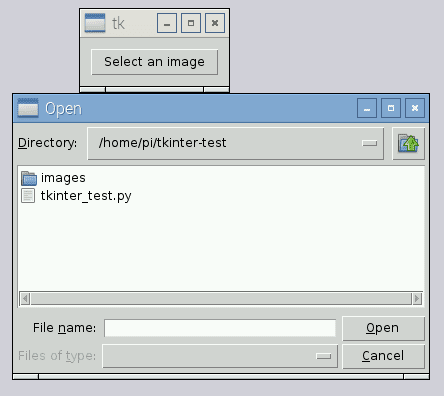
We can then navigate to the image file we want to compute edges for and click the “Open” button:
After our image has been selected, the edge map is computed using OpenCV, and both the original image and the edge map are added to our Tkinter GUI:
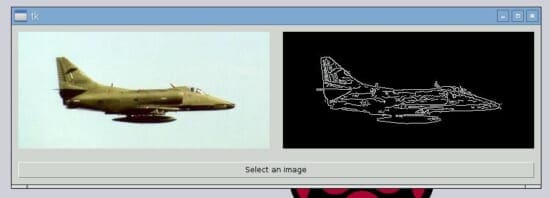
Of course, we can repeat this process for different images as well:

Let’s do one final example:
What's next? We recommend PyImageSearch University.
86+ total classes • 115+ hours hours of on-demand code walkthrough videos • Last updated: July 2025
★★★★★ 4.84 (128 Ratings) • 16,000+ Students Enrolled
I strongly believe that if you had the right teacher you could master computer vision and deep learning.
Do you think learning computer vision and deep learning has to be time-consuming, overwhelming, and complicated? Or has to involve complex mathematics and equations? Or requires a degree in computer science?
That’s not the case.
All you need to master computer vision and deep learning is for someone to explain things to you in simple, intuitive terms. And that’s exactly what I do. My mission is to change education and how complex Artificial Intelligence topics are taught.
If you're serious about learning computer vision, your next stop should be PyImageSearch University, the most comprehensive computer vision, deep learning, and OpenCV course online today. Here you’ll learn how to successfully and confidently apply computer vision to your work, research, and projects. Join me in computer vision mastery.
Inside PyImageSearch University you'll find:
- ✓ 86+ courses on essential computer vision, deep learning, and OpenCV topics
- ✓ 86 Certificates of Completion
- ✓ 115+ hours hours of on-demand video
- ✓ Brand new courses released regularly, ensuring you can keep up with state-of-the-art techniques
- ✓ Pre-configured Jupyter Notebooks in Google Colab
- ✓ Run all code examples in your web browser — works on Windows, macOS, and Linux (no dev environment configuration required!)
- ✓ Access to centralized code repos for all 540+ tutorials on PyImageSearch
- ✓ Easy one-click downloads for code, datasets, pre-trained models, etc.
- ✓ Access on mobile, laptop, desktop, etc.
Summary
In this blog post, I demonstrated how to build a very simple GUI application that integrates both OpenCV for computer vision and the Tkinter library for developing GUIs with the Python programming language.
I’ll be the first one to say that I am not a GUI developer, nor do I have any intentions of becoming one. This code is likely far from perfect — and that’s okay. I simply wanted to share my experience with you in the hopes that it helps other, more committed and advanced GUI developers learn how to integrate OpenCV with Tkinter.
All that said, next week I’ll be doing a second blog post on OpenCV and Tkinter, this time building a “Photo Booth” application that can access our webcam, display the (live) stream to our GUI, and save snapshots from the stream to disk at the click of a button.
To be notified when this blog post is published, be sure to enter your email address in the form below!

Download the Source Code and FREE 17-page Resource Guide
Enter your email address below to get a .zip of the code and a FREE 17-page Resource Guide on Computer Vision, OpenCV, and Deep Learning. Inside you'll find my hand-picked tutorials, books, courses, and libraries to help you master CV and DL!

