
Today is the second post in our three part series on milking every last bit of performance out of your webcam or Raspberry Pi camera.
Last week we discussed how to:
- Increase the FPS rate of our video processing pipeline.
- Reduce the affects of I/O latency on standard USB and built-in webcams using threading.
This week we’ll continue to utilize threads to improve the FPS/latency of the Raspberry Pi using both the picamera module and a USB webcam.
As we’ll find out, threading can dramatically decrease our I/O latency, thus substantially increasing the FPS processing rate of our pipeline.
Note: A big thanks to PyImageSearch reader, Sean McLeod, who commented on last week’s post and mentioned that I needed to make the FPS rate and the I/O latency topic more clear.
Increasing Raspberry Pi FPS with Python and OpenCV
In last week’s blog post we learned that by using a dedicated thread (separate from the main thread) to read frames from our camera sensor, we can dramatically increase the FPS processing rate of our pipeline. This speedup is obtained by (1) reducing I/O latency and (2) ensuring the main thread is never blocked, allowing us to grab the most recent frame read by the camera at any moment in time. Using this multi-threaded approach, our video processing pipeline is never blocked, thus allowing us to increase the overall FPS processing rate of the pipeline.
In fact, I would argue that it’s even more important to use threading on the Raspberry Pi 2 since resources (i.e., processor and RAM) are substantially more constrained than on modern laptops/desktops.
Again, our goal here is to create a separate thread that is dedicated to polling frames from the Raspberry Pi camera module. By doing this, we can increase the FPS rate of our video processing pipeline by 246%!
In fact, this functionality is already implemented inside the imutils package. To install imutils on your system, just use pip :
$ pip install imutils
If you already have imutils installed, you can upgrade to the latest version using this command:
$ pip install --upgrade imutils
We’ll be reviewing the source code to the video sub-package of imutils to obtain a better understanding of what’s going on under the hood.
To handle reading threaded frames from the Raspberry Pi camera module, let’s define a Python class named PiVideoStream :
# import the necessary packages
from picamera.array import PiRGBArray
from picamera import PiCamera
from threading import Thread
import cv2

class PiVideoStream:
	def __init__(self, resolution=(320, 240), framerate=32):
		# initialize the camera and stream
		self.camera = PiCamera()
		self.camera.resolution = resolution
		self.camera.framerate = framerate
		self.rawCapture = PiRGBArray(self.camera, size=resolution)
		self.stream = self.camera.capture_continuous(self.rawCapture,
			format="bgr", use_video_port=True)

		# initialize the frame and the variable used to indicate
		# if the thread should be stopped
		self.frame = None
		self.stopped = False
Lines 2-5 handle importing our necessary packages. We’ll import both PiCamera and PiRGBArray to access the Raspberry Pi camera module. If you do not have the picamera Python module already installed (or have never worked with it before), I would suggest reading this post on accessing the Raspberry Pi camera for a gentle introduction to the topic.
On Line 8 we define the constructor to the PiVideoStream class. We’ll can optionally supply two parameters here, (1) the resolution of the frames being read from the camera stream and (2) the desired frame rate of the camera module. We’ll default these values to (320, 240) and 32 , respectively.
Finally, Line 19 initializes the latest frame read from the video stream and an boolean variable used to indicate if the frame reading process should be stopped.
Next up, let’s look at how we can read frames from the Raspberry Pi camera module in a threaded manner:
	def start(self):
		# start the thread to read frames from the video stream
		Thread(target=self.update, args=()).start()
		return self

	def update(self):
		# keep looping infinitely until the thread is stopped
		for f in self.stream:
			# grab the frame from the stream and clear the stream in
			# preparation for the next frame
			self.frame = f.array
			self.rawCapture.truncate(0)

			# if the thread indicator variable is set, stop the thread
			# and resource camera resources
			if self.stopped:
				self.stream.close()
				self.rawCapture.close()
				self.camera.close()
				return
Lines 22-25 define the start method which is simply used to spawn a thread that calls the update method.
The update method (Lines 27-41) continuously polls the Raspberry Pi camera module, grabs the most recent frame from the video stream, and stores it in the frame variable. Again, it’s important to note that this thread is separate from our main Python script.
Finally, if we need to stop the thread, Lines 38-40 handle releasing any camera resources.
Note: If you are unfamiliar with using the Raspberry Pi camera and the picamera module, I highly suggest that you read this tutorial before continuing.
Finally, let’s define two more methods used in the PiVideoStream class:
	def read(self):
		# return the frame most recently read
		return self.frame

	def stop(self):
		# indicate that the thread should be stopped
		self.stopped = True
The read method simply returns the most recently read frame from the camera sensor to the calling function. The stop method sets the stopped boolean to indicate that the camera resources should be cleaned up and the camera polling thread stopped.
Now that the PiVideoStream class is defined, let’s create the picamera_fps_demo.py driver script:
# import the necessary packages
from __future__ import print_function
from imutils.video.pivideostream import PiVideoStream
from imutils.video import FPS
from picamera.array import PiRGBArray
from picamera import PiCamera
import argparse
import imutils
import time
import cv2

# construct the argument parse and parse the arguments
ap = argparse.ArgumentParser()
ap.add_argument("-n", "--num-frames", type=int, default=100,
	help="# of frames to loop over for FPS test")
ap.add_argument("-d", "--display", type=int, default=-1,
	help="Whether or not frames should be displayed")
args = vars(ap.parse_args())

# initialize the camera and stream
camera = PiCamera()
camera.resolution = (320, 240)
camera.framerate = 32
rawCapture = PiRGBArray(camera, size=(320, 240))
stream = camera.capture_continuous(rawCapture, format="bgr",
	use_video_port=True)
Lines 2-10 handle importing our necessary packages. We’ll import the FPS class from last week so we can approximate the FPS rate of our video processing pipeline.
From there, Lines 13-18 handle parsing our command line arguments. We only need two optional switches here, --num-frames , which is the number of frames we’ll use to approximate the FPS of our pipeline, followed by --display , which is used to indicate if the frame read from our Raspberry Pi camera should be displayed to our screen or not.
Finally, Lines 21-26 handle initializing the Raspberry Pi camera stream — see this post for more information.
Now we are ready to obtain results for a non-threaded approach:
# allow the camera to warmup and start the FPS counter
print("[INFO] sampling frames from `picamera` module...")
time.sleep(2.0)
fps = FPS().start()

# loop over some frames
for (i, f) in enumerate(stream):
	# grab the frame from the stream and resize it to have a maximum
	# width of 400 pixels
	frame = f.array
	frame = imutils.resize(frame, width=400)

	# check to see if the frame should be displayed to our screen
	if args["display"] > 0:
		cv2.imshow("Frame", frame)
		key = cv2.waitKey(1) & 0xFF

	# clear the stream in preparation for the next frame and update
	# the FPS counter
	rawCapture.truncate(0)
	fps.update()

	# check to see if the desired number of frames have been reached
	if i == args["num_frames"]:
		break

# stop the timer and display FPS information
fps.stop()
print("[INFO] elasped time: {:.2f}".format(fps.elapsed()))
print("[INFO] approx. FPS: {:.2f}".format(fps.fps()))

# do a bit of cleanup
cv2.destroyAllWindows()
stream.close()
rawCapture.close()
camera.close()
Line 31 starts the FPS counter, allowing us to approximate the number of frames our pipeline can process in a single second.
We then start looping over frames read from the Raspberry Pi camera module on Line 34.
Lines 41-43 make a check to see if the frame should be displayed to our screen or not while Line 48 updates the FPS counter.
Finally, Lines 61-63 handle releasing any camera sources.
The code for accessing the Raspberry Pi camera in a threaded manner follows below:
# created a *threaded *video stream, allow the camera sensor to warmup,
# and start the FPS counter
print("[INFO] sampling THREADED frames from `picamera` module...")
vs = PiVideoStream().start()
time.sleep(2.0)
fps = FPS().start()

# loop over some frames...this time using the threaded stream
while fps._numFrames < args["num_frames"]:
	# grab the frame from the threaded video stream and resize it
	# to have a maximum width of 400 pixels
	frame = vs.read()
	frame = imutils.resize(frame, width=400)

	# check to see if the frame should be displayed to our screen
	if args["display"] > 0:
		cv2.imshow("Frame", frame)
		key = cv2.waitKey(1) & 0xFF

	# update the FPS counter
	fps.update()

# stop the timer and display FPS information
fps.stop()
print("[INFO] elasped time: {:.2f}".format(fps.elapsed()))
print("[INFO] approx. FPS: {:.2f}".format(fps.fps()))

# do a bit of cleanup
cv2.destroyAllWindows()
vs.stop()
This code is very similar to the code block above, only this time we initialize and start the threaded PiVideoStream class on Line 68.
We then loop over the same number of frames as with the non-threaded approach, update the FPS counter, and finally print our results to the terminal on Lines 89 and 90.
Raspberry Pi FPS Threading Results
In this section we will review the results of using threading to increase the FPS processing rate of our pipeline by reducing the affects of I/O latency.
The results for this post were gathered on a Raspberry Pi 2:
- Using the
picameramodule. - And a Logitech C920 camera (which is plug-and-play capable with the Raspberry Pi).
I also gathered results using the Raspberry Pi Zero. Since the Pi Zero does not have a CSI port (and thus cannot use the Raspberry Pi camera module), timings were only gathered for the Logitech USB camera.
I used the following command to gather results for the picamera module on the Raspberry Pi 2:
$ python picamera_fps_demo.py
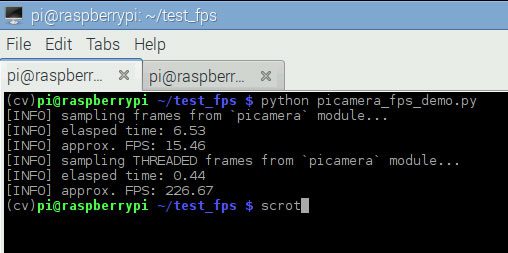
As we can see from the screenshot above, using no threading obtained 15.46 FPS.
However, by using threading, our FPS rose to 226.67, an increase of over 1,366%!
But before we get too excited, keep in mind this is not a true representation of the FPS of the Raspberry Pi camera module — we are certainly not reading a total of 226 frames from the camera module per second. Instead, this speedup simply demonstrates that our for loop pipeline is able to process 226 frames per second.
This increase in FPS processing rate comes from decreased I/O latency. By placing the I/O in a separate thread, our main thread runs extremely fast — faster than the I/O thread is capable of polling frames from the camera, in fact. This implies that we are actually processing the same frame multiple times.
Again, what we are actually measuring is the number of frames our video processing pipeline can process in a single second, regardless if the frames are “new” frames returned from the camera sensor or not.
Using the current threaded scheme, we can process approximately 226.67 FPS using our trivial pipeline. This FPS number will go down as our video processing pipeline becomes more complex.
To demonstrate this, let’s insert a cv2.imshow call and display each of the frames read from the camera sensor to our screen. The cv2.imshow function is another form of I/O, only now we are both reading a frame from the stream and then writing the frame to our display:
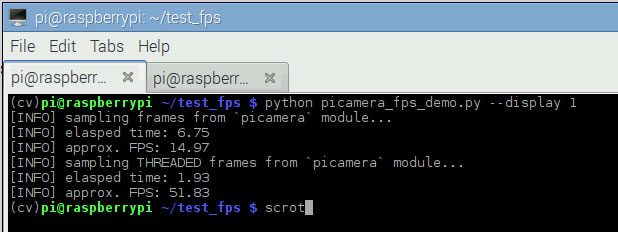
$ python picamera_fps_demo.py --display 1
Using no threading, we reached only 14.97 FPS.
But by placing the frame I/O into a separate thread, we reached 51.83 FPS, an improvement of 246%!
It’s also worth noting that the Raspberry Pi camera module itself can reportedly get up to 90 FPS.
To summarize the results, by placing the blocking I/O call in our main thread, we only obtained a very low 14.97 FPS. But by moving the I/O to an entirely separate thread our FPS processing rate has increased (by decreasing the affects of I/O latency), bringing up the FPS rate to an estimated 51.83.
Simply put: When you are developing Python scripts on the Raspberry Pi 2 using the picamera module, move your frame reading to a separate thread to speedup your video processing pipeline.
As a matter of completeness, I’ve also ran the same experiments from last week using the fps_demo.py script (see last week’s post for a review of the code) to gather FPS results from a USB camera on the Raspberry Pi 2:
$ python fps_demo.py --display 1
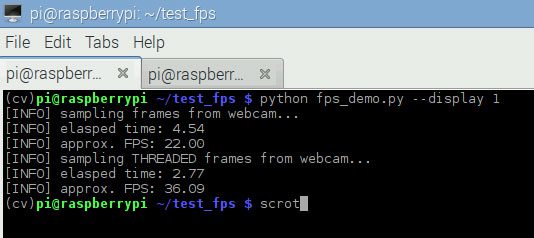
With no threading, our pipeline obtained 22 FPS. But by introducing threading, we reached 36.09 FPS — an improvement of 64%!
Finally, I also ran the fps_demo.py script on the Raspberry Pi Zero as well:
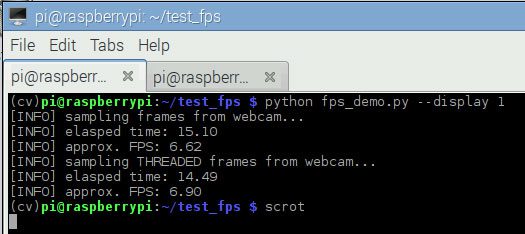
With no threading, we hit 6.62 FPS. And with threading, we only marginally improved to 6.90 FPS, an increase of only 4%.
The reason for the small performance gain is simply because the Raspberry Pi Zero processor has only one core and one thread, thus the same thread of execution must be shared for all processes running on the system at even given time.
Given the quad-core processor of the Raspberry Pi 2, it’s suffice to say the Pi 2 should be used for video processing.
What's next? We recommend PyImageSearch University.
86+ total classes • 115+ hours hours of on-demand code walkthrough videos • Last updated: March 2026
★★★★★ 4.84 (128 Ratings) • 16,000+ Students Enrolled
I strongly believe that if you had the right teacher you could master computer vision and deep learning.
Do you think learning computer vision and deep learning has to be time-consuming, overwhelming, and complicated? Or has to involve complex mathematics and equations? Or requires a degree in computer science?
That’s not the case.
All you need to master computer vision and deep learning is for someone to explain things to you in simple, intuitive terms. And that’s exactly what I do. My mission is to change education and how complex Artificial Intelligence topics are taught.
If you're serious about learning computer vision, your next stop should be PyImageSearch University, the most comprehensive computer vision, deep learning, and OpenCV course online today. Here you’ll learn how to successfully and confidently apply computer vision to your work, research, and projects. Join me in computer vision mastery.
Inside PyImageSearch University you'll find:
- ✓ 86+ courses on essential computer vision, deep learning, and OpenCV topics
- ✓ 86 Certificates of Completion
- ✓ 115+ hours hours of on-demand video
- ✓ Brand new courses released regularly, ensuring you can keep up with state-of-the-art techniques
- ✓ Pre-configured Jupyter Notebooks in Google Colab
- ✓ Run all code examples in your web browser — works on Windows, macOS, and Linux (no dev environment configuration required!)
- ✓ Access to centralized code repos for all 540+ tutorials on PyImageSearch
- ✓ Easy one-click downloads for code, datasets, pre-trained models, etc.
- ✓ Access on mobile, laptop, desktop, etc.
Summary
In this post we learned how threading can be used to increase our FPS processing rate and reduce the affects of I/O latency on the Raspberry Pi.
Using threading allowed us to increase our video processing rate by a nice 246%; however, its important to note that as the processing pipeline becomes more complex, the FPS processing rate will go down as well.
In next week’s post, we’ll create a Python class that incorporates last week’s WebcamVideoStream and today’s PiVideoStream into a single class, allowing new video processing blog posts on PyImageSearch to run on either a USB camera or a Raspberry Pi camera module without changing a single line of code!
Sign up for the PyImageSearch newsletter using the form below to be notified when the post goes live.

Download the Source Code and FREE 17-page Resource Guide
Enter your email address below to get a .zip of the code and a FREE 17-page Resource Guide on Computer Vision, OpenCV, and Deep Learning. Inside you'll find my hand-picked tutorials, books, courses, and libraries to help you master CV and DL!

