I’m going to start this post by clueing you in on a piece of personal history that very few people know about me: as a kid in early high school, I used to spend nearly every single Saturday at the local RC (Remote Control) track about 25 miles from my house.
You see, I used to race 1/10th scale (electric) RC cars on an amateur level. Being able to spend time racing every Saturday was definitely one of my favorite (if not the favorite) experience of my childhood.
I used to race the (now antiquated) TC3 from Team Associated. From stock engines, to 19-turns, to modified (I was down to using a 9-turn by the time I stopped racing), I had it all. I even competed in a few big-time amateur level races on the east coast of the United States and placed well.
But as I got older, and as racing became more expensive, I started spending less time at the track and more time programming. In the end, this was probably one of the smartest decisions that I’ve ever made, even though I loved racing so much — it seems quite unlikely that I could have made a career out of racing RC cars, but I certainly have made a career out of programming and entrepreneurship.
So perhaps it comes as no surprise, now that I’m 26 years old, that I felt the urge to get back into RC. But instead of cars, I wanted to do something that I had never done before — drones and quadcopters.
Which leads us to the purpose of this post: developing a system to automatically detect targets from a quadcopter video recording.
If you want to see the target acquisition in action, I won’t keep you waiting. Here is the full video:
Otherwise, keep reading to see how target detection in quadcopter and drone video streams is done using Python and OpenCV!
Looking for the source code to this post?
Jump Right To The Downloads SectionGetting into drones and quadcopters
While I have a ton of experience racing RC cars, I’ve never flown anything in my life. Given this, I decided to go with a nice entry level drone so I could learn the ropes of piloting without causing too much damage to my quadcopter or my back account. Based on the excellent recommendation from Marek Kraft, I ended up purchasing the Hubsan X4:
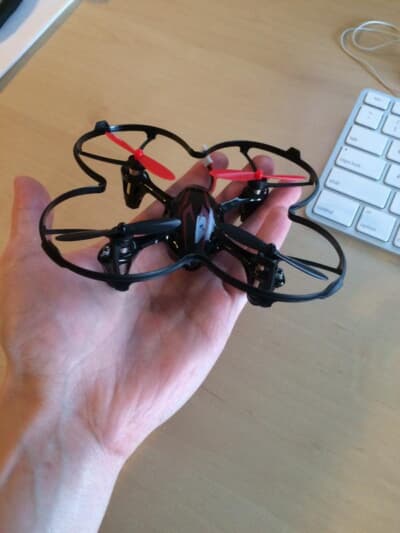
I went with this quadcopter for 4: reasons:
- The Hubsan X4 is excellent for first time pilots who are just learning to fly.
- It’s very tiny — you can fly it indoors and around your living room until you get used to the controls.
- It comes with a camera that records video footage to a micro-SD card. As a computer vision researcher and developer, having a built in camera was critical in making my decision. Granted, the camera is only 0.3MP, but that was good enough for me to get started. Hubsan also has another model that sports a 2MP camera, but it’s over double the price. Furthermore, you could always mount a smaller, higher resolution camera to the undercarriage of the X4, so I couldn’t justify the extra price as a novice pilot.
- Not only is the Hubsan X4 inexpensive (only $45), but so are the replacement parts! When you’re just learning to fly, you’ll be going through a lot of rotor blades. And for a pack of 10 replacement rotor blades you’re only looking at a handful of dollars.
Finding targets in drone and quadcopter video streams using Python and OpenCV
But of course, I am a computer vision developer and researcher…so after I learned how to fly my quadcopter without crashing it into my apartment walls repeatedly, I decided I wanted to have some fun and apply my computer vision expertise. The rest of this blog post will detail how to find and detect targets in quadcopter video streams using Python and OpenCV.
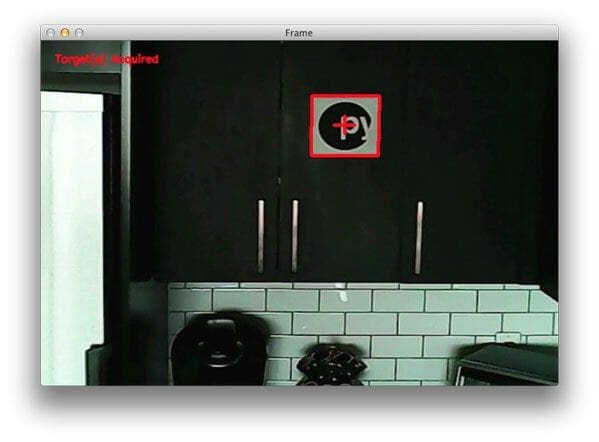
The first thing I did was create the “targets” that I wanted to detect. These targets were simply the PyImageSearch logo. I printed a handful of them out, cut them out as squares, and pasted them to my apartment cabinets and walls:
The end goal will be to detect these targets in the video recorded by my Hubsan X4:
So, you might be wondering why I chose my targets to be squares?
Well, if you’re a regular follower of the PyImageSearch blog, you may know that I’m a big fan of using contour properties to detect objects in images.
IMPORTANT: A clever use of contour properties can save you from training complicated machine learning models.
Why make a problem more challenging than it needs to be?
And when you think about it, detecting squares in images isn’t too terribly challenging of a task when you consider the geometry of a square.
Let’s think about the properties of a square for a second:
- Property #1: A square has four vertices.
- Property #2: A square will have (approximately) equal width and height. Therefore, the aspect ratio, or more simply, the ratio of the width to the height of the square will be approximately 1.
Leveraging these two properties (along with two other contour properties; the convex hull and solidity), we’ll be able to detect our targets in an image.
Anyway, enough talk. Let’s get to work. Open up a file, name it drone.py
, and insert the following code:
# import the necessary packages import argparse import imutils import cv2 # construct the argument parse and parse the arguments ap = argparse.ArgumentParser() ap.add_argument("-v", "--video", help="path to the video file") args = vars(ap.parse_args()) # load the video camera = cv2.VideoCapture(args["video"]) # keep looping while True: # grab the current frame and initialize the status text (grabbed, frame) = camera.read() status = "No Targets" # check to see if we have reached the end of the # video if not grabbed: break # convert the frame to grayscale, blur it, and detect edges gray = cv2.cvtColor(frame, cv2.COLOR_BGR2GRAY) blurred = cv2.GaussianBlur(gray, (7, 7), 0) edged = cv2.Canny(blurred, 50, 150) # find contours in the edge map cnts = cv2.findContours(edged.copy(), cv2.RETR_EXTERNAL, cv2.CHAIN_APPROX_SIMPLE) cnts = imutils.grab_contours(cnts)
We start off by importing our necessary packages, argparse
to parse command line arguments and cv2
for our OpenCV bindings.
We then parse our command line arguments on Lines 7-9. We’ll need only a single switch here, --video
, which is the path to the video file our quadcopter recorded while in flight. In an ideal situation we could stream the video from the quadcopter directly to our Python script, but the Hubsan X4 does not have that capability. Instead, we’ll just have to post-process the video, but if you were to stream the video, the same principles would apply.
Line 12 opens our video file for reading and Line 15 starts a loop, where the goal is to loop over each frame of the input video.
We grab the next frame of the video from the buffer on Line 17 by making a call to camera.read()
. This function returns a tuple of 2 values. The first, grabbed
, is a boolean indicating whether or not the frame was successfully read. If the frame was not successfully read or if we have reached the end of the video file, we break from the loop on Lines 22 and 23.
The second value returned from camera.read()
is the frame
itself — this frame is a NumPy array of size N x M pixels which we’ll be processing and attempting to find targets in.
We’ll also initialize a status
string on Line 18 which indicates whether or not a target was found in the current frame.
The first few pre-processing steps are handled on Lines 26-28. We’ll start by converting the frame from RGB to grayscale since we are not interested in the color of the image, just the intensity. We’ll then blur the grayscale frame to remove high frequency noise, allowing us to focus on the actual structural components of the frame. And we’ll finally perform edge detection to reveal the outlines of the objects in the image.
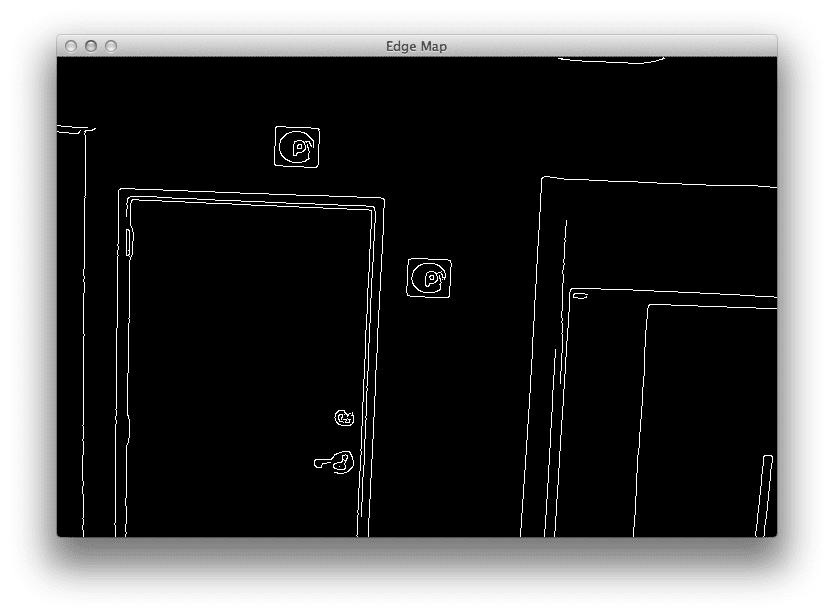
These outlines of the “objects” could correspond to the outlines of a door, a cabinet, the refrigerator, or the target itself. To distinguish between these outlines, we’ll need to leverage contour properties.
But first, we’ll need to find the contours of these objects from the edge map. To do this, we’ll make a call to cv2.findContours
on Lines 31 and 32 + handle OpenCV version compatibility on Line 33. This function gives us a list of contoured regions in the edge mapped image.
Now that we have the contours, let’s see how we can leverage them to find the actual targets in an image:
# loop over the contours for c in cnts: # approximate the contour peri = cv2.arcLength(c, True) approx = cv2.approxPolyDP(c, 0.01 * peri, True) # ensure that the approximated contour is "roughly" rectangular if len(approx) >= 4 and len(approx) <= 6: # compute the bounding box of the approximated contour and # use the bounding box to compute the aspect ratio (x, y, w, h) = cv2.boundingRect(approx) aspectRatio = w / float(h) # compute the solidity of the original contour area = cv2.contourArea(c) hullArea = cv2.contourArea(cv2.convexHull(c)) solidity = area / float(hullArea) # compute whether or not the width and height, solidity, and # aspect ratio of the contour falls within appropriate bounds keepDims = w > 25 and h > 25 keepSolidity = solidity > 0.9 keepAspectRatio = aspectRatio >= 0.8 and aspectRatio <= 1.2 # ensure that the contour passes all our tests if keepDims and keepSolidity and keepAspectRatio: # draw an outline around the target and update the status # text cv2.drawContours(frame, [approx], -1, (0, 0, 255), 4) status = "Target(s) Acquired" # compute the center of the contour region and draw the # crosshairs M = cv2.moments(approx) (cX, cY) = (int(M["m10"] // M["m00"]), int(M["m01"] // M["m00"])) (startX, endX) = (int(cX - (w * 0.15)), int(cX + (w * 0.15))) (startY, endY) = (int(cY - (h * 0.15)), int(cY + (h * 0.15))) cv2.line(frame, (startX, cY), (endX, cY), (0, 0, 255), 3) cv2.line(frame, (cX, startY), (cX, endY), (0, 0, 255), 3)
The snippet of code above is where the real bulk of the target detection happens.
We’ll start by looping over each of the contours on Line 36.
And then for each of these contours, we’ll apply contour approximation. As the name suggests, contour approximation, is an algorithm for reducing the number of points in a curve with a reduced set of points — thus, an approximation. This algorithm is commonly known as the Ramer-Douglas-Peucker algorithm, or simply the split-and-merge algorithm.
The general assumption of this algorithm is that a curve can be approximated by a series of short line segments. And we can thus approximate a given number of these line segments to reduce the number of points it takes to construct a curve.
Performing contour approximation is an excellent way to detect square and rectangular objects in an image. We’ve used in in building a kick-ass mobile document scanner. We’ve used it to find the Game Boy screen in an image. And we’ve even used it on a higher level to actually filter shapes from an image.
We’ll apply the same principles here. If our approximated contour has between 4 and 6 points (Line 42), then we’ll consider the object to be rectangular and a candidate for further processing.
Note: Ideally, an approximated contour should have exactly 4 vertices, but in the real-world this is not always the case due to sub-par image quality or noise introduced via motion blur, such as flying a quadcopter around a room.
Next up, we’ll grab the bounding box of the contour on Line 45 and use it to compute the aspect ratio of the box (Line 46). The aspect ratio is defined as the ratio of the width of the bounding box to the height of the bounding box:
aspect ratio = width / height
We’ll also compute two more contour properties on Lines 49-51. The first is the simple area of the bounding box, or the number of non-zero pixels inside the bounding box region divided by the total number of pixels in the bounding box region.
We’ll also compute the area of the convex hull, and finally use the area of the original bounding box and the area of the convex hull to compute the solidity:
solidity = original area / convex hull area
Since this is meant to be a super practical, hands-on post, I’m not going to go into the details of the convex hull. But if contour properties really interest you, I have over 50+ pages worth of tutorials on the contour properties inside the PyImageSearch Gurus course — if that sounds interesting to you, I would definitely reserve your spot in line for when the doors to the course open.
Anyway, now that we have our contour properties, we can use them to determine if we have found our target in the frame:
- Line 55: Our target should have a
width
andheight
of at least 25 pixels. This ensures that small, random artifacts are filtered from our frame. - Line 56: The target should have a
solidity
value greater than 0.9. - Line 57: Finally, the contour region should have an
aspectRatio
that is is between 0.8 <= aspect ratio <= 1.2, which will indicate that the region is approximately square.
Provided that all these tests pass on Line 60, we have found our target!
Lines 63 and 64 draw the bounding box region of the approximated contour and update the status
text.
Then, Lines 68-73 compute the center of the bounding box and use the center (x, y)-coordinates to draw crosshairs on the target.
Let’s go ahead and finish up this script:
# draw the status text on the frame cv2.putText(frame, status, (20, 30), cv2.FONT_HERSHEY_SIMPLEX, 0.5, (0, 0, 255), 2) # show the frame and record if a key is pressed cv2.imshow("Frame", frame) key = cv2.waitKey(1) & 0xFF # if the 'q' key is pressed, stop the loop if key == ord("q"): break # cleanup the camera and close any open windows camera.release() cv2.destroyAllWindows()
Lines 76 and 77 then draw the status
text on the top-left corner of our frame, while Lines 80-85 handle if the q
key is pressed, and if so, we break from the loop.
Finally, Lines 88 and 89 perform cleanup, release the pointer to the video file, and close all open windows.
Target detection results
Even though that was less than 100 lines of code, including comments, that was a decent amount of work. Let’s see our target detection in action.
Open up a terminal, navigate to where the source code resides, and issue the following command:
$ python drone.py --video FlightDemo.mp4
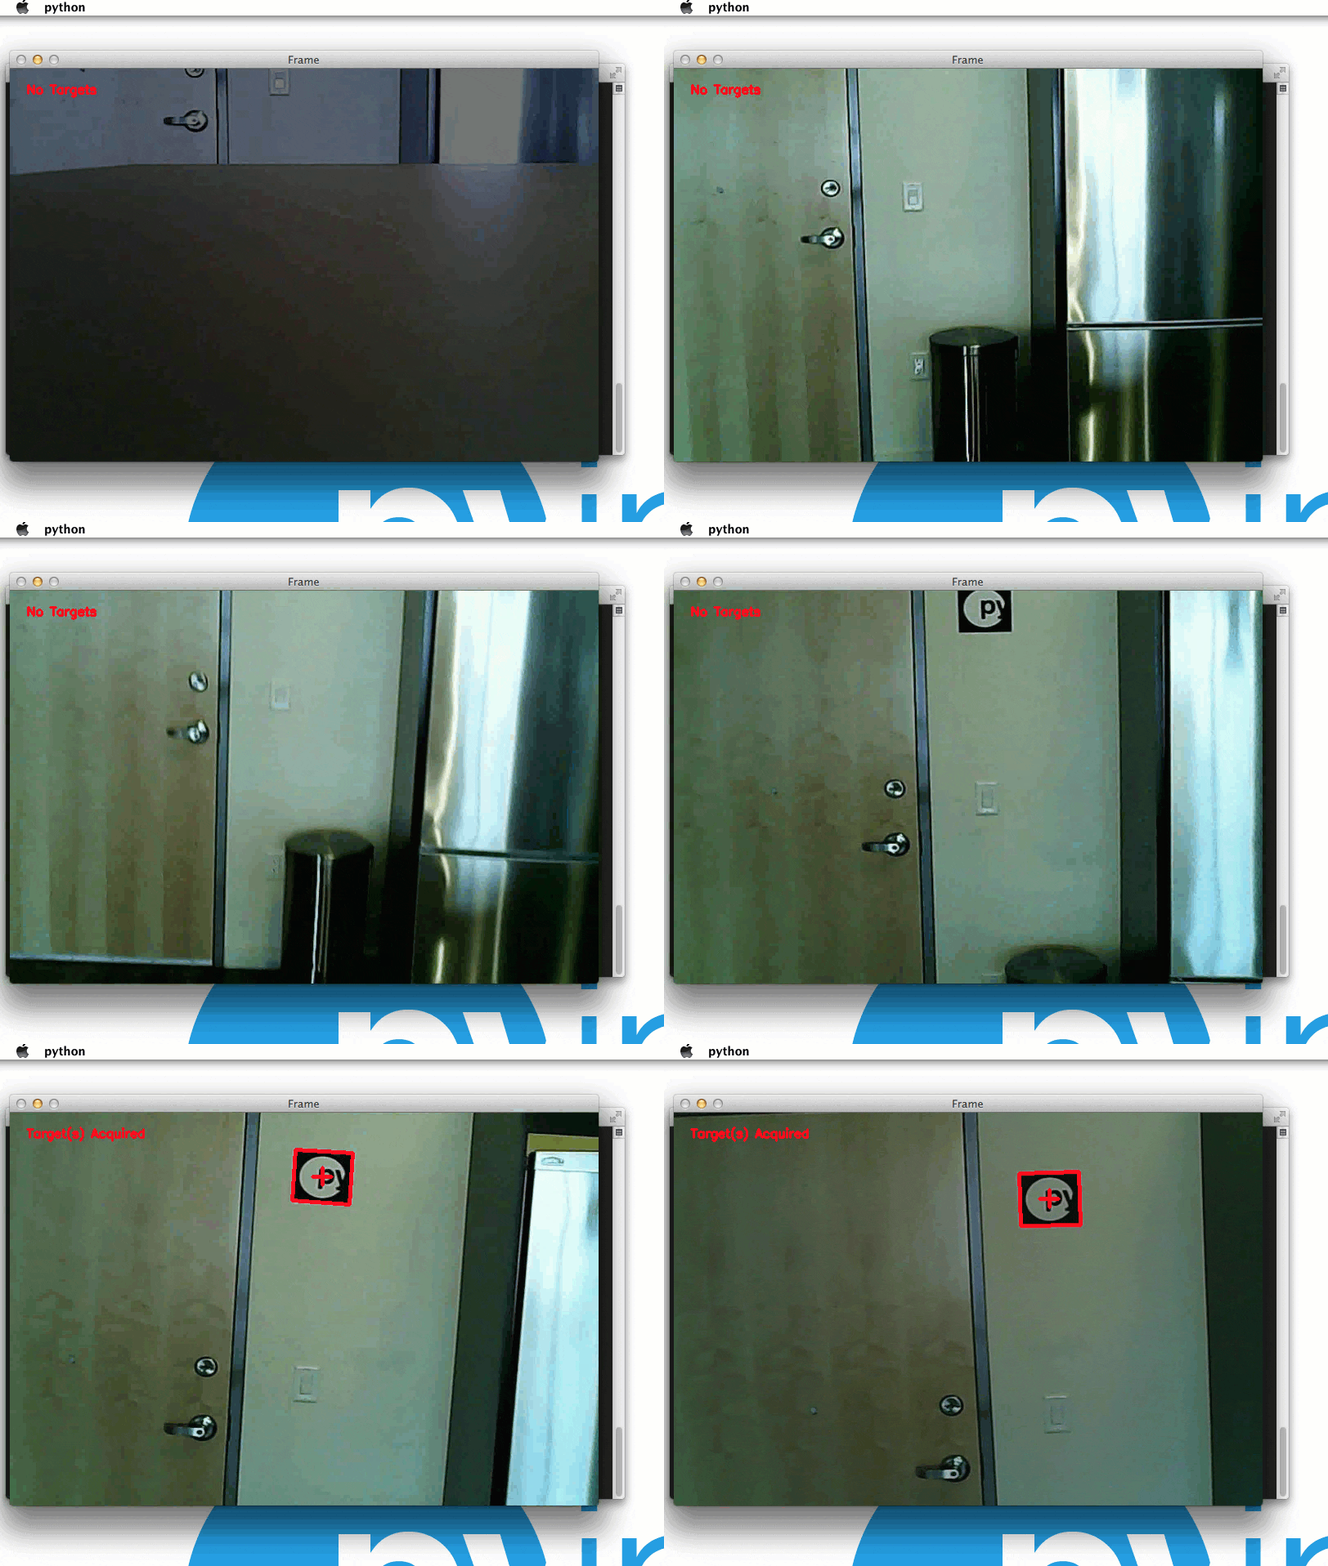
And if all goes well, you’ll see output similar to the following:
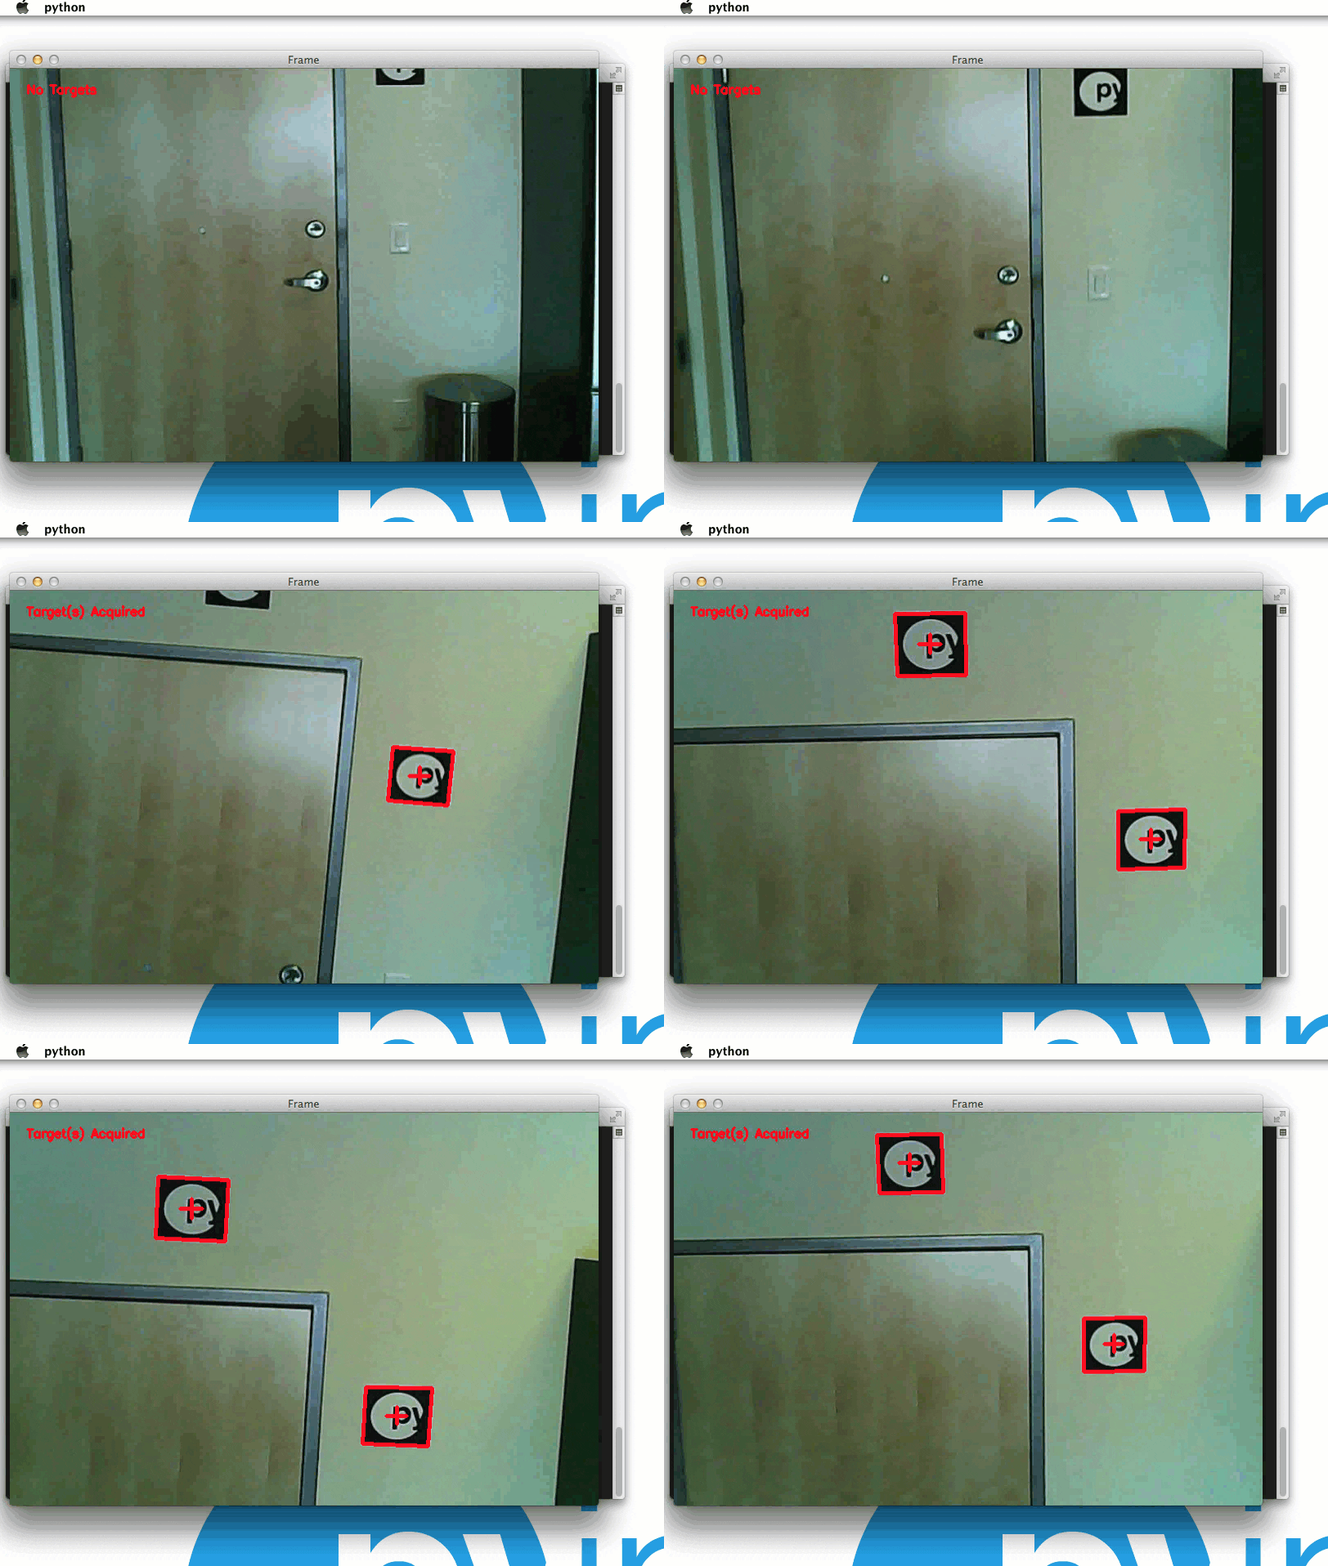
As you can see, our Python script has been able to successfully detect the targets!
Here’s another still image from a separate video of the PyImageSearch targets being detected:
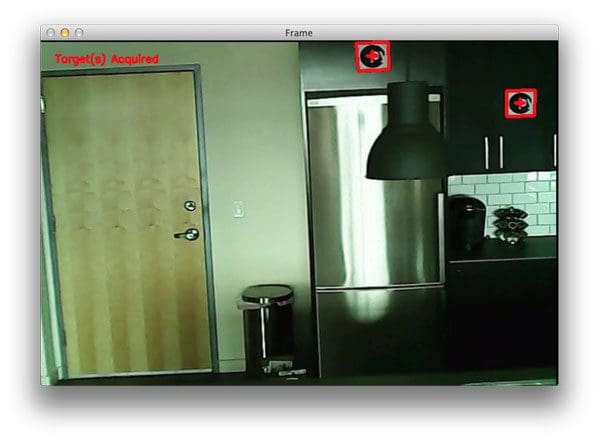
So as you can see, a our little target detection script has worked quite well!
For the full demo video of our quadcopter detecting targets in our video stream, be sure to watch the YouTube video at the top of this post.
Further work
If you watched the YouTube video at the top of this post, you may have noticed that sometimes the crosshairs and bounding box regions of the detected target tend to “flicker”. This is because many (basic) computer vision and image processing functions are very sensitive to noise, especially noise introduced due to motion — a blurred square can easily start to look like an arbitrary polygon, and thus our target detection tests can fail.
To combat this, we could use some more advanced computer vision techniques. For one, we could use adaptive correlation filters, which I’ll be covering in a future blog post.
What's next? We recommend PyImageSearch University.
86 total classes • 115+ hours of on-demand code walkthrough videos • Last updated: October 2024
★★★★★ 4.84 (128 Ratings) • 16,000+ Students Enrolled
I strongly believe that if you had the right teacher you could master computer vision and deep learning.
Do you think learning computer vision and deep learning has to be time-consuming, overwhelming, and complicated? Or has to involve complex mathematics and equations? Or requires a degree in computer science?
That’s not the case.
All you need to master computer vision and deep learning is for someone to explain things to you in simple, intuitive terms. And that’s exactly what I do. My mission is to change education and how complex Artificial Intelligence topics are taught.
If you're serious about learning computer vision, your next stop should be PyImageSearch University, the most comprehensive computer vision, deep learning, and OpenCV course online today. Here you’ll learn how to successfully and confidently apply computer vision to your work, research, and projects. Join me in computer vision mastery.
Inside PyImageSearch University you'll find:
- ✓ 86 courses on essential computer vision, deep learning, and OpenCV topics
- ✓ 86 Certificates of Completion
- ✓ 115+ hours of on-demand video
- ✓ Brand new courses released regularly, ensuring you can keep up with state-of-the-art techniques
- ✓ Pre-configured Jupyter Notebooks in Google Colab
- ✓ Run all code examples in your web browser — works on Windows, macOS, and Linux (no dev environment configuration required!)
- ✓ Access to centralized code repos for all 540+ tutorials on PyImageSearch
- ✓ Easy one-click downloads for code, datasets, pre-trained models, etc.
- ✓ Access on mobile, laptop, desktop, etc.
Summary
This article detailed how to use simple contour properties to find targets in drone and quadcopter video streams using Python and OpenCV.
The video streams were captured using my Hubsan X4, which is an excellent starter quadcopter that comes with a built-in camera. While the Hubsan X4 does not directly stream the video back to your system for processing, it does record the video feed to a micro-SD card so that you can post-process the video later.
However, if you had a quadcopter that included video stream properties, you could absolutely apply the same techniques proposed in this article.
Anyway, I hope you enjoyed this post! And please consider sharing it on your Twitter, Facebook, or other social media!
Download the Source Code and FREE 17-page Resource Guide
Enter your email address below to get a .zip of the code and a FREE 17-page Resource Guide on Computer Vision, OpenCV, and Deep Learning. Inside you'll find my hand-picked tutorials, books, courses, and libraries to help you master CV and DL!
Adrian Rosebrock
Wow, being mentioned in the same sentence as Lionel Messi, that’s quite the compliment. Thanks Luis! But since I’m German wouldn’t that make me more of a Miroslav Klose? 😉
Detecting colors in images can be tricky without controlled lighting conditions, it’s definitely not easy if you expect the lighting conditions to change. However, I do have a post on detecting colors in image and another one on detecting skin — definitely take a look if you are interested!
J. Sebastian Salazar
Wow Adrian! this is just too cool!!! And it’s what I was looking for!!! You are amazing! Keep doing what you do man, your the boss. Amazing post
Adrian Rosebrock
Thank you, I’m glad you enjoyed the post! 😀
afsane
????
charlie
I converted this code to run on live video. The problem I have is the video only shows when it detects a target (square). As soon as there are no more targets it freezes until the next target. I’ve tried moving the cv2.imshow around and putting it in multiple times but it doesn’t change the output. Any ideas?
Adrian Rosebrock
Hey Charlie, that definitely is a strange error. It sounds like your
cv2.imshow
call is likely in the wrong place. Keep it in the same place as the original code listing and everything should work fine.charlie
Well I’m dumb. I had to fix indentation, now it is working great with live video. Thanks for the great tutorial!
Adrian Rosebrock
Nice, glad to hear it’s working with a video stream! Out of curiosity, did you use the same example PyImageSearch logo marker or did you create your own?
charlie
Yes and no. I had the pyimagesearch logo on my other computer so I just pulled it up in an image viewer but I soon realized almost any square object gets detected. It would be nice to detect that one specific py logo and no other square objects. I’m sure that is significantly more advanced.
Adrian Rosebrock
Hey Charlie, you’re right. Pretty much any square object will be detected. In followup posts I’ll explain how to detect all square targets and then filter them based on their contents. It’s a little more challenging, but honestly not much.
Rig
Hey Charlie, I know it’s been some time since you posted this, but, if possible could you please share some insight as to how you converted the code to run on live video feed. I’m using the Pi Camera Module.
Adrian Rosebrock
Look into using the
cv2.VideoCature
method like I use in this post. You might also be interested in using the unified camera access class as well.Rig
I really appreciate the quick reply Adrian. I used the unified camera access as you suggested, along with the original target tracking code. The live feed tracking is now working great! Thank you very much for these in depth tutorials. They’re excellent!
Adrian Rosebrock
Congrats on getting it to work 🙂
Amy
Hey Rig,
any chance in sharing your code that does the live feed tracking?
Hanno
Hi Charlie, Could you help us shed some light on how you would capture video from a live source? And I mean, not from the Pi camera, but I imagine a drone video source via UDP, specified through a SDP H264 file? I tried to specify the source as cv2.VideoCapture(file.sdp) and opencv seems to connect to the source but returns chroma errors and the decoding stops after some frames. Any help would be fabulous.
Jessie
“Hey Charlie, you’re right. Pretty much any square object will be detected. In followup posts I’ll explain how to detect all square targets and then filter them based on their contents. It’s a little more challenging, but honestly not much.”
In relation to this response, is there a tutorial on how to filter contours based on contents? (beyond differentiating them by color) And can findContours() work with more complex, undefined shapes?
Adrian Rosebrock
You can use contours to compute contour properties such as solidity, extent, convex hull, etc., but you need to code logic to handle how to detect each shape of these properties.
Steve
Another great blog,moot it working on my raspberry PI series 2, now I will have to port it across to my BrickPI robot and get it to navigate. Just need to build some signs first.
Adrian Rosebrock
I’m glad you enjoyed it Steve!
Ankit
Hi Adrian again great work, can you suggest some simple yet powerful texture descripter for detection of different regions in an image. Thanks for the post adrian.
Adrian Rosebrock
Histogram of Oriented Gradients is excellent for texture/shape and quantifying the structure of an object. You could also look into Local Binary Patterns.
Amit
Hi Adrian, this is impressive. Can this code be used in detecting leader car in roads in realtime? Is is possible to measure the distance between the host and leader car with the integration of this code? It would be very helpful if you please let me know.
Keep up the great work.
Adrian Rosebrock
Hey Amit, this code couldn’t directly be used to detect cars in real-time. There would be too much motion going on and cars can have very different shapes, as opposed to a square target which is always square. You would need to use a bit of machine learning to train your own car detector classifier. As for detecting the distance between objects, or in this case, cars, I have a post dedicated to computing the distance between a camera and an object. Definitely take a look as it should be quite applicable to your problem.
Nima
Hey Adrian
Agian one of the greate works of you but still I am looking forward to your promise “For one, we could use adaptive correlation filters, which I’ll be covering in a future blog post.”
Adrian Rosebrock
Hi Nima, I certainly do plan on covering adaptive correlation filters, but I’m not sure when I’ll be able to get the post online — please be patient!
haim
Hi,
nice tutorial!
if i’m understand it correctly, you are not comparing the marker to predefined image.
so what if i want to recognize several different markers?
i was thinking to try this in real time video and let my robot act according the marker he see.
maybe if i run the algorithm on several markers to get they solidity then use it later to identify the marker in real time.. didn’t test it yet… should it work?
thanks!
Adrian Rosebrock
Correct, I am not comparing to a pre-defined marker. If you wanted to use multiple markers you would need to (1) detect the presence of a marker and (2) identify which marker it is. I’ll be doing a followup post in the future using multiple markers. It doesn’t add too much complexity to the code.
haim
Awesome! looking forward read it!
thanks!
gunadeep
hey bro !!..
u r really cool …
awsum work bro ….
legendry ….
i’m working on eye controlled wheel chair where my eye moments r used in moving wheel chair .. can u help me in localizing and tracking moments of pupil ..
thnxs .. 🙂
Sahil
I am actually working on the same type of project, and was wondering how do you identify unique object? Like say a red ball in white background, without explicitly telling the drone to look for red color?
I am thinking using histogram and then finding the peaks in it. Will this method work?
Could you please advise on this?
Thank you!
Adrian Rosebrock
It’s pretty hard to tell a computer what to look for without actually specifying what it looks like 😉 There are many methods to detect objects in images. Some a very simple like color based methods. Others are shape based, like the one in the post you’re reading now. Some methods can use template matching. And even more advanced methods require the usage of machine learning. In either case, you’ll obtain much better results if you can instruct your CV system what to look for. Peak finding methods may work, but they’ll also be extremely prone to error.
sahil dadia
I am working on making a drone which will follow a object that is moving
i will be attaching few common geometric figures, then moving one of them. Then will find the moved object and follow it.
Here is my approach:
1. Search the image for shapes, using shape matching, then perform edge detection and threshing only on that part.
2. Find the distance of centres of each geometric figures from each other’s centres. And is this centres distance changes then, the one that has moved will be detected.
3. Then use geometry to calculate the distance travelled by object and apply corresponding PWM to the flight controller.
So is my approach correct? This will surely detect geometric figures.
LIMITATION:
1. This works only for objects which are flat(since geometry is used to determine the distance moved.) How do I determine distance to any target of arbitrary height?
I tried your distance to object tutorial using webcam but it doesn’t work
https://pyimagesearch.com/2015/01/19/find-distance-camera-objectmarker-using-python-opencv/
2. How do I adjust for vibration of the drone?
How can I solve this problem? Please advise!
Thank you!
Adrian Rosebrock
You’re project sounds quite interesting Sahil! I would suggest looking into video stabilization which can actually be a really challenging topic. I don’t have any OpenCV code for that, but I know the MATLAB tutorials have a good example of a feature-based stabilization algorithm.
Sahil Dadia
Thanks for the help and advice, never would have thought of video stabilization using features by myself.
Chris
Hi Adrian this code looks awesome! however I am having trouble running it. When I change into the directory with the code and run “python drone.py –video FlightDemo.mp4” (without quotes) it cmd seems to execute the command however nothing else happens. the video doesn’t open. any ideas? I’m new to python and am working on a project where a drone will identify ground markers and fly to them and this code looks like a great starting point!
Thanks
Adrian Rosebrock
Hey Chris — it sounds like your installation of OpenCV was not compiled with video support, meaning that it cannot decode the frames of the .mp4 file. I would suggest re-compiling and re-installing OpenCV with video support. I provide a bunch of tutorials on how to do this on this page. Also, the Ubuntu virtual machine included in Practical Python and OpenCV comes with OpenCV + Python pre-configured and pre-installed, so that might be worth looking into as well!
Ruud
Hi Adrian,
Thanks for the great posts here! Really helpful! If i understand correctly, you did your video processing offline so not with the intention to control your quadcopter?
I’ve tested your code on a RPi 2B, and get about 3 or 4 FPS, which is not really enough to control the copter.
Thanks!
Adrian Rosebrock
That is correct — the quadcopter captured the video feed, which was then process offline on my laptop. Depending on the type of image processing algorithms used on the Pi, it can be challenging to get near 30 FPS unless (1) you’re using basic techniques, (2) implement in C/C++ for an added speed boost, or (3) a combination of both.
Benji White
Hi Adrian,
These are all amazing tutorials, in which I am trying to build a search and rescue drone using OpenCV and a Raspberry PI. I was just wondering, is there any way for the code to be modified, so that the camera can see an object that has more than just horizontal and vertical lines? I would like to be able to modify the code in order to see something other than a square, such as a triangle or a circle.
Adrian Rosebrock
You can actually do that with this code as well. You just need to modify the contour approximation and compute contour properties such as aspect ratio, solidity, and extent. Taken together you can differentiate triangles, circles, squares, etc. I plan on doing a blog post on this soon, but I also cover it inside the PyImageSearch Gurus course.
Mohamed Ragab
Hi Adrian,
Thanks alot for your efforts. I like more your posts. I want you tell how can I start with cars detection and counting for build my smart traffic light system and hope you recommend for me some types of cameras that will help me with good performance for this project.
Thanks!
Adrian Rosebrock
I would definitely start by reading up on the basics of motion detection. If you’re planning on doing a bit of machine learning to aid in the detection process, then understanding how HOG + Linear SVM works is a great idea as well.
Brian
If the target was painted on the wall (instead of printed on a square piece of paper), what method would you use to detect it? Would you reach for multi-scale template matching, or is there something else that might produce better results?
Thanks!
Adrian Rosebrock
You could still potentially apply contour detection even if the target was painted on the wall (provided you retained the square border). Otherwise, multi-scale template matching and object detection via HOG + Linear SVM would be a good approach.
rahul
Amazing!
M definitely going to try this out.
Brian
Is this method rotation invariant? If the square targets were hung on the wall in any orientation, or if the drone were to tip and tilt during flight, would the targets still be found?
Answered my own question: This IS rotation invariant!
I should wait until AFTER I test the code to ask questions. =)
Brian
I was doing some testing using your code above to see if there was any significant difference between Gaussian blurring and the bilateral filter to help preserve edges. I compared the following:
cv2.GaussianBlur (image_gray_rotated, (7,7), 0)
cv2.bilateralFilter (image_gray_rotated, 7, 75, 75)
Both seemed to yield almost exactly the same results. I was wondering if you had any further research or if you had done any other studies comparing the two. Seems to be a wash to me but I thought maybe you had some further insight. Thanks!
Adrian Rosebrock
Bilateral filtering is normally used to blur an image while still preserving edges (such as the edges between the target and the wall). However, bilateral filtering is also more computationally expensive. Bilateral filtering can yield different results depending on your parameter choices. I detail them more inside Practical Python and OpenCV and the PyImageSearch Gurus course.
Brian
Hi Adrian,
When I run your code above I get the following error for findContours: “too many values to unpack”. I made the following code change to address the problem. I thought I should let you know in case you want to update your code above so that others don’t encounter the same issue.
Original Code:
(cnts, _) = cv2.findContours(im_edged1.copy(), cv2.RETR_EXTERNAL, cv2.CHAIN_APPROX_SIMPLE) #error: too many values to unpack
New Code:
_, contours, _ = cv2.findContours(im_edged1.copy(), cv2.RETR_EXTERNAL, cv2.CHAIN_APPROX_SIMPLE)
Also, here is the link where I found the solution:
http://stackoverflow.com/questions/25504964/opencv-python-valueerror-too-many-values-to-unpack
Sincerely,
-Brian
Adrian Rosebrock
Hey Brian — the reason you encountered the error is because you’re using OpenCV 3 when this post was intended for OpenCV 2.4. You can read more about this here.
Also, here is a neat little trick I use to make the
cv2.findContours
function compatible with OpenCV 2.4 and OpenCV 3:cnts = cv2.findContours(im_edged1.copy(), cv2.RETR_EXTERNAL, cv2.CHAIN_APPROX_SIMPLE)[-2]
geany
Hi , i have question is this tutorial possible with pi camera ? and what should i change in code.
Adrian Rosebrock
Yes, this tutorial is possible using the
picamera
module. You’ll need to update the code to access the Raspberry Pi camera module using this tutorial.Boopathi
Innovative things, really helpful for my college project
Thanks
Adrian Rosebrock
No problem, I’m happy the tutorial helped! Best of luck with your college project.
David
excellent tutorial, i want to know what to change in the code to work with the camera pi, thank you
Adrian Rosebrock
You can update it to use the
capture_continuous
function like I detail in this post. Or better yet, you can use theVideoStream
class, like this post.frogxy
thanks for your tutorial, very simple easy tutorial.
Edan
Adrian, did you run this on a Raspberry Pi?
The line:
(cnts, _) = cv2.findContours(edged.copy(), cv2.RETR_EXTERNAL, cv2.CHAIN_APPROX_SIMPLE)
throws an error:
too many values to unpack.
Any ideas as to how to make it work. I have tried with a videostream from Webcam also with the same result.
Thanks!
Adrian Rosebrock
Hey Edan — make sure you read the comments. The comment by “Brian” above discusses this error and how to resolve it. You should also read this blog post on how the
cv2.findContours
function changed between OpenCV 2.4 and OpenCV 3.Edan Cain
Hey Adrian, thanks for the reply, my bad that I missed Brian’s comment above. Thanks for letting me know.
Peng Fei
Dear Adrian,
Your website has been an amazing help to my school projects. Thank you so much! Please help me to cross this one last hurdle:
I am looking to stream the video from my pi-cam over WIFI to an IP address, say 192.168.1.2:8080 and then extracting the packets to OpenCV on my Mac OS for processing. How can I make that happen? Or is other alternatives, or even no need for that because the Pi is good enough a processor in itself?
Your help is much appreciated!
Adrian Rosebrock
I’ll be covering how to do this in a future blog post, hopefully within the next 2-3 months. Be sure to keep an eye on the PyImageSearch blog!
Dave Rogers
Thanks Adrian,
This looks great.
something I’m interested in adapting. I have a raspberry Pi with a pi cam. the cam is on a pan/tilt mount with a laser module attached. I want it to be able to “look” around for a black balloon and to fire the laser (popping the balloon) once it’s found and then centred the image.
would you suggest this as a starting point or do you have something closer that you’ve already done?
Thanks very much!
Adrian Rosebrock
I personally haven’t done any pan and tilt programming, but for actual tracking, I would start with this blog post. This could serve as input to the pan and tilt function (since it allows you to track direction).
Dave Rogers
fantastic, thank you.
Ashraf
Hi Adrian ,
Thanks for this wonderful post
I’m wondering if we can detect two squares having the same center (one inside the other )…i mean it would be more secure if we could
Adrian Rosebrock
Sure, that’s absolutely possible. Just use the
cv2.RETR_CCOMP
flag rather thancv2.RETR_EXTERNAL
. Then, loop over the contours and find the two that (1) overlap and (2) have the desired properties as detailed in this post.fede16'8
Hi, this is amazing, I was wondering if it can be ported to Android, I need to do this from a drone stream into my phone.
Thanks!
Adrian Rosebrock
You can certainly port it to Android, that shouldn’t be much of a problem. Just keep in mind that you’ll need to use the Java + OpenCV bindings instead of the Python + OpenCV bindings.
naveed
hey adrian
amazing tutorial
i was wondering what changes to do exactly in the code if i wanted to detect a circular object
Adrian Rosebrock
You can detect circles in images using this post, although the parameters can be tricky to get right. In general, I wouldn’t recommend the technique discussed in this post for detecting circles, mainly because it uses contour approximation and vertices counting, which by definition doesn’t make sense for a circle.
naveed
i want to detect circles using a live video feed
is it possible to do that with the post you suggested??
Adrian Rosebrock
Yes, you just need to apply the
cv2.HoughCircles
method to each frame of a video stream.naveed
thnx mate, it worked 😉
Adrian Rosebrock
Fantastic, I’m glad to hear it 🙂 Congrats on getting it working!
Hung
Hey Adrian, thanks for this very helpful and informative post. I was wondering if you have tried detecting a specific image using the video streams? If so could you please point me in the direction of how to do this. Thanks again!
Adrian Rosebrock
There are multiple ways to detect a specific image in a video stream. I would start off with something like multi-scale template matching. Another method worth trying is to detect keypoints, extract local invariant descriptors, and apply keypoint matching. I detail how to apply this method to recognize book covers inside Practical Python and OpenCV.
Jaewon
Hi, Adrian
Thank you for your posting.
I just want to check one thing about this project.
I am doing an univ project. But it is actually pretty similar but little bit different with yours.
It is needed to detect particular marker. How can I do this?
If you can give me any advice, I will totally appreciate for it so much.
Thank you!
Adrian Rosebrock
Marker detection is entirely dependent on your marker and the environment you are trying to detect it in. I would start by trying basic detection using thresholding/edge detection and contour properties. If your marker is complex or your environment is quite “noisy”, then keypoint detection and local invariant descriptor matching works well. Otherwise, you might have to train a custom object detector.
Anthony
Very cool Adrian, thanks for spending the time to put together these howtos.
I’m looking for a way to do precision landing with my drone, with an accuracy of +/- 2 inches. I don’t really want to use any active systems on the ground, and so a printed marker + CV would be great. The drone needs to be able to see the target from about 20m above ground, and the conditions will be daylight. What image/pattern do you think would make for the best target?
Also, would you recommend using the technique described in this post, or using color based detection, or maybe a hybrid with both?
Thanks!
Adrian Rosebrock
The problem with “natural” outdoor scenes is that your lighting conditions can vary dramatically and thus color based region detection isn’t the best. You might be able to include color in your marker, but I would create a hybrid approach that uses color and other recognizable patterns.
Keypoint detection, local invariant descriptors, and keypoint matching would be a good approach here. Inside Practical Python and OpenCV I demonstrate how to use this approach to recognize the covers of books in images — but you could also apply it to recognizing a target as well.
Anthony
Thanks for the pointers I’ll take a look. When it comes to blurry images (due to vibrations), any idea which method and marker will yield the best results? Am I right to assume a sparse and well spaced pattern will do better than one with lots of small details? The distance between the camera and the marker will vary quite a bit over time so this has to be taken into account.
Adrian Rosebrock
Blurry images can be a pain to work with it, so the first general piece of advice is to try to avoid that. However, in some situations this is unavoidable. When that is the case, I would try to apply blur detection to find frames that are “less blurry” then others. Once you find one of these frames, try to detect your marker. Then once you have it, you can try applying correlation-based tracking methods to continue tracking the marker.
Another great alternative is to try to find the marker in every frame, but then take the average of the marker position over N frames, so even if you cannot find the marker in a given frame, your average will still help you “track” it until it’s found again.
Finally, larger, well defined patterns that don’t rely on tiny details (“big” details, if you will) are likely to perform better here.
Jeremyn
Good Morning Adrian!
So I have this working with live and pre-recorded video. With live, I’m using the picamera, and I’m using some short 10 second, high quality 720 mp4 clips. When using the clips, the frame is as large as my 42 inch TV, and the processing is very slow at what would seem like 1 FPS.
How would I go about tweaking the way the video is imported and processed so it played back at the correct speed and in a smaller window?
Also, could you explain why we dont need to import numpy as np in this tutorial? I just noticed that every other tut has the numpy imported.
USING: Python 2.7, OpenCV 3.1, imutils, threading, and VideoStream class.
Adrian Rosebrock
Hey Jeremyn — think of it this way: the larger your frame is, the more memory it takes up (both in disk and RAM). Also, the larger the frame is, the longer it takes to decode the frame using whatever CODEC your video file is in. In this case, it seems like what’s actually slowing down your script is the decoding process. I would look at different codecs that are faster to decode, perhaps push them to working in a different thread, and also look at more optimized methods to decoding your frames (perhaps at the hardware level).
As for as NumPy, the reason we didn’t import it is because we never called any NumPy functions — simple as that 🙂
Jeremyn
Hey Adrian! Just thought I’d post this update on my project. I’m about halfway done with this project. Thanks for these tutorials, I’ve really learned a lot and it’s even helped with my internship because I’m using Python there too. I’ll post another video when the semester is over and it’s complete.
https://www.youtube.com/watch?v=xO7bMGtEgHE&feature=youtu.be
Adrian Rosebrock
Great progress, thanks for sharing Jeremyn!
Muhammed
hello Adrian, i am just not sure how to connect my drone video stream to the laptop, my drone is xpredators 510 and i am looking for a way to apply image processing on the video stream. could you help me please
Adrian Rosebrock
I don’t have any experience with that drone, but I would suggest researching how the video stream is sent over the network. You might be able to send it directly to
cv2.VideoCapture
, but again, I’m not sure as I have not used that particular drone.Won Kyoung Jeong
Thanks for shareing good information with us. ^^
But I want to ask you sth.
If I want to change detecting square to rectangular, would I have to change
“if len(approx) >= 4 and len(approx) <= 6:"?
If not, what should I have to do?
Adrian Rosebrock
A square is a special case of a rectangle — they both have 4 corners. The reason I use >= 4 and <= 6 is to handle any cases where the approximation is close but due to various noise in the image it’s not exactly 4. If you are 100% sure that your images/video will contain 4 vertices after applying contour approximation you can simply change the line to:
if len(approx) == 4:
Mohamed
im from your fans Ardian …. you are amazing
i had a qustion is there eny Module to send the Live Streaming Video from Raspberry pi
Camera (Wireless ) to be Sutable for Quad Copter Application
Adrian Rosebrock
This is a project that I personally would like to do but haven’t had the time. I haven’t tried this tutorial, but the gist is that you should use gstreamer.
Gilad
Adrian,
I would like to thank you again.
Based on this tutorial, me and my son built a robot with a camera, that search for a target and try to get closer to it. we had lots of fun in the making process.
Thanks for reminding this.
G
https://youtu.be/4n3vSZPq1pc
Adrian Rosebrock
Thank you for sharing Gilad! It’s great to see father and son work on computer vision projects together 🙂
Rahulnath
Hey Adrian ,great post.Suppose I have a circular logo,what would I have to put into approximate it into circle.You had square logo right,I am trying to detect a red ball.So I would need circular approximations.
By the way,I read your each and every post and eagerly waits for new ones.Wishing you the best
Adrian Rosebrock
You could try utilizing circle detection, although I’m not a fan of circle detection as it can be a pain to get the parameters just right. Another option is to compute solidity and extent and use them to help filter the circle. The issue here is that since a circle has no real “edges” you’ll end up with a contour approximation with a lot of vertices. That’s fine, but you’ll also need to check the aspect ratio and solidity to see if you’re examining a circle.
Tony M.
As always. Outstanding engineering description and technical breakdown of the code.
Adrian Rosebrock
Thanks Tony! 🙂
XingXiaowei
Hey Adrian, what a post! I am new to Python while I have learned C and C++. I installed OpenCV 3.0 and Python 3.4 with your tutorial. When I run the drone.py, it tells me that ImportError: No module named cv2. How can I make it right? Many thanks!
Adrian Rosebrock
If you followed my OpenCV + Python install tutorials it sounds like you might not be in the “cv” virtual environment prior to executing the script:
Rida HAKIM
Hi Adrian?
Thank you for your wonderful tuto. I’m very new in python language, but not in development.
Sadly, after installing python environment and downloading drone.py and video file, my program doesn’ work. After putting some print to trace execution, it appears that the first frame reading always put grabbed to false, thus break execution, and no video analyse is done. This is my environment :
Windows 10 Pro 64 bits
Python 2.7.5
open cv 2.4.11
An idea ?
Thank you.
Rida
Adrian Rosebrock
If the frame is not being grabbed, then the likely issue is that OpenCV was not compiled with video codec support enabled. I don’t support Windows here on the PyImageSearch blog, so you’ll have to research this issue more yourself. Try re-compiling OpenCV by hand if you can. I personally recommend using a Unix-based OS for computer vision development. I have plenty of OpenCV install tutorials for a variety of operating systems here.
Ali
You are image processing magician!!
Adrian Rosebrock
Thanks Ali!
Pelin GEZER
Hey,
I am going to recognize stickman on paper. Using fitEllipse mostly works. I am trying to improve, heading by your article. What is solidity value and aspect ratio for Ellipse?
Thinking just aspect ratio is 1.6, isn’t it?
Adrian Rosebrock
You would need to tune the solidity and aspect ratio values based on your project. I would suggest experimenting with values and determining which ones work.
Pelin GEZERE
Yeap, I meant if you knew the values. Anyway, I found an article named by Image Analysis. There is all values of all shapes. (on behalf of, let other developers know)
Vũ Diên
Amazing Adrian!
Vishal Sharma
Hello Adrian
My final year engineering project is based on Autonomous Obstacle Avoiding Quad copter. I am using Raspberry Pi 3 and Pi Camera. The drone should fly to its destination autonomously.
I am currently facing difficulties with obstacle detection and avoidance. Can you help me out?
My drone should be able to detect obstacle, stop for a few seconds and decide on the manoeuvring process (that is, should the drone go up, down, left or right)
Obstacles and be both stationary and moving as well.
Thanks
Nagaraj
Hi Adrain, thanks for this post. I really learned few things, But how to identify if a given frame has a human being or a car or both present in it. Please help.
Adrian Rosebrock
I would suggest training your own custom object detector or using a pre-trained deep learning object detector.
Lucas
Hi Adrian !
First of all, thank you for this post, it helped my mate and I to get on track for a project our academy gave us : our goal is to try and find which kind of “target” would be most efficiently detected by a drone in order to guide it to a landing pad. Having little to no knowledge of OpenCV prior to this project, your work has… enlightened us, to the least !
We’ve played with contour detection and solidity in order to modify your code and be able to detect circles, stars, squares… using different parameters, but we’re currently facing quite a problem : we don’t know how to check if the target we’ve detected is actually the target we’re looking for.
In effect, some of the targets we have to try out are cut in four, six, eight parts, with black and white contrasts.
.
We’d like to study how black and white pixels are spread across such targets, therefore recognizing a pattern that would allow us to certify, but we’re not sure how to do it.
We thought about using finContour to study only the pixels that are inside our circle/polygon, do you think it’s possible ? We don’t know how this function works, and we couldn’t find it on the OpenCV resources…
Again, thank you for the initial post, it helped us a lot ! I hope you’ll have time to answer us.
Best regards from the French Air Force !
Adrian Rosebrock
Hey Lucas — this method is meant to be a simple introduction to target detection. You should look into more generalized object detection methods for a more robust approach. If you want to continue with this method contrast will be key here. You’ll first need to localize any regions in the image via threshold or edge detection (thresholding will help guarantee this) and then apply the contour detection method. Once you have region you could consider applying template matching to recognize it.
Zubair
How we can detect an anomalies e.g fighting or weapon or high speed of automobiles from the video capture by drone ?
Kathiresan
Thanks Adrian for your excellent articles. You are either making or will make soon revolutionary changes in image processing which will play a key role in autonomous robots/ small flying vehicles. Have you worked on indoor mapping using single camera and range measurement? Please share any reference if you have.
Adrian Rosebrock
Hey Kathiresan, thanks for the comment. I have not worked with indoor mapping using a single camera. The closest tutorial I have on that would be measuring the distance from a camera to an object.
Davis
Hey Adrian,
I am attempting to use this code with live stream video, like many others. However, I am getting an error saying the Gaussian Blur and Edges are trying to call a numpy array. Specifically, “TypeError: ‘numpy.ndarray’ object is not callable”. Any help would be appreciated. Thanks
Adrian Rosebrock
This sounds like a syntax error of some sort. It looks like you are trying to call a NumPy array as a function rather than passing it into a function.
Davis
Thanks, it was indeed a syntax error in the Gaussian Blur function. Forgot a comma! However, I did need to change the syntax of the findContours function to fit the new 3.x syntax. Instead of cnts, _ its now _,cnts, _ . I always forget to account for the new version!
But, thank you. Your tutorials have been absolutely amazing and of the upmost help on my project. Keep em comin!
Adrian Rosebrock
Thanks Davis, I’m glad you are enjoying the tutorials 🙂
alireza
hi i am very happy to be one of yours follower
but in this case detect object using contour and its ok but it can be have a lot of mistake
so like detect another square so how can i using contour to detect special word inside that square something like H landing pad in another word i have an square so i use this method to detect square when square has been detected i go to another class for detect H inside the square so how can i use contour for H? implemention in python i see another one but all of them are in cpp or c# please help me thank men
Adrian Rosebrock
If you can detect the square, first extract the ROI from the image. Then apply any additional image processing and contour extraction that you may need to detect the “H”. This may require you to perform additional thresholding or edge detection before applying another series of contour extraction.
alireza
thanks for reply can you give me more information or sample code ? or explain more please. i have one shape thats contains two squre and one of the square are bigger than other so wheh i ran the countor countor detect
both square randomly so how can i fix that and how can i detect H shape ??? thank you for everything
alireza
i forget to say that inside that’s two square i have an “H” character so how can i do that
Adrian Rosebrock
Sorry, I do not have any example code for your exact project. However, I am more than confident that with a little effort and the code in this post as a starting point, that you can certainly do it. I have faith in you! 🙂
seconc
Hello Adrian ,
How can we track an object with drone. I mean drone and object will move and drone will folllow it.
Adrian Rosebrock
It really depends on the objects you are trying to detect. First you use an object detection algorithm to localize the object. You would then typically pass the bounding box information into a dedicated object tracking algorithm, such as correlation tracking.
Phil
Nice! Do you have a tutorial of this code that ignores squares without the specific image on them? I’m looking for something similar, that only triggers when it detects the specific logo, not just any random square.
Adrian Rosebrock
There are a bunch of different ways to accomplish this. The first would be to train your own object detector but that would likely be overkill. Instead, you might be able to get away with template matching. A more advanced approach would be to use keypoints, local invariant descriptors, and keypoint matching for more robust detections — I cover this method inside Practical Python and OpenCV where we build a system that can recognize the covers of books. This method could likely be adapted to your project.
Phil
Thanks! I eventually solved this by going with a SURF classifier, since my orientation relative to the logo isn’t guaranteed to be horizontal.
Karen
Adrian,
First, Thank you for so many great educational posts. I learned a lot from just reading your posts.
I got two questions regarding this code if you have a moment:
1. I am using your code to identify two square markers in a picture. Two markers are the same size squares but not identical inside. Somehow the code clearly identifies one of the squares but not the other. When I draw contours before conditions, both squares are highlighted with inside contours. What can cause that when I am pretty sure squares are the same size, same quality, and with same distortion?
2. When I printed the results of approxPolyDP for the identified square I noticed it’s giving two sets of points – one set of points going clock wise and the other being different by 1-2 pixels and going anticlockwise. How can I avoid that?
Thanks a lot!
Adrian Rosebrock
1. This code uses contour approximation to detect squares/rectangles. After applying contour approximation, check the contour associated with your larger square. It seems like that it does not have four vertices and hence is not detected. You may need to adjust your preprocessing steps (resizing, blurring, etc.)
2. I’m not sure what you mean here but it sounds like it may be resolved by point 1 above.
I hope that helps!
Karen
Thanks Adrian.
After playing with blurring and Canny parameters I was able to get both squares identified.
But I am still getting two close rectangles for each square marker. The vertices of close rectangles are different from each other by 1-3 pixels. Should I just chose one of the rectangles and move on?
Adrian Rosebrock
That’s odd behavior, but without seeing the masks and the output images I’m not sure what the issue is. You may want to just move on with it. I’m sorry I couldn’t provide better advice here.
Mila
Really great work.
How to change code, that in video stream it detects circle targets ?
Adrian Rosebrock
If you want to detect circular objects you could try following this tutorial on Hough Circles. The problem is that the parameters to Hough Circles can be a pain to tune. You may instead need to train your own object detector to detect circular targets. The PyImageSearch Gurus course will show you how to train such object detectors.
submarine
Thank you, Adrian Rosebrock. But there are still some parts I do not understand. I don’t know the working principle behind each function. (First of all, please forgive my terrible English skills)
In lines 30-55 of the code, ‘cnts’ is an array containing a series of contours images. How do you detect squares from all the contours of a contour image in ‘cnts’? I thought that the contour in a contours image is an entireness. and It is necessary to cut a big picture into small pictures and compare their similarities to find the specific object hidden in a picture.
In fact, I tried to extract his contour, color from the target image and compare it with the contour and color of the image have the target.
Adrian Rosebrock
You are correct, the “cnts” variable does indeed contain the contours. We filter out square filters on Liens 37 and 40. First we compute the contour approximation and then we check if the contour is roughly rectangular. A rectangle would obviously have four vertices but our image is noisy so we could have more vertices in the approximation, hence why we check in the range 4 to 6. If you’re new to the world of OpenCV and computer vision I would encourage you to read through Practical Python and OpenCV where I teach the fundamentals. Once you understand the fundamentals I’m confident you will be able to work through this post and other PyImageSearch posts without a problem.
Eden Rodriguez
Hey Adrian,
How can i modify the script to use the raspberry PiCamera instead of a drone or usb camera. Thats the basics of what i need to get going, i also saw on the raspberry pi its not a live stream on someones question is there a way it can also be made into a live stream with the PiCamera?
Adrian Rosebrock
The drone I was working with does not provide a live stream. You would need to check whichever drone you were using and see if you can expose the live stream (if one exists).
If you wanted to use a Raspberry Pi camera module be sure to read this post on how you can modify code to work with the Pi camera by using my “VideoStream” class.
Brhayan Liberato
Hi Adrian, your blog is excellent, thanks for these tutorials. i would like to know if possible finding objects other than a square, like a star or objects specific irregular shapes. Greetings from Colombia
Adrian Rosebrock
Could you clarify what you mean by “irregular” here? What makes a shape “irregular” in your project? My gut tells me that you’ll need to train a custom object detector such as HOG + Linear SVM.
Xarion
Thanks for the great tutorials. How easy is it to use the code and convert to c++ ?
Adrian Rosebrock
I suppose that depends on how well you already know C++ and the OpenCV functions for C++. If you already do it should be fairly easy.
WESLEY S
Is it possible to detect colour changes from a particular object?( earlier it was blue colour …it changes to white) i want to calculate the time when it is being changed from one color to another .please direct me.
Adrian Rosebrock
You could certainly monitor the color histogram of an object or compute the mean of each of the RGB channels over time. Either would work.
Bayard K.
Hey Adrian, I’ve been fiddling with this all morning and quickly became fascinated with how easy it is to replicate. I made a wall of sticky note squares and recorded my own video to try it out on. I have one question though: Is there anyway to resize the video window that pops up? It’s quite enormous in the Virtual Machine I’m using to run this.
Adrian Rosebrock
You cannot directly resize the window itself but you can resize the image/frame using either
cv2.resize
orimutils.resize
— that will change the output window size.Mark
Adrian Hi,
Can the same thing run on RPi 3 with opencv or perhaps there might be some problems to anticipate?
Adrian Rosebrock
This particular algorithm will be capable of running on the Raspberry Pi.
Jovan Araiza
Adrian,
Awesome tutorial! Easy to read and understand. I appreciate all the work you put into these tutorials.
Adrian Rosebrock
Thanks Jovan, I really appreciate that 🙂
Leonard Armstrong
Adrian – I was elated to see this post today. This is exactly the use case I chose your books for – I am getting into quad copters and want to perform real-time in-home surveillance (finding my pets, keys, glasses, etc.), moving into self-automate piloting eventually. Lofty goals, to be sure, but heck, I have all the time in the world. 🙂 Can’t wait to start playing with this code. Awesome stuff. P.S. – Hope things are going well with your father. – LA
Adrian Rosebrock
Thanks Leonard 🙂