Alright, so at this point you have been exposed to contours pretty heavily on the PyImageSearch blog.
We used contours to build a kick-ass mobile document scanner.
Contours enabled us detect barcodes in images.
And we even leveraged the power of contours to find the distance from a camera to object or marker.
But there still remains a sticking question that we have not addressed: how in the world do we sort contours from left-to-right, top-to-bottom, etc.
Oddly enough OpenCV does not provide a built-in function or method to perform the actual sorting of contours.
But no worries.
In the rest of this blog you’ll be sorting contours using Python and OpenCV like a pro.
Read on to find out more…
Looking for the source code to this post?
Jump Right To The Downloads SectionOpenCV and Python versions:
In order to run this example, you’ll need Python 2.7 and OpenCV 2.4.X.
Sorting Contours using Python and OpenCV
By the end of this blog article you’ll be able to:
-
Sort contours according to their size/area, along with a template to follow to sort contours by any other arbitrary criteria.
-
Sort contoured regions from left-to-right, right-to-left, top-to-bottom, and bottom-to-top using only a single function.
So let’s go ahead and get started. Open up your favorite code editor, name it sorting_contours.py
and let’s get started:
# import the necessary packages import numpy as np import argparse import imutils import cv2 def sort_contours(cnts, method="left-to-right"): # initialize the reverse flag and sort index reverse = False i = 0 # handle if we need to sort in reverse if method == "right-to-left" or method == "bottom-to-top": reverse = True # handle if we are sorting against the y-coordinate rather than # the x-coordinate of the bounding box if method == "top-to-bottom" or method == "bottom-to-top": i = 1 # construct the list of bounding boxes and sort them from top to # bottom boundingBoxes = [cv2.boundingRect(c) for c in cnts] (cnts, boundingBoxes) = zip(*sorted(zip(cnts, boundingBoxes), key=lambda b:b[1][i], reverse=reverse)) # return the list of sorted contours and bounding boxes return (cnts, boundingBoxes)
We’ll start off by importing our necessary packages: NumPy for numerical processing, argparse
to parse our command line arguments, and cv2
for our OpenCV bindings.
Instead of starting off by parsing arguments, loading images, and taking care of other normal procedures, let’s skip these steps for the time being and jump immediately in to defining our sort_contours
function which will enable us to sort our contours.
The actual sort_contours
function is defined on Line 7 and takes two arguments. The first is cnts
, the list of contours that the we want to sort, and the second is the sorting method
, which indicates the direction in which we are going to sort our contours (i.e. left-to-right, top-to-bottom, etc.).
From there we’ll initialize two important variables on Lines 9 and 10. These variables simply indicate the sorting order (ascending or descending) and the index of the bounding box we are going to use to perform the sort (more on that later). We’ll initialize these variables to sort in ascending order and along to the x-axis location of the bounding box of the contour.
If we are sorting right-to-left or bottom-to-top, we’ll need to sort in descending order, according to the location of the contour in the image (Lines 13 and 14).
Similarly, on Lines 18 and 19 we check to see if we are sorting from top-to-bottom or bottom-to-top. If this is the case, then we need to sort according to the y-axis value rather than the x-axis (since we are now sorting vertically rather than horizontally).
The actual sorting of the contours happens on Lines 23-25.
We first compute the bounding boxes of each contour, which is simply the starting (x, y)-coordinates of the bounding box followed by the width and height (hence the term “bounding box”). (Line 23)
The boundingBoxes
enable us to sort the actual contours, which we do on Line 24 and 25 using some Python magic that sorts two lists together. Using this code we are able to sort both the contours and bounding boxes according to the criteria that we provided.
Finally, we return the (now sorted) list of bounding boxes and contours to the calling function on Line 28.
While we’re at it, let’s go ahead and define another helper function, draw_contour
:
def draw_contour(image, c, i): # compute the center of the contour area and draw a circle # representing the center M = cv2.moments(c) cX = int(M["m10"] / M["m00"]) cY = int(M["m01"] / M["m00"]) # draw the countour number on the image cv2.putText(image, "#{}".format(i + 1), (cX - 20, cY), cv2.FONT_HERSHEY_SIMPLEX, 1.0, (255, 255, 255), 2) # return the image with the contour number drawn on it return image
This function simply computes the center (x, y)-coordinate of the supplied contour c
on Lines 33-35 and then uses the center coordinates to draw the contour ID, i
, on Lines 38 and 39.
Finally, the passed in image
is returned to the calling function on Line 42.
Again, this is simply a helper function that we’ll leverage to draw contour ID numbers on our actual image so we can visualize the results of our work.
Now that the helper functions are done, let’s put the driver code in place to take our actual image, detect contours, and sort them:
# construct the argument parser and parse the arguments ap = argparse.ArgumentParser() ap.add_argument("-i", "--image", required=True, help="Path to the input image") ap.add_argument("-m", "--method", required=True, help="Sorting method") args = vars(ap.parse_args()) # load the image and initialize the accumulated edge image image = cv2.imread(args["image"]) accumEdged = np.zeros(image.shape[:2], dtype="uint8") # loop over the blue, green, and red channels, respectively for chan in cv2.split(image): # blur the channel, extract edges from it, and accumulate the set # of edges for the image chan = cv2.medianBlur(chan, 11) edged = cv2.Canny(chan, 50, 200) accumEdged = cv2.bitwise_or(accumEdged, edged) # show the accumulated edge map cv2.imshow("Edge Map", accumEdged)
Lines 45-48 aren’t very interesting — they simply parse our command line arguments, --image
which is the path to where our image resides on disk, and --method
which is a text representation of the direction in which we want to sort our contours.
From there we load our image off disk on Line 51 and allocate memory for the edge map on Line 52.
Constructing the actual edge map happens on Lines 55-60, where we loop over each Blue, Green, and Red channel of the image (Line 55), blur each channel slightly to remove high frequency noise (Line 58), perform edge detection, (Line 59), and update the accumulated edge map on Line 60.
We display the accumulated edge map on line 63 which looks like this:
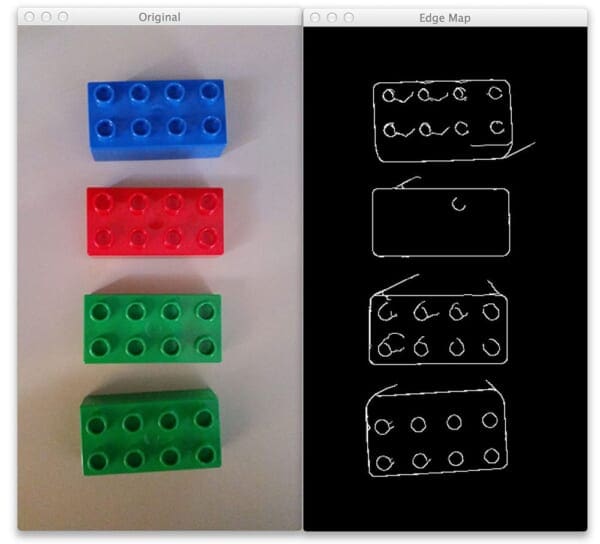
As you can see, we have detected the actual edge outlines of the Lego bricks in the image.
Now, let’s see if we can (1) find the contours of these Lego bricks, and then (2) sort them:
# find contours in the accumulated image, keeping only the largest # ones cnts = cv2.findContours(accumEdged.copy(), cv2.RETR_EXTERNAL, cv2.CHAIN_APPROX_SIMPLE) cnts = imutils.grab_contours(cnts) cnts = sorted(cnts, key=cv2.contourArea, reverse=True)[:5] orig = image.copy() # loop over the (unsorted) contours and draw them for (i, c) in enumerate(cnts): orig = draw_contour(orig, c, i) # show the original, unsorted contour image cv2.imshow("Unsorted", orig) # sort the contours according to the provided method (cnts, boundingBoxes) = sort_contours(cnts, method=args["method"]) # loop over the (now sorted) contours and draw them for (i, c) in enumerate(cnts): draw_contour(image, c, i) # show the output image cv2.imshow("Sorted", image) cv2.waitKey(0)
Quite obviously, the first step here is to find the actual contours in our accumulated edge map image on Line 67-69. We are looking for the external contours of the Lego bricks, which simply corresponds to their outlines.
Based on these contours, we are now going to sort them according to their size by using a combination of the Python sorted
function and the cv2.contourArea
method — this allows us to sort our contours according to their area (i.e. size) from largest to smallest (Line 70).
We take these sorted contours (in terms of size, not location), loop over them on Line 74 and draw each individual contour on Line 76 using our draw_contour
helper function.
This image is then displayed to our screen on Line 78.
However, as you’ll notice, our contours have been sorted only according to their size — no attention has been paid to their actual location in the image.
We address this problem on Line 81 where we make a call to our custom sort_contours
function. This method accepts our list of contours along with sorting direction method (provided via command line argument) and sorts them, returning a tuple of sorted bounding boxes and contours, respectively.
Finally, we take these sorted contours, loop over them, draw each individual one, and finally display the output image to our screen (Lines 84-89).
Results
Let’s put our hard work to the test.
Open up a terminal, navigate to your source code and execute the following command:
$ python sorting_contours.py --image images/image_01.png --method "top-to-bottom"
Your output should look like this:
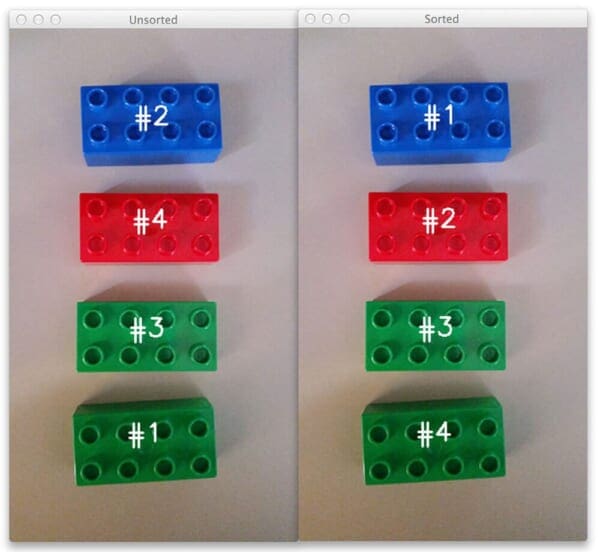
On the left we have our original unsorted contours. Clearly, we can see that the contours are very much out of order — the first contour is appearing at the very bottom and the second contour at the very top!
However, by applying our sorted_contours
function we were able to sort our Lego bricks from top-to-bottom.
Let’s take a look at another example.
$ python sorting_contours.py --image images/image_01.png --method "bottom-to-top"
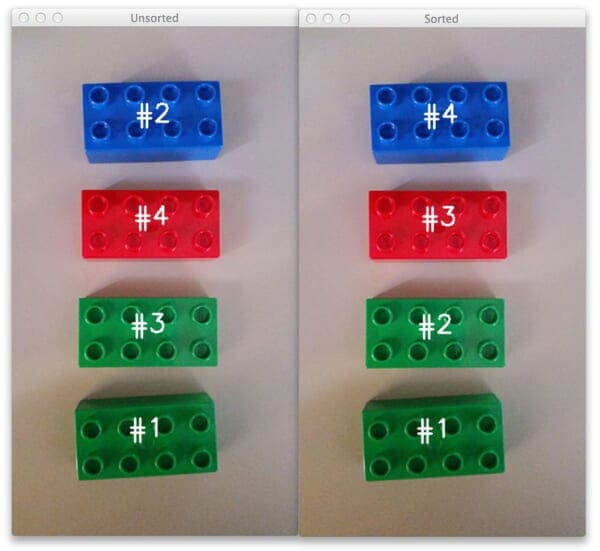
And here we have sorted on contours from bottom-to-top.
Of course, we can also sort contours horizontally as well:
$ python sorting_contours.py --image images/image_02.png --method "left-to-right"
Again, in the top image our contours are not in order. But in the bottom image we are able to successfully sort our contours without an issue.
One last example:
$ python sorting_contours.py --image images/image_02.png --method "right-to-left"
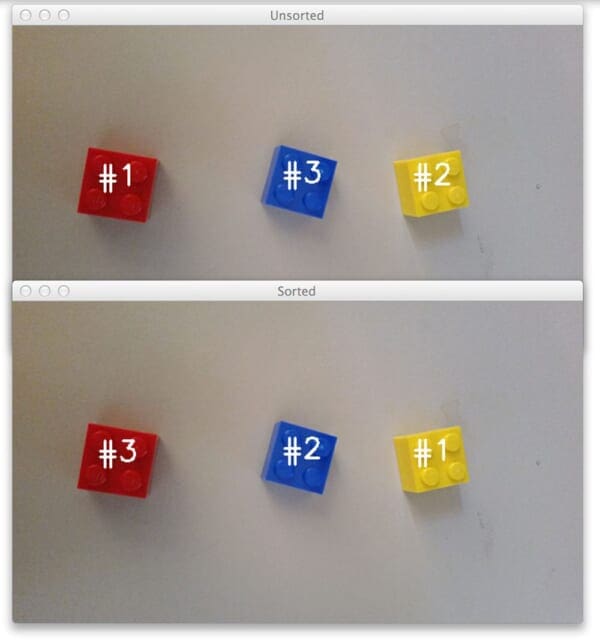
As you can see, there’s nothing to it — we’re simply leveraging the bounding box of each object in the image to sort the contours by direction using Python and OpenCV.
In the future all you need is our trusty sorted_contours
function and you’ll always be able to sort contours in terms of direction without a problem.
What's next? We recommend PyImageSearch University.
86 total classes • 115+ hours of on-demand code walkthrough videos • Last updated: October 2024
★★★★★ 4.84 (128 Ratings) • 16,000+ Students Enrolled
I strongly believe that if you had the right teacher you could master computer vision and deep learning.
Do you think learning computer vision and deep learning has to be time-consuming, overwhelming, and complicated? Or has to involve complex mathematics and equations? Or requires a degree in computer science?
That’s not the case.
All you need to master computer vision and deep learning is for someone to explain things to you in simple, intuitive terms. And that’s exactly what I do. My mission is to change education and how complex Artificial Intelligence topics are taught.
If you're serious about learning computer vision, your next stop should be PyImageSearch University, the most comprehensive computer vision, deep learning, and OpenCV course online today. Here you’ll learn how to successfully and confidently apply computer vision to your work, research, and projects. Join me in computer vision mastery.
Inside PyImageSearch University you'll find:
- ✓ 86 courses on essential computer vision, deep learning, and OpenCV topics
- ✓ 86 Certificates of Completion
- ✓ 115+ hours of on-demand video
- ✓ Brand new courses released regularly, ensuring you can keep up with state-of-the-art techniques
- ✓ Pre-configured Jupyter Notebooks in Google Colab
- ✓ Run all code examples in your web browser — works on Windows, macOS, and Linux (no dev environment configuration required!)
- ✓ Access to centralized code repos for all 540+ tutorials on PyImageSearch
- ✓ Easy one-click downloads for code, datasets, pre-trained models, etc.
- ✓ Access on mobile, laptop, desktop, etc.
Summary
In this blog article we learned how to sort contours from left-to-right, right-to-left, top-to-bottom, and bottom-to-top.
Realistically, we only needed to leverage two key functions.
The first critical function was the cv2.boundingRect
method which computes the bounding box region of the contour. And based on these bounding boxes, we leveraged some Python magic and used our second critical function, sorted
, to actually “sort” these bounding boxes in the direction we want.
And that’s all there is to it!
If you would like to play with the examples included in this post, just enter your email address in the form below and I’ll email you the code instantly.
Download the Source Code and FREE 17-page Resource Guide
Enter your email address below to get a .zip of the code and a FREE 17-page Resource Guide on Computer Vision, OpenCV, and Deep Learning. Inside you'll find my hand-picked tutorials, books, courses, and libraries to help you master CV and DL!
Chris
Hey! Can you do an article on sorting of points in a grid? I have a point grid on a wall and I make a picture of that wall and now I have the set of points, after a perspective transform and lens distortions, but no assignment of points to grid locations.
Adrian Rosebrock
Hi Chris, thanks for the comment. I’m not sure I fully understand your comment, but are you trying to (1) find the corners of the grid and (2) sort them according to some criterion? Finding the corners of the grid should be very simple — the Harris or GFTT corner detector will easily make quick work of that. But I’m not sure what you mean by sorting the actual locations?
mather
Hi, do you have a realtime implementation of this using a camera?
Ryan
Hi Adrian, interesting post. I like the idea of being able to sort the contours. However, I had 2 questions: 1) it’s a little difficult to tell which criteria is being used to do the actual sorting. From lines 23-24, it looks like it is the boundingBoxes starting points. Is that correct? 2) While it depends on the application, it’d seem better to sort the contours based upon their centroid or the first moment. In this case, all contours are roughly the same size so it may not matter much. Your thoughts?
Adrian Rosebrock
Hey Ryan, thanks for the comment. To answer your questions:
1. Correct, the we are sorting on either the x or y coordinate of the starting location of the bounding box.
2. As you suggested, it all depends on your application. In most cases when I am using bounding boxes, such as automatic license plate recognition or handwriting recognition, sorting from left-to-right based on the starting x-coordinate is more than sufficient. In other cases, this may not be case. But I think that’s the beauty of the approach suggested — you can sort however you want by modifying the
lambda
function.Austin
Hey adrian, am working on handwritten recognition. my problem is words are printing randomly.I have to sort the contours but I couldn’t able to come up with correct method. Can you help me with this?
Austin
Hi adrian,Nice article. Am beginner to python and I’m facing some issues with sorting contours for handwritten recognition. how to avoid random printing of words? How to code starting from x-coordinate.Please help.
Adrian Rosebrock
Hey Austin, I’m not sure what you mean by “random printing of words”. Are you using the code from this blog post or something different?
Austin
Hi, thanks for replying.Can you please go through this link once.
https://github.com/Breta01/handwriting-ocr
If you run it. Words were printing in random manner.
If you see ocr/words.py
Where contours are created. I couldn’t get how to sort the contours.
Adrian Rosebrock
Sorry, I’m happy to help point you in the right direction but I get asked many times per day to run source code or look at source code. As you know, reviewing another person’s code is a very time consuming and tedious task — it’s not something I can do. I hope you understand.
Austin
Hi, thanks for replying me back and thank you very much for the support. Yes, I understood.Sorry for asking you to go through the links.
The code which I mentioned is handwritten recognition where it will scan the image and finds all the words and print it. But it is printing randomly, I tried sorting out using your method but still the words are random. Hope you understand the method. I just want that to print in sequence.I thought for better understanding you will go for code. My mistake. As you mentioned for handwritten recognition, sorting from left-to-right based on the starting x-coordinate is more than sufficient. I just want to know this clearly. Can we sort it using bounding boxes because sorting contours haven’t worked properly.
and in code it contains a expession like this, index= [hierarchy][index][0] Is this for contours indexes?
Adrian Rosebrock
You can certainly sort by bounding box as well. You would use the cv2.boundingRect function to compute the bounding box of the contour and then sort on the top-left x-coordinate for each bounding box. I wish you the best of luck on the project Austin and hope it goes well 🙂
Austin
Thank you so much, Adrian.
Zain ul abdeen
Hey nice post! I am trying to do similar type of thing in android Java and any help would be appreciated. Please take a look at my question on given link. Thanks
stackoverflow.com/questions/29808847/how-to-sort-contours-from-top-to-bottom-opencv-android
Adrian Rosebrock
Hey Zain, I’m not much of a Java coder, but you should be able to port the code I provided to Java — the same concepts apply.
Abhi
hello Zain,
I have been trying to develop same OMR scanner App for Android but i am stuck on contour sort part, can you please help me out.
I have follwed Adrians method for until sorting and it works just well.
Saul Bernal
HI adrian. can i try sort with a different shaped in the image? like circles?
Adrian Rosebrock
Hi Saul, yes, you could sort the contours using circles in the same manner as suggested by this post. A circle can still have a bounding box associated with it.
jongwon
Thank you, This is what I try to figure out!!! Really Helpful
Adrian Rosebrock
No problem, happy to help! 🙂
friend
I had problem with line 66, this help me:
(change “(cnts, _)” on line 66 to “( _,cnts, hierarchy)”)
thanks for the article and good luck..
Adrian Rosebrock
Indeed, OpenCV 3 has changed the return signature of the
cv2.findContours
function from OpenCV 2.4. I discuss this a bit more in this blog post.Fabs
Hey Adrian,
I want to use part of your script in a programm to sort contours in a video stream. However it crashs all the time when I remove the contours out of the camera screen with:
“ValueError: need more than 0 values to unpack” refering to line 24 of your code. How can I tell the programm to wait untill there is at least one contour, or to just don’t “unpack” untill one contour appears.
Adrian Rosebrock
All you need is a simple
if
statement:Marbin
where will you put that if statement ? and what do you mean by the do more processing here?
Adrian Rosebrock
You would put that statement directory after the
cv2.findContours
call. Any code you want to fall under that “if” statement, presumably more contour processing, would be placed there.abhishek
i have several grid based images which has start point (small green colored region located anywhere within image) and stop point (small red region). i want to find shortest path between start point and end point. what should I do
Adrian Rosebrock
The first step is to find the two points. Methods like edge detection and thresholding can help you accomplish this. From there, you simply compute the Euclidean distance, which is by definition, the shortest path between two points.
Akash
this is for contours either in a single column or a single row…what if the contours are present both in columns and rows. Then how to sort it left to right as well as top to bottom??
Adrian Rosebrock
Great question — I’ll be sure to address this in a future blog post.
abdulvahid
Adrian, can’t find the post you mentioned here, did you publish it already?
Adrian Rosebrock
I have not published the tutorial already, I have many other items in my queue right now, but I will try to cover it in the future. Unfortunately, I cannot say when that might be.
gogo456
this was a great one but i have one qustion
i dad detected more than one object and i want to sort the Coordinates of this objects in array instead of printing out them like ( push-pop) -sorting method
do you have eny idea
Adrian Rosebrock
Can you elaborate more on what you mean? I’m not sure what sorting method you are trying to apply.
Steven
Is it possible to sort contours by both left-to-right and top-to-bottom at the same time?
Adrian Rosebrock
Not easily, but yes. If you know the number of items there are in a row, you first from top-to-bottom. Extract the rows, then sort the rows left-to-right. I’ll be demonstrating how to do this in an upcoming blog post.
Jarno
You can also make the method shorter.
reverse = method == “right-to-left” or method == “bottom-to-top”
i = method == “top-to-bottom” or method == “bottom-to-top”
instead of initializing and two if’s
Adrian Rosebrock
Good point, thanks for sharing Jarno.
Kenton
Hey Adrian,
I think in the section
“Constructing the actual edge map happens on Lines 54-59, where we loop over each Blue, Green, and Red channel of the image (Line 54), blur each channel slightly to remove high frequency noise (Line 57), perform edge detection, (Line 59), and update the accumulated edge map on Line 60.”
It should be line 58 instead of 59 and 59 instead of 60. Just a tiny nitpick :o)
Adrian Rosebrock
Thank you for pointing this out Kenton, the blog post has been updated 🙂
Ar
Hi Adrian,
I’m having a big problem iterating over contours. I Find Contours and then, when I try to used sorted_contours method you provide us, the error is: TypeError: iteration over non-sequence.
Do you know what could be happening?
Thanks in advance Adrian!
Adrian Rosebrock
Can you check the output of
cv2.findContours
and ensure you are actually detecting any contours? It sounds like zero contours may be returned bycv2.findContours
.Max
Hey Adrian,
I just wanted to add (maybe as hint for someone else) that the sorted contours aren’t in the same order as our contour hierarchy anymore. Which means, we can’t just access a contour hierarchy simply by its index we got from our newly sorted contour list.
I mean, you didn’t intent to sort the hierarchies here, but I just wanted to mention it. That should be something the user should be aware of.
Thanks for this blog post!
yash
tried to run left to right sorting…but it is running twice…in my case 69 contours are their and it again starts labelling from 1st contour and counts from 70….plzz help
Adrian Rosebrock
It sounds like the cv2.findContours function is returning two sets of contours for some reason. Did you use the “Downloads” section of this blog post to download the source code to this post before running the script? Additionally, which versions of OpenCV and Python are you using?
Hemi
I do not understand. Are the legos being sorted by their size? I thought by sort, it would mean to rearrange the object in the image?
Adrian Rosebrock
They are actually being sorted by their location in the image (top-to-bottom, left-to-right). Did you want to sort them by size instead? If so, use the
cv2.contourArea
as the key to the sorting function.Hamed
Thank’s Adrian.
I have a question. In line 54-59 you split channel of image and the use canny edge detection and then bitwise-or accumedged with edge. why you do this work ? what is the benefit of this work? what is a problem with simple canny edge detection?
Adrian Rosebrock
There are times when computing the edges on only the grayscale images is not accurate enough. Typically this could be due to the weighted combination of channels during the grayscale conversion or it could be the case that one channel has significantly more edge information than others. In those cases you may want to compute the edge map for each channel individually. I would encourage you to instead compute the edge map on the grayscale version and see what happens.
farhad jafari
hi adrian, Thanks for sharing the knowledge,
What is the zip function mean?
i don’t find it on the opencv.
is it for python ?
and in the end
how implement it in the c++ ?
Adrian Rosebrock
The “zip” function isn’t an OpenCV function, it’s a built-in Python function. Given two lists with the same number of elements, the zip function allows you to “zip” them together in a for loop. I would suggest referring to this example for more information.
farhad jafari
thanks adrian, do you have a solution for implement sorting in c++?
Adrian Rosebrock
I do not (PyImageSearch is primarily a Python blog). You can use the same techniques in C++ though, the general algorithm will be the same, you’ll just call slightly different functions depending on which C++ libraries you are using.
Lisias
Adrian,
Great post, and thanks for all content.
Regarding contours sorting, how can I sort by perimeter?
I used cv2.arcLength instead of cv2.contourArea as key but it didn´t work. It seems can not replace easy like that. How do you suggest to accomplish perimeter sorting as I want the biggest contours?
Thank you
Adrian Rosebrock
Something like the following should work:
cnts = sorted(cnts, key=cv2.arcLength, reverse=True)
Lisias
I see, but not..:
The result for this is:
cnts = sorted(cnts, key=cv2.arcLength, reverse=True)
TypeError: arcLength() missing required argument ‘closed’ (pos 2)
If I try:
cnts = sorted(cnts, key= cv2.arcLength(cnts, False), reverse=True), I get:
TypeError: curve is not a numpy array, neither a scalar
So I am firstly sorting area then checking some perimeter inside loop:
for (i, c) in enumerate(cnts):
peri = cv2.arcLength(c, False)
if peri < XXX:
But I think is not good, much better if initially sorted by perimeter as area is not important to me. Area is not related to perimeter mostly so is almost random.
I there is another way I would appreciate.
Thanks
Adrian Rosebrock
Another option would be to use lambda functions:
cnts = sorted(cnts, key=lambda c: cv2.arcLength(c, False), reverse=True)
I didn’t test the code but you can use Python lambda functions to accomplish the task. Make sure you read up on them.
Lisias
Good suggestion, will explore it. Thanks!
Nishith
Can I use the same algorithm for sorting different size of bottles? In my application bottle may be horizontal or vertical with top round facing up side? Basically, I want to move my robotic arm to pickup that bottle
Adrian Rosebrock
Yes, provided you can detect the contours of each bottle you can use this method.
WDC
Hello, I am a student, I am learning Python 2.7 + Opencv3, read your post is very beneficial to me. But now I encounter a problem, because your version is based on opencv2, so I use 3 to make programming unsuccessful, and in my other program, if the circumference and area of each contour have been obtained, now I want to count the number of contours, and want to rank the numbers from small to large in the center position, how to write? I checked a lot on the internet, some said through the “for loop” and also said “count function” and “sort function”, but I still failed to debug. Other minor problems, such as the maximum and minimum area, I use Max and min functions, but they don’t work out. Well, it’s really a headache. If you have time, please help me.can you give me your mailbox? I want to send you the questions and source code I met.
Adrian Rosebrock
The source code in this post is compatible with OpenCV 2.4, OpenCV 3, and OpenCV 4 so I’m not sure what you mean by the programming being unsuccessful. I would suggest you compute the area of the contour via
cv2.contourArea
. From there you can sort them from largest to smallest.I would also suggest you read through Practical Python and OpenCV so you can learn the fundamentals of computer vision and the image processing. The book will undoubtedly help you so please do take a look.
Yonten Jamtsho
When I run to the program, I get the following errors:
ValueError: not enough values to unpack (expected 2, got 0) in (cnts, boundingBoxes) = zip(*sorted(zip(cnts, boundingBoxes), key = lambda b:b[1][i], reverse=False)). The program works well for some image but for some, I am getting above mentioned error. Can you advise me on that?
Adrian Rosebrock
You first need to check and see if at least one contour was detected before trying to apply the sort_contours function:
Hemu
Hey Adrian
I am feeling embarrassed asking this but I am not getting what is sorting of contours??? By following examples also I am not getting what we are doing. So plzz help me
Adrian Rosebrock
Here we are sorting contours based on their (x, y)-coordinates, either top-to-bottom or left-to-right.
fatin
Hey adrian. thanks for the code. i have error regarding the imutils. grab_contour. my imutils vesion is updated to 0.5.2. can you help me or tell me other ways rather than use the imutils.grab_contour? thank!
Adrian Rosebrock
I’m not sure why you wouldn’t want to use imutils, but if you want to implement the “grab_contour” function yourself, just look at the source code:
https://github.com/jrosebr1/imutils/blob/master/imutils/convenience.py#L154
Joe
Hi
I’ve followed your tutorial but after I plotting my accumEdged it dosen’t look like yours. Why?
For mine they are not clear and connected like yours
Adrian Rosebrock
Are you using the example images in this post? Or your own custom images?
Raghav
Hey Adrian,
You’ve explained about 3 objects to get sorted.
Assume that my image is an irregular single object having 5 points. How will I sort from left-right(followed by top-bottom) ?
sahar tabrizi
Hi Adrian,
Thanks for the code. Can you please also help to indexing these kind of points?
my data is different set of points distributed in x,y direction; each set includes 6 points that are distributed in x direction ( these points have similar y coordinate but different x coordinates); totally, there are 8 lines of these sets, each set located in different y coordinate. I would like to index them according to increasing y an x coordinates. could you please help me in this regard. thanks.