There were three huge influences in my life that made me want to become a scientist.
The first was David A. Johnston, an American USGS volcanologist who died on May 18th, 1980, the day of the catastrophic eruption of Mount St. Helens in Washington state. He was the first to report the eruption, exclaiming “Vancouver! Vancouver! This is it!” moments before he died in the lateral blast of the volcano. I felt inspired by his words. He knew at that moment that he was going to die — but he was excited for the science, for what he had so tediously studied and predicted had become reality. He died studying what he loved. If we could all be so lucky.
The second inspiration was actually a melding of my childhood hobbies. I loved to build things out of plastic and cardboard blocks. I loved crafting structures out of nothing more than rolled up paper and Scotch tape — at first, I thought I wanted to be an architect.
But a few years later I found another hobby. Writing. I spent my time writing fictional short stories and selling them to my parents for a quarter. I guess I also found that entrepreneurial gene quite young. For a few years after, I felt sure that I was going to be an author when I grew up.
My final inspiration was Jurassic Park. Yes. Laugh if you want. But the dichotomy of scientists between Alan Grant and Ian Malcolm was incredibly inspiring to me at a young age. On one hand, you had the down-to-earth, get-your-hands-dirty demeanor of Alan Grant. And on the other you had the brilliant mathematician (err, excuse me, chaotician) rock star. They represented two breeds of scientists. And I felt sure that I was going to end up like one of them.
Fast forward through my childhood years to present day. I am indeed a scientist, inspired by David Johnston. I’m also an architect of sorts. Instead of building with physical objects, I create complex computer systems in a virtual world. And I also managed to work in the author aspect as well. I’ve authored two books, Practical Python and OpenCV + Case Studies (three books actually, if you count my dissertation), numerous papers, and a bunch of technical reports.
But the real question is, which Jurassic Park scientist am I like? The down to earth Alan Grant? The sarcastic, yet realist, Ian Malcom? Or maybe it’s neither. I could be Dennis Nedry, just waiting to die blind, nauseous, and soaking wet at the razor sharp teeth of a Dilophosaurus.
Anyway, while I ponder this existential crisis I’ll show you how to access the individual segmentations using superpixel algorithms in scikit-image…with Jurassic Park example images, of course.
Looking for the source code to this post?
Jump Right To The Downloads SectionOpenCV and Python versions:
This example will run on Python 2.7 and OpenCV 2.4.X/OpenCV 3.0+.
Accessing Individual Superpixel Segmentations with Python, OpenCV, and scikit-image
A couple months ago I wrote an article about segmentation and using the Simple Linear Iterative Clustering algorithm implemented in the scikit-image library.
While I’m not going to re-iterate the entire post here, the benefits of using superpixel segmentation algorithms include computational efficiency, perceptual meaningfulness, oversegmentation, and graphs over superpixels.
For a more detailed review of superpixel algorithms and their benefits, be sure to read this article.
A typical result of applying SLIC to an image looks something like this:
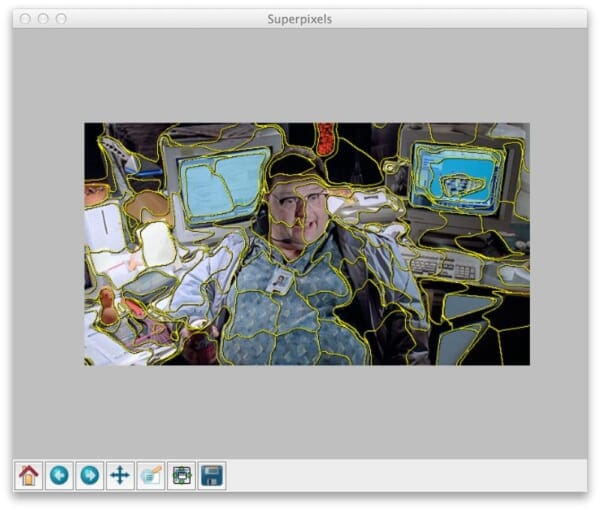
Notice how local regions with similar color and texture distributions are part of the same superpixel group.
That’s a great start.
But how do we access each individual superpixel segmentation?
I’m glad you asked.
Open up your editor, create a file named superpixel_segments.py
, and let’s get started:
# import the necessary packages from skimage.segmentation import slic from skimage.segmentation import mark_boundaries from skimage.util import img_as_float import matplotlib.pyplot as plt import numpy as np import argparse import cv2 # construct the argument parser and parse the arguments ap = argparse.ArgumentParser() ap.add_argument("-i", "--image", required = True, help = "Path to the image") args = vars(ap.parse_args())
Lines 1-8 handle importing the packages we’ll need. We’ll be utilizing scikit-image heavily here, especially for the SLIC implementation. We’ll also be using mark_boundaries
, a convenience function that lets us easily visualize the boundaries of the segmentations.
From there, we import matplotlib
for plotting, NumPy for numerical processing, argparse
for parsing command line arguments, and cv2
for our OpenCV bindings.
Next up, let’s go ahead and parse our command line arguments on Lines 10-13. We’ll need only a single switch --image
, which is the path to where our image resides on disk.
Now, let’s perform the actual segmentation:
# load the image and apply SLIC and extract (approximately) # the supplied number of segments image = cv2.imread(args["image"]) segments = slic(img_as_float(image), n_segments = 100, sigma = 5) # show the output of SLIC fig = plt.figure("Superpixels") ax = fig.add_subplot(1, 1, 1) ax.imshow(mark_boundaries(img_as_float(cv2.cvtColor(image, cv2.COLOR_BGR2RGB)), segments)) plt.axis("off") plt.show()
We start by loading our image on disk on Line 17.
The actual superpixel segmentation takes place on Line 18 by making a call to the slic
function. The first argument to this function is our image, represented as a floating point data type rather than the default 8-bit unsigned integer that OpenCV uses. The second argument is the (approximate) number of segmentations we want from slic
. And the final parameter is sigma
, which is the size of the Gaussian kernel applied prior to the segmentation.
Now that we have our segmentations, we display them on Lines 20-25 using matplotlib
.
If you were to execute this code as is, your results would look something like Figure 1 above.
Notice how slic
has been applied to construct superpixels in our image. And we can clearly see the “boundaries” of each of these superpixels.
But the real question is “How do we access each individual segmentation?”
It’s actually fairly simple if you know how masks work:
# loop over the unique segment values for (i, segVal) in enumerate(np.unique(segments)): # construct a mask for the segment print "[x] inspecting segment %d" % (i) mask = np.zeros(image.shape[:2], dtype = "uint8") mask[segments == segVal] = 255 # show the masked region cv2.imshow("Mask", mask) cv2.imshow("Applied", cv2.bitwise_and(image, image, mask = mask)) cv2.waitKey(0)
You see, the slic
function returns a 2D NumPy array segments
with the same width and height as the original image. Furthermore, each segment is represented by a unique integer, meaning that pixels belonging to a particular segmentation will all have the same value in the segments
array.
To demonstrate this, let’s start looping over the unique segments
values on Line 28.
From there, we construct a mask on Lines 31 and 32. This mask has the same width and height a the original image and has a default value of 0 (black).
However, Line 32 does some pretty important work for us. By stating segments == segVal
we find all the indexes, or (x, y) coordinates, in the segments
list that have the current segment ID, or segVal
. We then pass this list of indexes into the mask and set all these indexes to value of 255 (white).
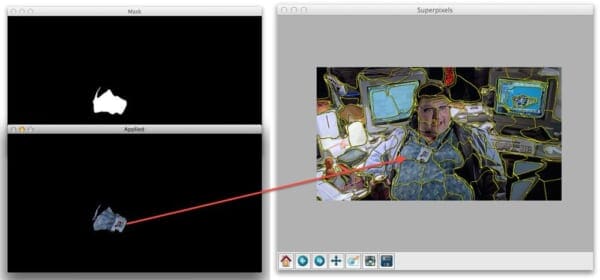
We can then see the results of our work on Lines 35-37 where we display our mask
and the mask
applied to our image.
Superpixel Segmentation in Action
To see the results of our work, open a shell and execute the following command:
$ python superpixel_segments.py --image nedry.png
At first, all you’ll see is the superpixel segmentation boundaries, just like above:
But when you close out of that window we’ll start looping over each individual segment. Here are some examples of us accessing each segment:
Nothing to it, right? Now you know how easy it is to access individual superpixel segments using Python, SLIC, and scikit-image.
What's next? We recommend PyImageSearch University.
86 total classes • 115+ hours of on-demand code walkthrough videos • Last updated: October 2024
★★★★★ 4.84 (128 Ratings) • 16,000+ Students Enrolled
I strongly believe that if you had the right teacher you could master computer vision and deep learning.
Do you think learning computer vision and deep learning has to be time-consuming, overwhelming, and complicated? Or has to involve complex mathematics and equations? Or requires a degree in computer science?
That’s not the case.
All you need to master computer vision and deep learning is for someone to explain things to you in simple, intuitive terms. And that’s exactly what I do. My mission is to change education and how complex Artificial Intelligence topics are taught.
If you're serious about learning computer vision, your next stop should be PyImageSearch University, the most comprehensive computer vision, deep learning, and OpenCV course online today. Here you’ll learn how to successfully and confidently apply computer vision to your work, research, and projects. Join me in computer vision mastery.
Inside PyImageSearch University you'll find:
- ✓ 86 courses on essential computer vision, deep learning, and OpenCV topics
- ✓ 86 Certificates of Completion
- ✓ 115+ hours of on-demand video
- ✓ Brand new courses released regularly, ensuring you can keep up with state-of-the-art techniques
- ✓ Pre-configured Jupyter Notebooks in Google Colab
- ✓ Run all code examples in your web browser — works on Windows, macOS, and Linux (no dev environment configuration required!)
- ✓ Access to centralized code repos for all 540+ tutorials on PyImageSearch
- ✓ Easy one-click downloads for code, datasets, pre-trained models, etc.
- ✓ Access on mobile, laptop, desktop, etc.
Summary
In this blog post I showed you how to utilize the Simple Linear Iterative Clustering (SLIC) algorithm to perform superpixel segmentation.
From there, I provided code that allows you to access each individual segmentation produced by the algorithm.
So now that you have each of these segmentations, what do you do?
To start, you could look into graph representations across regions of the image. Another option would be to extract features from each of the segmentations which you could later utilize to construct a bag-of-visual-words. This bag-of-visual-words model would be useful for training a machine learning classifier or building a Content-Based Image Retrieval system. But more on that later…
Anyway, I hope you enjoyed this article! This certainly won’t be the last time we discuss superpixel segmentations.
And if you’re interested in downloading the code to this blog post, just enter your email address in the form below and I’ll email you the code and example images. And I’ll also be sure to notify you when new awesome PyImageSearch content is released!
Download the Source Code and FREE 17-page Resource Guide
Enter your email address below to get a .zip of the code and a FREE 17-page Resource Guide on Computer Vision, OpenCV, and Deep Learning. Inside you'll find my hand-picked tutorials, books, courses, and libraries to help you master CV and DL!
Bruce Sharpe
That would be Dennis Nedry. 🙂
Interesting and well-written article, as usual. But I have to wonder how useful that segmentation is. It seems to have a lot of random oversegmentation. How would you go about merging segments so that you have something meaningful like shirt, computer screen, face, … to work with?
Adrian Rosebrock
Hi Bruce, thanks for the comment! Actually, oversegmentation can be a good thing. I would definitely read my previous post on superpixel segmentations, specifically the “Benefits of Superpixels” section. I think it will definitely help clear up any reasons on why using superpixels can be beneficial.
Miguel Eduardo Gil Biraud
Nice post and good memories from the movie! It’s fun to see that Dr. Oppenheimer is in a different superpixel than the atomic mushroom on the post-it note 😉
Ebrahim
Hi, thank you for your great blog. I have one question, how can I achieve a superpixels in closed region! I mean when I play with function parameters, I only get superpixels region with sometimes separated pixels. Is there a nice and easy way that I can make a graph with this superpixels? ( each superpixels is node in the graph )
Adrian Rosebrock
If you would like to construct a graph, I would abstract that to a library like igraph or NetworkX. The graph-tool package has also been getting a ton of attention lately since it’s so fast. In the future I will try to do a post where we use the super pixels to construct a graph.
Ebrahim
Thank you.
Sawyer
Hey Adrian,
I’m new to computer vision, and your posts / book have really softened the learning curve for me. Thanks for doing what you do, and doing it well.
Quick question:
when I run slic() w/ a lower number of segments (<25), I get non-continuous segments. Iterating over the segments, as in your post, will produce several "mini-segments" scattered across image at once
I was under the impression that superpixels were solitary in nature. Do you have any suggestions on how I could either
1) produce single segments while keeping (n) small OR
2) get a similar output with a different segmentation algorithm?
Thanks!
Adrian Rosebrock
Hi Sawyer, great questions, thanks for asking. If you are looking for continuous segments you’ll need to change the
enforce_connectivity
parameter of theslic
function toenforce_connectivity=True
(it isFalse
by default). You can read more about the parameters here. I would also go through the documentation on that page to read up on other segmentation algorithms you can utilize within scikit-image.Sawyer
That was a huge help. Thanks for the insight
Adrian Rosebrock
Glad to help! 🙂
Jillian Wang
Hey Adrian,
firstly, thanks for your amazing post,
secondly, I have noticed that in figure 2, the individual superpixel ” the face part segmentation” which not only contain the real face part but also contain the desk part ? which I can not very understand why? I think maybe the seed for the superpixel is near the edge of face and the superpixel search area include the desk part , could you please explain that to me? because I think this is the only reason why this superpixel contain the desk part and the left part face,while the right part face included in the neighbor superpixel .
thirdly, a further question , the superpixel segmentation like above figure 2 is not good for later process like face detection or head detection or object detection, could you give me some suggestion on how to deal with the superpixel like that kind. maybe i should try the similarity of the pixels in this superpixel to exclude the pixels that should not actually included in this superpixel ,but this computation will be very heavy, will you give me another suggestion?
finally
best wishes
thank you very much
Adrian Rosebrock
Hi Jillian, for more information on how SLIC performs the segmentation I would suggest taking a look at the SLIC paper. As you can see from their paper, the goal is not to create perfect semantic superpixels, but to quickly divide the image into regions that can be used as building blocks for other algorithms — this does not mean that the regions are perfect. If you are trying to exclude pixels from a given superpixel, then yes, you will likely have to compute some sort of similarity metric.
Jillian Wang
Hey Adrian,
thanks a lot
PS, I am going to study the first course of building my first image engine, so thanks for your help in my journey to becoming a computer vision and image search engine guru, I will do my best. O(∩_∩)O
Job Thomas
Hey Adrian,
Thanks for the amazing post! But say I wanted to extract out the shirt part alone from the superpixalated image, what direction should I be taking from here?
Adrian Rosebrock
Hey Job, there would be multiple ways to solve this problem. If you know what the shirt texture/color looks like, then you can simply loop over the super pixels, compare them to the color/pattern, and extract if necessary. Otherwise, if the shirt is entirely unknown, superpixels probably aren’t the best way to solve this problem. Instead, you’ll need to utilize machine learning to “train” a classifier to recognize shirts in images. Something like HOG + Linear SVM would be super helpful here.
Job Thomas
Thanks a lot, Adrian! My efforts are on a dataset where I don’t know the color/pattern. Just wanted to know if there was a possibility using superpixels. Thanks for pointing me in the right direction. Cheers!
Nawal
Hey Adrain! thanks for your useful blog, that was help me very much in my students PHD! and I want to loop over the super pixels to extract same feature! but i can’t find instruction for that without using the mask ! please can you give me help !
Adrian Rosebrock
What types of features are you trying to extract from the superpixel? In most cases you would:
1. Loop over each superpixel and extract its contour.
2. Compute bounding box of contour.
3. Extract the rectangular ROI.
4. Pass that into your descriptor to obtain your feature vector.
Many image descriptors (such as HOG, for example) assume a rectangular ROI. A good way to obtain this is to simply extract the bounding box of the superpixel.
Nawal
Thank you for fast answer! I want to extract LBP and Histogram HSV! I tried to algortithm your instructions and see if it works!
Adrian Rosebrock
If you’re extracting a HSV histogram, then you can use the
cv2.calcHist
method and supply the mask for the superpixel. For LBP, you can either use the mask (along with some NumPy masked array magic) or you can simply compute the LBP for the bounding box of the superpixel. Both are acceptable methods of extracting features from a superpixel.Júlio César Batista
Hey Adrian 🙂
You suggested to calculate the bounding box of the superpixel to extract HOG features. But, by using the bounding box it wouldn’t calculate some noisy features because the bounding box of the superpixel would be overlapping other superpixels?
Adrian Rosebrock
Yep, you’re absolutely right. You would be computing features that are outside the superpixel itself and might even overlap with other superpixels. In practice, that’s totally acceptable 🙂
Andrea
Hi Adrian,
Do you have any suggestions on how to extract a texture (and colour) features from each superpixel?
The purpose is to obtain coherent texture-colour regions, each with a descriptor.
Is it perhaps better to do extract the texture features (HOG or GLCM features) from the unsegmented image, and then create superpixels through a k-means clustering of the features? The representative feature for each superpixel is then the mean of it’s member pixels. This seems a bit like overkill.
I’m new to computer vision, so pardon me if I said anything silly.
Thank you for your blog!
Adrian Rosebrock
Hey Andrea, I would suggest running superpixel segmentation first and then computing your texture features across each superpixel. If you are computing the GLCM, I would also suggest using Haralick texture features. Local Binary Patterns over each superpixel would also be a great route to go.
Another route you could explore is extracting a “bag-of-visual-words” (sometimes called “textons” in the context of texture) from each image. This approach is involves extracting texture features from superpixels in each image; clustering them using k-means; and then quantizing the texture feature vectors from each image into the closest centroid to form a histogram. I haven’t had a chance to cover this on the PyImageSearch blog, but I will be doing it soon.
Amy
Hi Adrian! I have went through your blogs since three years ago. I had implemented face detection, recognition in my final year project and it went very well! As of now, I’m really interested to know more about this superpixels thing. And I’m very glad if you could please show us how to utilize bag-of-visual-words with well known classifiers such as SVM and CRC. Thanks!
Adrian Rosebrock
Hi Amy — is there anything in particular about superpixels you are trying to learn? I cover an introduction to superpixels here
As for the bag-of-visual-words model, SVM, classification, and CBIR, I have 30+ lessons on those techniques inside the PyImageSearch Gurus course. Be sure to take a look!
Amy
Apologize for the late reply. Just realize your comment today. 🙂
Oh, I am about the learn on what we can do with the superpixel. I mean, in object recognition, can I compute each of the superpixel according to the texture and colour?
And btw, thanks for the info. Really appreciate it!
David
Hi Adrian,
I tried to run your example but I had a problem, I have python 2.7.10 and opencv 2.4.10 and I got this error :
OpenCV Error: Unspecified error (The function is not implemented. Rebuild the library with Windows, GTK+ 2.x or Carbon support. If you are on Ubuntu or Debian, install libgtk2.0-dev and pkg-config, then re-run cmake or configure script) in cvShowImage.
Any Suggestion?
Thanks
Adrian Rosebrock
The error you are getting is related to GTK, which is essentially a GUI library that OpenCV uses to display images to your screen. You need to install GTK followed by re-compiling and re-installing OpenCV. If you’re on a Debian machine, installing GTK is super easy:
sudo apt-get install libgtk2.0-dev
Trevor
Hi,
Thank you for the tutorial, however is there any chance to convert this into Matlab code as this is very useful for my project?
Thanks
Adrian Rosebrock
Sorry, I do not do any work in Matlab. But I do believe SLIC is implemented inside the VLFeat library which has MATLAB bindings.
trevor
Hi Mr Rosebrock,
Thanks for the reply, I am actually using this library function, I have the segmented image, but i cannot access each superpixel……
Thanks
Melrick Nicolas
thats great .. do you have a feature extrcation using GLCM ?
Adrian Rosebrock
I don’t have any example tutorials using the GLCM on the PyImageSearch blog, but I do cover GLCM and Haralick features inside the PyImageSearch Gurus course.
Niki
Hi Adrian,
Thank you for the amazing post! I’m trying to draw the grayscale image of “segments” array with the corresponding label on each segment. I can get the image, but I’m not quite sure how I can enter the label on the corresponding region of this image. Any suggestion?
Thank you!
Adrian Rosebrock
You can draw the segment number using the
cv2.putText
function. A good example of how to usecv2.putText
can be found here.Moni
hi..Can we recombine all individual segments as original image after segment watermark ?
Adrian Rosebrock
Hey Moni — what do you mean by “recombine all individual segments”? If your goal is to obtain the original image why apply superpixels to start?
lee
hi… Thank you for the tutorial, i read your some posts about pedestrian detection, and i am wondering whether superpixels could be used for human detection or tracking?
Adrian Rosebrock
I wouldn’t recommend superpixels for tracking. Once you detect a person via the HoG method I would apply a correlation tracker to track the person as they move around the video stream.
ambika
hey!
i wanted to know if you have nay algorithm to watermark each segment individually without affecting the original image.
Adrian Rosebrock
Hi Ambika — can you clarify what you mean by “watermarking each segment individually”? What is “each segment”?
ambika
Hello Adrian,
I am making a project in which i need to divide my image into certain superpixels and then add an invisible watermark to each superpixel individually. For that, I may need to access each superpixel separately and then append the watermark on them.
Also on the other side, i need to remove the watermark which i have applied from each superpixel and retrieve the original image.
So for this, i wanted to know of you have any idea about how to separately access the superpixels and add separate watermarks to them as well as remove them.
ambika
by segment i mean superpixels.
i need to watermark each superpixel individually so i need to store them individually first, add invisible watermark to them and then finally joining them to get back the original image with invisible watermarks all over it.
Adrian Rosebrock
That is totally possible. Follow this tutorial on watermarking. Then, extract each superpixel (the ROI), apply the watermark, and add it back to the image. This can be accomplished using simply NumPy array slicing. If you need help getting started with learning OpenCV, be sure to take a look at Practical Python and OpenCV.
Ambika
Thanks Adrian! But the post that you have referred to in this comment seems to teach how to put a visible watermark on an image. Whereas, I want something to be invisible that would not show any difference between the original as well as watermarked image.
I know you might think if the watermark is invisible then what is the use of it. But it the need of my image authentication part for which i need the same.
It would be great if you can help!
Adrian Rosebrock
It sounds like you are referring to “image steganography”. I would suggest researching that topic further.
Ambika
Hello Adrian!
I have started implementing the idea which you have shared with me in this comment. Currently I have divided my image into several superpixels (number of superpixels to be split is dynamically taken) and have saved each superpixel as an image. Now what I am thinking is to read these segment images one-by-one, and then to embark the watermark (visible one) on them. But as you know, the segments created are just in a small part of the whole image and the rest of the part remains black always. So I need an idea of how can I set the watermark specifically on the part where my segment is present. Please help me out with this.
Thankyou!
omri
Is there a way to get the segment ID by a coordinate? meaning, I have a super pixels, and by clicking the wanted pixel, i want to mask the entire pixels so the wanted one will be in white and all the others in black?
Adrian Rosebrock
I would suggest creating a separate NumPy array and store the segment ID for each corresponding superpixel in the array. Basically, you are drawing the contours for each superpixel with the value of the segment ID. Then, at any point, if you want to know the superpixel ID of a given (x, y)-coordinate just pass the (x, y)-coordinate into the NumPy array.
Rafael
Thank you. There is a way to crop each segment in a new image?
Adrian Rosebrock
You would need to compute the bounding box for each superpixel and/or mask the ROI after extracting the bounding box. You can then save each ROI to disk via
cv2.imwrite
.Oshada
Hi Adrian,
I have a text inside a diamond shape(flowchart symbol for conditions). I have detected the diamond shape and obtain four coordinates of that. And I want to crop text area part using smaller diamond shape (lowering above coordinates accordingly).Is there a way get around that?
Adrian Rosebrock
Do you have an example image of what you’re working with? Seeing an example image would be easier to provide suggestions.
Oshada
I managed to do that after few efforts by creating a mask and cv2.bitwise_and. I want to create an application for users to draw a flowchart(hand-drawn) for their stored procedures and get the sql query from it. Here is one of images I am working on these days.
https://ibb.co/d10sEG
What I wanted is to get the text part inside each shapes and feed them to a text recognition module. My next and last task is to recognize arrows. So far I put those arrow shapes in my else condition in the shape detection. I tried to create some features for the arrows using contours, but no luck so far. Is there any way to do that without using ML or DL?
Adrian Rosebrock
Detecting the actual text can be accomplished via morphological operations. Take a look at how I do it here. Basically you need to extract the ROI for the shape and then apply the morphological operations to the ROI to obtain the text ROI. The text rOI can go through Tesseract.
As for detecting arrows you should be able to do that via aspect ratio, solidity, and extent contour properties. All of these are covered inside the PyImageSearch Gurus course as well (and in the context of shape recognition). Be sure to take a look!
shinigami
Hi Adrian, I’m trying to run your algorithm you’ll have any idea why it marks invalid syntax on line 33?
Adrian Rosebrock
Which version of Python and scikit-image are you using?
Amyraah
Hi Adrian!
I downloaded this codes and it works perfectly! Thanks!
Here, could i ask for your opinion?
What if i want to pass each “inspecting segment” image to Local Binary Pattern (with codes provided in one of your tutorial) and compare it with the training image accordingly.
My question here is, how to pass every image to the LBP in one python script? Or do u have any suggestion? Rlly appreciate it!
Adrian Rosebrock
I would suggest looping over each of the individual superpixels, computing the bounding box (since the LBP algorithm assumes a rectangular input, unless you want to try your hand at array masking, which introduces many problems), and then passing the ROI into your LBP extractor.
Amyraah
I see. Therefore, by computing bounding box, i don’t have to pass each inspecting segment image individually to the LBP? Am I right?
Thanks for your detailed explanation! 🙂
Adrian Rosebrock
Well, you are still passing each individual segment into the LBP descriptor — the difference is that you are computing the bounding box and extracting the ROI of the segment before it goes into the LBP descriptor.
Stas
Hello, Adrian.
Thank you for a code. I’ve changed it a bit for my needs and save segments as individual PNG files, instead of showing it (cv2.imwrite).
I want to change background area of segments from black to alpha, but I can’t figure out how to do it. Can you help with it?
Adrian Rosebrock
You’ll need to create an alpha channel for the image. I would use this tutorial as a starting point.
Tahereh
Hi Adrian
Thank you for your great post. I want to use superpixel algorithm for medical Image segmentation. I need to create a graph from superpixels and label each superpixel to the region of interest or background. do you have any code for creating a graph from superpixels?
Adrian Rosebrock
Hey Tahereh — this sounds like a great application; however, I do not have any code/tutorials on constructing a graph from superpixels. The good news is that it’s not too hard. For each superpixel, compute the centroid, and then use a graph library (there are many for Python) to add the centroid to the graph. From there you’ll be able to traverse the graph.
Jacopo Marcolini
Hi Adrian!
How can I compute the centroid of each superpixel?
Adrian Rosebrock
There are a few ways to do this, some more efficient but harder to implement, others very easy to implement but slower. What is your experience level with computer vision and OpenCV?
surya
thank you for the very good tutorial, always. what if i want to access not only one segment but more than one. please guide me how to. thank you very much
Adrian Rosebrock
You can use the same code to loop over each of the individual superpixels and then extract each of the superpixels you are interested in. I’m not sure how you are trying to define which superpixels you are specifically interested in though.
surya
Thank you very much for your useful reply. for example: i want to extract each two regions
region 1+ region 2, region 3 + region 4, region 5 + region 6, etc…… until end of last region.
Adrian Rosebrock
Thanks for the clarification.
First, determine the unique number of segments and sort them. Then loop over each of the values, incrementing by two at each iteration of the loop.
surya
Thank you very much for all your brilliant help. I am so glad to have you on internet.
wish you all the best
surya
Thank you very much. you are so genius and very kind. thanks god found and bookmarked your blog.
Adrian Rosebrock
Thank you for the kind words, Surya, I really appreciate that.
Aswathi
Hi Adrian,
Thank you for your code and it works perfectly. I would also like to know how i can detect feature points from each segment of the image block. I tried using a SIFT algorithm during accessing each segments but didnt work out .
Adrian Rosebrock
I would suggest you:
1. Detect keypoints first
2. Then apply superpixel segmentation
3. Loop over the superpixels
4. Select all keypoints that are within the mask of the current superpixel
I hope that helps!
Ad
Hi, if I want to use grabcut on the image already run through slic how would I go about it? Where do I start? Thanks
Adrian Rosebrock
You would first need to determine which superpixels should belong to the GrabCut mask/bounding box. Then either:
1. Compute the bounding box of the superpixels
2. Or create a binary mask for the superpixel area.
Use that as the seed to GrabCut.
Armando
Hello Adrian.. Thank you so much for this.
I was wonderinh though: I want to use the superpixels obtained from SLIC superpixel segmentation as input for an SVM binary classifier. I already have ground-truth binary masks but I am not really sure how to match it for each superpixel. I was thinking about bitwise masking the mas for each segment with the groundtruth but I am not sure how to check if a particular superpixel is marked as true in the binary mask.. Hope I made my self clear? Thanks in adavance
ikram
how can i save only , the part segmented (without the mask) i just want the result (exemple , juste the face of the person without a black background )
i hope that you reply me as soon as possible , thanks ^^
Adrian Rosebrock
You can use the “cv2.imwrite” function to save an image or mask to disk.
Manan
Thanks for this amazing article. How should I extract features like Fourier descriptors, color and texture features and dense SIFT features etc from each superpixel, since each superpixel is of irregular shape.
Adrian Rosebrock
The simplest method would be to compute the bounding box of the superpixel, extract that ROI, and apply standard processing to it. For keypoint detection you could detect on the ROI and then ignore any keypoints outside the original superpixel coordinates (via masking).
If you’re interested in learning more about feature extraction you should refer to the PyImageSearch Gurus course where I discuss feature extraction in detail.