Last week we kicked-off the OpenCV 3.0 install fest by detailing how to install OpenCV 3.0 and Python 2.7+ on the OSX platform.
Today we are going to continue the OpenCV 3.0 install instruction series by moving over to the Ubuntu operating system.
In the remainder of the post I will provide instructions on how to configure and install OpenCV 3.0 and Python 2.7+ on Ubuntu. I have personally tested these instructions on Ubuntu 14.04, but they should pretty much work on any Debian-based operating system.
A quick note before we get started: Yes, OpenCV 3.0 is indeed compatible with Python 3+. However, the install instructions are slightly different between Python 2.7+ and Python 3+. In an effort to keep each article self-contained and easy to follow, I am creating separate OpenCV 3.0 install tutorials for Python 2.7 and Python 3+. If you would like to use OpenCV 3.0 and Python 3+ on your Ubuntu system, please keep an eye on this blog — I will be posting OpenCV 3.0 and Python 3+ install instructions later this month. But for the time being, let’s stick with Python 2.7.
How to Install OpenCV 3.0 and Python 2.7+ on Ubuntu
UPDATE: The tutorial you are reading now covers how to install OpenCV 3.0 with Python 2.7+ bindings on Ubuntu 14.04. This tutorial still works perfectly, but if you want to install OpenCV on the newer Ubuntu 16.04 with OpenCV 3.1 and Python 2.7 (or Python 3.5) bindings, please use this freshly updated tutorial:
https://pyimagesearch.com/2016/10/24/ubuntu-16-04-how-to-install-opencv/
This is the second article in the OpenCV 3.0 install-fest series. Last week we covered how to install OpenCV 3.0 and Python 2.7+ on OSX. Today we are going to perform the same OpenCV 3.0 and Python 2.7 installation, only on the Ubuntu operating system. In general, you should find installing OpenCV 3.0 and Python 2.7+ on Ubuntu much easier than installing on OSX.
Step 1:
Open up a terminal and update the apt-get
package manager followed by upgrading any pre-installed packages:
$ sudo apt-get update $ sudo apt-get upgrade
Step 2:
Now we need to install our developer tools:
$ sudo apt-get install build-essential cmake git pkg-config
The pkg-config
is likely already installed, but be sure to include it just in case. We’ll be using git
to pull down the OpenCV repositories from GitHub. The cmake
package is used to configure our build.
Step 3:
OpenCV needs to be able to load various image file formats from disk, including JPEG, PNG, TIFF, etc. In order to load these image formats from disk, we’ll need our image I/O packages:
$ sudo apt-get install libjpeg8-dev libtiff4-dev libjasper-dev libpng12-dev
Step 4:
At this point, we have the ability to load a given image off of disk. But how do we display the actual image to our screen? The answer is the GTK development library, which the highgui
module of OpenCV depends on to guild Graphical User Interfaces (GUIs):
$ sudo apt-get install libgtk2.0-dev
Step 5:
We can load images using OpenCV, but what about processing video streams and accessing individual frames? We’ve got that covered here:
$ sudo apt-get install libavcodec-dev libavformat-dev libswscale-dev libv4l-dev
Step 6:
Install libraries that are used to optimize various routines inside of OpenCV:
$ sudo apt-get install libatlas-base-dev gfortran
Step 7:
Install pip
, a Python package manager:
$ wget https://bootstrap.pypa.io/get-pip.py $ sudo python get-pip.py
Step 8:
Install virtualenv and virtualenvwrapper. These two packages allow us to create separate Python environments for each project we are working on. While installing virtualenv
and virtualenvwrapper
is not a requirement to get OpenCV 3.0 and Python 2.7+ up and running on your Ubuntu system, I highly recommend it and the rest of this tutorial will assume you have them installed!
$ sudo pip install virtualenv virtualenvwrapper $ sudo rm -rf ~/.cache/pip
Now that we have virtualenv
and virtualenvwrapper
installed, we need to update our ~/.bashrc
file:
# virtualenv and virtualenvwrapper export WORKON_HOME=$HOME/.virtualenvs source /usr/local/bin/virtualenvwrapper.sh
This quick update will ensure that both virtualenv
and virtualenvwrapper
are loaded each time you login.
To make the changes to our ~/.bashrc
file take effect, you can either (1) logout and log back in, (2) close your current terminal window and open a new one, or preferably, (3) reload the contents of your ~/.bashrc
file:
$ source ~/.bashrc
Lastly, we can create our cv
virtual environment where we’ll be doing our computer vision development and OpenCV 3.0 + Python 2.7+ installation:
$ mkvirtualenv cv
Step 9:
As I mentioned above, this tutorial covers how to install OpenCV 3.0 and Python 2.7+ (I’ll have a OpenCV 3.0 + Python 3 tutorial available later this month), so we’ll need to install our Python 2.7 development tools:
$ sudo apt-get install python2.7-dev
Since OpenCV represents images as multi-dimensional NumPy arrays, we better install NumPy into our cv
virtual environment. We also install imutils — my package of convenience functions:
$ pip install numpy $ pip install imutils
Step 10:
Our environment is now all setup — we can proceed to change to our home directory, pull down OpenCV from GitHub, and checkout the 3.0.0
version:
$ cd ~ $ git clone https://github.com/Itseez/opencv.git $ cd opencv $ git checkout 3.0.0
Update (3 January 2016): You can replace the 3.0.0
version with whatever the current release is (as of right now, it’s 3.1.0
). Be sure to check OpenCV.org for information on the latest release.
As I mentioned last week, we also need the opencv_contrib repo as well. Without this repository, we won’t have access to standard keypoint detectors and local invariant descriptors (such as SIFT, SURF, etc.) that were available in the OpenCV 2.4.X version. We’ll also be missing out on some of the newer OpenCV 3.0 features like text detection in natural images:
$ cd ~ $ git clone https://github.com/Itseez/opencv_contrib.git $ cd opencv_contrib $ git checkout 3.0.0
Again, make sure that you checkout the same version for opencv_contrib
that you did for opencv
above, otherwise you could run into compilation errors.
Time to setup the build:
$ cd ~/opencv $ mkdir build $ cd build $ cmake -D CMAKE_BUILD_TYPE=RELEASE \ -D CMAKE_INSTALL_PREFIX=/usr/local \ -D INSTALL_C_EXAMPLES=ON \ -D INSTALL_PYTHON_EXAMPLES=ON \ -D OPENCV_EXTRA_MODULES_PATH=~/opencv_contrib/modules \ -D BUILD_EXAMPLES=ON ..
Update (3 January 2016): In order to build OpenCV 3.1.0
, you need to set -D INSTALL_C_EXAMPLES=OFF
(rather than ON
) in the cmake
command. There is a bug in the OpenCV v3.1.0 CMake build script that can cause errors if you leave this switch on. Once you set this switch to off, CMake should run without a problem.
Notice how compared to last week our CMake command is substantially less verbose and requires less manual tweaking — this is because CMake is able to better automatically tune our install parameters (at least compared to OSX).
Now we can finally compile OpenCV:
$ make -j4
Where you can replace the 4 with the number of available cores on your processor to speedup the compilation.
Here’s an example of OpenCV 3.0 compiling on my system:
Assuming that OpenCV compiled without error, you can now install it on your Ubuntu system:
$ sudo make install $ sudo ldconfig
Step 11:
If you’ve reached this step without an error, OpenCV should now be installed in /usr/local/lib/python2.7/site-packages
However, our cv
virtual environment is located in our home directory — thus to use OpenCV within our cv
environment, we first need to sym-link OpenCV into the site-packages
directory of the cv
virtual environment:
$ cd ~/.virtualenvs/cv/lib/python2.7/site-packages/ $ ln -s /usr/local/lib/python2.7/site-packages/cv2.so cv2.so
Step 12:
Congratulations! You have successfully installed OpenCV 3.0 with Python 2.7+ bindings on your Ubuntu system!
To confirm your installation, simply ensure that you are in the cv
virtual environment, followed by importing cv2
:
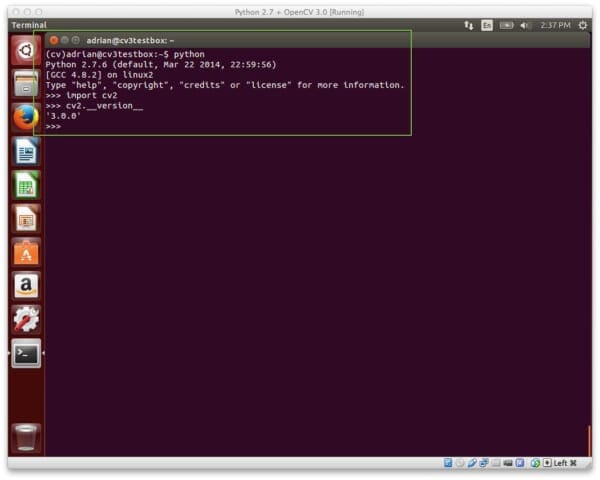
$ workon cv $ python >>> import cv2 >>> cv2.__version__ '3.0.0'
Here’s an example of demonstrating the OpenCV 3.0 and Python 2.7+ install on my own Ubuntu machine:
Step 13:
Now that OpenCV has been configured and installed, let’s build a quick Python script to detect the red game cartridge in the image named games.jpg
below:
Open up your favorite editor, create a new file, name it find_game.py
, and insert the following code:
# import the necessary packages import numpy as np import imutils import cv2 # load the games image image = cv2.imread("games.jpg") # find the red color game in the image upper = np.array([65, 65, 255]) lower = np.array([0, 0, 200]) mask = cv2.inRange(image, lower, upper) # find contours in the masked image and keep the largest one cnts = cv2.findContours(mask.copy(), cv2.RETR_EXTERNAL, cv2.CHAIN_APPROX_SIMPLE) cnts = imutils.grab_contours(cnts) c = max(cnts, key=cv2.contourArea) # approximate the contour peri = cv2.arcLength(c, True) approx = cv2.approxPolyDP(c, 0.05 * peri, True) # draw a green bounding box surrounding the red game cv2.drawContours(image, [approx], -1, (0, 255, 0), 4) cv2.imshow("Image", image) cv2.waitKey(0)
You’ll also need to download the games.jpg image and place it in the same directory as your find_game.py
file. Once the games.jpg
file has been downloaded, you can execute the script via:
$ python find_game.py
Assuming that you have downloaded the games.jpg
image and placed it in the same directory as our find_game.py
script, you should see the following output:
Notice how our script was able to successfully detect the red game cartridge in the right portion of the image, followed by drawing a green bounding box surrounding it.
Obviously this isn’t the most exciting example in the world — but it has demonstrated that we have OpenCV 3.0 with Python 2.7+ bindings up and running on our Ubuntu system!
So, what’s next?
Congrats! You have a brand new, fresh install of OpenCV on your Ubuntu system — and I’m sure you’re just itching to leverage your new install to build some awesome computer vision apps.
But I’m also willing to bet that you’re just getting started learning computer vision and OpenCV, and you’re probably feeling a bit confused and overwhelmed on where exactly to start.
Personally, I’m a big fan of learning by example, so a good first step would be to read this blog post on accessing your webcam with OpenCV. This tutorial details the exact steps you need to take to (1) capture photos from your webcam and (2) access the raw video stream.
And if you’re really interested in leveling-up your computer vision skills, you should definitely check out my book, Practical Python and OpenCV + Case Studies. My book not only covers the basics of computer vision and image processing, but also teaches you how to solve real world computer vision problems including face detection in images and video streams, object tracking in video, and handwriting recognition.
So let’s put your fresh install of OpenCV on your Ubuntu system to good use — just click here to learn more about the real-world projects you can solve using your new OpenCV install + Practical Python and OpenCV .
What's next? We recommend PyImageSearch University.
86 total classes • 115+ hours of on-demand code walkthrough videos • Last updated: October 2024
★★★★★ 4.84 (128 Ratings) • 16,000+ Students Enrolled
I strongly believe that if you had the right teacher you could master computer vision and deep learning.
Do you think learning computer vision and deep learning has to be time-consuming, overwhelming, and complicated? Or has to involve complex mathematics and equations? Or requires a degree in computer science?
That’s not the case.
All you need to master computer vision and deep learning is for someone to explain things to you in simple, intuitive terms. And that’s exactly what I do. My mission is to change education and how complex Artificial Intelligence topics are taught.
If you're serious about learning computer vision, your next stop should be PyImageSearch University, the most comprehensive computer vision, deep learning, and OpenCV course online today. Here you’ll learn how to successfully and confidently apply computer vision to your work, research, and projects. Join me in computer vision mastery.
Inside PyImageSearch University you'll find:
- ✓ 86 courses on essential computer vision, deep learning, and OpenCV topics
- ✓ 86 Certificates of Completion
- ✓ 115+ hours of on-demand video
- ✓ Brand new courses released regularly, ensuring you can keep up with state-of-the-art techniques
- ✓ Pre-configured Jupyter Notebooks in Google Colab
- ✓ Run all code examples in your web browser — works on Windows, macOS, and Linux (no dev environment configuration required!)
- ✓ Access to centralized code repos for all 540+ tutorials on PyImageSearch
- ✓ Easy one-click downloads for code, datasets, pre-trained models, etc.
- ✓ Access on mobile, laptop, desktop, etc.
Summary
To celebrate the OpenCV 3.0 release, I am working my way through OpenCV 3.0 and Python 2.7/Python 3.4 installation instructions on OSX, Ubuntu, and the Raspberry Pi.
Last week I covered how to install OpenCV 3.0 and Python 2.7+ on OSX.
And today we covered how to install OpenCV 3.0 with Python 2.7 bindings on Ubuntu. I have personally tested these instructions on my own Ubuntu 14.04 machine, but they should work on any Debian-based system.
Next week we’ll continue the install-fest and hop back to OSX — this time installing OpenCV 3.0 and Python 3!
This will be the first time we’ve used Python 3 on the PyImageSearch blog, so you won’t want to miss it!
And please consider subscribing to the PyImageSearch Newsletter by entering your email address in the form below. As we work through the OpenCV install-fest, I’ll be sending out updates as each new OpenCV 3.0 + Python install tutorial is released!
Join the PyImageSearch Newsletter and Grab My FREE 17-page Resource Guide PDF
Enter your email address below to join the PyImageSearch Newsletter and download my FREE 17-page Resource Guide PDF on Computer Vision, OpenCV, and Deep Learning.
Mitch Berkson
So where is games.jpg?
Adrian Rosebrock
Hey Mitch, I saw your other comment, but for further clarification I’ll add the
games.jpg
link here to help other readers out: https://pyimagesearch.com/wp-content/uploads/2015/06/games.jpgAlbert
Right click -> Save image as …
Adrian Rosebrock
I’ll also add that the code + images is available in the source code download of the post.
Mitch Berkson
Doh. Can just download games.jpg from the browser.
Frank Frederic
Thank you Adrian for the guide.
Are you able to install the combination OpenCV 3 + Python 3 on any platform?
I’m long for this.
Adrian Rosebrock
I’ve personally installed OpenCV 3.0 + Python 3 on OSX, Linux (Debian based systems), and the Raspberry Pi. I do not have a Windows system, otherwise I would probably give that a shot as well.
Red
I’m constantly struggling with “Missing PythonLibraries” for both the 2.7 and 3.x using an Xubuntu 14.04 LTS. Development packages for both Python versions are installed. Funny thing is that every second time I run `cmake ..` in the build directory of OpenCV 3’s source directory I get that the libraries for Python 2.7 are found. When I get that I’m also able to build the Python libs for 2.7. For Python 3.x not the same luck sadly. After two months still unable to compile the damn libs hence I’m unable to properly use OpenCV 3 in Python 3.
Adrian Rosebrock
I’m sure this is a dumb question on my part, but after you looked at my OpenCV 3 + Python 3 installation tutorial?
shixudongleo
Should I set the OPENCV_EXTRA_MODULES_PATH explicitly so that cmake can include the opencv_contrib modules?
Or the cmake can automatically locate the opencv_contrib directory because opencv and opencv_contrib directories are download side-by-side.
Adrian Rosebrock
You need to explicitly set the
OPENCV_EXTRA_MODULES_PATH
like this:-D OPENCV_EXTRA_MODULES_PATH=~/opencv_contrib/modules
Also, just realized that I didn’t mention that in the original post. I have updated it, thanks for pointing it out Xudong!
Sébastien Vincent
Hi
It seems to me that there’s a small mistake in the build setup instruction. The two dots should not be before the OPENCV_EXTRA_MODULES_PATH option but at the very end:
cmake -D CMAKE_BUILD_TYPE=RELEASE \
-D CMAKE_INSTALL_PREFIX=/usr/local \
-D INSTALL_C_EXAMPLES=ON \
-D INSTALL_PYTHON_EXAMPLES=ON \
-D BUILD_EXAMPLES=ON
-D OPENCV_EXTRA_MODULES_PATH=~/opencv_contrib/modules .. <== there!
Adrian Rosebrock
Thanks for pointing this out Sébastien! I have fixed the error 🙂
Anne
Dear Adrian,
At the ending of Step #10, is there a chance of getting errors if you type the command ‘make install’ instead of ‘sudo make install.’? Is there a way of doing it without sudo?
Thanks! 🙂
Adrian Rosebrock
Unless you set the install directory to something other than
/usr/local
you will need sudo permissions to install.Chris Viehoff
I did not get any error but in step11 checking for the files in /usr/local/lib/python2.7/site-packages …there were no files created.
Adrian Rosebrock
Take a look at your output from
cmake
, like in this screenshot and look for thepackages path
. This will tell you where the generatedc2.so
file will be stored. It’s possible that CMake had generated a differentpackages path
on your system.Refik Can
I also did not find cv2.so file under /usr/local/lib/python2.7/site-packages and my cmake build python options are same with your screenshot.
Adrian Rosebrock
Hey Refik, just to confirm — you ran
$ make install
after compiling, correct? If so, can you check in your/usr/local/lib/python2.7/dist-packages
directory to see if it ended up there?Finally, check in your
build/lib
directory as well. You should find thecv2.so
file there after a successful compilation. Themake install
command just copies thecv2.so
binary to the packages path.Evan Zamir
I have a similar issue installing on a clean (Docker) version of Ubuntu 14.04. The only instructions I didn’t follow were installing the virtualenv (which doesn’t make much sense since I’m using Docker anyway).
I can’t find cv2.so anywhere, not in /lib/build and not in site-packages or dist-packages. Any idea what might have gone wrong? No errors encountered along the way. Seems odd.
Adrian Rosebrock
After the compile did you run
sudo make install
? Also be sure to check the
lib
sub-directory ofbuild
.You might also want to try searching the entire Pi for the
cv2.so
file as well:$ find / -name "cv2.so"
Max Gordon
Thanks for an excellent tutorial! I’m having a samilar problem on Ubuntu 14.04. I’ve solved it by doing a “sudo cp lib/cv2.so /usr/local/lib/python2.7/dist-packages/” – it does feel like a hack and it would be nice to understand why this issue appears.
It seems that cmake doesn’t find the python2.7 libraries. I think the problem in my case is that it fails to find the python libraries, I get the:
Could NOT find PythonLibs (missing: PYTHON_INCLUDE_DIRS) (found suitable exact version “2.7.6”)
The part corresponding to you screenshot is just “Libraries: No” for the Python 2 section. I’ve also noticed that instead of site-packages it uses the dist-packages. From googling I’ve found a few hints (the best one is probably http://askubuntu.com/questions/479260/cmake-can-not-find-pythonlibs) but I’m not familiar enough with cmake to start changing the script and the python-dev is alreade installed.
Adrian Rosebrock
It might “feel” like a hack, but in reality that’s all the
sudo make install
command does for the Python bindings. It just copies thecv2.so
file into the specified location.Vincent
Thanks a lot Adrian! Everything worked great for me. I could even find the red cartridge.
As I located the cv2.so in the opencv/build/lib directory, I copied it in the dist-package with ” sudo cp lib/cv2.so /usr/local/lib/python2.7/dist-packages/ “, as Max said.
Thanks again for all this, guys.
plon.io
I have the same problem, and upgrading cmake 2.8->3.2 helps (http://askubuntu.com/questions/479260/cmake-can-not-find-pythonlibs)
sudo apt-get install software-properties-common
sudo add-apt-repository ppa:george-edison55/cmake-3.x
sudo apt-get update
sudo apt-get install –only-upgrade cmake
for me was also crucial to install
sudo apt-get install qt5-default libvtk6-dev
Red
Kudos for the tip! I had problems for both Python 2.7 and Python 3.4 but after upgrading cmake everything was found and configured appropriately. Thanks a lot!
hjjoo
Thank you!!! so!! much!!!!
John
Thanks, sorted also! Had to remember to delete CMakeCache.txt in the build folder before running CMake again.
Chris Viehoff
when I run
cmake -D CMAKE_BUILD_TYPE=RELEASE \
-D CMAKE_INSTALL_PREFIX=/usr/local \
-D INSTALL_C_EXAMPLES=ON \
-D INSTALL_PYTHON_EXAMPLES=ON \
-D BUILD_EXAMPLES=ON ..
-D OPENCV_EXTRA_MODULES_PATH=~/opencv_contrib/modules
the last command does not get executed and remains on the command line by itself:
(cv)chris@theLab:~/opencv/build$ -D OPENCV_EXTRA_MODULES_PATH=~/opencv_contrib/modules
Adrian Rosebrock
Hi Chris, thanks for pointing this out, I was missing an extra “\” after the
-D BUILD_EXAMPLES=ON ..
part. I have updated the post and added in the extra slash, please go back up and try copying and pasting the command again.Caio Iglesias
I installed opencv3 directly to the virtual enviroment so I can keep opencv3 on “cv” and leave opencv2 on the “gurus” enviroment as we move through the pyimagesearch gurus course. Just wanted to share the code here if someone ends up needing it.
cmake -D CMAKE_BUILD_TYPE=RELEASE \
-D CMAKE_INSTALL_PREFIX=$VIRTUAL_ENV/local/ \
-D INSTALL_C_EXAMPLES=ON \
-D INSTALL_PYTHON_EXAMPLES=ON \
-D OPENCV_EXTRA_MODULES_PATH=~/opencv_contrib/modules \
-D PYTHON_EXECUTABLE=$VIRTUAL_ENV/bin/python \
-D PYTHON_PACKAGES_PATH=$VIRTUAL_ENV/lib/python2.7/site-packages \
-D BUILD_EXAMPLES=ON ..
Just remember to delete CMakeCache.txt if you’ve ran cmake before and to run “workon cv” before running this cmake code.
Adrian Rosebrock
Very nice, thanks for sharing Caio!
Phil Smith
Thanks you – this worked perfectly on Ubuntu 14.04.
Manuel
Thank you very much, I did what you suggested and it worked.
Tim Clemans
Would be nice to have a single script version of this tutorial that one can wget and just run.
Adrian Rosebrock
Hey Tim, that’s a great suggestion. I’ll look into putting something like this together. The biggest challenge is that everyones’ system configuration is slightly different and that can lead to system/package paths being different. And if those system/packages paths are off, then you’ll get compile or install errors. I’ll look into the feasibility of this though.
Sébastien Vincent
Hello Adrian,
I’m not sure if it’s my install, but I performed all the steps, and it looks like cv2 can’t find the reference to the xfeatures2d package… Could you check if it’s ok on your PC? Here is what I got:
(cv)seb@seb-VirtualBox:~/tst-opencv$ python
Python 2.7.6 (default, Jun 22 2015, 17:58:13)
[GCC 4.8.2] on linux2
Type “help”, “copyright”, “credits” or “license” for more information.
>>> import cv2
>>> cv2.__version__
‘3.0.0’
>>> detector = cv2.xfeatures2d.SIFT_create()
Traceback (most recent call last):
File “”, line 1, in
AttributeError: ‘module’ object has no attribute ‘xfeatures2d’
>>>
Adrian Rosebrock
Hey Sébastien, I’m actually trying to figure out this problem myself. I’ve installed OpenCV 3 with Python 3+ bindings and the
xfeatures2d
module is installed. However, if I perform the same process of installing OpenCV 3 with Python 2.7 bindings, then thexfeatures2d
bindings are not not installed. I think it might be a bug with OpenCV as I’ve gone through the process a bunch of times, each time ensuring that theopencv_contrib
package was included in the compile, but each time it cannot importxfeatures2d
Definitely repeat the process with OpenCV 3 and Python 3 and let me know if this resolves the issue. If so, then we’ll know it’s a bug with either the cmake script/OpenCV.
AlexM
Thank you Adrian! I’ve done everything exactly as it was described here ( Ubuntu 14.04, Python 2.7), and I even have libopencv_xfeatures2d installed in site-packages, but still I can’t work with xfeatures2d 🙁
didn’t show, that xfeatures2d exist ( despite the fact, that .so object is installed properly, as I said before)
Could you please hint me?
Adrian Rosebrock
If you’re not seeing
xfeatures2d
, then go back to the CMake step and ensure thatxfeatures2d
is listed in the “modules to be built” list. If it’s not, then it’s likely that your path to theopencv_contrib/modules
directory is incorrect.Sébastien Vincent
Thanks for the quick answer. I’ll try with Python3.4. Coming back to Linux after ~15 years does not help, as I’m not sure if errors come from my mistakes or from something else!
Sébastien Vincent
Hello Adrian,
Up to now, I haven’t been able to install OpenCV3 with Python3 (in a virtualenv) on my Ubuntu install. I think I’ll have to wait for your tutorial. I guess something is wrong with my cmake options.
Adrian Rosebrock
Hey Sébastien — I was planning on having the OpenCV 3 + Python 3 tutorial online today, but the bat-country post ended up taking priority. I’ll try to have it online by next Monday.
Vanderson
Thanks a lot man! God bless you.
Adrian Rosebrock
No problem, I’m glad the tutorial worked for you!
Larry Low
Thanks Adrian! This works on Linux Mint 17.
Adrian Rosebrock
Awesome, glad to hear it Larry!
Nick
Works like a charm, did not even get one error message. Your page really do look very interesting. Now I have so many ideas about what to extract.
Thanks.
Adrian Rosebrock
Fantastsic — I’m glad it worked for you Nick!
tej kamal
i am working with ubuntu 14.04. i am getting an error at step11. it is stating that
(bash: cd: /home/kolukuluri/.virtualenvs/cv/lib/python2.7/site-pakages/: No such file or directory)
and in the next step while import cv2 file from opencv to python it is showing an error
>>> import cv2
Traceback (most recent call last):
File “”, line 1, in
ImportError: No module named cv2
please guide me a way to overcome this error
Adrian Rosebrock
If you are getting an error that the
site-packages
directory does not exist for thecv
virtual environment, then I would go back to Step 8 and installvirtualenv
,virtualenvwrapper
, and ensure that you have created thecv
virtual environment — that is a critical step in getting this tutorial to work.Sulav
Hello,
When I import the cv2 module from python interpreter it is imported, but when I do the same in python file, it says “importError : No cv2 module” ?
Can you help on this?
Thank you.
Adrian Rosebrock
There are many reasons why the
cv2
module could fail to import. The most common reasons are that your virtual environment was not setup correctly, the OpenCV compile failed, or the OpenCV bindings were not sym-linked into thesite-packages
directory of the virtual environment.Grant
I got through most of this tutorial fine, but I’m having a problem on the make step. I get about 40% compiled before getting this error.
make[2]: *** No rule to make target ‘/usr/include/../lib/libavcodec.a’, needed by ‘lib/libopencv_videoio.so.3.0.0’. Stop.
make[2]: *** Waiting for unfinished jobs….
[ 42%] Building CXX object modules/videoio/CMakeFiles/opencv_videoio.dir/src/cap_ffmpeg.cpp.o
CMakeFiles/Makefile2:5408: recipe for target ‘modules/videoio/CMakeFiles/opencv_videoio.dir/all’ failed
make[1]: *** [modules/videoio/CMakeFiles/opencv_videoio.dir/all] Error 2
make[1]: *** Waiting for unfinished jobs….
It’s having problems making the libavcodec, and I’ve tried several things, including install ffmpeg and other dev packages, but none of them seem to fix the missing rule. I’ve also re-run the cmake command to see if it makes any difference, but no dice. When going through the tutorial, I did notice that libtiff4-dev is no longer available and has been replaced with libtiff5-dev. I’ve seen some boards suggesting one of the other packages removed features that libavcodec depends on, but I haven’t had any luck fixing it. Any suggestions for how to modify the make command or other packages to install to get over this hump?
Adrian Rosebrock
Based on the compile error, it seems like FFMPEG is causing some problems. I would suggest running
ccmake ..
(you might have to install the ccmake terminal GUI) and going through the options. Look for an option that looks likeWITH_FFMPEG
or something similar and make sure it’s set toOFF
. Then do amake clean
and recompile.
Grant
Back again almost 10 months later. I recently got back into the idea of using OpenCV, after being unsuccessful building it back in August. I’ve been able to build OpenCV 3.1.0 and use it with FFMPEG turned off, but I’m trying to do the 10-day crash course now, which requires video features. The issue is the same one as before, and despite three solid days of trying different solutions, the problem is still libavcodec.a not having a rule.
I’ve posted the problem to the OpenCV board, but at this point, my options are to hope someone gives an answer that apparently doesn’t exist anywhere on the internet, or I find a way to compile OpenCV’s video features without FFMPEG.
Adrian Rosebrock
Hey Grant — just to confirm, did you try adding the
-D WITH-FFMPEG=OFF
to your CMake command?Luke
I tried these instructions with Anaconda. Initially cv2.so wasn’t generated, but I changed the cmake command as specified here and then it generated correctly:
http://stackoverflow.com/questions/29381705/install-opencv-3-0-0-beta-on-ubuntu-14-04-with-anaconda-python-2-7/29422394#29422394
then I followed the rest of this tutorial, and finally used the command
find / -name “cv2.so”
to locate the file.
Joey
Hello,
I work on Ubuntu 14.04.3. After I followed your tutorial I got no error until step 12. When I imported cv2 it gives me:
>>> import cv2
Traceback (most recent call last):
File “”, line 1, in
ImportError: No module named cv2
that error. Can you guess what should I do to make it work?
Adrian Rosebrock
Hey Joey — unfortunately, there are a number of reasons why importing OpenCV could fail. The main reasons are not being in the
cv
virtual environment before compiling, not being in the virtual environment when trying to import OpenCV, and not setting up the proper sym-links into the environment. My suggestion is to go back to Step 11 and see where thecv2.so
file is stored, it seems likely that the sym-link is incorrect.Andrey
Hello Adrian,
I wanted to update opencv version from 2.4.9 to 3.0.0 so I find your guidelines very useful, however I’ve stacked to some problem.
I’ve followed your instructions, except for step 8 with virtualenv.
Everything goes fine until step 11 – I am unable to find cv2.so.
I mean, there is cv2.so which belongs to older version of CV.
Bth I’m using python 2.7 under anaconda.
Adrian Rosebrock
I’m not a fan of anaconda so I don’t have any personal experience trying to install using it. Be sure to check the
lib
directory of yourbuild
.Bulat Suleymanov
Hello Adrian!
After installing Python 3.4 + OpenCV 3.0 on Ubuntu using virtual environment, I tried to create another one with Python 2.7 according to your tutorial. When I create new virtual environment it already consists lib/Python3.4. What should I do?
Adrian Rosebrock
Hey Bulat, you’ll need to specify your Python version when using the
mkvirtualenv
command:$ mkvirtualenv foo -p python2.7
Nathan McCorkle
Thanks! I just used these to compile the MASTER branches of both, since there have been tons of bugfixes since the 3.0.0 release… so far things are great!
Adrian Rosebrock
Nice — very nice Nathan. I’m sure there will be a ton more bug fixes to come. The 3.0.0 release is nice, but I don’t think things will start to settle down and become more stable until the 3.1 or even 3.2 release.
MJ
I install it on Ubuntu
I get the below error several time. plz any one help me.
ln: failed to create symbolic link ‘cv2.so’: File exists.
Adrian Rosebrock
If the file already exists, remove it:
$ rm cv2.so
And then re-create the sym-link.
sohmod
The cv2.so might had gotten installed in your dist-packages folder, if so the sym-link should be ;
cd ~/.virtualenvs/cv/lib/python2.7/site-packages/
$ ln -s /usr/local/lib/python2.7/dist-packages/cv2.so cv2.so
Arun Rajagopalan
Hi all,
If you encounter the error “use of enum ‘AVCodecID’ without previous declaration”during make, then the following link will help you.
http://stackoverflow.com/questions/31663498/opencv-3-0-0-make-error-with-ffmpeg
Hello Adrian Sir,
You deserve massive respect for making such an useful, lucid tutorial! Take a bow Sir! Continue being this awesome!
Adrian Rosebrock
Nice, thanks for passing this along Arun!
Ernest Chen
Hi Adrian,
I have been following your instructions without any issues. I noticed that I can only vidocapture the video stream at the recorded fps, and not faster. I found a similar issue here: http://stackoverflow.com/questions/28224280/how-to-process-video-files-with-python-opencv-faster-than-file-frame-rate
in which it mentions ffmpeg is required rather than the libavcodec library used here. How to do this with your instructions here? Thanks very much.
Ernest
Adrian Rosebrock
Hi Ernest — to get FFMPEG support for OpenCV, you’ll need to (1) install FFMPEG on your Ubuntu system, (2) compile OpenCV with the
-D WITH_ffmpeg=ON
flag set (you should also make sure that’s the correct flag, I’m doing this from memory since it’s been a long time since I’ve had to use FFMPEG), and then (3) re-install OpenCV once the compile has finished.Lawrence Moore
Hi Adrian,
Thanks for the super clear tutorial. The normal libraries of openCV work fine, but whenever I try to use something from the opencv_contrib repository like SIFT, it says “AttributeError: ‘module’ object has no attribute ‘SIFT'”. Doing a quick dir(cv2) affirms that the functions aren’t there. Do you know what could have gone wrong? I followed all the steps as best I could. I did notice that when I ran the cmake command it couldn’t find a few packages, but I ran all the apt-get installs as instructed. Thanks!
Lawrence
Adrian Rosebrock
Hey Lawrence, to read my post on Where did SIFT and SURF go in OpenCV 3?. If you followed my install instructions exactly, then you’ll be able to find SIFT and SURF in the
xfeatures2d
sub-module ofcv2
.Adrian
Hi Adrian, I was able to install OpenCV and Python with contrib modules but it seems that some contrib modules are missing.
For example “text” module seems to be incomplete.
This is the output of the command help(“cv2.text”). I was expected to find methods like “loadClassifierNM1”, etc.
Any help is appreciated.
Thanks
Adrian
Help on module cv2.text in cv2:
NAME
cv2.text
FILE
(built-in)
DATA
ERFILTER_NM_IHSGRAD = 1
ERFILTER_NM_IHSGrad = 1
ERFILTER_NM_RGBLGRAD = 0
ERFILTER_NM_RGBLGrad = 0
ERGROUPING_ORIENTATION_ANY = 1
ERGROUPING_ORIENTATION_HORIZ = 0
OCR_DECODER_VITERBI = 0
OCR_LEVEL_TEXTLINE = 1
OCR_LEVEL_WORD = 0
(END)
Adrian Rosebrock
Some modules may not be compiled and installed if your system does not have the appropriate dependencies installed. I haven’t explored all of the
opencv_contrib
modules, so I’m not sure which dependencies each of them has. However, after you run CMake, runccmake ..
and you’ll be able to easily navigate and see which modules will be compiled and which ones won’t.John Wandeto
Hello
May I update my earlier question. I get this at step 10:
(cv)john@john-Precision-T1700:~/opencv_contrib/build$ cmake -D CMAKE_BUILD_TYPE=RELEASE \
> D CMAKE_INSTALL_PREFIX=/usr/local \
> D INSTALL_C_EXAMPLES=ON \
> D INSTALL_PYTHON_EXAMPLES=ON \
> D OPENCV_EXTRA_MODULES_PATH=~/opencv_contrib/modules \
> D BUILD_EXAMPLES=ON ..
CMake Error: The source directory “/home/john/opencv_contrib” does not appear to contain CMakeLists.txt.
Specify –help for usage, or press the help button on the CMake GUI.
(cv)john@john-Precision-T1700:~/opencv_contrib/build$
Any idea what could be ailing me?
Adrian Rosebrock
Hey John — you’re trying to compile OpenCV from the
opencv_contrib
directory, not theopencv
directory, that’s what your problem is. Simply change directory tocd ~/opencv
, create yourbuild
directory, and then run CMake.selvam
Hi Adrian
In step 8, after entering “source ~/.bashrc”, I am getting the following response:
bash: /usr/share/virtualenvwrapper/virtualenvwrapper_lazy.sh: No such file or directory
Could you please guide me
Thanks in advance
Adrian Rosebrock
It sounds like you may have forgotten to install
virtualenv
andvirtualenvwrapper
in Step 8.vasista
ImportError: libtiff.so.4: cannot open shared object file: No such file or directory
I got this error while compiling find_game.py
Can you please tell how to rectify this issue @Adrian
Adrian Rosebrock
It sounds like you might have missed Step 3 where you install the required packages to read various image formats from disk:
$ sudo apt-get install libjpeg8-dev libtiff4-dev libjasper-dev libpng12-dev
I would suggest ensuring the packages above are installed, then re-compiling and re-installing OpenCV.
Tanya
Please tell me why am I having this errors?
tanichka@tanichka-K56CM:~/Sublime$ ./find_game.py
./find_game.py: line 2: import: command not found
I dont know why, because I installed numpy as well as opencv. Now I have to link them with python again?
Please tell me how
Adrian Rosebrock
Try executing the script with python:
$ python find_game.py
Vascom
How can I get the list of installed modules in cv2 interface. Exactly, I want to know if cuda based modules are installed in cv2.pyd
Adrian Rosebrock
The easiest way is to run
ccmake ..
(that’s not a typo, there are two c’s in the program). This will give you a graphical version of CMake, allowing you to see what is going to be compiled and installed.Chris
Outstanding step-by-step. Rarely do I ever find a guide that I can execute line-for-line with 0 modifications.
Adrian Rosebrock
Awesome, I’m glad it worked for you Chris! And thanks so much for the kind words. 😀
Paul
Hello, I have done this instruction yesterday. However, I`m getting this error after rebooting the ubuntu server. Could you let me know which configurations I`m missing? Thanks.
~/opencv/build$ workon cv
workon: command not found
Self answering to the question.. I went back to step 8 to set up virtual environment..
Adrian Rosebrock
Nice, I’m glad it’s working for you now Paul 🙂
chaima
workon: command not found and i didn’t found cv2
HELP ME PLEASE
Shia
Hi,
I am new to python,opencv. I followed these instructions and installed opencv,python on my machine(unix). It created two main folders opencv and opencv-contrib with many files and sub dirs.
I started saving my source files in opencv folder. Initially simple programs were executing perfectly but now i see for imports like
import matplotlib.pyplot as plt
import numpy as np
import scipy.signal as signal etc, it keeps giving ImportError, “eg:ImportError: No module named matplotlib.pyplot” for many such imports. I then have to google and find the solutions.
I then install the missing module again in the current dir. Exactly which directory should I work into, to avoid this problem?
P.S- I understand that this might be a very basic question, but i will greatly appreciate your help. I am just a beginner student here and for now I am getting so loaded with my assignments that I am not getting time to figure out the problem and its solution by myself, trying to implement algorithms from my assignments is eating up all my time.
Adrian Rosebrock
Did you follow the instructions exactly as detailed in this post? You’ll need to make sure you’re in the
cv
virtual environment, but afterwards, installing the extra packages is easy:I would suggest reading up on pip and how it allows you to install packages into Python. Also, there is no need to save your own Python scripts in the
opencv
folder. Provided you followed the instructions on this post, you can execute your scripts from anywhere on your machine.Michel
According to docs,
http://docs.opencv.org/modules/imgproc/doc/structural_analysis_and_shape_descriptors.html?highlight=findcontours#findcontours
findContours returns 2 values – contours, hierarchy not 3. And when changed it to
(_, cnts) = cv2.findContours(mask.copy(), cv2.RETR_EXTERNAL, cv2.CHAIN_APPROX_SIMPLE)
it gives error
in
c = max(cnts, key=cv2.contourArea)
Adrian Rosebrock
You can read more about the change in
cv2.findContours
return signature in OpenCV 3 here — what you linked to is the OpenCV 2.4 docs, not the OpenCV 3 docs.A quick fix to get
cv2.findContours
to work in both OpenCV 2.4 and OpenCV 3, just modify the code slightly:And that will take care of everything.
Michel
Thanks, Adrian. The fix worked like a charm!
Kouki
I am grateful for this great tutorial and for your response I had the same error and that fixed it.
Thanks a lot!
Toby
When I execute make -j4 it says – the source directory “home/toby/opencv/build/ -j4 does not exsist”. Any help thanks
Adrian Rosebrock
You need to preface that with a “make”:
$ make -j4
Saurabh Bisht
Everything went right before this at the last step
Adrian Rosebrock
Make sure the
cv2.so
file is properly sym-linked into yoursite-packages
directory.Saurabh Bisht
can you please tell me the procedure to do that.
Adrian Rosebrock
Please see Step 7 of this tutorial. The trick is to make sure the path to the
site-packages
directory is correct for your installation of Python.hacklavya
I installed succ. fully with this tutorial, thanks.
and in the installation terminal I ended up with (CV) before myname@computername and I can do import cv2
but
when I open a new terminal, I can not see (CV) on command prompt and also I can’t do import cv2.
is it some environment thing?
Adrian Rosebrock
Make sure to run
workon cv
in your new terminal and that will drop you down into the virtual environment, allowing you to importcv2
successfully.hacklavya
Thanks for the answer
but
how can I go into that environment (which command to use)?
I found following commands do it:
source /usr/local/bin/virtualenvwrapper.sh
source ~/.bashrc
mkvirtualenv cv
am I right? or there is short and easy way?
Adrian Rosebrock
If you want to access that virtual environment again, all you need is:
The
mkvirtualenv
command is only used to actually create the virtual environment.Betty
Hi. I also want to go into that environment but I found that it is “workon: command not found” after I followed your step.
Thank you!
Adrian Rosebrock
Take a look at the “Troubleshooting” section of this post. While it’s for the Raspberry Pi, it can help diagnose why the
workon
command is not working for you.Mohamed Ragab
Hi Adrain,
I have a problem with >>> import cv2,that not modules with this name and I am sure cv2.so is exited in package modules. Thanks for your efforts.
Adrian Rosebrock
If you are sure that the
cv2.so
file is in thesite-packages
directory of thecv
virtual environment, then make sure you’re typing it:$ workon cv
To drop down into the
cv
virtual environment prior to running Python or trying to import OpenCV.Arpit Joshi
I followed all the steps you told above.
After installing, in am in the cv environment and it successfully imports cv2.
I exit the terminal and then open it again and type import cv2
It gives me an error saying cv2 not defined
also if i type workon cv it gives me an error saying workon not defined.
I followed each and every step. I hope you can help me out on this one! Thanks
Also can this be installed without the virtual env? I really dont want to type workon cv again and again. Can’t we directly install it on the ubuntu system?
Adrian Rosebrock
The virtual environment is certainly optional, it’s just a best practice for Python development.
If you are getting an error that the
workon
command is not found, go back and make sure your~/.bashrc
was updated correctly. If you’re still getting an error, try directly sourcing it via:source ~/.bashrc
Krystof
Nice tutorial, Adrian.
If you’re using virtual environments (very reasonable), why do you install the library globally (‘sudo make install’)? Wouldn’t it be more sensible to keep it in the build directory and point the virtual environment there?
Ultimately the reason I ask is because I’d like to have OpenCV 2.x side-by-side with OpenCV 3.x, and it seems to me that virtual environments are the right way to do it, but it also seems to me that installing the lib globally is not conducive to this effort.
Adrian Rosebrock
If you want to avoid having OpenCV itself installed globally, just be sure to keep the
build
directory after the compilation has finished (everything else can be deleted). Then you can sym-link in thecv2.so
file into your virtual environment and it will work just fine.It involves a few more steps and I didn’t want to include it since this tutorial is meant for those who are just getting started building OpenCV and installing it.
Hacklavya
I CAN install scikit-image outside the virtual env. but I CAN’T install and use scikit-image in virtual env, and because of that I am unable to make any progress, please include the step(s) for scikit-image installation inside virtual env, so that I can use skimage on following command prompt.
Adrian Rosebrock
Installing scikit-image inside the virtual environment is just as easy as installing it outside the virtual environment, just let pip do the work for you:
Ben Lansdell
Thanks a lot for this, very useful.
I found this guide worked perfectly on Ubuntu 14.04 on a machine without CUDA installed.
On an Ubuntu machine with CUDA installed I needed to follow the advice here:
http://stackoverflow.com/questions/31663498/opencv-3-0-0-make-error-with-ffmpeg
and edit some of the source code to replace AVCodecID with CV_CODEC_ID.
Adrian Rosebrock
Thanks for sharing Ben!
Ben Lansdell
With a little extra thought, it’s unlikely the AVCodecID is actually related to CUDA. Nonetheless, it may still be useful for some to know that this correction is needed for some setups.
Michael
Hello
and I solved the problem, but now I have another not imported into the terminal well opencv
Now open my subleme_text editor and executor find_game.py code directly from there I get this error
import cv2
ImportError: No module named cv2
is not it should
thank you for your help
Adrian Rosebrock
Make sure you are in your Python virtual environment before executing the
find_game.py
script:workon cv
And then execute the Python script.
Beat Tödtli
Hi,
thanks!
In step 10 I needed a “cd ..” before
make -j4
Kind regards,
Beat
Aishwarya
Thanks a ton! Works for me!
Adrian Rosebrock
Glad to hear it Aishwarya! 🙂
Srikar
Thank You for the post!
I tried a lot to install on windows first but it wasn’t coming, so I did it on Ubuntu now and it works! 🙂
Srikar
Also, am having this problem:
Once it worked and I closed my terminal window and opened a new one and I type “workon cv”,”python”,”import cv2″ I get errors such as not found or no command, I realised I may not be in the correct directory, can you help me how to open it ?
As am using Ubuntu for the first time I don’t have much idea…
Thanks!
Hello,
I have found the solution to my problem, I have seen that many people are facing the same problem and thought I should share…
Once you open the terminal window start from step 8 with “$ sudo rm -rf ~/.cache/pip”
and follow all the commands upto ” mkvirtualenv cv”
Then you enter cv envirnoment and you can open python and import cv.
Thank You!
Adrian Rosebrock
After you have already created the
mkvirtualenv cv
command once, all you need is theworkon cv
command to drop down into the virtual environment. From there, you’ll be able to import OpenCV.Adrian Rosebrock
Glad to hear it Srikar! 🙂
Mahmoud Tolba
Hi Adrian,
Thanks for the great tutorials.
I installed OpenCV 3.0 and python 2.7 on a virtual environment cv and it works well.
Now I want to install OpenCV 2.4.11 on another virtual environment to run the old codes instead of modifying them to work with OpenCV 3.0, Should I start with creating a new virtual environment called cv2 for example and continue with the rest of steps?
Adrian Rosebrock
Yes, the first step would be to create a new virtual environment. Then, follow the same steps using this tutorial
However, do not run
make install
! Simply runmake
and then sym-link in thecv2.so
into your new virtual environment. All other files and directories besidesbuild/lib
can then be deleted.karun
hello first of all thanks for a great tutorial
am new to this kind of stuffs and while executing one of the programs i get an error saying that
orb = cv2.ORB()
AttributeError: ‘module’ object has no attribute ‘ORB’
and
also some errors in
xfeatures2d while using sift
Adrian Rosebrock
I would (1) check your OpenCV 3 version and (2) read this post on accessing SIFT/SURF in OpenCV 3.
Moataz
Adrian,
I followed every step on a clean VBox machine.
Everything is run without errors. but there is no cv2.so file on the machine at all.
There exist a bunch of so files related to cv (i.e. libopencv_*.so.*) in ‘/usr/local/lib/’ just setting there next to the python folder!
Any help is much appreciated.
Adrian Rosebrock
The
cv2.so
file should be in/usr/local/lib/python2.7/site-packages/
. You should also checkbuild/lib
to see if it was compiled. If there is not acv2.so
file in yourbuild/lib
directory, I would suggest double checking the output of your CMake command to ensure Python 2.7 was properly picked up for the build.Pewe
hi Adrian, nice tutorial btw,
when i followed your tutorial, i already have installed OpenCV2.4.11, and your tutorial works great, there’s no error on OpenCV3. But, is there any way to use OpenCV2.4.11 back instead of OpenCV3? when i first install OpenCV3, i made no changes at the Cmakelists but it still works. thanks
Adrian Rosebrock
Running a multi-version install of OpenCV on the same system is non-trivial, but the easiest way is to install OpenCV 3 first. Then, create a new build for OpenCV 2.4. After OpenCV 2.4 successfully compiles, you can delete everything but the
build/lib
directory. Then create a new Python virtual environment and sym-link in thecv2.so
file from thebuild/lib
OpenCV 2.4 directory.Sridhar
fatal: unable to access ‘https://github.com/Itseez/opencv.git/’: Could not resolve host: github.com
What do i do??
Adrian Rosebrock
Make sure your internet connection is working properly and can load GitHub.com.
Dhivya
Hi Adrian,
Nice tutorial! I followed this tutorial and reached till step 12. I am able to see the cv2.so file in the site-packages. But when I import cv2 in python from the virtual environment, it says “no module named cv2”.
I am working on Ubuntu 14.04. Can you help with troubleshooting this?
Adrian Rosebrock
I would suggest reading through the “Troubleshooting” section on this post.
Ajay Yadav
Hi Adrian,
Very nice tutorial, I followed all the steps. It works good.
Adrian Rosebrock
Awesome, I’m glad it worked for you Ajay! 🙂
Todd Brick
Hi Adrian, I got your package with the VM; I am learning a lot and having fun. I was installing the SITL environment from diydrones on it that has some OpenCV code to do a map and icon display. It was obviously written for 2.4.X since it can’t find cv2.cv functions like CreateMatHeader() and SetData(). Do you have any suggestions for replacements for these that will work with 3.0? I can’t seem to find any good docs on how to transition 2.4.X code to 3.X OpenCV code. Thanks, Todd
Adrian Rosebrock
Actually, those old
cv2.cv
bindings pre-date OpenCV 2.4! They are seriously old.I personally have tried this, but you should be able to compile OpenCV with the old functionality as well. Go back to the CMake command and try adding
--BUILD_opencv_world=ON
to he command. The “world” references the old legeacycv2.cv
bindings. If that switch doesn’t work, try runningccmake ..
from thebuild
directory and enabling anything related to the “world”.Otherwise, you should consider getting an OpenCV 2.4.X installation going. OpenCV 2.4 still has support for the super old bindings.
Ram
Hi Adrian,
The build completed without errors..However when i type workon cv it says command not found..i also did the previous step involving creation of symbolic linkage
Adrian Rosebrock
If the
workon
command is giving you trouble, it sounds like your.bashrc
file was not updated correctly. Take a look at “Step 8” of this tutorial and also give the “Troubleshooting” section of this post.Christian
Small typo in step 8: “To make the changes to our `~/bashrc` file take affect,…” Dot missing in ~/.bashrc. Also it should be “effect” not “affect”.
Adrian Rosebrock
Thanks for letting me know Christian!
Rig
Hey Adrian, will the cv2.VideoCapture feature work straight away with this install or do the uv4l drivers need to be installed during this setup to allow webcam access? Thanks for another great tutorial btw!
Adrian Rosebrock
Are you accessing a USB webcam or the Raspberry Pi camera module? For the USB webcam, you don’t need the UV4L drivers and
cv2.VideoCapture
should work out of the box.Joshua
Hi Adrian!
I followed all the steps you indicate and everything has been installed without errors . On completion, check the version of your cv and find_game.py example has worked. But after reboot I get the error ” no module named numpy “, and “no module named CV2 ” . I do not know what could have happened . thanks
Adrian Rosebrock
Make sure your
~/.bashrc
file has been successfully updated and the changes to includevirtualenv
andvirtualenvwrapper
are still there. If so, be sure to enter thecv
virtual environment before executing your Python script:joshua
thanks, i update my ~/.bashrc and now works.
Adrian Rosebrock
Congrats on resolving the issue, Joshua!
suresh
I just followed your steps and in the first try everything went smooth and it is installed successfully. By the way I am using Linux Mint 17.3 Mate. Your installation steps are just WOW. Thanks a lot. 🙂
Sandeep
This is a great resource! Thanks for these installation instructions. Coming from someone who has ran into all sorts of issues while compiling OpenCV + Python on Ubuntu and Mac.
panini
Thanks a million!
Very clear, and step by step. Needed to rope in the contrib repo and thanks for getting me to do the virtual env… been dragging my feet on that 🙂
Adrian Rosebrock
No problem, happy to help 🙂
Ravi Naik
Thanks a lot Adrian…Finally I could get Opencv working on my ubuntu…Thanks for your precise instructions…
Adrian Rosebrock
No problem Ravi, congrats on getting OpenCV installed!
Cédric
So I am just wondering what the point of the virtual environment is. How do I get to use OpenCV when I open up a new terminal. I have some python scripts, that are scattered all around my computer, and they usually tell me that they do not know the module cv2. Can you tell me how to make the module recognised everywhere?
Adrian Rosebrock
The point of using Python virtual environments is to have an isolated environment for each project you are working on. For example, suppose you are working on a project that requires package X v1.0. But another project you are working on requires package X v2.0. What do you do? Buy another machine? Install a VM? Nope. Instead, you use virtual environments. Each Python virtual environment is entirely isolated from the system install of Python, therefore you can install different versions of Python packages without having to worry about conflicts.
In either case, you need to execute the
workon
command before running your Python script to drop you into thecv
virtual environment. Inside this virtual environment, the OpenCV bindings can be found and recognized:Greg S
I meant this worked great 🙂 Haha sorry
Adrian Rosebrock
I’m glad it worked for you Greg! 🙂
Mathys
Hi man thanks for the tutorial(and all the other).
I have followed all the steps and redone them as well but no luck.
when I import cv2 it says no such file.
so I checked with sudo find / -name “cv2.s0” and it says its in my home/mathys/.virtualenvs/cv/lib/python2.7/site-packages/cv2.so
but when I go into that file it is empty, theres no cv2.so
Another thing as you mentioned earlier to check my cmake output under python2 everything looks the same as the sreenshot you gave a link too but where it says libraries it says no instead of something like usr/lib/libpython2.7.so
Many thanks
Mathys
Adrian Rosebrock
If you ran
find
and it returned acv2.so
file, then there is absolutely in the/home/mathys/.virtualenvs/cv/lib/python2.7/site-packages/
directory, so I would double check there again.Mathys
Man why must life be so hard haha
I just double checked it again I go into computer/home/mathys/ and then there is no folder called virtualenvs
Adrian Rosebrock
It’s a hidden directory. Note the “.” before the directory path “.virtualenvs”
Felipe
Excellent guide! Thanks a lot.
Adrian Rosebrock
No problem Felipe, I’m happy the guide helped!
mikele
Awesome! Everything works perfectly. Thank you.
Adrian Rosebrock
Glad to hear it! 🙂
Jacob S
Hi,
I got everything set up alright, but when running the example script (copied into a python file), I get the error “The lower bounary is neither an array of the same size and same type as src, nor a scalar in function inRange”
I’m using python 2.7 and openCV 3.1
Any idea what’s causing this?
Adrian Rosebrock
Double check your path passed to
cv2.imread
. Typically you’ll seecv2.inRange
throw that error message when the image path is invalid and thus the image is not properly loaded from disk.Paul
Excellent installation guide! I successfully installed OpenCV 3.1.0 in Ubuntu with the help of this article.
Adrian Rosebrock
Awesome job Paul! 🙂
Mo Badawy
Hi Adrian, Awesome tutorial but I ran into a snag. Regardless of what I do, querying the opencv version yields 2.4.8!!! After some digging it turned out that Linux Mint 17.3 Cinnamon have a dependency on opencv, so opencv 2.4.8 was already installed by system. Uninstalling opencv (2.4.8) => remove Cinnamon (among others as well, e.g. Blender) as well. Cinnamon is Mint’s Desktop Environment, so removing it is not an option.
So, here is what I did and it seems to be working so far 🙂
1. In step 10, in the cmake command, change the installation directory to a local folder, e.g. use “-D CMAKE_INSTALL_PREFIX=/home//local \”
2. Then use “make install”, i.e. drop “sudo”.
3. cd to the installation folder and search for “cv2.so” via:
$ find ./ -iname cv2.so
4. Copy the resulting folder’s path (e.g. /home//local/lib/python2.7/dist-packages) and add it to $PYTHONPATH by doing the following:
– Use your favorite text editor to open/create ~/.profile
– Add the line: export PYTHONPATH=$PYTHONPATH:/home//local/lib/python2.7/dist-packages
– Save & exit, then $ source ~/.profile
5. Loading the cv2 module in Python & checking version now yields 3.1.0, while system dependence on opencv 2.4.8 is uninterrupted.
Adrian Rosebrock
This is fantastic, thanks so much for sharing! 🙂
Anagh
Hello Adrian ,
When i used git checkout 3.0.0 in opencv_contrib
i m getting this error
HEAD is now at 6123e89… Merge pull request #247 from cbalint13/daisy
Adrian Rosebrock
That’s not an error message at all — it’s just the output of running
git checkout
.Emre
Hey Adrian. After installing and uninstalling for 5 times finally i installed the opencv 3.1.0 successfully. Thanks for the great tutorial .
Adrian Rosebrock
Congrats Emre!
ed
Hi, Great tutorial! Hopefully a simple issue, for some reason the game.jpg is rendered smaller that is should be e.g I can’t see the red game. It’s not shrunk compared to the original in ratio but it looks more cropped with the top left hand corner be OK extending out to 50% of the original image.
Thanks,
Ed
Adrian Rosebrock
That’s quite strange, I’m not sure why that may be. Make sure you download the original games.jpg file.
Ronald
Thanks a lot for taking time to write this amazing tutorial
Adrian Rosebrock
No problem Ronald, I’m happy I could help 🙂
ruben
hello adrian!!! i have this problem when compiling program!!!
can you help me?
thanks!!!
Adrian Rosebrock
Hi Ruben — please read the comments before posting. Michel and I have discussed the problem and solution in a comment above.
ruben
thanks a lot!!!!!
Adrian Rosebrock
No problem Ruben!
Swapnil
Hey Adrian after installing opencv, writing the code and downloading the image i am continuously getting assertion failed error i.e. its not reading the image but it works fine for videos. How can I fix this ??
I have saved the image in the same directory of the python code and tried several path name apart from “games.jpg” or “games.jpeg” but its showing the same error every time.
Adrian Rosebrock
It sounds like OpenCV is having issues loading images from disk, but it able to process videos just fine. In that case, you might have skipped over Step 3 where the image I/O libraries are installed.
Vania
Hi Adrian!
Could we install both OpenCV 2.4 and 3 on MacOS?
Adrian Rosebrock
Absolutely! The process is a bit more complicated, but you need to compile both of them — but don’t run
make install
. Instead, you’ll want to delete everything but yourbuild
directory and then sym-link thecv2.so
files into their corresponding virtual environments.mayank
I think the order of executing these commands must be reversed.
First sourse then export
1: source /usr/local/bin/virtualenvwrapper.sh
2: export WORKON_HOME=$HOME/.virtualenvs
If i followed the the order mentioned in post and it could not recognize mkvirtualenv command.
BTW great post adrian.
Adrian Rosebrock
According to the install instructions, the export comes before the source. I’m not sure why it would need to be reversed in your case.
Douglas
Hello Adrian, is there any good tutorials like your that you know that does not use cv virtual envs ?
i ask this because i need to call my python scripts from another aplication (unity) but i can’t find a way to do that using opencv virtual envs, basicaly i need the command “python script.py” to run my script using opencv without any virtualenv
Adrian Rosebrock
You can still use these same instructions to install OpenCV with Python bindings without the virtual environment. Just skip Step #8 and Step #11. Also, take note of which
site-packages
directory the outputcv2.so
bindings will be stored. That will help debug any issues when it comes toimport cv2
.Alternatively, if you need to call a Python script via a separate application, you can just as easily call a shell script form a separate application. The shell script can them access the Python virtual environment and then call the Python script, just like I do in this post.
douglas
Thank you for your answer, i am just having trouble with the “source /home/pi/.profile” path, i don’t know what path should i use in my machine, whats default ?
note: i followed the tutorial exactly.
Adrian Rosebrock
Are you trying to install on Ubuntu or a Raspberry Pi? The tutorial you’re currently following is for Ubuntu. On Ubuntu, the path should be
/home//.bashrc
. On the Pi it should be/home/pi/.profile
douglas
Thank you Adrian !
Yash K
Hi,
I proceeded as mentioned in the tutorial and everything went as per the tut till step 10 .
While using the ln command I got this error:
ln: failed to create symbolic link ‘cv2.so’: File exists
and cv2.so file is empty and when i start working cv2 is not found
Adrian Rosebrock
Take a look at your output of CMake, specifically the “Site packages configuration for Python. This is where your
cv2.so
bindings will be stored. Then, sym-link this file into thesite-packages
of your virtual environment.y2k
Hi Adrian
Amazing tutorial but I am having a problem executing the last step , it is saying
ln: failed to access ‘cv2.so’: Too many levels of symbolic links
So can you please suggest a work around to this or a way to resolve this , thanks in advance
Adrian Rosebrock
That’s quite strange, I’ve never encountered that error message before. It sounds like your sym-links are not valid. Can you double-check that the
cv2.so
file exists?Michael
Hi Adrian,
Thanks for providing the tutorials for this and installing openCV with python 3 I was wondering what you gain (or loose) from using python 3 over python 2 with OpenCV3 in particular and what config would you recommend?
Also any advice for installing OpenCV3 as part of a cluster requirement (having OpenCV3 available on every machine in the cluster) I see the benefit of the virtual environments but I expect my issue will be getting 1 consistent environment and deploying it to a cluster
Adrian Rosebrock
There aren’t any real benefits to using OpenCV 3 with Python 2 or Python 3 — simply go with the Python install that you feel most comfortable with.
As for installing OpenCV in a cluster environment, I would suggest creating a “master image” that has OpenCV installed and then replicating it across each of the systems in the cluster.
Michael
Thanks, python version would be 1 less job to worry about. The master image route have been my preference but beggars can’t be choosers.
Is it possible to run the “make install” command from outside the build directory and should I run cmake -> make -> make install on every system in the cluster or can I get away with just “make install”
Adrian Rosebrock
Is your hardware and OS the same? Because if so, you can just compile OpenCV once, copy the
build
directory to each machine, and runmake install
.If the environment is different for each system, then yes, you’ll need to run cmake, make, and make install on every system.
XuanToa
Hi Adrian,
Thanks for your tutorials.
To enter the cv enviroment, I must follow 4 steps
1. export WORKON_HOME=$HOME/.virtualenvs
2. source /usr/local/bin/virtualenvwrapper.sh
3. source ~/.bashrc
4. workon cv
If i just use ” workon cv”, I always get an error: command not found.
Can you solve this problem?
Adrian Rosebrock
Hey XuanTao — it looks like your
~/.bashrc
file has not been updated correctly. Make sure you open it:$ nano ~/.bashrc
And ensure you have included:
At the bottom of the file.
Sagar
Can I just delete the opencv and opencv_contrib folders once I finish installing?
Thanks
Adrian Rosebrock
Yes, once you have finished installing OpenCV, feel free to delete both the
opencv
andopencv_contrib
directories.Akshat Jain
Hey
I need to get opencv working on Apache Storm and everytime I install opencv and import it inside I keep getting an error that the requirements for cv2 were not met. Any ideas on how I should go around this error?
Adrian Rosebrock
Apache Storm is a distributed system for computation — which means that all nodes on your system need to have OpenCV installed on them. This includes all the dependency libraries, NumPy, etc. I haven’t tried to install OpenCV specifically on a Storm cluster before, so it’s pretty hard for me to diagnose this error.
Dinesh
Hey Adrian! Excellent Tutorial. But I have a small query in Step 10. I have read the comment and haven’t found anyone asking this. Should we exit the virtual environment ‘cv’ when you say ‘Our environment is now all setup — we can proceed to change to our home directory’.
I did cd ~ but that still keeps me in the virtual environment ‘cv’.. So am I supposed to continue there or exit the virtual environment before I clone the git?
Adrian Rosebrock
Once you enter the
cv
virtual environment, you should remain in that virtual environment for the remainder of the tutorial. Do not exit thecv
virtual environment.Youssef
Hello Adrian!
So I have run this whole tutorial around 5 times now and I am almost certain I did not miss any steps. I watched the other video from your tutorial with the Pi and viewed the troubleshooting section of that page. However, I cant seem to make the error go away.
ImportError: No module named cv2
when i go to ~/.virtualenvs/cv/lib/python2.7/site-packages/ there is a cv2.so, when I double click it it says
“This link cannot be used because its target “/usr/local/lib/python2.7/dist-packages/cv2.so” doesn’t exist.”
The /usr/local/lib/python2.7/site-packages directory is always empty. I think it should have the cv2.so file there or something, but it doesn’t have it.
I am not sure what I may b doing wrong.
I am fairly new to linux so my lingo is still new, I will try to understand your explanation.
Thank you for your time.
Adrian Rosebrock
Hey Youssef — unfortunately, there are many reasons why you might not be able to import OpenCV. I detail the main reasons in the “Troubleshooting” section of this post.
Raul
Hello Adrian,
Thanks for the great tutorial. I noticed the upper threshold used to retrieve the red game is practically the blue color. Could you explain the reasoning behind this? What changes should I make to retrieve the red instead? I tried messing around with the range values but was not successful.
Adrian Rosebrock
RGB colors are actually stored in reverse order in OpenCV, so we actually write them in BGR order. To detect red, you’ll want to change the range values. Given the new knowledge regarding RGB versus BGR order, this should help 🙂
Raul
Hi Adrian!
Thanks for getting back at me. In my last comment I meant to say blue instead of red!
Taking into account your comments about the color ordering I fiddled around with the thresholds but I did not get the results I expected.
These are the values I attempted:
upper = np.array([255, 65, 65])
lower = np.array([150, 0, 0])
Adrian Rosebrock
It’s a game of trial and error, and based on your lighting conditions, colors can appear differently. I would suggest using the
range-detector
script inside the imutils library to help you tune the threshold.Aris
Thanks for this easy to follow tutorial. Just to add a little on it if I could.
After following all with no Error whatsoever I started having the following error while trying to follow the simple example at the end: (pyhton find_game.py)
ImportError: No module named cv2
It happened for the simple reason that, as a beginner, I failed to understand how to update the ~/.bashrc file
The line at Step 8 are supposed to be added to the ~/.bashrc file. Not to be copy and paste in the terminal which I did in my first attempt.
You should copy those lines
use the following line to open the ~/.bashrc file
$ sudo nano ~/.bashrc
Copy and paste the code there and source the ~/.bashrc file.
This is how I solved the “ImportError: No module named cv2”
Thanks Adrian
Adrian Rosebrock
Hmmm, it’s strange that you would need to be
sudo
for this — that shouldn’t be necessary at all. Were you trying to install OpenCV as the “root” user? Or a standard, normal user?Aris
I was just trying to access the .bashrc file. May be I did not need to be sudo.
San
Works like a charm, thanks Adrian.
Adrian Rosebrock
Fantastic, glad to hear it San! 🙂
Gray
Thank you so much for this tutorial! I used it to install OpenCV 3.1 and Python 2.7 on an Ubuntu VM on VirtualBox. It worked very smoothly and I was able to try out the demo program by the end of the day. After tearing my hair out trying to work out how to install OpenCV for Python on my Windows 8.1 machine this was so much easier. Thank you, sir.
Adrian Rosebrock
Nice job getting OpenCV installed on your Ubuntu machine, congrats!
Antoine
Many thanks Adrian for you tutorial !
Hard time to get it working on Linux Mint 17.2 but (after many tries) using the opencv zip file its done !
Gotta catch the red !
Adrian Rosebrock
Congrats on getting OpenCV installed Antoine! 🙂
Alex
In my cmake report I have not the “packages path” neither for python 2.7 nor for python 3.4. I’ve followed all the instruction unless the use of the virtual environment. As result, i can see all the opencv modules compiled (i.e., all the .so files) in the “/usr/local/lib” directory but the cv2.so file. And I still not find such a file.
Adrian Rosebrock
It sounds like your
site-packages
directory is not being automatically determined for some reason. Try updating yourcmake
command to use the following switch:-D PYTHON_PACKAGES_PATH=$VIRTUAL_ENV/lib/python2.7/site-packages
Anushree
Looks like i forgot to install numpy. How to go about it now?
Adrian Rosebrock
You can install NumPy by accessing your virtual environment and using
pip
. Go back to Step #9 and continue with the tutorial.Abder-Rahman
Very nice and detailed tutorial, keep it up!
Thanks for your kind efforts.
Adrian Rosebrock
Thank you Abder-Rahman, I appreciate that 🙂
Luis
Hi Adrian,
When I run :
make -j4
CUDA causes problems because my default gcc version is 5.4, and CUDA only works with gcc version 4.9 & below. I have followed the guidance at
http://stackoverflow.com/questions/6622454/cuda-incompatible-with-my-gcc-version
to solve the problem, but it is not working. So I have three questions:
1. Is it possible to eliminate the dependence on CUDA?
2. If so, how?
3. What functionality in openCV might I lose if I were to do so?
Adrian Rosebrock
You can compile OpenCV without CUDA support. If your CMake command is automatically picking up CUDA support (likely due to NVIDIA/CUDA drivers already being installed), then just disable them within your CMake command by adding the following switch:
-D WITH_CUDA=OFF
You won’t lose much support, just any GPU optimizations that would have otherwise been installed.
Gaurav
After following all the steps my cv2 version is 2.4.8
How to create virtual environment for cv2??
Unable to run sift
Adrian Rosebrock
It sounds like you may not be in the
cv
virtual environment. Make sure you are in the correct Python virtual environment usingmkvirtualenv
and theworkon
commands when compiling and installing OpenCV.Zack Mitkin
Hello, I did all the steps correctly, but python cannot find cv2 or numpy. I swear I did all the steps correctly, and I got no errors. Please tell me a way to check what the problem is
Adrian Rosebrock
If you cannot find cv2 or Numpy, then you are likely not in the
cv
virtual environment when trying to import your libraries:jai
I am also facing similar problem n i am quite sure that i am working withing cv virtualenv.
Adrian Rosebrock
I would suggest taking a look at the Troubleshooting section of this blog post. This section details many of the common problems you can encounter when importing OpenCV.
Moni Delgado
I can’t even run the “workon cv” command. I think it’s because I’ve already closed the terminal and log in again, so I’m not running stuff in the right place…what are the easy steps to access cv on python and run again the example you showed, for example.
Adrian Rosebrock
If you can’t run the “workon” command then it’s likely your
~/.bashrc
file wasn’t updated properly. Go back to Step 8 and check the contents of the file.Nicolas
Thank you very much for this tutorial 😀
Adrian Rosebrock
No problem Nicolas, I’m glad I could help 🙂
Sai
Hey,
I already have opencv 2.4.8 and tried to do the above process and when i ran:
import cv2
print cv2.__version__
it printed 2.4.8
How can i upgrade it to 3.1.0?
Thanks,
Sai
Adrian Rosebrock
It sounds like you’re not in the proper virtual environment. Make sure you run:
$ workon cv
To access your Python virtual environment. You should also check the
site-packages
directory for the “cv” virtual environment to ensure thecv2.so
bindings are there.Pedro Lorente
Every time I close the terminal window, I have to repeat the whole process of Chapter 8, to be in the environment (cv).
Is there anyone who can help me?
Thank you all!
Adrian Rosebrock
Every time you open a new terminal all you need to do is:
$ workon cv
No other command except for the one above needs to be executed to access the “cv” Python virtual environment.
neztorig
Great I following this step to install OpenCV and its work on ubuntu.
many thank’s
Adrian Rosebrock
Great job getting OpenCV installed! 🙂
Melki
HI
I am trying to install OpenCV 3.1.0 with python 2.7 on linux. All the installation process went ok (I have some problems that I solved) but finally I see that the cv2.so is installed in /usr/local/python/2.7/ rather than /usr/local/lib/python2.7/site-packages. Do you have any idea why? I solced the problem by copying the cv2.so to /usr/local/lib/python2.7/site-packages manually but I guess it is not the way it should be done..
Thanks!
Adrian Rosebrock
I’m not sure why the
cv2.so
file would have ended up in/usr/local/python2.7
, but yes, copying it into/usr/local/lib/python2.7/site-packages
is the correct solution.Namrah
This was aweosme, I had been struggling with opencv and opencv_contrib installation. Thank you so much, this really helped.
Adrian Rosebrock
Congrats on getting OpenCV installed on your system Namrah, nice job!
DanDan
Thanks very much for the great post. I wonder how much time I spent to try out and compile into this comprehensive post.
Thanks again.
ibrahim
hi thanks for the great tutorial you give here,
i have installed the opencv3.1(with the instruction above) and python 2.7 successfully, but when come to run the program example you give, it give an error that said, “OpenCV Error: Sizes of input arguments do not match (The lower boundary is neither an array of the same size and same type as src, nor a scalar) in inRange”
i still new at this , perhaps you can give me some direction to solve this error
thanks
Adrian Rosebrock
Hey Ibrahim — it sounds like you might have passed an invalid path to
cv2.imread
. Double check the path to your input image is correct.Mehta Jaldhi
Actually I have installed opencv in different login.. now I need to login in hduser.. how can i remove from my local login?
Hakan
Hi Adrian,
Great tutorial. I followed all the steps installed OpenCV on Ubuntu successfully. Thanks !
Adrian Rosebrock
Fantastic, nice job getting OpenCV installed Hakan!
Madhu Oruganti
Dear Sir, I am using the Ubuntu 14.04 and I installed the Opencv3 as per given steps, but I am getting two problems as follows
1. If I close the terminal I could not open the CV directly until process the step8 and 9.
2.ImportError: No module named matplotlib
Please respond to my problem.
Adrian Rosebrock
1. If you close your terminal you can re-access the “cv” virtual environment via the
workon
command:$ workon cv
2. You need to install matplotlib into the “cv” virtual environment:
Madhu Oruganti
it’s working sir.Thank you so much, sir.
Madhu Oruganti
Sir, Can you please tell me the code/command to run the video in python and opencv3
Adrian Rosebrock
Are you trying to access a video stream with OpenCV? If so, please see this post.
Artur
Using your post I’ve just installed OpenCV 3.2 with Python 3.5 on Ubuntu 16.04.
Thanks Adrian 🙂
Adrian Rosebrock
Congrats on getting OpenCV installed Artur, nice job! 🙂
Yuvraj
Thank you Adrian!
up to step 11 everything works perfect but i got error in step12.
$workon cv
workon: command not found
can you please help me?
Adrian Rosebrock
Please see the “Troubleshooting” section of this blog post for common reasons why the “workon” command may not be found.
yuvraj
Getting error while importing “cv2”
“ImportError: No module name cv2”
even “cv2.so” present in site-packages.
so whats going wrong?
Adrian Rosebrock
It’s hard to say without having physical access to your machine, but I think the issue is that you aren’t in the “cv” virtual environment:
$ workon cv
Alex
One key package which I needed to install to get this working was python-dev…without it, everything runs successfully but cv.so is never built and therefore you cannot use the library.
Adrian Rosebrock
Correct, you need the Python development headers installed before trying to compile OpenCV.
Mehta Jaldhi
Thankx Adrian.
Loved your article.
But can you tell me how to uninstall the whole method what we just did?
Actually I need to again install it.
Adrian Rosebrock
You can delete OpenCV by removing all files that contain “opencv” in the filename from
/usr/local/lib
. Alternatively you can simply re-runmake
andmake install
and you will overwrite all the old files.Tony
I get to step 10 and type `make -j4`, but it doesn’t work, instead printing this error:
make: *** No targets specified and no makefile found. Stop.
It seems that cmake didn’t entirely work. There is a file in opencv/build/CMakeFiles/ called CMakeError.log. Scanning through that, I see a number of errors, but I don’t know how to resolve them.
I should note I’m doing this using MinGW/msys on a Windows 10 machine.
Saikanam
I had the same issue,try fixing the -D OPENCV_EXTRA_MODULES_PATH=~/opencv_contrib/modules \ thing,try to fix it to wherever you have cloned opencv_contrib.. hope this helps 🙂
Deepan Raj
Hi !!
Love this blog. But i dont have good computer specs that can support vmware. So i started to install Opencv for python in windows, also installed numpy, scikit, matplotlib too! Can you Please tell me is there any way to install dlib in windows.. installed all other packages like a charm in windows..Only thing i cant do is how to install dlib..I have downloaded dlib package. installed cmake….
Note: do i need visual studio to install dlib ?
Huck
I have used these steps many times without error but this time I’ve had problems. First, I had errors with opencv_perf_stitching so I just disabled building that module so I could get through the make step. I did the install and ldconfig but there is NO cv2.so on my machine anywhere! What in tarnation am I doing wrong?
Adrian Rosebrock
Hi Huck — I’m sorry to hear about the issues with compiling OpenCV. Can you check the
build/lib
directory and see if thecv2.so
file is there? If it’s not, there was likely a misconfiguration within CMake.Huck
I realized that I could not import numpy either….I had to re pip install numpy but this time with sudo…
sudo pip install numpy
I completely wiped my build directory and started over….this time cv2.so showed up as planned.
Note: I do NOT use the virtual environments so perhaps this is why I needed to sudo pip install?
Adrian Rosebrock
If you did not use the virtual environment then yes, you would need “sudo” to have the proper permissions to install any Python packages into your system’s
site-packages
directory.Huck
Adrian…thanks for your great instructions. Is it possible to build opencv 3.1.0 for both Python 2.7 (already done and working happily) *AND* Python 3.4 (not instead of)? Can I just follow your instructions here (https://pyimagesearch.com/2015/07/20/install-opencv-3-0-and-python-3-4-on-ubuntu/) or is there something else that needs to be done?
Adrian Rosebrock
To install OpenCV 3.1 for Python 2.7 and Python 3.4 you will need to run CMake and make twice. Once for Python 2.7. And then again for Python 3.4. Copy the
cv2.so
file created each respective Python version into their respectivesite-packages
directory.Tonmoy Roy
Hi, I didn’t read through all the comments, but someone might have asked this question already. What if OpenCV_Contrib is not the same version as OpenCV?
Adrian Rosebrock
You should be using the same
opencv_contrib
version as youropencv
version, otherwise you’ll likely run into errors.Deepak Sharma
in case you get an error numpy not found after pip install during make
export PYTHON_INCLUDE=$PYTHON_INCLUDE:/home/USERNAME/.virtualenvs/cv/lib/python2.7/site-packages/numpy
Siddhesh Acharekar
Hey I followed this step by step, everything worked great but in the last step i wasnt able to create the link. I got this error:
ln: failed to create symbolic link ‘cv2.so’: File exists
Not able to understand what this means but mainly how do I go about this? Also when I enter the python environment it shows version 2.4.8 which was preinstalled. I want to move onto 3.0.0 and based on your tutorial thats all but done due to this one error. Please help.
Adrian Rosebrock
If the sym-link already exists (I’m not sure why it would already) you can simply delete it and re-create it:
rm /path/to/sym-link
Zerui
Hi Adrian,
I am current setting up multiple virtual environments for different configuration combinations (i.e., OpenCV 3 with Python 2.7 and OpenCV 3 with Python 3.6). I followed the tutorial; everything was good until I built the OpenCV library. The problem is that CMake was not able to pick up the correct Python interpreter in my virtual environment. I force to set it to /home/username/.virtualenvs/cv_py2/bin/python, and this time it was able to find the correct interpreter, but the wrong Numpy include path. I am curious about the Cmake working mechanism and why it didn’t find the correct path and interpreter for me automatically. Is that a problem of my PATH and PYTHONPATY?
Thanks!
Adrian Rosebrock
If you are in the correct Python virtual environment for your respective version, CMake should be able to automatically determine your interpreter, NumPy path, etc. Are you in each of the respective virtual environments when running CMake?
Bharathi
Hi, I am trying to run opencv on my linux, following this tutorial step by step. But i could not compile. till last step it is fine but when i run “$ make -j4” the processing is done till 31% then system is getting stuck and shutting down. sometimes it runs in that particular step hours together. Can anyone please help me?
Adrian Rosebrock
This sounds like a race condition using multiple cores. Clean the build and then retry the compile using only a single core:
Bharathi
Hi Adrian, i tried compiling using single core even though the same story repeats…
Does the remaining space in the disk or the type of processor matters?
Adrian Rosebrock
The processor shouldn’t matter, but you should ensure you have a few gigabytes of space on your machine just to be safe.
Rodrigo Cesar da Silva
My installation of opencv is working fine, except for the fact that the modules of opencv-contrib were not installed.
I am not sure why this is happening since i am pointing to opencv-contrib folder.
Can anyone help with that? How can i check after Cmake if those modules are going to be installed?
thanks,
Rodrigo.
Adrian Rosebrock
Check the “Modules to be compiled” section of CMake and ensure the contrib libraries are included. Double and triple-check your paths to the
opencv_contrib
directory. You might also want to try deleting your “build” directory, re-creating it, and re-running CMake.ezlikespie
Everything worked fine except I don’t think virtualenv installed because there is not a .virtualenv folder to put cv2.so in. The only folders I have are the opencv and the opencv_contrib folders. I dont understand anything about the virtual env or how to install it.
Adrian Rosebrock
If you’re new to using Python virtual environments I would suggest reading through this tutorial before continuing.
Huang tzuen
Hi Adrian,
Here is installation come with a problem on STEP 3.
It show :package ‘libpng12-dev’ has no installation candidate
And it show some message on ubuntu16.10 : this may mean that the package is missing, has been obsoleted , or is only available from another source.
Really thanks for providing such a great tutorial to beginner.
Huang.
Adrian Rosebrock
Try running
sudo apt-get update
to refresh your package definitions. I also have an updated guide for Ubuntu 16.04 that you should take a look at.Miguel P Xochicale
Dear Adrian,
Following your instructions. I got OpenCV ‘3.2.0’ working with Python 2.7.13 on Ubuntu 14.04 x64. Now, I am ready to devour your tutorial of facial landmarks with dlib, OpenCV, and Python. Thank you very much!
Adrian Rosebrock
Congrats on getting OpenCV installed Miguel, nice job!
Sid
Hi Adrian! Thanks a lot for all the tutorials. I am unable to import cv2 as numpy isn’t installed in the environment. However I cannot pip install due to non-availability of an internet connection due to some reasons. Is there any other way to install it? I can access internet via some other laptop but not this one (OS: Ubuntu). For example if I can download the required whl file and then transfer it to this laptop in the required directory. But how to do that, I don’t have any idea.
Adrian Rosebrock
Can you clone the GitHub repo for NumPy from your laptop, save it to a thumb drive, and then copy the repo on to your system? From there you can run
python setup.py install
to install NumPy.Charushila
I am getting following error for python find_game.py
python: can’t open file ‘find_game.py’: [Errno 2] No such file or directory
Adrian Rosebrock
Make sure you use the “Downloads” section of this blog post to download the code. Then unzip the file, change directory, and execute the script.
Vaibhav
Whenever i write “make -j4” it shows make: *** No targets specified and no makefile found. Stop.
Please help!
Adrian Rosebrock
If you are getting an error related to no Makefile being found, then CMake must have excited with an error. Go back to the CMake step and ensure there are no errors during the configuration.
Sandy
Hi Adrin,
Its a very nice tutorial for biggners ike me…. it helped me alot foe installing and configuring opencv and python on my ubuntu 12.04 pc….
Now the issue is when i execute a program find_game.py i am getting a part of output (window size is small) insted of detecting the right portion of the image, followed by drawing a green bounding box surrounding it. The output window is covering only the1/4 of input image instaed of total image.
Even for video related programs I am getting a small window instead of getting full window.
so, how to rectify this issue…
Thanks
Sandy
Adrian Rosebrock
Hi Sandy — that sounds like a very strange error indeed. Do you have a screenshot of the error that you can share? I’m not sure I fully understand the exact issue.
Sandy
Hi Adrin, please check your mail for the screenshot of the error what i am getting when i execute find_game.py.
Thanks
Sandy
mohammad
Hi
I am a new gay in opencv and learn very helpful training from your site.
I’m read before you suggest better to start with virtual box and download ubuntu with configured opencv and python on it.
please send me the link of this image file.
Best regards
m.k
Adrian Rosebrock
Hi Mohammad — the Ubuntu VirtualBox VM you are referring to is part of the Quickstart Bundle and Hardcopy Bundle of Practical Python and OpenCV.
matheus macedo
you save my life, ty
Yanxiang
Hi Adrian,
Thanks for your guidance. It’s very useful. One thing I’d like to know, why not using “pip install opencv-python” directly? It seems to be much easier since you don’t have to “make”. What’s the difference between your steps and the way I mentioned?
I am quite new to area so hope to get your answer. Thanks.
Adrian Rosebrock
There are two reasons why I don’t recommend using the opencv-python package directly:
1. The opencv_contrib modules are not included.
2. There is no GUI support with opencv-python, so you can’t use functions such as
cv2.imshow
Lee
Thank you.
Lucas Alves
The installation came to a happy end, but as I copied the find_game script and run, got this message:
“The lower bounary is neither an array of the same size and same type as src, nor a scalar function inRange.”
Adrian Rosebrock
Instead of copy and pasting the code, use the “Downloads” section of this blog post to download the source code + example image.
Ali
Hi Adrian. I need your help. When I run the command ‘workon cv’, it says that : Error: deactivate must be sourced. Run ‘source deactivate’ instead of ‘deactivate’.
But I followed the instructions. Lastly, I can work import cv2 in the terminal, but when I try it in Idle it does not work. Any help would be appreciated. Thank you..
Adrian Rosebrock
Regarding your first error message, I’m not sure what the exact problem is. It sounds like you may have (somehow) introduced strange aliases to the
deactivate
andworkon
commands. I would suggest re-installing from scratch on a fresh Ubuntu system if you can.Secondly, I would also recommend that you take a look at the Quickstart Bundle and Hardcopy Bundle of my book, Practical Python and OpenCV which includes a pre-configured Ubuntu VM with OpenCV pre-installed. This is by far the fastest way to get up and running with OpenCV + Python.
Eric C. Gustav
Thankss Adrian for a great tutorial!!!
I have one comment to add. The latest version of OpenCV is 3.2.0 which is great and all, but it has some CMAKE issues with openBLAS, and LAPACK. The current work-around is to add “-D WITH_LAPACK=OFF”, which did the trick for me.
EKELE
I have installed matplotlib however, I am not able to work in the virtual environment with matplotlib and opencv python. Please can you help me
Adrian Rosebrock
It sounds like you installed matplotlib into your global Python site-packages and not the site-packages for your “cv” virtual environment. Make sure you install and Python packages you wish to interact with OpenCV into the “cv” virtual environment:
Kodur Krishna Chaitanya
Hey Adrian! great tutorial here! you have included -D CMAKE_INSTALL_PREFIX=/usr/local in the cmake command. But by default opencv is installed /usr/local so there is no need of mentioning it.
Reference:
# Set the install prefix
IF(NOT DEFINED CMAKE_INSTALL_PREFIX)
SET(CMAKE_INSTALL_PREFIX “/usr/local”)
ENDIF(NOT DEFINED CMAKE_INSTALL_PREFIX)
STRING(REGEX REPLACE “/$” “” CMAKE_INSTALL_PREFIX “${CMAKE_INSTALL_PREFIX}”) –cmake_install.cmake file
Madhu Oruganti
Dear Adrain,
How to use run length coding in python opencv.
ImportError: No module named runlength
I am getting Error
Adrian Rosebrock
Hi Madhu — I have not personally encountered that error before. How are you trying to import the OpenCV library?
Herleeyandi
Hello, I am trying to install opencv 3.3.0 with opencv contrib in my linux 15.04 in both python 2.7 and 3.4. It has been successfully installed. However when I am doing “import cv2” it return as “segmentation fault(core dumped)”. I think it can because conflict in python 2 and 3. So how can I fix it?, suppose that I just want opencv in my python 2.
Adrian Rosebrock
This sounds like you compiled OpenCV + Python bindings for a different Python version than the one you are trying to import it into. Double-check your output from CMake and ensure the Python bindings to be compiled match the Python version you are trying to import them into.
Andrea
Hi, just did it! I think i didnt execute perfectly all the steps and found the same error as other people when i was to import cv2.so in python! Searching in the folders i noticed that cv2.so wasnt in ‘site-packages’ folder but in the ‘dist-packages’ one. Basically i think i messed up using the virtual environment due tu i was following the ubuntu 16.04 guide at first then switched to this. I was able to import cv2.so and run correctly the find_games.py example by avoiding the virtual environment.
I am new to linux, hope i wont find any problems in future cause of my imperfect installation procedure.
Thank you!
Adrian Rosebrock
Congrats on getting OpenCV installed, Andrea! Nice job. Getting OpenCV installed is not an easy task, especially for someone new to Linux. You should be very proud of yourself!
Harshit
Hi, Adrian
Very good article on OpenCV installation. I have followed all of your steps and it’s working perfectly fine in my virtual environment. But, I wanted to use Jupyter Notebook for writing my python codes for my research work and I am facing issues to import cv2 inside Jupyter notebook.
Can you please help me how to import cv2 inside Jupyter notebook. As far as I know, I am facing problem because of sudo access given in your blog for my virtual environment.
I am trying this since October but couldn’t figure out. Any help would be really appreciated.
I have tried this page for setting up my Jupyter notebook and I am able to make new kernel for opencv but it doesn’t import opencv.
https://help.pythonanywhere.com/pages/IPythonNotebookVirtualenvs/
Adrian Rosebrock
I assume you are using Python virtual environments for your OpenCV install? If so, just install Jupyter Notebooks into your Python virtual environment (the same one that has OpenCV installed):
And then launch your notebook:
While you are in the “cv” virtual environment. You’ll be good to go from there.
Salvador Blanco
When I execute the $ sudo ldconfig command I get the following error:
/sbin/ldconfig.real: /usr/lib/nvidia-384/libEGL.so.1 is not a symbolic link
/sbin/ldconfig.real: /usr/lib32/nvidia-384/libEGL.so.1 is not a symbolic link
Salvador Blanco
I found a solution to my problem:
https://stackoverflow.com/questions/47449512/error-installing-opencv-python-on-linux-sbin-ldconfig-real-usr-lib32-nvidia-3
Salvador Blanco
Now I have another problem
I am finally able to run open-CV, but only inside the environment.
How can I run it outside the environment ?
Adrian Rosebrock
Hi Salvador — is there a particular reason you would like to not use the Python virtual environment? Some additional context here would absolutely help.
Jacqueline
I also have another question. So when I turn off my VirtualBox I have to re-run these lines to be able to run ‘workon’:
export WORKON_HOME=$HOME/.virtualenvs
source /usr/local/bin/virtualenvwrapper.sh
If I don’t re-run this, I get an error and my terminal does not recognize ‘workon’
Adrian Rosebrock
Hi Jacqueline — I would suggest taking a look at the
~/.bashrc
file in the home directory of your Ubuntu VM. It sounds like you may have accidentally forgotten to include:In the
.bashrc
file which would resolve the issue. Definitely check the file!Jacqueline Garcia
Hello,
I did that line when I was trying to get everything to work. It works the first time, but when I turn it off it almost forgets that I have done that. Does that command not write that to the .bashrc file?
Best,
Jacque
Adrian Rosebrock
Indeed, it sounds like your
.bashrc
file was not updated properly. Open the file again and confirm that those lines have been added.Jacqueline Garcia
Hello Adrian,
I am working on virtual box (from my macbook pro), trying to do your Real time Object detection. For some reason, I cannot get imutils.video to work because it is not detecting my Mac camera. I’ve searched the web tirelessly with no solution to this. Do you happen to know how to fix this issue?
Best,
-Jacque
Adrian Rosebrock
By definition, a virtual machine is not allowed to access peripherals on your host machine (i.e., your MacBook Pro). A VM abstracts away hardware and enables you to virtualize an operating system. The downside is that you cannot access your webcam or other peripherals. Some people on the Ubuntu forums have gotten this to work but again, I cannot say whether or not the solution will work in your case.
ajay bolloju
Hi Adrian,
I followed all your mentioned steps of installation. but when I enter command “workon” its saying that command is not found. and in phython when entered “import cv2″ its saying that
”
Traceback (most recent call last):
File “”, line 1, in
ImportError: No module named cv2
”
can you please help me to fix this.
ajay bolloju
now I can run “workon” command. but “import cv2” in python is showing error.
in the path “site-packages” I found cv2.so with a symbol “cv2.so@” even if I removed it and reinstalled the same thing is happening.
help me to fix this.
thank you for the help.
ajay bolloju
now I can run “workon” command but cv2 error is still exits.
I found “cv2.so@” in “site-packages” even if I removed and reinstalled it, the same thing is happening.
can you help me to fix this..
thank you for the help.
Adrian Rosebrock
Hi Ajay — please see the “Troubleshooting and FAQ” section of this blog post. The likely issue here is that you have OpenCV installed, but it’s not properly sym-linked into the “cv” Python virtual environment. Please see the post I linked to for more details.
Zhenglin Li
Hi Adrian, thanks a lot for your brilliant tutorial. I have successfully it installed on my ubuntu. But now I’d like to use opencv together with C as well. Is it possible? I set the search directories in codeblocks as ” /usr/local/lib/python2.7/site-packages” and “/usr/local/include” but it still doesn’t work. I think it may be related to the virtual envirionment but I have no idea how to fix it. Could you please help to give some advice? Many thanks.
Adrian Rosebrock
The OpenCV C/C++ libraries should be installed on your system now. The Python virtual environment has nothing to do with the C/C++ libraries, they are installed independently. Take a look at this post in the official OpenCV forums to help you get started.
Zhenglin Li
Hi Adrian, thank you so much for your helpful advice. It works well with codeblocks now 😀
Adrian Rosebrock
Awesome, I’m glad to hear it 🙂
pooja
Hey thankyou for great tutorial
In workon cv step i m getting this error
workon:command not found
please help
Adrian Rosebrock
Try reading the “Trouble shooting your install (FAQ)” section of this blog post as it should help you resolve the issue.
Arezoo
I installed opencv 3.3.1 on python3.5 and ubuntu 16.04. I did not install OpenCV through the repositories and I compiled it myself. how can I update opencv to the last version?
Adrian Rosebrock
You will need to compile and install OpenCV from source for whatever version you would like to update to.
Akshay Chaturvedi
Hi Adrian, thanks for the tutorial,
i am already using opencv3.2 on ubuntu 16.04,is there a way so that i can upgrade opencv ver 3.2 to 3.4.1 or better.
Adrian Rosebrock
You will need to compile and install from scratch. Be sure to refer to one of my OpenCV install guides.
Krishna Thali
Hey Adrian Rosebrock, I followed the same procedure and I am not able to find cv2.so anywhere in the machine. Command I used to find cv2.so is sudo find / -name cv2.so, as a result, I didnt get anything. Please help me fixing this issue.
Adrian Rosebrock
Double-check your output of “cmake”. Your “Python 2.7” section of the command was likely not configured properly. I would also suggest you follow one of my recent OpenCV + Ubuntu install guides.
Vishnucharan
First of all nice tutorial, I have made everything as you mentioned. But when i run import cv it shows error no module name cv
Adrian Rosebrock
I would instead suggest you follow Updated OpenCV + Ubuntu install guide. That tutorial should help you more.
Vishnucharan
I got that on day after i messaged.Thank you for your kind reply. I have a doubt now I want to use opencv in C++, can i use this same cv environment to run that? I had run the image stitching code and got error like follow . What should i do now? or else please suggest me any tutorial.
Adrian Rosebrock
The “cv” virtual environment is for Python only. You can use gcc/g++ to build and link your C++ code.