Last Updated on July 5, 2021
In this tutorial, you will learn how to apply OpenCV OCR (Optical Character Recognition). We will perform both (1) text detection and (2) text recognition using OpenCV, Python, and Tesseract.
A few weeks ago I showed you how to perform text detection using OpenCV’s EAST deep learning model. Using this model we were able to detect and localize the bounding box coordinates of text contained in an image.
The next step is to take each of these areas containing text and actually recognize and OCR the text using OpenCV and Tesseract.
To learn how to build your own OpenCV OCR and text recognition system, just keep reading!
- Update July 2021: Added section on alternatives to Tesseract OCR, including cloud-based OCR engines and the EasyOCR Python package.
OpenCV OCR and text recognition with Tesseract
In order to perform OpenCV OCR text recognition, we’ll first need to install Tesseract v4 which includes a highly accurate deep learning-based model for text recognition.
From there, I’ll show you how to write a Python script that:
- Performs text detection using OpenCV’s EAST text detector, a highly accurate deep learning text detector used to detect text in natural scene images.
- Once we have detected the text regions with OpenCV, we’ll then extract each of the text ROIs and pass them into Tesseract, enabling us to build an entire OpenCV OCR pipeline!
Finally, I’ll wrap up today’s tutorial by showing you some sample results of applying text recognition with OpenCV, as well as discussing some of the limitations and drawbacks of the method.
Let’s go ahead and get started with OpenCV OCR!
How to install Tesseract 4
Tesseract, a highly popular OCR engine, was originally developed by Hewlett Packard in the 1980s and was then open-sourced in 2005. Google adopted the project in 2006 and has been sponsoring it ever since.
If you’ve read my previous post on Using Tesseract OCR with Python, you know that Tesseract can work very well under controlled conditions…
…but will perform quite poorly if there is a significant amount of noise or your image is not properly preprocessed and cleaned before applying Tesseract.
Just as deep learning has impacted nearly every facet of computer vision, the same is true for character recognition and handwriting recognition.
Deep learning-based models have managed to obtain unprecedented text recognition accuracy, far beyond traditional feature extraction and machine learning approaches.
It was only a matter of time until Tesseract incorporated a deep learning model to further boost OCR accuracy — and in fact, that time has come.
The latest release of Tesseract (v4) supports deep learning-based OCR that is significantly more accurate.
The underlying OCR engine itself utilizes a Long Short-Term Memory (LSTM) network, a kind of Recurrent Neural Network (RNN).
In the remainder of this section, you will learn how to install Tesseract v4 on your machine.
Later in this blog post, you’ll learn how to combine OpenCV’s EAST text detection algorithm with Tesseract v4 in a single Python script to automatically perform OpenCV OCR.
Let’s get started configuring your machine!
Install OpenCV
To run today’s script you’ll need OpenCV installed. Version 3.4.2 or better is required.
To install OpenCV on your system, just follow one of my OpenCV installation guides, ensuring that you download the correct/desired version of OpenCV and OpenCV-contrib in the process.
Install Tesseract 4 on Ubuntu
The exact commands used to install Tesseract 4 on Ubuntu will be different depending on whether you are using Ubuntu 18.04 or Ubuntu 17.04 and earlier.
To check your Ubuntu version you can use the lsb_release command:
$ lsb_release -a
No LSB modules are available.
Distributor ID:	Ubuntu
Description:	Ubuntu 18.04.1 LTS
Release:	18.04
Codename:	bionic
As you can see, I am running Ubuntu 18.04 but you should check your Ubuntu version before continuing.
For Ubuntu 18.04 users, Tesseract 4 is part of the main apt-get repository, making it super easy to install Tesseract via the following command:
$ sudo apt install tesseract-ocr
If you’re using Ubuntu 14, 16, or 17 though, you’ll need a few extra commands due to dependency requirements.
The good news is that Alexander Pozdnyakov has created an Ubuntu PPA (Personal Package Archive) for Tesseract, which makes it super easy to install Tesseract 4 on older versions of Ubuntu.
Just add the alex-p/tesseract-ocr PPA repository to your system, update your package definitions, and then install Tesseract:
$ sudo add-apt-repository ppa:alex-p/tesseract-ocr
$ sudo apt-get update
$ sudo apt install tesseract-ocr
Assuming there are no errors, you should now have Tesseract 4 installed on your machine.
Install Tesseract 4 on macOS
Installing Tesseract on macOS is straightforward provided you have Homebrew, macOS’ “unofficial” package manager, installed on your system.
Just run the following command and Tesseract v4 will be installed on your Mac:
$ brew install tesseract
2020-07-21 Update: Tesseract 5 (alpha release) is available. Currently, we recommend sticking with Tesseract 4. If you would like the latest Tesseract (as of this writing it is 5.0.0-alpha), then be sure to append the --HEAD switch at the end of the command.
If you already have Tesseract installed on your Mac (if you followed my previous Tesseract install tutorial, for example), you’ll first want to unlink the original install:
$ brew unlink tesseract
And from there you can run the install command.
Verify your Tesseract version
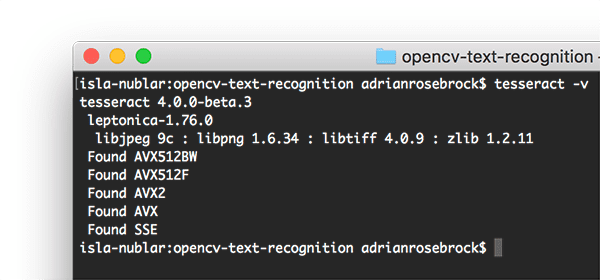
tesseract -v command to query for the version. I have verified that I have Tesseract 4 installed.Once you have Tesseract installed on your machine you should execute the following command to verify your Tesseract version:
$ tesseract -v
tesseract 4.0.0-beta.3
 leptonica-1.76.0
  libjpeg 9c : libpng 1.6.34 : libtiff 4.0.9 : zlib 1.2.11
 Found AVX512BW
 Found AVX512F
 Found AVX2
 Found AVX
 Found SSE
As long as you see tesseract 4 somewhere in the output you know that you have the latest version of Tesseract installed on your system.
Install your Tesseract + Python bindings
Now that we have the Tesseract binary installed, we now need to install the Tesseract + Python bindings so our Python scripts can communicate with Tesseract and perform OCR on images processed by OpenCV.
If you are using a Python virtual environment (which I highly recommend so you can have separate, independent Python environments) use the workon command to access your virtual environment:
$ workon cv
In this case, I am accessing a Python virtual environment named cv (short for “computer vision”) — you can replace cv with whatever you have named your virtual environment.
From there, we’ll use pip to install Pillow, a more Python-friendly version of PIL, followed by pytesseract and imutils :
$ pip install pillow
$ pip install pytesseract
$ pip install imutils
Now open up a Python shell and confirm that you can import both OpenCV and pytesseract :
$ python
Python 3.6.5 (default, Apr  1 2018, 05:46:30)
[GCC 7.3.0] on linux
Type "help", "copyright", "credits" or "license" for more information.
>>> import cv2
>>> import pytesseract
>>> import imutils
>>>
Congratulations!
If you don’t see any import errors, your machine is now configured to perform OCR and text recognition with OpenCV
Let’s move on to the next section (skipping the Pi instructions) where we’ll learn how to actually implement a Python script to perform OpenCV OCR.
Install Tesseract 4 and supporting software on Raspberry Pi and Raspbian
Note: You may skip this section if you aren’t on a Raspberry Pi.
Inevitably, I’ll be asked how to install Tesseract 4 on the Rasberry Pi.
The following instructions aren’t for the faint of heart — you may run into problems. They are tested, but mileage may vary on your own Raspberry Pi.
First, uninstall your OpenCV bindings from system site packages:
$ sudo rm /usr/local/lib/python3.5/site-packages/cv2.so
Here I used the rm command since my cv2.so file in site-packages is just a sym-link. If the cv2.so bindings are your real OpenCV bindings then you may want to move the file out of site-packages for safe keeping.
Now install two QT packages on your system:
$ sudo apt-get install libqtgui4 libqt4-test
Then, install tesseract via Thortex’s GitHub:
$ cd ~
$ git clone https://github.com/thortex/rpi3-tesseract
$ cd rpi3-tesseract/release
$ ./install_requires_related2leptonica.sh
$ ./install_requires_related2tesseract.sh
$ ./install_tesseract.sh
For whatever reason, the trained English language data file was missing from the install so I needed to download and move it into the proper directory:
$ cd ~
$ wget https://github.com/tesseract-ocr/tessdata/raw/master/eng.traineddata
$ sudo mv -v eng.traineddata /usr/local/share/tessdata/
From there, create a new Python virtual environment:
$ mkvirtualenv cv_tesseract -p python3
And install the necessary packages:
$ workon cv_tesseract
$ pip install opencv-contrib-python imutils pytesseract pillow
You’re done! Just keep in mind that your experience may vary.
Understanding OpenCV OCR and Tesseract text recognition
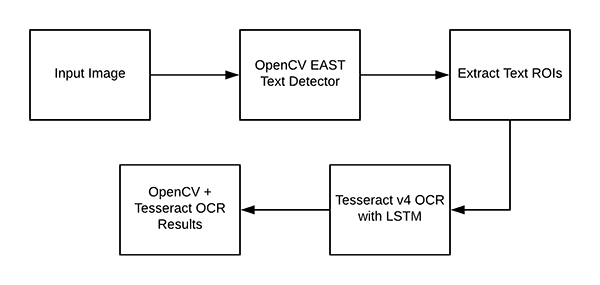
Now that we have OpenCV and Tesseract successfully installed on our system we need to briefly review our pipeline and the associated commands.
To start, we’ll apply OpenCV’s EAST text detector to detect the presence of text in an image. The EAST text detector will give us the bounding box (x, y)-coordinates of text ROIs.
We’ll extract each of these ROIs and then pass them into Tesseract v4’s LSTM deep learning text recognition algorithm.
The output of the LSTM will give us our actual OCR results.
Finally, we’ll draw the OpenCV OCR results on our output image.
But before we actually get to our project, let’s briefly review the Tesseract command (which will be called under the hood by the pytesseract library).
When calling the tessarct binary we need to supply a number of flags. The three most important ones are -l , --oem , and --psm .
The -l flag controls the language of the input text. We’ll be using eng (English) for this example but you can see all the languages Tesseract supports here.
The --oem argument, or OCR Engine Mode, controls the type of algorithm used by Tesseract.
You can see the available OCR Engine Modes by executing the following command:
$ tesseract --help-oem
OCR Engine modes:
  0    Legacy engine only.
  1    Neural nets LSTM engine only.
  2    Legacy + LSTM engines.
  3    Default, based on what is available.
We’ll be using --oem 1 to indicate that we wish to use the deep learning LSTM engine only.
The final important flag, --psm controls the automatic Page Segmentation Mode used by Tesseract:
$ tesseract --help-psm
Page segmentation modes:
  0    Orientation and script detection (OSD) only.
  1    Automatic page segmentation with OSD.
  2    Automatic page segmentation, but no OSD, or OCR.
  3    Fully automatic page segmentation, but no OSD. (Default)
  4    Assume a single column of text of variable sizes.
  5    Assume a single uniform block of vertically aligned text.
  6    Assume a single uniform block of text.
  7    Treat the image as a single text line.
  8    Treat the image as a single word.
  9    Treat the image as a single word in a circle.
 10    Treat the image as a single character.
 11    Sparse text. Find as much text as possible in no particular order.
 12    Sparse text with OSD.
 13    Raw line. Treat the image as a single text line,
       bypassing hacks that are Tesseract-specific.
For OCR’ing text ROIs I’ve found that modes 6 and 7 work well, but if you’re OCR’ing large blocks of text then you may want to try 3 , the default mode.
Whenever you find yourself obtaining incorrect OCR results I highly recommend adjusting the --psm as it can have dramatic influences on your output OCR results.
Project structure
Be sure to grab the zip from the “Downloads” section of the blog post.
From there unzip the file and navigate into the directory. The tree command allows us to see the directory structure in our terminal:
$ tree --dirsfirst
.
├── images
│   ├── example_01.jpg
│   ├── example_02.jpg
│   ├── example_03.jpg
│   ├── example_04.jpg
│   └── example_05.jpg
├── frozen_east_text_detection.pb
└── text_recognition.py

1 directory, 7 files
Our project contains one directory and two notable files:
images/: A directory containing six test images containing scene text. We will attempt OpenCV OCR with each of these images.frozen_east_text_detection.pb: The EAST text detector. This CNN is pre-trained for text detection and ready to go. I did not train this model — it is provided with OpenCV; I’ve also included it in the “Downloads” for your convenience.text_recognition.py: Our script for OCR — we’ll review this script line by line. The script utilizes the EAST text detector to find regions of text in the image and then takes advantage of Tesseract v4 for recognition.
Implementing our OpenCV OCR algorithm
We are now ready to perform text recognition with OpenCV!
Open up the text_recognition.py file and insert the following code:
# import the necessary packages
from imutils.object_detection import non_max_suppression
import numpy as np
import pytesseract
import argparse
import cv2
Today’s OCR script requires five imports, one of which is built into OpenCV.
Most notably, we’ll be using pytesseract and OpenCV. My imutils package will be used for non-maxima suppression as OpenCV’s NMSBoxes function doesn’t seem to be working with the Python API. I’ll also note that NumPy is a dependency for OpenCV.
The argparse package is included with Python and handles command line arguments — there is nothing to install.
Now that our imports are taken care of, let’s implement the decode_predictions function:
def decode_predictions(scores, geometry):
	# grab the number of rows and columns from the scores volume, then
	# initialize our set of bounding box rectangles and corresponding
	# confidence scores
	(numRows, numCols) = scores.shape[2:4]
	rects = []
	confidences = []

	# loop over the number of rows
	for y in range(0, numRows):
		# extract the scores (probabilities), followed by the
		# geometrical data used to derive potential bounding box
		# coordinates that surround text
		scoresData = scores[0, 0, y]
		xData0 = geometry[0, 0, y]
		xData1 = geometry[0, 1, y]
		xData2 = geometry[0, 2, y]
		xData3 = geometry[0, 3, y]
		anglesData = geometry[0, 4, y]

		# loop over the number of columns
		for x in range(0, numCols):
			# if our score does not have sufficient probability,
			# ignore it
			if scoresData[x] < args["min_confidence"]:
				continue

			# compute the offset factor as our resulting feature
			# maps will be 4x smaller than the input image
			(offsetX, offsetY) = (x * 4.0, y * 4.0)

			# extract the rotation angle for the prediction and
			# then compute the sin and cosine
			angle = anglesData[x]
			cos = np.cos(angle)
			sin = np.sin(angle)

			# use the geometry volume to derive the width and height
			# of the bounding box
			h = xData0[x] + xData2[x]
			w = xData1[x] + xData3[x]

			# compute both the starting and ending (x, y)-coordinates
			# for the text prediction bounding box
			endX = int(offsetX + (cos * xData1[x]) + (sin * xData2[x]))
			endY = int(offsetY - (sin * xData1[x]) + (cos * xData2[x]))
			startX = int(endX - w)
			startY = int(endY - h)

			# add the bounding box coordinates and probability score
			# to our respective lists
			rects.append((startX, startY, endX, endY))
			confidences.append(scoresData[x])

	# return a tuple of the bounding boxes and associated confidences
	return (rects, confidences)
The decode_predictions function begins on Line 8 and is explained in detail inside the EAST text detection post. The function:
- Uses a deep learning-based text detector to detect (not recognize) regions of text in an image.
- The text detector produces two arrays, one containing the probability of a given area containing text, and another that maps the score to a bounding box location in the input image.
As we’ll see in our OpenCV OCR pipeline, the EAST text detector model will produce two variables:
scores: Probabilities for positive text regions.geometry: The bounding boxes of the text regions.
…each of which is a parameter to the decode_predictions function.
The function processes this input data, resulting in a tuple containing (1) the bounding box locations of the text and (2) the corresponding probability of that region containing text:
rects: This value is based ongeometryand is in a more compact form so we can later apply NMS.confidences: The confidence values in this list correspond to each rectangle inrects.
Both of these values are returned by the function.
Note: Ideally, a rotated bounding box would be included in rects , but it isn’t exactly straightforward to extract a rotated bounding box for today’s proof of concept. Instead, I’ve computed the horizontal bounding rectangle which does take angle into account. The angle is made available on Line 41 if you would like to extract a rotated bounding box of a word to pass into Tesseract.
For further details on the code block above, please see this blog post.
From there let’s parse our command line arguments:
# construct the argument parser and parse the arguments
ap = argparse.ArgumentParser()
ap.add_argument("-i", "--image", type=str,
	help="path to input image")
ap.add_argument("-east", "--east", type=str,
	help="path to input EAST text detector")
ap.add_argument("-c", "--min-confidence", type=float, default=0.5,
	help="minimum probability required to inspect a region")
ap.add_argument("-w", "--width", type=int, default=320,
	help="nearest multiple of 32 for resized width")
ap.add_argument("-e", "--height", type=int, default=320,
	help="nearest multiple of 32 for resized height")
ap.add_argument("-p", "--padding", type=float, default=0.0,
	help="amount of padding to add to each border of ROI")
args = vars(ap.parse_args())
Our script requires two command line arguments:
--image: The path to the input image.--east: The path to the pre-trained EAST text detector.
Optionally, the following command line arguments may be provided:
--min-confidence: The minimum probability of a detected text region.--width: The width our image will be resized to prior to being passed through the EAST text detector. Our detector requires multiples of 32.--height: Same as the width, but for the height. Again, our detector requires multiple of32for resized height.--padding: The (optional) amount of padding to add to each ROI border. You might try values of0.05for 5% or0.10for 10% (and so on) if you find that your OCR result is incorrect.
From there, we will load + preprocess our image and initialize key variables:
# load the input image and grab the image dimensions
image = cv2.imread(args["image"])
orig = image.copy()
(origH, origW) = image.shape[:2]

# set the new width and height and then determine the ratio in change
# for both the width and height
(newW, newH) = (args["width"], args["height"])
rW = origW / float(newW)
rH = origH / float(newH)

# resize the image and grab the new image dimensions
image = cv2.resize(image, (newW, newH))
(H, W) = image.shape[:2]
Our image is loaded into memory and copied (so we can later draw our output results on it) on Lines 82 and 83.
We grab the original width and height (Line 84) and then extract the new width and height from the args dictionary (Line 88).
Using both the original and new dimensions, we calculate ratios used to scale our bounding box coordinates later in the script (Lines 89 and 90).
Our image is then resized, ignoring aspect ratio (Line 93).
Next, let’s work with the EAST text detector:
# define the two output layer names for the EAST detector model that
# we are interested in -- the first is the output probabilities and the
# second can be used to derive the bounding box coordinates of text
layerNames = [
	"feature_fusion/Conv_7/Sigmoid",
	"feature_fusion/concat_3"]

# load the pre-trained EAST text detector
print("[INFO] loading EAST text detector...")
net = cv2.dnn.readNet(args["east"])
Our two output layer names are put into list form on Lines 99-101. To learn why these two output names are important, you’ll want to refer to my original EAST text detection tutorial.
Then, our pre-trained EAST neural network is loaded into memory (Line 105).
I cannot emphasize this enough: you need OpenCV 3.4.2 at a minimum to have the cv2.dnn.readNet implementation.
The first bit of “magic” occurs next:
# construct a blob from the image and then perform a forward pass of
# the model to obtain the two output layer sets
blob = cv2.dnn.blobFromImage(image, 1.0, (W, H),
	(123.68, 116.78, 103.94), swapRB=True, crop=False)
net.setInput(blob)
(scores, geometry) = net.forward(layerNames)

# decode the predictions, then  apply non-maxima suppression to
# suppress weak, overlapping bounding boxes
(rects, confidences) = decode_predictions(scores, geometry)
boxes = non_max_suppression(np.array(rects), probs=confidences)
To determine text locations we:
- Construct a
blobon Lines 109 and 110. Read more about the process here. - Pass the
blobthrough the neural network, obtainingscoresandgeometry(Lines 111 and 112). - Decode the predictions with the previously defined
decode_predictionsfunction (Line 116). - Apply non-maxima suppression via my imutils method (Line 117). NMS effectively takes the most likely text regions, eliminating other overlapping regions.
Now that we know where the text regions are, we need to take steps to recognize the text! We begin to loop over the bounding boxes and process the results, preparing the stage for actual text recognition:
# initialize the list of results
results = []

# loop over the bounding boxes
for (startX, startY, endX, endY) in boxes:
	# scale the bounding box coordinates based on the respective
	# ratios
	startX = int(startX * rW)
	startY = int(startY * rH)
	endX = int(endX * rW)
	endY = int(endY * rH)

	# in order to obtain a better OCR of the text we can potentially
	# apply a bit of padding surrounding the bounding box -- here we
	# are computing the deltas in both the x and y directions
	dX = int((endX - startX) * args["padding"])
	dY = int((endY - startY) * args["padding"])

	# apply padding to each side of the bounding box, respectively
	startX = max(0, startX - dX)
	startY = max(0, startY - dY)
	endX = min(origW, endX + (dX * 2))
	endY = min(origH, endY + (dY * 2))

	# extract the actual padded ROI
	roi = orig[startY:endY, startX:endX]
We initialize the results list to contain our OCR bounding boxes and text on Line 120.
Then we begin looping over the boxes (Line 123) where we:
- Scale the bounding boxes based on the previously computed ratios (Lines 126-129).
- Pad the bounding boxes (Lines 134-141).
- And finally, extract the padded
roi(Line 144).
Our OpenCV OCR pipeline can be completed by using a bit of Tesseract v4 “magic”:
	# in order to apply Tesseract v4 to OCR text we must supply
	# (1) a language, (2) an OEM flag of 1, indicating that the we
	# wish to use the LSTM neural net model for OCR, and finally
	# (3) an OEM value, in this case, 7 which implies that we are
	# treating the ROI as a single line of text
	config = ("-l eng --oem 1 --psm 7")
	text = pytesseract.image_to_string(roi, config=config)

	# add the bounding box coordinates and OCR'd text to the list
	# of results
	results.append(((startX, startY, endX, endY), text))
Taking note of the comment in the code block, we set our Tesseract config parameters on Line 151 (English language, LSTM neural network, and single-line of text).
Note: You may need to configure the --psm value using my instructions at the top of this tutorial if you find yourself obtaining incorrect OCR results.
The pytesseract library takes care of the rest on Line 152 where we call pytesseract.image_to_string , passing our roi and config string .
? Boom! In two lines of code, you have used Tesseract v4 to recognize a text ROI in an image. Just remember, there is a lot happening under the hood.
Our result (the bounding box values and actual text string) are appended to the results list (Line 156).
Then we continue this process for other ROIs at the top of the loop.
Now let’s display/print the results to see if it actually worked:
# sort the results bounding box coordinates from top to bottom
results = sorted(results, key=lambda r:r[0][1])

# loop over the results
for ((startX, startY, endX, endY), text) in results:
	# display the text OCR'd by Tesseract
	print("OCR TEXT")
	print("========")
	print("{}\n".format(text))

	# strip out non-ASCII text so we can draw the text on the image
	# using OpenCV, then draw the text and a bounding box surrounding
	# the text region of the input image
	text = "".join([c if ord(c) < 128 else "" for c in text]).strip()
	output = orig.copy()
	cv2.rectangle(output, (startX, startY), (endX, endY),
		(0, 0, 255), 2)
	cv2.putText(output, text, (startX, startY - 20),
		cv2.FONT_HERSHEY_SIMPLEX, 1.2, (0, 0, 255), 3)

	# show the output image
	cv2.imshow("Text Detection", output)
	cv2.waitKey(0)
Our results are sorted from top to bottom on Line 159 based on the y-coordinate of the bounding box (though you may wish to sort them differently).
From there, looping over the results , we:
- Print the OCR’d
textto the terminal (Lines 164-166). - Strip out non-ASCII characters from
textas OpenCV does not support non-ASCII characters in thecv2.putTextfunction (Line 171). - Draw (1) a bounding box surrounding the ROI and (2) the result
textabove the ROI (Lines 173-176). - Display the output and wait for any key to be pressed (Lines 179 and 180).
OpenCV text recognition results
Now that we’ve implemented our OpenCV OCR pipeline, let’s see it in action.
Be sure to use the “Downloads” section of this blog post to download the source code, OpenCV EAST text detector model, and the example images.
From there, open up a command line, navigate to where you downloaded + extracted the zip, and execute the following command:
$ python text_recognition.py --east frozen_east_text_detection.pb \
	--image images/example_01.jpg
[INFO] loading EAST text detector...
OCR TEXT
========
OH OK
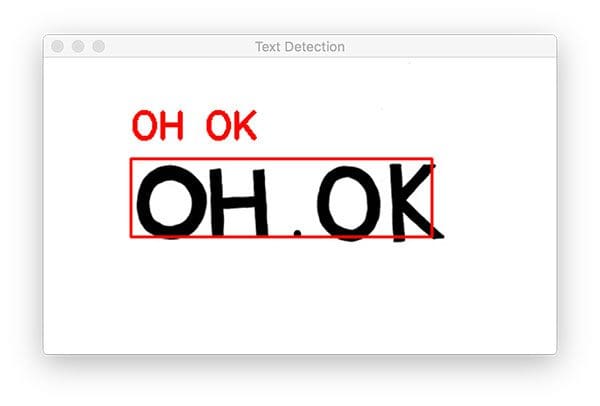
We’re starting with a simple example.
Notice how our OpenCV OCR system was able to correctly (1) detect the text in the image and then (2) recognize the text as well.
The next example is more representative of text we would see in a real- world image:
$ python text_recognition.py --east frozen_east_text_detection.pb \
	--image images/example_02.jpg
[INFO] loading EAST text detector...
OCR TEXT
========
® MIDDLEBOROUGH
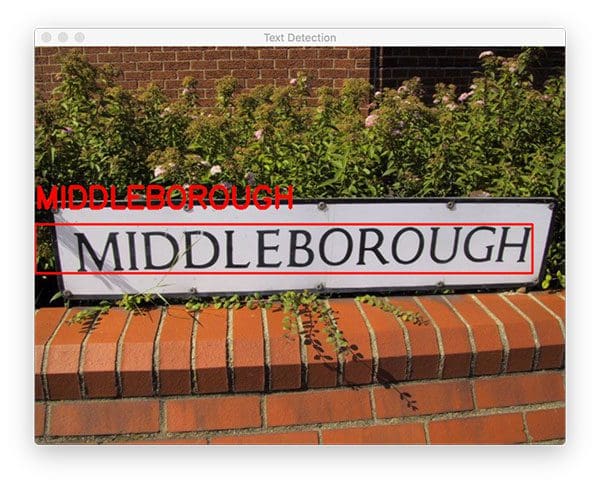
Again, notice how our OpenCV OCR pipeline was able to correctly localize and recognize the text; however, in our terminal output we see a registered trademark Unicode symbol — Tesseract was likely confused here as the bounding box reported by OpenCV’s EAST text detector bled into the grassy shrubs/plants behind the sign.
Let’s look at another OpenCV OCR and text recognition example:
$ python text_recognition.py --east frozen_east_text_detection.pb \
	--image images/example_03.jpg
[INFO] loading EAST text detector...
OCR TEXT
========
ESTATE

OCR TEXT
========
AGENTS

OCR TEXT
========
SAXONS
In this case, there are three separate text regions.
OpenCV’s text detector is able to localize each of them — we then apply OCR to correctly recognize each text region as well.
Our next example shows the importance of adding padding in certain circumstances:
$ python text_recognition.py --east frozen_east_text_detection.pb \
	--image images/example_04.jpg
[INFO] loading EAST text detector...
OCR TEXT
========
CAPTITO

OCR TEXT
========
SHOP

OCR TEXT
========
|.
In the first attempt of OCR’ing this bake shop storefront, we see that “SHOP” is correctly OCR’d, but:
- The “U” in “CAPUTO” is incorrectly recognized as “TI”.
- The apostrophe and “S” is missing from “CAPUTO’S’.
- And finally, “BAKE” is incorrectly recognized as a vertical bar/pipe (“|”) with a period (“.”).
By adding a bit of padding we can expand the bounding box coordinates of the ROI and correctly recognize the text:
$ python text_recognition.py --east frozen_east_text_detection.pb \
	--image images/example_04.jpg --padding 0.05
[INFO] loading EAST text detector...
OCR TEXT
========
CAPUTO'S

OCR TEXT
========
SHOP

OCR TEXT
========
BAKE
Just by adding 5% of padding surrounding each corner of the bounding box we’re not only able to correctly OCR the “BAKE” text but we’re also able to recognize the “U” and “’S” in “CAPUTO’S”.
$ python text_recognition.py --east frozen_east_text_detection.pb \
	--image images/example_05.jpg --padding 0.25
[INFO] loading EAST text detector...
OCR TEXT
========
Designer

OCR TEXT
========
a

