Happy New Year!
It’s now officially 2018…which also means that PyImageSearch is (almost) four years old!
I published the very first blog post on Monday, January 12th 2014. Since then over 230 posts have been published, along with two books and a full-fledged course.
At the beginning of every New Year I take some quiet time to reflect.
I grab my notebook + a couple pens (leaving my laptop and phone at home; no distractions) and head to the local cafe in my neighborhood. I then sit there and reflect on the past year and ask myself the following questions:
- What went well and gave me life?
- What went poorly and sucked life from me?
- How can I double-down on the positive, life-giving aspects?
- How can I get the negative aspects off my plate (or at least minimize their impact on my life)?
These four questions (and my thoughts on them) ultimately shape the upcoming year.
But most of all, the past four years running PyImageSearch has always been at the top of my list for “life-giving”.
Thank you for making PyImageSearch possible. Running this blog is truly the best part of my day.
Without you PyImageSearch would not be possible.
And in honor of that, today I am going to answer a question I received from Shelby, a PyImageSearch reader:
Hi Adrian, I’ve been reading PyImageSearch for the past couple of years. One topic I’m curious about is taking screenshots with OpenCV. Is this possible?
I’d like to build an app that can automatically control the user’s screen and it requires screenshots. But I’m not sure how to go about it.
Shelby’s question is a great one.
Building a computer vision system to automatically control or analyze what is on a user’s screen is a great project.
Once we have the screenshot we can identify elements on a screen using template matching, keypoint matching, or local invariant descriptors.
The problem is actually obtaining the screenshot in the first place.
We call this data acquisition — and in some cases, acquiring the data is actually harder than
applying the computer vision or machine learning itself.
To learn how to take screenshots with OpenCV and Python, just keep reading.
Taking screenshots with OpenCV and Python
Today’s blog post is broken down into two sections.
In the first section, we’ll learn how to install the PyAutoGUI library. This library is responsible for actually capturing our screenshots to disk or directly to memory.
From there we’ll learn how to use PyAutoGUI and OpenCV together to obtain our screenshots.
Installing PyAutoGUI for screenshots
You can find instructions for installing PyAutoGUI in their install documentation; however, as a matter of completeness, I have included the instructions below.
I highly recommend that you install the PyAutoGUI into your Python virtual environment for computer vision (as we have done for all other install tutorials here on PyImageSearch).
Discussing virtual environments in detail is beyond the scope of this blog post; however, I encourage you to set up an environment for computer vision (including OpenCV and other tools) by following the installation instructions for your system available here.
macOS
Installing PyAutoGUI for macOS is very straightforward. As stated above, you’ll want to be sure you’re “inside” your virtual environment prior to executing the following pip commands:
$ workon your_virtualenv
$ pip install pillow imutils
$ pip install pyobjc-core
$ pip install pyobjc
$ pip install pyautogui
Ubuntu or Raspbian
To install PyAutoGUI for Ubuntu (or Raspbian), you’ll need to make use of both Aptitude and pip. Again, before the pip commands, be sure that you’re working on your Python virtual environment:
$ sudo apt-get install scrot
$ sudo apt-get install python-tk python-dev
$ sudo apt-get install python3-tk python3-dev
$ workon your_virtualenv
$ pip install pillow imutils
$ pip install python3_xlib python-xlib
$ pip install pyautogui
Screenshots and screen captures with OpenCV and Python
Now that PyAutoGUI is installed, let’s take our first screenshot with OpenCV and Python.
Open up a new file, name it take_screenshot.py , and insert the following code:
# import the necessary packages
import numpy as np
import pyautogui
import imutils
import cv2
On Lines 2-5 we’re importing our required packages, notably pyautogui .
From there we’ll take a screenshot via two different methods.
In the first method, we take the screenshot and store it in memory for immediate use:
# take a screenshot of the screen and store it in memory, then
# convert the PIL/Pillow image to an OpenCV compatible NumPy array
# and finally write the image to disk
image = pyautogui.screenshot()
image = cv2.cvtColor(np.array(image), cv2.COLOR_RGB2BGR)
cv2.imwrite("in_memory_to_disk.png", image)
Line 10 shows that we’re grabbing a screenshot with pyautogui.screenshot and storing it as image (again, this image is stored in memory it is not saved to disk).
Easy, huh?
Not so fast!
PyAutoGUI actually stores the image as a PIL/Pillow image, so we need to perform an additional step before the image can be used with OpenCV.
On Line 11 we convert the image to a NumPy array and swap the color channels from RGB ordering (what PIL/Pillow uses) to BGR (what OpenCV expects). That’s all that’s required for making our screenshot image OpenCV-compatible.
From here the sky is the limit with what you can do. You could detect buttons displayed on the screen or even determine the coordinates of where the mouse is on the screen.
We won’t do either of those tasks today. Instead, let’s just write the image to disk with cv2.imwrite to ensure the process worked correctly (Line 12).
The second method (where we write the screenshot to disk) is even easier:
# this time take a screenshot directly to disk
pyautogui.screenshot("straight_to_disk.png")
As shown, this one-liner writes the image straight to disk. Enough said.
We could stop there, but for a sanity check, let’s make sure that OpenCV can also open + display the screenshot:
# we can then load our screenshot from disk in OpenCV format
image = cv2.imread("straight_to_disk.png")
cv2.imshow("Screenshot", imutils.resize(image, width=600))
cv2.waitKey(0)
Here, we read the image from disk. Then we resize and display it on the screen until a key is pressed.
That’s it!
As you can tell, PyAutoGui is dead simple thanks to the hard work of Al Sweigart.
Let’s see if it worked.
To test this script, open up a terminal and execute the following command:
$ python take_screenshot.py
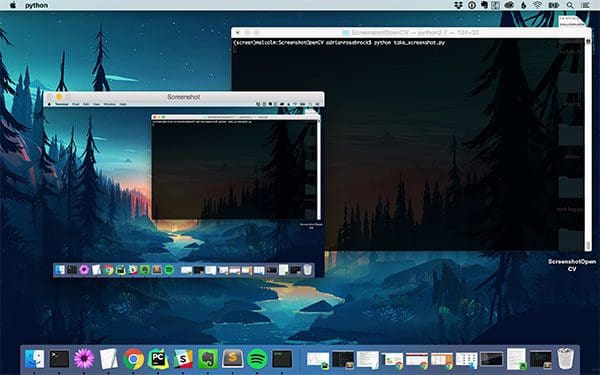
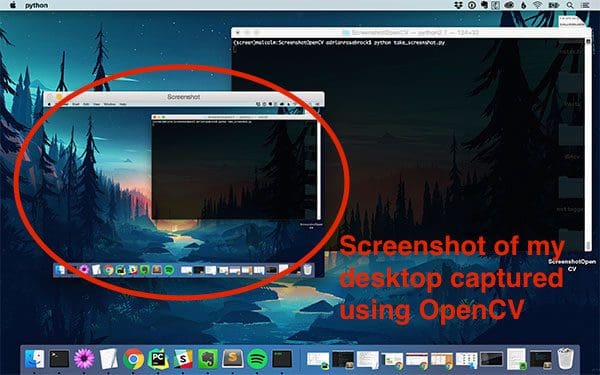
And here’s our desktop screenshot shown within our desktop…proving that the screenshot was taken and displayed:

Notice how in the terminal the Python script is running (implying that the screenshot is currently being taken).
After the script exits, I have two new files in my working directory: in_memory_to_disk.png and straight_to_disk.png .
Let’s list contents of the directory:
$ ls -al
total 18760
drwxr-xr-x@ 5 adrian  staff      160 Jan 01 10:04 .
drwxr-xr-x@ 8 adrian  staff      256 Jan 01 20:38 ..
-rw-r--r--@ 1 adrian  staff  4348537 Jan 01 09:59 in_memory_to_disk.png
-rw-r--r--@ 1 adrian  staff  5248098 Jan 01 09:59 straight_to_disk.png
-rw-r--r--@ 1 adrian  staff      703 Jan 01 09:59 take_screenshot.py
As you can see, I’ve got my take_screenshot.py script and both screenshot PNG images
Now that we have our screenshot in OpenCV format, we can apply any “standard” computer vision or image processing operation that we wish, including edge detection, template matching, keypoint matching, object detection, etc.
In a future blog post, I’ll be demonstrating how to detect elements on a screen followed by controlling the entire GUI from the PyAutoGUI library based on what our computer vision algorithms detect.
Stay tuned for this post in early 2018!
What's next? We recommend PyImageSearch University.
86+ total classes • 115+ hours hours of on-demand code walkthrough videos • Last updated: October 2025
★★★★★ 4.84 (128 Ratings) • 16,000+ Students Enrolled
I strongly believe that if you had the right teacher you could master computer vision and deep learning.
Do you think learning computer vision and deep learning has to be time-consuming, overwhelming, and complicated? Or has to involve complex mathematics and equations? Or requires a degree in computer science?
That’s not the case.
All you need to master computer vision and deep learning is for someone to explain things to you in simple, intuitive terms. And that’s exactly what I do. My mission is to change education and how complex Artificial Intelligence topics are taught.
If you're serious about learning computer vision, your next stop should be PyImageSearch University, the most comprehensive computer vision, deep learning, and OpenCV course online today. Here you’ll learn how to successfully and confidently apply computer vision to your work, research, and projects. Join me in computer vision mastery.
Inside PyImageSearch University you'll find:
- ✓ 86+ courses on essential computer vision, deep learning, and OpenCV topics
- ✓ 86 Certificates of Completion
- ✓ 115+ hours hours of on-demand video
- ✓ Brand new courses released regularly, ensuring you can keep up with state-of-the-art techniques
- ✓ Pre-configured Jupyter Notebooks in Google Colab
- ✓ Run all code examples in your web browser — works on Windows, macOS, and Linux (no dev environment configuration required!)
- ✓ Access to centralized code repos for all 540+ tutorials on PyImageSearch
- ✓ Easy one-click downloads for code, datasets, pre-trained models, etc.
- ✓ Access on mobile, laptop, desktop, etc.
Summary
In today’s blog post we learned how to take screenshots using OpenCV, Python, and the PyAutoGUI library.
Using PyAutoGUI we can easily capture screenshots directly to disk or to memory, which we can then convert to OpenCV/NumPy format.
Screenshots are an important first step when creating computer vision software that can automatically control GUI operations on the screen, including automatically moving the mouse, clicking the mouse, and registering keyboard events.
In future blog posts, we’ll learn how we can automatically control our entire computer via computer vision and the PyAutoGUI.
To be notified when future blog posts are published here on PyImageSearch, just enter your email address in the form below!

Download the Source Code and FREE 17-page Resource Guide
Enter your email address below to get a .zip of the code and a FREE 17-page Resource Guide on Computer Vision, OpenCV, and Deep Learning. Inside you'll find my hand-picked tutorials, books, courses, and libraries to help you master CV and DL!


