Table of Contents
FastAPI Docker Deployment: Preparing ONNX AI Models for AWS Lambda
In this tutorial, you will learn how to build a FastAPI-based AI inference server for serving an ONNX model, handle image preprocessing, and expose an API endpoint for real-time predictions. We’ll also run the server in a Docker container, ensuring consistent environments before AWS Lambda deployment. By the end, you’ll have a fully functional AI API running in Docker, ready for serverless deployment on AWS Lambda.
This lesson is the 3rd in a 4-part series on AWS Lambda:
- Introduction to Serverless Model Deployment with AWS Lambda and ONNX
- Converting a PyTorch Model to ONNX for FastAPI (Docker) Deployment
- FastAPI Docker Deployment: Preparing ONNX AI Models for AWS Lambda (this tutorial)
- Lesson 4
To learn how to build a FastAPI AI inference server with ONNX, run it in Docker, and prepare for AWS Lambda deployment, just keep reading.
Introduction
In the previous lesson, we converted a PyTorch ResNetV2-50 model to ONNX, analyzed its structure, and validated its performance using ONNX Runtime. We compared the ONNX model against PyTorch in terms of model size and inference speed, where ONNX showed a 17% improvement for single-image inference and a 2x speed boost for batch inference (128 images). After confirming that ONNX maintains the same accuracy as PyTorch, we are now ready to serve the model via an API and containerize it for deployment.
Why Do We Need an API for AI Inference?
Running inference locally is fine for testing, but real-world AI applications require serving models via APIs so users or systems can send inference requests dynamically. A dedicated API:
- Enables real-time AI inference: Instead of running models locally for every request, an API makes it accessible to multiple users or applications.
- Simplifies integration: Any frontend (like a web app) or backend service can communicate with the AI model using simple API calls.
- Scales efficiently: With an API, inference can run asynchronously on scalable cloud infrastructure instead of being restricted to a single machine.
- Supports deployment on serverless environments: AWS Lambda requires an HTTP-based entry point, which APIs provide.
To serve our ONNX model efficiently, we need a fast, lightweight API framework that handles inference requests with minimal latency.
Why Use Python FastAPI + Docker Before AWS Lambda Deployment?
To deploy our AI model on AWS Lambda, we first need to test it in a controlled environment. Instead of deploying directly, we:
- Use FastAPI for AI inference: FastAPI is a high-performance Python web framework that allows us to:
- Expose the ONNX model as an API endpoint.
- Process incoming image requests and return predictions efficiently.
- Handle multiple requests asynchronously to reduce API latency.
- Use Docker for environment consistency: AWS Lambda runs in a containerized environment, so:
- Running FastAPI inside Docker ensures that the API behaves consistently across different environments (local & cloud).
- We avoid dependency conflicts by defining a standardized runtime before deployment.
- It allows us to test inference inside a Docker container before pushing it to AWS.
The following diagram illustrates the full request-response cycle — from API request handling in FastAPI to inference execution in a Docker container.
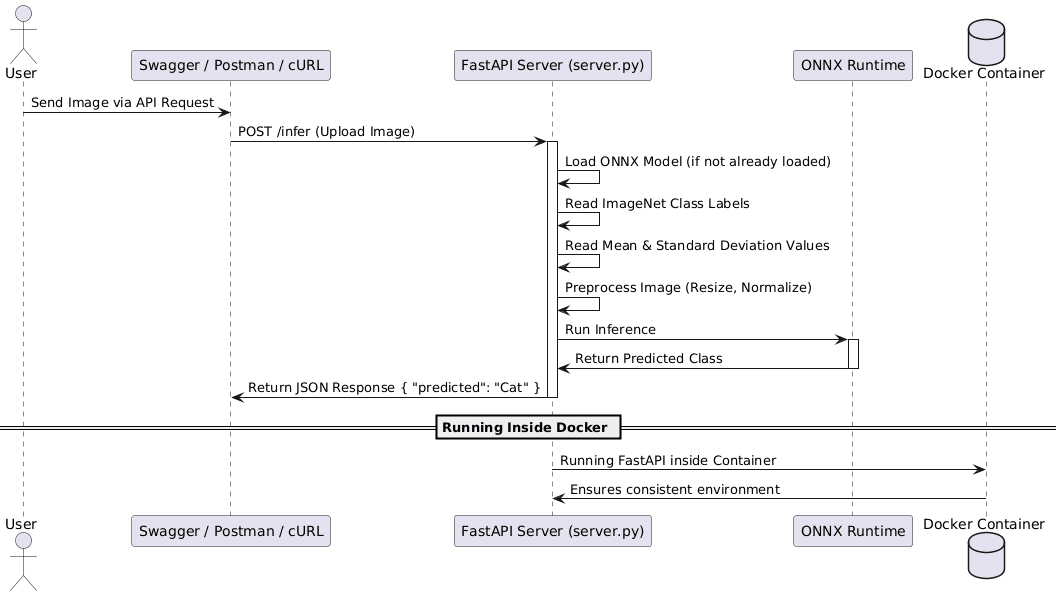
By the end of this tutorial, we will have a fully functional AI inference API running inside Docker, ensuring that our ONNX model is ready for serverless deployment on AWS Lambda.
Configuring Your Development Environment
To ensure a smooth development process, we first need to set up our environment with the required dependencies. This includes installing FastAPI, ONNX Runtime, PyTorch Image Models (TIMM), and Docker to run the inference API inside a container before deploying to AWS Lambda.
Luckily, all required Python packages are pip-installable. Run the following command to install them:
$ pip install fastapi[all]==0.98.0 numpy==1.25.2 onnxruntime==1.15.1 mangum==0.17.0 Pillow==9.5.0 timm==0.9.5 onnx==1.14.0
Setting Up Docker
Since we’ll be running our FastAPI inference server in a Docker container, make sure Docker is installed.
Download and install Docker from:
After installation, verify that Docker is running by executing:
$ docker --version
You should see an output similar to:
Docker version 25.0.1, build 29cf629
💡 If you’re new to Docker, refer to our guide on Getting Started with Docker.
Now that our environment is set up, let’s move to understanding the project directory structure.
Need Help Configuring Your Development Environment?

All that said, are you:
- Short on time?
- Learning on your employer’s administratively locked system?
- Wanting to skip the hassle of fighting with the command line, package managers, and virtual environments?
- Ready to run the code immediately on your Windows, macOS, or Linux system?
Then join PyImageSearch University today!
Gain access to Jupyter Notebooks for this tutorial and other PyImageSearch guides pre-configured to run on Google Colab’s ecosystem right in your web browser! No installation required.
And best of all, these Jupyter Notebooks will run on Windows, macOS, and Linux!
Project Structure
We first need to review our project directory structure.
Start by accessing this tutorial’s “Downloads” section to retrieve the source code and example images.
From there, take a look at the directory structure:
$ tree . -L 1
resnet-aws-serverless-classifier/
├── src/
│   ├── convert.py           # Used previously (Lesson 2) – converts PyTorch model to ONNX
│   ├── server.py            # Used in this lesson – FastAPI inference server
│   ├── onnxt.py             # Not used here – ONNX Runtime CLI testing (later)
│   ├── onnx_local.py        # Not used here – local ONNX example tests (later)
│   └── __init__.py
├── models/
│   ├── resnetv2_50.onnx     # Used in this lesson – ONNX model loaded by FastAPI
│   └── imagenet_classes.txt # Used in this lesson – ImageNet class label mappings
├── data/
│   ├── cat.jpg / dog.jpg    # Used in this lesson – sample images for API testing
│   ├── cat_base64.txt       # Not used here – for Lambda JSON payloads (later)
│   ├── event.json / payload.json / response.json  # Not used here – for AWS Lambda tests (later)
├── tests/                   # Not used here – Lambda & boto3 tests (later)
│   ├── prepare_event.py
│   ├── test_boto3_lambda.py
│   └── test_lam.py
├── frontend/                # Not used here – used in Lessons 7–8 (Next.js UI)
├── Dockerfile               # Not used here – AWS Lambda container (later)
├── Dockerfile.local         # Used in this lesson – build local FastAPI Docker image
├── docker-compose.local.yml # Not used here – multi-container setup (later)
├── dev.sh                   # Optional helper script for local development
├── requirements.txt         # Used in this lesson – base dependencies
├── requirements-local.txt   # Used in this lesson – local FastAPI/Docker dependencies
├── .dockerignore
├── .gitignore
└── README.md
Let’s quickly review the components we use in this lesson:
server.py: Implements the FastAPI inference API, loads the ONNX model, and defines the/inferand/healthendpoints.resnetv2_50.onnx: The exported ONNX model loaded by FastAPI for real-time inference.imagenet_classes.txt: Maps the model’s numeric output to human-readable ImageNet class labels.cat.jpg / dog.jpg: Sample images for testing model predictions through Swagger UI or cURL.Dockerfile.local: Defines the Docker image used for local FastAPI + ONNX testing before deploying to AWS Lambda.requirements.txt: Base Python dependencies for the inference server.requirements-local.txt: Additional packages needed when running FastAPI inside Docker during local development.
Writing a FastAPI Inference API
Now that we have our ONNX model ready, it’s time to build an inference API using FastAPI. This API will handle incoming image requests, preprocess them, run inference using ONNX Runtime, and return the predicted class.
FastAPI is chosen because it is lightweight, fast, and asynchronous, making it ideal for AI inference use cases that require processing multiple requests efficiently.
Creating server.py (FastAPI Server for Inference)
Open a new file named server.py and start by importing the necessary libraries:
from typing import Annotated
import io
import numpy as np
import onnxruntime as ort
from PIL import Image
from fastapi import FastAPI, File
from fastapi.middleware.cors import CORSMiddleware
from fastapi.responses import Response
from mangum import Mangum
We start by importing the necessary modules. FastAPI is used to create the API, while Pillow (PIL) helps read and process image files. ONNX Runtime is responsible for loading and running the ONNX model for inference. The mangum package is imported to ensure that the API can later be deployed on AWS Lambda.
app = FastAPI(
    title="AWS Lambda + FastAPI",
    description="AWS API Gateway, ONNX, Lambda and FastAPI",
)

app.add_middleware(
    CORSMiddleware,
    allow_origins=["*"],
    allow_credentials=True,
    allow_methods=["*"],
    allow_headers=["*"],
)
Once the required modules are imported, the FastAPI application is initialized. The API includes metadata such as a title and description, which will be visible in the Swagger UI.
Additionally, CORS middleware is enabled to allow frontend applications to communicate with the backend without security restrictions. CORS (Cross-Origin Resource Sharing) ensures that API requests from different domains are processed correctly, especially when integrating with a frontend hosted separately.
print("loading model...")
ort_session = ort.InferenceSession("resnetv2_50.onnx")
ort_session.run(['output'], {'input': np.random.randn(
    1, 3, 224, 224).astype(np.float32)})
print("model loaded ...")
After setting up FastAPI, the script loads the ONNX model. The model is loaded using ONNX Runtime, and a dummy inference is run at startup to warm it up. This ensures that the model is initialized and ready to handle inference requests efficiently.
print("fetch classnames")
with open("imagenet_classes.txt", "r") as f:
    classes_response = f.read()
classes_list = [line.strip() for line in classes_response.split('\n')]
Along with the model, we also load ImageNet class labels. These labels map the model’s numerical output to human-readable class names. The labels are stored in a text file, imagenet_classes.txt, and read into a list for easy lookup during inference.
Defining API Endpoints
The API includes 3 endpoints:
- The
/inferendpoint handles image uploads and performs inference on the ONNX model. - The
/healthendpoint is a simple health check to confirm if the API is running properly. - The root
/endpoint serves a welcome message when accessed.
@app.post("/infer")
async def infer(image: Annotated[File(...)]):
    img = Image.open(io.BytesIO(image))
    img = img.resize((224, 224))

    img_np = np.array(img)
    img_np = img_np / 255.0
    img_np = (img_np - mean) / std
    img_np = img_np.transpose(2, 0, 1)  # Convert HWC to CHW format

    ort_outputs = ort_session.run(
        ['output'], {'input': img_np[None, ...].astype(np.float32)})

    pred_class_idx = np.argmax(ort_outputs[0])
    print(pred_class_idx)

    predicted_class = classes_list[pred]

    return {"predicted": predicted_class}
The infer function is designed to
- accept an uploaded image file,
- preprocess it, and
- run inference on the ONNX model.
When an image is uploaded, it is first converted to a PIL image and resized to 224×224 pixels. Once the image is processed, it is passed to the ONNX Runtime session for inference.
The model returns an array of probabilities, and the index of the highest probability determines the predicted class.
Finally, the predicted class is returned as a JSON response.
@app.get("/health")
async def health():
    return {"message": "ok"}
The /health endpoint is a simple check to confirm that the API is operational. It returns a JSON response with a message indicating that the server is running. This is useful in production environments where monitoring systems regularly check the API’s availability.
Running FastAPI Locally with Uvicorn
To start the FastAPI server, we use Uvicorn, a high-performance ASGI server. Running the following command starts the API on port 8080 and enables auto-reload for development:
uvicorn server:app --host 0.0.0.0 --port 8080 --reload
Once the server is running, the API can be accessed at http://localhost:8080. The interactive Swagger UI is available at http://localhost:8080/docs, where users can test the API by uploading images.
Testing FastAPI with Postman and cURL
The API can be tested using Postman or cURL. For command-line testing, the following cURL command sends an image to the /infer endpoint:
curl -X 'POST' 'http://localhost:8080/infer' \
-H 'accept: application/json' \
-H 'Content-Type: multipart/form-data' \
-F 'file=@test_images/cat.jpg'
The expected response is:
{
  "predicted": "Siamese cat"
}
Next, we will containerize FastAPI using Docker to ensure consistent environments before deploying to AWS Lambda.
Running FastAPI Inside Docker
Now that our FastAPI inference server is up and running locally, the next step is to containerize it using Docker. Running our FastAPI server in a Docker container ensures consistent behavior across environments, whether on a local machine or in AWS Lambda. This is crucial because AWS Lambda runs in a containerized environment, so testing inside Docker before deployment helps avoid runtime errors and dependency mismatches.
Why Use Docker for AI Inference?
Deploying an AI model in production requires an environment that remains consistent regardless of where it’s executed. Docker enables this by packaging the application and its dependencies into a lightweight, portable container.
Without Docker, we might run into issues such as missing dependencies, conflicting package versions, or inconsistent behavior between local and cloud environments. By using Docker:
- We ensure that FastAPI and ONNX Runtime run in the same environment, both locally and in AWS Lambda.
- We eliminate “it works on my machine” issues by explicitly defining all dependencies within the container.
- We can easily replicate the same environment across different machines or cloud deployments.
- We simplify the deployment process, making it seamless to move from local testing to AWS Lambda deployment.
Since AWS Lambda supports containerized applications, using Docker aligns perfectly with our serverless AI deployment strategy.
Creating a Dockerfile.local for Containerized Testing
To containerize our FastAPI inference server for local testing, we create a separate Dockerfile (Dockerfile.local). This ensures the containerized API behaves consistently before deploying to AWS Lambda.
Create a file named Dockerfile.local in the project root directory and add the following content:
# Use official Python image for local testing
FROM python:3.9

# Set the working directory inside the container
WORKDIR /app

# Copy requirements file and install dependencies
COPY requirements.txt ./
RUN pip install --no-cache-dir -r requirements-local.txt

# Copy the entire project directory
COPY . .

# Expose the API port (same as FastAPI default)
EXPOSE 8080

# Run FastAPI application inside the container
CMD ["uvicorn", "server:app", "--host", "0.0.0.0", "--port", "8080"]
This Dockerfile defines a lightweight container for running our FastAPI inference server. Let’s break it down:
- The container is based on
python:3.9-slim, which is a lightweight Python image optimized for production. - We set
/appas the working directory, where all project files will reside. - The
requirements-local.txtfile is copied into the container, and dependencies are installed using pip. - The entire project directory is copied to the container to ensure that
server.pyand the ONNX model are available. - We expose port
8080, which allows the API to be accessed from outside the container. - Finally, the FastAPI server is started in the container using Uvicorn on port 8080.
Building and Running the Docker Container
Once Dockerfile.local is created, we can build and run the container to test our inference API inside Docker.
Step 1: Build the Docker Image
To create a Docker image from Dockerfile.local, run:
docker build -t fastapi-inference-local -f Dockerfile.local .
Step 2: Run the Docker Container
Once the image is built, start a containerized instance of the FastAPI server:
docker run -p 8080:8080 fastapi-inference-local
Testing AI Inference Inside Docker
With the container running, we can test our API inside Docker just as we did before.
Using Swagger UI
Visit http://localhost:8080/docs in your browser. The Swagger interface allows you to upload an image and test the /infer endpoint interactively.
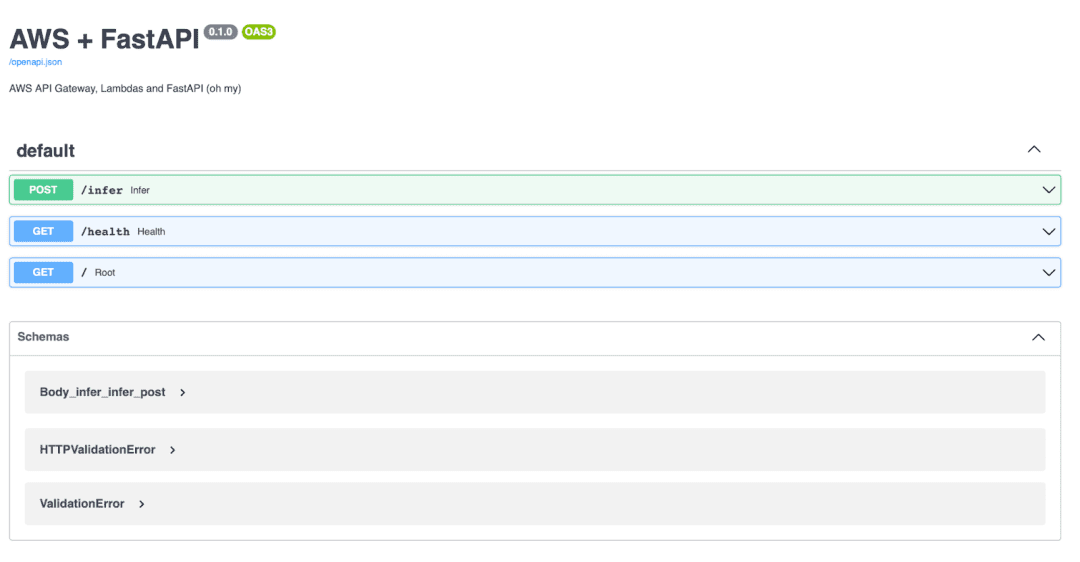
/infer, /health, and root endpoints that will later be exposed through AWS API Gateway (source: image by the author).Using cURL
curl -X 'POST' 'http://localhost:8080/infer' \
-H 'accept: application/json' \
-H 'Content-Type: multipart/form-data' \
-F 'file=@cat.jpg'
Expected Response
If the model classifies the image correctly, the response will look like this:
{
  "predicted": "Siamese cat"
}
What's next? We recommend PyImageSearch University.

86+ total classes • 115+ hours hours of on-demand code walkthrough videos • Last updated: June 2026
★★★★★ 4.84 (128 Ratings) • 16,000+ Students Enrolled
I strongly believe that if you had the right teacher you could master computer vision and deep learning.
Do you think learning computer vision and deep learning has to be time-consuming, overwhelming, and complicated? Or has to involve complex mathematics and equations? Or requires a degree in computer science?
That’s not the case.
All you need to master computer vision and deep learning is for someone to explain things to you in simple, intuitive terms. And that’s exactly what I do. My mission is to change education and how complex Artificial Intelligence topics are taught.
If you're serious about learning computer vision, your next stop should be PyImageSearch University, the most comprehensive computer vision, deep learning, and OpenCV course online today. Here you’ll learn how to successfully and confidently apply computer vision to your work, research, and projects. Join me in computer vision mastery.
Inside PyImageSearch University you'll find:
- ✓ 86+ courses on essential computer vision, deep learning, and OpenCV topics
- ✓ 86 Certificates of Completion
- ✓ 115+ hours hours of on-demand video
- ✓ Brand new courses released regularly, ensuring you can keep up with state-of-the-art techniques
- ✓ Pre-configured Jupyter Notebooks in Google Colab
- ✓ Run all code examples in your web browser — works on Windows, macOS, and Linux (no dev environment configuration required!)
- ✓ Access to centralized code repos for all 540+ tutorials on PyImageSearch
- ✓ Easy one-click downloads for code, datasets, pre-trained models, etc.
- ✓ Access on mobile, laptop, desktop, etc.
Summary
In this lesson, we took a major step forward in our serverless AI deployment journey by building a FastAPI inference server that efficiently serves ONNX models. We started by setting up the API with FastAPI, creating endpoints for image uploads, preprocessing the inputs, and performing inference with ONNX Runtime. Once the API was functional, we ran it locally with Uvicorn and tested it with Swagger UI and cURL, ensuring our model was generating accurate predictions.
To make the deployment more robust and cloud-ready, we containerized the FastAPI inference server using Docker. By defining a Dockerfile.local, we ensured that our model and dependencies would run consistently across different environments, preventing compatibility issues between local testing and AWS Lambda. Running the FastAPI server inside Docker allowed us to validate that our API would work as expected inside a containerized environment before deployment.
Now that our FastAPI inference server runs inside Docker, we’re ready to set up AWS Lambda for deployment. In the next lesson, we’ll configure AWS Lambda, IAM (Identity and Access Management) roles, and API Gateway using the AWS Console and CLI to prepare our cloud environment. The full deployment workflow, which includes pushing the container to Amazon ECR (Elastic Container Registry), running it on AWS Lambda, and exposing it via the API Gateway, is covered in the mini-course.
Citation Information
Singh, V. “FastAPI Docker Deployment: Preparing ONNX AI Models for AWS Lambda,” PyImageSearch, P. Chugh, S. Huot, A. Sharma, and P. Thakur, eds., 2025, https://pyimg.co/a6uo2
@incollection{ Singh_2025_fastapi-docker-deployment-preparing-onnx-ai-models-for-aws-lambda,
  author = {Vikram Singh},
  title = {{FastAPI Docker Deployment: Preparing ONNX AI Models for AWS Lambda}},
  booktitle = {PyImageSearch},
  editor = {Puneet Chugh and Susan Huot and Aditya Sharma and Piyush Thakur},
  year = {2025},
  url = {https://pyimg.co/a6uo2},
}
To download the source code to this post (and be notified when future tutorials are published here on PyImageSearch), simply enter your email address in the form below!

Download the Source Code and FREE 17-page Resource Guide
Enter your email address below to get a .zip of the code and a FREE 17-page Resource Guide on Computer Vision, OpenCV, and Deep Learning. Inside you'll find my hand-picked tutorials, books, courses, and libraries to help you master CV and DL!

Comment section
Hey, Adrian Rosebrock here, author and creator of PyImageSearch. While I love hearing from readers, a couple years ago I made the tough decision to no longer offer 1:1 help over blog post comments.
At the time I was receiving 200+ emails per day and another 100+ blog post comments. I simply did not have the time to moderate and respond to them all, and the sheer volume of requests was taking a toll on me.
Instead, my goal is to do the most good for the computer vision, deep learning, and OpenCV community at large by focusing my time on authoring high-quality blog posts, tutorials, and books/courses.
If you need help learning computer vision and deep learning, I suggest you refer to my full catalog of books and courses — they have helped tens of thousands of developers, students, and researchers just like yourself learn Computer Vision, Deep Learning, and OpenCV.
Click here to browse my full catalog.