Normally, I only publish blog posts on Monday, but I’m so excited about this one that it couldn’t wait and I decided to hit the publish button early.
You see, just a few days ago, François Chollet pushed three Keras models (VGG16, VGG19, and ResNet50) online — these networks are pre-trained on the ImageNet dataset, meaning that they can recognize 1,000 common object classes out-of-the-box.
To utilize these models in your own applications, all you need to do is:
- Install Keras.
- Download the weights files for the pre-trained network(s) (which we’ll be done automatically for you when you import and instantiate the respective network architecture).
- Apply the pre-trained ImageNet networks to your own images.
It’s really that simple.
So, why is this so exciting? I mean, we’ve had the weights to popular pre-trained ImageNet classification networks for awhile, right?
The problem is that these weight files are in Caffe format — and while the Caffe library may be the current standard for which many researchers use to construct new network architectures, train them, and evaluate them, Caffe also isn’t the most Python-friendly library in the world, at least in terms of constructing the network architecture itself.
Note: You can do some pretty cool stuff with the Caffe-Python bindings, but I’m mainly focusing on how Caffe architectures and the training process itself is defined via .prototxt
configuration files rather than code that logic can be inserted into.
There is also the fact that there isn’t an easy or streamlined method to convert Caffe weights to a Keras-compatible model.
That’s all starting to change now — we can now easily apply VGG16, VGG19, and ResNet50 using Keras and Python to our own applications without having to worry about the Caffe => Keras weight conversion process.
In fact, it’s now as simple as these three lines of code to classify an image using a Convolutional Neural Network pre-trained on the ImageNet dataset with Python and Keras:
model = VGG16(weights="imagenet") preds = model.predict(preprocess_input(image)) print(decode_predictions(preds))
Of course, there are a few other imports and helper functions that need to be utilized — but I think you get the point:
It’s now dead simple to apply ImageNet-level pre-trained networks using Python and Keras.
To find out how, keep reading.
Looking for the source code to this post?
Jump Right To The Downloads SectionImageNet classification with Python and Keras
In the remainder of this tutorial, I’ll explain what the ImageNet dataset is, and then provide Python and Keras code to classify images into 1,000 different categories using state-of-the-art network architectures.
What is ImageNet?
Within computer vision and deep learning communities, you might run into a bit of contextual confusion surrounding what ImageNet is and what it isn’t.
You see, ImageNet is actually a project aimed at labeling and categorizing images into almost 22,000 categories based on a defined set of words and phrases. At the time of this writing, there are over 14 million images in the ImageNet project.
So, how is ImageNet organized?
To order such a massive amount of data, ImageNet actually follows the WordNet hierarchy. Each meaningful word/phrase inside WordNet is called a “synonym set” or “synset” for short. Within the ImageNet project, images are organized according to these synsets, with the goal being to have 1,000+ images per synset.
ImageNet Large Scale Recognition Challenge (ILSVRC)
In the context of computer vision and deep learning, whenever you hear people talking about ImageNet, they are very likely referring to the ImageNet Large Scale Recognition Challenge, or simply ILSVRC for short.
The goal of the image classification track in this challenge is to train a model that can classify an image into 1,000 separate categories using over 100,000 test images — the training dataset itself consists of approximately 1.2 million images.
Be sure to keep the context of ImageNet in mind when you’re reading the remainder of this blog post or other tutorials and papers related to ImageNet. While in the context of image classification, object detection, and scene understanding, we often refer to ImageNet as the classification challenge and the dataset associated with the challenge, remember that there is also a more broad project called ImageNet where these images are collected, annotated, and organized.
Configuring your system for Keras and ImageNet
To configure your system to use the state-of-the-art VGG16, VGG19, and ResNet50 networks, make sure you follow my latest tutorial on installing Keras on Ubuntu or on macOS. GPU Ubuntu users should see this tutorial.
The Keras library will use PIL/Pillow for some helper functions (such as loading an image from disk). You can install Pillow, the more Python friendly fork of PIL, by using this command:
$ pip install pillow
To run the networks pre-trained on the ImageNet dataset with Python, you’ll need to make sure you have the latest version of Keras installed. At the time of this writing, the latest version of Keras is 1.0.6
, the minimum requirement for utilizing the pre-trained models.
You can check your version of Keras by executing the following commands:
$ python Python 3.6.3 (default, Oct 4 2017, 06:09:15) [GCC 4.2.1 Compatible Apple LLVM 9.0.0 (clang-900.0.37)] on darwin Type "help", "copyright", "credits" or "license" for more information. >>> import keras Using TensorFlow backend. >>> keras.__version__ '2.2.0' >>>
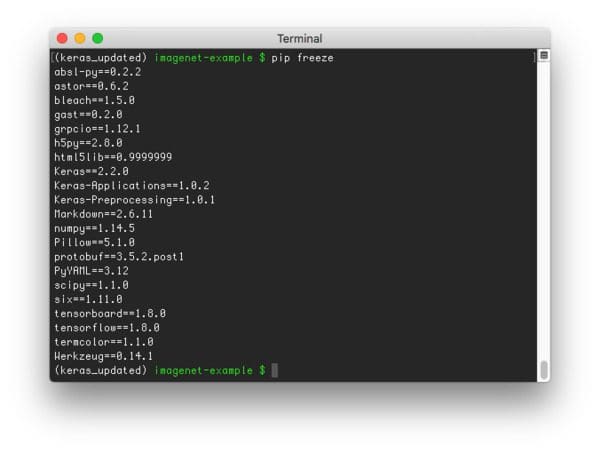
Alternatively, you can use pip freeze
to list the out the packages installed in your environment:
If you are using an earlier version of Keras prior to 2.0.0
, uninstall it, and then use my previous tutorial to install the latest version.
Keras and Python code for ImageNet CNNs
We are now ready to write some Python code to classify image contents utilizing Convolutional Neural Networks (CNNs) pre-trained on the ImageNet dataset.
To start, open up a new file, name it test_imagenet.py
, and insert the following code:
# import the necessary packages from keras.preprocessing import image as image_utils from keras.applications.imagenet_utils import decode_predictions from keras.applications.imagenet_utils import preprocess_input from keras.applications import VGG16 import numpy as np import argparse import cv2 # construct the argument parser and parse the arguments ap = argparse.ArgumentParser() ap.add_argument("-i", "--image", required=True, help="path to the input image") args = vars(ap.parse_args()) # load the original image via OpenCV so we can draw on it and display # it to our screen later orig = cv2.imread(args["image"])
We start on Lines 2-8 by importing our required Python packages. Line 2 imports the image
pre-processing module directly from the Keras library.
Lines 11-14 parse our command line arguments. We only need a single switch here, --image
, which is the path to our input image.
We then load our image in OpenCV format on Line 18. This step isn’t strictly required since Keras provides helper functions to load images (which I’ll demonstrate in the next code block), but there are differences in how both these functions work, so if you intend on applying any type of OpenCV functions to your images, I suggest loading your image via cv2.imread
and then again via the Keras helpers. Once you get a bit more experience manipulating NumPy arrays and swapping channels, you can avoid the extra I/O overhead, but for the time being, let’s keep things simple.
# load the input image using the Keras helper utility while ensuring # that the image is resized to 224x224 pxiels, the required input # dimensions for the network -- then convert the PIL image to a # NumPy array print("[INFO] loading and preprocessing image...") image = image_utils.load_img(args["image"], target_size=(224, 224)) image = image_utils.img_to_array(image)
Line 25 applies the .load_img
Keras helper function to load our image from disk. We supply a target_size
of 224 x 224 pixels, the required spatial input image dimensions for the VGG16, VGG19, and ResNet50 network architectures.
After calling .load_img
, our image
is actually in PIL/Pillow format, so we need to apply the .img_to_array
function to convert the image
to a NumPy format.
Next, let’s preprocess our image:
# our image is now represented by a NumPy array of shape (224, 224, 3), # assuming TensorFlow "channels last" ordering of course, but we need # to expand the dimensions to be (1, 3, 224, 224) so we can pass it # through the network -- we'll also preprocess the image by subtracting # the mean RGB pixel intensity from the ImageNet dataset image = np.expand_dims(image, axis=0) image = preprocess_input(image)
If at this stage we inspect the .shape
of our image
, you’ll notice the shape of the NumPy array is (3, 224, 224) — each image is 224 pixels wide, 224 pixels tall, and has 3 channels (one for each of the Red, Green, and Blue channels, respectively).
However, before we can pass our image
through our CNN for classification, we need to expand the dimensions to be (1, 3, 224, 224).
Why do we do this?
When classifying images using Deep Learning and Convolutional Neural Networks, we often send images through the network in “batches” for efficiency. Thus, it’s actually quite rare to pass only one image at a time through the network — unless of course, you only have one image to classify (like we do).
We then preprocess the image
on Line 34 by subtracting the mean RGB pixel intensity computed from the ImageNet dataset.
Finally, we can load our Keras network and classify the image:
# load the VGG16 network pre-trained on the ImageNet dataset print("[INFO] loading network...") model = VGG16(weights="imagenet") # classify the image print("[INFO] classifying image...") preds = model.predict(image) P = decode_predictions(preds) # loop over the predictions and display the rank-5 predictions + # probabilities to our terminal for (i, (imagenetID, label, prob)) in enumerate(P[0]): print("{}. {}: {:.2f}%".format(i + 1, label, prob * 100)) # load the image via OpenCV, draw the top prediction on the image, # and display the image to our screen orig = cv2.imread(args["image"]) (imagenetID, label, prob) = P[0][0] cv2.putText(orig, "Label: {}, {:.2f}%".format(label, prob * 100), (10, 30), cv2.FONT_HERSHEY_SIMPLEX, 0.8, (0, 255, 0), 2) cv2.imshow("Classification", orig) cv2.waitKey(0)
On Line 38 we initialize our VGG16
class. We could also substitute in VGG19
or ResNet50
here, but for the sake of this tutorial, we’ll use VGG16
.
Supplying weights="imagenet"
indicates that we want to use the pre-trained ImageNet weights for the respective model.
Once the network has been loaded and initialized, we can predict class labels by making a call to the .predict
method of the model
. These predictions are actually a NumPy array with 1,000 entries — the predicted probabilities associated with each class in the ImageNet dataset.
Calling decode_predictions
on these predictions gives us the ImageNet Unique ID of the label, along with a human-readable text version of the label.
Finally, Lines 47-57 print the predicted label
to our terminal and display the output image to our screen.
ImageNet + Keras image classification results
To apply the Keras models pre-trained on the ImageNet dataset to your own images, make sure you use the “Downloads” form at the bottom of this blog post to download the source code and example images. This will ensure your code is properly formatted (without errors) and your directory structure is correct.
But before we can apply our pre-trained Keras models to our own images, let’s first discuss how the model weights are (automatically) downloaded.
Downloading the model weights
The first time you execute the test_imagenet.py
script, Keras will automatically download and cache the architecture weights to your disk in the ~/.keras/models
directory.
Subsequent runs of test_imagenet.py
will be substantially faster (since the network weights will already be downloaded) — but that first run will be quite slow (comparatively), due to the download process.
That said, keep in mind that these weights are fairly large HDF5 files and might take awhile to download if you do not have a fast internet connection. For convenience, I have listed out the size of the weights files for each respective network architecture:
- ResNet50: 102MB
- VGG16: 553MB
- VGG19: 574MB
ImageNet and Keras results
We are now ready to classify images using the pre-trained Keras models! To test out the models, I downloaded a couple images from Wikipedia (“brown bear” and “space shuttle”) — the rest are from my personal library.
To start, execute the following command:
$ python test_imagenet.py --image images/dog_beagle.png
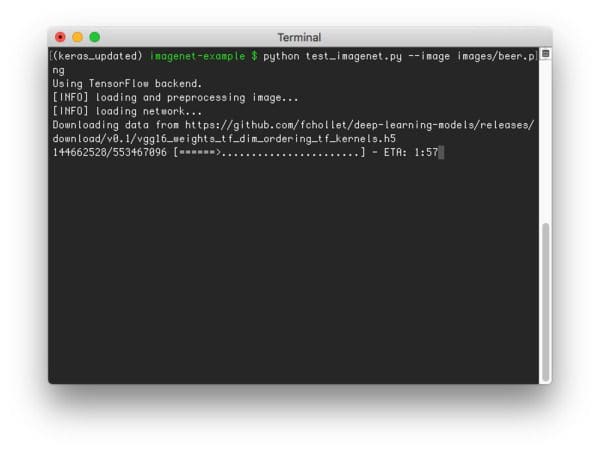
Notice that since this is my first run of test_imagenet.py
, the weights associated with the VGG16 ImageNet model need to be downloaded:
Once our weights are downloaded, the VGG16 network is initialized, the ImageNet weights loaded, and the final classification is obtained:
Let’s give another image a try, this one of a beer glass:
$ python test_imagenet.py --image images/beer.png
The following image is of a brown bear:
$ python test_imagenet.py --image images/brown_bear.png
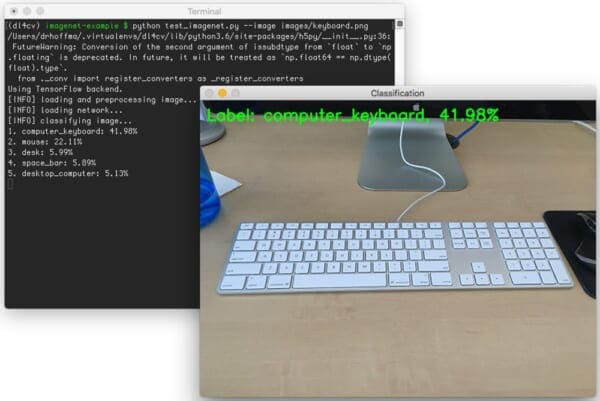
I took the following photo of my keyboard to test out the ImageNet network using Python and Keras:
$ python test_imagenet.py --image images/keyboard.png
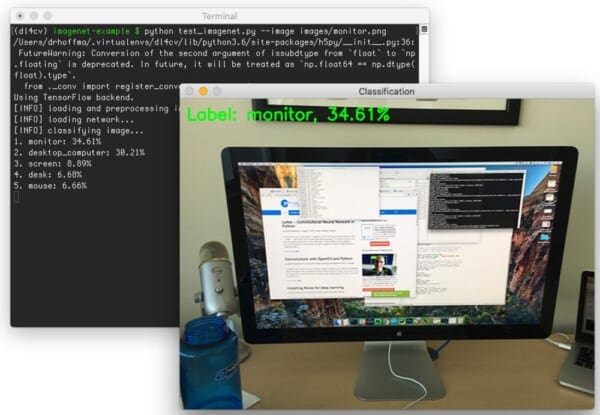
I then took a photo of my monitor as I was writing the code for this blog post. Interestingly, the network classified this image as “desktop computer”, which makes sense given that the monitor is the primary subject of the image:
$ python test_imagenet.py --image images/monitor.png
This next image is of a space shuttle:
$ python test_imagenet.py --image images/space_shuttle.png
The final image is of a steamed crab, a blue crab, to be specific:
$ python test_imagenet.py --image images/steamed_crab.png
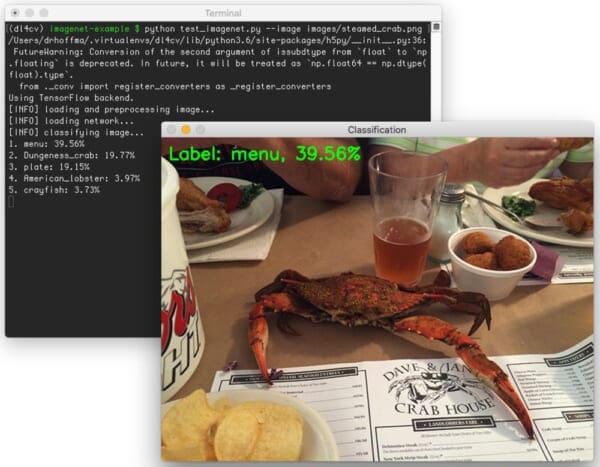
What I find interesting about this particular example is that VGG16 classified this image as “Menu” while “Dungeness Crab” is equally as prominent in the image.
Furthermore, this is actually not a Dungeness crab in the image — it’s actually a blue crab that has been steamed so it’s shell has turned red. Dungeness crabs are naturally red. A blue crab only turns red after it’s been steamed prior to eating.
A note on model timing
From start to finish (not including the downloading of the network weights files), classifying an image using VGG16 took approximately 11 seconds on my Titan X GPU. This includes the process of actually loading both the image and network from disk, performing any initializations, passing the image through the network, and obtaining the final predictions.
However, once the network is actually loaded into memory, classification takes only 1.8 seconds, which goes to show you how much overhead is involved in actually loading an initializing a large Convolutional Neural Network. Furthermore, since images can be presented to the network in batches, this same time for classification will hold for multiple images.
If you’re classifying images on your CPU, then you should obtain a similar classification time. This is mainly because there is substantial overhead in copying the image from memory over to the GPU. When you pass multiple images via batches, it makes the I/O overhead for using the GPU more acceptable.
What's next? We recommend PyImageSearch University.
86 total classes • 115+ hours of on-demand code walkthrough videos • Last updated: October 2024
★★★★★ 4.84 (128 Ratings) • 16,000+ Students Enrolled
I strongly believe that if you had the right teacher you could master computer vision and deep learning.
Do you think learning computer vision and deep learning has to be time-consuming, overwhelming, and complicated? Or has to involve complex mathematics and equations? Or requires a degree in computer science?
That’s not the case.
All you need to master computer vision and deep learning is for someone to explain things to you in simple, intuitive terms. And that’s exactly what I do. My mission is to change education and how complex Artificial Intelligence topics are taught.
If you're serious about learning computer vision, your next stop should be PyImageSearch University, the most comprehensive computer vision, deep learning, and OpenCV course online today. Here you’ll learn how to successfully and confidently apply computer vision to your work, research, and projects. Join me in computer vision mastery.
Inside PyImageSearch University you'll find:
- ✓ 86 courses on essential computer vision, deep learning, and OpenCV topics
- ✓ 86 Certificates of Completion
- ✓ 115+ hours of on-demand video
- ✓ Brand new courses released regularly, ensuring you can keep up with state-of-the-art techniques
- ✓ Pre-configured Jupyter Notebooks in Google Colab
- ✓ Run all code examples in your web browser — works on Windows, macOS, and Linux (no dev environment configuration required!)
- ✓ Access to centralized code repos for all 540+ tutorials on PyImageSearch
- ✓ Easy one-click downloads for code, datasets, pre-trained models, etc.
- ✓ Access on mobile, laptop, desktop, etc.
Summary
In this blog post, I demonstrated how to use the newly released deep-learning-models repository to classify image contents using state-of-the-art Convolutional Neural Networks trained on the ImageNet dataset.
To accomplish this, we leveraged the Keras library, which is maintained by François Chollet — be sure to reach out to him and say thanks for maintaining such an incredible library. Without Keras, deep learning with Python wouldn’t be half as easy (or as fun).
Of course, you might be wondering how to train your own Convolutional Neural Network from scratch using ImageNet. Don’t worry, we’re getting there — we just need to understand the basics of neural networks, machine learning, and deep learning first. Walk before you run, so to speak.
I’ll be back next week with a tutorial on hyperparameter tuning, a key step to maximizing your model’s accuracy.
To be notified when future blog posts are published on the PyImageSearch blog, be sure to enter your email address in the form below — se you next week!
Download the Source Code and FREE 17-page Resource Guide
Enter your email address below to get a .zip of the code and a FREE 17-page Resource Guide on Computer Vision, OpenCV, and Deep Learning. Inside you'll find my hand-picked tutorials, books, courses, and libraries to help you master CV and DL!
RyanE
Is there a way to only learn part of the large imagenet dataset, if your classification needs are more along the lines of “Is there a chicken in this picture, and if so, where?”
Thanks.
Adrian Rosebrock
Absolutely. You would normally take a pre-trained network, “freeze” the lower-level layers of the network so that their weights don’t change, and then apply fine-tuning using your partial (or custom dataset).
Alexander
Hi! There is a bunch of articles about how to classify using pre-trained weights and ready-models on the internet. But I can’t understand why there is almost no articles about how to train that models on your own. Currently I’m trying to train Inception V1 using Keras and follow by this code https://gist.github.com/joelouismarino/a2ede9ab3928f999575423b9887abd14. Everything is clear why we just use pre-trained weights and some images to classify them, but real problems appear when I’m trying to train the model with my images set. Here’s some questions those I can’t solve (maybe I’m too stupid…):
1. how to get images by category from the ImageNet (e.g. I need all plants)
2. how to preprocess images and keep them ready for training: should we vectorise them? where to store labels for images?
3. what shape to use for model input on train
4. what shape to use for model output on train
5. can we train model for two classes?
It feels like it’s a big secret on how to train such models and those guys just brag about how they trained them
Adrian Rosebrock
These are all great questions Alexander. Training CNNs doesn’t have to be a “black art”. And honestly, I learned the answers to these via trial and error. I can’t answer all of these questions in the comments, mainly because my comment reply would be longer than the blog post it self — but I have a roadmap planned to address these types of questions related to training your own custom CNNs. Keep following the PyIMageSearch blog!
Alexander
Hi! Thanks for the reply. I hope the blog post will come to world soon)))
garret
Alexander,
I understand your frustration. Take a look at https://pythonprogramming.net/tensorflow-deep-neural-network-machine-learning-tutorial/
He goes over the actual training of Deep Neural Networks for tensorflow in that tutorial. Also I was checking out the git repository of François Chollet and hes got a list of tutorials that sound promising. https://github.com/fchollet/keras-resources
Nir
do you know if there exists a similar code supporting keras over tensorflow (not only theano) ?
thanks
yantao
Hello,Alexander,I’m a beginner of deep learning and meet all the same questions as you ,you point the big problem of the beginner . Have you solved these question? can you give me some idea or example code to solve these questions,think you very much!
my email: email removed by spam filter
Marko Plahuta
Thanks for your articles, they are well written and easy to understand. Could you write one about efficiently and quickly detecting multiple objects on an image? I already implemented a pyramid method once with Keras and a preloaded VGG16 model, but as you can imagine, it’s very slow for the exact reasons you pojnted out. Is there an architecture that would allow one to do just one pass through the net with entire image, and get bounding boxes of detected objects, along with labels? Thanks!
Adrian Rosebrock
Sure, I’ll absolutely consider a blog post on object localization using Keras. If you’re super concerned about speed, I like using the You Only Look Once method since it’s (1) fast and (2) straightforward.
Tushar Soni
I’ve same problem, I want YOLO in Keras, when can we have that blog post.
Adrian Rosebrock
I’ll likely be covering YOLO inside my upcoming deep learning book.
Geoffrey Anderson
Thanks for the write-up, Adrian.
I’d actually more like to use ImageNet to beg, borrow, or steal (or train my own) an unsupervised set of weights trained as an autoencoder to behave as the lower layer to help me detect edges better in a medical imaging application, where just 250 images (examples) exist all-told. Or perhaps I’d, alternatively, directly use the lower layer of this supervised-learning model. Maybe either one will work as the lower layer for generic edge detection? Not sure. But anyway if I can get a generic vision layer at the bottom from someone else’s ImageNet training efforts, then the higher layers would be trained by me on my computer hardware, to be completely application-specific.
I’ve actually seen some academic papers where ImageNet proved actually helpful on medical images, even though there were no frogs and cats in the medical images, strange as this may seem.
Adrian Rosebrock
Hey Geoffrey — the lower level layers of ImageNet consist of filters that can be used to detect blobs and edge-like regions. You could essentially “freeze” these layer weights and then apply fine-tuning to the higher-level layers of the network to recognize particular structures in your images.
However, depending on what you’re trying to do, I would take one of the higher level layers of the network and treat it as my feature extraction layer. Take the output of one of these layers (normally a CONV or POOL layer) and treat the output as a feature vector. This feature vector can then be used for classification, clustering, etc.
Simon Burfield
My results were wrong returing crazy stuff, turned out I had changed the Keras.json file to use theano but no the ording “tf” to “th”
Geoffrey Anderson
Can anyone with a 8GB memory (or less?) GPU confirm that our Keras-supplied pretrained VGG16 model actually worked to completion on that hardware? Maybe I (we) can save money on a cheaper card than a 12 GB Titan! Thanks if you found that this pretrained model actually worked on your GPU that has less than 12 GB! Please report your GB too. (Actual results only please. not looking for speculation. hope you all understand.)
Grant
I just finished this program on my platform and it runs well.
System configuration:
Skylake i7-6700, 8G RAM, 500G HD
ASUS 950GTX (2G Memory)
Ubuntu 14.04 x64
Just for your reference.
Zhang Han
Hi! I have a question to ask you. I have a image dataset. But the image size isn’t the same. How to deal with it? I want to train it.Thanks!
Adrian Rosebrock
Simply resize your images prior to passing them to the network. You can resize by ignoring the aspect ratio or resize along the smallest dimension and then taking the center crop.
Terry Simons
I tried running the code on a random image from the internet (224×224) but I get messages like this:
Error allocating 411041792 bytes of device memory (out of memory). Driver report 34959360 bytes free and 1073414144 bytes total
With a Python traceback that says:
MemoryError: (‘Error allocating 411041792 bytes of device memory (out of memory).’, “you might consider using ‘theano.shared(…, borrow=True)'”)
Any ideas?
I’m still waiting on the official download link, so I don’t have the demo images.
Adrian Rosebrock
Please see my replies to Garret and Vineet above.
garret
Hi Adrian,
Im getting a Memory Error which seems to trigger on line 40 of the code. Do you have any insight as to why this might happen? FYI, Im noty using any GPU features since Im running this on a digialocean droplet. Does that have anything to do with it?
Thanks.
Adrian Rosebrock
Deep Learning networks, especially Convolutional Neural Networks, require a lot of RAM. How much memory does your Digital Ocean droplet have?
VINEEt
Hi .. It’s giving me a memory error . I m using windows7 laptop 32 bit. Cud it be due to my laptop configuration or something else.. Kindly guide … And thanks a ton in advance .. Yr tutorial is really very helpful ..
Adrian Rosebrock
If you are getting a memory error, then you likely don’t have enough RAM on your machine to load and run the network.
narayan
I want to load ImageNet weights and train my 100 category images by using this weight …So can anyone suggest me how i can do this ..?
Adrian Rosebrock
This process is called “finetuning”. I’ll be doing a blog post on this concept soon.
Dawer
Hi, great post.
I was able to classify images successfully but how do we control the output of the classification? Like what if I want to go to the base word. Rather than classifying “beagle” how do I tune the ImageNet to output only “dog”? Is there any reference guide for that.
Also in comments you mentioned freezing lower-layers of the network to classify only part of the ImageNet. how do we do that too?
Adrian Rosebrock
Freezing the lower layers of the network and then training the upper layers is called “finetuning”. I can’t explain how to do that in a single blog post, I’ll have to create a separate tutorial for that.
As for ImageNet, keep in mind that it’s built on the WordNet synsets. Therefore, you can just follow the WordNet hierarchy.
Nasa
Hi Adrian,
Great post. I just want to ask if this tutorial could be use with raspberry pi? Instead showing pictures taken from camera, I want to use raspberry pi and webcam to classify the image.
Adrian Rosebrock
Networks such as VGG and ResNet are too large for the Pi. You could use smaller CNNs for sure — I would highly recommend using SqueezeNet which is actually intended to run on embedded devices.
Wassim El Youssoufi
Hi Adrian,
If I may, I would add that you can encounter issues if your default backend is tensorflow and not theano.
If you have false predictions, it can be that your code is using the wrong backend.
To correct that just change the ~/.keras/keras.json to change the “tf” to “th”.
Adrian Rosebrock
Great point, thanks for sharing Wassim. If anyone else is interested in the
keras.json
file, here is a link to the documentation.Grant
Hi Adrain,
Thank you for your great post!
It took me a looooooong time to try to download the pre-trained data, and python failed several times.
At last I used a download tool to get all the data files and copy them to the directory.
To those who might encounter same issue, the directory is:
~/.keras/models
Finally I can get the system run smoothly. Thank you!
Adrian Rosebrock
Thanks for sharing Grant. I know the files are served from GitHub’s CDN which is normally very reliable. Do you have a strong internet connection?
Grant
Well I can access most website at a fast speed. But I don’t know why the connection between GitHub is very unstable. Maybe because of GFW, I guess…
Alexandru Paiu
Hey great post as always!
In the newest version of keras the models are loaded directly so you don’t have to clone the github repository. You can just do: `from keras.applications.resnet50 import ResNet50` Pretty awesome! Also decode predictions now has a top feature that allows you to see top n predicted probabilities.
Adrian Rosebrock
Awesome, thanks for sharing this Alexandru! I didn’t realize there was now an
applications
module. I’ll be sure to play around with this.Jason
Hi,
I’ve got a bit of a problem, I ran the tutorial at home and everything was as expected however I’ve come into uni and installed , and the images are being misclassified is the beagle is a pug and the rocket is a barrow. Not sure what to make of it… Is it a conflict with the model weights being downloaded automatically now?
Actually it was a conflict in the keras.Jason file I had ‘tf’ and ‘theano’ oops
Adrian Rosebrock
Nice job resolving the issue Jason!
abby
Hello Adrian ,
Thank you so much for the amazing tutorials.
I was wondering if we could use the pre-trained models by Chollet (VGG16, VGG19, and ResNet50) for transfer learning, so that we can fine-tune the models trained on imagenet to work with another dataset?
Adrian Rosebrock
You absolutely can fine-tune these pre-trained networks. This is a topic I’ll be covering in my next book. More details to come in late-November/early-December.
Walid Ahmed
Thanks a lot Adrian
I can not wait for your post on Object localization.
Walid Ahmed
Hi Adrian.
I want to share with you that I think
1-results from all models are not always the same as you would notice one image classified as a desk by ResNet50 and the as a keyboard by VGG16.
2-all models are limited by having the identified object consuming most of the space of thee image
am I right?
Adrian Rosebrock
Different network architectures that were trained using different optimizers can certainly obtain different results on a per-image basis. What matters is on the aggregate.
And yes, for this specific type of setup the classification is normally dependent on the object consuming a large portion of the image. However, with that said, we can apply localization methods to find various objects in an image.
Rors
Hi Adrian,
Once you have a trained neural net is it possible to use a webcam to capture video and send those images through the net for classification like with a haar classifier ?
Best
Adrian Rosebrock
Absolutely. You likely want to “skip frames” and send only ever N-th frame to the NN. But yes, the same techniques still apply. Just access your webcam, read the frame, and pass it to your network.
Nurman
I have managed to run the tutorial successfully but when I tried to change the setting to ResNet50, and the run, I got the following error:
ValueError: CorrMM images and kernel must have the same stack size.
I have not made any changes to the code apart from changing the VGG to ResNet.
Do you have any ideas what went wrong?
Adrian Rosebrock
I’m not sure regarding that error, I have not encountered that before. I would suggest opening an issue on GitHub.
Bob Haffner
Nurman,
I believe that’s the error I was getting when I was on Keras 1.0.7 I just updated to 1.2.2 so I could use the built-in Resnet50 model i.e. keras.applications.resnet50 and the error went away.
Bob
Dinesh Vadhia
To extract the dense feature vector of an image, the recommendation is to get it from the penultimate layer. But, what is the name of this layer for the respective pre-trained models ie. VGG16, VGG19 and InceptionV3?
The keras doc has one example at https://keras.io/applications for VGG19 (‘block4_pool’) but I don’t know if this is the penultimate layer. Thanks for the help.
Adrian Rosebrock
You need to look at the source code for VGG16, VGG19, Inception, etc. Each layer in the respective architecture has a
name
attribute.Atti
hey Adrian, great post as always.
i ran into a little problem: “too many values to unpack” at this line
(inID, label) = decode_predictions(preds)[0]
which i replaced with
(inID, label, probability) = decode_predictions(preds)[0][0]
and it started working
you might want to take a look at this. Maybe its because i`m usinga never version of Keras 1.1.2
Adrian Rosebrock
Thanks Atti — I was just about to update the code for this change, thank you for pointing this out.
Martin
This bug is still there….
Adrian Rosebrock
Please re-read the post. I’ve put a note at the bottom regarding the updated function call. You can also refer to the latest post on pre-trained ImageNet networks with Keras.
Walid
Can you please advice how to apply localization?
Adrian Rosebrock
I’ll be discussing detection/localization in my upcoming deep learning book (stay tuned).
Joey Sidesmith
Struggling to follow along here…
‘img_path = ‘/path/to.my/image.jpg’
from keras.preprocessing import image
x = image.load_img(img_path, target_size=(250, 250))
x = image.img_to_array(x)
print x.shape
>> (250, 250, 3)
x
x = np.expand_dims(x, axis=0)
print x.shape
>>(1, 250, 250, 3)’
However i’m under the impression my output should be (1, 3, 250, 250)…..
?
Adrian Rosebrock
This is entirely dependent on your
image_dim_ordering
in your~/.keras/keras.json
file. A “tf” value will produce a shape of (h, w, d) while a “th” ordering will be (d, h, w). Be sure to double-check with backend you are using along with which image dimension ordering you are using.RAFAEL FIGUEROA
Hello Adrian, greetings from Brasil 🙂
Thanks for the model, it´s very instructional.
I´m manage to change between VGG16 and VGG19, but when I try to load resnet50 it´s says that there is no such model.
Can you explain how to load it please.
Thanks !
Adrian Rosebrock
Which version of Keras are you using? If it’s Keras 1.1 or greater you can just do:
from keras.applications import ResNet50
Thomas
Great post!
I ran into an error message running it though:
Seems like decode_predictions(preds)[0] returns a list of five tuples for each of the classifications that has any probability at all.
Changing to:
decode_predictions(preds)[0][0] returns the tuple of the classification with largest probability. This is a tuple consisting of three variables, the id, the classification and the probability.
So if I change to (inID, label, prob) = decode_predictions(preds)[0][0] we can print the probability as well.
Maybe this is due to some recent changes in the classification index that is downloaded?
Adrian Rosebrock
Hey Thomas — you are indeed correct. The error is due to an update to Keras. I’ll also update this blog post to reflect the change. Thank you for pointing it out!
Lars
First of all: Thanks for this tutorial !!! Now to my problem :
I tried to predict multiple images in a batch, but I can’t seem to get it to work.
I tried to make a batch like this :
image = np.array([np.array(image_utils.load_img(fname, target_size=(224, 224))) for fname in filelist]).
Or should I just do a for loop and load the images one after another ?
Adrian Rosebrock
It looks like you’re forgetting to call
.img_to_array
andpreprocess_input
on each image. You’ll also need to expand the dimensions of each image. Since that would make for a vey long list comprehension I would suggest using just a simplefor
loop.nobit
Hi,
I would like to know the difficulty level to clasify two variants of the same concept. For example, if I already know that what is in the image is a door, to train a network to determine wether the door is open or closed.
What approach would you recommend me?
Adrian Rosebrock
Is your camera fixed and non-moving? If so, this is a very easy problem to solve (and you don’t need machine learning, just basic computer vision techniques).
However, if you’re looking to determine if any given door is open or closed, that is much more challenging and would certainly require a large dataset and likely deep learning techniques.
DJ
test_imagenet.py: error: the following arguments are required: -i/–image
How do I fix this
Adrian Rosebrock
You need to supply the
--image
command line argument as I do in the example in the blog post.DJ
Where? What does the syntax look like?
Adrian Rosebrock
Please take the time to read up on command line arguments before you continue.
DJ
C:\Users\AppData\Local\Programs\Python\Python35\Scripts\deep-learning-m
odels>python test_imagenet.py –image dog.jpg
Traceback (most recent call last):
File “test_imagenet.py”, line 2, in
from keras.preprocessing import image as image_utils
ModuleNotFoundError: No module named ‘keras’
I have Keras version 1.2.2 installed and runs in PyCharm. Cmd line does not recognize Keras, as you have shown.
Adrian Rosebrock
If you are using a Python virtual environment make sure you have access it before running your Python script. You’ll want to make sure your command line environment matches your PyCharm environment.
Jose Luis Verdugo
Hi everyone, I configured Keras with Theano as backend, following in the footsteps of an earlier Adrian post. Now, I cloned the git mentioned above and created the test_imagenet.py script, but when I tried to run the script, the following error was returned: “AttributeError: The ‘module’ object has no ‘image_data_format’ “. I tried to add the following row to the keras.json file but it does not work: “image_data_format”: “channels_first”
Someone knows this issue or have a solution?
Thanks
Max
Hi, Jose.
I’ve got the same error first. Then I downloaded the ready-made code (red button at the end of blog post) and ran it with success.
amell
Hi,
it is interesting but if I want to classify an object that is not included in IMAGENET. Briefly, I want to recognize automatically a business card but there isn’t a class of business card.
Adrian Rosebrock
You would want to consider using transfer learning, either via feature extraction or fine-tuning. I’ll be covering both in my upcoming deep learning book.
Azamat
Hi,
Why the program cannot be executed? When I enter “python test_imagenet.py –image images/beer.png” into cmd, it starts to do something but then “Python has stopped working” error happens… Is it because of my 4gb RAM?
Abder-Rahman
Thanks for the nice tutorial. Can I apply the program on my own custom data (i.e. medical images). I believe I should include “training” and “validation” data? What changes should I make to use my own custom data?
Adrian Rosebrock
You would need to either (1) train your network from scratch or (2) apply transfer learning via feature extraction or fine-tuning. I’m covering both inside Deep Learning for Computer Vision with Python.
KY
I was trying to follow along but it seems like I don’t have imagenet_utils when I did pip install keras, anyway I can download and install Keras directly from the source so that imagenet_util is included? Thanks!
Adrian Rosebrock
I would suggest following this updated tutorial on pre-trained ImageNet classifiers with Keras.
Amna
hi, i’m having a problem with displaying the predictions to screen with these lines since i didn’t use OpenCV:
cv2.putText(orig, “Label: {}”.format(label), (10, 30),
cv2.FONT_HERSHEY_SIMPLEX, 0.9, (0, 255, 0), 2)
cv2.imshow(“Classification”, orig)
cv2.waitKey(0)
how can i load the picture without using cv2 ?
Adrian Rosebrock
You can load an image from disk without OpenCV using SciPy, scikit-learn, or
load_img
provided by the Keras library. However, keep in mind that if you don’t have OpenCV installed, you won’t be able to draw the label on the image.Tinu
Hi Adrian,
I am getting the error “ImportError: `load_weights` requires h5py”.. Could you please help here?
Thanks,
Tinu
Adrian Rosebrock
Make sure you have HDF5 and h5py installed on your system:
$ pip install h5py
ThanhThanh
Hi!
can I run this code in cmd of windows 7? Do you a guide to run this code in windows 7? Thank you!
Adrian Rosebrock
I don’t support Windows here on the PyImageSearch blog (I recommend using a Unix-based system such as Linux or macOS), but you can certainly execute a Python script via command line on Windows. I would suggest taking a look at this tutorial to get you started.
ThanhThanh
Thank you very much! I will try.
ThanhThanh
Hi Adrian Rosebrock!
I have read your post and i think i can run step by step in Ubuntu 12.04:
1. Install Python3.5
2. Install Tensorflow, Keras, Theano
3. Download your code in this page.
4. Run python test_imagenet.py –image images/dog_beagle.png
Please tell me if i am wrong. Thank you very much!!!
Adrian Rosebrock
You don’t have to install both TensorFlow or Theano — just pick one. From there, the rest of your steps are correct.
Suranjan Goswami
First off, this was a very good tutorial for someone like me who is beginning to work with python. I ran it on Windows 10 using Anaconda. Just 2 things. In the most recent VGG16 architecture, a specific line has been changed (which does throw an error, and can be modified accordingly. Also, the last image (of the crab), no longer classifies it as a crab, but instead as a ‘menu’, which is also correct, since there is a (partial menu) in the photo as well.
Janek
Great article! I’m just wondering if it’s possible to recognize human spine with Keras and ImageNet? I tried to find proper images on ImageNet but I couldn’t find appropriate for me.
Adrian Rosebrock
I don’t believe ImageNet has images of the human spine. You should consider gathering your own dataset.
kay
Great tutorial!
can you please provide step by step guide to train a classifier on own dataset using resnet in keras with tensorflow as backend?
Adrian Rosebrock
Hi Kay — is there a particular dataset you would like to train ResNet on? For what it’s worth, I explain how to implement ResNet and train it from scratch (with lots of explanation and code) inside Deep Learning for Computer Vision with Python. I explain ResNet + training using Keras and a TensorFlow backend as well. I would suggest you start there. I hope that helps!
Mustafa Demir
Hello,
I get this error
“ImportError: Could not import PIL.Image. The use of `array_to_img` requires PIL.
can you help me pls.
thanks
Adrian Rosebrock
Make sure you install PIL/pillow:
$ pip install pillow
Raj
My work is to create a surveillance camera that detect and recognize all the objects. And then it have to track the user specified objects. How i have to approach this?
Adrian Rosebrock
I’m a bit confused. Are “all objects” user specified objects? If not, are you planning on training a network to recognize the objects? Keep in mind that a network cannot recognize an object if it wasn’t trained on it.
Keerthi
Hii..
I work on a project that resembles video surveillance . It has to detect and recognize all the objects. And the user mentioned objects has to be tracked.
Adrian Rosebrock
What types of objects are you trying to detect and track? Can you be more specific?
Radhika
I want to detect the speed breakers in road.where can I find the classifier xml.
Adrian Rosebrock
What is a “speed breaker”? Perhaps you could provide an example image of what one looks like?
Radhika
it is a bump or hump in the road.
kashif
how can i get .caffemodel file
Adrian Rosebrock
This blog post covers pre-trained ImageNet models for Keras. Take a look at the Caffe Model Zoo for Caffe-specific models.
Gagandeep
Dear Adrain
Thanx for such a great article
My question is :- How we can extract x,y coordinates of animals from whole image..
Adrian Rosebrock
Image classification is not sufficient for extracting the (x, y)-coordinates of an object. For that you will need object detection.