We have now reached the final installment in our three part series on measuring the size of objects in an image and computing the distance between objects.
Two weeks ago, we started this round of tutorials by learning how to (correctly) order coordinates in a clockwise manner using Python and OpenCV. Then, last week, we discussed how to measure the size of objects in an image using a reference object.
This reference object should have two important properties, including:
- We know the dimensions (in terms of inches, millimeters, etc.) of the object.
- It can be easily identifiable in our image (based on either location or appearances).
Given such a reference object, we can use it compute the size of objects in our image.
Today, we are going to combine the techniques used in the previous blog posts in this series and use these methods to compute the distance between objects.
Keep reading to find out how…
Measuring distance between objects in an image with OpenCV
Computing the distance between objects is very similar to computing the size of objects in an image — it all starts with the reference object.
As detailed in our previous blog post, our reference object should have two important properties:
- Property #1: We know the dimensions of the object in some measurable unit (such as inches, millimeters, etc.).
- Property #2: We can easily find and identify the reference object in our image.
Just as we did last week, we’ll be using a US quarter as our reference object which has a width of 0.955 inches (satisfying Property #1).
We’ll also ensure that our quarter is always the left-most object in our image, thereby satisfying Property #2:
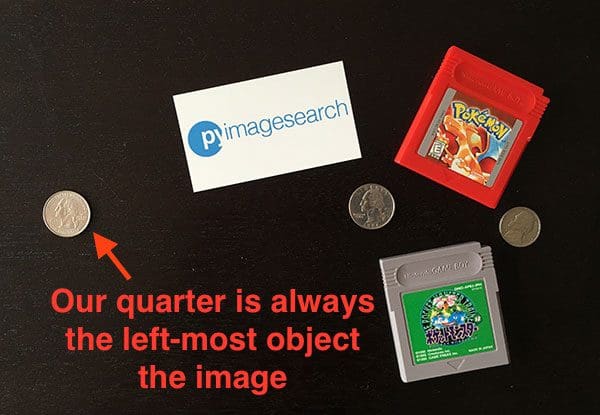
Our goal in this image is to (1) find the quarter and then (2) use the dimensions of the quarter to measure the distance between the quarter and all other objects.
Defining our reference object and computing distances
Let’s go ahead and get this example started. Open up a new file, name it distance_between.py
, and insert the following code:
# import the necessary packages from scipy.spatial import distance as dist from imutils import perspective from imutils import contours import numpy as np import argparse import imutils import cv2 def midpoint(ptA, ptB): return ((ptA[0] + ptB[0]) * 0.5, (ptA[1] + ptB[1]) * 0.5) # construct the argument parse and parse the arguments ap = argparse.ArgumentParser() ap.add_argument("-i", "--image", required=True, help="path to the input image") ap.add_argument("-w", "--width", type=float, required=True, help="width of the left-most object in the image (in inches)") args = vars(ap.parse_args())
Our code here is near identical to last week. We start by importing our required Python packages on Lines 2-8. If you don’t already have the imutils package installed, stop now to install it:
$ pip install imutils
Otherwise, you should upgrade to the latest version (0.3.6
at the time of this writing) so you have the updated order_points function:
$ pip install --upgrade imutils
Lines 14-19 parse our command line arguments. We need two switches here: --image
, which is the path to the input image containing the objects we want to measure, and --width
, the width (in inches) of our reference object.
Next, we need to preprocess our image:
# load the image, convert it to grayscale, and blur it slightly image = cv2.imread(args["image"]) gray = cv2.cvtColor(image, cv2.COLOR_BGR2GRAY) gray = cv2.GaussianBlur(gray, (7, 7), 0) # perform edge detection, then perform a dilation + erosion to # close gaps in between object edges edged = cv2.Canny(gray, 50, 100) edged = cv2.dilate(edged, None, iterations=1) edged = cv2.erode(edged, None, iterations=1) # find contours in the edge map cnts = cv2.findContours(edged.copy(), cv2.RETR_EXTERNAL, cv2.CHAIN_APPROX_SIMPLE) cnts = imutils.grab_contours(cnts) # sort the contours from left-to-right and, then initialize the # distance colors and reference object (cnts, _) = contours.sort_contours(cnts) colors = ((0, 0, 255), (240, 0, 159), (0, 165, 255), (255, 255, 0), (255, 0, 255)) refObj = None
Lines 22-24 load our image from disk, convert it to grayscale, and then blur it using a Gaussian filter with a 7 x 7 kernel.
Once our image has been blurred, we apply the Canny edge detector to detect edges in the image — a dilation + erosion is then performed to close any gaps in the edge map (Lines 28-30).
A call to cv2.findContours
detects the outlines of the objects in the edge map (Lines 33-35) while Line 39 sorts our contours from left-to-right. Since we know that our US quarter (i.e., the reference object) will always be the left-most object in the image, sorting the contours from left-to-right ensures that the contour corresponding to the reference object will always be the first entry in the cnts
list.
We then initialize a list of colors
used to draw the distances along with the refObj
variable, which will store our bounding box, centroid, and pixels-per-metric value of the reference object.
# loop over the contours individually for c in cnts: # if the contour is not sufficiently large, ignore it if cv2.contourArea(c) < 100: continue # compute the rotated bounding box of the contour box = cv2.minAreaRect(c) box = cv2.cv.BoxPoints(box) if imutils.is_cv2() else cv2.boxPoints(box) box = np.array(box, dtype="int") # order the points in the contour such that they appear # in top-left, top-right, bottom-right, and bottom-left # order, then draw the outline of the rotated bounding # box box = perspective.order_points(box) # compute the center of the bounding box cX = np.average(box[:, 0]) cY = np.average(box[:, 1])
On Line 45 we start looping over each of the contours in the cnts
list. If the contour is not sufficiently large (Lines 47 and 48), we ignore it.
Otherwise, Lines 51-53 compute the rotated bounding box of the current object (using cv2.cv.BoxPoints
for OpenCV 2.4 and cv2.boxPoints
for OpenCV 3).
A call to order_points
on Line 59 rearranges the bounding box (x, y)-coordinates in top-left, top-right, bottom-right, and bottom-left order, which as we’ll see, is important when we go to compute the distance between object corners.
Lines 62 and 63 compute the center (x, y)-coordinates of the rotated bounding box by taking the average of the bounding box in both the x and y direction.
The next step is to calibrate our refObj
:
# if this is the first contour we are examining (i.e., # the left-most contour), we presume this is the # reference object if refObj is None: # unpack the ordered bounding box, then compute the # midpoint between the top-left and top-right points, # followed by the midpoint between the top-right and # bottom-right (tl, tr, br, bl) = box (tlblX, tlblY) = midpoint(tl, bl) (trbrX, trbrY) = midpoint(tr, br) # compute the Euclidean distance between the midpoints, # then construct the reference object D = dist.euclidean((tlblX, tlblY), (trbrX, trbrY)) refObj = (box, (cX, cY), D / args["width"]) continue
If our refObj
is None
(Line 68), then we need to initialize it.
We start by unpacking the (ordered) rotated bounding box coordinates and computing the midpoint between the top-left and bottom-left along with top-right and bottom-right points, respectively (Lines 73-75).
From there, we compute the Euclidean distance between the points, giving us our “pixels-per-metric”, allowing us to determine how many pixels fit into --width
inches.
Note: See last week’s post for a more detailed discussion of the “pixels-per-metric” variable.
Finally, we instantiate our refObj
as a 3-tuple consisting of:
- The sorted coordinates corresponding to the rotated bounding box reference object.
- The centroid of the reference object.
- The pixels-per-metric ratio that we’ll be using to determine the distance between objects.
Our next code block handles drawing the contours around our reference object and the object we are currently examining, followed by constructing refCoords
and objCoords
such that (1) the bounding box coordinates and (2) the (x, y)-coordinates of the of the centroid are included in the same arrays:
# draw the contours on the image orig = image.copy() cv2.drawContours(orig, [box.astype("int")], -1, (0, 255, 0), 2) cv2.drawContours(orig, [refObj[0].astype("int")], -1, (0, 255, 0), 2) # stack the reference coordinates and the object coordinates # to include the object center refCoords = np.vstack([refObj[0], refObj[1]]) objCoords = np.vstack([box, (cX, cY)])
We are now ready to compute the distance between the respective corners and centroids of objects in our image:
# loop over the original points for ((xA, yA), (xB, yB), color) in zip(refCoords, objCoords, colors): # draw circles corresponding to the current points and # connect them with a line cv2.circle(orig, (int(xA), int(yA)), 5, color, -1) cv2.circle(orig, (int(xB), int(yB)), 5, color, -1) cv2.line(orig, (int(xA), int(yA)), (int(xB), int(yB)), color, 2) # compute the Euclidean distance between the coordinates, # and then convert the distance in pixels to distance in # units D = dist.euclidean((xA, yA), (xB, yB)) / refObj[2] (mX, mY) = midpoint((xA, yA), (xB, yB)) cv2.putText(orig, "{:.1f}in".format(D), (int(mX), int(mY - 10)), cv2.FONT_HERSHEY_SIMPLEX, 0.55, color, 2) # show the output image cv2.imshow("Image", orig) cv2.waitKey(0)
On Line 94 we start looping over pairs of (x, y)-coordinates that correspond to our reference object and object of interest.
We then draw a circle representing the (x, y)-coordinates of the current points we are computing the distance between and draw a line to connect the points (Lines 97-110).
From there, Line 105 computes the Euclidean distance between the reference location and the object location, followed by dividing the distance by the “pixels-per-metric”, giving us the final distance in inches between the two objects. The computed distance is then drawn on our image (Lines 106-108).
Note: This distance computation is performed for each of the top-left, top-right, bottom-right, bottom-left, and centroid coordinates for a total of five distance comparisons.
Finally, Lines 111 and 112 display the output image to our screen.
Distance measurement results
To give our distance measurement script a try, download the source code and corresponding images to this post using the “Downloads” form at the bottom of this tutorial. Unarchive the .zip
file, change directory to the distance_between.py
script, and then execute the following command:
$ python distance_between.py --image images/example_01.png --width 0.955
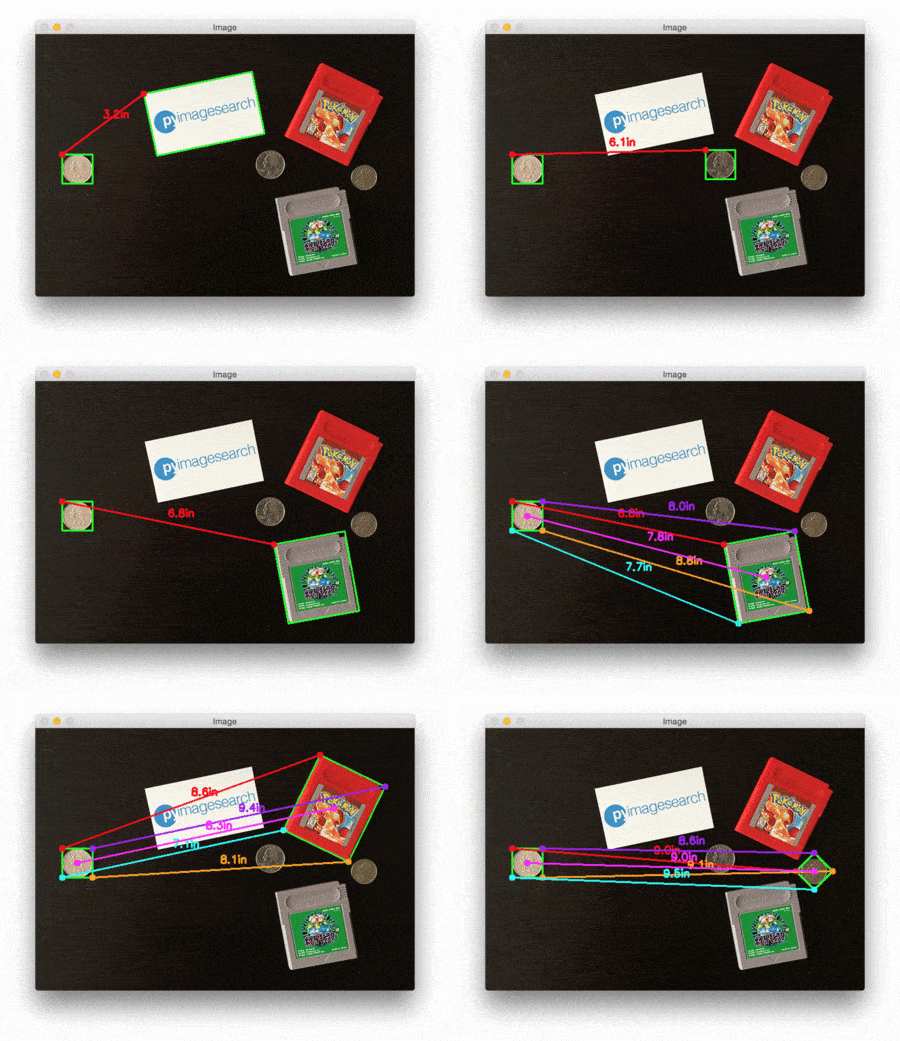
Below follows a GIF animation demonstrating the output of our script:
In each of these cases, our script matches the top-left (red), top-right (purple), bottom-right (orange), bottom-left (teal), and centroid (pink) coordinates, followed by computing the distance (in inches) between the reference object and the current object.
Notice how the two quarters in the image are perfectly parallel to each other, implying that the distance between all five control points is 6.1 inches.
Below follows a second example, this time computing the distance between our reference object and a set of pills:
$ python distance_between.py --image images/example_02.png --width 0.955
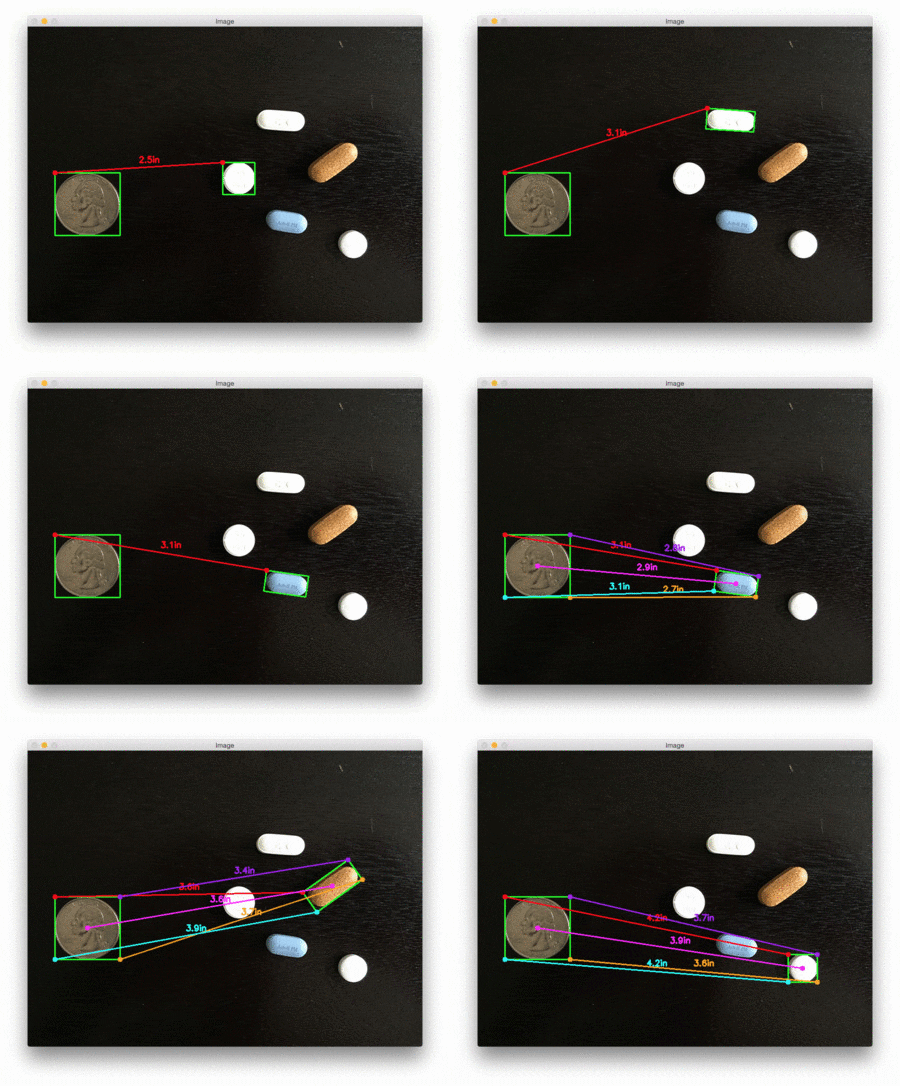
This example could be used as input to a pill sorting robot that automatically takes a set of pills and organizes them according to their size and distance from a pill container.
Our last example computes the distance between our reference object (a 3.5in x 2in business card) and a set of 7″ vinyl records and an envelope:
$ python distance_between.py --image images/example_03.png --width 3.5
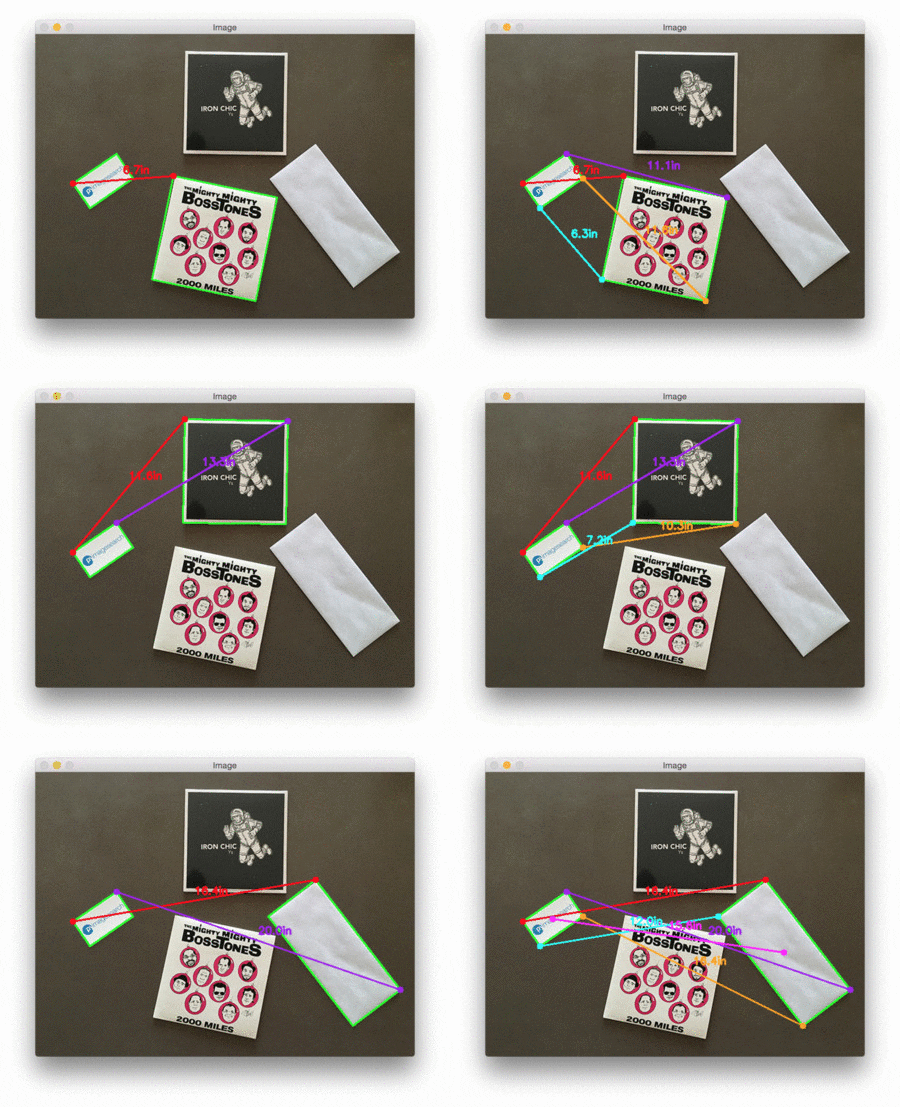
As you can see, in each of these cases, we have successfully computed the distance (in actual, measurable units) between objects in an image.
What's next? We recommend PyImageSearch University.
86+ total classes • 115+ hours hours of on-demand code walkthrough videos • Last updated: September 2025
★★★★★ 4.84 (128 Ratings) • 16,000+ Students Enrolled
I strongly believe that if you had the right teacher you could master computer vision and deep learning.
Do you think learning computer vision and deep learning has to be time-consuming, overwhelming, and complicated? Or has to involve complex mathematics and equations? Or requires a degree in computer science?
That’s not the case.
All you need to master computer vision and deep learning is for someone to explain things to you in simple, intuitive terms. And that’s exactly what I do. My mission is to change education and how complex Artificial Intelligence topics are taught.
If you're serious about learning computer vision, your next stop should be PyImageSearch University, the most comprehensive computer vision, deep learning, and OpenCV course online today. Here you’ll learn how to successfully and confidently apply computer vision to your work, research, and projects. Join me in computer vision mastery.
Inside PyImageSearch University you'll find:
- ✓ 86+ courses on essential computer vision, deep learning, and OpenCV topics
- ✓ 86 Certificates of Completion
- ✓ 115+ hours hours of on-demand video
- ✓ Brand new courses released regularly, ensuring you can keep up with state-of-the-art techniques
- ✓ Pre-configured Jupyter Notebooks in Google Colab
- ✓ Run all code examples in your web browser — works on Windows, macOS, and Linux (no dev environment configuration required!)
- ✓ Access to centralized code repos for all 540+ tutorials on PyImageSearch
- ✓ Easy one-click downloads for code, datasets, pre-trained models, etc.
- ✓ Access on mobile, laptop, desktop, etc.
Summary
In the third and final installment in our series on measuring object sizes, we learned how to take two different objects in an image and compute the distance between them in actual measurable units (such as inches, millimeters, etc.).
Just as we found out in last week’s post, before we can (1) compute the size of an object or (2) measure the distance between two objects, we first need to compute the “pixels-per-metric” ratio, used to determine how many pixels “fit” into a given unit of measurement.
Once we have this ratio, computing the distance between objects is almost trivially easy.
Anyway, I hope you enjoyed this series of blog posts! If you have any suggestions for a future series, please leave a comment on shoot me a message.
And before you go, be sure to signup for the PyImageSearch Newsletter by entering your email address in the form below!
Download the Source Code and FREE 17-page Resource Guide
Enter your email address below to get a .zip of the code and a FREE 17-page Resource Guide on Computer Vision, OpenCV, and Deep Learning. Inside you'll find my hand-picked tutorials, books, courses, and libraries to help you master CV and DL!
Thanks for the great tutorial, I have one question.
if I don’t have a reference object but I know the distance from the left edge of the image to the right edge can I find the distance from any object to the center of the image ?
Best Regards
Yep, you absolutely can! The same ratio test applies.
hi adrian, i want to know the distance between digits in an image, where should i make changes to get desired output?
Adria, Western Washington is Seeing ALOT of distracted driving collisions. I have seen a increase in guarder rail damage “most likely the car went off the highway as the driver was distracted”. LOTS of rear end collisions. Do you have sample code that determines distance to the rear of a vehicle and sends out a alert town to brake? Does the code measure the distance of the rear tail lights and uses trig to determine distance from the car in front of the vehicle? I have a Beagleboard and want to set it up to do do the test.
Sorry, I do not have any code for that specific project.
Hey Adrian Its a Great Tutorial, thanks a lot I used it in my project for determining distance between the two bright objects.
What If the reference object dimensions are continuously varying?? How to determine distance between the two variable size objects in a live stream video??
Can you elaborate on what you mean by “continuously varying”? If you have different reference objects, you’ll need to identify which one you are looking at. This can be done using all sorts of methods including object detection, keypoint matching, template matching, etc.
In your tutorial about Ball Tracking with opencv, when we move the ball back and forth in front of camera, the size of the contour varies accordingly, So taking this as reference, how to find distance between two balls??
I have to detect the distance between the two head lights of a car and distance from the camera when car is moving.
You’ll need to combine two calibration methods. The first (this blog post) to measure the distance between objects in images. Then, you can use this blog post to measure the distance from the camera to the object.
Really thanks a lot Adrian!!!!!!!!
No problem 🙂
Well … you know what they, there really is no off-switch to genius !!!
Cant wait to see what Adrian has got brilliant plans for PyImage Gurus bit 🙂
Thanks Mahed! I have some pretty special announcements related to PyImageSearch Gurus coming in the next 1-2 months, so be sure to keep an eye on the blog 🙂
Hello Adrian,
can you explain what this line does:
cnts = cnts[0] if imutils.is_cv2() else cnts[1]
Thanks
Jim
That line of code handles if you are using OpenCV 2.4 or OpenCV 3. There is a difference in the tuple returned by OpenCV between OpenCV 2.4 and OpenCV 3. You can read more about the change to
cv2.findContours
in this blog post.Hey, nice post.
I guess its a stupid question, but how can i loop only over the center of the objects.
Thanks for any help ^^
The center of the coordinates are stored in
cX
andcY
. You can just loop over those and ignore the other 🙂Can you elaborate more on how to do this, like where in the code to comment out the rest?
great work bro . u r really awesome …
can u plzz explain how to find distance between two tracked objects in a live video
The same general algorithm as discussed in this blog post needs to be applied. You first need to “calibrate” the camera. From there, determining the distance between two objects in a video stream is the same as determining the distance between two objects in an image — you just need to access the video stream and then process every frame of the stream.
how to measure eye to eye distance?? can this be done similar way?
If you can detect both eyes in an image, then yes, you can use this method to compute the distance between them.
what values are stored in (xA, yA), (xB, yB) ..please explain
(xA, yA)
stores the (x, y)-coordinates of the reference image, meanwhile(xB, yB)
store the (x, y)-coordinates of the object we are computing the distance to.Is that possible if I want to draw all the lines of distances between objects and saved it in a single image..??
Found it
Thank you very much
You gave an awesome guide for beginners
Plz if you can explain for me
How i can draw all rectangles in a single image?
Thanks in advance
Draw the lines on the original
image
loaded on Line 22 (rather thanorig
). Then save the image to disk once all lines are drawn viacv2.imwrite
.Dear Dr. Adrian;
Thanks in advance for your reply
I do it. Now i can save all result in a single image, but i have a problem:
When i delet line 111 [ cv2.imshow(“Image”, orig)] when i want to stop show result on the screen, for loop not work perfectly!! Just work for 3 object ((it save result just for 2 or 3 object )) not for all object
Please if you can help me ?
How i can cancel line 111 and run program with out error ??
Thanks a lot dear Dr. Adrian i do it
I removed line 112
cv2.waitKey(0)
And now works fine without problem
Your blog post very awesome
Thanks again
Hi Adrian, im new with OpenCV so if i may ask in detail how does i draw the lines on the original image? because i keep getting the image saved without the lines using cv2.imwrite
If you’re new to the world of computer vision and OpenCV you should read Practical Python and OpenCV first. That book will teach you the fundamentals. From there you can continue with your project. Walk before you run.
I think some modifications are required if the distance between reference object and camera are different from other objects and camera. What should be done then?
Hi,
I see that the calculated distance is between the reference object and all other objects, what if I want to measure the distance between two objects that both are non reference objects?
You can certainly do that as well. The important part is that you find your reference object first. Your reference object allows you to compute the number of pixels per metric. As long as you have this, you can compute the distance between two non-reference objects.
HI Adrian. Is the distance between two objects affected by the viewpoint of camera or the camera lens angle?
Yes, it absolutely is. In order to correct for this it’s common to calibrate our camera by computing the intrinsic properties of the camera. This allows us to help us correct for distortion. For these measurements to be correct you should have an (approximately) 90 degree, birds-eye-view of the objects.
hi adrian!
Is this code suitable for android app development?
You would need to convert the code from Python to Java + OpenCV for Android, but the same computer vision algorithms can be used.
Hi Adrian,
Thanks a lot for your tutorials .. I an still a beginner in Opencv and I want to use the same approach but with camera .. how to determine the distance between two Pink boxes by Camera ?
What is the simplest code for that ?
Thx
I would suggest starting with this blog post to learn how to measure the distance between a camera and an object. Once you’ve detected both objects you can apply the same triangle similarity technique to measure the distance between the objects.
Do you have code to convert a perspective image into a birds-eye-view?
Yes, please see this blog post.
Hi,
The tutorial is awesome, but i need to adapt it for a video. So it can detect distances in real time. Could you please help me with it?
Regards
The same techniques applied to single images can also be applied to video. I would suggest reading this blog post on accessing video streams. If you are new to OpenCV and Python, be sure to read through Practical Python and OpenCV as this book will give you the fundamentals you need to be successful porting the algorithm from single images to video.
Hi Adrian!!!!
The tutorial was great. Thank you for that.
I wanted to know if i have a set of parallel lines, then can i get the distance between two consecutive lines instead of with reference to just the first one???
What would be the execution time for this code???
If given an image, in how much time can it provide the answer on a raspberry pi based camera?
Regardless if your lines or parallel you would still need to be able to detect them both, otherwise how would you be able to know the distance between two arbitrary points on either line?
As for the execution time, yes, you could certainly run this script on a Raspberry Pi.
Hey, I was working on a project which required me to measure the diameter of holes and length and width of a plate using the image of the plate and a rasp pi cam and ofc rasp pi. I was wondering if this has the ability to be accurate to .001 in? Please let me know
For that level of accuracy I would recommend computing the intrinsic and extrinsic parameters of your camera and calibrating.
Hi Adrian!
This tutorial is great! But what if I want to make one pupil of the eye as a reference object and determine its distance to the other pupil without detecting other edges like the eyebrows, mouth etc. ?
Thank you!
Hi Law — I would suggest combining this tutorial on object distance along with this one on facial landmarks.
Hi Adrian,
Loved the work you have done. What if the second object is moving instead of being static? Will it calculate correct distance from reference object? If not then, how do I achieve that?
As long as you have your reference object computed initially you can compute the distance between any other object in the image (provided it can be detected and localized, of course). In order to work with a video stream you’ll need to access your webcam. I discuss the topic in detail inside this post.
Hi Adrian,
Can you tell me how to display all the lines and distance in a single image rather than pressing other keys to display the distance.
Moe the
cv2.imshow
andcv.waitKey
calls to the end of the script rather than inside the loop.Hi Adrien ,
I use this program to determine distance beetween cars. Can you help to find the shortest distance please ?
Hi Yan — I’m not sure I understand your question fully, but I’ll give it a shot. The shortest distance would be where the contour of the car is bigger than the image frame.
Hello Adrian;
for example; There is a person identified with haarcascade; how the distances of detected persons to a specific object are calculated?
thank you so much for your work.
There are a number of ways you could determine the (x, y)-coordinate of the person. I personally would recommend (1) computing the center of the person bounding box or (2) compute the center (x, y)-coordinates of their face.
Hello Adrian:
Hey Adrian Its a Great Tutorial, thanks a lot I used it in my project for determining distance between the two objects. Can you tell how to reduce size of an image ?
You can reduce the size of an image via
cv2.resize
orimutils.resize
. If you’re new to OpenCV and image processing I would suggest working through Practical Python and OpenCV where I discuss image transformation basics in detail.Ok thankew 🙂
hi andrian
i have a problem with that code. like this :
usage: distance_between.py [-h] -i IMAGE -w WIDTH
distance_between.py: error: argument -i/–image is required
Can you explain that ?
Hey Izzan — you need to pass the command line arguments to the script when you execute it via the command line. The code itself does not need to be updated. If you’re new to command line arguments, that’s okay, but you should read up on them before continuing.
I am new to Python programming. Can you add command line arguments code to the script?
It’s okay if you are new, but you should read about command line arguments before continuing.
that’s for linux do you have any idea for windows ?
This code can be executed and ran on Windows.
Hello, adrian
Could you please explain this part of the code. What is the” –image” and do we need to download a reference object image and parse the dimensions to it or is it something else?
ap.add_argument(“-i”, “–image”, required=True,
help=”path to the input image”)
ap.add_argument(“-w”, “–width”, type=float, required=True,
help=”width of the left-most object in the image (in inches)”
Hey Francis — I would suggest reading up on command line arguments before continuing.
hello adrian,
Thanks for the great tutorial !! If I want to calculate the center distance of the object only, what line of code should I remove?
Thank youu~
You should compute the center (x, y)-coordinates of the bounding box. Add the two x-coordinates together and divide by two. Repeat for the y-coordinate.
Hi Adrian… many thanks for the tutorial…since I am a beginner I just tried to download and run your code on my RPi 3 but I got “No module named scipy.spatial” error message… so I tried $ pip install scipy and then after few minutes my RPi was frozen 🙁 any idea what should I do? Thanks.
BTW, I am using Python virtual environment based on your suggestion in other tutorials… so I did $workon cv $pip install scipy and it did not work
Make sure you supply the
--no-cache-dir
when installing SciPy on a Raspberry Pi:$ pip install scipy --no-cache-dir
The only time we use SciPy is for the Euclidean distance so I would instead recommend you implement it as a helper function at the top of the script. This would allow you to skip installing SciPy entirely.
Hi,
How to convert inches to millimeters in this code??
Thanks
1 inch is 25.4 millimeters. You can use this relationship to perform the conversion.
Hi Adrian,
I’m trying to detect distance between objects in my mobile app , can I follow your workflow while implementing it for openCV in Android?
Or should I follow something different?
Please let me know
Thanks!
You can use the same algorithm discussed in this blog post but you’ll need to implement it in Java rather than Python.
Hello Adrian
I am trying to do stackup analysis on NX unigraphics using Python. Is that possible?
Stackup analysis is measuring the gap between assembled parts.
Could u please help me with that Python code?
Sorry, I do not have any blog posts or source code on “stackup analysis”.
Thank you Adrian for reverting back.
Can you suggest any other solution or provide me with a code for measuring the gap between two end points of a mechanical part?
I do not have any code for such as specific use case. The PyImageSearch blog contains over 300+ free tutorials on how to learn computer vision — use them to learn and enrich your knowledge but I cannot write code for you. Additionally, I would suggest you work through Practical Python and OpenCV so you can learn the basics of computer vision and image processing.
Tysm Adrian.
Hi Adrian,
This is quite interesting post. I wanted to ask you one interesting problem related to this or even suggestion will help. Is it possible to find the distance between two objects, but without going through the objects, means the distance between objects though some random curves without touching other objects.
Thanks for any help
Hey Swapnil — I’m not sure what you mean by “distance through some random curves”. Perhaps you could clarify or provide an example?
Hi Adrian
Thanks for awesome codes, Your descriptions on file ease noob like me in learning them. My question is on section “ # loop over the original points” , why refCoords unchanged , objCoords changed to next object. Is It caused by zip class? Is there any class will change refCoords by previous objCoords whenever new objCoords changed to next.
Im stuck in a problem, have three known points, how to find a point that connect a known point to perpendicular line of rest 2 known points
can you please recommend example code for it
how can we apply this code for video
Hello, Mr. Adrian Rosebrock, i wanna ask to you.
I’m a newbie to learn opencv. How to streaming video and calculating distance measurement with plate police? if distance between my camera and plate in front of me too close, i’ve already make notification to rasb pi.
but i cannot to make coding of plate police distance measurement
You would want to first detect the license plate in the image. Do you already have a license plate detector? If not, I cover Automatic License Plate Recognition (ANPR) inside the PyImageSearch Gurus course.
Hello man, how you doing?
Sorry about my english errors and excitement, i’m not a professional programer and english isn’t my native language.
The first time I saw this post I get really excited because i am working on a project that requires object distance measuring and I have been looking for a solution like this for too long.
The way you explain each line on your code and call your own blog links is amazing.
Looking on the post’s date, I get a bit nervous thinking that maybe I would have some problems with Python and the Libraries version, but it doesn’t happened.
On the same way your blog is still alive since them! You are always here answering the questions and helpping people.
When I got to the end of the reading I thought: I need to thank that guy! And for my surprise all of your posts have such a good amount of replys and polite people doing this.
By the way, thank you very much for your job and support for the community. I hope you really get the gratitude for all of us.
Thank you for the kind words, Arthur! I really appreciate your comment. I’m so happy you enjoyed the tutorial 🙂
Hey! im working on small project where I need to detect the size of a object .Is it possible to measure the size without using a reference object but instead calibrating initially with a reference and later working for objects independent of reference ?
Yes, take a look into computing the intrinsic/extrinsic parameters of the camera.
Is it possible to change the units to Microns? If yes, can you please help in the conversion factor.
1 inch is equal to 25400 microns if I’m not mistaken. You should double-check that though.
Hello, Adrian. I’m having a little problem looping only over the centers. Already tried looping over cX and cY, created new variables to alocate centers and alot of other things but nothing works. Could you please help me?
What specifically do you mean by “nothing works”? It sounds like there is a probably a logic error in the code. In that I would recommend reading through Practical Python and OpenCV to help you learn the fundamentals of OpenCV. That will better prepare you to write your own custom OpenCV code (and build your own projects).
Can i convert the inches to mm in my output??
1in is 25.4mm. You can do that the conversion.
Hey how can i include a second or third decimal value in my output??
You would change “{:.1f}in” to “{:.3f}in” in the “cv2.putText” function.
Hello Adrian, thank you for you tutorial.
i don’t speak english very well, excuse me in advance.
I work on a picture. I did the job to have the contour on my thread (it’s a picture of thread).
Now i would like to measure the dimension on my thread.
Do you have an idea to do it ?
thank you
This tutorial will show you how to measure the size of your thread.
Thank you Adrian
Hello Adrian,
I appreciate these tutorials as they are helping me a lot in getting started with OpenCV. I plan on incorporating this into a video instead of a single image.
However, I want to determine how far an object has moved in the video from its original place in inches, based on using the size of the object that is being tracked. Am I correct in assuming that using the object reference’s size will help me determine in how far the object has traveled from it’s original starting point? Also, how do I reference this original “starting point” as the object moves across the screen?
Also, I am just speaking in terms of x, y. The distance from the camera will not change.
Yes, all you need to do is (1) detect its original position and (2) detect its now position. Compute the midpoint between the two and then compute the distance.
hi adrian i am new to this field . i have a stupid question is this code for linux or windows
This code will work on both Windows and Linux.
Hi Adrian I am Raghu i currently working on the dynamic distance measurement between moving cars in a video. Please provide me a suitable solution for estimating the distance between the contours in a video
Hey thanks a lot for all the guides. They have all been great!
I was just wondering if it is possible to calculate the distance from the centre of the whole image to the objects. This will be helpful for a project I am working on. I am trying to get the reference object as the point in the centre of the image but I have had no luck so far. Any advice would be appreciated. Thanks in advance.
Computing the center (x, y)-coordinates of the image is easy, just divide the width and height by half. Unless I’m misunderstanding your question?
Hello Adrian! thanks for the tutorial. I need only compute a distance, from the nearest corners. What modifications should I make? I was trying and I can’t make it
I am going to measure the distance between 2 objects by millimeters.
Is It 100% exact solution when it is measured by millimeters?
Hello, thank you for your great tutorial. Question: could we use the height and width of the whole frame as a reference object?
I mean, measure the height and width in meters, for example, of the whole area covered in the image, having that and the height and width in pixels of the image on screen, couldn’t it be used to calculate distance between objects on image/video?
Thanks
Yes, you could do that as well but an intrinsic/extrinsic camera calibration would work best there.