This past Saturday, I was caught in the grips of childhood nostalgia, so I busted out my PlayStation 1 and my original copy of Final Fantasy VII. As a kid in late middle school/early high school, I logged 70+ hours playing through this heartbreaking, inspirational, absolute masterpiece of an RPG.
As a kid in middle school (when I had a lot more free time), this game was almost like a security blanket, a best friend, a make-believe world encoded in 1’s in 0’s where I could escape to, far away from the daily teenage angst, anxiety, and apprehension.
I spent so much time inside this alternate world that I completed nearly every single side quest. Ultimate and Ruby weapon? No problem. Omnislash? Done. Knights of the Round? Master level.
It probably goes without saying that Final Fantasy VII is my favorite RPG of all time — and it feels absolutely awesome to be playing it again.
But as I sat on my couch a couple nights ago, sipping a seasonal Sam Adams Octoberfest while entertaining my old friends Cloud, Tifa, Barret, and the rest of the gang, it got me thinking: “Not only have video games evolved dramatically over the past 10 years, but the controllers have as well.”
Think about it. While it a bit gimmicky, the Wii Remote was a major paradigm shift in user/game interaction. Over on the PlayStation side, we had PlayStation Move, essentially a wand with both (1) an internal motion sensors, (2) and an external motion tracking component via a webcam hooked up to the PlayStation 3 itself. Of course, then there is the XBox Kinect (one of the largest modern day computer vision success stories, especially within the gaming area) that required no extra remote or wand — using a stereo camera and a regression forest for pose classification, the Kinect allowed you to become the controller.
This week’s blog post is an extension to last week’s tutorial on ball tracking with OpenCV. We won’t be learning how to build the next generation, groundbreaking video game controller — but I will show you how to track object movement in images, allowing you to determine the direction an object is moving:
Read on to learn more.
Looking for the source code to this post?
Jump Right To The Downloads SectionOpenCV Track Object Movement
Note: The code for this post is heavily based on last’s weeks tutorial on ball tracking with OpenCV, so because of this I’ll be shortening up a few code reviews. If you want more detail for a given code snippet, please refer to the original blog post on ball tracking.
Let’s go ahead and get started. Open up a new file, name it object_movement.py
, and we’ll get to work:
# import the necessary packages from collections import deque from imutils.video import VideoStream import numpy as np import argparse import cv2 import imutils import time # construct the argument parse and parse the arguments ap = argparse.ArgumentParser() ap.add_argument("-v", "--video", help="path to the (optional) video file") ap.add_argument("-b", "--buffer", type=int, default=32, help="max buffer size") args = vars(ap.parse_args())
We start off by importing our necessary packages on Lines 2-8. We need Python’s built in deque datatype to efficiently store the past N points the object has been detected and tracked at. We’ll also need imutils, by collection of OpenCV and Python convenience functions. If you’re a follower of this blog, you likely already have this package installed. If you don’t have imutils
installed/upgraded yet, let pip
take care of the installation process:
$ pip install --upgrade imutils
Lines 11-16 handle parsing our two (optional) command line arguments. If you want to use a video file with this example script, just pass the path to the video file to the object_movement.py
script using the --video
switch. If the --video
switch is omitted, your webcam will (attempted) to be used instead.
We also have a second command line argument, --buffer
, which controls the maximum size of the deque
of points. The larger the deque
the more (x, y)-coordinates of the object are tracked, essentially giving you a larger “history” of where the object has been in the video stream. We’ll default the --buffer
to be 32, indicating that we’ll maintain a buffer of (x, y)-coordinates of our object for only the previous 32 frames.
Now that we have our packages imported and our command line arguments parsed, let’s continue on:
# define the lower and upper boundaries of the "green" # ball in the HSV color space greenLower = (29, 86, 6) greenUpper = (64, 255, 255) # initialize the list of tracked points, the frame counter, # and the coordinate deltas pts = deque(maxlen=args["buffer"]) counter = 0 (dX, dY) = (0, 0) direction = "" # if a video path was not supplied, grab the reference # to the webcam if not args.get("video", False): vs = VideoStream(src=0).start() # otherwise, grab a reference to the video file else: vs = cv2.VideoCapture(args["video"]) # allow the camera or video file to warm up time.sleep(2.0)
Lines 20 and 21 define the lower and upper boundaries of the color green in the HSV color space (since we will be tracking the location of a green ball in our video stream). Let’s also initialize our pts
variable to be a deque
with a maximum size of buffer
(Line 25).
From there, Lines 25-28 initialize a few bookkeeping variables we’ll utilize to compute and display the actual direction the ball is moving in the video stream.
Lastly, Lines 32-37 handle grabbing a pointer, vs
, to either our webcam or video file. We are taking advantage of the imutils.video
VideoStream
class to handle the camera frames in a threaded approach. To handle the video file, cv2.VideoCapture
does the best job.
Now that we have a pointer to our video stream we can start looping over the individual frames and processing them one-by-one:
# keep looping while True: # grab the current frame frame = vs.read() # handle the frame from VideoCapture or VideoStream frame = frame[1] if args.get("video", False) else frame # if we are viewing a video and we did not grab a frame, # then we have reached the end of the video if frame is None: break # resize the frame, blur it, and convert it to the HSV # color space frame = imutils.resize(frame, width=600) blurred = cv2.GaussianBlur(frame, (11, 11), 0) hsv = cv2.cvtColor(blurred, cv2.COLOR_BGR2HSV) # construct a mask for the color "green", then perform # a series of dilations and erosions to remove any small # blobs left in the mask mask = cv2.inRange(hsv, greenLower, greenUpper) mask = cv2.erode(mask, None, iterations=2) mask = cv2.dilate(mask, None, iterations=2) # find contours in the mask and initialize the current # (x, y) center of the ball cnts = cv2.findContours(mask.copy(), cv2.RETR_EXTERNAL, cv2.CHAIN_APPROX_SIMPLE) cnts = imutils.grab_contours(cnts) center = None
This snippet of code is identical to last week’s post on ball tracking so please refer to that post for more detail, but the gist is:
- Line 43: Start looping over the frames from the
vs
pointer (whether that’s a video file or a webcam stream). - Line 45: Grab the next
frame
from the video stream. Line 48 takes care of parsing either a tuple or variable directly. - Lines 52 and 53: If a
frame
could not not be read, break from the loop. - Lines 57-59: Pre-process the
frame
by resizing it, applying a Gaussian blur to smooth the image and reduce high frequency noise, and finally convert theframe
to the HSV color space. - Lines 64-66: Here is where the “green color detection” takes place. A call to
cv2.inRange
using thegreenLower
andgreenUpper
boundaries in the HSV color space leaves us with a binarymask
representing where in the image the color “green” is found. A series of erosions and dilations are applied to remove small blobs in themask
.
You can see an example of the binary mask below:
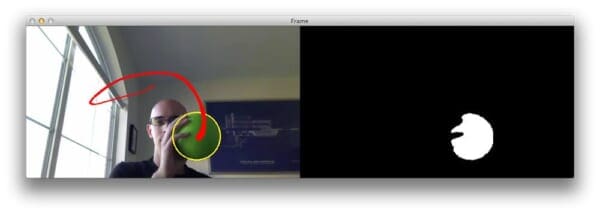
On the left we have our original frame and on the right we can clearly see that only the green ball has been detected, while all other background and foreground objects are filtered out.
Finally, we use the cv2.findContours
function to find the contours (i.e. “outlines”) of the objects in the binary mask
(Lines 70-72).
Let’s find the ball contour:
# only proceed if at least one contour was found if len(cnts) > 0: # find the largest contour in the mask, then use # it to compute the minimum enclosing circle and # centroid c = max(cnts, key=cv2.contourArea) ((x, y), radius) = cv2.minEnclosingCircle(c) M = cv2.moments(c) center = (int(M["m10"] / M["m00"]), int(M["m01"] / M["m00"])) # only proceed if the radius meets a minimum size if radius > 10: # draw the circle and centroid on the frame, # then update the list of tracked points cv2.circle(frame, (int(x), int(y)), int(radius), (0, 255, 255), 2) cv2.circle(frame, center, 5, (0, 0, 255), -1) pts.appendleft(center)
This code is also near-identical to the previous post on ball tracking, but I’ll give a quick rundown of the code to ensure you understand what is going on:
- Line 76: Here we just make a quick check to ensure at least one object was found in our
frame
. - Lines 80-83: Provided that at least one object (in this case, our green ball) was found, we find the largest contour (based on its area), and compute the minimum enclosing circle and the centroid of the object. The centroid is simply the center (x, y)-coordinates of the object.
- Lines 86-92: We’ll require that our object have at least a 10 pixel radius to track it — if it does, we’ll draw the minimum enclosing circle surrounding the object, draw the centroid, and finally update the list of
pts
containing the center (x, y)-coordinates of the object.
Unlike last weeks example that simply drew the contrail of the object as it moved around the frame, let’s see how we can actually track the object movement, followed by using this object movement to compute the direction the object is moving using only (x, y)-coordinates of the object:
# loop over the set of tracked points for i in np.arange(1, len(pts)): # if either of the tracked points are None, ignore # them if pts[i - 1] is None or pts[i] is None: continue # check to see if enough points have been accumulated in # the buffer if counter >= 10 and i == 1 and pts[-10] is not None: # compute the difference between the x and y # coordinates and re-initialize the direction # text variables dX = pts[-10][0] - pts[i][0] dY = pts[-10][1] - pts[i][1] (dirX, dirY) = ("", "") # ensure there is significant movement in the # x-direction if np.abs(dX) > 20: dirX = "East" if np.sign(dX) == 1 else "West" # ensure there is significant movement in the # y-direction if np.abs(dY) > 20: dirY = "North" if np.sign(dY) == 1 else "South" # handle when both directions are non-empty if dirX != "" and dirY != "": direction = "{}-{}".format(dirY, dirX) # otherwise, only one direction is non-empty else: direction = dirX if dirX != "" else dirY
On Line 95 we start to loop over the (x, y)-coordinates of object we are tracking. If either of the points are None
(Lines 98 and 99) we simply ignore them and keep looping.
Otherwise, we can actually compute the direction the object is moving by investigating two previous (x, y)-coordinates.
Computing the directional movement (if any) is handled on Lines 107 and 108 where we compute dX
and dY
, the deltas (differences) between the x and y coordinates of the current frame and a frame towards the end of the buffer, respectively.
However, it’s important to note that there is a bit of a catch to performing this computation. An obvious first solution would be to compute the direction of the object between the current frame and the previous frame. However, using the current frame and the previous frame is a bit of an unstable solution. Unless the object is moving very quickly, the deltas between the (x, y)-coordinates will be very small. If we were to use these deltas to report direction, then our results would be extremely noisy, implying that even small, minuscule changes in trajectory would be considered a direction change. In fact, these changes could be so small that they would be near invisible to the human eye (or at the very least, trivial) — we are most likely not that interested reporting and tracking such small movements.
Instead, it’s much more likely that we are interested in the larger object movements and reporting the direction in which the object is moving — hence we compute the deltas between the coordinates of the current frame and a frame farther back in the queue. Performing this operation helps reduce noise and false reports of direction change.
On Line 113 we check the magnitude of the x-delta to see if there is a significant difference in direction along the x-axis. In this case, if there is more than 20 pixel difference between the x-coordinates, we need to figure out in which direction the object is moving. If the sign of dX
is positive, then we know the object is moving to the right (east). Otherwise, if the sign of dX
is negative, then we are moving to the left (west).
Note: You can make the direction detection code more sensitive by decreasing the threshold. In this case, a 20 pixel different obtains good results. However, if you want to detect tiny movements, simply decrease this value. On the other hand, if you want to only report large object movements, all you need to do is increase this threshold.
Lines 118 and 119 handle dY
in a similar fashion. First, we must ensure there is a significant change in movement (at least 20 pixels). If so, we can check the sign of dY
. If the sign of dY
is positive, then we’re moving up (north), otherwise the sign is negative and we’re moving down (south).
However, it could be the case that both dX
and dY
have substantial directional movements (indicating diagonal movement, such as “South-East” or “North-West”). Lines 122 and 123 handle the case our object is moving along a diagonal and update the direction
variable as such.
At this point, our script is pretty much done! We just need to wrap a few more things up:
# otherwise, compute the thickness of the line and # draw the connecting lines thickness = int(np.sqrt(args["buffer"] / float(i + 1)) * 2.5) cv2.line(frame, pts[i - 1], pts[i], (0, 0, 255), thickness) # show the movement deltas and the direction of movement on # the frame cv2.putText(frame, direction, (10, 30), cv2.FONT_HERSHEY_SIMPLEX, 0.65, (0, 0, 255), 3) cv2.putText(frame, "dx: {}, dy: {}".format(dX, dY), (10, frame.shape[0] - 10), cv2.FONT_HERSHEY_SIMPLEX, 0.35, (0, 0, 255), 1) # show the frame to our screen and increment the frame counter cv2.imshow("Frame", frame) key = cv2.waitKey(1) & 0xFF counter += 1 # if the 'q' key is pressed, stop the loop if key == ord("q"): break # if we are not using a video file, stop the camera video stream if not args.get("video", False): vs.stop() # otherwise, release the camera else: vs.release() # close all windows cv2.destroyAllWindows()
Again, this code is essentially identical to the previous post on ball tracking, so I’ll just give a quick rundown:
- Lines 131 and 132: Here we compute the thickness of the contrail of the object and draw it on our
frame
. - Lines 138-140: This code handles drawing some diagnostic information to our
frame
, such as thedirection
in which the object is moving along with thedX
anddY
deltas used to derive thedirection
, respectively. - Lines 143-149: Display the
frame
to our screen and wait for a keypress. If theq
key is pressed, we’ll break from thewhile
loop on Line 149. - Lines 152-160: Cleanup our
vs
pointer and close any open windows.
Testing out our object movement tracker
Now that we have coded up a Python and OpenCV script to track object movement, let’s give it a try. Fire up a shell and execute the following command:
$ python object_movement.py --video object_tracking_example.mp4
Below we can see an animation of the OpenCV tracking object movement script:
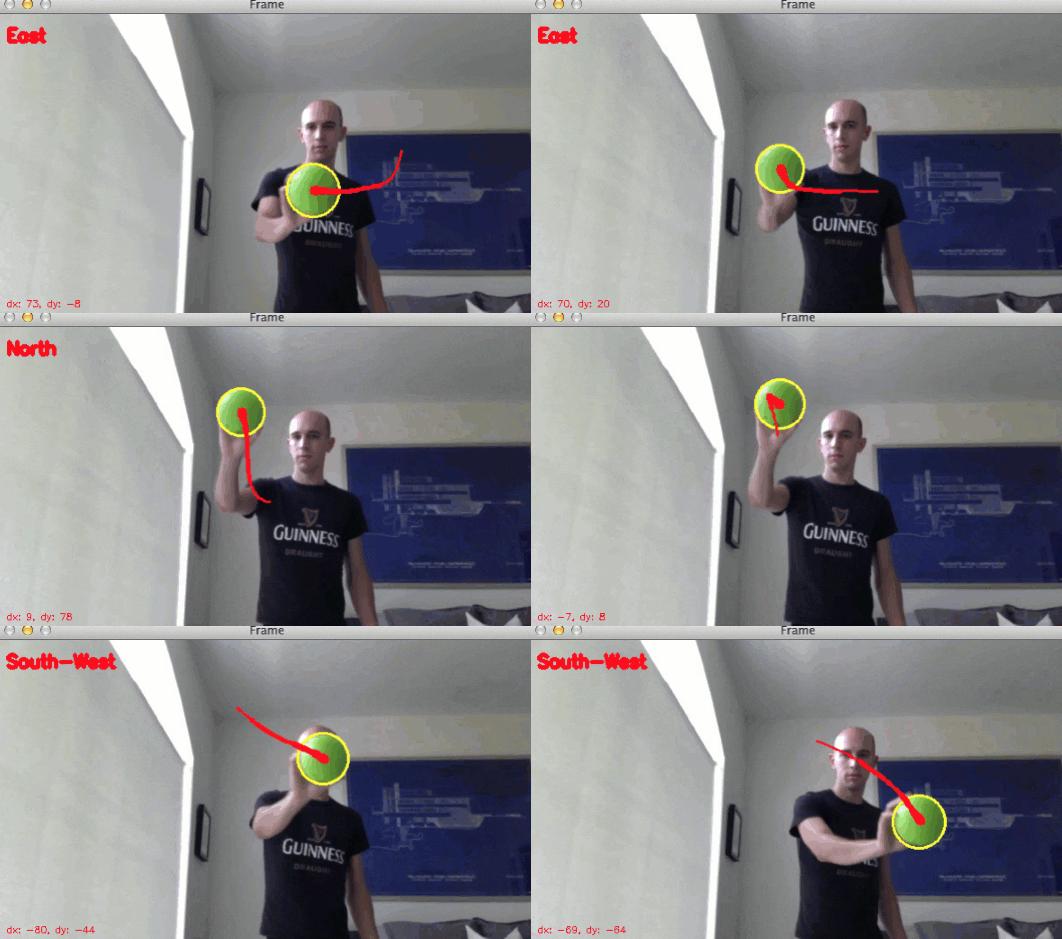
However, let’s take a second to examine a few of the individual frames.
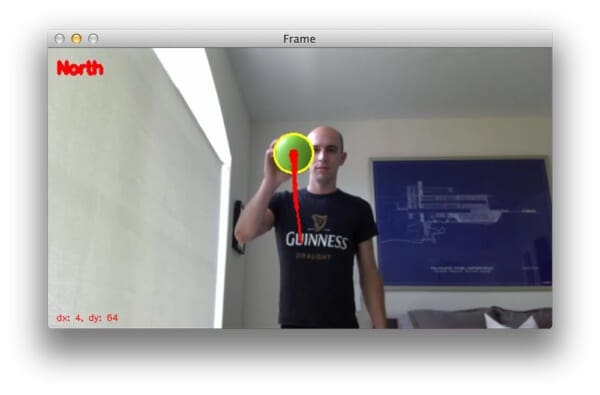
From the above figure we can see that the green ball has been successfully detected and is moving north. The “north” direction was determined by examining the dX
and dY
values (which are displayed at the bottom-left of the frame). Since |dY| > 20 we were able to determine there was a significant change in y-coordinates. The sign of dY
is also positive, allowing us to determine the direction of movement is north.
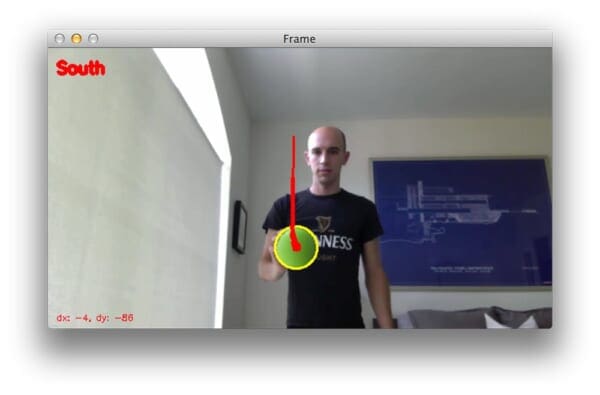
Again, |dY| > 20, but this time the sign is negative, so we must be moving south.
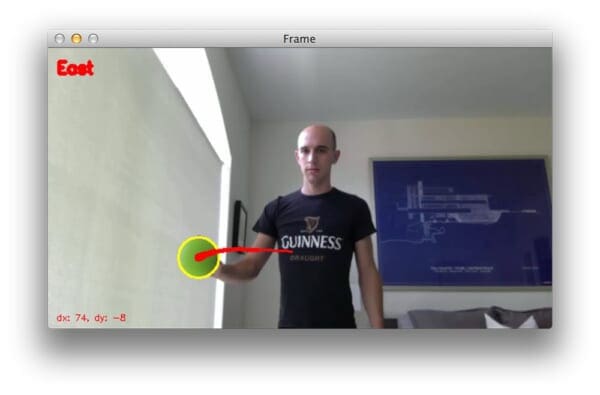
In the above image we can see that the ball is moving east. It may appear that the ball is moving west (to the left); however, keep in mind that our viewpoint is reversed, so my right is actually your left.
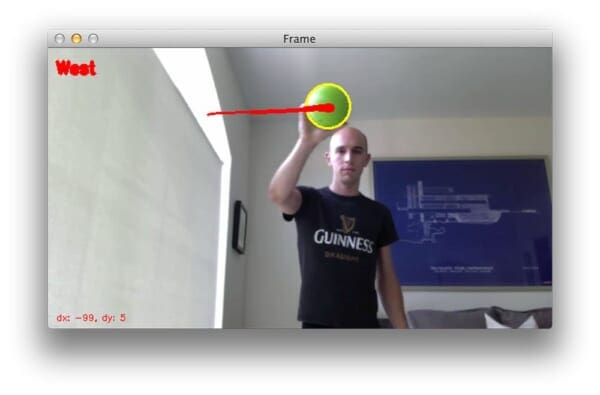
Just as we can track movements to the east, we can also track movements to the west.
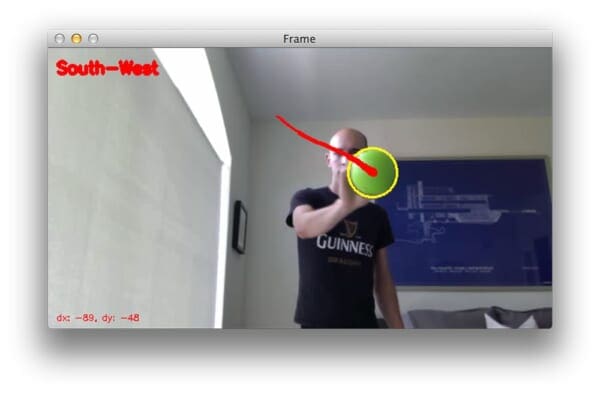
Moving across a diagonal is also not an issue. When both |dX| > 20 and |dY| > 20, we know that the ball is moving across a diagonal.
You can see the full demo video here:
If you want the object_movement.py
script to access your webcam stream rather than the supplied object_tracking_example.mp4
video supplied in the code download of this post, simply omit the --video
switch:
$ python object_movement.py
What's next? We recommend PyImageSearch University.
86 total classes • 115+ hours of on-demand code walkthrough videos • Last updated: October 2024
★★★★★ 4.84 (128 Ratings) • 16,000+ Students Enrolled
I strongly believe that if you had the right teacher you could master computer vision and deep learning.
Do you think learning computer vision and deep learning has to be time-consuming, overwhelming, and complicated? Or has to involve complex mathematics and equations? Or requires a degree in computer science?
That’s not the case.
All you need to master computer vision and deep learning is for someone to explain things to you in simple, intuitive terms. And that’s exactly what I do. My mission is to change education and how complex Artificial Intelligence topics are taught.
If you're serious about learning computer vision, your next stop should be PyImageSearch University, the most comprehensive computer vision, deep learning, and OpenCV course online today. Here you’ll learn how to successfully and confidently apply computer vision to your work, research, and projects. Join me in computer vision mastery.
Inside PyImageSearch University you'll find:
- ✓ 86 courses on essential computer vision, deep learning, and OpenCV topics
- ✓ 86 Certificates of Completion
- ✓ 115+ hours of on-demand video
- ✓ Brand new courses released regularly, ensuring you can keep up with state-of-the-art techniques
- ✓ Pre-configured Jupyter Notebooks in Google Colab
- ✓ Run all code examples in your web browser — works on Windows, macOS, and Linux (no dev environment configuration required!)
- ✓ Access to centralized code repos for all 540+ tutorials on PyImageSearch
- ✓ Easy one-click downloads for code, datasets, pre-trained models, etc.
- ✓ Access on mobile, laptop, desktop, etc.
Summary
In this blog post you learned about tracking object direction (not to mention, my childhood obsession with Final Fantasy VII).
This tutorial started as an extension to our previous article on ball tracking. While the ball tracking tutorial showed us the basics of object detection and tracking, we were unable to compute the actual direction the ball was moving. By simply computing the deltas between (x, y)-coordinates of the object in two separate frames, we were able to correctly track object movement and even report the direction it was moving.
We could make this object movement tracker even more precise by reporting the actual angle of movement simply by taking the arctangent of dX
and dY
respectively — but I’ll leave that as an exercise to you, the reader.
Be sure to download the code to this post and give it a try!
Download the Source Code and FREE 17-page Resource Guide
Enter your email address below to get a .zip of the code and a FREE 17-page Resource Guide on Computer Vision, OpenCV, and Deep Learning. Inside you'll find my hand-picked tutorials, books, courses, and libraries to help you master CV and DL!
Pedro
Hey Adrian,
And what about the z-dimension? Could you determine the direction just by checking if the ball’s radius is increasing or decreasing?
Awesome tutorial!!
Pedro
Adrian Rosebrock
Hey Pedro, great question. Yes, you can certainly do that as well, although for good accurate readings I would suggest performing some sort of camera calibration. See this post for more info.
Jeffrey Batista
Hi, i’m the following error
attributeerror: nonetype object has no attribute shape
Adrian Rosebrock
If you are getting an error related to the NumPy array having no shape, then your system is not reading frames from the video stream correctly. If you are trying to read frames from a video file, then OpenCV was likely not compiled and installed with video support. If you are trying to read frames from a webcam, then OpenCV is having problems accessing the webcam.
Fabs
Hi, in my case I solved that problem by typing:
$ sudo modprobe bcm2835-v4l2
found it on some other pyimagesearch post. But I wonder if its possible to get that in some kind of autostart so we don’t have to type it in manually all the time we want to run cv.
Adrian Rosebrock
This should only work if you have installed the V4l2 driver already installed (which it sounds like you do). But I imagine most PyImageSearch readers don’t have V4l2 configured and installed.
Mats Önnerby
Hi
To make it load at boot, you need to add this line to /etc/module
bcm2835-v4l2
You need to start your editor with sudo, link this
sudo vi /etc/modules
Adrian Rosebrock
Thanks for sharing Mats!
Jeffrey Batista
That has been my entire headache, So when i use this command cap = cv2.VideoCapture(0) nothing happens. how can i recompile OpenCV with video support?
Adrian Rosebrock
That really depends on your operating system. I have a bunch of tutorials related to installing OpenCV and Python together available here — I would definitely start there and follow the instructions specific to your OS and Python version.
Fabs
Hi Adrian, thanks for your awesome tutorial. I got your code running as long as I dont run it with “sudo”. Since I want to work with some stepper motors as well, I made the experience that those need to be run with “sudo” in front.
When I try to run the python file in the (cv) mode with
$ sudo python filename.py
it prints: “ImportError: No module named imutils” which I re-installed twice today. The same command without sudo
$ python filename.py
works great. But when implementing the GPIO modul (import RPi.GPIO) I need sudo to get the motors working.
Do you have any idea why there is this difference with imutils in sudo?
Adrian Rosebrock
If you want to use
sudo
, I would actually suggest launching a root shell and then installingimutils
Remember, the
sudo
command is running your script as root — it doesn’t care about what you have installed in your user account. Also, if you have been using a virtual environment for your user account, you’ll need to create one for your root account as well and make sure you access it before executing the script.Scott Routley
I tried to create a similar demo a few months ago. (Applying what I had learnt from you)
But one of my biggest challenges determining what are the best upper and lower colours.
Do you have any techniques that you could share?
Adrian Rosebrock
Take a look at this post where I briefly discuss and link off to the
range-detector
script. This can be used to help determine good color ranges.Fabs
Is there a way to get the stream faster? Cause my video stream is very lagged, with a three seconds delay. So I won’t get smoth curves like you do, instead I’ll just see straight lines from point to point. Looks like I got arround 2fps. I’m working with the RPi B+ and the CPU always shows 100% when video stream is shown.
Adrian Rosebrock
For most image processing tasks I would really suggest using the Pi 2. It’s much faster and better suited for video processing.
Dan
Hi Adrian,
what sort of fps and resolutions did you achieve with the RPi 2 performing the colour tracking processes?
Thank you
Adrian Rosebrock
I haven’t had a chance to run this script on the Pi 2 yet, but once I do, I’ll be sure to come back and let you know. My intuition says it should be approximately 8-16 FPS.
Anh
Great tutorial! If I want to detect Arrow (for left, right), how I can do that? Thank you
Adrian Rosebrock
The actual shape of the object (whether it’s an arrow or a ball) doesn’t really matter for this technique. What matters is the color of the object. You can use the
range-detector
script mentioned in this post to help you find the color ranges to detect your object.Oren
Would you recommend using same technique to detect and track the feet of a runner or animal e.g. dog to analyse gait cycle events i.e foot ground contact time and foot off time? What is your experience using the Meanshift and Camshift in opencv?
Adrian Rosebrock
I probably would not recommend this approach for feet detection unless the shoes/paws were easily identifiable by color. The cornerstone of this approach is that you can define the color range of the object you want to track. Shoes and animal paws can vary dramatically in color — and often times they may blend into their environment making it hard to define a color range that can segment them from the background.
Finally, you can read about my experience with CamShift here.
PABLITO
Hello Adrian, I’m working with HSV space color too. So I want to ask you how do you choose saturation and brightness values. Please help me with that information .
Thank you very much
Adrian Rosebrock
Please see my reply to Scott above.
Jeffrey Batista
Hi Adrian, are you using the pi camera or a USB camera for this demo. After following the tutorial I never managed to to get opencv to detect my raspberry pi camera. I can take pictures using the camera = picamera.PiCamera() the camera = cv2.VideoCapture(0) method doesn’t work. If you could please explain the part that i missed. I’m really trying to get into computing vision but feel like a I hit a dead end road. Thank you, I really appreciate your time!
Adrian Rosebrock
This demo was actually done with my OSX machine which has a built in webcam.
However, I’ve used both
picamera
andcv2.VideoCapture
to capture images/video using the Raspberry Pi camera module. If you want to usepicamera
take a look at this post. If you want to usecv2.VideoCapture
with a USB camera, then you’ll need to look into installing the uv4l drivers and re-compiling and re-installing OpenCV.Jamie
I am trying to follow this tutorial with a picamera, I followed your post of accessing the picamera and tried to implement that code into this tutorial. however, I cannot get past this error “Incorrect buffer length for resolution”
Adrian Rosebrock
Hey Jamie — it sounds like you’re forgetting the call to
.truncate
on the Raspberry Pi camera object. Please see this tutorial for more information.Deven Patel
Thanks a ton for all the inspiration. Inspired by your post, i ended up with this https://github.com/devenpatel2/Backprojection_tracking. I used backprojection for tracking purpose. Still have to add the queue though. Your posts really give good ideas to start a new project in CV.
Adrian Rosebrock
Nice work Deven! 😀
Gintautas
IS this tutorial works on Python 2.7 and Open CV 3.0 ? and im using raspberry pi 2 camera module.
https://cdn.sparkfun.com//assets/parts/8/2/7/8/11868-00a.jpg
Adrian Rosebrock
This tutorial can run on the the Raspberry Pi if you are using a USB camera. But since you’re using the camera module, you’ll need to update the main loop that grabs frames to use the
picamera
module instead. You can read more about accessing the Raspberry Pi camera module here.Gintautas
i tried using usb camera, its filming for few seconds and crash.
Adrian Rosebrock
The script makes the assumption that the
deque
buffer is filled before the object to track has entered the screen. You can either modify this behavior, or wait until the buffer is filled to avoid this error.Vyspace
Hi Adrian,
How can I change the script to make it wait until the buffer is filled?
Thanks in advance,
Vyspace
Adrian Rosebrock
What do you mean by “make it wait until the buffer is filled”? You do not want the “tail” of the tracked object to be drawn until the buffer is filled? If so, you’ll want to modify Line 94 to look like:
if counter >= 10 and i == 1 and len(pts) == args["buffer"]
Sergio
Hi you all. I have had the some issue. I fix them modifying a little the code:
I understand that counter is a flag to wait to have at least 10 points in the buffer, we check if is true and i is equal to 10 and finally chek if the point number 0 (i-10) isn’t None. Inside the loop we calculate delta between 10 points. Hope it can help you.
Thank’s a lot Adrian for your great job, without your contribution, work with RPi+PiCamera+OpenCV+Python could be impossible for me.
Gintautas
And last question is about:
# define the lower and upper boundaries of the “green”
# ball in the HSV color space
greenLower = (29, 86, 6)
greenUpper = (64, 255, 255)
If i want that i would detect not green but red. Those numbers from where ? from rgb to HSV or ?
Adrian Rosebrock
Please see my reply to Scott Routley above.
Joshua
I implemented this code exactly, but I cant run this code at faster than 2fps. CPU usage also never exceeds 35%. Using Python 3 and Opencv 3.
kihong
Thank you Adrian!
The opencv 3.0 with python 2.7 is installed as your guide.
I want to control gpio in opencv environment to control motors.
Actually, i try to project “track_moving objects” using your “object_movement.py” program.
However, command window come out error message ” no module rpi . gpio as gpio”
Despite i inserted ” import RPi.GPIO as GPIO in python-code” .
What should i do?
sorry.. I would like you understand i can’t speak English well.
Adrian Rosebrock
I haven’t written a blog post detailing the process yet (although I will in the future), but in the meantime, head to this post and search for “GPIO” in the comments. I detail how to address the issue there.
Sai Krishna
Hi Adrian,
can you please explain why you have converted the image to HSV color space? why can’t we use BGR space?
thanks for the great tutorial
Adrian Rosebrock
In some situations you can use the RGB color space for color thresholding and tracking. The problem is that RGB isn’t very representative of how humans perceive and interpret color. HSV (and L*a*b*) are much more intuitive of how we see and define color — it is also much easier to define color threshold ranges in HSV. I would suggest reading up on color space to better familiarize yourself with this idea.
Manez
Great work Adrian !
How could you identify and tracked multiple objects ?
Is it possible to compute the time for which an objet is detected ?
Adrian Rosebrock
Tracking multiple objects is substantially harder, but can be done. In this case, you need to create lower and upper boundaries of color thresholds for each object you want to detect (assuming they are different colors). You’ll also want to check the size of each contour to ensure it’s sufficiently large (to avoid noise). At that point, you’ll have multiple contours that you can use for tracking.
As for the time for which an object is detected, yes, just use the
time
Python module and you can take the timestamp of when the object enters the view of the camera and the time that it leaves the field of view.Kuken
Tracking multiple objects with same color ….is it possible???
Thanks for the tutorial adrian
Adrian Rosebrock
Yes, it is. Take a look at the other comments on this post as I’ve discussed how to do that.
Mathilda
hi Adrian,
how can I print the direction of the ball?
I thought I could easily print np.abs(dX) and np.abs(dY)
but I was wrong… Cuz it only prints 0…
Adrian Rosebrock
Take a look at Lines 98-118; specifically; how the
direction
variable is determined. This code is used to display the direction variable to the screen. You can also print it to your terminal.
Alex
Hi Adrian!
First of all thanks for all your great tutorials, it really helped me a lot for my projects. Without them, it would have been impossible for me to obtain any results in Python.
I would like to kindly ask you if there is a possibility to plot the trajectory which is made by the tracked object with respect to the time stamp ( I added this info because I need to synchronize this movement with the result given by another sensor). I tried to plot dX, dY but I only get an empty graph.
Thanks in advance!
Adrian Rosebrock
Hi Alex — you can maintain a list of
dX
anddY
over a per-frame basis. I would suggest using thedequeue
data structure to maintain this list. From there, you should be able to plot these values, but again, make sure you have multiple values inside the list, that way you can plot the trajectory over time.Aditya
Hi Adrian,
Firstly, Thankyou for all your great work. i am new to python and looking into your tutorials helps a lot.
In my project i am trying to do somewhat same using your code, like i am detecting a object(beam) and then drawing contours around it and calculating its position, but what i want to know is how much an object has moved from its position( i want to get the new coordinates of that position- how to get it?) and i see in your program that if the object has moved and if it remains there for a bit and again starts moving then you consider the intermediate state as your starting point or zeroth point rather could you tell me how to retain it in that position(like pointing out its coordinates at that point and saying its at north-east) and then calculate the new direction and coordinates if it has moved from that position rather than setting it to zero.
Thank you in advance.
Adrian Rosebrock
So if I understand your question correctly, if an object pauses along it’s trajectory for N frames, you want this position to be logged and recorded? And then all new subsequent movements tracked based on where you previously logged the object?
Aditya
Yes Andrian. And is there any way to get the coordinates at that point or all along the motion .
Adrian Rosebrock
This will take some non-trivial edits to the code. The first is to detect when the ball has “stopped”. To accomplish this, you’ll want to monitor the (x, y)-coordinates of the ball. If it stays (approximately) in the same area for N frames (where you can define N to be whatever value you want — I suggest using 32-64 consecutive frames), then you can mark the ball as “stopped”. Store the (x, y)-coordinates of this “stopped” location. And then once the ball starts moving again, derive your changes in direction based on the stored, saved location.
Again, this is a non-trivial edit to the code, so you’ll have to work at it.
ahmed
Adrian,
I tried this and it worked for me. I would like to extend this tracking to two (similar but not equal sized) contours. Is that possible, what changes would be necessary in the algorithm?
Adrian Rosebrock
Absolutely, you can certainly extend this to track multiple objects. You’ll want to change the code that finds the
max
of the contour area and instead have it return the top N largest objects in the images. You can then loop over them and prune them to find your two objects.Duncan
hey what if tou are you are using a read ball can you change 64, 255, 255 code ??
Adrian Rosebrock
You would need to manually set these parameters for your object. I would suggest using the range-detector script.
Israel
Hey Adrian thanks for the tutorial, I’m trying to use your code to do automated navigation in my robotics project, when I run your program it opens up, but as soon as I try to use a green object on to track it down, it exits saying
At first I thought it was because of the radius restriction you had, but even after changing it it doesn’t make a difference, do you have any clue as of why it’s exiting?
Adrian Rosebrock
Please see my reply to “Gintautas” above where I discuss this error and how to resolve it.
Supra
Worked perfectly using OpenCV 3.1.0 and python 3.4.2 for raspberry pi 3. Without using “import imutils”. So I used cv2.resize(frame, (800, 480)).
Thanks!
Adrian Rosebrock
Nice job Supra! 🙂 Congrats on getting the example working.
Julian
Hi Adrian,
I’m working on Windows 7, using python 2.7.10 and opencv 3.1.0
But when I try to launch the following command :
python object_movement.py –video object_tracking_example.mp4
Absolutely nothing happen :'(
Not even an error message…
Did I forget something ?
Thank you 🙂
Adrian Rosebrock
Please see my reply to “Jeffrey Batista” above — it’s likely that your version of OpenCV was not compiled with video support.
LinuxCircle
How do you deal with different lights in the room? Yellow ball may appear brown in darker room.
Adrian Rosebrock
At the most basic level, you would need to tune the color parameters on a per-room basis if you are expecting dramatic changes in lighting conditions.
Ravi
Thank you for sharing your knowledge. Does this algorithm work well for soccer ball detection and tracking? As it could be any color for different kind of soccer balls, what algorithm would you suggest? I just want to detect soccer balls in the field and not anything else.
Adrian Rosebrock
The answer, like the answer to most problems in advanced computer science is “it depends”. It depends on the quality of your camera. It depends on lighting conditions. It depends on occlusion. Tracking a soccer ball on a pitch based on color alone would be somewhat problematic due to varying lighting conditions (shadowing, clouds overhead, glare from lights). I think correlation filters would work better here or feature based approaches.
Randy
Hi Adrian.
I am 12 years old and I was doing a project related to this one. I was wondering what type of resources/ installations do I need to compile and execute this code?
By the way, this project seems really cool!!
Thanks,
Randy
Adrian Rosebrock
You don’t need a super powerful system to run this code. In fact, a simple Raspberry Pi can easily run this code. If you have a laptop or desktop from the past 5 years you shouldn’t have any issue running this example.
Arun
How to get the co-ordinates of a particular tracked object, which will be required as an input for another device?
Adrian Rosebrock
Line 72 already gives you the (x, y)-coordinates of the tracked object.
Amy
How to save the coordinates of the tracking object?
Adrian Rosebrock
I assume you mean “save” the coordinates to disk? I would use
cPickle
and write thepts
object to file:Ned Reilly
Hello Adrian,
I am searching for how to track objects with the KLT tracker. I got really confused about it. Do you have an idea about which object detection sould I use and then how can I track it?
Adrian Rosebrock
It really depends on what type of object you are trying to track. Are you tracking based on color? Shape? Texture? A combination of all?
Reza
Hi Adrian. Fantastic code. Run like a Charm.
What if to track vehicle base on shape,color, texture or Combination? could you please guide in more specific details?
Thank you very much 😉
Adrian Rosebrock
It sounds like you might be interested in correlation trackers.
Mosa
Hi Adrian, thank you for the incredible tutorial, I’m following your tutorials and doing it myself.
However, in this particular one, I’m getting this error :
” if counter >= 10 and i == 1 and pts[-10] is not None:
IndexError: deque index out of range”
what could possibly be the error in my case? thanks in advace.
Adrian Rosebrock
Take a look at the comment from “Gintautas” exactly a year ago 🙂
Mosa
Yeah it works now ! thank you so much 🙂
Apiz
Hi Adrian, from your tutorial OpenCV track object Movement. How I want to transfer the coordinates that i get from Raspberry pi camera to Pulse Width Modulation (or PWM)? Because i want send the signal using GPiO to Motor Driver MD10C to control the current. I hope u can help me.. thanks
Adrian Rosebrock
I don’t have any tutorials for operating a motor via a Python script, but you can combine OpenCV with GPIO via this tutorial.
onur
hi adrian,
thanks for greatful sharing,
i installed opencv 2.4.10 and put the code into python 2.7.9 on my raspberry pi 3b. The code works on my windows computer but it doesnt work on my rasp. I have no error i use usb webcam. When i run the module i have no video window . there is only restart on shell window.
sincerely….
Adrian Rosebrock
Are you using a Raspberry Pi camera module? Or a USB camera? If you’re using a USB camera you might have forgotten to compile OpenCV with video support. I would suggest following one of my tutorials to help you get OpenCV + Python installed and configured correctly.
onur
I am using a USB camera, while installing OpenCV i have to skip the mpeg part of the video compiler. I installed OpenCV by following your tutorial. Wıthout skipping this part i get error while ‘make’ procedure. Can it be the problem?
I have another question if you answer i will be happy. After trying the OpenCV installization my wifi scan interface do not work so i cannot find any wireless connection for internet. Unless i find the problem, i will reinstall the raspian.
Thanks…
Adrian Rosebrock
Your WiFi issue doesn’t sound OpenCV related. That could be a problem with either (1) your Raspberry Pi or (2) your network.
As for the OpenCV compile, it’s hard to know what the problem is without seeing the error message is from “make”. For what it’s worth, I offer a pre-configured Raspbian .img file as part of Practical Python and OpenCV. You should also check and make sure your USB camera is compatible with the Pi.
onur
adrian i have another question,
this code is compatible with opencv 2.7.10 and i have some error with opencv3, do you suggest opencv3 or 2.4.10. If you suggest opencv3, can you share your modified code which works with opencv3?
sincerely…
Adrian Rosebrock
Hey Onur — the only line of code that should have to change for OpenCV 3 compatibility is the
cv2.findContours
call. Here is the updated to make it work with OpenCV 3:onur
Now i have 2.4.13 openCV in my rasp. When i click run than in shell window, there are two ‘RESTART’ and no camera window opens, my camera works with the command ‘sudo fswebcam -S 20 image.jpeg’ which gives correct image. What can be problem? I cannot solve the problem please help me what can i do?
sorry for my too many questions,
sincerely…
onur
I have finally solved my problem,
We cannot use camera while using SSH. The code works fine The only problem is the effect of lighting conditions.
Thanks Adrian…
Adrian Rosebrock
If you’re trying to view the results of the camera when SSH’ing just enable X11 forwarding:
$ ssh -X user@ip_address
Roshan
why is the frame = imutils.resize(frame, width=600) giving me a nonetype error for shape
Adrian Rosebrock
For a detailed explanation of NoneType errors, please refer to this blog post.
Arvind Mohan
What should be done while tracking a pentagon or any polygon instead of the circle?
Adrian Rosebrock
I would suggest using contour approximation and contour properties, like I do in this blog post on tracking targets in drone video streams.
Westley
Hi there,
Great tutorial! However, whenever I bring the ball in front of the camera, it is tracked for about a quarter of a second and then crashes. Leaving the error:
line 95, in
if counter >= 10 and i == 1 and pts[-10] is not None:
IndexError: deque index out of range
Any idea on how to fix this?
Thanks!
Adrian Rosebrock
Please see the comment thread started by “Gintautas” above for the full solution to your error.
George
Hi Adrian, thanks for your awesome tutorial.It really helped me in doing my project.
Each time this program displays the direction sequentially even after it moves out of the frame. For eg: when we move from left to right, it displays west and when it moves out of the frame and again move object from left to right, it displays east then west(west then west is only required). But in my project, I don’t want to connect the points which was present just before moving out of the frame and the point which would appear just after the object is displayed in the frame. Can u please help?
Thanks in advance.
Adrian Rosebrock
Hey George — if you want to stop the trail of points from displaying after the object has moved out of the screen, just count the number of pixels in the mask:
cv2.countNonZero(mask)
if the value is zero then the object is not in view. Place this in anif
statement to avoid any extra drawing.George
Thanks Adrian. Is it possible to update the pts array as empty each time the object is not in view so that the buffer(array) newly updates when it moves in and out of the view?
Adrian Rosebrock
Sure. Just include some sentinel value that represents “not in view” to the
pts
list. You’ll want to modify thefor
loop logic that loops over thepts
and then ignores this sentinel value when drawing.dreamline
thank you.
if you want to see normal by mirror or flip the video:
best regards
i hope you add project for counting the objects by the webcam, like counte the moving cars in the street.
Joe
Hello Dude,
Thank you so much for this great tutorial! Dude, I was trying to test multiple balls together but I got the texts over each others, can you please tell me how to separate each text?
Thank you so much,
Best regards,
Joe
Adrian Rosebrock
What do you mean by “separate each text”? Can you please elaborate?
Louis
Hi Adrian,
Nice work, Thanks for your tutorial!
I am trying to tracking ants and analyse their directions(whether they are getting into the hole or out of it.) Now I have drew the contour of each ant. I am stucked in tracking their directions. If I want to use ‘deque’ for each ant, I need to detect each ant and find out which ‘deque’ it belongs to. Any good idea?
Thanks in advance.
Adrian Rosebrock
There are many ways to approach this problem. One way would be correlation trackers, but I think that is overkill. Simply compute the centroid of each ant and then compute the distance between centroids in subsequent frames. Minimum distances between centroids are very likely to be the same ant.
Conni
Dear Adrian,
I have just started to use the imutils tools. Thank you for your awsome tutorial. Is it possible to change the field of view of the videostream.
I tried: vs = VideoStream(usePiCamera=args[“picamera”]>0, resolution = (640, 480)).start()
However, this does seem to change the resolution but not the field of view.
Adrian Rosebrock
Hi Conni — what do you mean by the “field of view”? Are you looking for a specific area of the frame? If so you would accomplish that via image cropping with NumPy array slicing. If you’re new to OpenCV/computer vision I would suggest working through Practical Python and OpenCV to help you get started.
Rob
Hi Adrian,
Thanks for the tutorial! It’s been super helpful. Is it possible to write the video from a webcam to a saved file in a way that saves the object detection marker and trail of center points? I have been able to save a video of what my webcam sees, but I haven’t been able to do it in a way where I also record the object detection or center trails.
Thanks again for the tutorials. I’ve only been using Python for a few days now and you’ve been a huge help.
Adrian Rosebrock
Hey Rob — I would start by using this tutorial to help you write the video to file. You can then use
cPickle
to serialize thedequeue
object to file as well.spospider
is there a version of this for python 3.4 ?
Adrian Rosebrock
Change the
cv2.findContours
call to:(_, cnts, _) = cv2.findContours(mask.copy(), cv2.RETR_EXTERNAL, cv2.CHAIN_APPROX_SIMPLE)
And it will work for OpenCV 3.
spospider
i tried it with python 3 on rpi 2 model b and the terminal always tells me “select timeout” every 10 seconds and the frame window is black with dx and dy = 0
is there a way to solve this ?
spospider
cpu usage is below 7%
program doesnt quit unless it is terminated when it becomes unresponsive
Adrian Rosebrock
If your frame window is black, I think you might have an issue with your Raspberry Pi firmware. Please see this post for more information.
Josh Lovell
How would I use this to track a ball on my screen as opposed to on my webcam?
Josh Lovell
As in, a live video, not a saved one. Thanks!
Adrian Rosebrock
You would simply need to access your webcam rather than the video file. I describe the basics of accessing a webcam and video file inside Practical Python and OpenCV. This would likely be an excellent starting point for you (and help you master the fundamentals of OpenCV).
Samyak Jain
Hey Adrian, do you know of any object tracking methods/implementations which consider the problem of objects with similar appearances?
Adrian Rosebrock
Hi Samyak — I think that depends on how you define “similar appearance”. What does “similar appearance” mean in context of your problem? Are the objects too similar in terms of color such that you cannot define color thresholds to segment each of them?
Samyak Jain
Yes, by “similar appearance” I mean objects like multiple same colored balls in a video sequence. In that case, if I want to track one particular ball, without being mistaken for another ball, how would I go about doing it?
Adrian Rosebrock
In that case I would consider exactly how you are identifying the original ball in the first place. If you can identify it via color thresholding (using some heuristics to discount the others), then correlation tracking or centroid tracking is a good start. Otherwise, consider training a custom object detector that is not based on color and use that to detect your object. From there you can also apply correlation tracking and centroid tracking.
TAMG
hi adrian ,, i’ve a strange question ,, how does it work ?!! ,, i mean when i run the code it run successfully .. but nothing happens even the video doesn’t open .. what are the possibilities for this 🙁 ??
Adrian Rosebrock
It sounds like your OpenCV install wasn’t compiled with video support enabled. I would suggest using one of my tutorials to compile OpenCV with video support.
Austin Bashaw
Hi Adrian,
I am working on pedestrian tracking and detection for a class of mine. I am not very good with the coding lingo, so I apologize in advance.
Based on your tutorial using HOG Descriptors, I am able to find pedestrian extremely well. I am attempting to place a unique colored rectangle around each person and am able to do so. The problem comes in with the tracking portion. I am struggling with how to make my code realize that ‘Person A’ is still ‘Person A’ in a consecutive frame. Currently, a different colored box is drawn around the same person between consecutive frames.
Since the HOG returns ‘rects’ or points of a rectangle around person. How can I use this ‘rects’ array to track across several frames if the HOG might skip detection over a frame or two?
I would definitely have an F in my class if it weren’t for your site.
Thanks
Adrian Rosebrock
Hi Austin — I would suggest using the centroid tracking method. Compute the centroids for each bounding box and then determine the Euclidean distance between each centroid in successive frames. Bounding boxes with the smallest distance between the frames (very likely) refer to the same person/object.
Kiki
Hi Adrian,
Thanks for your awesome tutorial !
Best website to source OpenCV and computer vision ! I learned a lot from it.It will be useful to my coming graduation project.
But I’m not sure what kind of object detection and tracking methods did you use in this tutorial??
Thanks in advance
Adrian Rosebrock
Thank you Kiki, I’m happy to hear you are enjoying the PyImageSearch blog! I’d also like to wish you the best of luck on your graduation project. As far as object detection/tracking in this blog post, we used simple color thresholding to detect the ball in each frame. The (x, y)-coordinates of the ball were then monitored and stored in a list.
Fufu
Hi Adrian,
Thanks for your awesome tutorial !
Best website to source OpenCV and computer vision!It will be useful to my graduation project.
But I am not sure what kind of object detection and tracking methods did you use in this tutorial??
Tira
Hi Adrian,
Thanks for your great tutorial!
But I have a question, is this method can be used to set the object to stay in the center with the camera moving automatically follow the direction of the movement of the object?
I have assembled a pi camera with two servo motors in order to move vertically and horizontally for 180 degree.
Sorry if my english is not good. Thanks.
Adrian Rosebrock
Provided you can detect and track the object in each frame, then yes, you could theoretically use the servos to follow the object.
Suraj
Hey Adrian,
Nice tutorial by the way! Do you know any website from which I can download OpenCv, Portable Python and Numpy. Can you tell me as to how to install them?
selvam
Hi Adrian
First, thanks a ton for your contribution.
Is it possible to take a reference point for the ball in the frame and calculate the distance and angle with respective to that reference point as the ball moves.
And of course if the ball comes to the reference point, it should tell the distance is Zero cm/mm
Adrian Rosebrock
Yes, but I would suggest reading up on how to perform camera calibration first. This will give you a much better estimation to the angle and distance.
Dibakar Saha
Hi Adrian,
I am Dibakar Saha. I found your blog searching on google for “object motion tracking opencv”.
Here is my question-
In this blog post you have used HSV color space to identify a green ball. Right? What if instead of using the HSV color space we use a haar cascade to identify an object? Can we do that? Well, you see understanding HSV color space is a bit hard for me and that is why I ask this question. Moreover I have used range_picker.py and I find it highly difficult to find the right lower and upper limits of a particular color.
I am a newbie to OpenCV and I have just started to learn it. But I have a good experience in Python, C, C++ and Java.
Thanks,
Dibakar.
Adrian Rosebrock
You can certainly train your own object detector to detect ball-like objects. Haar cascades are one option, but I prefer HOG + Linear SVM. I discuss the HOG + Linear SVM object detector framework (with lots of Python code), inside the PyImageSearch Gurus course.
Varghese Mathai
bro, I made a tiny application using your tutorial and some .NET code. All OpenCV wrappers for .NET seemed to be kinda expensive. So I used sockets to communicate within localhost.
Not a big deal. The delay in recognising the direction is noticeable. . But was interesting.
Thanks
The demo can be found here:
https://www.youtube.com/watch?v=SyC9LNrI3BA
Adrian Rosebrock
Congratulations Varghese, this is AWESOME! Great work.
Chunni
Hi Adrian,
I had a query regarding the approaching of the object. How do you find if the object is approaching towards the camera?
Thank you in advance
Adrian Rosebrock
The object will appear bigger (i.e., larger radius/bounding box) the closer it gets to the camera.
Mafuyu
Hi Adrian,
Thanks for making this guide, I’ve been tweaking it on my own for my school project.
Is it possible for the script to print the last known coordinates onto the terminal? Like once I quit the script, the next line on the terminal is the last known coordinates of the ball.
I’ll be connecting the raspberry pi through putty, so I’ll need to see results on that!
Thank you
Adrian Rosebrock
Sure, just place the following code at the end of the script after you quit:
print(cX, cY)
Navaneeth Krishnan
hi adrian i am a big fan of you i want a favour from you.how to find the color range for hsv color space. i want to find the optimal color range for red is there any way to find the color range easiy
Adrian Rosebrock
The “optimal range” is going to depend highly on your environment unless you are doing some sort of color balancing. For a given environment you would want to use the “range-detector” script I mentioned in the post.
ALOK MISHRA
sir, i want to use this code to control mouse cursor movement is it possible…
Adrian Rosebrock
I’ve never tried to control the mouse via Python before. For Windows you might want to try the win32api/cytpes library. I also believe that PyAutoGUI is multi-platform but I’ve never tried either of these.
deshario
Hi Sir ! If i have two balls… 1 is red and 1 is green how to implement it ! It will be very helpful to me #Thank
Adrian Rosebrock
You define two different color thresholds, one for red and one for green. You then create a mask for each color and check the contours.
Jimmer
If i wanted to track a tennis ball bouncing at speed what would be a good approach to detect the point of impact.
I was thinking that i would try and measure the change of the slope of the ball as it is approaching the ground and after it bounces. Do you have any suggestions on how to do this?
Adrian Rosebrock
In general this can be a pretty tough problem. If you do not have a fixed, non-moving camera it could be near impossible. How are you capturing frames?
Jimmer
I will be using a fixed camera to capture the frames.
Adrian Rosebrock
It’s still pretty hard to provide concrete suggestions without first seeing some example images from your input camera so I’m more-or-less shooting in the dark here, but I would consider looking at training a custom object detector to detect the racket. You could do the same for a tennis ball but color thresholding might also be reliable enough. Once you have the bounding boxes for both you can monitor them and determine when the (x, y)-coordinates overlap/are sufficient close.
Karen
Hi Adrian,
Rather than tracking a green ball, is there a way to modify this code to track eye movement? I’m currently using haarcascades to detect eyes on a face, and I’m curious as if to whether or not I can replace the green ball with the cascades instead to track their movement?
Adrian Rosebrock
For eye movement take a look at facial landmarks. They will help you get started.
kaber
Hi Adrian,
i am running my code in ubuntu , when i put the command line, nothing happens to video , can you explain me how to run
Adrian Rosebrock
Can you elaborate on what you mean by “nothing happens”? Are you trying to use the example video file? Or are you trying to use your webcam on your Ubuntu machine?
kaber
Yes i am trying to use the example video file, and nothing happens means just it does not execute any thing and command line starts with new one.
Adrian Rosebrock
So the script automatically exits? If that’s the case it sounds like OpenCV was compiled without video I/O support. Please use one of my tutorials to install OpenCV (and make sure you don’t skip any steps). Again, this is most likely due to not having video I/O support compiled with OpenCV.
Terry
Greetings.
I have been trying to make this track multiple objects, but I fail on keeping the deque pairs “pts” on some array or something. I have managed to get multiple contours on the np.array, so I can have multiple centers and I believe that I have to do an iteration on my array to see if there is already a tuple with its x,y close to the new one, so that I append the new tuple on that position on the array and do that for all the centers I get. I fail at managing to initialize an array of tuples and iterating through them :/
Adrian Rosebrock
Hey Terry — I would suggest creating a deque for each object you want to track. You can use either a correlation tracking algorithm or centroid-based tracking to associate the deque with an object. Compute the euclidean distance between the the centroids of objects in subsequent frames. The centroids with the smallest distances are (presumably) the same object.
Daniel
Hello, Adrian!
I’m triying to track multiple objects, I’ve had follow your tutorial of the shapedetector and now I’m triying to track them.
I’m already detect multiple shapes and colours but when my script draws the line, it only connect the center of all my shapes, not the movement, so all I got is a big n vortex shape.
I have a class name Agent, it works fine when I detect the shapes and the colours (one agent = one shape of one colour), so I though to create the deque array in there, so all the agents would have their private deque, but thats not happend, can you help me in here?
Please.
Mustafa
I have done Object detection using DNN and now I have the boundary box drawn on the perticular object. Furthermore, I want that object to be tracked exactly as it is done in this post?
Adrian Rosebrock
I would suggest passing the bounding box into a dedicated object tracking algorithm. Take a look at correlation tracking.
Spencer
Hi Adrian,
In your code you write:
# resize the frame, blur it, and convert it to the HSV
# color space
frame = imutils.resize(frame, width=600)
blurred = cv2.GaussianBlur(frame, (11, 11), 0)
hsv = cv2.cvtColor(frame, cv2.COLOR_BGR2HSV)
but you do not use the “blurred” variable when setting hsv (instead the code uses “frame”). Is there a reason that you do not use “blurred” to set hsv? and if so, why is “blurred” calculated at all. Thanks!
Adrian Rosebrock
I used the
blurred
image when I was doing some debugging but forgot to remove it from the code after I was done. It can be safely ignored/removed.owais
hi adrian
dX = pts[-10][0] – pts[i][0]
dY = pts[-10][1] – pts[i][1]
Adrian could you explain this code i know here we are computing our coordinates i want to know how it’s working thanks in advance
Adrian Rosebrock
We are computing the difference in (x, y)-coordinates between the current point (index 0) and the point added 10 frames ago (index -10).
faraz
can you plz show me how to change this code to track very small ball?
Amare Mahtsentu
Hi adrian
thank you for your time
can I use this motion tracking together with deep learning object detectors like FRCNN ? how?
If you get my idea, after generating the coordinates of the bounding boxes how can I use these points to track motion of the object and follo until it is lost? thank you
Adrian Rosebrock
I would suggest you look into dedicated object tracking algorithms such as “correlation trackers”. These trackers allow you to pass in the bounding box coordinates of a detected object and then track the object in subsequent frames.
Amare Mahtsentu
Thank you
does your practitioner bundle have such kind of things (detection with deep learning plus tracking with opencv)?
Adrian Rosebrock
The Practitioner Bundle covers the fundamentals of object detection. The ImageNet Bundle covers more advanced object detection algorithms such as Faster R-CNNs and Single Shot Detectors (SSDs). I do not cover object tracking with OpenCV inside the book as the book focuses on deep learning rather than OpenCV. I’ll be doing more object detection tutorials here on the PyImageSearch blog though!
Rajnish Kumar
Hello sir.
I am Rajnish kumar, I am working on a project where i m gonna choose different options with help of eye motion but i have issues regarding eye motion .How by my pupil is detected and its midpoint .so please help me with this issue .However i have gone through all your tutorials just as object tracking,face detection,etc
Adrian Rosebrock
I don’t have any tutorials on eye tracking and pupil localization but I know a few PyImageSearch readers have had good luck with this algorithm.
Nithin
Hi Adrian,
Can you suggest any method to display the video output from an opencv python program to a webpage. Thanks in advance 🙂
Adrian Rosebrock
I don’t have any tutorials to cover that, but I will certainly try to cover it in the future! Thank you for the suggestion.
Praneeth
Hello Adrian,
My project is a pupil controlled wheelchair, i need to detect the motion of the pupil in real time and actuate the DC motors to move in the direction accordingly.
Could you please help me track the black pupil in real time.
It would be great if you could send me a source code, that can support my project.
I will be using python with open CV2 for image processing and Arduino for actuation of motors.
Thank you in advance!
Adrian Rosebrock
I don’t have any tutorials on pupil detection but I know other PyImageSearch readers have had good luck with this tutorial. I would suggest starting there.
SHREY MAHESHWARI
Hello Adrian,
How can i get the dx and dy values for two different colored objects??
Adrian Rosebrock
You would need to maintain two deque data structures, one for each of the different colored objects. This would also require you to to define two sets of color thresholds for the
cv2.inRange
function.SHREY MAHESHWARI
Could you show how do to it in the python code above? I mean how to maintain two deque data structures and what transformations should be there in the cv2.inRange function
Rakshanda
HI Adrain,
I need to track people moving and count the number of people. Can you please suggest me how can I do it?
Adrian Rosebrock
I don’t have a tutorial on people counting at the moment but I will try to do one soon.
Anand
very well appreciated if you do a tutorial on this one.I’m googling for over a week to find a good tutorial on people-counting. Also your tutorials are excellent,simple and informative for newbies like me.
Thankyou
mo1878
Hello Adrian,
Firstly I’d like to thank you for this tutorial. Secondly,I am playing around with the code right now, but I am wondering if it is possible to just output the (x,y) coordinates of the centroid? rather than the change in the x and y; (dx, dy)?
Adrian Rosebrock
What does “output” in this context mean?
diego
Hello Adrian!
Thanks for sharing your knowledge. How can I determine the movement of more than one object at the same time time?
Adrian Rosebrock
Hey Diego, take a look at my replies to the following PyImageSearch readers:
– Manez on February 26, 2016
– Alex on May 9, 2016
– ahmed on May 23, 2016
– Samyak on Jain May 1, 2017
– Terry December 14, 2017
I hope that helps point you in the right direction!
amare
hi Adrian
last time on February 6 2018 You suggest me to use correlation trackers along with object detectors like FRCNN. I tried that and it detect and track the objects well. but there is no way of telling the direction of movement. do you have any idea?
Thanks
Adrian Rosebrock
Yes, there is a way. If you know the bounding box of the object you can compute the center/centroid. Pass the centroid into a dequeue data structure, like I do in this post and you can determine object direction.
John
How can I track the velocity of the object moving
Johnny
Dear Adrian,
I am new to opencv coding. I love this tutorial, but I was wondering if it possible to add in velocity tracking to this code and convert to real world coordinates? I want to track the speed of a moving object accurately with a 1in/sec margin of error. Do you have any ideas or know of any tutorials I can refer to?
Adrian Rosebrock
If you’re new to OpenCV coding then trying to compute the velocity is a bit aggressive. I would start with learning the fundamentals first, you will need a strong foundation for this project. From there you’ll want to learn about the intrinsic/extrinsic parameters of a camera and how to properly calibrate it. A calibration is required for real-world coordinates and an accurate measurement. You can avoid this more complicated camera if you’re willing to sacrifice accuracy and will most likely be worse than a 1in margin of error, depending on your project. I do not have any tutorials on velocity tracking but I may consider it for the future. In the meantime consider working through Practical Python and OpenCV to help you learn the fundamentals. I hope at the very least that helps point you in the right direction and gives you some terms to research.
Steve
Hey adrian
i was wandering if its possible to track multiple objects?
Adrian Rosebrock
Totally. See my reply to “Manez” on February 26, 2016.
Jose
Hi !
Sorry for my stupid question but where is your haarcascade to detect the ball??
Keep with your amazing job!
Adrian Rosebrock
We aren’t using a Haar cascade here, we are using object detection and tracking via color thresholding.
John
Adrian,
I am attempting to predict the path of a the ball and draw the tale for that set of predicted points. I am storing the predicted (x,y) coordinates for each frame into a queue then I attempt to draw that tail the same way you have but the issue i am having is the tail is never cleared off the screen. Do you have any suggestions on how i could fix that?
Adrian Rosebrock
Hey John — there’s probably a logic error in your code somewhere. Are you using the same deque data structure as I am? That will ensure the older (x, y)-coordinates are removed from the queue and the newer coordinates are kept. You may also be using a simple Python list which will never delete older items.
Jay
Hi Andrian ! first thank you for this such good tutorial. Recently there have some questions bothering me , if I want to design an object tracking model , especially draw the movement of the objets why can’t I do it base on deep learning such like your recent post talking about real time detection with deep learning? Thanks for your time !
Adrian Rosebrock
Hey Jay, I’m not sure I understand the question here. You can certainly use deep learning to perform object detection. Once you have the object detected you can track it as well. Here is a good example of both in action.
Naveen
Dear Adrian,
Appreciate for your tutorial, I am new to opencv coding and really interesting this tutorial.
installed opencv and run your source code working fine.How to set object boundaries and colors, I want to track pen with green color or red. most of the times showing red lines without green color, How to track exact accurately, Please provide me any solution.
Adrian Rosebrock
You can probably get away with simple color thresholding.
kumar
Dear Adrian,
I installed opencv and run your source code working fine. started small project using with your code, Crated nine small circles(c1,c2 …c9) in white paper, How to get exact location with accurate when moving object, Please provide me solution for this.
Adrian Rosebrock
Can you clarify what you mean by “exact location”? You can compute the bounding box of the contour region of each circle by using the “cv2.boundingRect” function. Furthermore, this tutorial shows you how to compute the centroid of the contour as well. Instead of finding the largest contour via the “max” function you would just loop over them individually.
MJ
Hi. tnq for your astonishing work. I’m somehow noob in python. I;m using spyder for compiling thus code but it doesn’t grab any frame from the example video .
Adrian Rosebrock
Try executing the code from your command line/prompt rather than the Spyder IDE.
Sun
Hi Adrian,
Thank you so much for your great tutorial.
I’m working on a similar project recently, I’m provided a video shooting through a vehicle control panel, the task is to find out meters(speed, rotate speed etc..)locations on that panel and track them. All the meters are on the same panel (which is a plane surface).
I have tried feature matching and object tracking but cannot get a satisfying results in both speed and accuracy. I’m wondering do you have suggestions for this task?
Thanks again
Adrian Rosebrock
Hey Sun — I’m not entirely sure I understand the project. Do you have any images or example video?
Kevin
Hi Adrian,
Thank you for these amazing tutorials! One quick question tho, what if both dirX and dirY are empty? The if-else statement starting from line 123 does not seem to solve this case. But I guess it really doesnt matter since it has no impact for the tracking?
Adrian Rosebrock
If both are empty then you are correct, you wouldn’t be able to derive the tracking information since there are no “deltas”.
Ramiro
Hi Adrian!
First of all, thanks for the huge help on this topic. I’m now trying to get the proximity to the camera (using the ‘radius’) and the distance (both in an adequate unit, e.g: cm, mt, etc.) to the camera center (using the ‘center’). How could I do this in an efficient way?
Thanks again!
Adrian Rosebrock
See this tutorial on finding the distance from an object to the camera.
Billy
Hi Adrian,
I’m hoping to use this tutorial for a project at work. But I keep running into either NameError problems with this line:
((x, y), radius) = cv2.minEnclosingCircle(largestContour)
I get errors that x, y, and radius are not defined
NameError: name ‘x’ is not defined
Even when I try print(x) immediately after it still get that error.
The other error I sometimes get is this:
if counter >= 10 and i == 1 and pts[-10] is None:
IndexError: deque index out of range
when I print(len(pts)) I get 0
I don think I’ve missed anything in your example, but going through line by to see if there is anything I missed. There is also a chance ive installed opencv wrong it took me longer to figure that out than it did to go through your tutorial.
Do you have any pointers or suggestions?
Thanks
Adrian Rosebrock
Hey Billy — are you downloading the source code to this post or copying and pasting? Make sure you use the “Downloads” section to grab the code, it sounds there is some sort of strange logic error related to the “x” variable that is causing you problems (likely related to copying and pasting).
Billy
Thanks! I tried that now, im running source code. I’m using a virtual environment following this tutorial:
https://pyimagesearch.com/2018/08/17/install-opencv-4-on-macos/
it works with your sample video, but when I try to use the webcam I break once I bring the ball into view, and I get this error:
if counter >= 10 and i == 1 and pts[-10] is not None:
IndexError: deque index out of range
it only happens, once I bring the green ball into view
Adrian Rosebrock
See this comment thread for proposed solutions.
kishore k
Hi Adrian
how to print the dx an dy values in ubuntu terminal
if i printed means it shows like error
error:inconsistent use of tabs and spaces in indentation
how to solve this error??
Adrian Rosebrock
Make sure you’re using tabs instead of spaces when indenting your code. Your IDE, if you’re using one, should also have an option to convert spaces to tabs or vice versa.
Jose
Hello, I’m new and trying my hand at coding, specifically about computer vision as I find myself drawn to it. I was just wondering if it was also possible to create an absolute coordinate system with this method IE, having the first point where the camera sees the object as the reference point (0,0) and moving according to that and maybe even a 3-D coordinate system relative to the camera. Maybe you could also point me to some other references that might be useful? Thank you!
Adrian Rosebrock
I don’t have any tutorials on that exact topic but you would want to look into camera calibration, the intrinsic/extrinsic parameters of a camera, epipolar geometry, and mapping to real-world coordinates. The OpenCV documentation has a few examples on those topics.
Jose
Thank you for the reply and I was also wondering if there was any way to lock the frame rate for the entire process?
Adrian Rosebrock
Lock the frame rate of the camera? You may be able to do that, depending on your camera, but keep in mind that your frames will be processed as soon as they are received. If you lock your frame rate at N seconds but takes M seconds to process the frame, where M is larger than N, it more-or-less defeats the purpose. You need to be careful there.
Jose
So I was able to more or less set the frame rate that I wanted without much problem but now I have an issue where the program doesn’t detect my ELP USB camera. Works fine using the built-in windows webcam on my laptop, but fails to load completely on the USB camera regardless on whether or not I use imutils videostream or opencv videocapture. Would you have any idea on how I would be able to go about this? Thanks!
Adrian Rosebrock
That’s definitely an issue with OpenCV being unable to access your webcam. Can you reach out to your ELP camera supplier? They may have some suggestions there.
L
Hi Adrian,
Thank you for the making and sharing of this tutorial. As a total newcomer to OpenCV, I echo others when I say that your work has been immensely helpful. My question is can this code track very small objects, such as 3 mm in size? If so, would that just mean an adjustment in line 86 for the minimum value of pixels that form the object’s radius? Or would that need to reflect in other parts of this code as well? Much thanks again-
Adrian Rosebrock
Whether or not you can track an object that is 3mm in size depends on your camera, the lens, and how far the camera is from the object.
Sharmila Shree
How to get the coordinates of the position of the ball ?
Adrian Rosebrock
Line 83 gives you the coordinates of the ball.
Adrian Rosebrock
You mean something like this?
Rishi
Hey Adrian thanks for this fantastic tutorial!
I am actually using this process in my project work for detection of tomatoes,
Can you please suggest me something as to detect red color using a USB camera on raspberry pi model 3B.
Thanks in advance!
Donald
Hi Adrian,
Will this code continue to detect an object even when it comes to a complete stop for some time? (I scanned the comments and apologize if this comment is still redundant) I am trying to use this code to detect an object that is not always moving, or may stand still at times. Unless I’m mistaken as soon as the object stops moving the code stops running. I tried to account for this by modifying lines 113 and 118 by greatly decreasing the threshold but the video keeps cutting out at the same place each time and without any error messages.
Could this have something to do with the video file itself? As a supreme novice, I appreciate your time and any help with this
Adrian Rosebrock
This code will still work even if the object stops moving.
If you are new to the world of computer vision and image processing I would definitely recommend reading Practical Python and OpenCV first. That book will get you up to speed quickly and better prepare you for the tutorials I cover here on PyImageSearch. Definitely give it a look.
Merlin
Hi Adrian,
Is there a way to print/save the list of x and y coordinates if one is using PyCharm? I saw that you have suggested using cPickle.. Would that also work for the PyCharm environment? Thanks
Adrian Rosebrock
PyCharm is just an IDE, it won’t impact how files are saved via the Python script. I would suggest you look into basic file I/O to get you started.
Mehul
Hey, Great work, i was facing an issue with the direction part, both dx and dy are displayed 0 and no direction comes up either any idea what could be the reason?
Gabriel
I’m doing a game with the opencv, where i identify an object through the green color in a quadrant and it triggers a light through the arduino. My question is how can i get a x and y absolut coordenate in reference to the center o the image being this point o,o so that it recognizes that object in a especific quadrant
Adithya Raj
If I want find track multiple objects in the frame, could you please tell what kind of changes I should make in the code.
Adrian Rosebrock
See this tutorial to help you get started.
Mechcraze
Hello Adrian,
Thnks for excellent tutorial!!
My objective was to track a circular object filled red.
I tried the same using your code, the program is able to detect colour & contour
However, most cases it not able to compute the center.
I tried retaking and uploading several videos in different angles.
But in most cases it is showing the below error.
cx = int(M[‘m10’]/M[‘m00’])
ZeroDivisionError: float division by zero
Any suggestion for computation?.
Also, how to fix the range of RGB values for a given video. The values you used for green works in certain cases, but remaining cases it doesn’t work.
I’m aware that spectrum of RGB values are possible based on the brightness, how to determine the range if my intention is to track an object of a specific color?
Adrian Rosebrock
Add a very small episolon value to prevent division by zero errors or simply check to see if the m[’00’] value is zero, and if so, ignore the object.
Mechcraze
Thank you for the suggestion
I added an if statement so that the code skips the points at which m[’00’] value is zero. As a result even a single frame isn’t getting read.
I tried taking videos of several spherical and circular objects, but the result is same.
Any suggestions?
Also how did you arrive at this particular range of RGB?
Shubham Kothawade
Hello Adrian,
Thanks for the tutorial!
can you please explain how can we detect the speed of the ball ?
Adrian Rosebrock
That question is covered inside Raspberry Pi for Computer Vision.
Lutz
Adrian,
what method would you recommend for detecting ellipsoids in an image? I can’t do it based on color since our chickens all lay different color eggs.
Iskandar Shah
Hello Sir, i would like to ask regarding your opinion on the limitation of the object tracking and why do you think so?
Adrian Rosebrock
I would suggest you refer to my object tracking guides and read through them. I discuss limitations of each algorithm inside the guide.
Robbi
Hi there!
Do you have a method to output a list of the x, y coordinates in, say, an excel file to keep track of the changing values for analysis?
Thanks!
Adrian Rosebrock
I would suggest you look into CSV files and basic file I/O using Python.
Ali
Hi Adrian,
Thank you for your codes. Actually, I have a specific system and I am going to use your code to track an object. But I have some problems:
I have a video about moving a worm in a container including water. I want to track the worm and save the positions (x, y) of the worm into a text file. The video is gray and the worm is a bit darker. Please guide me how can I do this?
Thank you.
Rahul
Hi adrian sir,
Your example is pretty good but i need to track a person with track line and dX and dY direction can you please help with this please
Jon
Hello and thank you for your content!
Question:
How would one approach image matching with real time object tracking? Meaning, if I had a picture of you holding a ball as a based picture. Then I want to utilize the live camera to track your movements, and when your position is exactly the same as the base picture, the function returns. If this possible? If so, may I ask that you point me towards the right resources?
Silvana
Hello Adrian,
thank you so much for your tutorials! they are really, really helpful.
I was wondering if there is a way to output just the first point where the camera sees the object? basically just the starting position of the ball. I tried printing the first item on the pts list, but the coordinates keep on changing.
thank you sooo much once again.
Adrian Rosebrock
I would suggest you check the length of the “pts” list. If it’s zero then you know no points have been added yet, in which case you can print the coordinates.
santosh vuppala
Hello Adrian, thank you for writing this article in such detail. Really like the way you walk through the code.
If this had to applied to a fast moving ball in a sports broadcast video do you have any references that will help this. I am working on a project to track and detect a fast moving ball in a sports video and derive analytics based on that.
Adrian Rosebrock
Sorry, I don’t have any examples of fast moving/high frame rate object tracking. When it comes to those types of applications you need to have both:
1. Processing power
2. But more importantly, a camera capable of extremely high frame rates
The higher quality the input image/frame, the easier it will be to track fast moving objects (and ideally you won’t have as much motion blur with a high frame rate camera).
Kristian Bodolai
Hello Adrian!
First of all, I want to thank you for your work, it’s really inspiring.
I’m a physicist currently trying to use this to track movement of an object in a plane. For the analysis I would need to set some kind of scale, so the information of pixels would be in meters. Setting an origin of coordinates would also be quite helpful. Do you know any way to do that in live video?