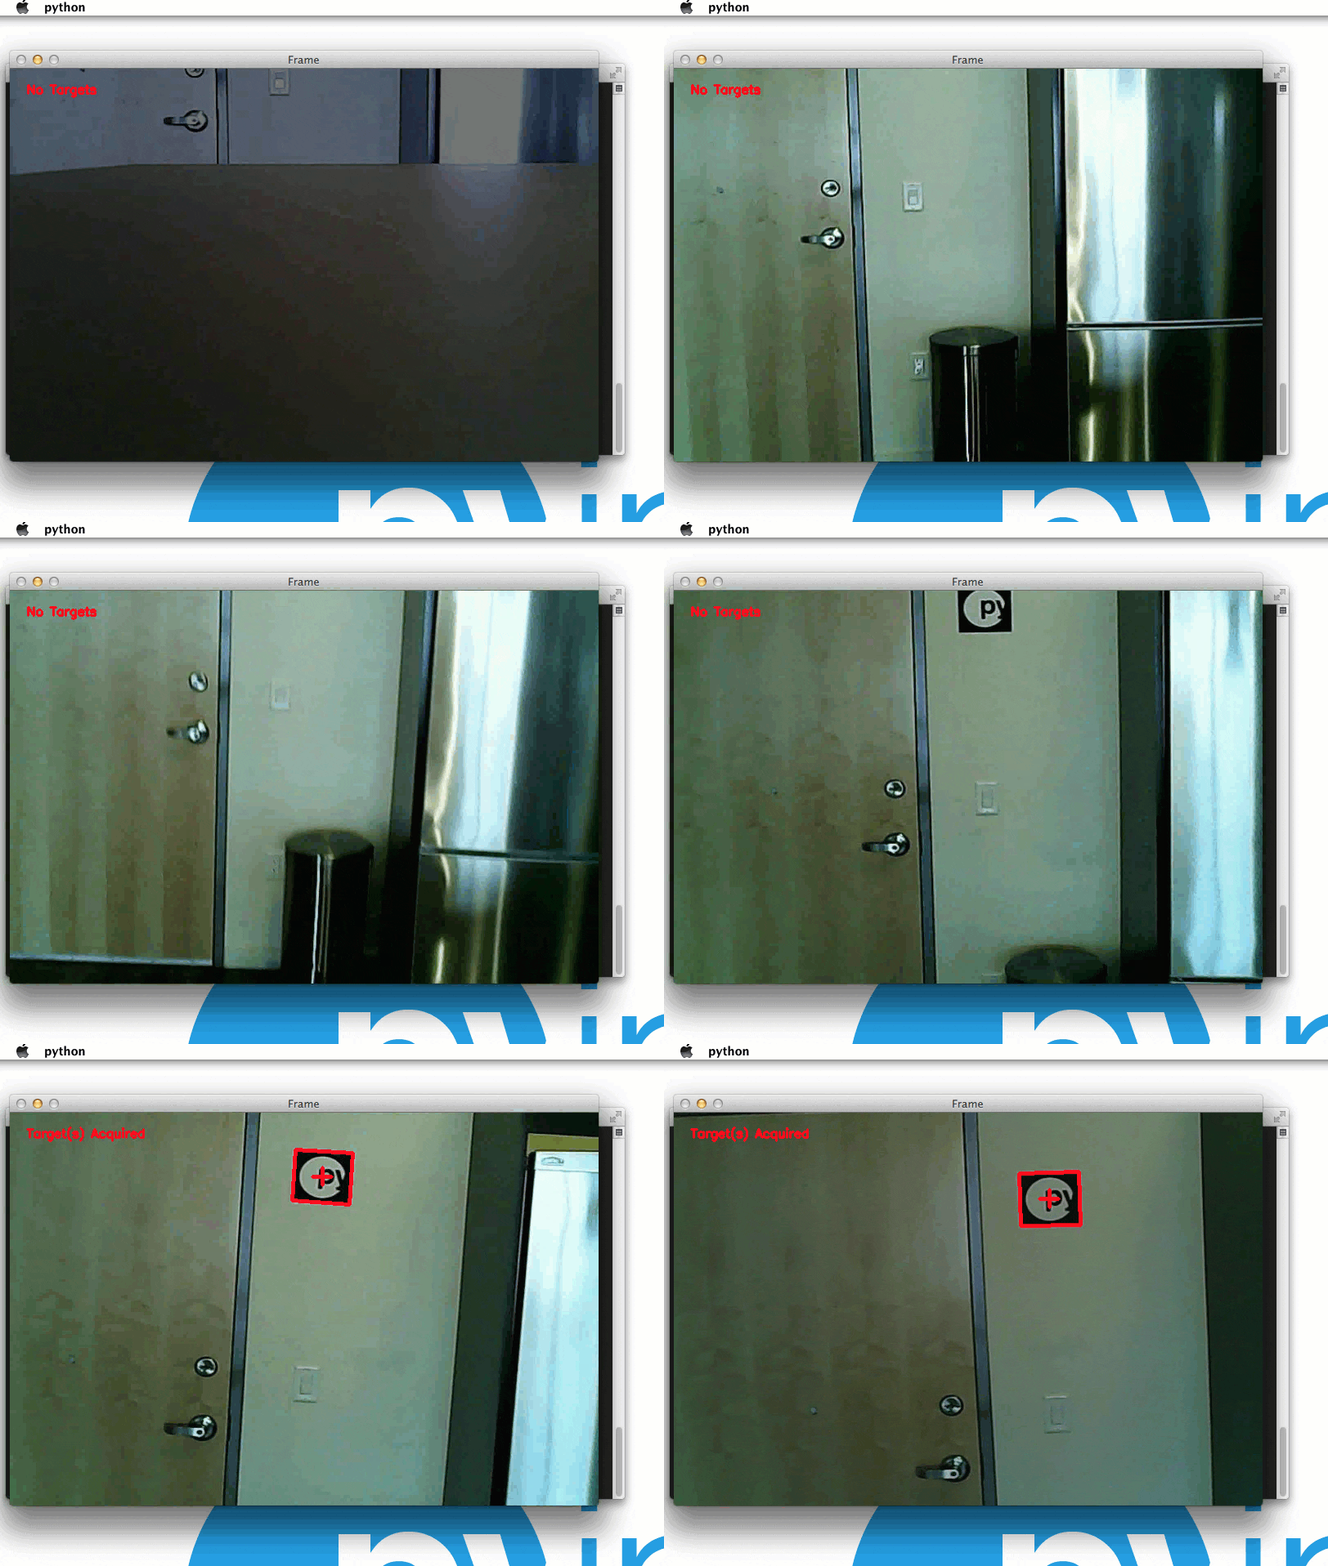
I’m going to start this post by clueing you in on a piece of personal history that very few people know about me: as a kid in early high school, I used to spend nearly every single Saturday at the local RC (Remote Control) track about 25 miles from my house.
You see, I used to race 1/10th scale (electric) RC cars on an amateur level. Being able to spend time racing every Saturday was definitely one of my favorite (if not the favorite) experience of my childhood.
I used to race the (now antiquated) TC3 from Team Associated. From stock engines, to 19-turns, to modified (I was down to using a 9-turn by the time I stopped racing), I had it all. I even competed in a few big-time amateur level races on the east coast of the United States and placed well.
But as I got older, and as racing became more expensive, I started spending less time at the track and more time programming. In the end, this was probably one of the smartest decisions that I’ve ever made, even though I loved racing so much — it seems quite unlikely that I could have made a career out of racing RC cars, but I certainly have made a career out of programming and entrepreneurship.
So perhaps it comes as no surprise, now that I’m 26 years old, that I felt the urge to get back into RC. But instead of cars, I wanted to do something that I had never done before — drones and quadcopters.
Which leads us to the purpose of this post: developing a system to automatically detect targets from a quadcopter video recording.
If you want to see the target acquisition in action, I won’t keep you waiting. Here is the full video:
Otherwise, keep reading to see how target detection in quadcopter and drone video streams is done using Python and OpenCV!
Getting into drones and quadcopters
While I have a ton of experience racing RC cars, I’ve never flown anything in my life. Given this, I decided to go with a nice entry level drone so I could learn the ropes of piloting without causing too much damage to my quadcopter or my back account. Based on the excellent recommendation from Marek Kraft, I ended up purchasing the Hubsan X4:
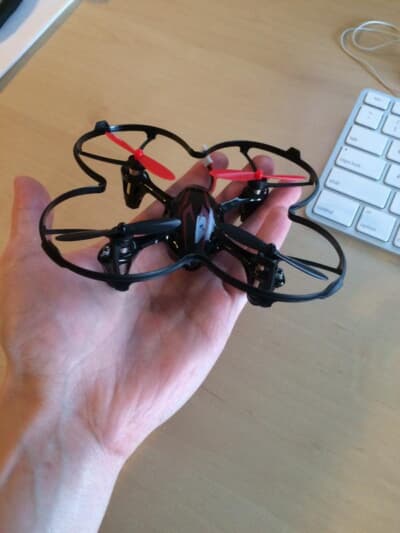
I went with this quadcopter for 4: reasons:
- The Hubsan X4 is excellent for first time pilots who are just learning to fly.
- It’s very tiny — you can fly it indoors and around your living room until you get used to the controls.
- It comes with a camera that records video footage to a micro-SD card. As a computer vision researcher and developer, having a built in camera was critical in making my decision. Granted, the camera is only 0.3MP, but that was good enough for me to get started. Hubsan also has another model that sports a 2MP camera, but it’s over double the price. Furthermore, you could always mount a smaller, higher resolution camera to the undercarriage of the X4, so I couldn’t justify the extra price as a novice pilot.
- Not only is the Hubsan X4 inexpensive (only $45), but so are the replacement parts! When you’re just learning to fly, you’ll be going through a lot of rotor blades. And for a pack of 10 replacement rotor blades you’re only looking at a handful of dollars.
Finding targets in drone and quadcopter video streams using Python and OpenCV
But of course, I am a computer vision developer and researcher…so after I learned how to fly my quadcopter without crashing it into my apartment walls repeatedly, I decided I wanted to have some fun and apply my computer vision expertise. The rest of this blog post will detail how to find and detect targets in quadcopter video streams using Python and OpenCV.
The first thing I did was create the “targets” that I wanted to detect. These targets were simply the PyImageSearch logo. I printed a handful of them out, cut them out as squares, and pasted them to my apartment cabinets and walls:

The end goal will be to detect these targets in the video recorded by my Hubsan X4:
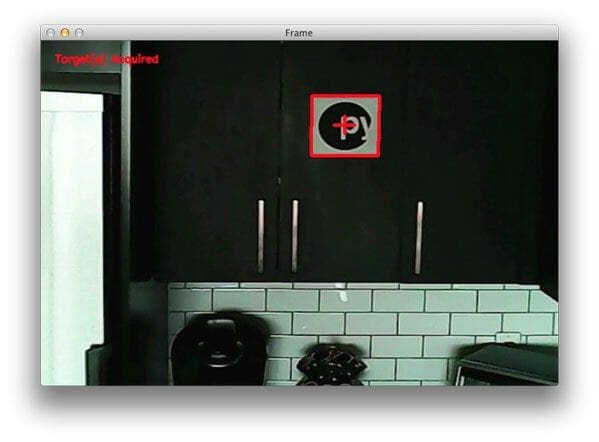
So, you might be wondering why I chose my targets to be squares?
Well, if you’re a regular follower of the PyImageSearch blog, you may know that I’m a big fan of using contour properties to detect objects in images.
IMPORTANT: A clever use of contour properties can save you from training complicated machine learning models.
Why make a problem more challenging than it needs to be?
And when you think about it, detecting squares in images isn’t too terribly challenging of a task when you consider the geometry of a square.
Let’s think about the properties of a square for a second:
- Property #1: A square has four vertices.
- Property #2: A square will have (approximately) equal width and height. Therefore, the aspect ratio, or more simply, the ratio of the width to the height of the square will be approximately 1.
Leveraging these two properties (along with two other contour properties; the convex hull and solidity), we’ll be able to detect our targets in an image.
Anyway, enough talk. Let’s get to work. Open up a file, name it drone.py , and insert the following code:
# import the necessary packages
import argparse
import imutils
import cv2

# construct the argument parse and parse the arguments
ap = argparse.ArgumentParser()
ap.add_argument("-v", "--video", help="path to the video file")
args = vars(ap.parse_args())

# load the video
camera = cv2.VideoCapture(args["video"])

# keep looping
while True:
	# grab the current frame and initialize the status text
	(grabbed, frame) = camera.read()
	status = "No Targets"

	# check to see if we have reached the end of the
	# video
	if not grabbed:
		break

	# convert the frame to grayscale, blur it, and detect edges
	gray = cv2.cvtColor(frame, cv2.COLOR_BGR2GRAY)
	blurred = cv2.GaussianBlur(gray, (7, 7), 0)
	edged = cv2.Canny(blurred, 50, 150)

	# find contours in the edge map
	cnts = cv2.findContours(edged.copy(), cv2.RETR_EXTERNAL,
		cv2.CHAIN_APPROX_SIMPLE)
	cnts = imutils.grab_contours(cnts)
We start off by importing our necessary packages, argparse to parse command line arguments and cv2 for our OpenCV bindings.
We then parse our command line arguments on Lines 7-9. We’ll need only a single switch here, --video , which is the path to the video file our quadcopter recorded while in flight. In an ideal situation we could stream the video from the quadcopter directly to our Python script, but the Hubsan X4 does not have that capability. Instead, we’ll just have to post-process the video, but if you were to stream the video, the same principles would apply.
Line 12 opens our video file for reading and Line 15 starts a loop, where the goal is to loop over each frame of the input video.
We grab the next frame of the video from the buffer on Line 17 by making a call to camera.read() . This function returns a tuple of 2 values. The first, grabbed , is a boolean indicating whether or not the frame was successfully read. If the frame was not successfully read or if we have reached the end of the video file, we break from the loop on Lines 22 and 23.
The second value returned from camera.read() is the frame itself — this frame is a NumPy array of size N x M pixels which we’ll be processing and attempting to find targets in.
We’ll also initialize a status string on Line 18 which indicates whether or not a target was found in the current frame.
The first few pre-processing steps are handled on Lines 26-28. We’ll start by converting the frame from RGB to grayscale since we are not interested in the color of the image, just the intensity. We’ll then blur the grayscale frame to remove high frequency noise, allowing us to focus on the actual structural components of the frame. And we’ll finally perform edge detection to reveal the outlines of the objects in the image.
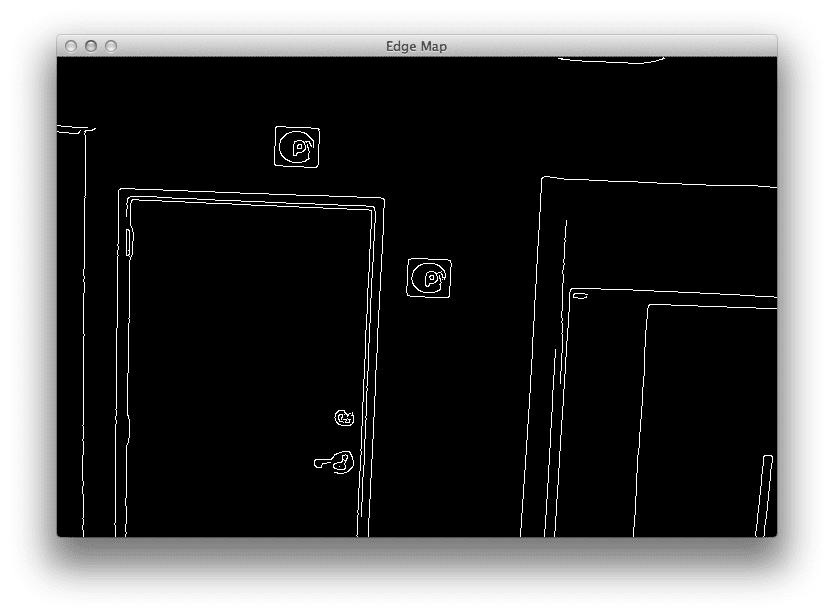
These outlines of the “objects” could correspond to the outlines of a door, a cabinet, the refrigerator, or the target itself. To distinguish between these outlines, we’ll need to leverage contour properties.
But first, we’ll need to find the contours of these objects from the edge map. To do this, we’ll make a call to cv2.findContours on Lines 31 and 32 + handle OpenCV version compatibility on Line 33. This function gives us a list of contoured regions in the edge mapped image.
Now that we have the contours, let’s see how we can leverage them to find the actual targets in an image:
	# loop over the contours
	for c in cnts:
		# approximate the contour
		peri = cv2.arcLength(c, True)
		approx = cv2.approxPolyDP(c, 0.01 * peri, True)

		# ensure that the approximated contour is "roughly" rectangular
		if len(approx) >= 4 and len(approx) <= 6:
			# compute the bounding box of the approximated contour and
			# use the bounding box to compute the aspect ratio
			(x, y, w, h) = cv2.boundingRect(approx)
			aspectRatio = w / float(h)

			# compute the solidity of the original contour
			area = cv2.contourArea(c)
			hullArea = cv2.contourArea(cv2.convexHull(c))
			solidity = area / float(hullArea)

			# compute whether or not the width and height, solidity, and
			# aspect ratio of the contour falls within appropriate bounds
			keepDims = w > 25 and h > 25
			keepSolidity = solidity > 0.9
			keepAspectRatio = aspectRatio >= 0.8 and aspectRatio <= 1.2

			# ensure that the contour passes all our tests
			if keepDims and keepSolidity and keepAspectRatio:
				# draw an outline around the target and update the status
				# text
				cv2.drawContours(frame, [approx], -1, (0, 0, 255), 4)
				status = "Target(s) Acquired"

				# compute the center of the contour region and draw the
				# crosshairs
				M = cv2.moments(approx)
				(cX, cY) = (int(M["m10"] // M["m00"]), int(M["m01"] // M["m00"]))
				(startX, endX) = (int(cX - (w * 0.15)), int(cX + (w * 0.15)))
				(startY, endY) = (int(cY - (h * 0.15)), int(cY + (h * 0.15)))
				cv2.line(frame, (startX, cY), (endX, cY), (0, 0, 255), 3)
				cv2.line(frame, (cX, startY), (cX, endY), (0, 0, 255), 3)
The snippet of code above is where the real bulk of the target detection happens.
We’ll start by looping over each of the contours on Line 36.
And then for each of these contours, we’ll apply contour approximation. As the name suggests, contour approximation, is an algorithm for reducing the number of points in a curve with a reduced set of points — thus, an approximation. This algorithm is commonly known as the Ramer-Douglas-Peucker algorithm, or simply the split-and-merge algorithm.
The general assumption of this algorithm is that a curve can be approximated by a series of short line segments. And we can thus approximate a given number of these line segments to reduce the number of points it takes to construct a curve.
Performing contour approximation is an excellent way to detect square and rectangular objects in an image. We’ve used in in building a kick-ass mobile document scanner. We’ve used it to find the Game Boy screen in an image. And we’ve even used it on a higher level to actually filter shapes from an image.
We’ll apply the same principles here. If our approximated contour has between 4 and 6 points (Line 42), then we’ll consider the object to be rectangular and a candidate for further processing.
Note: Ideally, an approximated contour should have exactly 4 vertices, but in the real-world this is not always the case due to sub-par image quality or noise introduced via motion blur, such as flying a quadcopter around a room.
Next up, we’ll grab the bounding box of the contour on Line 45 and use it to compute the aspect ratio of the box (Line 46). The aspect ratio is defined as the ratio of the width of the bounding box to the height of the bounding box:
aspect ratio = width / height
We’ll also compute two more contour properties on Lines 49-51. The first is the simple area of the bounding box, or the number of non-zero pixels inside the bounding box region divided by the total number of pixels in the bounding box region.
We’ll also compute the area of the convex hull, and finally use the area of the original bounding box and the area of the convex hull to compute the solidity:
solidity = original area / convex hull area
Since this is meant to be a super practical, hands-on post, I’m not going to go into the details of the convex hull. But if contour properties really interest you, I have over 50+ pages worth of tutorials on the contour properties inside the PyImageSearch Gurus course — if that sounds interesting to you, I would definitely reserve your spot in line for when the doors to the course open.
Anyway, now that we have our contour properties, we can use them to determine if we have found our target in the frame:
- Line 55: Our target should have a
widthandheightof at least 25 pixels. This ensures that small, random artifacts are filtered from our frame. - Line 56: The target should have a
solidityvalue greater than 0.9. - Line 57: Finally, the contour region should have an
aspectRatiothat is is between 0.8 <= aspect ratio <= 1.2, which will indicate that the region is approximately square.
Provided that all these tests pass on Line 60, we have found our target!
Lines 63 and 64 draw the bounding box region of the approximated contour and update the status text.
Then, Lines 68-73 compute the center of the bounding box and use the center (x, y)-coordinates to draw crosshairs on the target.
Let’s go ahead and finish up this script:
	# draw the status text on the frame
	cv2.putText(frame, status, (20, 30), cv2.FONT_HERSHEY_SIMPLEX, 0.5,
		(0, 0, 255), 2)

	# show the frame and record if a key is pressed
	cv2.imshow("Frame", frame)
	key = cv2.waitKey(1) & 0xFF

	# if the 'q' key is pressed, stop the loop
	if key == ord("q"):
		break

# cleanup the camera and close any open windows
camera.release()
cv2.destroyAllWindows()
Lines 76 and 77 then draw the status text on the top-left corner of our frame, while Lines 80-85 handle if the q key is pressed, and if so, we break from the loop.
Finally, Lines 88 and 89 perform cleanup, release the pointer to the video file, and close all open windows.
Target detection results
Even though that was less than 100 lines of code, including comments, that was a decent amount of work. Let’s see our target detection in action.
Open up a terminal, navigate to where the source code resides, and issue the following command:
$ python drone.py --video FlightDemo.mp4
And if all goes well, you’ll see output similar to the following:
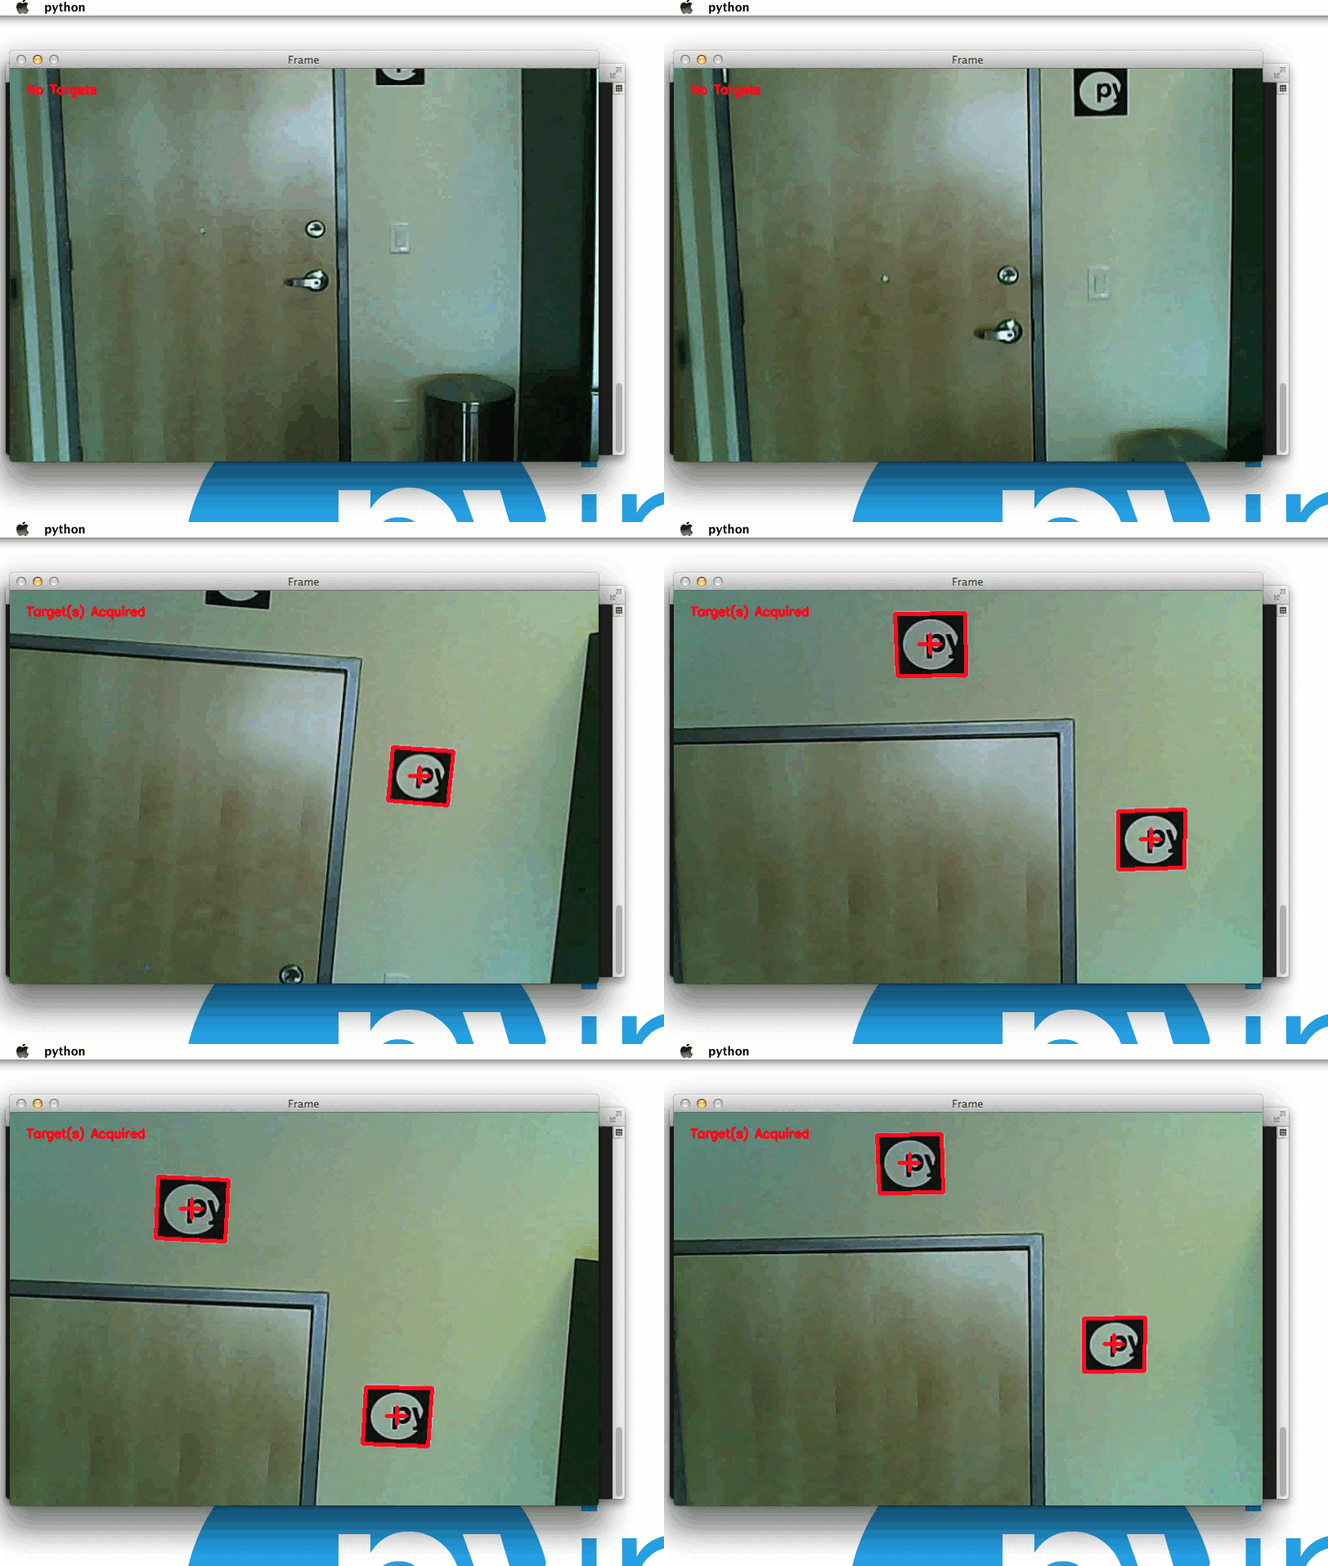
As you can see, our Python script has been able to successfully detect the targets!
Here’s another still image from a separate video of the PyImageSearch targets being detected:
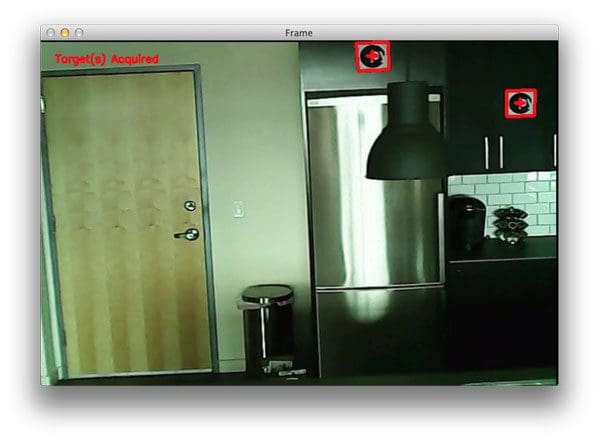
So as you can see, a our little target detection script has worked quite well!
For the full demo video of our quadcopter detecting targets in our video stream, be sure to watch the YouTube video at the top of this post.
Further work
If you watched the YouTube video at the top of this post, you may have noticed that sometimes the crosshairs and bounding box regions of the detected target tend to “flicker”. This is because many (basic) computer vision and image processing functions are very sensitive to noise, especially noise introduced due to motion — a blurred square can easily start to look like an arbitrary polygon, and thus our target detection tests can fail.
To combat this, we could use some more advanced computer vision techniques. For one, we could use adaptive correlation filters, which I’ll be covering in a future blog post.
What's next? We recommend PyImageSearch University.
86+ total classes • 115+ hours hours of on-demand code walkthrough videos • Last updated: February 2026
★★★★★ 4.84 (128 Ratings) • 16,000+ Students Enrolled
I strongly believe that if you had the right teacher you could master computer vision and deep learning.
Do you think learning computer vision and deep learning has to be time-consuming, overwhelming, and complicated? Or has to involve complex mathematics and equations? Or requires a degree in computer science?
That’s not the case.
All you need to master computer vision and deep learning is for someone to explain things to you in simple, intuitive terms. And that’s exactly what I do. My mission is to change education and how complex Artificial Intelligence topics are taught.
If you're serious about learning computer vision, your next stop should be PyImageSearch University, the most comprehensive computer vision, deep learning, and OpenCV course online today. Here you’ll learn how to successfully and confidently apply computer vision to your work, research, and projects. Join me in computer vision mastery.
Inside PyImageSearch University you'll find:
- ✓ 86+ courses on essential computer vision, deep learning, and OpenCV topics
- ✓ 86 Certificates of Completion
- ✓ 115+ hours hours of on-demand video
- ✓ Brand new courses released regularly, ensuring you can keep up with state-of-the-art techniques
- ✓ Pre-configured Jupyter Notebooks in Google Colab
- ✓ Run all code examples in your web browser — works on Windows, macOS, and Linux (no dev environment configuration required!)
- ✓ Access to centralized code repos for all 540+ tutorials on PyImageSearch
- ✓ Easy one-click downloads for code, datasets, pre-trained models, etc.
- ✓ Access on mobile, laptop, desktop, etc.
Summary
This article detailed how to use simple contour properties to find targets in drone and quadcopter video streams using Python and OpenCV.
The video streams were captured using my Hubsan X4, which is an excellent starter quadcopter that comes with a built-in camera. While the Hubsan X4 does not directly stream the video back to your system for processing, it does record the video feed to a micro-SD card so that you can post-process the video later.
However, if you had a quadcopter that included video stream properties, you could absolutely apply the same techniques proposed in this article.
Anyway, I hope you enjoyed this post! And please consider sharing it on your Twitter, Facebook, or other social media!

Download the Source Code and FREE 17-page Resource Guide
Enter your email address below to get a .zip of the code and a FREE 17-page Resource Guide on Computer Vision, OpenCV, and Deep Learning. Inside you'll find my hand-picked tutorials, books, courses, and libraries to help you master CV and DL!
