In this tutorial, you will learn to install TensorFlow 2.0 on your Ubuntu system either with or without a GPU.
There are a number of important updates in TensorFlow 2.0, including eager execution, automatic differentiation, and better multi-GPU/distributed training support, but the most important update is that Keras is now the official high-level deep learning API for TensorFlow.
In short — you should be using the Keras implementation inside TensorFlow 2.0 (i.e., tf.keras ) when training your own deep neural networks. The official Keras package will still receive bug fixes, but all new features and implementations will be inside tf.keras .
Both Francois Chollet (the creator of Keras) as well as the TensorFlow developers and maintainers recommend you use tf.keras moving forward.
Furthermore, if you own a copy of my book, Deep Learning for Computer Vision with Python, you should use this guide to install TensorFlow 2.0 on your Ubuntu system.
Inside this tutorial, you’ll learn how to install TensorFlow 2.0 on Ubuntu.
Alternatively, click here for my macOS + TensorFlow 2.0 installation instructions.
To learn how to install TensorFlow 2.0 on Ubuntu, just keep reading.
How to install TensorFlow 2.0 on Ubuntu
In the first part of this tutorial we’ll discuss the pre-configured deep learning development environments that are a part of my book, Deep Learning for Computer Vision with Python.
From there, you’ll learn why you should use TensorFlow 2.0, including the Keras implementation inside of TensorFlow 2.0.
We’ll then configure and install TensorFlow 2.0 on our Ubuntu system.
Let’s begin.
Pre-configured deep learning environments
When it comes to working with deep learning and Python I highly recommend that you use a Unix-based environment.
Deep learning tools can be more easily configured and installed on Linux, allowing you to develop and run neural networks quickly.
Of course, configuring your own deep learning + Python + Linux development environment can be quite the tedious task, especially if you are new to Linux, a beginner at working the command line/terminal, or a novice when compiling and installing packages by hand.
In order to help you jump start your deep learning + Python education, I have created two pre-configured environments:
- Pre-configured VirtualBox Ubuntu Virtual Machine (VM) with all necessary deep learning libraries you need to be successful (including Keras, TensorFlow, scikit-learn, scikit-image, OpenCV, and others) pre-configured and pre-installed.
- Pre-configured Deep Learning Amazon Machine Image (AMI) which runs on Amazon Web Service’s (AWS) Elastic Compute (EC2) infrastructure. This environment is free for anyone on the internet to use regardless of whether you are a DL4CV customer of mine or not (cloud/GPU fees apply). Deep learning libraries are pre-installed including both those listed in #1 in addition to TFOD API, Mask R-CNN, RetinaNet, and mxnet.
I strongly urge you to consider using my pre-configured environments if you are working through my books. Using a pre-configured environment is not cheating — they simply allow you to focus on learning rather than the job of a system administrator.
If you are more familiar with Microsoft Azure’s infrastructure, be sure to check out their Data Science Virtual Machine (DSVM), including my review of the environment. The Azure team maintains a great environment for you and I cannot speak highly enough about the support they provided while I ensured that all of my deep learning chapters ran successfully on their system.
That said, pre-configured environments are not for everyone.
In the remainder of this tutorial, we will serve as the “deep learning systems administrators” installing TensorFlow 2.0 on our bare metal Ubuntu machine.
Why TensorFlow 2.0 and where is Keras?
It seems like every day that there is a war on Twitter about the best deep learning framework. The problem is that these discussions are counterproductive to everyone’s time.
What we should be talking about is your new model architecture and how you’ve applied it to solve a problem.
That said, I use Keras as my daily deep learning library and as the primary teaching tool on this blog.
If you can pick up Keras, you’ll be perfectly comfortable in TensorFlow, PyTorch, mxnet, or any other similar framework. They are all just different ratcheting wrenches in your toolbox that can accomplish the same goal.
Francois Chollet (chief maintainer/developer of Keras), committed his first version of Keras to his GitHub on March 27th, 2015. Since then, the software has undergone many changes and iterations.
Earlier in 2019, the tf.keras submodule was introduced into TensorFlow v1.10.0.
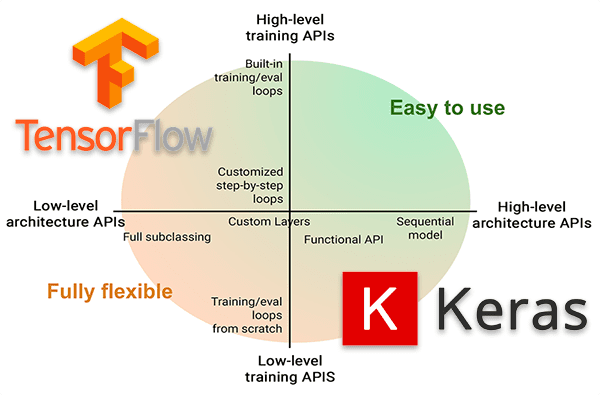
Now with TensorFlow 2.0, Keras is the official high-level API of TensorFlow.
The keras package will only receive bug fixes from here forward. If you want to use Keras now, you need to use TensorFlow 2.0.
To learn more about the marriage of Keras and TensorFlow, be sure to read my previous article.
TensorFlow 2.0 has a bunch of new features, including:
- The integration of Keras into TensorFlow via
tf.keras - Sessions and eager execution
- Automatic differentiation
- Model and layer subclassing
- Better multi-GPU/distributed training support
- TensorFlow Lite for mobile/embedded devices
- TensorFlow Extended for deploying production models
Long story short — if you would like to use Keras for deep learning, then you need to install TensorFlow 2.0 going forward.
Configuring your TensorFlow 2.0 + Ubuntu deep learning system
The following instructions for installing TensorFlow 2.0 on your machine assume:
- You have administrative access to your system
- You can open a terminal and or you have an active SSH connection to the target machine
- You know how to operate the command line.
Let’s get started!
Step #1: Install Ubuntu + TensorFlow 2.0 deep learning dependencies
This step is for both GPU users and non-GPU users.
Our Ubuntu install instructions assume you are working with Ubuntu 18.04 LTS. These instructions are tested on 18.04.3.
We’ll begin by opening a terminal and updating our system:
$ sudo apt-get update
$ sudo apt-get upgrade
From there we’ll install compiler tools:
$ sudo apt-get install build-essential cmake unzip pkg-config
$ sudo apt-get install gcc-6 g++-6
And then we’ll install screen, a tool used for multiple terminals in the same window — I often use it for remote SSH connections:
$ sudo apt-get install screen
From there we’ll install X windows libraries and OpenGL libraries:
$ sudo apt-get install libxmu-dev libxi-dev libglu1-mesa libglu1-mesa-dev
Along with image and video I/O libraries:
$ sudo apt-get install libjpeg-dev libpng-dev libtiff-dev
$ sudo apt-get install libavcodec-dev libavformat-dev libswscale-dev libv4l-dev
$ sudo apt-get install libxvidcore-dev libx264-dev
Next, we’ll install optimization libraries:
$ sudo apt-get install libopenblas-dev libatlas-base-dev liblapack-dev gfortran
And HDF5 for working with large datasets:
$ sudo apt-get install libhdf5-serial-dev
We also need our Python 3 development libraries including TK and GTK GUI support:
$ sudo apt-get install python3-dev python3-tk python-imaging-tk
$ sudo apt-get install libgtk-3-dev
If you have a GPU, continue to Step #2.
Otherwise, if you do not have a GPU, skip to Step #3.
Step #2 (GPU-only): Install NVIDIA drivers, CUDA, and cuDNN

This step is only for GPU users.
In this step, we will install NVIDIA GPU drivers, CUDA, and cuDNN for TensorFlow 2.0 on Ubuntu.
We need to add an apt-get repository so that we can install NVIDIA GPU drivers. This can be accomplished in your terminal:
$ sudo add-apt-repository ppa:graphics-drivers/ppa
$ sudo apt-get update
Go ahead and install your NVIDIA graphics driver:
$ sudo apt-get install nvidia-driver-418
And then issue the reboot command and wait for your system to restart:
$ sudo reboot now
Once you are back at your terminal/SSH connection, run the nvidia-smi command to query your GPU and check its status:
$ nvidia-smi
Fri Nov 22 03:14:45 2019
+-----------------------------------------------------------------------------+
| NVIDIA-SMI 430.50       Driver Version: 430.50       CUDA Version: 10.1     |
|-------------------------------+----------------------+----------------------+
| GPU  Name        Persistence-M| Bus-Id        Disp.A | Volatile Uncorr. ECC |
| Fan  Temp  Perf  Pwr:Usage/Cap|         Memory-Usage | GPU-Util  Compute M. |
|===============================+======================+======================|
|   0  Tesla V100-SXM2...  Off  | 00000000:00:1E.0 Off |                    0 |
| N/A   41C    P0    39W / 300W |      0MiB / 16160MiB |      0%      Default |
+-------------------------------+----------------------+----------------------+
+-----------------------------------------------------------------------------+
| Processes:                                                       GPU Memory |
|  GPU       PID   Type   Process name                             Usage      |
|=============================================================================|
|  No running processes found                                                 |
+-----------------------------------------------------------------------------+
The nvidia-smi command output is useful to see the health and usage of your GPU.
Let’s go ahead and download CUDA 10.0. I’m recommending CUDA 10.0 from this point forward as it is now very reliable and mature.
The following commands will both download and install CUDA 10.0 right from your terminal
$ cd ~
$ mkdir installers
$ cd installers/
$ wget https://developer.nvidia.com/compute/cuda/10.0/Prod/local_installers/cuda_10.0.130_410.48_linux
$ mv cuda_10.0.130_410.48_linux cuda_10.0.130_410.48_linux.run
$ chmod +x cuda_10.0.130_410.48_linux.run
$ sudo ./cuda_10.0.130_410.48_linux.run --override
Note: As you follow these commands take note of the line-wrapping due to long URLs/filenames.
You will be prompted to accept the End User License Agreement (EULA). During the process, you may encounter the following error:
Please make sure that
PATH includes /usr/local/cuda-10.0/bin
LD_LIBRARY_PATH includes /usr/local/cuda-10.0/lib64, or, add /usr/local/cuda-10.0/lib64 to /etc/ld.so.conf and run ldconfig as root
To uninstall the CUDA Toolkit, run the uninstall script in /usr/local/cuda-10.0/bin
Please see CUDA_Installation_Guide_Linux.pdf in /usr/local/cuda-10.0/doc/pdf for detailed information on setting up CUDA.
*WARNING: Incomplete installation! This installation did not install the CUDA Driver. A driver of version at least 384.00 is required for CUDA 10.0 functionality to work.
To install the driver using this installer, run the following command, replacing  with the name of this run file:
sudo .run -silent -driver

Logfile is /tmp/cuda_install_25774.log
You may safely ignore this error message.
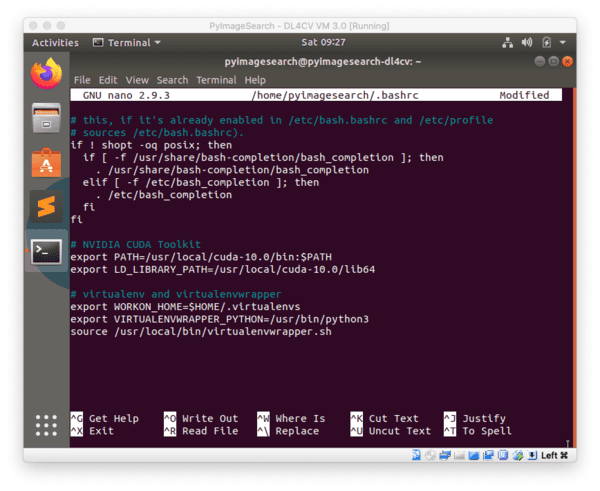
Now let’s update our bash profile using nano (you can use vim or emacs if you are more comfortable with them):
$ nano ~/.bashrc
Insert the following lines at the bottom of the profile:
# NVIDIA CUDA Toolkit
export PATH=/usr/local/cuda-10.0/bin:$PATH
export LD_LIBRARY_PATH=/usr/local/cuda-10.0/lib64
Save the file (ctrl + x , y , enter ) and exit to your terminal.
Then, source the profile:
$ source ~/.bashrc
From here we’ll query CUDA to ensure that it is successfully installed:
$ nvcc -V
nvcc: NVIDIA (R) Cuda compiler driver
Copyright (c) 2005-2018 NVIDIA Corporation
Built on Sat_Aug_25_21:08:01_CDT_2018
Cuda compilation tools, release 10.0, V10.0.130
If your output shows that CUDA is built, then you’re now ready to install cuDNN — the CUDA compatible deep neural net library.
Go ahead and download cuDNN v7.6.4 for CUDA 10.0 from the following link:
https://developer.nvidia.com/rdp/cudnn-archive
Make sure you select:
- Download cuDNN v7.6.4 (September 27, 2019), for CUDA 10.0
- cuDNN Library for Linux
- And then allow the .zip file to download (you may need to create an account on NVIDIA’s website to download the cuDNN files)
You then may need to SCP (secure copy) it from your home machine to your remote deep learning box:
$ scp ~/Downloads/cudnn-10.0-linux-x64-v7.6.4.24.tgz \
    username@your_ip_address:~/installers
Back on your GPU development system, let’s install cuDNN:
$ cd ~/installers
$ tar -zxf cudnn-10.0-linux-x64-v7.6.4.38.tgz
$ cd cuda
$ sudo cp -P lib64/* /usr/local/cuda/lib64/
$ sudo cp -P include/* /usr/local/cuda/include/
$ cd ~
At this point, we have installed:
- NVIDIA GPU v418 drivers
- CUDA 10.0
- cuDNN 7.6.4 for CUDA 10.0
The hard part is certainly behind us now — GPU installations can be challenging. Great job setting up your GPU!
Continue on to Step #3.
Step #3: Install pip and virtual environments
This step is for both GPU users and non-GPU users.
In this step, we will set up pip and Python virtual environments.
We will use the de-facto Python package manager, pip.
Note: While you are welcome to opt for Anaconda (or alternatives), I’ve still found pip to be more ubiquitous in the community. Feel free to use Anaconda if you so wish, just understand that I cannot provide support for it.
Let’s download and install pip:
$ wget https://bootstrap.pypa.io/get-pip.py
$ sudo python3 get-pip.py
To complement pip, I recommend using both virtualenv and virtualenvwrapper to manage virtual environments.
Virtual environments are a best practice when it comes to Python development. They allow you to test different versions of Python libraries in sequestered development and production environments. I use them daily and you should too for all Python development.
In other words, do not install TensorFlow 2.0 and associated Python packages directly to your system environment. It will only cause problems later.
Let’s install my preferred virtual environment tools now:
$ pip3 install virtualenv virtualenvwrapper
Note: Your system may require that you use the sudo command to install the above virtual environment tools. This will only be required once — from here forward, do not use sudo .
From here, we need to update our bash profile to accommodate virtualenvwrapper . Open up the ~/.bashrc file with Nano or another text editor:
$ nano ~/.bashrc
And insert the following lines at the end of the file:
# virtualenv and virtualenvwrapper
export WORKON_HOME=$HOME/.local/bin/.virtualenvs
export VIRTUALENVWRAPPER_PYTHON=/usr/bin/python3
export VIRTUALENVWRAPPER_VIRTUALENV=$HOME/.local/bin/virtualenv
source $HOME/.local/bin/virtualenvwrapper.sh
Save the file (ctrl + x , y , enter ) and exit to your terminal.
Go ahead and source/load the changes into your profile:
$ source ~/.bashrc
Output will be displayed in your terminal indicating that virtualenvwrapper is installed. If you encounter errors here, you need to address them before moving on. Usually, errors at this point are due to typos in your ~/.bashrc file.
Now we’re ready to create your Python 3 deep learning virtual environment named dl4cv:
$ mkvirtualenv dl4cv -p python3
You can create similar virtual environments with different names (and packages therein) as needed. On my personal system, I have many virtual environments. For developing and testing software for my book, Deep Learning for Computer Vision with Python, I like to name (or precede the name of) the environment with dl4cv . That said, feel free to use the nomenclature that makes the most sense to you.
Great job setting up virtual environments on your system!
Step #3: Install TensorFlow 2.0 into your dl4cv virtual environment
This step is for both GPU users and non-GPU users.
In this step, we’ll install TensorFlow 2.0 with pip.
Ensure that you are still in your dl4cv virtual environment (typically the virtual environment name precedes your bash prompt). If not, no worries. Simply activate the environment with the following command:
$ workon dl4cv
A prerequisite of TensorFlow 2.0 is NumPy for numerical processing. Go ahead and install NumPy and TensorFlow 2.0 using pip:
$ pip install numpy
$ pip install tensorflow==2.0.0 # or tensorflow-gpu==2.0.0
To install TensorFlow 2.0 for a GPU be sure to replace tensorflow with tensorflow-gpu.
You should NOT have both installed — use either tensorflow for a CPU install or tensorflow-gpu for a GPU install, not both!
Great job installing TensorFlow 2.0!
Step #4: Install TensorFlow 2.0 associated packages into your dl4cv virtual environment
This step is for both GPU users and non-GPU users.
In this step, we will install additional packages needed for common deep learning development with TensorFlow 2.0.
Ensure that you are still in your dl4cv virtual environment (typically the virtual environment name precedes your bash prompt). If not, no worries. Simply activate the environment with the following command:
$ workon dl4cv
We begin by installing standard image processing libraries including OpenCV:
$ pip install opencv-contrib-python
$ pip install scikit-image
$ pip install pillow
$ pip install imutils
These image processing libraries will allow us to perform image I/O, various preprocessing techniques, as well as graphical display.
From there, let’s install machine learning libraries and support libraries, the most notable two being scikit-learn and matplotlib:
$ pip install scikit-learn
$ pip install matplotlib
$ pip install progressbar2
$ pip install beautifulsoup4
$ pip install pandas
Scikit-learn is an especially important library when it comes to machine learning. We will use a number of features from this library including classification reports, label encoders, and machine learning models.
Great job installing associated image processing and machine learning libraries.
Step #5: Test your TensorFlow 2.0 install
This step is for both GPU users and non-GPU users.
As a quick sanity test, we’ll test our TensorFlow 2.0 install.
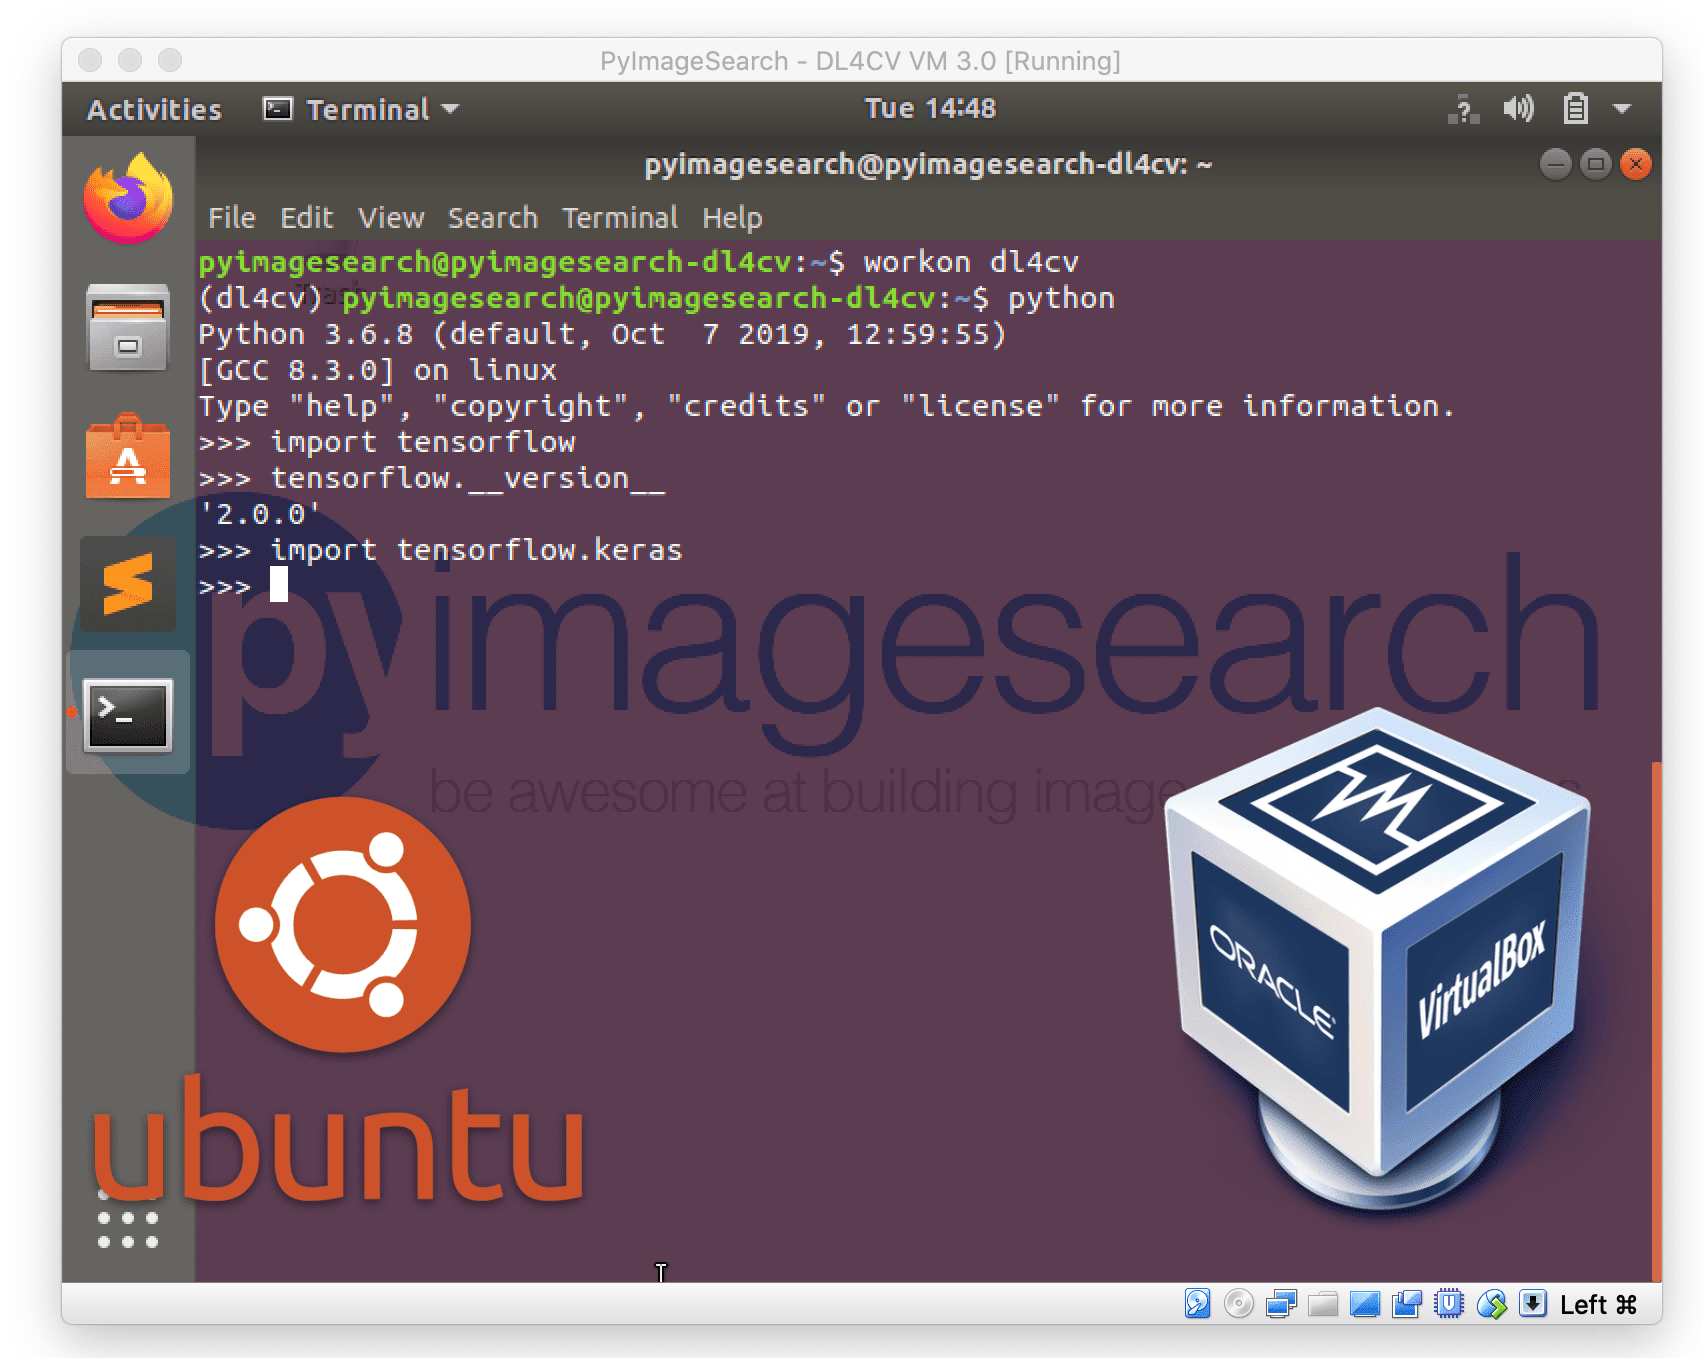
Fire up a Python shell in your dl4cv environment and ensure that you can import the following packages:
$ workon dl4cv
$ python
>>> import tensorflow as tf
>>> tf.__version__
2.0.0
>>> import tensorflow.keras
>>> import cv2
>>> cv2.__version__
4.1.2
If you configured your system with an NVIDIA GPU, be sure to check if TensorFlow 2.0’s installation is able to take advantage of your GPU:
$ workon dl4cv
$ python
>>> import tensorflow as tf
>>> tf.test.is_gpu_available()
True
Great job testing your TensorFlow 2.0 installation on Ubuntu.
Accessing your TensorFlow 2.0 virtual environment
At this point, your TensorFlow 2.0 dl4cv environment is ready to go. Whenever you would like to execute TensorFlow 2.0 code (such as from my deep learning book), be sure to use the workon command:
$ workon dl4cv
Your bash prompt will be preceded with (dl4cv) indicating that you are “inside” the TensorFlow 2.0 virtual environment.
If you need to get back to your system-level environment, you can deactivate the current virtual environment:
$ deactivate
Frequently Asked Questions (FAQ)
Q: These instructions seem really complicated. Do you have a pre-configured environment?
A: Yes, the instructions can be daunting. I recommend brushing up on your Linux command line skills prior to following these instructions. I do offer two pre-configured environments for my book:
- Pre-configured Deep Learning Virtual Machine: My VirtualBox VM is included with your purchase of my deep learning book. Just download the VirtualBox and import the VM into VirtualBox. From there, boot it up and you’ll be running example code in a matter of minutes.
- Pre-configured Amazon Machine Image (EC2 AMI): Free for everyone on the internet. You can use this environment with no strings attached even if you don’t own my deep learning book (AWS charges apply, of course). Again, compute resources on AWS are not free — you will need to pay for cloud/GPU fees but not the AMI itself. Arguably, working on a deep learning rig in the cloud is cheaper and less time-consuming than keeping a deep learning box on-site. Free hardware upgrades, no system admin headaches, no calls to hardware vendors about warranty policies, no power bills, pay only for what you use. This is the best option if you have a few one-off projects and don’t want to drain your bank account with hardware expenses.
Q: Why didn’t we install Keras?
A: Keras is officially part of TensorFlow as of TensorFlow v1.10.0. By installing TensorFlow 2.0 the Keras API is inherently installed.
Keras has been deeply embedded into TensorFlow and tf.keras is the primary high-level API in TensorFlow 2.0. The legacy functions that come with TensorFlow play nicely with tf.keras now.
In order to understand the difference between Keras and tf.keras in a more detailed manner, check out my recent blog post.
You may now import Keras using the following statement in your Python programs:
$ workon dl4cv
$ python
>>> import tensorflow.keras
>>>
Q: Which version of Ubuntu should I use?
A: Ubuntu 18.04.3 is “Long Term Support” (LTS) and is perfectly appropriate. There are plenty of legacy systems using Ubuntu 16.04 as well, but if you are building a new system, I would recommend Ubuntu 18.04.3 at this point. Currently, I do not advise using Ubuntu 19.04, as usually when a new Ubuntu OS is released, there are Aptitude package conflicts.
Q: I’m really stuck. Something is not working. Can you help me?
A: I really love helping readers and I would love to help you configure your deep learning development environment.
That said, I receive 100+ emails and blog post comments per day — I simply don’t have the time to get to them all
Customers of mine receive support priority over non-customers due to the number of requests myself and my team receive. Please consider becoming a customer by browsing my library of books and courses.
My personal recommend is that you to grab a copy of Deep Learning for Computer Vision with Python — that book includes access to my pre-configured deep learning development environments that have TensorFlow, Keras, OpenCV, etc. pre-installed. You’ll be up and running in a matter of minutes.
What's next? We recommend PyImageSearch University.

86+ total classes • 115+ hours hours of on-demand code walkthrough videos • Last updated: June 2026
★★★★★ 4.84 (128 Ratings) • 16,000+ Students Enrolled
I strongly believe that if you had the right teacher you could master computer vision and deep learning.
Do you think learning computer vision and deep learning has to be time-consuming, overwhelming, and complicated? Or has to involve complex mathematics and equations? Or requires a degree in computer science?
That’s not the case.
All you need to master computer vision and deep learning is for someone to explain things to you in simple, intuitive terms. And that’s exactly what I do. My mission is to change education and how complex Artificial Intelligence topics are taught.
If you're serious about learning computer vision, your next stop should be PyImageSearch University, the most comprehensive computer vision, deep learning, and OpenCV course online today. Here you’ll learn how to successfully and confidently apply computer vision to your work, research, and projects. Join me in computer vision mastery.
Inside PyImageSearch University you'll find:
- ✓ 86+ courses on essential computer vision, deep learning, and OpenCV topics
- ✓ 86 Certificates of Completion
- ✓ 115+ hours hours of on-demand video
- ✓ Brand new courses released regularly, ensuring you can keep up with state-of-the-art techniques
- ✓ Pre-configured Jupyter Notebooks in Google Colab
- ✓ Run all code examples in your web browser — works on Windows, macOS, and Linux (no dev environment configuration required!)
- ✓ Access to centralized code repos for all 540+ tutorials on PyImageSearch
- ✓ Easy one-click downloads for code, datasets, pre-trained models, etc.
- ✓ Access on mobile, laptop, desktop, etc.
Summary
In this tutorial, you learned how to install TensorFlow 2.0 on Ubuntu (either with or without GPU support).
Now that your TensorFlow 2.0 + Ubuntu deep learning rig is configured, I would suggest picking up a copy of Deep Learning for Computer Vision with Python. You’ll be getting a great education and you’ll learn how to successfully apply Deep Learning to your own projects.
To be notified when future tutorials are published here on PyImageSearch, just enter your email address in the form below!

Join the PyImageSearch Newsletter and Grab My FREE 17-page Resource Guide PDF
Enter your email address below to join the PyImageSearch Newsletter and download my FREE 17-page Resource Guide PDF on Computer Vision, OpenCV, and Deep Learning.

