Table of Contents
- Make a Chrome Extension to Digest Webpages with Manifest V3 and Groq API
- Meet the Project
- Configuring Your Development Environment
- Project Structure
- The Chrome Extension Mental Model
- Walking Through manifest.json
- Understanding popup.html
- Understanding styles.css
- Reading README.md the Right Way
- Walking Through popup.js
- How the Extension Reads the Current Webpage
- How the Groq Streaming Call Works
- How Conversation State Is Managed
- How the Summarize Workflow Works
- How the Clear Button Resets the Interface
- End-to-End Flow, From Click to Answer
- Practical Engineering Takeaways
- Where You Could Take This Project Next
- Summary
Make a Chrome Extension to Digest Webpages with Manifest V3 and Groq API
In this lesson, you will learn how to build a Chrome extension that can read the current webpage, send that content to a large language model (LLM), and stream the answer back into a popup interface.
To learn how to build a Chrome extension that summarizes webpages with Manifest V3 and the Groq API, just keep reading.

This is exactly the kind of project we want for a first lesson. The codebase is small enough to understand in one sitting, but practical enough to expose the moving parts that actually matter in a real browser-based artificial intelligence (AI) tool:
- Manifest V3 configuration
- Extension permissions
- Popup user interface (UI) structure
- Persistent storage with
chrome.storage.local - Reading live page content with
chrome.scripting.executeScript - Calling the Groq API with
fetch - Streaming tokens back into the interface
- Managing conversation history across turns
By the end of this lesson, you will understand what each file does, how the pieces fit together, and why this design works so well for a first Chrome LLM extension.
Meet the Project
Our project is called Page Intelligence. When the user clicks the extension icon, Chrome opens a popup. From that popup, the user can:
- Save a Groq application programming interface (API) key
- Summarize the current webpage
- Ask follow-up questions about that page
- Clear the current conversation and start over
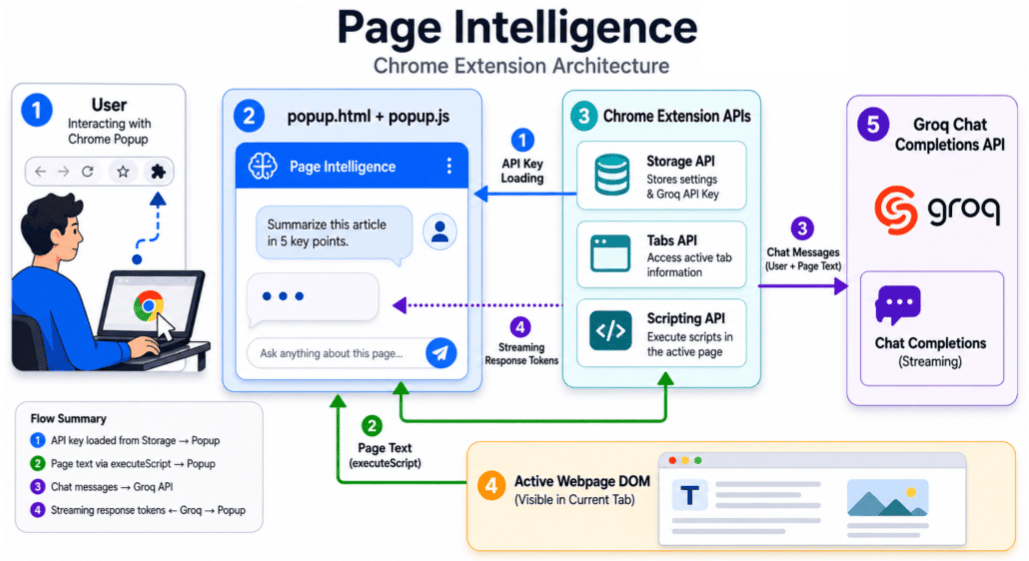
At first glance, that workflow feels straightforward. Under the hood, though, it touches three separate environments:
- The popup UI, rendered by Chrome as an extension page
- The active tab, which contains the webpage we want to read
- The Groq API, which generates the response
That separation is the key architectural idea in this lesson. The popup cannot directly read the page Document Object Model (DOM) just because both are open in the same browser window. Instead, it has to ask Chrome for permission and inject code into the active tab at the right moment.
Would you like immediate access to 3,457 images curated and labeled with hand gestures to train, explore, and experiment with … for free? Head over to Roboflow and get a free account to grab these hand gesture images.
Configuring Your Development Environment
To follow this lesson, you only need Google Chrome, a Groq API key, and the project files for the extension. Since this is a lightweight Chrome extension project, there are no Python packages or JavaScript dependencies to install.
Then follow these steps:
- Download or open the project folder.
- Get a Groq API key.
- Open
chrome://extensions. - Enable Developer mode.
- Click Load unpacked and select the project folder.
Need Help Configuring Your Development Environment?

All that said, are you:
- Short on time?
- Learning on your employer’s administratively locked system?
- Wanting to skip the hassle of fighting with the command line, package managers, and virtual environments?
- Ready to run the code immediately on your Windows, macOS, or Linux system?
Then join PyImageSearch University today!
Gain access to Jupyter Notebooks for this tutorial and other PyImageSearch guides pre-configured to run on Google Colab’s ecosystem right in your web browser! No installation required.
And best of all, these Jupyter Notebooks will run on Windows, macOS, and Linux!
Project Structure
We first need to review our project directory structure.
Start by accessing this tutorial’s “Downloads” section to retrieve the source code.
From there, take a look at the directory structure:
chrome-llm-extension/
├── manifest.json
├── popup.html
├── popup.js
├── styles.css
└── README.md
The minimal layout is intentional. It keeps the lesson focused. There is no framework, no extra build system, and no separate content script file to chase through. All of the user-facing logic lives in the popup, and the extension reaches into the current page only when it needs to read content.
What Each File Is Responsible For
manifest.json
- Declares that this is a Manifest V3 extension
- Requests the permissions needed to read the active tab, inject a script, and store the API key
- Registers
popup.htmlas the default popup
popup.html
- Defines the structure of the popup interface
- Creates the API key panel, chat area, quick action buttons, and message box
styles.css
- Controls layout, spacing, colors, bubble styles, and the overall feel of the popup
popup.js
- Contains the extension’s runtime logic
- Loads and stores the API key
- Reads page content from the active tab
- Calls the Groq API
- Streams the response token by token
- Maintains
chatHistory
Why This Structure Works Well for a Lesson
For a first Chrome extension project, fewer files usually mean faster understanding. Instead of bouncing between a popup, a background worker, and multiple content scripts, you get to follow one direct path:
- Chrome opens the popup.
- The popup loads saved state.
- The popup requests page text when needed.
- The popup sends a streaming LLM request.
- The popup updates the UI in real time.
For a teaching project, that is a great tradeoff. We stay practical without burying the learner in scaffolding.
The Chrome Extension Mental Model
Before we go any further, let us make the execution model crystal clear.
A popup is not the webpage
When you click a Chrome extension icon, Chrome opens a small Hypertext Markup Language (HTML) page that belongs to the extension. That page has its own DOM, JavaScript context, and permissions.
This means:
popup.jscan manipulate elements inpopup.htmlpopup.jscannot directly accessdocument.bodyfrom the currently open website- To read the website, the extension must ask Chrome to run code inside the active tab
This is exactly why chrome.scripting.executeScript matters in this project.
Storage Belongs to the Extension, Not the Site
There is a second separation we need to keep in mind, and that is storage.
If you used localStorage inside a normal webpage, that data would belong to that page’s origin. Here, we want the API key to belong to the extension itself, regardless of which site the user is visiting.
For that reason, the code uses:
chrome.storage.local
This storage area is managed by Chrome and shared across extension contexts.
Network Requests Must Be Explicitly Allowed
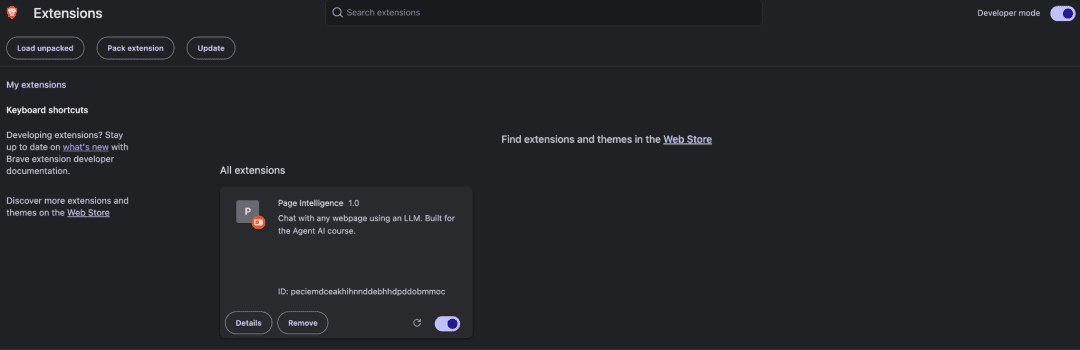
Extensions are permission-driven. If you want to send requests to the Groq API, you declare that in manifest.json using host_permissions.
This is one of the core Chrome extension design principles:
- UI and code live inside the extension
- Privileges are declared in the manifest
- Cross-context access is granted only through the proper APIs
Walking Through manifest.json
Open manifest.json, and you will find the contract between your extension and Chrome.
Here is the full file:
{
  "manifest_version": 3,
  "name": "Page Intelligence",
  "version": "1.0",
  "description": "Chat with any webpage using an LLM. Built for the Agent AI course.",
  "permissions": ["activeTab", "scripting", "storage"],
  "host_permissions": ["https://api.groq.com/*"],
  "action": {
    "default_popup": "popup.html",
    "default_title": "Page Intelligence"
  }
}
manifest_version: 3
Chrome expects modern extensions to use Manifest V3. That affects how extensions are structured, how scripts are injected, and how background logic is handled.
In this project, Manifest V3 gives us a clean, current, production-relevant starting point.
Why These Permissions Matter
activeTab
This permission allows the extension to interact with the tab the user is currently using. In a tool like this, that is essential because the extension must read the active page when the user clicks Summarize Page.
scripting
This permission unlocks chrome.scripting.executeScript, which is the modern Manifest V3 (MV3) way to inject code into a page.
storage
This permission lets the extension persist the Groq API key using chrome.storage.local.
Why host_permissions Matters
The extension calls https://api.groq.com/openai/v1/chat/completions.
Without the proper host permission, that request would be blocked. This line gives the extension permission to communicate with the Groq API host.
Why action.default_popup Matters
Here we define the entry point for the user experience. This tells Chrome, “when the extension icon is clicked, open popup.html.”
One line is all it takes to wire the entire interface into the browser.
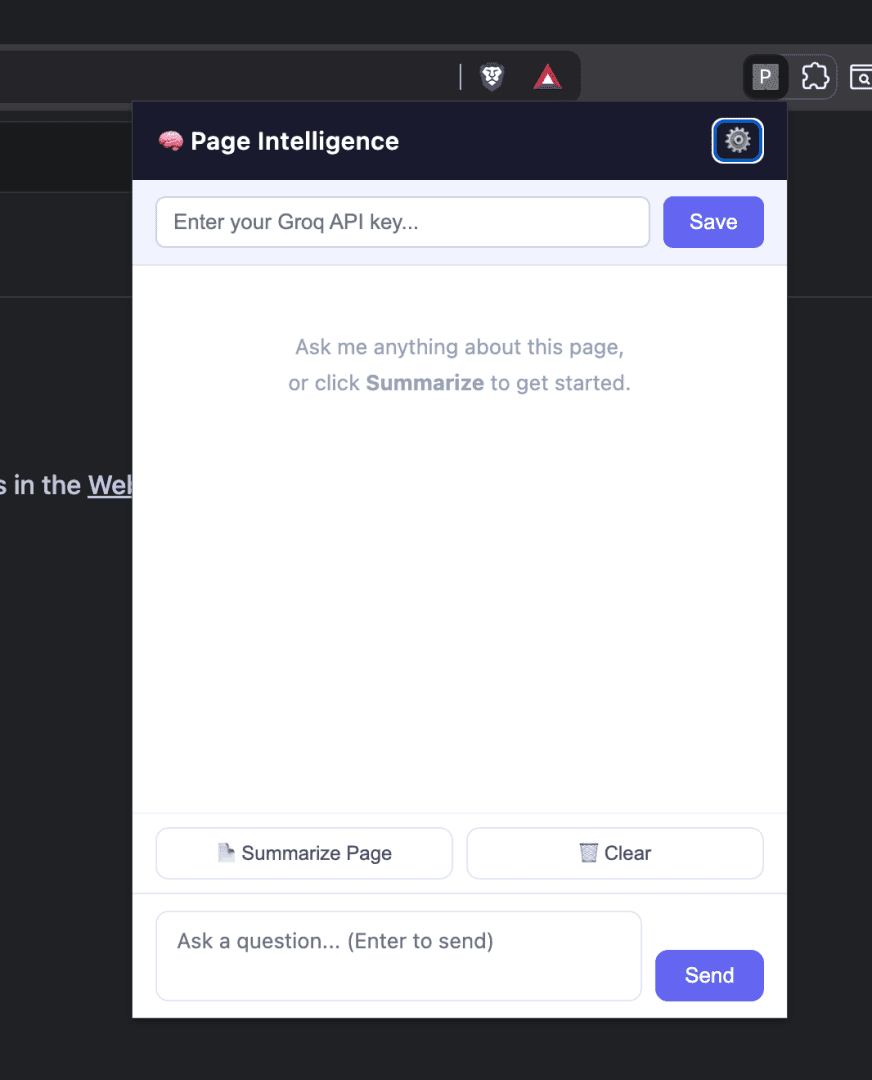
Understanding popup.html
Next, open popup.html. If manifest.json is the contract, popup.html is the stage where the user interacts with the extension.
The Popup Is Intentionally Split into Clear UI Regions
The HTML defines 5 major regions:
- Header
- API key section
- Chat history
- Quick actions
- Input area
That separation matters because each region maps directly to behavior in popup.js.
Here is the structural core of the file:
<div class="container">
  <div class="header">...</div>
  <div id="api-key-section" class="api-key-section">...</div>
  <div id="chat-history" class="chat-history">...</div>
  <div class="quick-actions">...</div>
  <div class="input-area">...</div>
</div>
The Header Sets Up Identity and Settings Access
At the top, we have:
<h1>Page Intelligence</h1>
<button id="settings-btn" class="icon-btn">...</button>
The lesson here is simple but important. Even a tiny extension UI needs clear affordances. The settings button gives the user a predictable place to reopen the API key panel after the initial save.
The API Key Section Introduces Stateful UI
The API key input exists in the DOM from the beginning, but JavaScript decides whether it should be visible based on whether a key has already been saved.
A common frontend pattern is at work here:
- Keep the structure in HTML
- Let JavaScript decide the current state
The Chat Area Is the Main Feedback Surface
The #chat-history container starts with a welcome message:
<div class="welcome-msg">
  Ask me anything about this page,<br />
  or click <strong>Summarize</strong> to get started.
</div>
This does more than decorate the popup. It solves the empty-state problem. Before the first interaction, the popup still feels guided and purposeful.
Quick Actions Reduce Friction
The 2 action buttons are:
- Summarize Page
- Clear
These are excellent teaching examples because they show 2 different UI intents:
- Task button: launches a multi-step workflow
- Reset button: clears local state
The Input Area Supports Chat-Like Behavior
The textarea plus send button give the user a second interaction path. They can either:
- Click the guided summary flow first
- Skip directly to a custom question
Practically, this supports both beginners and more confident users.
Understanding styles.css
Now open styles.css. This is where the extension begins to feel polished instead of merely functional.
The Layout Uses a Simple But Effective Flex Column
The 2 most important layout rules are:
body {
  width: 400px;
}

.container {
  display: flex;
  flex-direction: column;
  height: 560px;
}
This gives the popup a fixed footprint and lets the chat area grow while the header, actions, and input stay anchored.
Why the Chat Panel Works Well
The chat container uses:
.chat-history {
  flex: 1;
  overflow-y: auto;
  display: flex;
  flex-direction: column;
  gap: 10px;
}
You will see this pattern often in messaging interfaces:
flex: 1: lets the panel absorb remaining heightoverflow-y: auto: makes long conversations scrollablegap: keeps messages visually separated without hard-to-maintain margins
Message Bubbles Encode Role Visually
The Cascading Style Sheets (CSS) differentiate:
.message.user.message.assistant.message.error.message.system
This is not just cosmetic. Good styling teaches the user how to read the conversation. With one glance, they can tell which text came from them, which came from the model, and whether a message is informational or an error.
Small Animation Helps the Interface Feel Alive
The fadeIn keyframe is subtle:
@keyframes fadeIn {
  from { opacity: 0; transform: translateY(4px); }
  to   { opacity: 1; transform: translateY(0); }
}
It is also a good reminder that user experience (UX) is part of engineering. Because the model response streams in incrementally, the interface benefits from motion that feels lightweight and responsive.
Input and Actions Are Styled for Fast Iteration
The quick action buttons and textarea focus states give the extension a clean, modern feel without pulling in a UI framework.
This leads to another useful lesson from the project:
HTMLCSS: handles presentationJavaScript: handles behavior
For a beginner-friendly extension, that separation is exactly what we want.
Reading README.md the Right Way
It is easy to ignore README.md, but in a teaching repository, that file matters.
The README Is the Learner’s Runway
This project’s README does 3 useful jobs:
- Explains: what concepts the extension teaches
- Shows: setup steps for getting a Groq API key and loading the extension
- Presents: the codebase structure in a fast, approachable way
So while README.md is not runtime code, it is still part of the learning architecture of the project.
Why This Matters in Real Projects
When you teach or ship developer tooling, code alone is not enough. Learners need:
- Context
- Setup steps
- A map of what to read first
This repository already does a good job of that by aligning the README sections with the files learners will inspect next.
Walking Through popup.js
With the surrounding files covered, we can move to the heart of the extension.
popup.js is where the extension:
- Loads saved state
- Handles button clicks
- Reads the active page
- Calls the Groq API
- Streams the assistant output
- Updates the chat UI
This single file is small enough to follow in one sitting, which makes it ideal for a hands-on lesson.
Configuration and State Live at the Top
The file begins with configuration values:
const GROQ_API_URL = "https://api.groq.com/openai/v1/chat/completions";
const MODEL = "meta-llama/llama-4-scout-17b-16e-instruct";
Then it defines a reusable system prompt and 2 key pieces of runtime state:
let apiKey = "";
let chatHistory = [];
This pattern is worth teaching because it keeps the mental model clean:
- Constants describe how the app talks to the model
- Mutable state tracks what the user has done in this popup session
DOM References Create a Bridge from HTML to Behavior
The next block grabs the key UI elements:
const apiKeySection = document.getElementById("api-key-section");
const apiKeyInput   = document.getElementById("api-key-input");
const saveKeyBtn    = document.getElementById("save-key-btn");
const settingsBtn   = document.getElementById("settings-btn");
const chatHistoryEl = document.getElementById("chat-history");
const summarizeBtn  = document.getElementById("summarize-btn");
const clearBtn      = document.getElementById("clear-btn");
const userInput     = document.getElementById("user-input");
const sendBtn       = document.getElementById("send-btn");
This is why the element identifiers (IDs) in popup.html matter. They are the handles that let JavaScript attach behavior to markup.
DOMContentLoaded Restores Saved Extension State
When the popup opens, this listener runs:
document.addEventListener("DOMContentLoaded", async () => {
  const stored = await chrome.storage.local.get("groq_api_key");

  if (stored.groq_api_key) {
    apiKey = stored.groq_api_key;
    apiKeySection.style.display = "none";
  }
});
Here is one of the first places where theory and practice meet:
- The popup is ephemeral. It opens when the user clicks the extension icon.
- Any in-memory JavaScript state disappears when the popup closes.
- Persistent state must therefore live outside regular variables.
This is exactly why chrome.storage.local is essential here. It gives us persistence without forcing us to introduce a database or a heavier architecture.
Saving the API Key
When the user clicks Save, the extension:
- Reads the input value
- Validates that it is not empty
- Stores it with
chrome.storage.local.set(...) - Copies it into the in-memory
apiKeyvariable - Hides the API key panel
- Shows a confirmation message
What you are seeing is a tidy example of state synchronization between:
- The DOM
- Extension storage
- In-memory JavaScript state
The Settings Button Reopens the Key Panel
This small handler is worth pointing out:
settingsBtn.addEventListener("click", () => {
  apiKeySection.style.display =
    apiKeySection.style.display === "none" ? "flex" : "none";
});
Again, not every useful behavior needs a framework. For a focused popup, direct DOM manipulation is perfectly reasonable and easy to understand.
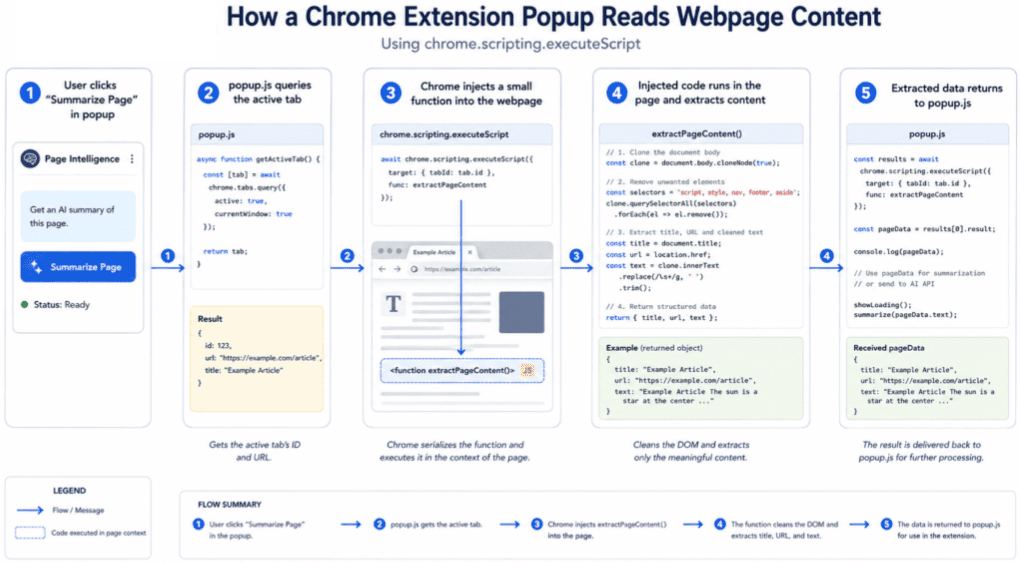
How the Extension Reads the Current Webpage
This is the most important architectural jump in the lesson, so take a moment to make sure the flow is clear before moving on.
getPageText() Starts by Locating the Active Tab
The function begins with:
const [tab] = await chrome.tabs.query({ active: true, currentWindow: true });
In plain English, this asks Chrome to return the tab the user is looking at right now.
The Extension Then Injects a Function into That Tab
Here is the core pattern:
const results = await chrome.scripting.executeScript({
  target: { tabId: tab.id },
  func: () => {
    const clone = document.body.cloneNode(true);
    clone.querySelectorAll("script, style, nav, footer, aside")
      .forEach(el => el.remove());

    return {
      title: document.title,
      url: window.location.href,
      text: clone.innerText.replace(/\s+/g, " ").trim().slice(0, 8000),
    };
  },
});
As a teaching example, this snippet is excellent because it shows the exact boundary between extension code and page code.
Why Clone the Page Body First
The code uses:
const clone = document.body.cloneNode(true);
Cloning first is smart because it lets the extension clean the content without altering the actual webpage the user is viewing.
Why Remove Script, Style, Nav, Footer, and Aside
This is a lightweight content-cleaning step. The extension wants the main readable text, not the surrounding noise.
This gives learners a practical introduction to preprocessing before sending data to an LLM.
Why Normalize Whitespace and Cap Text Length
This line matters:
clone.innerText.replace(/\s+/g, " ").trim().slice(0, 8000)
It does 3 useful things:
- Collapses repeated whitespace
- Trims leading and trailing space
- Limits the payload to 8,000 characters
The final limit is especially important. Even though modern models have large context windows, good engineering still means keeping inputs focused and predictable.
The Return Value Comes Back to the Popup
After executeScript finishes, the popup receives:
- The page title
- The page uniform resource locator (URL)
- Cleaned text content
This makes getPageText() the bridge from the browser page to an LLM-ready prompt.
chrome.scripting.executeScript injects page-reading logic into the active tab (source: author)How the Groq Streaming Call Works
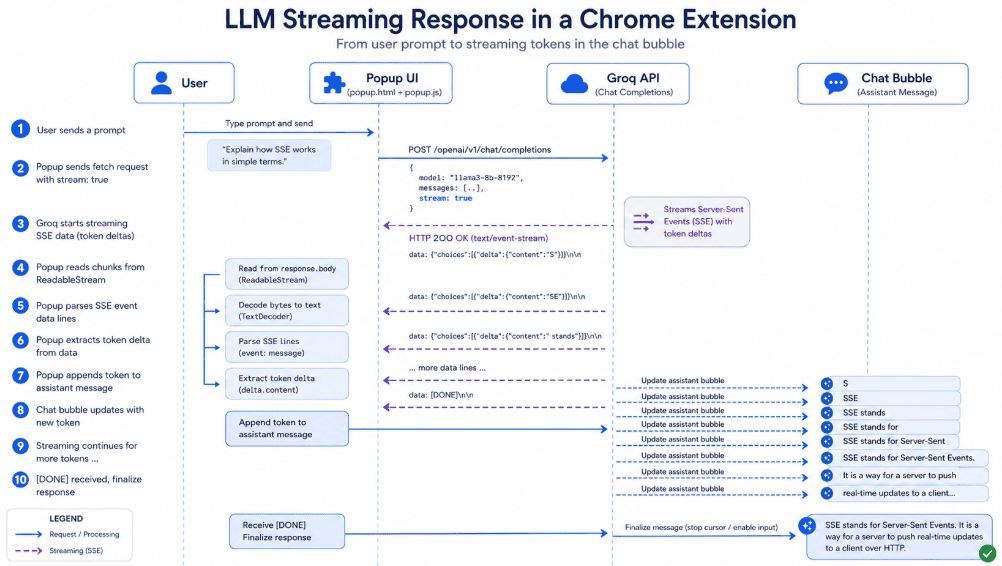
Once the extension has page content, it needs to send a chat completion request and render the answer in real time.
streamResponse() Checks for the API Key First
The function opens with a guard clause:
if (!apiKey) {
  apiKeySection.style.display = "flex";
  showSystem("Please set your Groq API key first.", "error");
  return;
}
This is good defensive programming. Before the app makes a network request, it verifies that the minimum required state is present.
The Request Body Sends the Full Conversation
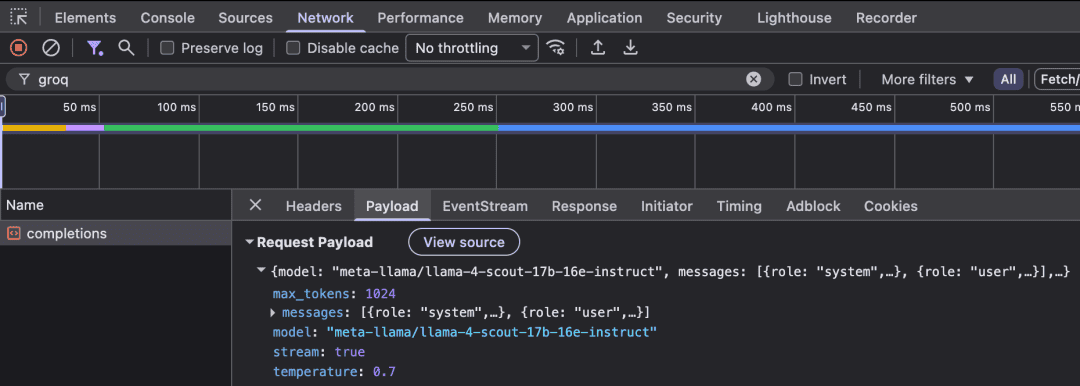
The fetch call includes:
body: JSON.stringify({
  model: MODEL,
  messages: chatHistory,
  stream: true,
  temperature: 0.7,
  max_tokens: 1024,
})
There are 2 especially important details here.
messages: chatHistory
This is how the model gets context. Instead of sending only the newest user message, the extension sends the full running conversation.
As a result, the model can handle:
- Follow-up questions
- Clarifications
- Multi-turn interaction grounded in prior turns
stream: true
This tells the API to return response content instead of waiting for the full answer to be finished.
That is what gives the extension its chat-like feel.
The Response Is Read as a Stream
The code then creates:
const reader  = response.body.getReader();
const decoder = new TextDecoder();
This is where the frontend side starts to feel more advanced. Instead of calling await response.json(), the extension reads raw chunks from the response body.
Server-Sent Events (SSE) Are Parsed Line by Line
The code looks for lines that begin with: data:
It then trims the prefix, checks for [DONE], and parses the JavaScript Object Notation (JSON) payload:
const parsed = JSON.parse(payload);
const token  = parsed.choices?.[0]?.delta?.content ?? "";
If content is present, the function sends it to onChunk(token).
Why the UI Feels Responsive
Every arriving content chunk updates the assistant bubble immediately. That means the user does not stare at a frozen popup waiting for a full paragraph to appear all at once.
There is a practical UX lesson here:
- Streaming improves perceived speed
- Real-time rendering makes the app feel more interactive
- Even a simple UI can feel polished if feedback arrives continuously
One Subtle Engineering Note
This implementation splits each decoded chunk by newline and skips JSON parsing errors when a partial fragment arrives at a chunk boundary.
For a teaching demo, that tradeoff is acceptable. In a more robust production version, you would usually maintain a rolling buffer so partial SSE lines can be reconstructed correctly before parsing.
That is a valuable lesson too: simple implementations are often ideal for learning, even when they are not yet industrial-strength.
How Conversation State Is Managed
A good chat interface is really a state-management problem wearing a friendly UI.
sendMessage() Handles the Main Interaction Loop
At a high level, sendMessage() does the following:
- Cleans the user input
- Pushes the user message into
chatHistory - Renders the user bubble
- Disables the input while the model responds
- Creates an empty assistant bubble
- Streams response content into that bubble
- Saves the final assistant response back into
chatHistory - Re-enables the input
This is the core interaction cycle of the whole extension.
Why Create an Empty Assistant Bubble First
This line is the trick:
const assistantBubble = appendMessage("assistant", "");
Instead of waiting for the final answer, the UI creates a placeholder bubble and fills it as response content arrive. That is what makes streaming visible to the user.
Auto-Scroll Keeps the Newest Response Content in View
During streaming, the code does:
chatHistoryEl.scrollTop = chatHistoryEl.scrollHeight;
This small line is easy to miss, but it matters. Without it, long responses would stream out of view and the interface would feel clumsy.
The System Prompt Is Injected When Needed
When the user clicks Send on a fresh chat, the code makes sure the system prompt is present:
if (chatHistory.length === 0) {
  chatHistory.push({ role: "system", content: SYSTEM_PROMPT });
}
This is a compact but important pattern. It ensures that every conversation begins with the assistant’s behavioral instructions, even if the user skips the summarize flow and goes straight to a custom question.
The Enter Key Is Tuned for Chat UX
This handler:
if (e.key === "Enter" && !e.shiftKey) {
  e.preventDefault();
  sendBtn.click();
}
gives the interface a familiar messaging behavior:
EntersendsShift + Entercan still be used for a multiline prompt
Small details like this make the project feel thoughtful.
How the Summarize Workflow Works
The Summarize Page button is where all the major ideas in the project come together.
The Button First Updates Its Own UI State
When clicked, it temporarily changes to: "Reading page..."
This gives the user immediate feedback that work has started.
The History Is Reset for a Page-First Conversation
Inside the click handler, the code sets:
chatHistory = [
  { role: "system", content: SYSTEM_PROMPT },
];
This is a deliberate design decision. The summarize flow creates a fresh conversation centered on the current page.
The Page Content Is Converted into a User Message
The extension builds a message like this:
const userMessage =
  `Please summarise the following webpage.\n\n` +
  `Title: ${page.title}\nURL: ${page.url}\n\nContent:\n${page.text}`;
This is a clever and practical technique. Instead of inventing a separate prompt schema, the extension simply turns page context into a normal user message. That means the rest of the chat pipeline can stay unchanged.
Why This Design Is Elegant
The same sendMessage() function handles:
- Free-form user questions
- A page summary request
That reduces duplicated logic and keeps the codebase teachable.
How the Clear Button Resets the Interface
The clear handler is short, but it teaches an important UI principle.
Reset Both State and Visible Output
When the user clicks Clear, the code:
- Empties
chatHistory - Restores the welcome message HTML inside
#chat-history
This gives the user a clean slate both logically and visually.
In many small projects, bugs appear because developers reset one layer but forget the other. This extension avoids that trap by resetting both.
End-to-End Flow, From Click to Answer
Let us put the whole lesson together in one concrete sequence.
What Happens When the User Clicks Summarize Page
- Chrome opens the extension popup.
popup.jsloads and restores any saved API key fromchrome.storage.local.- The user clicks Summarize Page.
getPageText()asks Chrome for the active tab.- Chrome injects a function into that page using
chrome.scripting.executeScript. - The injected function clones the page body, removes noisy elements, and returns title, URL, and cleaned text.
- The popup resets
chatHistorywith the system prompt. - The popup creates a user message containing the page content.
sendMessage()renders the user bubble and creates an empty assistant bubble.streamResponse()sends the chat request to Groq withstream: true.- The popup reads SSE chunks, extracts response content, and updates the assistant bubble live.
- When streaming ends, the full assistant message is saved into
chatHistory.
That is the full extension lifecycle in one pass.
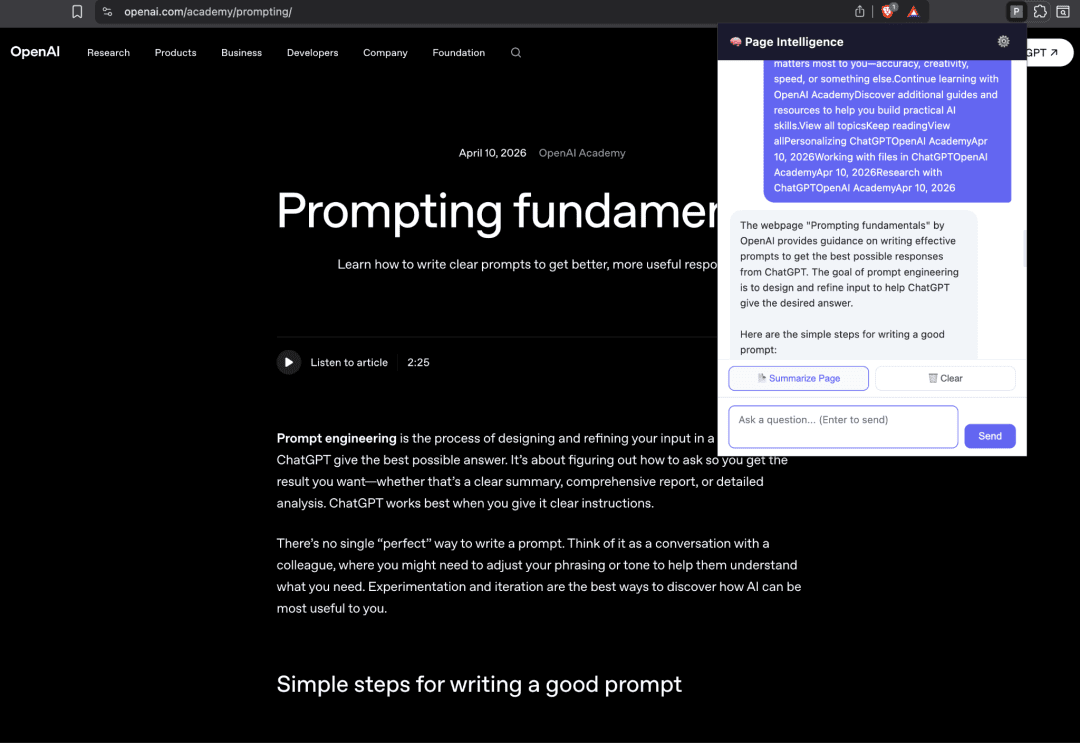
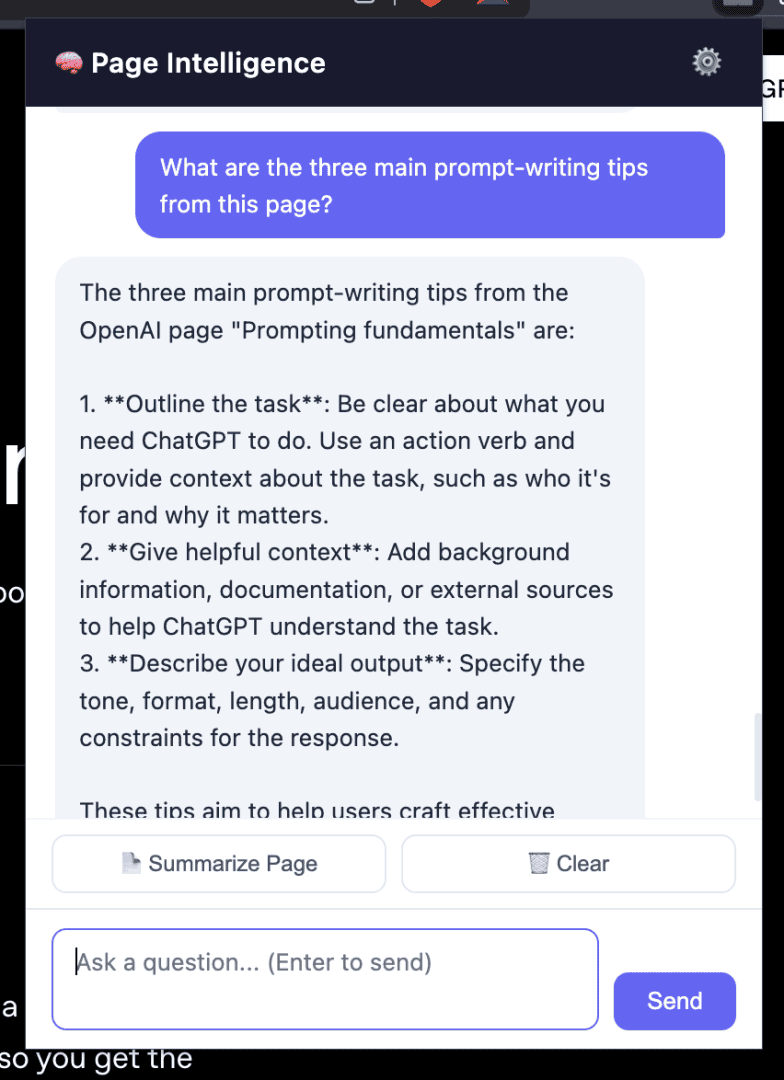
What Happens on the Next Follow-Up Question
The second turn is even more interesting:
- The user asks a follow-up question in the textarea.
sendMessage()appends that new message to the existingchatHistory.- The full conversation is sent again to the model.
- The model now has access to both the page context and the prior summary.
That is what makes the extension feel conversational instead of one-shot.
chatHistory preserves multi-turn context (source: author)Practical Engineering Takeaways
This extension may be small, but it teaches several patterns that show up in larger AI products too.
Pattern 1: Retrieve First, Generate Second
The extension does not ask the model to guess what is on the page. It retrieves the page content first, then sends that content to the model.
The retrieval step is simple, but it is foundational.
Pattern 2: Separate UI State from Persistent State
The API key lives in chrome.storage.local.
The active conversation lives in memory as chatHistory.
This is a healthy separation because:
- Long-lived secrets survive popup closures
- Short-lived conversations reset naturally when the session changes
Pattern 3: Stream Whenever Responsiveness Matters
Streaming is not just a flashy feature. It changes how the user experiences latency.
Even if the total response time stays similar, streaming makes the system feel faster and more alive.
Pattern 4: Keep the First Version Intentionally Small
This extension could have included:
- A background service worker
- Conversation persistence across popup sessions
- Rich markdown rendering
- Better page extraction heuristics
- More robust streaming buffering
But for a lesson, the current scope is exactly right. It is complete enough to be useful and small enough to fully understand.
Where You Could Take This Project Next
Once learners understand this version, there are several natural improvements worth exploring.
Improve Content Extraction
Right now, the extension removes a few noisy tags and then uses innerText.
A stronger version could:
- Prefer
mainorarticle-like containers when present - Skip repeated sidebar content more aggressively
- Chunk long pages instead of truncating them at 8,000 characters
Improve Streaming Robustness
The current SSE parsing is easy to understand, which is excellent for a first lesson. A more production-oriented version could keep a line buffer across chunk boundaries before parsing JSON.
Improve Conversation Persistence
chatHistory currently lives only in memory. If you close the popup, the conversation disappears.
That is fine for a lesson, but a future version could store conversations in chrome.storage.local or IndexedDB.
Improve Prompting
The current system prompt is short and sensible. A later lesson could show how to:
- Ask for citation-style answers grounded in extracted text
- Detect when the page content is too thin
- Adapt response style for summarization versus question answering
What's next? We recommend PyImageSearch University.

120+ total classes • 115+ hours of on-demand code walkthrough videos • Last updated: August 2026
★★★★★ 4.84 (128 Ratings) • 16,000+ Students Enrolled
I strongly believe that if you had the right teacher you could master computer vision and deep learning.
Do you think learning computer vision and deep learning has to be time-consuming, overwhelming, and complicated? Or has to involve complex mathematics and equations? Or requires a degree in computer science?
That’s not the case.
All you need to master computer vision and deep learning is for someone to explain things to you in simple, intuitive terms. And that’s exactly what I do. My mission is to change education and how complex Artificial Intelligence topics are taught.
If you're serious about learning computer vision, your next stop should be PyImageSearch University, the most comprehensive computer vision, deep learning, and OpenCV course online today. Here you’ll learn how to successfully and confidently apply computer vision to your work, research, and projects. Join me in computer vision mastery.
Inside PyImageSearch University you'll find:
- ✓ 120+ courses on essential computer vision, deep learning, and OpenCV topics
- ✓ 94+ Certificates of Completion
- ✓ 115+ hours of on-demand video
- ✓ Brand new courses released regularly, ensuring you can keep up with state-of-the-art techniques
- ✓ Pre-configured Jupyter Notebooks in Google Colab
- ✓ Run all code examples in your web browser — works on Windows, macOS, and Linux (no dev environment configuration required!)
- ✓ Access to centralized code repos for all 540+ tutorials on PyImageSearch
- ✓ Easy one-click downloads for code, datasets, pre-trained models, etc.
- ✓ Access on mobile, laptop, desktop, etc.
Summary
In this lesson, you saw how a compact Chrome extension can combine browser APIs and LLM APIs into a practical, real-time workflow.
You learned how:
manifest.json: declares the extension’s privileges and popup entry pointpopup.html: structures the user interfacestyles.css: makes the UI readable and responsiveREADME.md: supports learning and onboardingpopup.js: ties everything together through storage, page extraction, streaming, and chat state
Most importantly, you learned the core architectural idea behind the project:
- read the current page with the proper Chrome API
- turn that content into model-ready context
- stream the answer back into a lightweight interface
This pattern is simple, useful, and widely applicable. Once you understand it here, you can reuse it in richer browser tools, agent workflows, and AI-powered productivity extensions.
Citation Information
Singh, V. “Make a Chrome Extension to Digest Webpages with Manifest V3 and Groq API,” PyImageSearch, S. Huot, A. Sharma, and P. Thakur, eds., 2026, https://pyimg.co/8q9l7
@incollection{Singh_2026_make-chrome-extension-digest-webpages-manifest-v3-groq-api,
  author = {Vikram Singh},
  title = {{Make a Chrome Extension to Digest Webpages with Manifest V3 and Groq API}},
  booktitle = {PyImageSearch},
  editor = {Susan Huot and Aditya Sharma and Piyush Thakur},
  year = {2026},
  url = {https://pyimg.co/8q9l7},
}
To download the source code to this post (and be notified when future tutorials are published here on PyImageSearch), simply enter your email address in the form below!

Download the Source Code and FREE 17-page Resource Guide
Enter your email address below to get a .zip of the code and a FREE 17-page Resource Guide on Computer Vision, OpenCV, and Deep Learning. Inside you'll find my hand-picked tutorials, books, courses, and libraries to help you master CV and DL!


Comment section
Hey, Adrian Rosebrock here, author and creator of PyImageSearch. While I love hearing from readers, a couple years ago I made the tough decision to no longer offer 1:1 help over blog post comments.
At the time I was receiving 200+ emails per day and another 100+ blog post comments. I simply did not have the time to moderate and respond to them all, and the sheer volume of requests was taking a toll on me.
Instead, my goal is to do the most good for the computer vision, deep learning, and OpenCV community at large by focusing my time on authoring high-quality blog posts, tutorials, and books/courses.
If you need help learning computer vision and deep learning, I suggest you refer to my full catalog of books and courses — they have helped tens of thousands of developers, students, and researchers just like yourself learn Computer Vision, Deep Learning, and OpenCV.
Click here to browse my full catalog.