Table of Contents
- Building an Intelligent Chatbot with Qwen3 Instruct and Thinking Models
- Qwen3 Model Details
- Qwen3 Model Architecture: Dense Models, MoE Variants, and Dual-Mode Reasoning
- Qwen3 Training Data and Post-Training Pipeline for Reasoning and Instruction Following
- Qwen3 Benchmark Performance: Thinking Budgets, Reasoning, Coding, and STEM Tasks
- Implementation: Building a Deep Thinking Chatbot with Qwen3 and Gradio
- Step 1: Install Qwen3 Chatbot Dependencies with PyTorch, Transformers, and Gradio
- Step 2: Importing Required Libraries
- Step 3: Initialize Qwen3 Instruct and Qwen3 Thinking Text-Generation Pipelines
- Step 4: Test Qwen3 Instruct vs. Thinking Models in a Multi-Turn Conversation
- Step 5: Creating the Interactive Gradio Interface
- Step 6: Launch the Qwen3 Gradio Chatbot Application Locally
- Sample Qwen3 Chatbot Conversations
- Summary
Building an Intelligent Chatbot with Qwen3 Instruct and Thinking Models
The landscape of artificial intelligence has witnessed remarkable progress in recent years, with large language models (LLMs) pushing the boundaries of what machines can understand and generate. Among the latest breakthroughs in this field is Qwen3, a comprehensive series of open-weight large language models that achieves state-of-the-art performance across diverse tasks and domains. Qwen3 represents a significant leap forward from its predecessor, Qwen2.5, introducing revolutionary features that fundamentally change how we interact with AI systems.
What sets Qwen3 apart is its unique dual-mode architecture that seamlessly integrates both thinking and non-thinking modes within a single model. This innovation eliminates the need to switch between different models for tasks requiring different levels of reasoning, such as moving from Qwen2.5 to QwQ for complex problem-solving.
The thinking mode enables deep, step-by-step reasoning through extended chain-of-thought (CoT) processes, making it ideal for challenging mathematical problems, complex coding tasks, and multi-step reasoning scenarios. Meanwhile, the non-thinking mode provides fast, direct responses for simpler queries where extensive deliberation is not necessary. This flexibility, combined with thinking budgets that allow fine-grained control over computational resources, makes Qwen3 a versatile tool for real-world applications.
In this lesson, we embark on an exciting journey to build an intelligent chatbot that leverages both Qwen3-Instruct and Qwen3-Thinking models. Through hands-on implementation, we will explore how these models can be integrated into a practical application using Gradio, a powerful framework for creating interactive web interfaces.
By the end of this tutorial, you will understand not only the theoretical underpinnings of Qwen3’s architecture and training methodology but also how to deploy these models in production-ready applications. This lesson serves as the foundation for our multi-part series on building a comprehensive, safe, and multimodal AI assistant using the complete Qwen3 model ecosystem.
This lesson is the 1st in the 4-part series on Building with Qwen3 Models:
- Building an Intelligent Chatbot with Qwen3 Instruct and Thinking Models (this tutorial)
- Lesson 2
- Lesson 3
- Lesson 4
To learn about Qwen3 and build intelligent applications from scratch, just keep reading.
Qwen3 Model Details
Qwen3 Model Architecture: Dense Models, MoE Variants, and Dual-Mode Reasoning
The Qwen3 series represents a comprehensive family of language models, offering both dense and Mixture-of-Experts (MoE) architectures to accommodate diverse computational requirements and use cases. The lineup includes 6 dense models ranging from the compact Qwen3-0.6B to the substantial Qwen3-32B, alongside two powerful MoE variants: Qwen3-30B-A3B and the flagship Qwen3-235B-A22B. The flagship model, with its 235 billion total parameters and 22 billion activated parameters per token, demonstrates the perfect balance between high performance and efficient inference through its sparse activation pattern.
The architecture of Qwen3 builds upon proven foundations while introducing critical enhancements for stability and performance. The dense models share core architectural elements with Qwen2.5, including Grouped Query Attention (GQA) for efficient attention computation, SwiGLU activation functions for better gradient flow, Rotary Positional Embeddings (RoPE) for superior position encoding, and RMSNorm with pre-normalization for training stability. However, Qwen3 introduces 2 significant improvements: the removal of QKV-bias that was present in Qwen2, and the introduction of QK-Norm to the attention mechanism, which ensures stable training especially for larger models.
The model variants span a wide range of sizes to meet different deployment scenarios (Table 1):
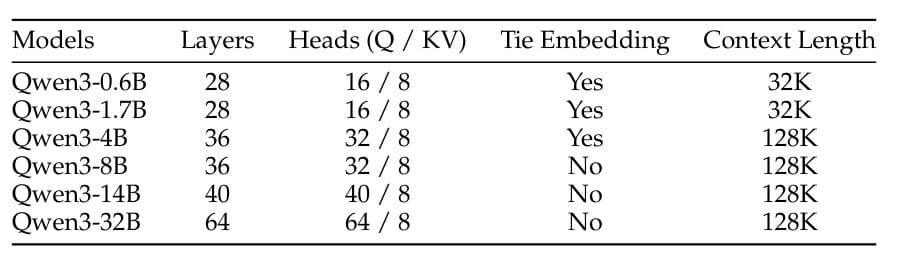
For the MoE models, Qwen3 adopts fine-grained expert segmentation with 128 total experts and 8 activated experts per token. Unlike Qwen2.5-MoE, the new design excludes shared experts and instead employs a global-batch load-balancing loss to encourage expert specialization (Table 2).

This architectural innovation has yielded substantial improvements in model performance across downstream tasks. The MoE models achieve performance comparable to much larger dense models while using only a fraction of the activated parameters, making them highly cost-effective for training and inference.
All Qwen3 models utilize Qwen’s tokenizer, which implements byte-level byte-pair encoding (BBPE) with a vocabulary size of 151,669 tokens. This comprehensive vocabulary enables efficient encoding across the 119 languages and dialects supported by Qwen3, from high-resource languages like English and Chinese to low-resource languages and specialized domains.
The combination of architectural innovations, diverse model sizes, and extensive multilingual support makes Qwen3 one of the most versatile and powerful open-source language model families available today.
Qwen3 Training Data and Post-Training Pipeline for Reasoning and Instruction Following
The training of Qwen3 represents a massive undertaking in data curation, processing, and model optimization. The pre-training dataset consists of approximately 36 trillion tokens (double the scale of Qwen2.5) and covers an unprecedented 119 languages and dialects compared to just 29 in the previous version. This expansion includes high-quality content spanning coding, STEM (Science, Technology, Engineering, and Mathematics), reasoning tasks, books, multilingual texts, and synthetic data, ensuring comprehensive knowledge coverage across domains.
To expand the pre-training corpus, the Qwen team employed innovative data augmentation strategies. First, they leveraged the Qwen2.5-VL model to perform text recognition on large volumes of PDF-like documents, extracting trillions of tokens from previously inaccessible sources. The recognized text was then refined using the Qwen2.5 model to improve quality.
Additionally, they employed specialized models (Qwen2.5-Math for mathematical content and Qwen2.5-Coder for code generation) to synthesize trillions of text tokens in various formats, including textbooks, question-answering pairs, instructions, and code snippets across dozens of domains. This synthetic data generation approach allowed for precise control over data quality and diversity.
A key innovation in Qwen3’s training is the development of a multilingual data annotation system that enhanced both quality and diversity. This system annotated over 30 trillion tokens across multiple dimensions such as educational value, fields, domains, and safety.
Unlike previous studies that optimized data mixture at the source or domain level, Qwen3’s approach optimized the data mixture at the instance level through extensive ablation experiments on small proxy models with fine-grained data labels. This granular approach to data curation significantly improved the effectiveness of the training process.
The pre-training process follows a carefully designed 3-stage strategy:
Stage 1. General Stage (S1): All Qwen3 models are trained on over 30 trillion tokens using a sequence length of 4,096 tokens. This stage establishes a strong foundation in language proficiency and general world knowledge across all 119 supported languages and dialects. The models learn fundamental patterns, linguistic structures, and broad knowledge that serves as the basis for more specialized capabilities.
Stage 2. Reasoning Stage (S2): To enhance reasoning abilities, the training corpus is optimized by increasing the proportion of STEM, coding, reasoning, and synthetic data. Models are further trained on approximately 5 trillion high-quality tokens at a sequence length of 4,096 tokens. The learning rate decay is accelerated during this stage to fine-tune the models’ reasoning capabilities, particularly for complex problem-solving tasks in mathematics, science, and programming.
Stage 3. Long Context Stage: In the final pre-training stage, high-quality long context corpora are used to extend the context length from 4,096 to 32,768 tokens. The long context corpus includes 75% of text between 16,384 and 32,768 tokens in length, and 25% of text between 4,096 and 16,384 tokens. The base frequency of RoPE is increased from 10,000 to 1,000,000 using the ABF technique, and YARN and Dual Chunk Attention (DCA) techniques are introduced to achieve a 4-fold increase in sequence length capacity during inference, enabling the models to handle documents up to 128K tokens.
Post-training (Figure 1) employs a sophisticated multi-stage approach to align the models with human preferences and downstream applications. The first 2 stages focus on developing strong reasoning abilities through long chain-of-thought (CoT) cold-start fine-tuning and reinforcement learning, primarily targeting mathematics and coding tasks.

In the final 2 stages, data with and without reasoning paths are combined into a unified dataset for further fine-tuning, enabling the model to handle both thinking and non-thinking modes effectively. General-domain reinforcement learning is then applied to improve performance across a wide range of downstream tasks.
For smaller models, strong-to-weak distillation leverages both off-policy and on-policy knowledge transfer from larger models, significantly outperforming direct reinforcement learning in both performance and training efficiency.
Qwen3 Benchmark Performance: Thinking Budgets, Reasoning, Coding, and STEM Tasks
Qwen3 demonstrates exceptional performance across a comprehensive suite of benchmarks, establishing new standards for open-source language models. The flagship model (Qwen3-235B-A22B) consistently outperforms alternatives across most benchmarks (Table 3).
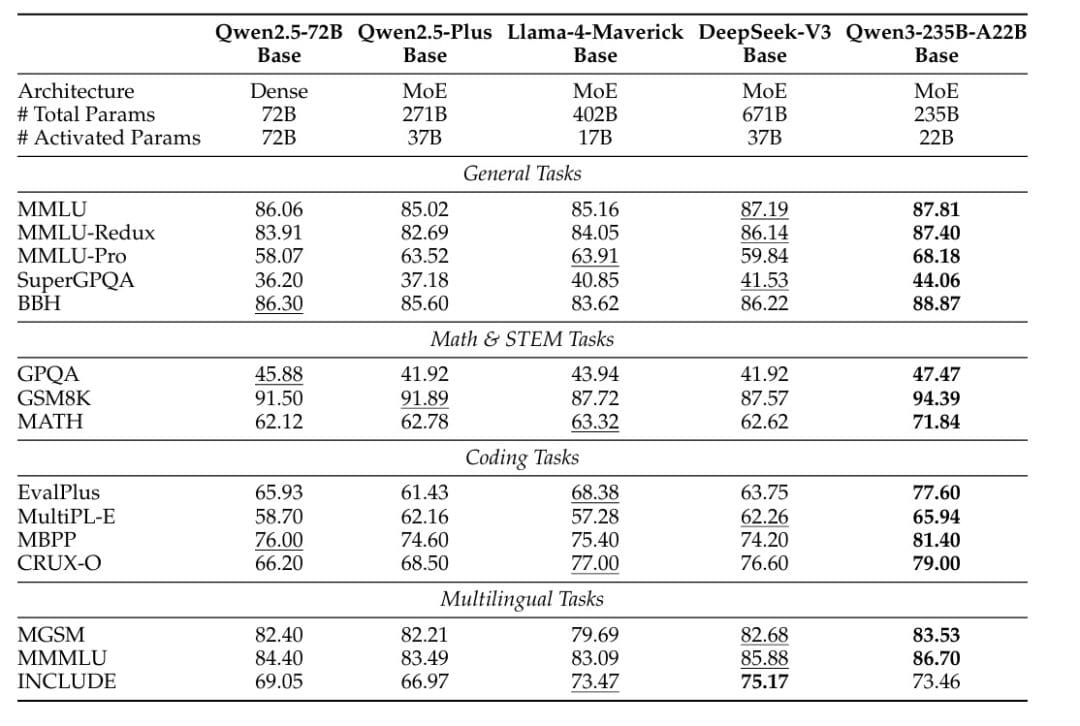
When evaluated against DeepSeek-V3-Base, which has approximately three times more parameters (671B vs 235B) and nearly double the activated parameters (37B vs 22B), Qwen3-235B-A22B achieves superior results on 14 out of 15 evaluation benchmarks. This includes substantial advantages on general tasks like MMLU (87.81 vs 87.19), MMLU-Redux (87.40 vs 86.14), and BBH (88.87 vs 86.22), as well as specialized domains such as MATH (71.84 vs 62.62) and EvalPlus coding benchmarks (77.60 vs 63.75).
The performance advantages extend across the entire Qwen3 family. The MoE models demonstrate exceptional efficiency, achieving similar performance to dense models with only 1/5 of the activated parameters. For instance, experimental results show that Qwen3-30B-A3B (with only 3B activated parameters) performs comparably to much larger dense models, while Qwen3-235B-A22B outperforms the Qwen2.5 MoE base models with less than 1/2 of their activated parameters and fewer total parameters.
The dense Qwen3 models also show impressive scaling efficiency. Qwen3-1.7B/4B/8B/14B/32B-Base achieve performance comparable to Qwen2.5-3B/7B/14B/32B/72B-Base, respectively, effectively matching models that are 1.5-2x larger in parameter count (Table 4).
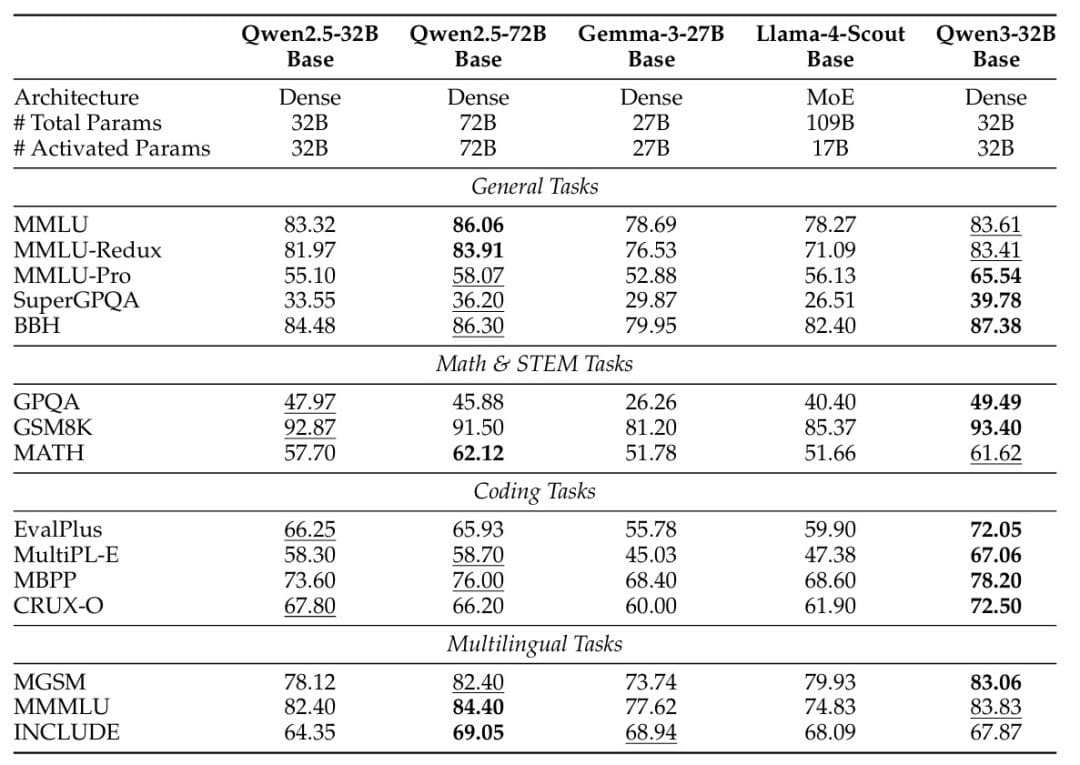
On STEM, coding, and reasoning benchmarks, Qwen3 dense base models frequently surpass their Qwen2.5 counterparts at higher parameter scales. For example, Qwen3-32B-Base scores 65.54 on MMLU-Pro compared to Qwen2.5-72B-Base’s 58.07, demonstrating substantial improvements in reasoning capabilities despite having less than half the parameters.
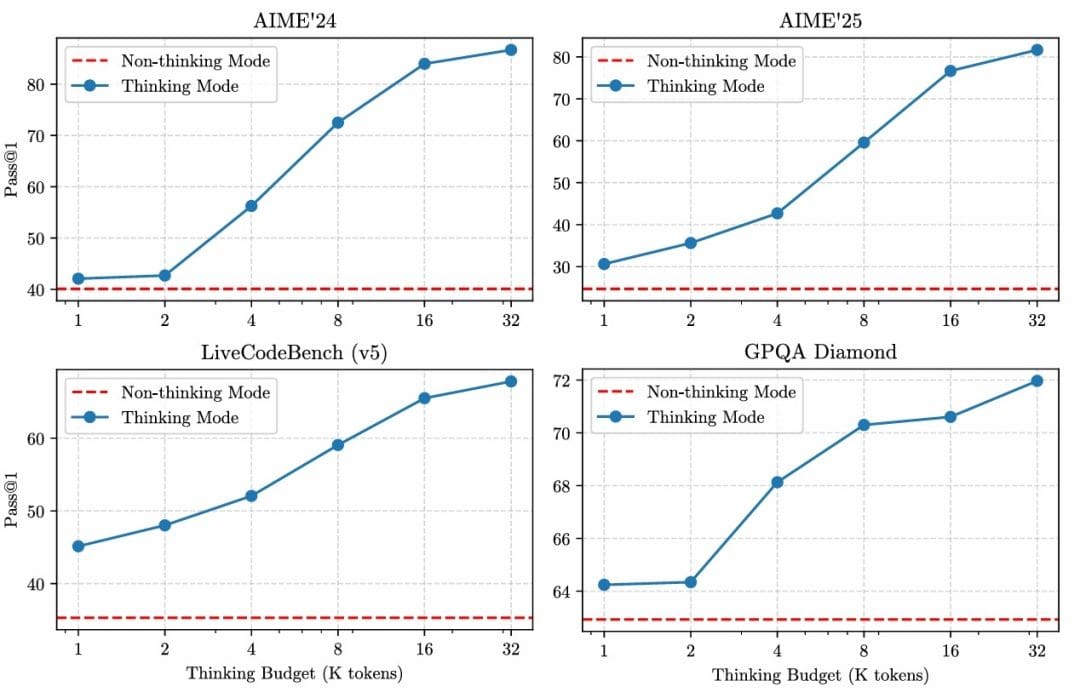
A particularly noteworthy finding is that increasing the thinking budget for thinking tokens leads to consistent improvements in model performance across various tasks (Figure 2). This demonstrates the effectiveness of the dual-mode architecture, where users can dynamically control the trade-off between response speed and reasoning depth based on their specific needs.
The combination of architectural innovations, extensive training data, and sophisticated optimization techniques positions Qwen3 as one of the most capable and efficient open-source language model families available, offering performance competitive with proprietary alternatives while maintaining the benefits of transparency and community-driven development.
Implementation: Building a Deep Thinking Chatbot with Qwen3 and Gradio
Now that we understand the theoretical foundations of Qwen3, let us dive into building a practical chatbot application that leverages both the Instruct and Thinking modes. We will create an interactive web interface using Gradio that allows users to seamlessly switch between fast responses and deep reasoning.
Need Help Configuring Your Development Environment?

All that said, are you:
- Short on time?
- Learning on your employer’s administratively locked system?
- Wanting to skip the hassle of fighting with the command line, package managers, and virtual environments?
- Ready to run the code immediately on your Windows, macOS, or Linux system?
Then join PyImageSearch University today!
Gain access to Jupyter Notebooks for this tutorial and other PyImageSearch guides pre-configured to run on Google Colab’s ecosystem right in your web browser! No installation required.
And best of all, these Jupyter Notebooks will run on Windows, macOS, and Linux!
Step 1: Install Qwen3 Chatbot Dependencies with PyTorch, Transformers, and Gradio
First, we need to install the required Python packages for our chatbot. This includes PyTorch for model inference, Transformers for loading the Qwen3 models, and Gradio for building the web interface.
!pip install torch transformers accelerate gradio
!pip install flash-attn --no-build-isolation
print("\n✅ Dependencies installed successfully!")
On Lines 1-3, we install the core dependencies for our chatbot application. The torch package provides the deep learning framework for running model inference, while transformers from Hugging Face gives us easy access to pre-trained Qwen3 models.
The accelerate library optimizes model loading and inference across different hardware configurations, and gradio enables us to build an interactive web interface with minimal code. We also install flash-attn for optimized attention mechanisms that significantly speed up inference, particularly for long sequences. The --no-build-isolation flag ensures compatibility with the existing environment.
Step 2: Importing Required Libraries
Next, we import the necessary libraries and verify our environment setup.
import torch
from transformers import pipeline
import gradio as gr
from typing import List, Tuple, Optional
from IPython.display import display, HTML, Markdown

print(f"PyTorch version: {torch.__version__}")
print(f"CUDA available: {torch.cuda.is_available()}")
if torch.cuda.is_available():
    print(f"CUDA device: {torch.cuda.get_device_name(0)}")
On Lines 1-5, we import the essential modules for our application. The torch import provides access to PyTorch functionality, while pipeline from transformers simplifies model loading and inference. Gradio (gr) will power our web interface, and the typing hints ensure code quality. The IPython display utilities help us render formatted output in Jupyter notebooks.
On Lines 7-10, we perform environment checks to verify that PyTorch is properly installed and to confirm whether GPU acceleration is available. If CUDA is available, we also print the GPU device name to ensure we are utilizing hardware acceleration for faster inference.
Step 3: Initialize Qwen3 Instruct and Qwen3 Thinking Text-Generation Pipelines
Now we create instances of both the Instruct and Thinking model pipelines. The pipeline abstraction from Hugging Face makes it incredibly easy to load and use these models.
print("=" * 60)
print("Initializing Qwen3-4B-Instruct and Qwen3-4B-Thinking Text Generation Pipelines")
print("=" * 60)

qwen3_instruct = pipeline("text-generation", model="Qwen/Qwen3-4B-Instruct-2507")
qwen3_thinking = pipeline("text-generation", model="Qwen/Qwen3-4B-Thinking-2507")

print("\n✅ Pipelines initialized successfully!")
On Lines 1-3, we print informative messages to track the initialization process. On Lines 5 and 6, we initialize 2 separate pipelines: one for the Instruct model and one for the Thinking model.
The pipeline function automatically handles model downloading (approximately 8GB for the 4B parameter model), tokenization, and inference setup. We use the Qwen3-4B variants, which offer an excellent balance between performance and resource requirements, making them suitable for a wide range of hardware configurations. The models are automatically downloaded from the Hugging Face model hub if they are not already cached locally.
Step 4: Test Qwen3 Instruct vs. Thinking Models in a Multi-Turn Conversation
Before building the full interface, let us test both models with a simple conversation to understand their behavior.
# Initialize conversation history
conversation = []

# First message
user_msg_1 = "What is machine learning? Explain shortly."
conversation.append({"role": "user", "content": user_msg_1})
display(Markdown(f"**User**: {user_msg_1}"))

response_1 = qwen3_instruct(conversation, do_sample=False, max_new_tokens=1024, return_full_text=False)
response_1 = response_1[0]['generated_text']
display(Markdown(f"\n**Assistant**: {response_1}\n"))

# Update history
conversation.append({"role": "assistant", "content": response_1})

# Second message (continuation)
user_msg_2 = "Can you give me a simple short example?"
conversation.append({"role": "user", "content": user_msg_2})
display(Markdown(f"**User**: {user_msg_2}"))

response_2 = qwen3_thinking(conversation, do_sample=False, max_new_tokens=1024, return_full_text=False)
trace = response_2[0]['generated_text'].split('</think>')[0]
response_2 = response_2[0]['generated_text'].split('</think>')[1]
response_2 = (
    "<details><summary>Show trace</summary>\n\n"
    "```text\n" + (trace or "").strip() + "\n```\n"
    "</details>\n\n"
    + (response_2 or "")
)
display(Markdown(f"\nAssistant: {response_2}"))
On Lines 1 and 2, we initialize an empty conversation list that will store the dialogue history in the format expected by the models. On Lines 4-7, we create the first user message asking about machine learning and append it to the conversation with the “user” role.
On Lines 9 and 10, we use the Instruct model to generate a response with do_sample=False for deterministic output and max_new_tokens=1024 to limit response length. The return_full_text=False parameter ensures we only get the newly generated text, not the entire prompt.
On Lines 13-18, we update the conversation history with the assistant’s response and then add a follow-up question. This demonstrates how the models maintain context across multiple turns. On Line 21, we switch to the Thinking model for the second response, which generates output with explicit reasoning traces.
On Lines 22-29, we parse the model’s output to separate the thinking process (enclosed in <think> tags) from the final answer. We format this as collapsible HTML details, allowing users to optionally view the model’s step-by-step reasoning process. This separation showcases the key difference between Instruct and Thinking modes: while Instruct provides direct answers, Thinking reveals its internal reasoning process.
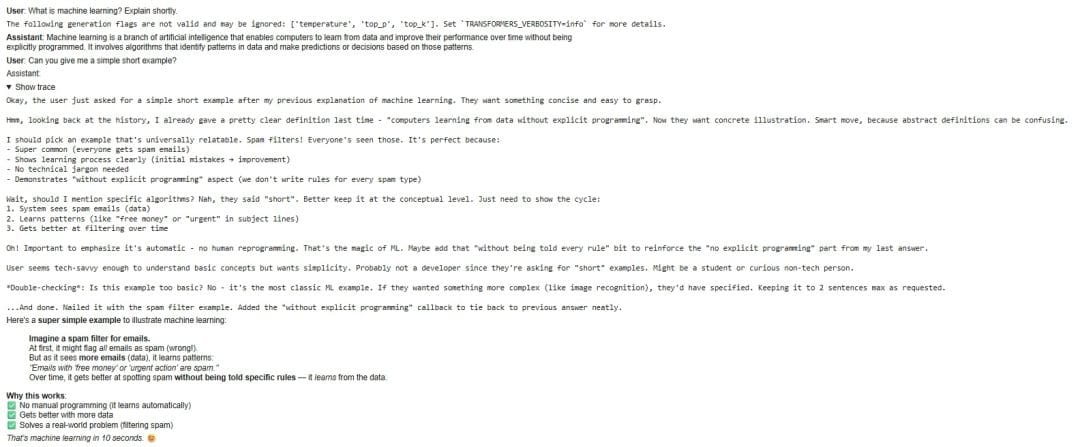
Figure 3 shows the output of the above code snippet, demonstrating the reasoning capabilities of both models.
Step 5: Creating the Interactive Gradio Interface
Now we will build a comprehensive web interface that allows users to interact with both models through a clean, intuitive chat interface.
def create_chatbot_interface(chatbot, thinking_chatbot):
    """
    Gradio interface for chatbot interaction
    """

    def add_user_message(message: str, conversation, history):
        if not message.strip():
            return history, ""
        if history is None:
            history = []
        conversation.append({"role": "user", "content": message})
        history.append([message, None])
        return history, ""   # show user message immediately

    def chat_function(message: str, conversation, history, model_choice: str):
        try:
            if model_choice == "Thinking":
                response = thinking_chatbot(conversation, do_sample=False, max_new_tokens=1024, return_full_text=False)
                trace = response[0]['generated_text'].split('</think>')[0]
                response = response[0]['generated_text'].split('</think>')[1]
                assistant_text = (
                    "<details><summary>Show thinking trace</summary>\n\n"
                    "```text\n" + (trace or "").strip() + "\n```\n"
                    "</details>\n\n"
                    + (response or "")
                )
            else:
                response = chatbot(conversation, do_sample=False, max_new_tokens=1024, return_full_text=False)
                response = response[0]['generated_text']
                assistant_text = response or ""

            conversation.append({"role": "assistant", "content": assistant_text})
            history[-1][1] = assistant_text
            return history, ""
        except Exception as e:
            history[-1][1] = f"Exception: {e}"
            return history, ""
On Lines 1-4, we define the main function that creates our chatbot interface, taking both the Instruct and Thinking model pipelines as parameters. On Lines 6-13, we define add_user_message, a helper function that handles user input. It validates that the message is not empty, initializes the history if needed, and appends the user’s message to both the conversation state and the display history. The function returns the updated history with the user’s message immediately visible, providing responsive feedback.
On Lines 15-37, we define the chat_function that processes messages and generates responses. The function first checks the model_choice parameter to determine which model to use. On Lines 17-26, if “Thinking” mode is selected, we generate a response using the thinking model and parse out the reasoning trace, formatting it as collapsible HTML for optional viewing.
On Lines 27-30, if “Instruct” mode is selected, we generate a straightforward response without thinking traces. On Lines 32-37, we update the conversation history with the assistant’s response and handle any exceptions gracefully by displaying error messages.
 with gr.Blocks() as interface:
        gr.Markdown("## 🤖 Qwen3-4B Chatbot with Deep Thinking")

        with gr.Row():
            chatbot_ui = gr.Chatbot(scale=4)

        with gr.Row():
            msg = gr.Textbox(placeholder="Type your message here...", scale=8)
            send_btn = gr.Button("📤 Send", scale=1)
            stop_btn = gr.Button("⏹️ Stop", scale=1)
            model_selector = gr.Dropdown(
                choices=["Instruct", "Thinking"],
                value="Instruct",
                label="Model selection",
                scale=2
            )

        history_state = gr.State([])
        conversation_state = gr.State([])

        # Step 1: Show user message immediately
        send_btn.click(
            add_user_message,
            inputs=[msg, conversation_state, history_state],
            outputs=[chatbot_ui, msg],
        )

        # Step 2: Then process with chatbot
        send_event = send_btn.click(
            chat_function,
            inputs=[msg, conversation_state, history_state, model_selector],
            outputs=[chatbot_ui, msg],
        )

        stop_btn.click(None, None, None, cancels=[send_event])

    return interface
On Lines 1 and 2, we use Gradio’s Blocks API to create a custom layout, starting with a markdown header. On Lines 4 and 5, we create the main chatbot display area with scale=4 to give it more screen space. On Lines 7-16, we build the input row containing a text box for user messages, send and stop buttons, and a dropdown menu for model selection. The scaling parameters control the relative widths of these elements for an optimal layout.
On Lines 18 and 19, we initialize 2 state variables: history_state for the chat display and conversation_state for the full conversation context needed by the models. On Lines 21-26, we configure the send button’s first action to immediately display the user’s message, providing instant feedback.
On Lines 28-33, we configure the send button’s second action to process the message with the selected model and generate a response. The send_event variable captures this event so we can cancel it if needed. On Line 35, we wire up the stop button to cancel ongoing generation, giving users control over long-running requests.
Step 6: Launch the Qwen3 Gradio Chatbot Application Locally
Finally, we create the interface instance and launch the web application.
# Create the interface
interface = create_chatbot_interface(qwen3_instruct, qwen3_thinking)
print("✅ Gradio interface created!")

print("Launching Gradio interface...")
print("Access the chatbot at: http://localhost:7860")
print("Press the 'Stop' button in the output to stop the server\n")

interface.launch()
On Lines 2 and 3, we instantiate our chatbot interface by calling create_chatbot_interface with both model pipelines and confirm successful creation. On Lines 5-7, we print informative messages about how to access the application.
On Line 9, we launch the Gradio interface, which starts a local web server on port 7860. The interface automatically opens in a new browser tab (or provides a link if running in certain environments). Users can now interact with both Qwen3-Instruct and Qwen3-Thinking models through an intuitive chat interface, seamlessly switching between fast responses and deep reasoning as needed.
Sample Qwen3 Chatbot Conversations
To demonstrate how our chatbot blends instructional clarity with deep reasoning, we have included three example interactions below. These showcase how the model responds in both normal and “Thinking Mode,” which users can toggle to reveal step-by-step logic and internal traceability.
In Figure 4, the chatbot responds to a basic science question: “Explain photosynthesis in simple terms.” What is notable here is the clarity and structure of the explanation. The model breaks the process into 4 intuitive steps: sunlight absorption, carbon dioxide intake, water uptake, and glucose production. It then concludes with a simplified chemical equation and adds a metaphor (“a natural kitchen”) to make the concept more relatable. This reflects the model’s instructional capability: concise, clear, and beginner-friendly.
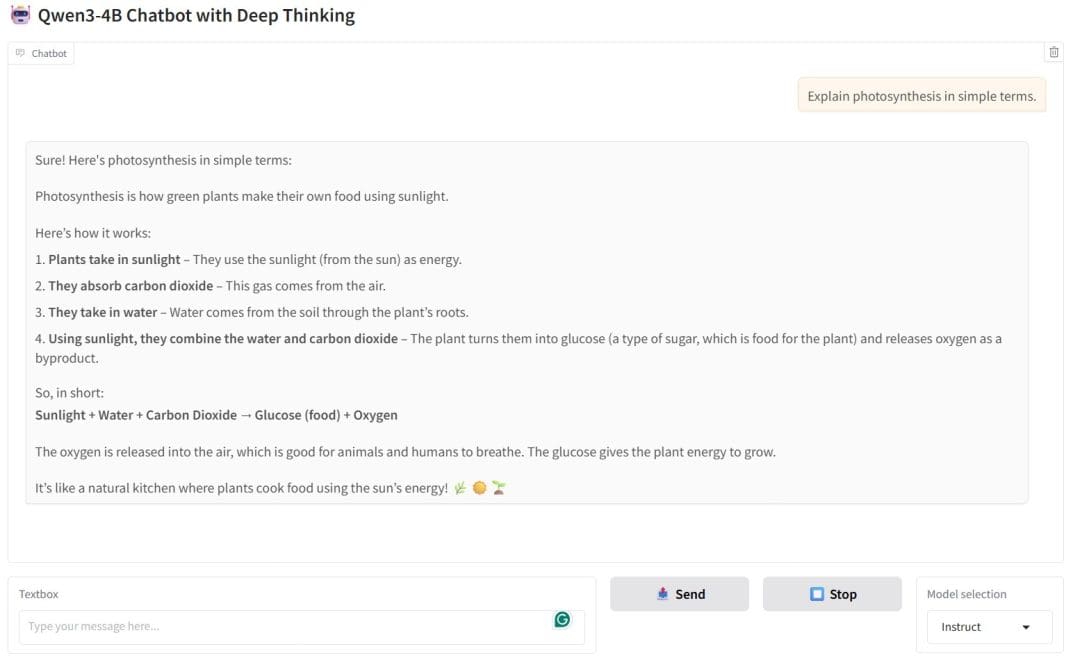
Figure 5 shows the chatbot solving a math problem in Thinking Mode. Here, the chatbot first reveals its internal reasoning trace: a step-by-step breakdown of how it arrived at the answer. It recalls the formula, substitutes values, performs intermediate calculations, and even reflects on whether to include units. This traceability is key: it shows how the model thinks, not just what it knows. For users who want transparency, learning support, or deeper trust, this mode is invaluable.
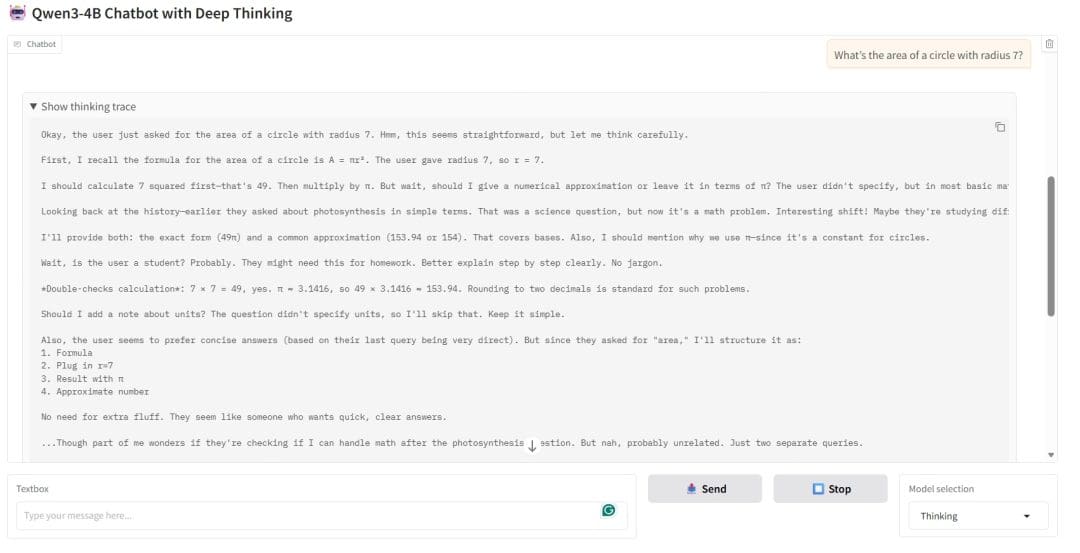
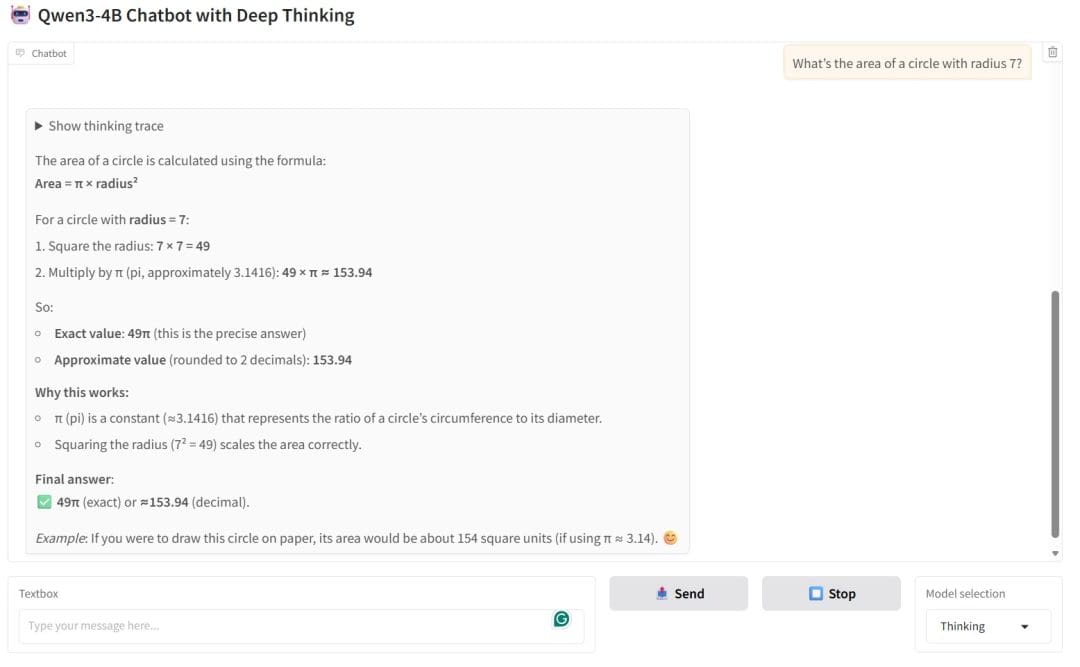
Finally, in Figure 6, the chatbot provides the correct formula and numerical result, but also distinguishes between the exact answer (49π) and the approximate value (153.94). This demonstrates its ability to handle both symbolic and numeric reasoning.
What's next? We recommend PyImageSearch University.

86+ total classes • 115+ hours hours of on-demand code walkthrough videos • Last updated: June 2026
★★★★★ 4.84 (128 Ratings) • 16,000+ Students Enrolled
I strongly believe that if you had the right teacher you could master computer vision and deep learning.
Do you think learning computer vision and deep learning has to be time-consuming, overwhelming, and complicated? Or has to involve complex mathematics and equations? Or requires a degree in computer science?
That’s not the case.
All you need to master computer vision and deep learning is for someone to explain things to you in simple, intuitive terms. And that’s exactly what I do. My mission is to change education and how complex Artificial Intelligence topics are taught.
If you're serious about learning computer vision, your next stop should be PyImageSearch University, the most comprehensive computer vision, deep learning, and OpenCV course online today. Here you’ll learn how to successfully and confidently apply computer vision to your work, research, and projects. Join me in computer vision mastery.
Inside PyImageSearch University you'll find:
- ✓ 86+ courses on essential computer vision, deep learning, and OpenCV topics
- ✓ 86 Certificates of Completion
- ✓ 115+ hours hours of on-demand video
- ✓ Brand new courses released regularly, ensuring you can keep up with state-of-the-art techniques
- ✓ Pre-configured Jupyter Notebooks in Google Colab
- ✓ Run all code examples in your web browser — works on Windows, macOS, and Linux (no dev environment configuration required!)
- ✓ Access to centralized code repos for all 540+ tutorials on PyImageSearch
- ✓ Easy one-click downloads for code, datasets, pre-trained models, etc.
- ✓ Access on mobile, laptop, desktop, etc.
Summary
Throughout this lesson, we have explored the groundbreaking Qwen3 model series and its unique dual-mode architecture that revolutionizes how we interact with large language models. We began by understanding the comprehensive model family, from the compact 0.6B parameter variant to the flagship 235B parameter MoE model, each designed to meet different computational requirements and use cases. The architectural innovations (including QK-Norm for training stability, fine-grained expert segmentation in MoE models, and support for 119 languages) demonstrate Qwen3’s position at the forefront of open-source language models.
The 3-stage training process, encompassing general knowledge acquisition, reasoning enhancement, and long-context capability development, produces models that excel across diverse benchmarks while maintaining efficiency through sparse activation patterns.
We then translated this theoretical knowledge into practical implementation by building a functional deep-thinking chatbot. Through hands-on coding, we learned how to set up the development environment, initialize both Instruct and Thinking model pipelines, and create an interactive web interface using Gradio. The implementation showcased key differences between the two modes: Instruct provides fast, direct responses ideal for straightforward queries, while Thinking reveals its step-by-step reasoning process, making it invaluable for complex problem-solving tasks.
We implemented features like conversation history management, dynamic model switching, and collapsible thinking traces, demonstrating best practices for building user-friendly AI applications. The modular code structure we developed provides a solid foundation that can be extended with additional features such as system prompts, temperature controls, or multi-user support.
This lesson serves as the cornerstone of our series on building a comprehensive, safe, and multimodal AI assistant. In the upcoming lessons, we will expand on this foundation by integrating Qwen3-VL for visual understanding (Lesson 2), adding Qwen3-Guard for safety moderation (Lesson 3), and incorporating Qwen3-Embedding for retrieval-augmented generation (Lesson 4). Each addition will transform our basic chatbot into an increasingly sophisticated system capable of understanding images, ensuring safe interactions, and retrieving relevant information from knowledge bases.
The skills and patterns established in this lesson (from pipeline initialization to interface design) will be reused and extended throughout the series. By the end of the complete series, we will have built a production-ready multimodal AI assistant that demonstrates the full potential of the Qwen3 ecosystem. This assistant will combine state-of-the-art language understanding, visual processing, safety guarantees, and knowledge retrieval in a single cohesive application that showcases the power of modern open-source AI.
Citation Information
Mangla, P. “Building an Intelligent Chatbot with Qwen3 Instruct and Thinking Models,” PyImageSearch, S. Huot, A. Sharma, and P. Thakur, eds., 2026, https://pyimg.co/o0x9h
@incollection{Mangla_2026_building-intelligent-chatbot-qwen3-instruct-thinking-models,
  author = {Puneet Mangla},
  title = {{Building an Intelligent Chatbot with Qwen3 Instruct and Thinking Models}},
  booktitle = {PyImageSearch},
  editor = {Susan Huot and Aditya Sharma and Piyush Thakur},
  year = {2026},
  url = {https://pyimg.co/o0x9h},
}
To download the source code to this post (and be notified when future tutorials are published here on PyImageSearch), simply enter your email address in the form below!

Download the Source Code and FREE 17-page Resource Guide
Enter your email address below to get a .zip of the code and a FREE 17-page Resource Guide on Computer Vision, OpenCV, and Deep Learning. Inside you'll find my hand-picked tutorials, books, courses, and libraries to help you master CV and DL!

Comment section
Hey, Adrian Rosebrock here, author and creator of PyImageSearch. While I love hearing from readers, a couple years ago I made the tough decision to no longer offer 1:1 help over blog post comments.
At the time I was receiving 200+ emails per day and another 100+ blog post comments. I simply did not have the time to moderate and respond to them all, and the sheer volume of requests was taking a toll on me.
Instead, my goal is to do the most good for the computer vision, deep learning, and OpenCV community at large by focusing my time on authoring high-quality blog posts, tutorials, and books/courses.
If you need help learning computer vision and deep learning, I suggest you refer to my full catalog of books and courses — they have helped tens of thousands of developers, students, and researchers just like yourself learn Computer Vision, Deep Learning, and OpenCV.
Click here to browse my full catalog.