
Table of Contents
- Neural Machine Translation with Luong’s Attention Using TensorFlow and Keras
- Introduction
- Configuring Your Development Environment
- Having Problems Configuring Your Development Environment?
- Project Structure
- Luong’s Attention
- Encoder Architecture
- Decoder Architecture
- Input Feeding Approach
- Implementing Luong’s Attention
- Summary
Neural Machine Translation with Luong’s Attention Using TensorFlow and Keras
The previous tutorial on Neural Machine Translation is where we first covered attention (Bahdanau’s attention). Not only did we cover the math behind it, but we also went hands-on training a TensorFlow model from scratch. If you haven’t read it yet, be sure to read that before you go through this tutorial.
In this tutorial, you will learn how Neural Machine Translation can be achieved using Luong’s attention and how it enhances the attention mechanism introduced in Bahdanau’s attention.
Enough of Google Translate. We also have an interactive demo where you can see the trained model in action.
This lesson is the last in a 2-part series on NLP 103:
- Neural Machine Translation with Bahdanau’s Attention Using TensorFlow and Keras
- Neural Machine Translation with Luong’s Attention Using TensorFlow and Keras (this tutorial)
To learn how to apply Luong’s attention to the Neural Machine Translation task, just keep reading.
Neural Machine Translation with Luong’s Attention Using TensorFlow and Keras
Introduction
In the academic paper, Effective Approaches to Attention-Based Neural Machine Translation, Luong et al. provide more effective approaches to building attention. We have to note here that the basic intuition behind attention does not change. The additions provided by Luong et al. are iterative changes that make the process of attention simpler and more efficient.
Building upon the work of Bahdanau et al., Luong et al. add their own twist to the normal attention architecture, suggesting subtle changes to break through the limitations of the old architecture.
Note: We will not be diving too deep into the entire code walkthrough since that has already been covered in the Bahdanau’s attention tutorial. This tutorial will cover the significant changes and how to implement them in TensorFlow and Keras.
Configuring Your Development Environment
To follow this guide, you need to have the tensorflow and tensorflow-text installed on your system.
Luckily, TensorFlow is pip-installable:
$ pip install tensorflow==2.8.0
$ pip install tensorflow-text==2.8.0
Having Problems Configuring Your Development Environment?
All that said, are you:
- Short on time?
- Learning on your employer’s administratively locked system?
- Wanting to skip the hassle of fighting with the command line, package managers, and virtual environments?
- Ready to run the code right now on your Windows, macOS, or Linux system?
Then join PyImageSearch University today!
Gain access to Jupyter Notebooks for this tutorial and other PyImageSearch guides that are pre-configured to run on Google Colab’s ecosystem right in your web browser! No installation required.
And best of all, these Jupyter Notebooks will run on Windows, macOS, and Linux!
Project Structure
We first review our project directory structure.
Start by accessing the “Downloads” section of this tutorial to retrieve the source code and example images.
From there, take a look at the directory structure:
├── download.sh
├── inference.py
├── output
│   └── loss.png
├── pyimagesearch
│   ├── config.py
│   ├── dataset.py
│   ├── __init__.py
│   ├── loss.py
│   ├── models.py
│   ├── schedule.py
│   └── translator.py
├── requirements.txt
└── train.py
In the pyimagesearch directory, we have:
config.py: The configuration file for the taskdataset.py: The utilities for the dataset pipelineloss.py: Holds the code snippet for the losses needed to train the modelmodels.py: Encoder and Decoder for the translation modelschedule.py: The learning rate scheduler for the training pipelinetranslator.py: The train and inference models
In the core directory, we have four scripts:
download.sh: A shell script to download the training datarequirements.txt: The python packages that are required for this tutorialtrain.py: The script run to train the modelinference.py: The inference script
Luong’s Attention
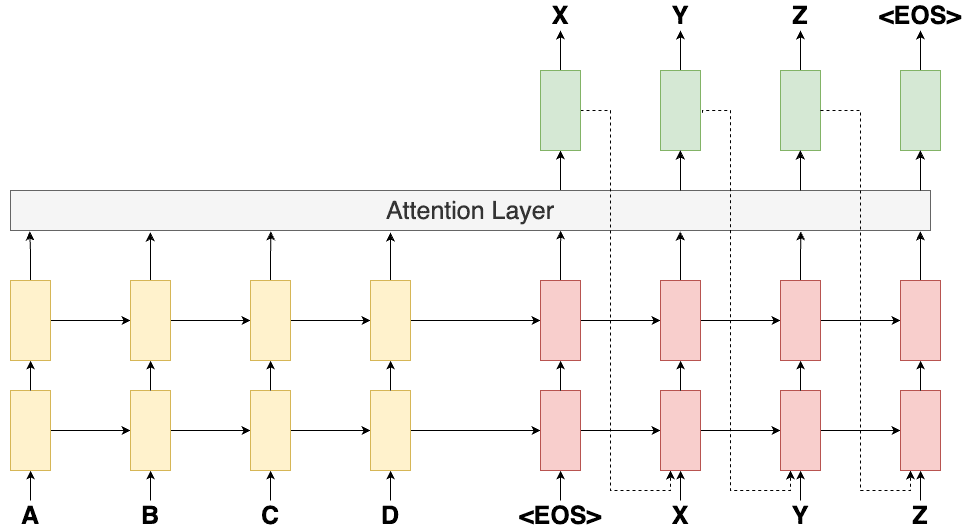
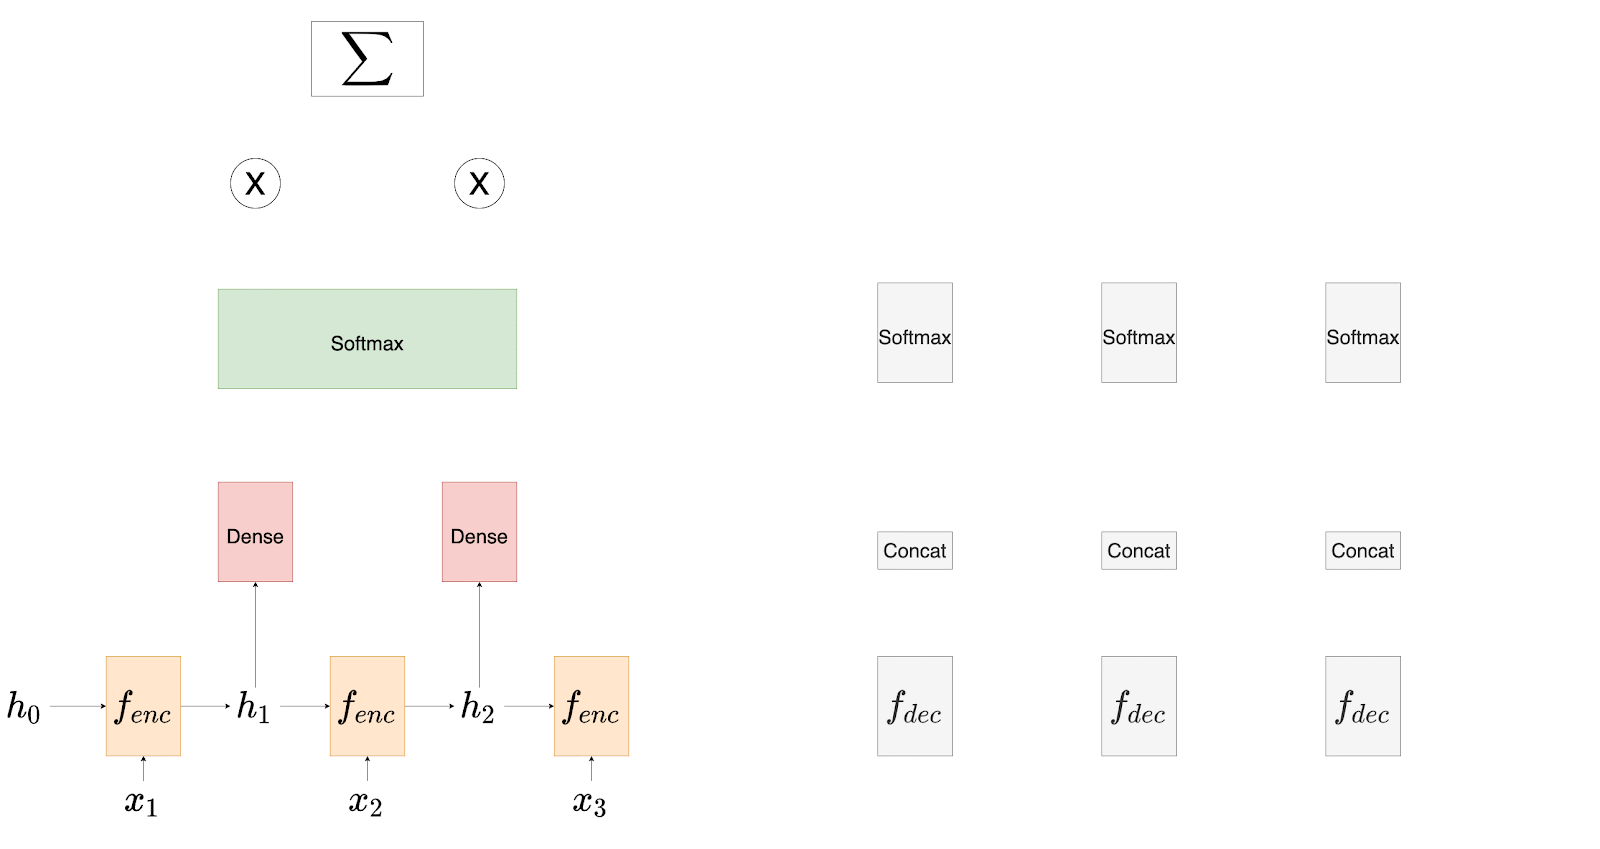
Luong et al. suggest some small but necessary changes to the architecture of the decoder. We will first talk about the encoder, the attention layer, and then the decoder. While discussing the architecture, we will also compare it with that of Bahdanau et al. Consider the diagram shown in Figure 2.
Encoder Architecture
In this paper, the authors opt for a unidirectional (instead of bidirectional as in Bahdanau’s implementation) Recurrent Neural architecture for the encoder. Unidirectional RNNs speed up the computation.
For the encoder we choose a Gated Recurrent Unit (GRU) which takes the present input  and past hidden state
  as input while processing them into the present hidden state
  .
.

After passing the entire source sentence to the encoder, we have a set of all the hidden states.

Decoder Architecture
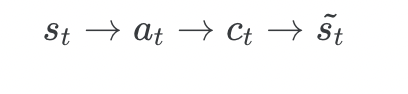
At each time step,  , in the decoding phase, the main motive is to capture the present hidden state of the decoder,
  , and then to derive a context vector,
  , that captures relevant source-side information.
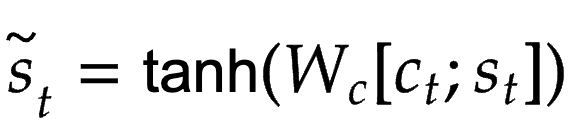
Specifically, given the target hidden state, , and the source-side context vector, , we employ a simple concatenation layer to combine the information from both vectors to produce an attentional hidden state as follows:
The attention vector,  , is then fed through the softmax layer to produce the probability of the next decoder word.

Enough of mathematical jargon, let’s focus only on the part where the authors have proposed changes to the attention layer.
Bahdanau goes from:

Luong goes from:
Input Feeding Approach
With the present proposal, the authors discovered that they were not feeding the attention to the decoder’s recurrent units. This meant that the decoding system did not know which parts of the source sentence were attended to at the previous step.
With that in mind, they now propose to provide the attention to the next decoder unit along with the input and the hidden states. This proved to be a game-changer. While Bahdanau’s model already had this mechanism installed inside of it, Luong’s model had to do it explicitly.
Figure 3 shows the entire encoding and decoding mechanism envisioned by Luong et al.
Implementing Luong’s Attention
Since all the methods and functions are the same as Bahdanau’s attention, we will discuss Luong’s attention module in this tutorial. The entire code walkthrough is covered in the previous blog post of this series.
If you haven’t already, do be sure to read it before proceeding further. And if you have done so already, let us open models.py inside the pyimagesearch directory and go through it.
class LuongAttention(Layer):
    def __init__(self, attnUnits, **kwargs):
        super().__init__(**kwargs)
        # initialize the attention units
        self.attnUnits = attnUnits

    def build(self, inputShape):
        # build the additive attention layer
        self.attention = Attention()

    def get_config(self):
        # return the configuration of the layer
        return {
            "attnUnits": self.attnUnits,
        }

    def call(self, hiddenStateEnc, hiddenStateDec, mask):
        # grab the source and target mask
        sourceMask = mask[0]
        targetMask = mask[1]

        # apply attention to align the representations
        (contextVector, attentionWeights) = self.attention(
            inputs=[hiddenStateDec, hiddenStateEnc, hiddenStateEnc],
            mask=[targetMask, sourceMask],
            return_attention_scores=True
        )

        # return the context vector and the attention weights
        return (contextVector, attentionWeights)
We begin by initializing the attention units on Line 80 inside the __init__ function of the LuongAttention class.
Next, on Lines 82-84, we build the attention layer inside the build function. We return the attention units inside the get_config function (Lines 86-90).
On Line 92, we define the call method. First, we extract the sourceMask and targetMask on Lines 94 and 95.
On Lines 98-102, we apply attention to align the representations. We use the neat attention API from TensorFlow to achieve this. You can read more about it from the official TensorFlow documentation here.
Finally on Line 105, we return the contextVector and attentionWeights.
What's next? We recommend PyImageSearch University.
120+ total classes • 115+ hours hours of on-demand code walkthrough videos • Last updated: July 2026
★★★★★ 4.84 (128 Ratings) • 16,000+ Students Enrolled
I strongly believe that if you had the right teacher you could master computer vision and deep learning.
Do you think learning computer vision and deep learning has to be time-consuming, overwhelming, and complicated? Or has to involve complex mathematics and equations? Or requires a degree in computer science?
That’s not the case.
All you need to master computer vision and deep learning is for someone to explain things to you in simple, intuitive terms. And that’s exactly what I do. My mission is to change education and how complex Artificial Intelligence topics are taught.
If you're serious about learning computer vision, your next stop should be PyImageSearch University, the most comprehensive computer vision, deep learning, and OpenCV course online today. Here you’ll learn how to successfully and confidently apply computer vision to your work, research, and projects. Join me in computer vision mastery.
Inside PyImageSearch University you'll find:
- ✓ 120+ courses on essential computer vision, deep learning, and OpenCV topics
- ✓ 94+ Certificates of Completion
- ✓ 115+ hours hours of on-demand video
- ✓ Brand new courses released regularly, ensuring you can keep up with state-of-the-art techniques
- ✓ Pre-configured Jupyter Notebooks in Google Colab
- ✓ Run all code examples in your web browser — works on Windows, macOS, and Linux (no dev environment configuration required!)
- ✓ Access to centralized code repos for all 540+ tutorials on PyImageSearch
- ✓ Easy one-click downloads for code, datasets, pre-trained models, etc.
- ✓ Access on mobile, laptop, desktop, etc.
Summary
This tutorial walked us through the specific ways Luong’s attention improved the task of Neural Machine Translation. We also learned how to implement the attention module simply using Keras and TensorFlow.
The Bahdanau and Luong attentions are neither state-of-the-art techniques nor widely used in NLP systems. But they do provide a stepping stone and a concrete foundation for what comes next.
We will be back with another tutorial on attention and its uses, but till that time, here’s a little food for thought:
“What happens if we only use attention in an architecture? ?”
Citation Information
A. R. Gosthipaty and R. Raha. “Neural Machine Translation with Luong’s Attention Using TensorFlow and Keras,” PyImageSearch, P. Chugh, S. Huot, K. Kidriavsteva, and A. Thanki, eds., 2022, https://pyimg.co/tpf3l
@incollection{ARG-RR_2022_Luong,
  author = {Aritra Roy Gosthipaty and Ritwik Raha},
  title = {Neural Machine Translation with {Luong’s} Attention Using {TensorFlow} and {Keras}},
  booktitle = {PyImageSearch},
  editor = {Puneet Chugh and Susan Huot and Kseniia Kidriavsteva and Abhishek Thanki},
  year = {2022},
  note = {https://pyimg.co/tpf3l},
}
Unleash the potential of computer vision with Roboflow - Free!
- Step into the realm of the future by signing up or logging into your Roboflow account. Unlock a wealth of innovative dataset libraries and revolutionize your computer vision operations.
- Jumpstart your journey by choosing from our broad array of datasets, or benefit from PyimageSearch’s comprehensive library, crafted to cater to a wide range of requirements.
- Transfer your data to Roboflow in any of the 40+ compatible formats. Leverage cutting-edge model architectures for training, and deploy seamlessly across diverse platforms, including API, NVIDIA, browser, iOS, and beyond. Integrate our platform effortlessly with your applications or your favorite third-party tools.
- Equip yourself with the ability to train a potent computer vision model in a mere afternoon. With a few images, you can import data from any source via API, annotate images using our superior cloud-hosted tool, kickstart model training with a single click, and deploy the model via a hosted API endpoint. Tailor your process by opting for a code-centric approach, leveraging our intuitive, cloud-based UI, or combining both to fit your unique needs.
- Embark on your journey today with absolutely no credit card required. Step into the future with Roboflow.
To download the source code to this post (and be notified when future tutorials are published here on PyImageSearch), simply enter your email address in the form below!

Download the Source Code and FREE 17-page Resource Guide
Enter your email address below to get a .zip of the code and a FREE 17-page Resource Guide on Computer Vision, OpenCV, and Deep Learning. Inside you'll find my hand-picked tutorials, books, courses, and libraries to help you master CV and DL!

Comment section
Hey, Adrian Rosebrock here, author and creator of PyImageSearch. While I love hearing from readers, a couple years ago I made the tough decision to no longer offer 1:1 help over blog post comments.
At the time I was receiving 200+ emails per day and another 100+ blog post comments. I simply did not have the time to moderate and respond to them all, and the sheer volume of requests was taking a toll on me.
Instead, my goal is to do the most good for the computer vision, deep learning, and OpenCV community at large by focusing my time on authoring high-quality blog posts, tutorials, and books/courses.
If you need help learning computer vision and deep learning, I suggest you refer to my full catalog of books and courses — they have helped tens of thousands of developers, students, and researchers just like yourself learn Computer Vision, Deep Learning, and OpenCV.
Click here to browse my full catalog.