In today’s tutorial, you will learn how to configure your NVIDIA Jetson Nano for Computer Vision and Deep Learning with TensorFlow, Keras, TensorRT, and OpenCV.
Two weeks ago, we discussed how to use my pre-configured Nano .img file — today, you will learn how to configure your own Nano from scratch.
This guide requires you to have at least 48 hours of time to kill as you configure your NVIDIA Jetson Nano on your own (yes, it really is that challenging)
If you decide you want to skip the hassle and use my pre-configured Nano .img, you can find it as part of my brand-new book, Raspberry Pi for Computer Vision.
But for those brave enough to go through the gauntlet, this post is for you!
To learn how to configure your NVIDIA Jetson Nano for computer vision and deep learning, just keep reading.
How to configure your NVIDIA Jetson Nano for Computer Vision and Deep Learning
The NVIDIA Jetson Nano packs 472GFLOPS of computational horsepower. While it is a very capable machine, configuring it is not (complex machines are typically not easy to configure).
In this tutorial, we’ll work through 16 steps to configure your Jetson Nano for computer vision and deep learning.
Prepare yourself for a long, grueling process — you may need 2-5 days of your time to configure your Nano following this guide.
Once we are done, we will test our system to ensure it is configured properly and that TensorFlow/Keras and OpenCV are operating as intended. We will also test our Nano’s camera with OpenCV to ensure that we can access our video stream.
If you encounter a problem with the final testing step, then you may need to go back and resolve it; or worse, start back at the very first step and endure another 2-5 days of pain and suffering through the configuration tutorial to get up and running (but don’t worry, I present an alternative at the end of the 16 steps).
Step #1: Flash NVIDIA’s Jetson Nano Developer Kit .img to a microSD for Jetson Nano
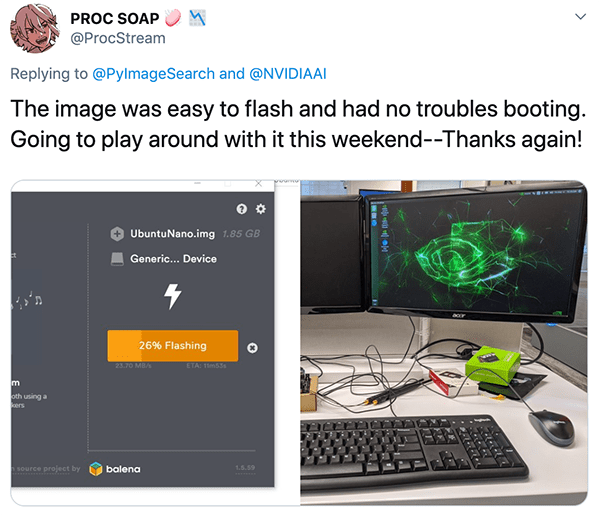
In this step, we will download NVIDIA’s Jetpack 4.2 Ubuntu-based OS image and flash it to a microSD. You will need the microSD flashed and ready to go to follow along with the next steps.
Go ahead and start your download here, ensuring that you download the “Jetson Nano Developer Kit SD Card image” as shown in the following screenshot:
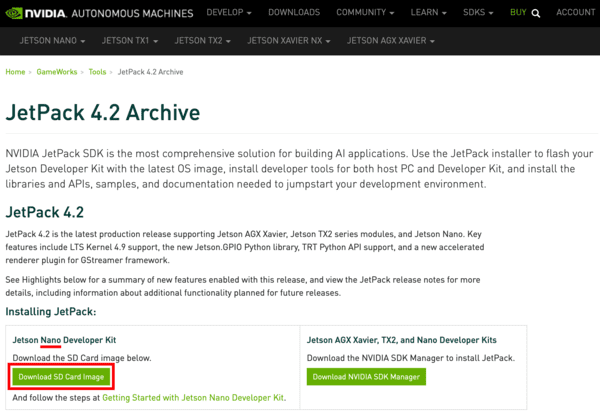
We recommend the Jetpack 4.2 for compatibility with the Complete Bundle of Raspberry Pi for Computer Vision (our recommendation will inevitably change in the future).
While your Nano SD image is downloading, go ahead and download and install balenaEtcher, a disk image flashing tool:
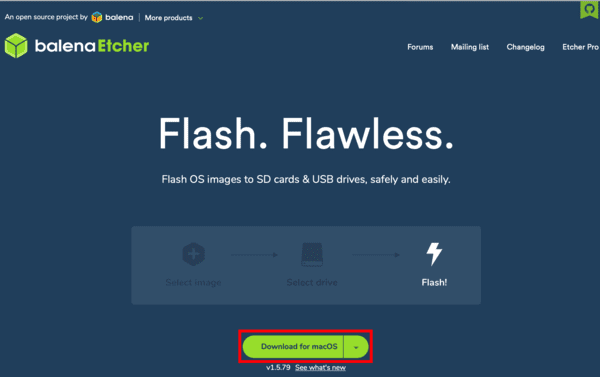
Once both (1) your Nano Jetpack image is downloaded, and (2) balenaEtcher is installed, you are ready to flash the image to a microSD.
You will need a suitable microSD card and microSD reader hardware. We recommend either a 32GB or 64GB microSD card (SanDisk’s 98MB/s cards are high quality, and Amazon carries them if they are a distributor in your locale). Any microSD card reader should work.
Insert the microSD into the card reader, and then plug the card reader into a USB port on your computer. From there, fire up balenaEtcher and proceed to flash.
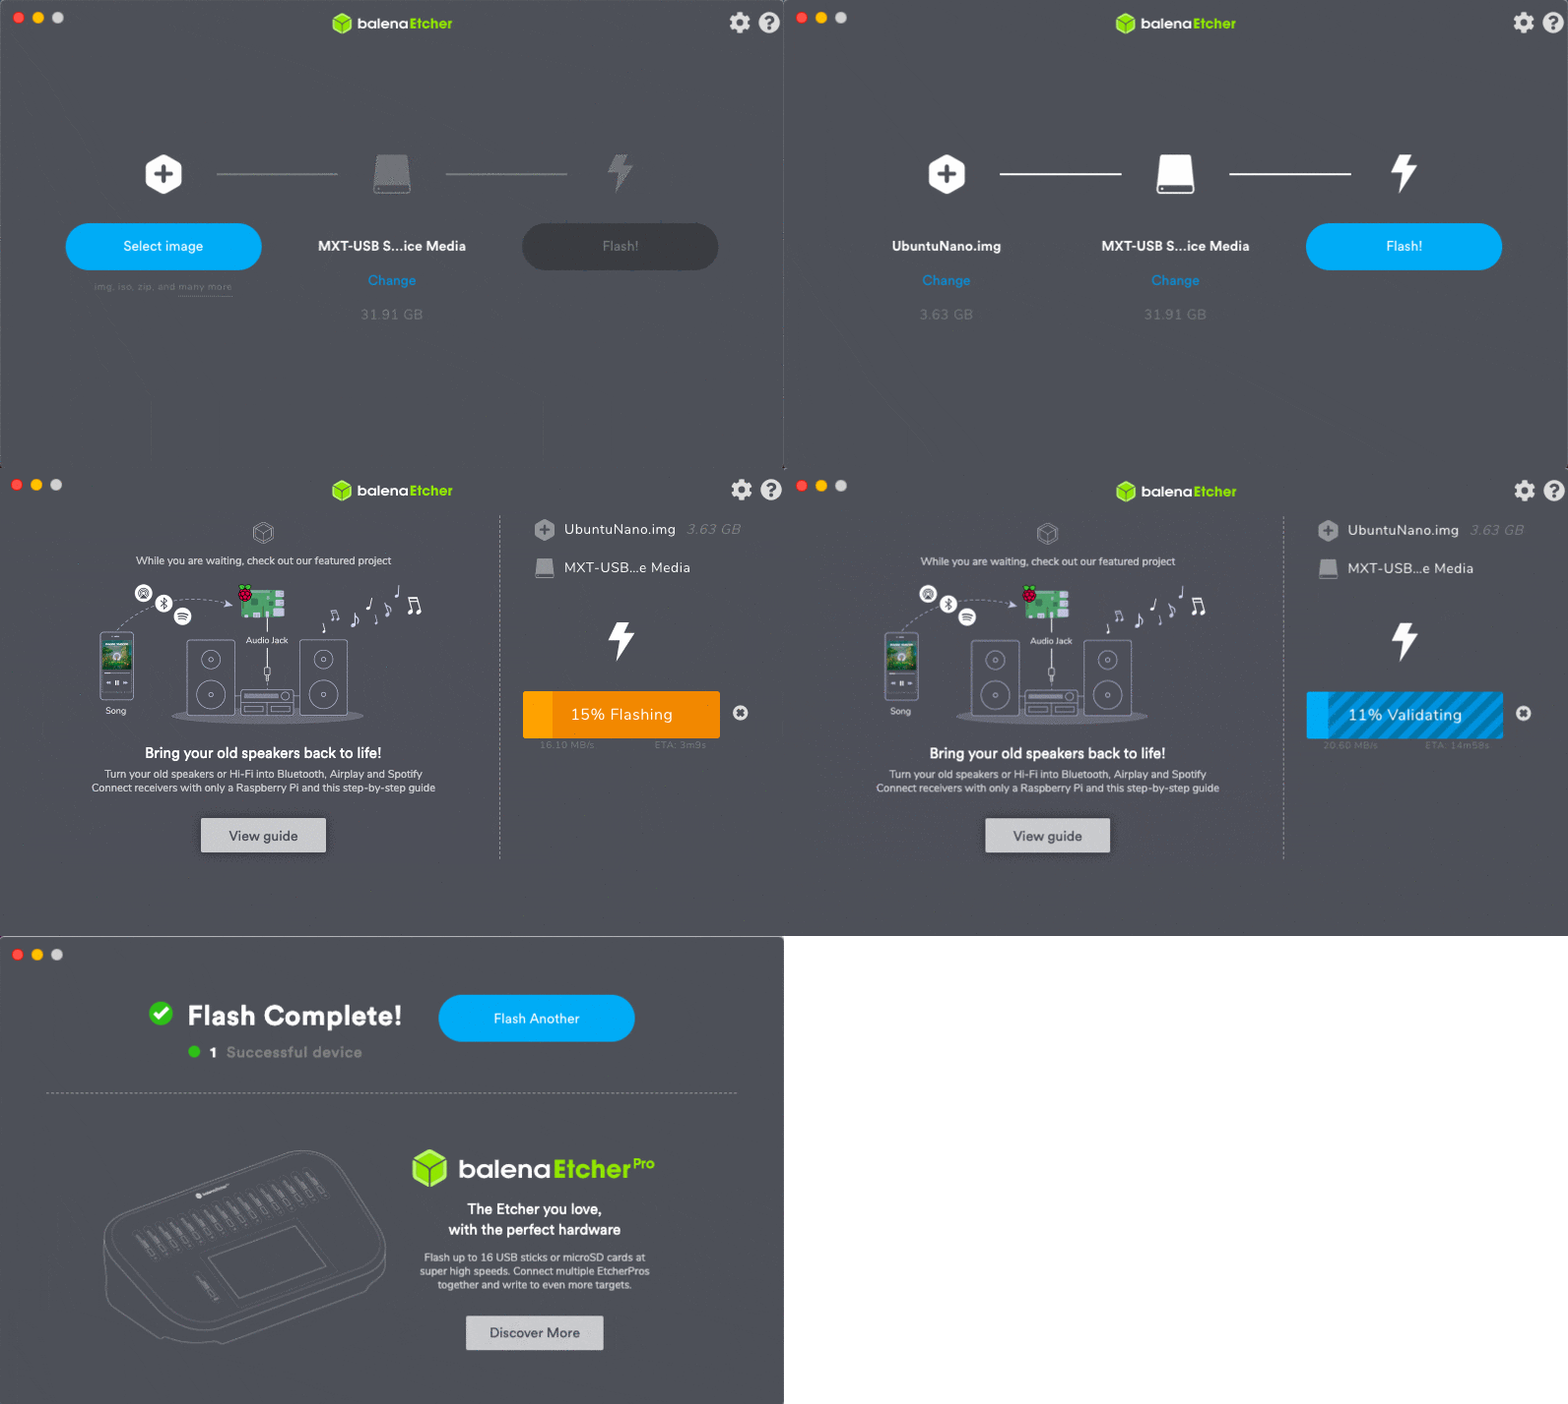
When flashing has successfully completed, you are ready to move on to Step #2.
Step #2: Boot your Jetson Nano with the microSD and connect to a network
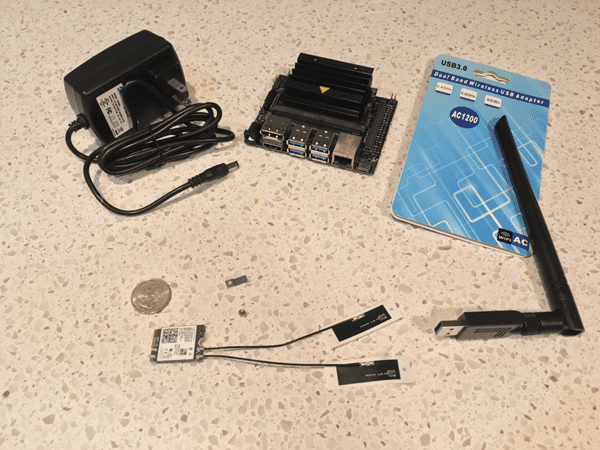
In this step, we will power up our Jetson Nano and establish network connectivity.
This step requires the following:
- The flashed microSD from Step #1
- An NVIDIA Jetson Nano dev board
- HDMI screen
- USB keyboard + mouse
- A power supply — either (1) a 5V 2.5A (12.5W) microSD power supply or (2) a 5V 4A (20W) barrel plug power supply with a jumper at the J48 connector
- Network connection — either (1) an Ethernet cable connecting your Nano to your network or (2) a wireless module. The wireless module can come in the form of a USB WiFi adapter or a WiFi module installed under the Jetson Nano heatsink
If you want WiFi (most people do), you must add a WiFi module on your own. Two great options for adding WiFi to your Jetson Nano include:
- USB to WiFi adapter (Figure 4, top-right). No tools are required and it is portable to other devices. Pictured is the Geekworm Dual Band USB 1200m
- WiFi module such as the Intel Dual Band Wireless-Ac 8265 W/Bt (Intel 8265NGW) and 2x Molex Flex 2042811100 Flex Antennas (Figure 5, bottom-center). You must install the WiFi module and antennas under the main heatsink on your Jetson Nano. This upgrade requires a Phillips #2 screwdriver, the wireless module, and antennas (not to mention about 10-20 minutes of your time)
We recommend going with a USB WiFi adapter if you need to use WiFi with your Jetson Nano. There are many options available online, so try to purchase one that has Ubuntu 18.04 drivers preinstalled on the OS so that you don’t need to scramble to download and install drivers.
Once you have gathered all the gear, insert your microSD into your Jetson Nano as shown in Figure 5:
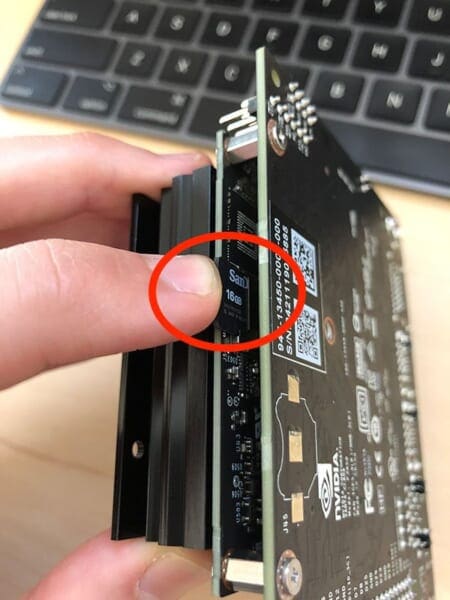
From there, connect your screen, keyboard, mouse, and network interface.
Finally, apply power. Insert the power plug of your power adapter into your Jetson Nano (use the J48 jumper if you are using a 20W barrel plug supply).
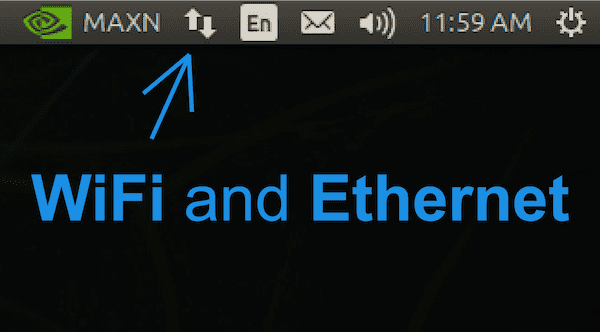
Once you see your NVIDIA + Ubuntu 18.04 desktop, you should configure your wired or wireless network settings as needed using the icon in the menubar as shown in Figure 6.
When you have confirmed that you have internet access on your NVIDIA Jetson Nano, you can move on to the next step.
Step #3: Open a terminal or start an SSH session
In this step we will do one of the following:
- Option 1: Open a terminal on the Nano desktop, and assume that you’ll perform all steps from here forward using the keyboard and mouse connected to your Nano
- Option 2: Initiate an SSH connection from a different computer so that we can remotely configure our NVIDIA Jetson Nano for computer vision and deep learning
Both options are equally good.
Option 1: Use the terminal on your Nano desktop
For Option 1, open up the application launcher, and select the terminal app. You may wish to right click it in the left menu and lock it to the launcher, since you will likely use it often.
You may now continue to Step #4 while keeping the terminal open to enter commands.
Option 2: Initiate an SSH remote session
For Option 2, you must first determine the username and IP address of your Jetson Nano. On your Nano, fire up a terminal from the application launcher, and enter the following commands at the prompt:
$ whoami
nvidia
$ ifconfig
en0: flags=8863 mtu 1500
	options=400
	ether 8c:85:90:4f:b4:41
	inet6 fe80::14d6:a9f6:15f8:401%en0 prefixlen 64 secured scopeid 0x8
	inet6 2600:100f:b0de:1c32:4f6:6dc0:6b95:12 prefixlen 64 autoconf secured
	inet6 2600:100f:b0de:1c32:a7:4e69:5322:7173 prefixlen 64 autoconf temporary
	inet 192.168.1.4 netmask 0xffffff00 broadcast 192.168.1.255
	nd6 options=201
	media: autoselect
	status: active
Grab your IP address (it is on the highlighted line). My IP address is 192.168.1.4; however, your IP address will be different, so make sure you check and verify your IP address!
Then, on a separate computer, such as your laptop/desktop, initiate an SSH connection as follows:
$ ssh nvidia@192.168.1.4
Notice how I’ve entered the username and IP address of the Jetson Nano in my command to remotely connect. You should now have a successful connection to your Jetson Nano, and you can continue on with Step #4.
Step #4: Update your system and remove programs to save space
In this step, we will remove programs we don’t need and update our system.
First, let’s set our Nano to use maximum power capacity:
$ sudo nvpmodel -m 0
$ sudo jetson_clocks
The nvpmodel command handles two power options for your Jetson Nano: (1) 5W is mode 1 and (2) 10W is mode 0. The default is the higher wattage mode, but it is always best to force the mode before running the jetson_clocks command.
According to the NVIDIA devtalk forums:
The
jetson_clocksscript disables the DVFS governor and locks the clocks to their maximums as defined by the activenvpmodelpower mode. So if your active mode is 10W,jetson_clockswill lock the clocks to their maximums for 10W mode. And if your active mode is 5W,jetson_clockswill lock the clocks to their maximums for 5W mode (NVIDIA DevTalk Forums).
Note: There are two typical ways to power your Jetson Nano. A 5V 2.5A (10W) microUSB power adapter is a good option. If you have a lot of gear being powered by the Nano (keyboards, mice, WiFi, cameras), then you should consider a 5V 4A (20W) power supply to ensure that your processors can run at their full speeds while powering your peripherals. Technically there’s a third power option too if you want to apply power directly on the header pins.
After you have set your Nano for maximum power, go ahead and remove LibreOffice — it consumes lots of space, and we won’t need it for computer vision and deep learning:
$ sudo apt-get purge libreoffice*
$ sudo apt-get clean
From there, let’s go ahead and update system level packages:
$ sudo apt-get update && sudo apt-get upgrade
In the next step, we’ll begin installing software.
Step #5: Install system-level dependencies
The first set of software we need to install includes a selection of development tools:
$ sudo apt-get install git cmake
$ sudo apt-get install libatlas-base-dev gfortran
$ sudo apt-get install libhdf5-serial-dev hdf5-tools
$ sudo apt-get install python3-dev
$ sudo apt-get install nano locate
Next, we’ll install SciPy prerequisites (gathered from NVIDIA’s devtalk forums) and a system-level Cython library:
$ sudo apt-get install libfreetype6-dev python3-setuptools
$ sudo apt-get install protobuf-compiler libprotobuf-dev openssl
$ sudo apt-get install libssl-dev libcurl4-openssl-dev
$ sudo apt-get install cython3
We also need a few XML tools for working with TensorFlow Object Detection (TFOD) API projects:
$ sudo apt-get install libxml2-dev libxslt1-dev
Step #6: Update CMake
Now we’ll update the CMake precompiler tool as we need a newer version in order to successfully compile OpenCV.
First, download and extract the CMake update:
$ wget http://www.cmake.org/files/v3.13/cmake-3.13.0.tar.gz
$ tar xpvf cmake-3.13.0.tar.gz cmake-3.13.0/
Next, compile CMake:
$ cd cmake-3.13.0/
$ ./bootstrap --system-curl
$ make -j4
And finally, update your bash profile:
$ echo 'export PATH=/home/nvidia/cmake-3.13.0/bin/:$PATH' >> ~/.bashrc
$ source ~/.bashrc
CMake is now ready to go on your system. Ensure that you do not delete the cmake-3.13.0/ directory in your home folder.
Step #7: Install OpenCV system-level dependencies and other development dependencies
Let’s now install OpenCV dependecies on our system beginning with tools needed to build and compile OpenCV with parallelism:
$ sudo apt-get install build-essential pkg-config
$ sudo apt-get install libtbb2 libtbb-dev
Next, we’ll install a handful of codecs and image libraries:
$ sudo apt-get install libavcodec-dev libavformat-dev libswscale-dev
$ sudo apt-get install libxvidcore-dev libavresample-dev
$ sudo apt-get install libtiff-dev libjpeg-dev libpng-dev
And then we’ll install a selection of GUI libraries:
$ sudo apt-get install python-tk libgtk-3-dev
$ sudo apt-get install libcanberra-gtk-module libcanberra-gtk3-module
Lastly, we’ll install Video4Linux (V4L) so that we can work with USB webcams and install a library for FireWire cameras:
$ sudo apt-get install libv4l-dev libdc1394-22-dev
Step #8: Set up Python virtual environments on your Jetson Nano
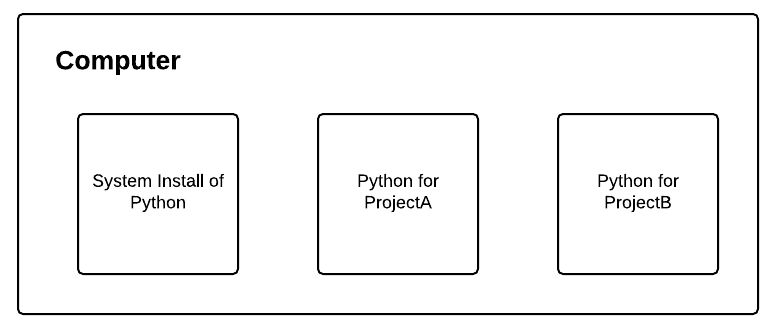
I can’t stress this enough: Python virtual environments are a best practice when both developing and deploying Python software projects.
Virtual environments allow for isolated installs of different Python packages. When you use them, you could have one version of a Python library in one environment and another version in a separate, sequestered environment.
In the remainder of this tutorial, we’ll create one such virtual environment; however, you can create multiple environments for your needs after you complete this Step #8. Be sure to read the RealPython guide on virtual environments if you aren’t familiar with them.
First, we’ll install the de facto Python package management tool, pip:
$ wget https://bootstrap.pypa.io/get-pip.py
$ sudo python3 get-pip.py
$ rm get-pip.py
And then we’ll install my favorite tools for managing virtual environments, virtualenv and virtualenvwrapper:
$ sudo pip install virtualenv virtualenvwrapper
The virtualenvwrapper tool is not fully installed until you add information to your bash profile. Go ahead and open up your ~/.bashrc with the nano ediitor:
$ nano ~/.bashrc
And then insert the following at the bottom of the file:
# virtualenv and virtualenvwrapper
export WORKON_HOME=$HOME/.virtualenvs
export VIRTUALENVWRAPPER_PYTHON=/usr/bin/python3
source /usr/local/bin/virtualenvwrapper.sh
Save and exit the file using the keyboard shortcuts shown at the bottom of the nano editor, and then load the bash profile to finish the virtualenvwrapper installation:
$ source ~/.bashrc
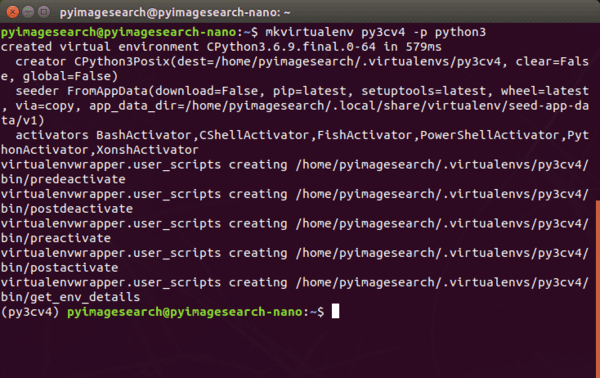
virtualenvwrapper setup installation indicates that there are no errors. We now have a virtual environment management system in place so we can create computer vision and deep learning virtual environments on our NVIDIA Jetson Nano.So long as you don’t encounter any error messages, both virtualenv and virtualenvwrapper are now ready for you to create and destroy virtual environments as needed in Step #9.
Step #9: Create your ‘py3cv4’ virtual environment
This step is dead simple once you’ve installed virtualenv and virtualenvwrapper in the previous step. The virtualenvwrapper tool provides the following commands to work with virtual environments:
mkvirtualenv: Create a Python virtual environmentlsvirtualenv: List virtual environments installed on your systemrmvirtualenv: Remove a virtual environmentworkon: Activate a Python virtual environmentdeactivate: Exits the virtual environment taking you back to your system environment
Assuming Step #8 went smoothly, let’s create a Python virtual environment on our Nano:
$ mkvirtualenv py3cv4 -p python3
I’ve named the virtual environment py3cv4 indicating that we will use Python 3 and OpenCV 4. You can name yours whatever you’d like depending on your project and software needs or even your own creativity.
When your environment is ready, your bash prompt will be preceded by (py3cv4). If your prompt is not preceded by the name of your virtual environment name, at any time you can use the workon command as follows:
$ workon py3cv4
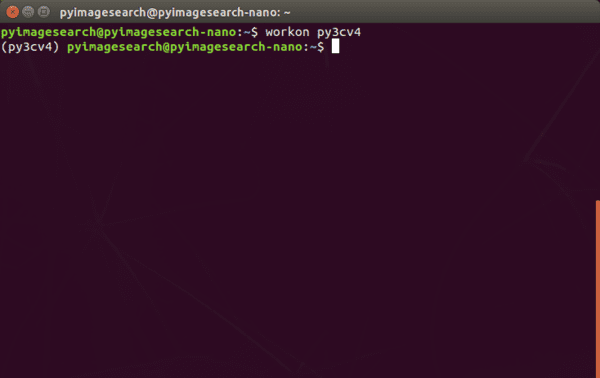
For the remaining steps in this tutorial, you must be “in” the py3cv4 virtual environment.
Step #10: Install the Protobuf Compiler
This section walks you through the step-by-step process for configuring protobuf so that TensorFlow will be fast.
TensorFlow’s performance can be significantly impacted (in a negative way) if an efficient implementation of protobuf and libprotobuf are not present.
When we pip-install TensorFlow, it automatically installs a version of protobuf that might not be the ideal one. The issue with slow TensorFlow performance has been detailed in this NVIDIA Developer forum.
First, download and install an efficient implementation of the protobuf compiler (source):
$ wget https://raw.githubusercontent.com/jkjung-avt/jetson_nano/master/install_protobuf-3.6.1.sh
$ sudo chmod +x install_protobuf-3.6.1.sh
$ ./install_protobuf-3.6.1.sh
This will take approximately one hour to install, so go for a nice walk, or read a good book such as Raspberry Pi for Computer Vision or Deep Learning for Computer Vision with Python.
Once protobuf is installed on your system, you need to install it inside your virtual environment:
$ workon py3cv4 # if you aren't inside the environment
$ cd ~
$ cp -r ~/src/protobuf-3.6.1/python/ .
$ cd python
$ python setup.py install --cpp_implementation
Notice that rather than using pip to install the protobuf package, we used a setup.py installation script. The benefit of using setup.py is that we compile software specifically for the Nano processor rather than using generic precompiled binaries.
In the remaining steps we will use a mix of setup.py (when we need to optimize a compile) and pip (when the generic compile is sufficient).
Let’s move on to Step #11 where we’ll install deep learning software.
Step #11: Install TensorFlow, Keras, NumPy, and SciPy on Jetson Nano
In this section, we’ll install TensorFlow/Keras and their dependencies.
First, ensure you’re in the virtual environment:
$ workon py3cv4
And then install NumPy and Cython:
$ pip install numpy cython
You may encounter the following error message:
ERROR: Could not build wheels for numpy which use PEP 517 and cannot be installed directly.
If you come across that message, then follow these additional steps. First, install NumPy with super user privileges:
$ sudo pip install numpy
Then, create a symbolic link from your system’s NumPy into your virtual environment site-packages. To be able to do that you would need the installation path of numpy, which can be found out by issuing a NumPy uninstall command, and then canceling it as follows:
$ sudo pip uninstall numpy
Uninstalling numpy-1.18.1:
  Would remove:
    /usr/bin/f2py
    /usr/local/bin/f2py
    /usr/local/bin/f2py3
    /usr/local/bin/f2py3.6
    /usr/local/lib/python3.6/dist-packages/numpy-1.18.1.dist-info/*
    /usr/local/lib/python3.6/dist-packages/numpy/*
Proceed (y/n)? n
Note that you should type n at the prompt because we do not want to proceed with uninstalling NumPy. Then, note down the installation path (highlighted), and execute the following commands (replacing the paths as needed):
$ cd ~/.virtualenvs/py3cv4/lib/python3.6/site-packages/
$ ln -s ~/usr/local/lib/python3.6/dist-packages/numpy numpy
$ cd ~
At this point, NumPy is sym-linked into your virtual environment. We should quickly test it as NumPy is needed for the remainder of this tutorial. Issue the following commands in a terminal:
$ workon py3cv4
$ python
>>> import numpy
Now that NumPy is installed, let’s install SciPy. We need SciPy v1.3.3 for TensorFlow 1.13.1 compatibility on the Nano. Therefore, we cannot use pip. Instead, we’re going to grab a release directly from GitHub (as recommended to us in the DevTalk link) and install it:
$ wget https://github.com/scipy/scipy/releases/download/v1.3.3/scipy-1.3.3.tar.gz
$ tar -xzvf scipy-1.3.3.tar.gz scipy-1.3.3
$ cd scipy-1.3.3/
$ python setup.py install
Installing SciPy will take approximately 35 minutes. Watching and waiting for it to install is like watching paint dry, so you might as well pop open one of my books or courses and brush up on your computer vision and deep learning skills.
Now we will install NVIDIA’s TensorFlow 1.13 optimized for the Jetson Nano. Of course you’re wondering:
Why shouldn’t I use TensorFlow 2.0 on the NVIDIA Jetson Nano?
That’s a great question, and I’m going to bring in my NVIDIA Jetson Nano expert, Sayak Paul, to answer that very question:
Although TensorFlow 2.0 is available for installation on the Nano it is not recommended because there can be incompatibilities with the version of TensorRT that comes with the Jetson Nano base OS. Furthermore, the TensorFlow 2.0 wheel for the Nano has a number of memory leak issues which can make the Nano freeze and hang. For these reasons, we recommend TensorFlow 1.13 at this point in time.
Given Sayak’s expert explanation, let’s go ahead and install TF 1.13 now:
$ pip install --extra-index-url https://developer.download.nvidia.com/compute/redist/jp/v42 tensorflow-gpu==1.13.1+nv19.3
Let’s now move on to Keras, which we can simply install via pip:
$ pip install keras
Next, we’ll install the TFOD API on the Jetson Nano.
Step #12: Install the TensorFlow Object Detection API on Jetson Nano
In this step, we’ll install the TFOD API on our Jetson Nano.
TensorFlow’s Object Detection API (TFOD API) is a library that we typically know for developing object detection models. We also need it to optimize models for the Nano’s GPU.
NVIDIA’s tf_trt_models is a wrapper around the TFOD API, which allows for building frozen graphs, a necessary for model deployment. More information on tf_trt_models can be found in this NVIDIA repository.
Again, ensure that all actions take place “in” your py3cv4 virtual environment:
$ cd ~
$ workon py3cv4
First, clone the models repository from TensorFlow:
$ git clone https://github.com/tensorflow/models
In order to be reproducible, you should checkout the following commit that supports TensorFlow 1.13.1:
$ cd models && git checkout -q b00783d
From there, install the COCO API for working with the COCO dataset and, in particular, object detection:
$ cd ~
$ git clone https://github.com/cocodataset/cocoapi.git
$ cd cocoapi/PythonAPI
$ python setup.py install
The next step is to compile the Protobuf libraries used by the TFOD API. The Protobuf libraries enable us (and therefore the TFOD API) to serialize structured data in a language-agnostic way:
$ cd ~/models/research/
$ protoc object_detection/protos/*.proto --python_out=.
From there, let’s configure a useful script I call setup.sh. This script will be needed each time you use the TFOD API for deployment on your Nano. Create such a file with the Nano editor:
$ nano ~/setup.sh
Insert the following lines in the new file:
#!/bin/sh

export PYTHONPATH=$PYTHONPATH:/home/`whoami`/models/research:\
/home/`whoami`/models/research/slim
The shebang at the top indicates that this file is executable and then the script configures your PYTHONPATH according to the TFOD API installation directory. Save and exit the file using the keyboard shortcuts shown at the bottom of the nano editor.
Step #13: Install NVIDIA’s ‘tf_trt_models’ for Jetson Nano
In this step, we’ll install the tf_trt_models library from GitHub. This package contains TensorRT-optimized models for the Jetson Nano.
First, ensure you’re working in the py3cv4 virtual environment:
$ workon py3cv4
Go ahead and clone the GitHub repo, and execute the installation script:
$ cd ~
$ git clone --recursive https://github.com/NVIDIA-Jetson/tf_trt_models.git
$ cd tf_trt_models
$ ./install.sh
That’s all there is to it. In the next step, we’ll install OpenCV!
Step #14: Install OpenCV 4.1.2 on Jetson Nano
In this section, we will install the OpenCV library with CUDA support on our Jetson Nano.
OpenCV is the common library we use for image processing, deep learning via the DNN module, and basic display tasks. I’ve created an OpenCV Tutorial for you if you’re interested in learning some of the basics.
CUDA is NVIDIA’s set of libraries for working with their GPUs. Some non-deep learning tasks can actually run on a CUDA-capable GPU faster than on a CPU. Therefore, we’ll install OpenCV with CUDA support, since the NVIDIA Jetson Nano has a small CUDA-capable GPU.
This section of the tutorial is based on the hard work of the owners of the PythOps website.
We will be compiling from source, so first let’s download the OpenCV source code from GitHub:
$ cd ~
$ wget -O opencv.zip https://github.com/opencv/opencv/archive/4.1.2.zip
$ wget -O opencv_contrib.zip https://github.com/opencv/opencv_contrib/archive/4.1.2.zip
Notice that the versions of OpenCV and OpenCV-contrib match. The versions must match for compatibility.
From there, extract the files and rename the directories for convenience:
$ unzip opencv.zip
$ unzip opencv_contrib.zip
$ mv opencv-4.1.2 opencv
$ mv opencv_contrib-4.1.2 opencv_contrib
Go ahead and activate your Python virtual environment if it isn’t already active:
$ workon py3cv4
And change into the OpenCV directory, followed by creating and entering a build directory:
$ cd opencv
$ mkdir build
$ cd build
It is very important that you enter the next CMake command while you are inside (1) the ~/opencv/build directory and (2) the py3cv4 virtual environment. Take a second now to verify:
(py3cv4) $ pwd
/home/nvidia/opencv/build
I typically don’t show the name of the virtual environment in the bash prompt because it takes up space, but notice how I have shown it at the beginning of the prompt above to indicate that we are “in” the virtual environment.
Additionally, the result of the pwd command indicates we are “in” the build/ directory.
Provided you’ve met both requirements, you’re now ready to use the CMake compile prep tool:
$ cmake -D CMAKE_BUILD_TYPE=RELEASE \
	-D WITH_CUDA=ON \
	-D CUDA_ARCH_PTX="" \
	-D CUDA_ARCH_BIN="5.3,6.2,7.2" \
	-D WITH_CUBLAS=ON \
	-D WITH_LIBV4L=ON \
	-D BUILD_opencv_python3=ON \
	-D BUILD_opencv_python2=OFF \
	-D BUILD_opencv_java=OFF \
	-D WITH_GSTREAMER=ON \
	-D WITH_GTK=ON \
	-D BUILD_TESTS=OFF \
	-D BUILD_PERF_TESTS=OFF \
	-D BUILD_EXAMPLES=OFF \
	-D OPENCV_ENABLE_NONFREE=ON \
	-D OPENCV_EXTRA_MODULES_PATH=/home/`whoami`/opencv_contrib/modules ..
There are a lot of compiler flags here, so let’s review them. Notice that WITH_CUDA=ON is set, indicating that we will be compiling with CUDA optimizations.
Secondly, notice that we have provided the path to our opencv_contrib folder in the OPENCV_EXTRA_MODULES_PATH, and we have set OPENCV_ENABLE_NONFREE=ON, indicating that we are installing the OpenCV library with full support for external and patented algorithms.
Be sure to copy the entire command above, including the .. at the very bottom. When CMake finishes, you’ll encounter the following output in your terminal:
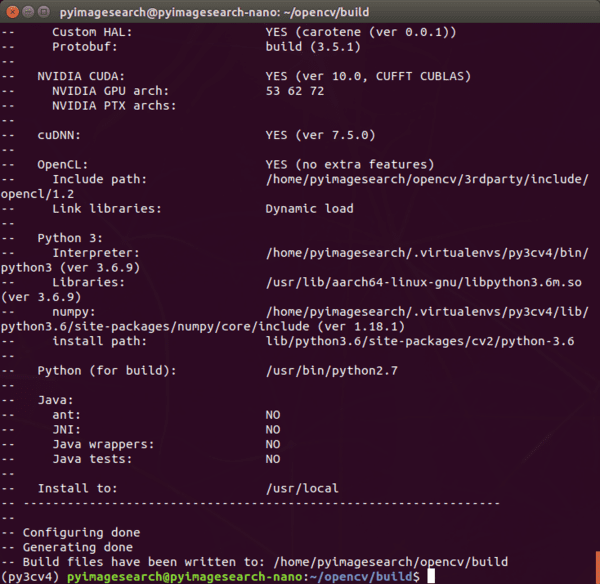
I highly recommend you scroll up and read the terminal output with a keen eye to see if there are any errors. Errors need to be resolved before moving on. If you do encounter an error, it is likely that one or more prerequisites from Steps #5-#11 are not installed properly. Try to determine the issue, and fix it.
If you do fix an issue, then you’ll need to delete and re-creating your build directory before running CMake again:
$ cd ..
$ rm -rf build
$ mkdir build
$ cd build
# run CMake command again
When you’re satisfied with your CMake output, it is time to kick of the compilation process with Make:
$ make -j4
Compiling OpenCV will take approximately 2.5 hours. When it is done, you’ll see 100%, and your bash prompt will return:
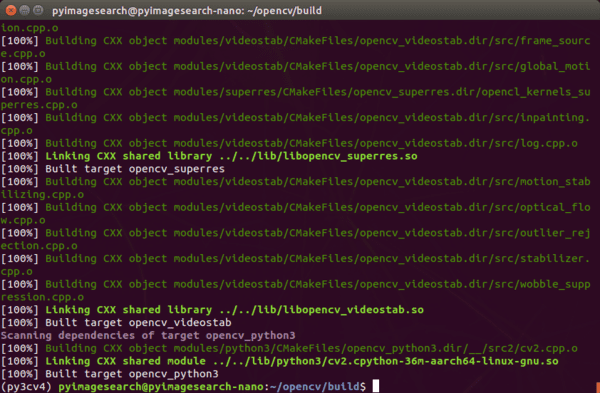
make command reaches 100% you can proceed with setting up your NVIDIA Jetson Nano for computer vision and deep learning.From there, we need to finish the installation. First, run the install command:
$ sudo make install
Then, we need to create a symbolic link from OpenCV’s installation directory to the virtual environment. A symbolic link is like a pointer in that a special operating system file points from one place to another on your computer (in this case our Nano). Let’s create the sym-link now:
$ cd ~/.virtualenvs/py3cv4/lib/python3.6/site-packages/
$ ln -s /usr/local/lib/python3.6/site-packages/cv2/python3.6/cv2.cpython-36m-aarch64-linux-gnu.so cv2.so
OpenCV is officially installed. In the next section, we’ll install a handful of useful libraries to accompany everything we’ve installed so far.
Step #15: Install other useful libraries via pip
In this section, we’ll use pip to install additional packages into our virtual environment.
Go ahead and activate your virtual environment:
$ workon py3cv4
And then install the following packages for machine learning, image processing, and plotting:
$ pip install matplotlib scikit-learn
$ pip install pillow imutils scikit-image
Followed by Davis King’s dlib library:
$ pip install dlib
Note: While you may be tempted to compile dlib with CUDA capability for your NVIDIA Jetson Nano, currently dlib does not support the Nano’s GPU. Sources: (1) dlib GitHub issues and (2) NVIDIA devtalk forums.
Now go ahead and install Flask, a Python micro web server; and Jupyter, a web-based Python environment:
$ pip install flask jupyter
And finally, install our XML tool for the TFOD API, and progressbar for keeping track of terminal programs that take a long time:
$ pip install lxml progressbar2
Great job, but the party isn’t over yet. In the next step, we’ll test our installation.
Step #16: Testing and Validation
I always like to test my installation at this point to ensure that everything is working as I expect. This quick verification can save time down the road when you’re ready to deploy computer vision and deep learning projects on your NVIDIA Jetson Nano.
Testing TensorFlow and Keras
To test TensorFlow and Keras, simply import them in a Python shell:
$ workon py3cv4
$ python
>>> import tensorflow
>>> import keras
>>> print(tensorflow.__version__)
1.13.1
>>> print(keras.__version__)
2.3.0
Again, we are purposely not using TensorFlow 2.0. As of March 2020, when this post was written, TensorFlow 2.0 is/was not supported by TensorRT and it has memory leak issues.
Testing the TFOD API
To test the TFOD API, we first need to run the setup script:
$ cd ~
$ source ./setup.sh
And then execute the test routine as shown in Figure 12:
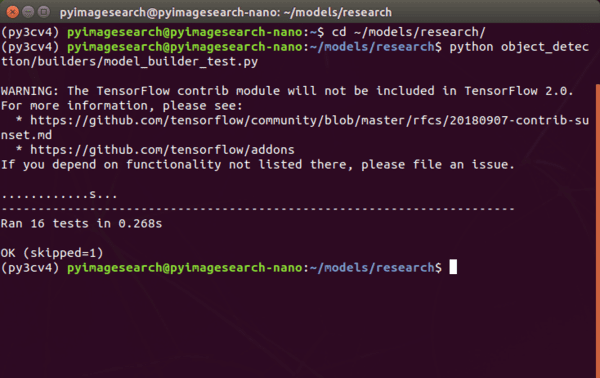
Assuming you see “OK” next to each test that was run, you are good to go.
Testing OpenCV
To test OpenCV, we’ll simply import it in a Python shell and load + display an image:
$ workon py3cv4
$ wget -O penguins.jpg http://pyimg.co/avp96
$ python
>>> import cv2
>>> import imutils
>>> image = cv2.imread("penguins.jpg")
>>> image = imutils.resize(image, width=400)
>>> message = "OpenCV Jetson Nano Success!"
>>> font = cv2.FONT_HERSHEY_SIMPLEX
>>> _ = cv2.putText(image, message, (30, 130), font, 0.7, (0, 255, 0), 2)
>>> cv2.imshow("Penguins", image); cv2.waitKey(0); cv2.destroyAllWindows()
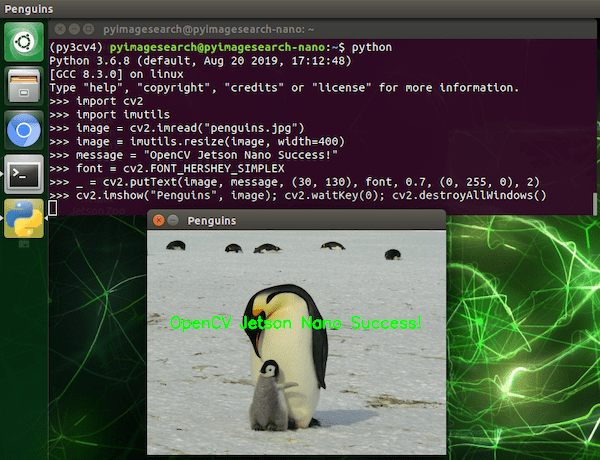
Testing your webcam
In this section, we’ll develop a quick and dirty script to test your NVIDIA Jetson Nano camera using either (1) a PiCamera or (2) a USB camera.
Did you know that the NVIDIA Jetson Nano is compatible with your Raspberry Pi picamera?
In fact it is, but it requires a long source string to interact with the driver. In this section, we’ll fire up a script to see how it works.
First, connect your PiCamera to your Jetson Nano with the ribbon cable as shown:
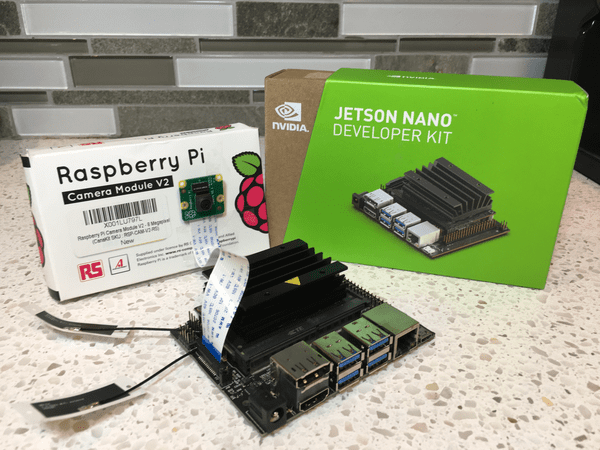
Next, be sure to grab the “Downloads” associated with this blog post for the test script. Let’s review the test_camera_nano.py script now:
# import the necessary packages
from imutils.video import VideoStream
import imutils
import time
import cv2

# grab a reference to the webcam
print("[INFO] starting video stream...")
#vs = VideoStream(src=0).start()
vs = VideoStream(src="nvarguscamerasrc ! video/x-raw(memory:NVMM), " \
	"width=(int)1920, height=(int)1080,format=(string)NV12, " \
	"framerate=(fraction)30/1 ! nvvidconv ! video/x-raw, " \
	"format=(string)BGRx ! videoconvert ! video/x-raw, " \
	"format=(string)BGR ! appsink").start()
time.sleep(2.0)
This script uses both OpenCV and imutils as shown in the imports on Lines 2-4.
Using the video module of imutils, let’s create a VideoStream on Lines 9-14:
- USB Camera: Currently commented out on Line 9, to use your USB webcam, you simply need to provide
src=0or another device ordinal if you have more than one USB camera connected to your Nano - PiCamera: Currently active on Lines 10-14, a lengthy
srcstring is used to work with the driver on the Nano to access a PiCamera plugged into the MIPI port. As you can see, the width and height in the format string indicate 1080p resolution. You can also use other resolutions that your PiCamera is compatible with
We’re more interested in the PiCamera right now, so let’s focus on Lines 10-14. These lines activate a stream for the Nano to use the PiCamera interface. Take note of the commas, exclamation points, and spaces. You definitely want to get the src string correct, so enter all parameters carefully!
Next, we’ll capture and display frames:
# loop over frames
while True:
	# grab the next frame
	frame = vs.read()

	# resize the frame to have a maximum width of 500 pixels
	frame = imutils.resize(frame, width=500)

	# show the output frame
	cv2.imshow("Frame", frame)
	key = cv2.waitKey(1) & 0xFF

	# if the `q` key was pressed, break from the loop
	if key == ord("q"):
		break

# release the video stream and close open windows
vs.stop()
cv2.destroyAllWindows()
Here we begin looping over frames. We resize the frame, and display it to our screen in an OpenCV window. If the q key is pressed, we exit the loop and cleanup.
To execute the script, simply enter the following command:
$ workon py3cv4
$ python test_camera_nano.py
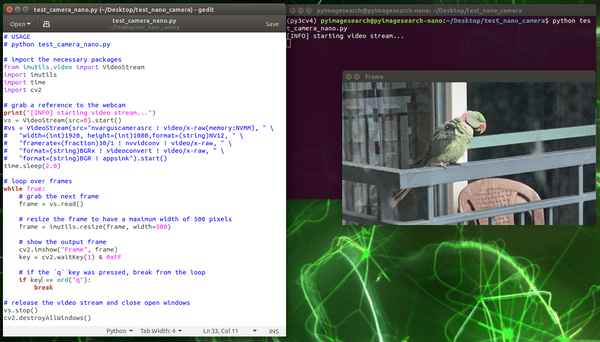
As you can see, now our PiCamera is working properly with the NVIDIA Jetson Nano.
Is there a faster way to get up and running?
As an alternative to the painful, tedious, and time consuming process of configuring your Nano over the course of 2+ days, I suggest grabbing a copy off the Complete Bundle of Raspberry Pi for Computer Vision.
My book includes a pre-configured Nano .img developed with my team that is ready to go out of the box. It includes TensorFlow/Keras, TensorRT, OpenCV, scikit-image, scikit-learn, and more.
All you need to do is simply:
- Download the Jetson Nano .img file
- Flash it to your microSD card
- Boot your Nano
- And begin your projects
The .img file is worth the price of the Complete Bundle bundle alone.
As Peter Lans, a Senior Software Consultant, said:
Setting up a development environment for the Jetson Nano is horrible to do. After a few attempts, I gave up and left it for another day.
Until now my Jetson does what it does best: collecting dust in a drawer. But now I have an excuse to clean it and get it running again.
Besides the fact that Adrian’s material is awesome and comprehensive, the pre-configured Nano .img bonus is the cherry on the pie, making the price of Raspberry Pi for Computer Vision even more attractive.
To anyone interested in Adrian’s RPi4CV book, be fair to yourself and calculate the hours you waste getting nowhere. It will make you realize that you’ll have spent more in wasted time than on the book bundle.
One of my Twitter followers echoed the statement:
My .img files are updated on a regular basis and distributed to customers. I also provide priority support to customers of my books and courses, something that I’m unable to offer for free to everyone on the internet who visits this website.
Simply put, if you need support with your Jetson Nano from me, I recommend picking up a copy of Raspberry Pi for Computer Vision, which offers the best embedded computer vision and deep learning education available on the internet.
In addition to the .img files, RPi4CV covers how to successfully apply Computer Vision, Deep Learning, and OpenCV to embedded devices such as the:
- Raspberry Pi
- Intel Movidus NCS
- Google Coral
- NVIDIA Jetson Nano
Inside, you’ll find over 40 projects (including 60+ chapters) on embedded Computer Vision and Deep Learning.
A handful of the highlighted projects include:
- Traffic counting and vehicle speed detection
- Real-time face recognition
- Building a classroom attendance system
- Automatic hand gesture recognition
- Daytime and nighttime wildlife monitoring
- Security applications
- Deep Learning classification, object detection, and human pose estimation on resource-constrained devices
- … and much more!
If you’re just as excited as I am, grab the free table of contents by clicking here:
Summary
In this tutorial, we configured our NVIDIA Jetson Nano for Python-based deep learning and computer vision.
We began by flashing the NVIDIA Jetpack .img. From there we installed prerequisites. We then configured a Python virtual environment for deploying computer vision and deep learning projects.
Inside our virtual environment, we installed TensorFlow, TensorFlow Object Detection (TFOD) API, TensorRT, and OpenCV.
We wrapped up by testing our software installations. We also developed a quick Python script to test both PiCamera and USB cameras.
If you’re interested in a computer vision and deep learning on the Raspberry Pi and NVIDIA Jetson Nano, be sure to pick up a copy of Raspberry Pi for Computer Vision.
To download the source code to this post (and be notified when future tutorials are published here on PyImageSearch), just enter your email address in the form below!

Download the Source Code and FREE 17-page Resource Guide
Enter your email address below to get a .zip of the code and a FREE 17-page Resource Guide on Computer Vision, OpenCV, and Deep Learning. Inside you'll find my hand-picked tutorials, books, courses, and libraries to help you master CV and DL!
