In this blog post, you will learn how to perform remote development on a Raspberry Pi (or Amazon EC2 server). You will discover how to configure your host machine to connect to these systems and remotely perform Python development.
Today’s tutorial is actually a chapter for my upcoming book, Raspberry Pi for Computer Vision.
As I was writing the chapter I realized that the guide wasn’t specific to the RPi and could actually be used for anyone who needed to configure a remote system for development (and in particular, using the Python programming language).
Therefore, I decided to take the chapter and convert it into a blog post.
Using this tutorial you will learn how to configure:
- Your Raspberry Pi for remote computer vision development
- An Amazon AWS server for remote deep learning
- …or any other system that you can connect to remotely!
To learn how to configure your Raspberry Pi, Amazon EC2 instance, or server for remote Python development, just keep reading!
Remote development on the Raspberry Pi (or Amazon EC2)
In the first part of this tutorial, we’ll discuss the concept of remote development and why it’s not only convenient for us as programmers, but also why you should be doing it when writing code on your non-host machine.
From there I’ll provide you with my three favorite methods to connecting to a Raspberry Pi, AWS instance, or remote server.
We’ll then discuss two easy to use methods for transferring files from your host machine to a remote system.
Finally, we’ll wrap up the post with a discussion of Python IDEs that can be used to write code on a remote system.
What is remote development?
Remote development assumes that you have two computers:
- Your host machine (also called your local machine) that has your monitor, keyboard, and mouse attached to.
- The remote machine where your code is executing.
Or, more simply put:
- Your host machine is your laptop/desktop sitting on your desk where you normally work.
- Your remote machine is the machine you login to via your host machine.
To perform development you first connect to the remote machine from your host.
There are a number of ways to connect to the remote machine, including SSH, VNC, Jupyter Notebooks, and others. We’ll be covering these methods later in this guide.
Once you’re connected to the remote machine you can then:
- Write code on the remote machine
- Execute code on the remote machine
Figure 1 illustrates the concept of using your host machine to login to a device, writing code on the remote system, and then executing it.
While you are still typing using the keyboard on your local system, the commands/code itself are actually being executed on the remote machine.
Why would I want to write my code remotely?
If you’re working with a cloud-based instance such as Amazon EC2, Microsoft Azure, etc., then you do not have physical access to the machine (meaning there is no keyboard/mouse to use).
In that situation you need to login to the server and perform remote development — and you’ll want to ensure that your local host is configured properly for remote development.
If you’re using a Raspberry Pi then you certainly could connect a keyboard, monitor, and mouse, but that’s not always necessary!
First, you’ll have the hassle of setting up the additional hardware — it’s clunky to set up, you’ll lose space on your desk, and worst of all, you’ll constantly be switching back and forth between your RPi keyboard and your laptop/desktop keyboard.
Secondly, even with the release of the Raspberry Pi 4, the RPi itself is still very underpowered compared to your laptop/desktop — you won’t (and shouldn’t) be able to utilize powerful programming IDEs on the Pi itself.
When it comes to Python development, PyCharm is quite literally the standard.
However, IDEs like PyCharm, while super powerful, are resource hogs, consuming quite a bit of RAM and CPU cycles — on a resource-constrained device such as the RPi, running such an IDE is computationally wasteful.
Instead, you should:
- Configure your local machine to connect to the Pi
- Code on your laptop/desktop
- And then have those files transferred (potentially automatically) to the Pi so you can run the code itself on the remote machine.
In the remainder of this tutorial, I’ll show you how to configure your host machine to create a seamless transition, making it feel like you’re writing code on your host but you’re actually writing code on the remote system.
Connecting to a remote machine or Raspberry Pi
There are a number of methods, protocols, and procedures to connect to a remote machine.
The methods discussed in this section are certainly not exhaustive, but they are my favorites and ones you will absolutely encounter when performing remote development.
Secure Shell (SSH)

The first method, and arguably the most simple, is to utilize Secure Shell (SSH), which is the ssh command on Unix machines.
To use SSH you need:
- An SSH server installed and running on your remote machine.
- An SSH client installed on your local machine.
- The IP address, username, and password of the remote system.
Most systems will have an SSH server. On Ubuntu, if you need to install an SSH server, simply:
$ sudo apt-get install openssh-server
On macOS, you only need to enable “Remote Login”:
sudo systemsetup -setremotelogin on
See below for two options to enable an SSH server on the Raspberry Pi.
If you’re working with a Unix-based machine (such as Linux or macOS), the ssh client is installed by default. If you are using Windows you may need to install it
Note: I haven’t used Windows in over 10+ years and do not officially support Windows on the PyImageSearch blog. The last I checked PuTTY was still a good option but I’ll leave SSH install on Windows up to you.
Provided you have SSH installed, first open a terminal/command line on your host machine.
You’ll then need the following:
- The IP address of the machine you are connecting to.
- The username of the user you’ll be logging into on the remote machine.
- The password of the respective user.
Once you have that information, you can use the following command as a template:
$ ssh username@ip_address
If you are using Amazon EC2, you may need to supply a private key instead of a password:
$ ssh -i ~/keyfile.pem username@ip_address # AWS EC2
For example, if the IP address of my remote machine is 10.0.0.90 and my username is adrian , the ssh command becomes:
$ ssh adrian@10.0.0.90
I can then supply my password and login to the remote machine. Once logged in, I can now execute any command I wish (provided I have the proper permissions, of course) on the remote machine.
X11 forwarding

Did you know that you can use SSH to see basic GUI windows from your Python scripts and programs?
First, you need an X-Window manager:
- If your host is Ubuntu (or another Linux distro), it is built-in.
- If your host is macOS, you should download + install xQuartz.
- If your host is Windows, I think you need Xming these days still (It has been over 10 years since I’ve used Windows so you should do your own research).
All you need to do is enable X11 forwarding via the -X switch:
$ ssh -X username@ip_address
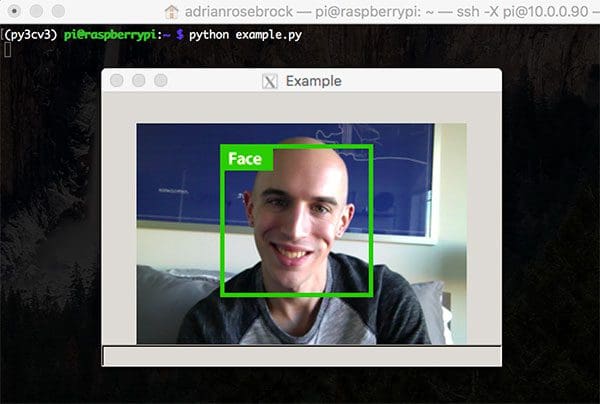
Here I’ve launched a Python script named example.py. This script loads an image from disk and displays it to my local host’s screen via cv2.imshow call.
Since I have X11 forwarding enabled, the window opened via OpenCV is displayed on my host machine. Remember, the code is executed remotely and the image is rendered remotely but displayed locally.
You might be wondering:
Is X11 forwarding useful for video streaming?
In short, the answer is “no, don’t bother.” The X11 forwarding protocol doesn’t compress the images at all or effectively to make video streaming possible. Do not attempt to use X11 forwarding for apps where the content changes often or there are video feeds.
A quick note on SSH on the Raspberry Pi
It’s important to note that SSH is turned off by default on the Raspberry Pi, meaning that you cannot connect to your RPi via SSH without first enabling it.
There are a few methods to enable SSH on the Raspberry Pi.
Option 1: You may enable it via the Desktop user interface:

From there, find the “Interfaces” tab and enable SSH:
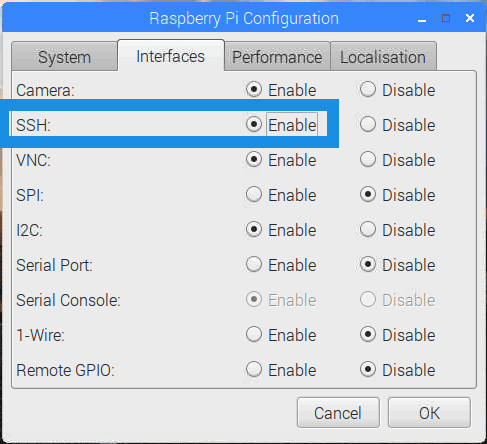
Option 2: The second method is to use the following command to enable it:
$ sudo service ssh start
The problem with this method is that requires you to have physical access to the RPi to type in the command.
The second issue is that if you reboot the Raspberry Pi, SSH will not automatically start (i.e., starting SSH will not persist across reboots).
Option 3: Similar to Option 1, you may enter the Raspberry Pi Configuration via the command line:
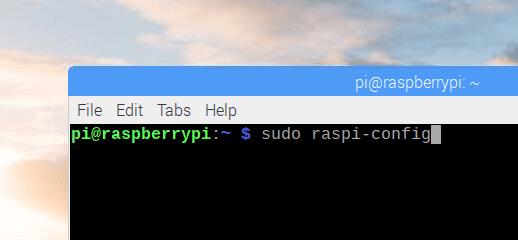
raspi-config command allows you to change system settings.From there, you’ll be presented with a terminal menu:

Then you’ll be presented with the interfaces, one of which is SSH:

A reboot will be required. From there you can use the Raspberry Pi’s IP address to connect to it remotely. To find your RPi’s IP address, simply use the ifconfig command:

ifconfig command. Here my RPi is connected to my wlan0 interface on the 192.168.1.150 IP.Another way to find a Raspberry Pi on your network is to go to our router’s client page. This is useful if you don’t have a screen and keyboard/mouse connected to your RPi at the time.
Virtual Network Computing (VNC)

If you prefer a graphical user interface (GUI) instead of the command line when working on your remote machine, then you can use VNC.
To use VNC you need:
- A VNC server installed and running on your remote machine.
- A VNC client installed on your local machine.
- The IP address, username, and password of the remote system.
However, keep in mind that VNC assumes you have GUI/desktop manager running on your remote system.
For the Raspberry Pi, that’s a perfectly fine assumption to make — the RPi launches a window manager on boot (provided you are using the standard install of Raspbian, of course).
However, for a remote server, such as Amazon EC2 or Microsoft Azure, you likely don’t have a window manager.
In those situations, you cannot use VNC and should instead use SSH.
How to install a VNC server is dependent on your operating system so you’ll want to do your own research on that (as I cannot provide instructions for every single operating system).
That said, I have provided VNC server install instructions for Raspbian and Ubuntu, two of the most popular operating systems you’ll want to install VNC server on.
Installing VNC Server on Raspbian
Luckily for us, it is easy to get VNC going on the Raspbian OS.
You have two options:
Option 1: Use the Desktop configuration to change the setting:
Refer to Figure 5 to open the “Raspberry Pi Configuration” user interface. Then enable VNC via the radio button:
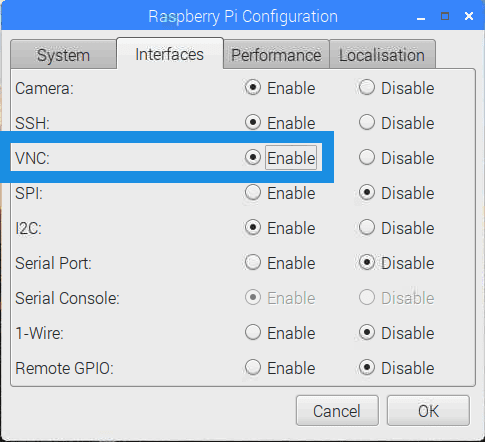
This method requires a reboot.
Option 2: Enable VNC Server with the command line:
At the command line, run sudo raspi-config (refer to Figure 7).
Then, navigate to the “5 Interfacing Options” menu item (refer to Figure 8).
Finally, select “P3 VNC”:

raspi-config command to open the configuration settings.Enable VNC and you’ll be good to go after a reboot.
Installing VNC Server on Ubuntu
There are multiple methods to install a VNC Server on Ubuntu.
Option 1: Given that my preference is Real VNC (for both server and client), you could start by installing their .deb file for the easiest method:

To install a .deb file in Ubuntu, you can double click the icon in the file browser/desktop. Alternatively, you may run .deb files from the command line:
$ sudo dpkg -i VNC-Server-6.4.1-Linux-x64.deb
Option 2: Alternatively, there is plenty of information online on how to manually install a VNC server from the command line.
Rather than regurgitating someone else’s installation guide here, I’m providing links to promising tutorials:
- https://www.cyberciti.biz/faq/install-and-configure-tigervnc-server-on-ubuntu-18-04/
- https://www.digitalocean.com/community/tutorials/how-to-install-and-configure-vnc-on-ubuntu-18-04
If you find a tutorial that you particularly like for installing VNC via the command line, please share it in the comments section of this post.
Real VNC Client
My preferred VNC client is Real VNC which is available for macOS, Linux, Windows, and other operating systems.
You can download the Real VNC client appropriate for your system using this link.
Once you have both (1) VNC server running on your remote machine and (2) the VNC client running on your local machine, follow the steps in Figure 11:
- Enter the IP address of the remote machine.
- Enter the username and password for the account on the remote system.
- Enjoy your VNC connection!
From there you have remote access to the desktop and GUI manager on the remote machine.
So, what’s the catch?
The problem with VNC is that it’s slow due to network latency. Even on local networks, VNC can appear to be a bit “laggy” at times.
I personally only use VNC when:
- I need to access my Raspberry Pi on a local network.
- I need to run Python scripts that utilize
cv2.imshowso I can visualize the output.
If your network connection is strong, you can use VNC and cv2.imshow calls to debug real-time Python and OpenCV scripts; however, if your connection is weak and you consistently need to use cv2.imshow, you should simply use a physical monitor attached to your “remote” machine.
Jupyter Notebooks

Jupyter Notebooks have become super popular for Python development.
I encourage you to use them, provided you understand that Jupyter Notebooks are not a replacement for the command line — they are just a different tool in your tool belt.
Just because you can execute commands and code via a Jupyter Notebook does not mean you can ignore learning the command line (and vice versa).
To be a well-rounded developer you need to learn how to use both.
The benefit of Jupyter Notebooks is that you have an interactive IDLE environment that you access via your web browser — you simply point your web browser at the IP address/port of the Jupyter Notebook running on your remote machine and access it. To utilize Jupyter Notebooks you first need to install it on your remote machine:
$ workon your_env_name
$ pip install jupyter
If you are using Python virtual environments (recommended) you will need to install the jupyter package into whichever Python environment you use to use Jupyter Notebooks inside of.
As a quick sanity check, you can launch a jupyter notebook via:
$ jupyter notebook
Your web browser will launch automatically if your notebook is running on the local machine and you are also on your local machine.

If your notebook is running remotely, you need to launch a web browser and enter the server IP address and port (http://10.0.0.90:8888 ) into the URL box.
From there, you can create a new notebook by pressing “New” and “Python 3” as shown in Figure 16.
You can insert Python code or system commands into a Notebook in “Cells”. Go ahead and press “Insert” > “Insert cell below” a few times. From there you can enter Python code normally. System commands are preceded with ! (refer to cell “In [3]” of Figure 15).
What about displaying images in Jupyter?
Jupyter does not have access to your system GUI.
Therefore, cv2.imshow and any other GUI command will not work.
If you would like to display images inside your Jupyter notebook, I recommend using matplotlib.
The only caveat is that matplotlib’s default channel ordering for display is RGB. As you likely know, OpenCV’s default is BGR. So you must swap the Blue and Red channels (cv2.cvtColor ) prior to displaying with matplotlib in a Jupyter notebook. Here’s a quick example:

For further details, be sure to refer to my previous post.
Transferring files to your remote machine or Raspberry Pi
In this section, you will learn how to transfer files from your host machine to your remote machine.
There are many methods to accomplish this task, but my two favorite methods include using SCP/SFTP or using a remotely mounted drive.
Manual SCP or SFTP
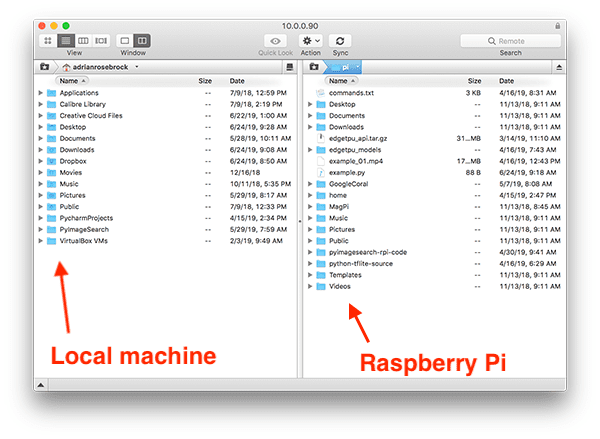
If you need to transfer files to your remote machine (such as moving the code associated with your purchase of Raspberry Pi for Computer Vision from your laptop to your RPi), I highly recommend using SCP/SFTP.
If you are using a Unix-based machine you can use the SCP command:
$ scp foo.py username@ip_address:~/foobar_project
Here I am moving a file named foo.py from local machine to my remote machine in the ~/foobar_project folder.
Note how I am supplying the name of the file along with the IP address and username of the remote machine (the password is supplied after I execute the command).
Similarly, I can transfer files back from my remote machine to my local machine:
$ scp username@ip_address:~/foobar_project/bar.py ~/foobar_project
This command transfers a file named bar.py back to my local machine in my local machine’s ~/foobar_project folder.
If you prefer to use a GUI-based program for SCP/SFTP I would recommend using FileZilla (all OSes) or Transmit for macOS (Figure 18).
Using these programs you can simply “drag and drop” files back and forth.
Of course, the biggest problem with SCP and SFTP is that they are manual — you cannot automatically transfer files back and forth (at least not without additional commands).
The “Developing Python scripts remotely via an IDE” section of this tutorial will show you how to automatically transfer files from your host machine to your remote system, but for now, let’s take a look at remote mounted drives.
Remote mounted drive
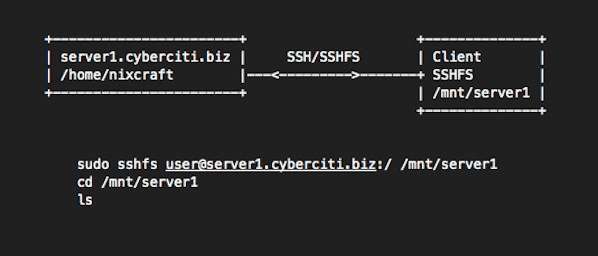
I’m not the biggest fan of remote mounted machines or drives, but they are worth noting here.
Using the SSH file system (SSHFS) you can remote mount a remote system and access its file system, just like you would on your host machine (i.e., via macOS Finder, the Ubuntu/Raspbian GUI, Windows Explorer, etc.).
The problem I’ve always encountered with remote mounted devices is that:
- Connections mysteriously drop.
- Files don’t always transfer.
Instead, if I want a file to sync automatically (such as when I save/update a file), I use a dedicated IDE, which is exactly what we’ll be covering in the next section.
Developing Python scripts remotely via an IDE
In this section, you will learn about two software development IDEs that will make working with Python on remote machines a breeze.
Sublime Text with SFTP plugin
Sublime Text is a popular code editor.
The editor is free but you can purchase an optional license (which I recommend you do if you find yourself using Sublime Text — always be sure to support those who build software you regularly use!).
One of the benefits of Sublime Text is that it allows for extendability via plugins/packages.
For remote developing you should use the Sublime Text SFTP plugin. This plugin is also free but has an optional paid version (which again, you should consider purchasing if you use the SFTP plugin often). The installation instructions for the plugin are listed here.
Once installed, you can launch the Sublime Text editor:

Open the command palette via “shift + command + p”.
From there, select “SFTP: Setup Server…”:

You’ll then be prompted with a template JSON file with options you can fill out.

You’ll want to edit the host and user to be the IP address and username of your remote machine. You can also specify the password if you want to avoid entering it each time.
You should also specify the remote_path which is the default path of where you’ll be placed when logging in — I typically recommend setting the remote_path to be the path of the home directory for the user.
After editing, my SFTP configuration looks like the following:

Next, save the file:

Notice how I am prompted with a dialog box asking me to name the file. You should give the file a descriptive name. Here I am naming my file rpi_office to indicate that this is the Raspberry Pi in my office.
After saving the file I can then select “SFTP: Browser Server…” (via the command palette again):

And then select my “rpi_office”:

I then enter my password and am dropped into the /home/pi directory.
From there I select “Folder Actions” followed by “New File” to create a new file named test.py :

test.py on a remote system (Raspberry Pi) via the Sublime Text SFTP plugin.I can then save the file, the contents of which are automatically updated on the Raspberry Pi.
Executing the script from an SSH connection, you can see the text “Hello, PyImageSearch Reader!” is displayed to my terminal (again, noting that the code itself was executed on the Raspberry Pi and not my local machine).

A quick note to Amazon EC2 users
If you are using Amazon EC2 or any other authentication method that requires an SSH key, you need to edit the sftp_flags option during server setup.
Specifically, you’ll want to edit to look like the following:

Notice how I have updated sftp_flags to include the -i option, followed by the path to my SSH key. The SFTP plugin then knows to perform the proper authentication using this file.
Note: While you edit remote code on your local machine, your system will automatically generate/download temporary files that you see on your screen. When you “Save” your code, it is automatically updated to the remote machine. If you ever also need these files on your local system, I would recommend using SCP/SFTP to transfer the files. You may also use the “Save as” command in Sublime to save a file locally.
PyCharm with automatic upload deployment
If you are looking for a more full-fledged IDE, I recommend using PyCharm which has essentially become the de facto standard for Python IDEs.
I’m a huge fan of PyCharm, and if my Python code ends up spanning more than 1-2 files, I tend to use PyCharm over Sublime Text. That said, PyCharm is a big IDE — it’s not small and minimal like Sublime Text is.
Similar to Sublime Text, we can also configure PyCharm to:
- Use a remote Python interpreter (including a Python virtual environment on a remote machine).
- Automatically transfer edited files, ensuring that code is updated on your remote machine.
This feature requires that you have PyCharm Professional installed (click here to see the features and benefits of PyCharm Professional).
Assuming you have PyCharm installed, let’s create a project that performs automatic upload deployment.
Start by creating a new project:

I have named this project “RPiTest”.
You’ll then want to expand the “Project Interpreter” option to expand the Python interpreter options:

Select the “Existing interpreter” radio button and then click the “…” which will open a new window similar to the following:

Select the “SSH Interpreter” option and then “New server configuration”:

Here I have entered the IP address and username my Raspberry Pi.
Click the “Next” button and then enter the password for your server:

Make sure you check the “Save password” checkbox to ensure your password is saved, otherwise you will have to re-enter it each time you want to save/modify a file (which will become quite frustrating and tedious).
The next window will prompt you to select a Python interpreter, which will by default be /usr/bin/python:

Since we’re using Python virtual environments we should instead click the “…” and navigate to the python binary inside the /home/pi/.virtualenvs/py3cv3/bin/python directory:

Select “Ok” to confirm the Python virtual environment choice. Notice how the Python interpreter path has now been updated to to be /home/pi/.virtualenvs/py3cv3/bin/python. Click the “Finish” button to finish creating the Python virtual environment.
PyCharm will now provide us with details on our “Existing interpreter” along with the “Remote project location”:

However, we don’t want our project to live in /tmp/pycharm_project_409 on the Raspberry Pi. Instead, we want this project to live in /home/pi/RPiTest. To make this update, you can either use the “…” button to navigate or simply manually type in the path into the field.
Click the “Create” button and then the PyCharm IDE will then load:

It may take 5-10 minutes for PyCharm to index the Python virtual environment and project files on your Raspberry Pi, so be patient.
Let’s add a new file to the project.
Right click on the RPiTest directory in the project and then select “New” and “File”:

We’ll name this file pycharm_test.py:

pycharm_test.py.I’ve updated the file to include the following code:

Notice how PyCharm is indicating that the file has been automatically uploaded to the Raspberry Pi for us. You can validate that the file has been automatically uploaded by logging into the Raspberry Pi via a terminal and checking the file contents:

When it comes to remote Python development it’s hard to beat PyCharm with automatic upload.
Yes, there are more steps involved (at least when compared to configuring Sublime Text), but once you have it working, it’s well worth it!
Note: While you edit remote code on your local machine, your system will automatically generate/download temporary files that you see on your screen. When you “Save” your code, it is automatically updated to the remote machine.
Executing code via the command line
When performing remote Python development, my personal recommendation is to:
- Use either Sublime Text or PyCharm with automatic SFTP enabled.
- Execute my Python scripts via command line using SSH.
You are free to use whichever option you prefer. Perhaps you like to use Jupyter Notebooks. Or maybe you feel like you have more control using manual SFTP upload. All options are perfectly okay, it’s just a matter of your own preference.
That said, I’m going to give you a quick demonstration of executing a script via the command line over SSH.
First, I am going to login to my Raspberry Pi (or AWS server) using SSH:
$ ssh pi@192.168.1.150
$ ls *.py
simple_example.py
I have listed the contents of my home directory and see I have an existing file named simple_example.py.
I’d like to edit this file so I’m also going to login via Sublime Text and open it:

Here you can see simple_example.py is now open in Sublime Text.
I’m going to take the opportunity to edit this file and include a command line argument — the code listing now looks like:
# import the necessary packages
import argparse

# construct the argument parser and parse the arguments
ap = argparse.ArgumentParser()
ap.add_argument("-n", "--name", help="your name")
args = vars(ap.parse_args())

# greet the user
print("Hello there, {}!".format(args["name"]))
I save the file via Sublime Text and then switch back to my terminal. I can then execute the Python script via:
$ python simple_example.py --name Adrian
Hello there, Adrian!
Note how I’ve supplied the command line argument to the script — we use command line arguments quite often on PyImageSearch so make sure you take the time now to understand how they work.
Also, note how the script has been executed not on my local machine, but on the remote Raspberry Pi.
What's next? We recommend PyImageSearch University.
86+ total classes • 115+ hours hours of on-demand code walkthrough videos • Last updated: February 2026
★★★★★ 4.84 (128 Ratings) • 16,000+ Students Enrolled
I strongly believe that if you had the right teacher you could master computer vision and deep learning.
Do you think learning computer vision and deep learning has to be time-consuming, overwhelming, and complicated? Or has to involve complex mathematics and equations? Or requires a degree in computer science?
That’s not the case.
All you need to master computer vision and deep learning is for someone to explain things to you in simple, intuitive terms. And that’s exactly what I do. My mission is to change education and how complex Artificial Intelligence topics are taught.
If you're serious about learning computer vision, your next stop should be PyImageSearch University, the most comprehensive computer vision, deep learning, and OpenCV course online today. Here you’ll learn how to successfully and confidently apply computer vision to your work, research, and projects. Join me in computer vision mastery.
Inside PyImageSearch University you'll find:
- ✓ 86+ courses on essential computer vision, deep learning, and OpenCV topics
- ✓ 86 Certificates of Completion
- ✓ 115+ hours hours of on-demand video
- ✓ Brand new courses released regularly, ensuring you can keep up with state-of-the-art techniques
- ✓ Pre-configured Jupyter Notebooks in Google Colab
- ✓ Run all code examples in your web browser — works on Windows, macOS, and Linux (no dev environment configuration required!)
- ✓ Access to centralized code repos for all 540+ tutorials on PyImageSearch
- ✓ Easy one-click downloads for code, datasets, pre-trained models, etc.
- ✓ Access on mobile, laptop, desktop, etc.
Summary
In this tutorial, you discovered my personal recommendations when performing remote Python development on the Raspberry Pi, Amazon EC2, or any other remote server instance.
When you’re connecting to the machine I recommend using:
- SSH
- VNC
- Jupyter Notebooks
When editing code remotely I suggest you use either:
- Sublime Text with SFTP plugin
- PyCharm with automatic upload deployment
My personal preference is to edit code via either Sublime Text or PyCharm and then execute via SSH + command line. That said, you should take the time to play with each option. One method is not always better than the others and you may find you prefer one method over the other in the majority of situations — that’s perfectly okay!
Keep in mind that these are all tools in your tool belt, learn how to use them all and you’ll have more tools available to you.
I hope you enjoyed this tutorial!
To be notified when future tutorials are published here on PyImageSearch (and obtain my free computer vision and deep learning resource guide), just enter your email address in the form below!

Join the PyImageSearch Newsletter and Grab My FREE 17-page Resource Guide PDF
Enter your email address below to join the PyImageSearch Newsletter and download my FREE 17-page Resource Guide PDF on Computer Vision, OpenCV, and Deep Learning.
