In this tutorial, you will learn how to use Mask R-CNN with OpenCV.
Using Mask R-CNN you can automatically segment and construct pixel-wise masks for every object in an image. We’ll be applying Mask R-CNNs to both images and video streams.
In last week’s blog post you learned how to use the YOLO object detector to detect the presence of objects in images. Object detectors, such as YOLO, Faster R-CNNs, and Single Shot Detectors (SSDs), generate four sets of (x, y)-coordinates which represent the bounding box of an object in an image.
Obtaining the bounding boxes of an object is a good start but the bounding box itself doesn’t tell us anything about (1) which pixels belong to the foreground object and (2) which pixels belong to the background.
That begs the question:
Is it possible to generate a mask for each object in our image, thereby allowing us to segment the foreground object from the background?
Is such a method even possible?
The answer is yes — we just need to perform instance segmentation using the Mask R-CNN architecture.
To learn how to apply Mask R-CNN with OpenCV to both images and video streams, just keep reading!
Looking for the source code to this post?
Jump Right To The Downloads SectionMask R-CNN with OpenCV
In the first part of this tutorial, we’ll discuss the difference between image classification, object detection, instance segmentation, and semantic segmentation.
From there we’ll briefly review the Mask R-CNN architecture and its connections to Faster R-CNN.
I’ll then show you how to apply Mask R-CNN with OpenCV to both images and video streams.
Let’s get started!
Instance segmentation vs. Semantic segmentation
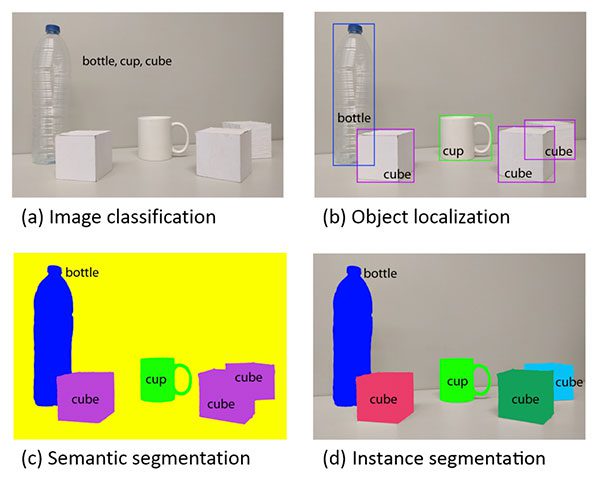
Explaining the differences between traditional image classification, object detection, semantic segmentation, and instance segmentation is best done visually.
When performing traditional image classification our goal is to predict a set of labels to characterize the contents of an input image (top-left).
Object detection builds on image classification, but this time allows us to localize each object in an image. The image is now characterized by:
- Bounding box (x, y)-coordinates for each object
- An associated class label for each bounding box
An example of semantic segmentation can be seen in bottom-left. Semantic segmentation algorithms require us to associate every pixel in an input image with a class label (including a class label for the background).
Pay close attention to our semantic segmentation visualization — notice how each object is indeed segmented but each “cube” object has the same color.
While semantic segmentation algorithms are capable of labeling every object in an image they cannot differentiate between two objects of the same class.
This behavior is especially problematic if two objects of the same class are partially occluding each other — we have no idea where the boundaries of one object ends and the next one begins, as demonstrated by the two purple cubes, we cannot tell where one cube starts and the other ends.
Instance segmentation algorithms, on the other hand, compute a pixel-wise mask for every object in the image, even if the objects are of the same class label (bottom-right). Here you can see that each of the cubes has their own unique color, implying that our instance segmentation algorithm not only localized each individual cube but predicted their boundaries as well.
The Mask R-CNN architecture we’ll be discussing in this tutorial is an example of an instance segmentation algorithm.
What is Mask R-CNN?
The Mask R-CNN algorithm was introduced by He et al. in their 2017 paper, Mask R-CNN.
Mask R-CNN builds on the previous object detection work of R-CNN (2013), Fast R-CNN (2015), and Faster R-CNN (2015), all by Girshick et al.
In order to understand Mask R-CNN let’s briefly review the R-CNN variants, starting with the original R-CNN:
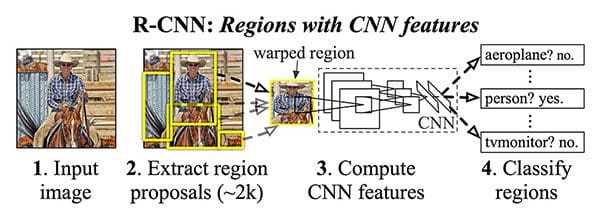
The original R-CNN algorithm is a four-step process:
- Step #1: Input an image to the network.
- Step #2: Extract region proposals (i.e., regions of an image that potentially contain objects) using an algorithm such as Selective Search.
- Step #3: Use transfer learning, specifically feature extraction, to compute features for each proposal (which is effectively an ROI) using the pre-trained CNN.
- Step #4: Classify each proposal using the extracted features with a Support Vector Machine (SVM).
The reason this method works is due to the robust, discriminative features learned by the CNN.
However, the problem with the R-CNN method is it’s incredibly slow. And furthermore, we’re not actually learning to localize via a deep neural network, we’re effectively just building a more advanced HOG + Linear SVM detector.
To improve upon the original R-CNN, Girshick et al. published the Fast R-CNN algorithm:
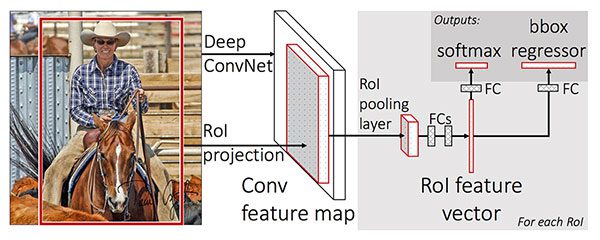
Similar to the original R-CNN, Fast R-CNN still utilizes Selective Search to obtain region proposals; however, the novel contribution from the paper was Region of Interest (ROI) Pooling module.
ROI Pooling works by extracting a fixed-size window from the feature map and using these features to obtain the final class label and bounding box. The primary benefit here is that the network is now, effectively, end-to-end trainable:
- We input an image and associated ground-truth bounding boxes
- Extract the feature map
- Apply ROI pooling and obtain the ROI feature vector
- And finally, use the two sets of fully-connected layers to obtain (1) the class label predictions and (2) the bounding box locations for each proposal.
While the network is now end-to-end trainable, performance suffered dramatically at inference (i.e., prediction) by being dependent on Selective Search.
To make the R-CNN architecture even faster we need to incorporate the region proposal directly into the R-CNN:
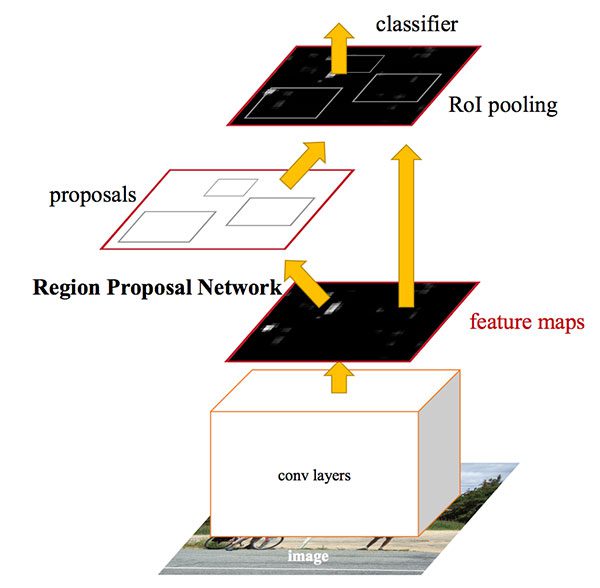
The Faster R-CNN paper by Girshick et al. introduced the Region Proposal Network (RPN) that bakes region proposal directly into the architecture, alleviating the need for the Selective Search algorithm.
As a whole, the Faster R-CNN architecture is capable of running at approximately 7-10 FPS, a huge step towards making real-time object detection with deep learning a reality.
The Mask R-CNN algorithm builds on the Faster R-CNN architecture with two major contributions:
- Replacing the ROI Pooling module with a more accurate ROI Align module
- Inserting an additional branch out of the ROI Align module
This additional branch accepts the output of the ROI Align and then feeds it into two CONV layers.
The output of the CONV layers is the mask itself.
We can visualize the Mask R-CNN architecture in the following figure:
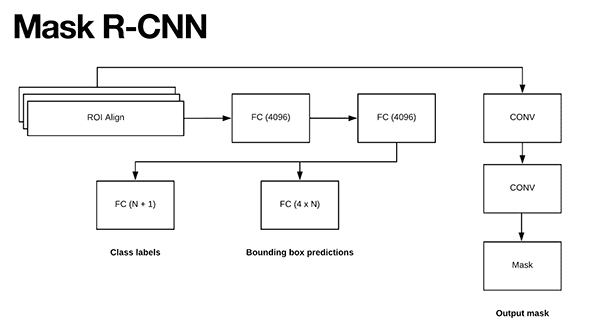
Notice the branch of two CONV layers coming out of the ROI Align module — this is where our mask is actually generated.
As we know, the Faster R-CNN/Mask R-CNN architectures leverage a Region Proposal Network (RPN) to generate regions of an image that potentially contain an object.
Each of these regions is ranked based on their “objectness score” (i.e., how likely it is that a given region could potentially contain an object) and then the top N most confident objectness regions are kept.
In the original Faster R-CNN publication Girshick et al. set N=2,000, but in practice, we can get away with a much smaller N, such as N={10, 100, 200, 300} and still obtain good results.
He et al. set N=300 in their publication which is the value we’ll use here as well.
Each of the 300 selected ROIs go through three parallel branches of the network:
- Label prediction
- Bounding box prediction
- Mask prediction
Figure 5 above above visualizes these branches.
During prediction, each of the 300 ROIs go through non-maxima suppression and the top 100 detection boxes are kept, resulting in a 4D tensor of 100 x L x 15 x 15 where L is the number of class labels in the dataset and 15 x 15 is the size of each of the L masks.
The Mask R-CNN we’re using here today was trained on the COCO dataset, which has L=90 classes, thus the resulting volume size from the mask module of the Mask R CNN is 100 x 90 x 15 x 15.
To visualize the Mask R-CNN process take a look at the figure below:
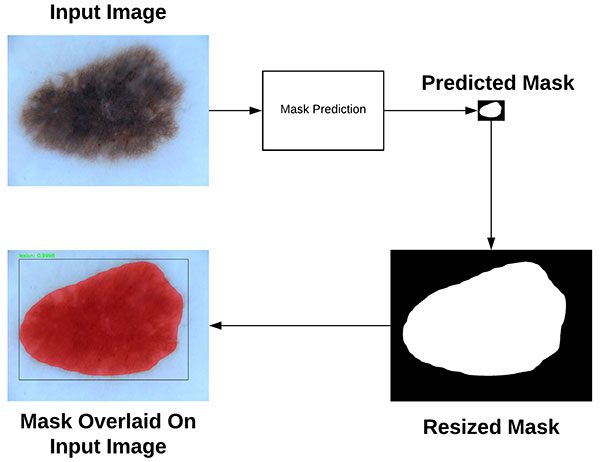
Here you can see that we start with our input image and feed it through our Mask R-CNN network to obtain our mask prediction.
The predicted mask is only 15 x 15 pixels so we resize the mask back to the original input image dimensions.
Finally, the resized mask can be overlaid on the original input image. For a more thorough discussion on how Mask R-CNN works be sure to refer to:
- The original Mask R-CNN publication by He et al.
- My book, Deep Learning for Computer Vision with Python, where I discuss Mask R-CNNs in more detail, including how to train your own Mask R-CNNs from scratch on your own data.
Project structure
Our project today consists of two scripts, but there are several other files that are important.
I’ve organized the project in the following manner (as is shown by the tree
command output directly in a terminal):
$ tree . ├── mask-rcnn-coco │ ├── colors.txt │ ├── frozen_inference_graph.pb │ ├── mask_rcnn_inception_v2_coco_2018_01_28.pbtxt │ └── object_detection_classes_coco.txt ├── images │ ├── example_01.jpg │ ├── example_02.jpg │ └── example_03.jpg ├── videos │ ├── ├── output │ ├── ├── mask_rcnn.py └── mask_rcnn_video.py 4 directories, 9 files
Our project consists of four directories:
mask-rcnn-coco/
: The Mask R-CNN model files. There are four files:frozen_inference_graph.pb
: The Mask R-CNN model weights. The weights are pre-trained on the COCO dataset.mask_rcnn_inception_v2_coco_2018_01_28.pbtxt
: The Mask R-CNN model configuration. If you’d like to build + train your own model on your own annotated data, refer to Deep Learning for Computer Vision with Python.object_detection_classes_coco.txt
: All 90 classes are listed in this text file, one per line. Open it in a text editor to see what objects our model can recognize.colors.txt
: This text file contains six colors to randomly assign to objects found in the image.
images/
: I’ve provided three test images in the “Downloads”. Feel free to add your own images to test with.videos/
: This is an empty directory. I actually tested with large videos that I scraped from YouTube (credits are below, just above the “Summary” section). Rather than providing a really big zip, my suggestion is that you find a few videos on YouTube to download and test with. Or maybe take some videos with your cell phone and come back to your computer and use them!output/
: Another empty directory that will hold the processed videos (assuming you set the command line argument flag to output to this directory).
We’ll be reviewing two scripts today:
mask_rcnn.py
: This script will perform instance segmentation and apply a mask to the image so you can see where, down to the pixel, the Mask R-CNN thinks an object is.mask_rcnn_video.py
: This video processing script uses the same Mask R-CNN and applies the model to every frame of a video file. The script then writes the output frame back to a video file on disk.
OpenCV and Mask R-CNN in images
Now that we’ve reviewed how Mask R-CNNs work, let’s get our hands dirty with some Python code.
Before we begin, ensure that your Python environment has OpenCV 3.4.2/3.4.3 or higher installed. You can follow one of my OpenCV installation tutorials to upgrade/install OpenCV. If you want to be up and running in 5 minutes or less, you can consider installing OpenCV with pip. If you have some other requirements, you might want to compile OpenCV from source.
Make sure you’ve used the “Downloads” section of this blog post to download the source code, trained Mask R-CNN, and example images.
From there, open up the mask_rcnn.py
file and insert the following code:
# import the necessary packages import numpy as np import argparse import random import time import cv2 import os
First we’ll import our required packages on Lines 2-7. Notably, we’re importing NumPy and OpenCV. Everything else comes with most Python installations.
From there, we’ll parse our command line arguments:
# construct the argument parse and parse the arguments ap = argparse.ArgumentParser() ap.add_argument("-i", "--image", required=True, help="path to input image") ap.add_argument("-m", "--mask-rcnn", required=True, help="base path to mask-rcnn directory") ap.add_argument("-v", "--visualize", type=int, default=0, help="whether or not we are going to visualize each instance") ap.add_argument("-c", "--confidence", type=float, default=0.5, help="minimum probability to filter weak detections") ap.add_argument("-t", "--threshold", type=float, default=0.3, help="minimum threshold for pixel-wise mask segmentation") args = vars(ap.parse_args())
Our script requires that command line argument flags and parameters be passed at runtime in our terminal. Our arguments are parsed on Lines 10-21, where the first two of the following are required and the rest are optional:
--image
: The path to our input image.--mask-rnn
: The base path to the Mask R-CNN files.--visualize
(optional): A positive value indicates that we want to visualize how we extracted the masked region on our screen. Either way, we’ll display the final output on the screen.--confidence
(optional): You can override the probability value of0.5
which serves to filter weak detections.--threshold
(optional): We’ll be creating a binary mask for each object in the image and this threshold value will help us filter out weak mask predictions. I found that a default value of0.3
works pretty well.
Now that our command line arguments are stored in the args
dictionary, let’s load our labels and colors:
# load the COCO class labels our Mask R-CNN was trained on labelsPath = os.path.sep.join([args["mask_rcnn"], "object_detection_classes_coco.txt"]) LABELS = open(labelsPath).read().strip().split("\n") # load the set of colors that will be used when visualizing a given # instance segmentation colorsPath = os.path.sep.join([args["mask_rcnn"], "colors.txt"]) COLORS = open(colorsPath).read().strip().split("\n") COLORS = [np.array(c.split(",")).astype("int") for c in COLORS] COLORS = np.array(COLORS, dtype="uint8")
Lines 24-26 load the COCO object class LABELS
. Today’s Mask R-CNN is capable of recognizing 90 classes including people, vehicles, signs, animals, everyday items, sports gear, kitchen items, food, and more! I encourage you to look at object_detection_classes_coco.txt
to see the available classes.
From there we load the COLORS
from the path, performing a couple array conversion operations (Lines 30-33).
Let’s load our model:
# derive the paths to the Mask R-CNN weights and model configuration weightsPath = os.path.sep.join([args["mask_rcnn"], "frozen_inference_graph.pb"]) configPath = os.path.sep.join([args["mask_rcnn"], "mask_rcnn_inception_v2_coco_2018_01_28.pbtxt"]) # load our Mask R-CNN trained on the COCO dataset (90 classes) # from disk print("[INFO] loading Mask R-CNN from disk...") net = cv2.dnn.readNetFromTensorflow(weightsPath, configPath)
First, we build our weight and configuration paths (Lines 36-39), followed by loading the model via these paths (Line 44).
In the next block, we’ll load and pass an image through the Mask R-CNN neural net:
# load our input image and grab its spatial dimensions image = cv2.imread(args["image"]) (H, W) = image.shape[:2] # construct a blob from the input image and then perform a forward # pass of the Mask R-CNN, giving us (1) the bounding box coordinates # of the objects in the image along with (2) the pixel-wise segmentation # for each specific object blob = cv2.dnn.blobFromImage(image, swapRB=True, crop=False) net.setInput(blob) start = time.time() (boxes, masks) = net.forward(["detection_out_final", "detection_masks"]) end = time.time() # show timing information and volume information on Mask R-CNN print("[INFO] Mask R-CNN took {:.6f} seconds".format(end - start)) print("[INFO] boxes shape: {}".format(boxes.shape)) print("[INFO] masks shape: {}".format(masks.shape))
Here we:
- Load the input
image
and extract dimensions for scaling purposes later (Lines 47 and 48). - Construct a
blob
viacv2.dnn.blobFromImage
(Line 54). You can learn why and how to use this function in my previous tutorial. - Perform a forward pass of the
blob
through thenet
while collecting timestamps (Lines 55-58). The results are contained in two important variables:boxes
andmasks
.
Now that we’ve performed a forward pass of the Mask R-CNN on the image, we’ll want to filter + visualize our results. That’s exactly what this next for loop accomplishes. It is quite long, so I’ve broken it into five code blocks beginning here:
# loop over the number of detected objects for i in range(0, boxes.shape[2]): # extract the class ID of the detection along with the confidence # (i.e., probability) associated with the prediction classID = int(boxes[0, 0, i, 1]) confidence = boxes[0, 0, i, 2] # filter out weak predictions by ensuring the detected probability # is greater than the minimum probability if confidence > args["confidence"]: # clone our original image so we can draw on it clone = image.copy() # scale the bounding box coordinates back relative to the # size of the image and then compute the width and the height # of the bounding box box = boxes[0, 0, i, 3:7] * np.array([W, H, W, H]) (startX, startY, endX, endY) = box.astype("int") boxW = endX - startX boxH = endY - startY
In this block, we begin our filter/visualization loop (Line 66).
We proceed to extract the classID
and confidence
of a particular detected object (Lines 69 and 70).
From there we filter out weak predictions by comparing the confidence
to the command line argument confidence
value, ensuring we exceed it (Line 74).
Assuming that’s the case, we’ll go ahead and make a clone
of the image (Line 76). We’ll need this image later.
Then we scale our object’s bounding box as well as calculate the box dimensions (Lines 81-84).
Image segmentation requires that we find all pixels where an object is present. Thus, we’re going to place a transparent overlay on top of the object to see how well our algorithm is performing. In order to do so, we’ll calculate a mask:
# extract the pixel-wise segmentation for the object, resize # the mask such that it's the same dimensions of the bounding # box, and then finally threshold to create a *binary* mask mask = masks[i, classID] mask = cv2.resize(mask, (boxW, boxH), interpolation=cv2.INTER_NEAREST) mask = (mask > args["threshold"]) # extract the ROI of the image roi = clone[startY:endY, startX:endX]
On Lines 89-91, we extract the pixel-wise segmentation for the object as well as resize it to the original image dimensions. Finally we threshold the mask
so that it is a binary array/image (Line 92).
We also extract the region of interest where the object resides (Line 95).
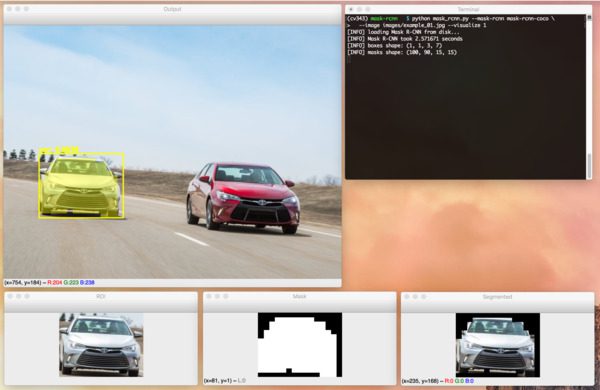
Both the mask
and roi
can be seen visually in Figure 8 later in the post.
For convenience, this next block accomplishes visualizing the mask
, roi
, and segmented instance
if the --visualize
flag is set via command line arguments:
# check to see if are going to visualize how to extract the # masked region itself if args["visualize"] > 0: # convert the mask from a boolean to an integer mask with # to values: 0 or 255, then apply the mask visMask = (mask * 255).astype("uint8") instance = cv2.bitwise_and(roi, roi, mask=visMask) # show the extracted ROI, the mask, along with the # segmented instance cv2.imshow("ROI", roi) cv2.imshow("Mask", visMask) cv2.imshow("Segmented", instance)
In this block we:
- Check to see if we should visualize the ROI, mask, and segmented instance (Line 99).
- Convert our mask from boolean to integer where a value of “0” indicates background and “255” foreground (Line 102).
- Perform bitwise masking to visualize just the instance itself (Line 103).
- Show all three images (Lines 107-109).
Again, these visualization images will only be shown if the --visualize
flag is set via the optional command line argument (by default these images won’t be shown).
Now let’s continue on with visualization:
# now, extract *only* the masked region of the ROI by passing # in the boolean mask array as our slice condition roi = roi[mask] # randomly select a color that will be used to visualize this # particular instance segmentation then create a transparent # overlay by blending the randomly selected color with the ROI color = random.choice(COLORS) blended = ((0.4 * color) + (0.6 * roi)).astype("uint8") # store the blended ROI in the original image clone[startY:endY, startX:endX][mask] = blended
Line 113 extracts only the masked region of the ROI by passing the boolean mask array as our slice condition.
Then we’ll randomly select one of our six COLORS
to apply our transparent overlay on the object (Line 118).
Subsequently, we’ll blend our masked region with the roi
(Line 119) followed by placing this blended
region into the clone
image (Line 122).
Finally, we’ll draw the rectangle and textual class label + confidence value on the image as well as display the result!
# draw the bounding box of the instance on the image color = [int(c) for c in color] cv2.rectangle(clone, (startX, startY), (endX, endY), color, 2) # draw the predicted label and associated probability of the # instance segmentation on the image text = "{}: {:.4f}".format(LABELS[classID], confidence) cv2.putText(clone, text, (startX, startY - 5), cv2.FONT_HERSHEY_SIMPLEX, 0.5, color, 2) # show the output image cv2.imshow("Output", clone) cv2.waitKey(0)
To close out, we:
- Draw a colored bounding box around the object (Lines 125 and 126).
- Build our class label + confidence
text
as well as draw thetext
above the bounding box (Lines 130-132). - Display the image until any key is pressed (Lines 135 and 136).
Let’s give our Mask R-CNN code a try!
Make sure you’ve used the “Downloads” section of the tutorial to download the source code, trained Mask R-CNN, and example images. From there, open up your terminal and execute the following command:
$ python mask_rcnn.py --mask-rcnn mask-rcnn-coco --image images/example_01.jpg [INFO] loading Mask R-CNN from disk... [INFO] Mask R-CNN took 0.761193 seconds [INFO] boxes shape: (1, 1, 3, 7) [INFO] masks shape: (100, 90, 15, 15)
In the above image, you can see that our Mask R-CNN has not only localized each of the cars in the image but has also constructed a pixel-wise mask as well, allowing us to segment each car from the image.
If we were to run the same command, this time supplying the --visualize
flag, we can visualize the ROI, mask, and instance as well:
Let’s try another example image:
$ python mask_rcnn.py --mask-rcnn mask-rcnn-coco --image images/example_02.jpg \ --confidence 0.6 [INFO] loading Mask R-CNN from disk... [INFO] Mask R-CNN took 0.676008 seconds [INFO] boxes shape: (1, 1, 8, 7) [INFO] masks shape: (100, 90, 15, 15)
Our Mask R-CNN has correctly detected and segmented both people, a dog, a horse, and a truck from the image.
Here’s one final example before we move on to using Mask R-CNNs in videos:
$ python mask_rcnn.py --mask-rcnn mask-rcnn-coco --image images/example_03.jpg [INFO] loading Mask R-CNN from disk... [INFO] Mask R-CNN took 0.680739 seconds [INFO] boxes shape: (1, 1, 3, 7) [INFO] masks shape: (100, 90, 15, 15)
In this image, you can see a photo of myself and Jemma, the family beagle.
Our Mask R-CNN is capable of detecting and localizing me, Jemma, and the chair with high confidence.
OpenCV and Mask R-CNN in video streams
Now that we’ve looked at how to apply Mask R-CNNs to images, let’s explore how they can be applied to videos as well.
Open up the mask_rcnn_video.py
file and insert the following code:
# import the necessary packages import numpy as np import argparse import imutils import time import cv2 import os # construct the argument parse and parse the arguments ap = argparse.ArgumentParser() ap.add_argument("-i", "--input", required=True, help="path to input video file") ap.add_argument("-o", "--output", required=True, help="path to output video file") ap.add_argument("-m", "--mask-rcnn", required=True, help="base path to mask-rcnn directory") ap.add_argument("-c", "--confidence", type=float, default=0.5, help="minimum probability to filter weak detections") ap.add_argument("-t", "--threshold", type=float, default=0.3, help="minimum threshold for pixel-wise mask segmentation") args = vars(ap.parse_args())
First we import our necessary packages and parse our command line arguments.
There are two new command line arguments (which replaces --image
from the previous script):
--input
: The path to our input video.--output
: The path to our output video (since we’ll be writing our results to disk in a video file).
Now let’s load our class LABELS
, COLORS
, and Mask R-CNN neural net
:
# load the COCO class labels our Mask R-CNN was trained on labelsPath = os.path.sep.join([args["mask_rcnn"], "object_detection_classes_coco.txt"]) LABELS = open(labelsPath).read().strip().split("\n") # initialize a list of colors to represent each possible class label np.random.seed(42) COLORS = np.random.randint(0, 255, size=(len(LABELS), 3), dtype="uint8") # derive the paths to the Mask R-CNN weights and model configuration weightsPath = os.path.sep.join([args["mask_rcnn"], "frozen_inference_graph.pb"]) configPath = os.path.sep.join([args["mask_rcnn"], "mask_rcnn_inception_v2_coco_2018_01_28.pbtxt"]) # load our Mask R-CNN trained on the COCO dataset (90 classes) # from disk print("[INFO] loading Mask R-CNN from disk...") net = cv2.dnn.readNetFromTensorflow(weightsPath, configPath)
Our LABELS
and COLORS
are loaded on Lines 24-31.
From there we define our weightsPath
and configPath
before loading our Mask R-CNN neural net
(Lines 34-42).
Now let’s initialize our video stream and video writer:
# initialize the video stream and pointer to output video file vs = cv2.VideoCapture(args["input"]) writer = None # try to determine the total number of frames in the video file try: prop = cv2.cv.CV_CAP_PROP_FRAME_COUNT if imutils.is_cv2() \ else cv2.CAP_PROP_FRAME_COUNT total = int(vs.get(prop)) print("[INFO] {} total frames in video".format(total)) # an error occurred while trying to determine the total # number of frames in the video file except: print("[INFO] could not determine # of frames in video") total = -1
Our video stream (vs
) and video writer
are initialized on Lines 45 and 46.
We attempt to determine the number of frames in the video file and display the total
(Lines 49-53). If we’re unsuccessful, we’ll capture the exception and print a status message as well as set total
to -1
(Lines 57-59). We’ll use this value to approximate how long it will take to process an entire video file.
Let’s begin our frame processing loop:
# loop over frames from the video file stream while True: # read the next frame from the file (grabbed, frame) = vs.read() # if the frame was not grabbed, then we have reached the end # of the stream if not grabbed: break # construct a blob from the input frame and then perform a # forward pass of the Mask R-CNN, giving us (1) the bounding box # coordinates of the objects in the image along with (2) the # pixel-wise segmentation for each specific object blob = cv2.dnn.blobFromImage(frame, swapRB=True, crop=False) net.setInput(blob) start = time.time() (boxes, masks) = net.forward(["detection_out_final", "detection_masks"]) end = time.time()
We begin looping over frames by defining an infinite while
loop and capturing the first frame
(Lines 62-64). The loop will process the video until completion which is handled by the exit condition on Lines 68 and 69.
We then construct a blob
from the frame and pass it through the neural net
while grabbing the elapsed time so we can calculate estimated time to completion later (Lines 75-80). The result is included in both boxes
and masks
.
Now let’s begin looping over detected objects:
# loop over the number of detected objects for i in range(0, boxes.shape[2]): # extract the class ID of the detection along with the # confidence (i.e., probability) associated with the # prediction classID = int(boxes[0, 0, i, 1]) confidence = boxes[0, 0, i, 2] # filter out weak predictions by ensuring the detected # probability is greater than the minimum probability if confidence > args["confidence"]: # scale the bounding box coordinates back relative to the # size of the frame and then compute the width and the # height of the bounding box (H, W) = frame.shape[:2] box = boxes[0, 0, i, 3:7] * np.array([W, H, W, H]) (startX, startY, endX, endY) = box.astype("int") boxW = endX - startX boxH = endY - startY # extract the pixel-wise segmentation for the object, # resize the mask such that it's the same dimensions of # the bounding box, and then finally threshold to create # a *binary* mask mask = masks[i, classID] mask = cv2.resize(mask, (boxW, boxH), interpolation=cv2.INTER_NEAREST) mask = (mask > args["threshold"]) # extract the ROI of the image but *only* extracted the # masked region of the ROI roi = frame[startY:endY, startX:endX][mask]
First we filter out weak detections with a low confidence value. Then we determine the bounding box coordinates and obtain the mask
and roi
.
Now let’s draw the object’s transparent overlay, bounding rectangle, and label + confidence:
# grab the color used to visualize this particular class, # then create a transparent overlay by blending the color # with the ROI color = COLORS[classID] blended = ((0.4 * color) + (0.6 * roi)).astype("uint8") # store the blended ROI in the original frame frame[startY:endY, startX:endX][mask] = blended # draw the bounding box of the instance on the frame color = [int(c) for c in color] cv2.rectangle(frame, (startX, startY), (endX, endY), color, 2) # draw the predicted label and associated probability of # the instance segmentation on the frame text = "{}: {:.4f}".format(LABELS[classID], confidence) cv2.putText(frame, text, (startX, startY - 5), cv2.FONT_HERSHEY_SIMPLEX, 0.5, color, 2)
Here we’ve blended
our roi
with color and store
it in the original frame
, effectively creating a colored transparent overlay (Lines 118-122).
We then draw a rectangle
around the object and display the class label + confidence
just above (Lines 125-133).
Finally, let’s write to the video file and clean up:
# check if the video writer is None if writer is None: # initialize our video writer fourcc = cv2.VideoWriter_fourcc(*"MJPG") writer = cv2.VideoWriter(args["output"], fourcc, 30, (frame.shape[1], frame.shape[0]), True) # some information on processing single frame if total > 0: elap = (end - start) print("[INFO] single frame took {:.4f} seconds".format(elap)) print("[INFO] estimated total time to finish: {:.4f}".format( elap * total)) # write the output frame to disk writer.write(frame) # release the file pointers print("[INFO] cleaning up...") writer.release() vs.release()
On the first iteration of the loop, our video writer
is initialized.
An estimate of the amount of time that the processing will take is printed to the terminal on Lines 143-147.
The final operation of our loop is to write
the frame to disk via our writer
object (Line 150).
You’ll notice that I’m not displaying each frame to the screen. The display operation is time-consuming and you’ll be able to view the output video with any media player when the script is finished processing anyways.
Note: Furthermore, OpenCV does not support NVIDIA GPUs for it’s dnn
module. Right now only a limited number of GPUs are supported, mainly Intel GPUs. NVIDIA GPU support is coming soon but for the time being we cannot easily use a GPU with OpenCV’s dnn
module.
Lastly, we release video input and output file pointers (Lines 154 and 155).
Now that we’ve coded up our Mask R-CNN + OpenCV script for video streams, let’s give it a try!
Make sure you use the “Downloads” section of this tutorial to download the source code and Mask R-CNN model.
You’ll then need to collect your own videos with your smartphone or another recording device. Alternatively, you can download videos from YouTube as I have done.
Note: I am intentionally not including the videos in today’s download because they are rather large (400MB+). If you choose to use the same videos as me, the credits and links are at the bottom of this section.
From there, open up a terminal and execute the following command:
$ python mask_rcnn_video.py --input videos/cats_and_dogs.mp4 \ --output output/cats_and_dogs_output.avi --mask-rcnn mask-rcnn-coco [INFO] loading Mask R-CNN from disk... [INFO] 19312 total frames in video [INFO] single frame took 0.8585 seconds [INFO] estimated total time to finish: 16579.2047
In the above video, you can find funny video clips of dogs and cats with a Mask R-CNN applied to them!
Here is a second example, this one of applying OpenCV and a Mask R- CNN to video clips of cars “slipping and sliding” in wintry conditions:
$ python mask_rcnn_video.py --input videos/slip_and_slide.mp4 \ --output output/slip_and_slide_output.avi --mask-rcnn mask-rcnn-coco [INFO] loading Mask R-CNN from disk... [INFO] 17421 total frames in video [INFO] single frame took 0.9341 seconds [INFO] estimated total time to finish: 16272.9920
You can imagine a Mask R-CNN being applied to highly trafficked roads, checking for congestion, car accidents, or travelers in need of immediate help and attention.
Credits for the videos and audio include:
- Cats and Dogs
- Slip and Slide
What's next? We recommend PyImageSearch University.
86 total classes • 115+ hours of on-demand code walkthrough videos • Last updated: October 2024
★★★★★ 4.84 (128 Ratings) • 16,000+ Students Enrolled
I strongly believe that if you had the right teacher you could master computer vision and deep learning.
Do you think learning computer vision and deep learning has to be time-consuming, overwhelming, and complicated? Or has to involve complex mathematics and equations? Or requires a degree in computer science?
That’s not the case.
All you need to master computer vision and deep learning is for someone to explain things to you in simple, intuitive terms. And that’s exactly what I do. My mission is to change education and how complex Artificial Intelligence topics are taught.
If you're serious about learning computer vision, your next stop should be PyImageSearch University, the most comprehensive computer vision, deep learning, and OpenCV course online today. Here you’ll learn how to successfully and confidently apply computer vision to your work, research, and projects. Join me in computer vision mastery.
Inside PyImageSearch University you'll find:
- ✓ 86 courses on essential computer vision, deep learning, and OpenCV topics
- ✓ 86 Certificates of Completion
- ✓ 115+ hours of on-demand video
- ✓ Brand new courses released regularly, ensuring you can keep up with state-of-the-art techniques
- ✓ Pre-configured Jupyter Notebooks in Google Colab
- ✓ Run all code examples in your web browser — works on Windows, macOS, and Linux (no dev environment configuration required!)
- ✓ Access to centralized code repos for all 540+ tutorials on PyImageSearch
- ✓ Easy one-click downloads for code, datasets, pre-trained models, etc.
- ✓ Access on mobile, laptop, desktop, etc.
Summary
In this tutorial, you learned how to apply the Mask R-CNN architecture with OpenCV and Python to segment objects from images and video streams.
Object detectors such as YOLO, SSDs, and Faster R-CNNs are only capable of producing bounding box coordinates of an object in an image — they tell us nothing about the actual shape of the object itself.
Using Mask R-CNN we can generate pixel-wise masks for each object in an image, thereby allowing us to segment the foreground object from the background.
Furthermore, Mask R-CNNs enable us to segment complex objects and shapes from images which traditional computer vision algorithms would not enable us to do.
I hope you enjoyed today’s tutorial on OpenCV and Mask R-CNN!
To download the source code to this post, and be notified when future tutorials are published here on PyImageSearch, just enter your email address in the form below!
Download the Source Code and FREE 17-page Resource Guide
Enter your email address below to get a .zip of the code and a FREE 17-page Resource Guide on Computer Vision, OpenCV, and Deep Learning. Inside you'll find my hand-picked tutorials, books, courses, and libraries to help you master CV and DL!
Faizan Amin
Hi. How can we train our own Mask RCNN model. Can we use Tensorflow Models API for this purpose?
Adrian Rosebrock
Hey Faizan — I cover how to train your own custom Mask R-CNN models inside Deep Learning for Computer Vision with Python.
sree
Thank you Adrian for the article.I am a beginner in python cv. Well when i was testing the code with example_01 image it was detecting only one car instead of two cars….any explanation??
Adrian Rosebrock
Click on the window opened by OpenCV and click any key on your keyboard to advance the execution of the script.
Steph
Hi Adrian,
thanks a lot for another great tutorial.
I already knew Mask-RCNN for trying it on my problem, but apparently that is not the way to go.
What I want to do is to detect movie posters in videos and then track them over time. The first time they appear I also manually define a mask to simplify the process. Unfortunately any detection/tracking method I tried failed miserably… the detection step is hard, because the poster is not an object available in the models, and it can vary a lot depending on the movie it represents; tracking also fails, since I need a pixel perfect tracking and any deep learning method I tried does not return a shape with straight borders but always rounded objects.
Do you have any algorithms to recommend for this specific task? Or shall I resort to traditional, not DL-based methids?
Thanks in advance!
Adrian Rosebrock
How many example images per movie poster do you have?
Steph
I have 10 videos, each of them showing a movie poster for about 150 frames. The camera is always panning or zooming, so the shape and size of the poster is constantly changing.
Thanks in advance for any help 🙂
Adrian Rosebrock
I assume each of the 150 frames has the same movie poster? Are these 150 frames your training data? If so, have you labeled them and annotated them so you can train an object detector?
Steph
Yes, I have 1500 images as training data. For each movie poster, i created a binary mask showing where is the poster. The shape is usually a quadrilateral, unless in case the poster is partially occluded.
I’d like to train a system which, given an annotated frame of a video, could then detect the movie poster with pixel precision during camera movement and occlusions, but so far I didn’t have luck. Even system especially trained for that (as they do in the Davis challenge https://davischallenge.org/) seem to fail after just a few frames.
If you are going to work / publish a post on the issue, let me know!
Adrian Rosebrock
Thanks for the clarification. In that case I would highly suggest using a Mask R-CNN. The Mask R-CNN will give you a pixel-wise segmentation of the movie poster. Once you have the location of the poster you can either:
1. Continue to process subsequent frames using the Mask R-CNN
2. Or you can apply a dedicated object tracker
Mansoor
Adrian, you are constantly bombarding us with such valuable information every single week, which otherwise would take us months to even understand.
Thank you for sharing this incredible piece of code with us.
Adrian Rosebrock
Thanks Mansoor — it is my pleasure 🙂
YEVHENII RVACHOV
Hello, Adrian.
Thanks so much for your article and explanation of principles R-CNN
Adrian Rosebrock
You are welcome, I’m happy you found the post useful! I hope you can apply it to your own projects.
Atul
Thanks , very informative and useful 🙂
Adrian Rosebrock
Thanks Atul!
Faraz
Hi Adrain.
Thank you again for the great effort.My question is that mask rcnn is according to authors of paper Mask rcnn : https://arxiv.org/pdf/1703.06870.pdf ,fps is around 5fps.Isnt it a bit slow for using it in real time application and how do you compare YOLO or SSD with it.Thanks.
Adrian Rosebrock
Yes, Faster R-CNN and Mask R-CNN are slower than YOLO and SSD. I would request you read “Instance segmentation vs. Semantic segmentation” section of this tutorial — the section will explain to you how YOLO, SSD, and Faster R-CNN (object detectors) are different than Mask R-CNN (instance segmentation).
Faraz
Thanks Adrian ,so what i understand is that mask rcnn may not be suitable for real time applications.Great tutorial by the way.Thumbs up
Cenk
Hi Adrian,
Thank you very much for your sharing the code along with the blog, as it will be very helpful for us to play around and understand better.
Adrian Rosebrock
Thanks Cenk!
Walid
Thanks a lot.
I worked when I updated openCV 🙂
Adrian Rosebrock
Awesome, glad to hear it!
atom
Great post, Adrian. Actually, a large number of papers are published everyday on machine learning, so can you share us the way you keep track almost of them. Thanks so muchs, Adrian
atom
Adrian, please give me some comment about this. Thanks
Paul
Hi Adrian
This is awesome. I loved your book. (still trying to learn most of it)
I used matterport’s Mask RCNN in our software to segment label-free cells in microscopy images and track them.
I wonder if you can comment on two things
1.
would you comment on how to improve the accuracy of the mask?
Do you think it’s the interpolation error or we can improve the accuracy by increasing the depth of the CNNs?
2. I’ve seen this “flicking” thing in segmentation. (as in video)
If i’m doing image segmentation, it would be one trained weight can recognize a target, while the other may not. some kind of false negative.
would you know where it came from?
Adrian Rosebrock
1. Are you already applying data augmentation? If not, make sure you are. I’m also not sure how much data you have for training but you may need more.
2. False-negatives and false-positives will happen, especially if you’re trying to run the model on video. Ways to improve your model include using training data that is similar to your testing data, applying data augmentation, regularization, and anything that will increase the ability of your model to generalize.
Jaan
This is looks really cool. Is this the same thing as pose estimation?
Adrian Rosebrock
No, pose estimation actually finds keypoints/landmarks for specific joints/body parts. I’ll try to cover pose estimation in the future.
Sumit
Thank you so much for all the wonderful tutorials. i am great follower of your work. had a doubt here:
To perform Localization and Classification at the same time we add 2 fully connected layers at the end of our network architecture. One classifies and other provides the bounding box information. But how will come to know which fully connected layer produces cordinates and which one is for classification?
What i read in some blogs is that we receive a matrix at the end which contains: [confidence score, bx, by, bw, bh, class1, class2, class3].
Adrian Rosebrock
We know due to our implementation. One FC branch is (N + 1)-d where N is the number of class labels plus an additional one for the background. The other FC branch is 4xN-d where each of the four values represents the deltas for the final predicted bounding boxes.
Dona Paula
Thanks for your invaluable tutorials. I ran your code as is, however I am getting only one object instance segemented. i.e If I have two cars in the image (e.g example1), only one car is detected and instance segmented. I have tried with other images. Same story.
My openCV version is 3.4.3. Please suggest resolution.
Dona Paula
Please ignore my previous comment. I thought it would be an animated gif.
Adrian Rosebrock
Click on the window opened by OpenCV and press any key on your keyboard. It will advance the execution of the script to highlight the next car.
Digant
Hi Adrian,
Can you suggest me any architecture for Sementic Segmentation which performs segmentation without resizing the image. Any blog/code related to it would be great.
Adrian Rosebrock
I would suggest starting by reading my tutorial on semantic segmentation to help you get started.
Kark
Hi Adrian,
Thanks for this awesome post.
I am working on a similar project where I have to identify and localize each object in the picture. Can you please advise how to make this script identify all the objects in the picture like a carton box, wooden block etc. I will not know what could be in the picture in advance.
Adrian Rosebrock
You would need to first train a Mask R-CNN to identify each of the objects you would like to recognize. Mask R-CNNs, and in general, all machine learning models, are not magic boxes that intuitively understand the contents of an image. Instead, we need to explicitly train them to do so. If you’re interested in training your own custom Mask R-CNN networks be sure to refer to Deep Learning for Computer Vision with Python where I discuss how to train your own models in detail (including code).
abkul
Great tutorial.
I am interested in extracting and classifying/labeling plant disease(s) and insects from an image sent by a farmer using deep learning paradigm. Please advice the relevant approaches/techniques to be employed.
Are you planning to diversify your blog with examples in the field of plant pests or disease diagnosis in future?
Adrian Rosebrock
I haven’t covered plant diseases specifically before but I have cover human diseases such as skin lesion/cancer segmentation using a Mask R-CNN. Be sure to take a look at Deep Learning for Computer Vision with Python for more details. I’m more than confident that the book would help you complete your plant disease classification project.
Abhiraj Biswas
As you mentioned it’s storing as an output I wanted to know How can we show the output on the screen Frame by frame.
Adrian Rosebrock
You can insert a call to
cv2.imshow
but keep in mind that the Mask R-CNN running on a CPU, at best, may only be able to do 1 FPS. The results wouldn’t look as good.Dave P
Hi Adrian, Another great tutorial – Your program examples just work first time (unlike many other object detection tutorials on the web…)
I am trying to reduce the number of false positives from my CCTV alarm system which monitors for visitors against a very ‘noisy’ background (trees blowing in the wind etc) and using an RCNN looks most promising. The Mask RCNN gives very accurate results but I don’t really need the pixel-level masks and the extra CPU time to generate them.
Is there a (simple) way to just generate the bounding boxes?
I have tried to use Faster RCNN rather than Mask RCNN but the accuracy I am getting (from the aforementioned web tutorials and Github downloads) is much poorer.
Adrian Rosebrock
If Faster R-CNN isn’t working you may want to try YOLO or Single Shot Detector (SSDs).
Paul Z
Never even heard of R-CNN until now .. but great follow up to the YOLO post. Question … sometimes the algo seems to identify the same person twice, very very similar confidence levels and at times, the same person twice, once at ~90% and once at ~50%.
Any ideas?
Adrian Rosebrock
The same person in the same frame? Or the same person in subsequent frames?
sophia
another great article! would it be possible to use instance segmentation or object detection to detect whether an object is on the floor? i wanna be able to scan a room and trigger an alert if an object is on the floor. I haven’t seen any deep learning algorithm applied to detect the floor. thanks, look forward to your reply.
Adrian Rosebrock
That would actually be a great application of semantic segmentation. Semantic segmentation algorithms can be used to classify all pixels of an image/frame. Try looking into semantic segmentation algorithms for room understanding.
Sophia
thanks Adrian, I’ll look into using semantic segmentation for this, look forward to more articles from you!
Bharath
Hi Adrian, I found u have lots of blogs on install opencv on raspberry pi, they build and compile (min 2hours)…..I found pip install opencv- python working fine on raspberry Pi. Did you try it?
Adrian Rosebrock
I actually have an entire tutorial dedicated to installing OpenCV with pip. I would refer to it to ensure your install is working properly.
abkul
Like always great tutorial.
No algorithm is perfect.What are the short comings of Mask R-CNN approach/algorithm?
Adrian Rosebrock
Mask R-CNNs are extremely slow. Even on a GPU they only operate at 5-7 FPS.
Mandar Patil
Hey Adrian,
I made the entire tree structure on Google Colab and ran the mask_rcnn.py file.
!python mask_rcnn.py –mask-rcnn mask-rcnn-coco –image images/example_01.jpg
It gave the following result:
[INFO] loading Mask R-CNN from disk…
[INFO] Mask R-CNN took 5.486852 seconds
[INFO] boxes shape: (1, 1, 3, 7)
[INFO] masks shape: (100, 90, 15, 15)
: cannot connect to X server
Could you please tell me why did this happen?
Adrian Rosebrock
I don’t believe Google Colab has X11 forwarding which is required to display images via
cv2.imshow
. Don’t worry though, you can still use matplotlib to display images.xuli
cool..leading the way for us to the most recent technology
Micha
Thinking to use MASK R-CNN for background removal, is there and way to make the mask more accurate then the examples in the video in the examples?
Adrian Rosebrock
You would want to ensure your Mask R-CNN is trained on objects that are similar to the ones in your video streams. A deep learning model is only as good as the training data you give it.
Micha Amir Cohen
I’m talking about person recognize, It can be any person… so I’m understanding your comment ” objects that are similar ”
look on the picture below the mask cut part of the person head (the one near the dog)… for example…
however if I’m looking on this document the mask cover the persons better
https://arxiv.org/pdf/1703.06870.pdf%5D
any idea how the mask can cover the body better then the examples?
Micha Amir Cohen
tFirst thanks for all the information you share with us!!!!
I Just to verify, as I understand your opinion is that better training can improve the mask fit to the object required and it is not the limitation that related to the ability of Mask RCNN and for my needs I need to search for other AI model
Gagandeep
Thanx a lot for a great blog !
on internet lots of article available on custom object detection using tensorflow API , but not well explained..
In future Can we except blog on “Custom object detection using tensorflow API” ??
thanx a lot your blogs are really very helpful for us…
Best regards
Gagandeep
Adrian Rosebrock
Hi Gagandeep — if you like how I explain computer vision and deep learning here on the PyImageSearch blog I would recommend taking a look at my book, Deep Learning for Computer Vision with Python which includes six chapters on training your own custom object detectors, including using the TensorFlow Object Detection API.
Sunny
Hi Adrian,
Thanks for such a great tutorial! I have some questions after reading the tutorial:
1. Which one is faster between Faster R-CNN and Mask R-CNN? What about the accuracy?
2. Under what condition I should consider using Mask R-CNN? Under what condition I should consider using Faster-CNN? (Just for Mask R-CNN and Faster R-CNN)
3. What is the limitation of Mask R-CNN?
Sincerely,
Sunny
Adrian Rosebrock
1. Mask R-CNN builds on Faster R-CNN and includes extra computation. Faster R-CNN is slightly faster.
2 and 3. Go back and read the “Instance segmentation vs. Semantic segmentation” section of this post. Faster R-CNN is an object detector while Mask R-CNN is used for instance segmentation.
sophia
the mask output that I’m getting for the images that you provided is not as smooth as the output that you have shown in this article – there are significant jagged edges on the outline of the mask. is there any way to get a smoother mask as you have got ? I’m running the script on a Macbook Pro.
looking forward to your reply, thanks.
Sophia
Hi Adrian,
don’t mean to annoy you, but it’d help me considerably if you could give me some ideas for why I’m getting masks with jagged edges (like steps all over the outline) as opposed to the smooth mask outputs, and how I can possible fix this problem. Thanks,
Adrian Rosebrock
See my reply to Robert in this same comment thread. What interpolation are you using? Try using a different interpolation method when resizing. Instead of “cv2.INTER_NEAREST” you may want to try linear or cubic interpolation.
Sophia
using cubic interpolation gives the same results as you show in this post. thank you so much!!
Adrian Rosebrock
Awesome, glad to hear it!
Robert
I’m running into the same issue. Do you have any recommendation Adrian? Are you smoothing the pixels in some way?
Adrian Rosebrock
What interpolation method are you using when resizing the mask?
Abhiraj Biswas
box = boxes[0, 0, i, 3:7] * np.array([W, H, W, H])
(startX, startY, endX, endY) = box.astype(“int”)
boxW = endX – startX
boxH = endY – startY
What is happening in the first step.?
Why is it 3:7…?
Looking forward for your reply.
Adrian Rosebrock
That is the NumPy array slice. The 7 values correspond to:
[batchId, classId, confidence, left, top, right, bottom]
Bhagesh
In a very simple yet detailed way all the procedures are described. Easy to understand.
Can you please tell me how to get or generate these files ?
colors.txt
frozen_inference_graph.pb
mask_rcnn_inception_v2_coco_2018_01_28.pbtxt
object_detection_classes_coco.txt
I want to go through your example.
Adrian Rosebrock
These models were generated by training the Mask R-CNN network. You need to train the actual network which will require you to understand machine learning and deep learning. Do you have any prior experience in those areas?
Manuel
it looks like those files are generated by Tensorflow, look for tutorials on how to use Tensorflow Object detection API.
Bob Estes
Any thoughts on this error:
… cv2.error: OpenCV(3.4.2) /home/estes/git/cv-modules/opencv/modules/dnn/src/tensorflow/tf_graph_simplifier.cpp:659: error: (-215:Assertion failed) !field.empty() in function ‘getTensorContent’
Note that I’m using opencv 3.4.2, as suggested, and am running an unmodified version of your code.
Thanks!
Bob Estes
Found a link suggesting I needed 3.4.3. I updated to 3.4 and all is well.
Bob Estes
Typo: can’t edit post. I upgraded to 4.0.0 and it worked.
Adrian Rosebrock
Thanks for letting us know, Bob!
Pablo
Hello Adrian,
Thanks for you post, it’s a really good tutorial!
But I am wondering whether there is any way to limit the categories of coco dataset if I just want it to detect the ‘person’ class. Forgive my stupidity, I really couldn’t find the model file or some other file contains the code related to it.
Looking forward to your reply;)
Adrian Rosebrock
I show you exactly how to do that in this post.
Sophia
this is probably my favorite of all of your posts! i have a question about extending the Mask R-CNN model. Currently, if i run the code on a video that has more than 1 person, i get a mask output labeled ‘person’ for each person in the video. Is there any way to identify and track each person in the video, so the output would be ‘person 1’, ‘person 2’ and so on… Thanks,
Adrian Rosebrock
I would suggest using a simple object tracking algorithm.
Michael
Hi Adrian,
Amazing book. I’ve been reading through it. Love the materials. I was going through your custom mask rcnn pills example and the annotation is done using a circle. If I am training on something custom I’m using polygons. The code has it finding the center the circle from the annotation and draws a mask. Any suggestions on how to update this to get it to work with polygon annotations in via? Thanks!
Adrian Rosebrock
Thanks Michael, I’m glad you’re enjoying Deep Learning for Computer Vision with Python!
As for your question, yes, there is a way to draw polygons. Using the scikit-image library it’s actually quite easy. You’ll need the skimage.draw.polygon function.
Michael
Hi Adrian,
Thanks for that. I was able to train now but I realized it was only on CPU and it was sooo slow. When I convert to GPU I get a Segmentation Fault (Core Dumped) could be related to a version issue? How can I repay your time???
Michael
Adrian Rosebrock
Hey Michael, be sure to see my quote from the tutorial:
“Furthermore, OpenCV does not support NVIDIA GPUs for it’s dnn module. Right now only a limited number of GPUs are supported, mainly Intel GPUs. NVIDIA GPU support is coming soon but for the time being we cannot easily use a GPU with OpenCV’s dnn module.”
Parupudi Pramod
Can I use this on a gray scale image like Dental x-ray?
Adrian Rosebrock
Yes, Mask R-CNNs can be used on grayscale, single channel images. I demonstrate how to train your own custom Mask R-CNNs, including Mask R-CNNs for medical applications, inside my book, Deep Learning for Computer Vision with Python.
Adrian Rosebrock
Thanks Christian, I’m glad you’re enjoying the tutorials.
You could certainly adapt the ball tracking contrails to this tutorial as well. Just maintain a “deque” class for each detected object like we do in the ball tracking tutorial (I would recommend computing the center x,y-coordinates of the bounding box).
setti
when i run it i see this error can you pls tell me how to fix it
mask_rcnn.py: error: the following arguments are required: -i/–image, -m/–mask-rcnn
Adrian Rosebrock
If you’re new to command line arguments that’s okay, but you need to read this tutorial first.
Zhijia Chen
Hi Adrian,
Currently, I am doing a project which is about capturing the trajectory of some scalpels when a surgeon is doing operations, so that I can input this data to a robot arm and hope it can help surgeons with operations.
The first task of my project is to track the scalpels first, then the second task is to know their 2D movement from the videos provided and even 3D motions.
I think CNN can help me with the first task easily, right?
My question is: is it possible to help me with the second task?
Looking forward to your reply, thanks.
Adrian Rosebrock
Yes, Mask R-CNNs and object detectors will help you detect an object. You can then track them using object tracking algorithms.
Carmelo
Hi,
congrats for the tuorial. Really well done!
I have a question:
I used your code but the masks are not as smooths as the one I see on your article, but they are quite roughly squared.
Is there a reason for this?
Thank you!
Adrian Rosebrock
See my reply to Sophia.
葉又銘
How do you set ask_rcnn_video .py” line 97: box = boxes[0, 0, i, 3:7] * np.array([W, H, W, H])”, I am through your other articles and try I will use YOLO+opencv with centroidtracker, but there is always a problem with the coordinates. I think it is a problem with box. I don’t know yolo’s box=[0:4]. What is the difference between the two, I saw you have used centroidtracker’s article, all use: box = boxes[0, 0, i, 3:7], please help me answer
I tried to use YOLO+centroidtracker to achieve thank you.
Adrian Rosebrock
The returned coordinates for the bounding boxes are:
[batchID, classID, confidence, left, top, right, bottom]
yoming
yes,but yolo_video.py is ” box = detection[0:4] * np.array([W, H, W, H])”,i don’t know how to use
Adrian Rosebrock
YOLO’s return signature is slightly difference. It’s actually:
[center_x, center_y, width, height]
Ben
Hi Adrian, really helpful post. Would it be possible to extract a 128-D object embedding vector (or larger size vector like 256-D or 512-D) that quantifies a specific instance of that object class – similar to the way a 128-D face embedding vector is extracted for a face https://pyimagesearch.com/2018/09/24/opencv-face-recognition/?
For example, if you have two different (different color, different model) Toyota cars in an image, then two object embedding vectors would be generated in such a way that both cars could be re-identified in a later image, even if those cars would appear in different angles – similar to the way a person’s face can be re-identified by the 128-D face embedding vector.
Adrian Rosebrock
Yes, but you would need to train a model to do exactly that. I would suggest looking into siamese networks and triplet loss functions.
yoming
How do I do that showing two bounding boxes in one image without pressing ESC
Adrian Rosebrock
You would remove the “cv2.imshow” statement inside the “for” loop and place it after the loop.
Walid
I think it is better in Figure 5 to change notation N to L for consistency
Miguel Bordalo
Would it possible to run MaskR-CNN in the raspberry pi ?
Adrian Rosebrock
Realistically, no. The Raspberry Pi is far too underpowered. The best you could do is attempt to run the model a Movidius NCS connected to the Pi.
Adama
I ordered the max bundler imageNet. It worth it !
I hope more material using Tensorflow 2.0, TF Lite , TPU, Colab for more coherent and easy development.
I have a question: can we add background sample images without masking them with the masked objects to train the model better on detecting similar object. Like detecting windows but not doors ?
Adrian Rosebrock
Thanks for picking up a copy of the ImageNet Bundle, Adama! I’m glad you are enjoying it.
As far as your question goes, yes, you can insert “negative” samples in your dataset. As long as none of the regions are annotated they will be used as negative samples.
Hocine
Hello dear
i want to know if it’s possible to run the Mask R-CNN with Web cam to make it detect in real time?
thanks
Adrian Rosebrock
You would need a GPU to run the Mask R-CNN network in real-time. It is not fast enough to run in real-time on the CPU.
Hocine
it’s works but so heavy there’s no way to make it littel faster?
Alok
Hello Andrian, will it work on lenovo i5 8th generation 4gb graphics card laptop
Adrian Rosebrock
Yes, but keep in mind that only your CPU will be used, not your GPU as OpenCV’s “dnn” module does not support most GPUs.
Asher
Hello, fantastic articles that are just a wealth of information. Is the download link for the source code still functioning?
Adrian Rosebrock
Yes, you can use the “Downloads” section of the post to download the source code and pre-trained model.
Gabriella
Hi Adrian, How did you get the fc layers as 4096 in Figure 5? According to the Mask R-CNN paper the fc layers are 1024 from Figure 4 (in their paper).
Dawid
Dear Adrian,
Great post, as always. Based on your posts I have learned a lot about CV, NN and python. I still have a question: I have my own Keras CNN saved as a model.h5. I would like to use it to detect features in the pictures, also hopefully with masking. I have transformed keras model to tensorflow and also generated the pdtxt file, however, my model does not want to work because of the error: ‘cv::dnn::experimental_dnn_34_v11::`anonymous-namespace’::addConstNodes’. Is there any other way to use own CNN to detect features on the images? I have tried with dividing image into blocks which were fed into CNN but this approach is rather slow and I would also need to include some more sophisticated algorithms to specify exact location. I would be very grateful for your answer!
Adrian Rosebrock
Could you elaborate a bit more about what you mean by “detect features”? What is the end goal of what you are trying to achieve?
maomao
do you have the code for training?I want to test it on my datasets,thank you
Adrian Rosebrock
I cover how to train your own custom Mask R-CNN networks inside my book, Deep Learning for Computer Vision with Python.
Pallawi
Hi Adrian,
I am so much thankful to you for writing, encouraging and motivating so many young talents in the field of Computer Vision and AI.
Thank you so much, once again.
Keep writing.
We love you so much.
God bless you.
Adrian Rosebrock
Than you for the kind words, Pallawi 🙂
Izack
Adrian thank you so much for yet another amazing post!
Adrian Rosebrock
Thanks Izack, I’m glad you enjoyed it!
may ashraf
how to draw contours for the output of the mask rcnn
Adrian Rosebrock
Take a look at Line 92 where the mask is calculated. You can take that mask and find contours in it.
Ina
Hello Adrian,
thank you for the tutorial. It really is great.
Can you tell whether I can use this program also for the raspberry?
Thank you 🙂
Adrian Rosebrock
No, the RPi is too underpowered to run Mask R-CNN. You would need to combine the Pi with a Movidius NCS or Google Coral USB Accelerator.
Oli
Hi Adrian,
Thanks for another great tutorial!
I was wondering how I would go about getting the code to also output coordinates for the four corners of each bounding box? Is that possible?
Thanks!
Adrian Rosebrock
What do you mean by “output” the bounding box coordinates?
Oli
Hi, thanks for your response.
I am looking to collect data on where each object is located in an image. So, ideally, as well as producing the output image/video, the code will also produce an array containing the pixel coordinates for each bounding box.
Adrian Rosebrock
Line 82 gives you the (x, y)-coordinates of the box.
Pj
Hi
Thanks for this great tutorial.
I am trying run this on intel movidius ncs 2 but am getting the following error:
[INFO] loading Mask R-CNN from disk…
terminate called after throwing an instance of ‘std::bad_cast’
what(): std::bad_cast
Aborted (core dumped)
It works perfectly with opencv but gives error with openvino’s opencv
Adrian Rosebrock
OpenVINO’s OpenCV has their own custom implementations. Unfortunately it’s hard to say what the exact issue is there. Have you tried posting the issue on their GitHub?
Akhilesh
Hi Adrian
This is very informative. Actually I am trying to detect different color wires in an images. My dataset has images of wires in it, I want to detect where are the wires and what colors are they. I was trying to use MASK RCNN, it was able to detect the wires but it is classifying all the wires of same color.
Do you know how can I improve my code.
Adrian Rosebrock
Have you taken a look at Raspberry Pi for Computer Vision? That book will teach you how to train your own Mask R-CNNs. I also provide my best practices, tips, and suggestions.
Med Chrigui
Hi Adrian,
Thank you for this excellent tutorial, I ran the code, it works but it gives me rectangular shapes, not like the results in the tutorial. the second problem is when I test with a 5MB image it gives me an error (cv::OutOfMemoryError). All my images contain only one object which is the body of a person, I like to use mask rcnn in order to detect the shape of the skin, can I obtain such a result starting from your tutorial code?
Thank you in advance.
Adrian Rosebrock
To avoid the memory error first resize your input image to the network — your machine is running out of memory trying to process the large image.
Flávio
I wan to plot the image with Matplotlib but I don’t know exactly where in the code I put that.
Adrian Rosebrock
You mean you want to use the matplotlib’s “plt.imshow” function to display the image?
jeff
Hi Adrian
I really appreciate all of your detailed tutorials.
For reference, I am not very familiar with DNN
in line (source code for images): 113 ,,,
roi = roi [ mask ]
Q1 : Does ‘roi’ have all the pixels that are masked?
Q2 : I want to know the center of the coordinates of the masked area using the OPENCV function. Is it possible?
Adrian Rosebrock
1. The ROI contains the “Region of Interest”. The “mask” variable contains the masked pixels. We use NumPy array indexing to grab only the masked pixels.
2. Compute the centroid of the mask.
Reed Kelso
Hi Adrian,
Great work! I bought the practitioner package to try and learn more about the process. I can’t find anything about image annotation tools for training my own dataset in the book. I found VGG from Oxford but I’m not sure if that will work with the tools you’ve put together.
Thanks again for all these great tutorials!
Reed
Adrian Rosebrock
Hi Reed — it’s the ImageNet Bundle of Deep Learning for Computer Vision with Python that covers Mask R-CNN and my recommended image annotation tools.
Asal
Hi Adrian,
In which bundle you teach to train a Mask R-CNN on a custom dataset? I have the starter bundle of your book and it’s not there.
Thanks
Adrian Rosebrock
The ImageNet Bundle of Deep Learning for Computer Vision with Python contains the Mask R-CNN chapters.
If you would like to upgrade to the ImageNet Bundle from the Starter Bundle just send me an email and I can get you upgraded!
Sandeep Pokhrel
Hi Adrian,
Can we do object detection in video by retaining the sound of the video?
Adrian Rosebrock
I’m not sure what you mean by “retaining the sound”? What do you hope to do with the audio from the video?
Programmer
Thank you it works great, had some issues getting started because of the project interpreter but once I sorted that out it works exactly as stated, I learnt a lot from this tutorial thanks again.
Bob
Hi Adrian!
I am curious if I can combine mask r-cnn with webcam input in real time? Could you please give me any ideas how to achieve this?
Adrian Rosebrock
A Mask R-CNN, even with a GPU, is not going to run in real-time (you’ll be in the 5-7 FPS range).
WhoAmI
Hi Adrian,
Am a novice in the field of image recognition. I started exploring your blog and ran my first sample today.
I have two points to mention
1) Why is the Mask R-CNN not accurate in real time images? If I have around 5 images of car then it is detecting only 3 (The other 2 cars are might not be clear but still they are clearly visible (60%) for human eyes in the image and this algorithm is not detecting them).
2) Instead of viewing different output files of an image, can’t I view the image segmentation in a single image? (Ex: If it detected 2 cars then it is poping up a window showing a single car and after closing it then it is reopening it and showing me the second car. Is there any chance of viewing them in a sigle window probably on a single image).
Shamika K
Hi Adrian,
Just went through this masking tutorial. You really made it made easy to understand every step.
Have one question though, is there any way to extract the black and white resized mask that is present in Figure 6? I am not interested in actual masking but need shape of object for my next steps.
Adrian Rosebrock
If I understand what you’re asking correctly you can refer here.
usha
Hi,
its a great post thanks for explaining each concept clearly, i have a query ,I ran the code with the image but i m not getting the required output , I m getting only 1 car labelled, this is with any image i am feeding , it is able to detect only one object in the image , i have not made any changes to the code, Thank You
Adrian Rosebrock
Click on the window opened by OpenCV to advance execution of the script.
Ankit
Hello sir,
this is an amazing tutorial ever seen.
I wanted to save the cropped images which are detected after segmentation.
I have done with the square cropping things, but I want that particular object to be saved.
Thanks
Adrian Rosebrock
Images can only be rectangular. You cannot save non-rectangular images. Perhaps you instead want to save the image and it’s alpha mask?
Ankit Pitroda
Yes, sir, I am okay with an image with alpha mask
Ankit
Thanks a lot, sir for the reply
I want to save the masked region into the square/rectangle image with the background white/black/transparent.
can I have some suggestions from you?
Ankit
Hello Sir,
I want to detect the floor of the room.
Is there any technique to do this thing?
Thank you
Adrian Rosebrock
Take a look at semantic segmentation algorithms.
Enes
Hi Adrian, thank you very much for this tutorial. Your tutorials are very helpful for my DL journey.
I have a question about RCNN mask. I try to detect shop signs from the street image. Most of the shop signs are rectengular and some of them are rotated. I want to get coordinates of the corners of shop signs from the mask matrix. (‘Roi’ information is not accurate when shop sign is rotated.) Mask matrix are boolean matrix and its pixel value is ‘True’, if this pixel is in the mask region. I cannot generate a solution for finding coordinates of corners of the mask from this mask matrix. Can you suggest a solution for me?
Thanks.
Adrian Rosebrock
Hey Enes — have you taken a look at Deep Learning for Computer Vision with Python? That book will help you train your own custom Mask R-CNNs.
Ankit
hello sir
again awesome tutorial.
My question is:
Can I set the sequence of the object detection?
e.g. first it will detect all the chairs, then all the dining tables than all the wine glasses and so on?
Thanks
Adrian Rosebrock
No, you would do that in your post-processing code. First you obtain all detections from the network. You can then sort them as you see fit.
Ankit PItroda
Thanks man 🙂
Asjad Murtaza
Hi, I have a question that is a little off topic, please guide me.
Is it possible to do semantic segmentation with Matterport’s implementation of Mask RCNN ?
Adrian Rosebrock
No, not out of the box. You would need to train the network specifically for semantic segmentation. The pre-trained network only does instance segmentation.
manish rajput
how can i avoid multiple detection box in single objects?
Adrian Rosebrock
Apply non-maxima suppression.
Florian
Hello, Thanks for this article !
I have a question, can i blur the ROI created ?
And what i have to modify in your code ?
Thanks in advance,
Florian
Adrian Rosebrock
I would follow this tutorial. I blur everything but the ROI but you could easily update the code to blur the ROI instead.