This tutorial is meant for advanced Raspberry Pi users who are looking to milk every last bit of performance out of their Pi for computer vision and image processing using OpenCV.
I’ll be assuming:
- You have worked through my previous Raspberry Pi + OpenCV install tutorials (ideally multiple times).
- You are comfortable with the command line and Unix environments.
Since this is an advanced guide, I’ll be doing less hand holding and instead focusing on the optimizations themselves. If you get stuck or run into an error, you’ll need to refer back to the previous tutorials I offer here on PyImageSearch.
By the time you finish this tutorial, your Raspberry Pi will enjoy a 30% speed increase when executing OpenCV and Python scripts.
To learn more about optimizing OpenCV on your Raspberry Pi, just keep reading.
Optimizing OpenCV on the Raspberry Pi
A couple weeks ago I demonstrated how to deploy a deep neural network to your Raspberry Pi.
The results were satisfactory, taking approximately 1.7 seconds to classify an image using GoogLeNet and 0.9 seconds for SqueezeNet, respectively.
However, I was left wondering if we could do better.
While we cannot train neural networks on the Raspberry Pi, we can deploy pre-trained networks to our Pi — provided we can optimize the Raspberry Pi sufficiently (and the network can fit into the limited memory of the Pi hardware).
In the remainder of this tutorial, we will discuss the optimizations we will leverage during our OpenCV installation, followed by walking through the seven installation steps.
After our optimized OpenCV compile is installed, we’ll run a few quick tests determine if our new OpenCV install is faster than the previous one.
My goal here to demonstrate that the optimizations are in fact much faster on the Raspberry Pi 3 and you should not hesitate to use them in your own projects.
NEON and FVPV3
In my research on how to optimize the Raspberry Pi for OpenCV I came across this excellent article by Sagi Zeevi.
Inside the tutorial Sagi recommends using:
- NEON
- VFPV3
- And optionally Threading Building Blocks (TBB)
I’m not a big fan of TBB as (1) the performance gains are meager and (2) they are a royal pain in the ass to install on the Raspberry Pi.
The most bang for your buck is going to come from NEON and VFPV3.
ARM NEON is an optimization architecture extension for ARM processors. It was designed by the ARM engineers specifically for faster video processing, image processing, speech recognition, and machine learning. This optimization supports Single Instruction Multiple Data (SIMD) (as opposed to SISD, MISD, MIMD), which describes an architecture where multiple processing elements in the pipeline perform operations on multiple data points (hardware) all executed with a single instruction.
The ARM engineers also built VFPV3, a floating point optimization, into the chip our Raspberry Pi 3’s use. The ARM page linked here describes features included in this optimization such as configurable rounding modes and customizable default not a number (NaN) behavior.
What this means for us is that our neural network is likely to run faster because the ARM processor on the Raspberry Pi 3 has hardware optimizations that we can take advantage of with the 4× ARM Cortex-A53, 1.2GHz processor.
I think you’ll be really impressed with the results, so let’s go ahead and get your optimized OpenCV installed on the Raspberry Pi.
Step #1: Expand filesystem and reclaim space
For the remainder of this tutorial I’ll be making the following assumptions:
- You are working with a brand new, fresh install of Raspbian Stretch.
- This is not the first time you have installed OpenCV on the Raspberry Pi using Python virtual environments. If it is, please get your feet wet using one of my introductory OpenCV install guides.
- You are comfortable with the command line and Unix environments.
- You know how to debug CMake output for common errors (Python virtual environment not found, missing Python libraries, etc.).
Again, this tutorial is an advanced guide so I’ll presenting the commands and only providing an explanation if it is pertinent — by and large, you should know what these commands do before you execute them.
The first step is to run, raspi-config
and expand your filesystem:
$ sudo raspi-config
And then reboot your Raspberry Pi:
$ sudo reboot
From there, delete both Wolfram Engine and LibreOffice to reclaim ~1GB of space on your Raspberry Pi:
$ sudo apt-get purge wolfram-engine $ sudo apt-get purge libreoffice* $ sudo apt-get clean $ sudo apt-get autoremove
Step #2: Install dependencies
The following commands will update and upgrade any existing packages, followed by installing dependencies, I/O libraries, and optimization packages for OpenCV:
$ sudo apt-get update && sudo apt-get upgrade $ sudo apt-get install build-essential cmake pkg-config $ sudo apt-get install libjpeg-dev libtiff5-dev libjasper-dev libpng12-dev $ sudo apt-get install libavcodec-dev libavformat-dev libswscale-dev libv4l-dev $ sudo apt-get install libxvidcore-dev libx264-dev $ sudo apt-get install libgtk2.0-dev libgtk-3-dev $ sudo apt-get install libcanberra-gtk* $ sudo apt-get install libatlas-base-dev gfortran $ sudo apt-get install python2.7-dev python3-dev
This entire process should take about 5 minutes.
Note: I added libcanberra-gtk*
which grabs the ARM specific GTK to prevent GTK warnings (not errors; warnings) you may encounter when running Python + OpenCV scripts on the Raspberry Pi.
Step #3: Download the OpenCV source code
Next, download the OpenCV source code for both the opencv and opencv_contrib repositories, followed by unarchiving them:
$ cd ~ $ wget -O opencv.zip https://github.com/opencv/opencv/archive/3.4.7.zip $ unzip opencv.zip $ wget -O opencv_contrib.zip https://github.com/opencv/opencv_contrib/archive/3.4.7.zip $ unzip opencv_contrib.zip
Note: You will need to click the “<=>” button in the toolbar of the codeblock above to grab the full paths to the zip archives.
For this blog post, we’ll be using OpenCV 3.4.7; however, as newer versions of OpenCV are released you can update the corresponding version numbers (Note: some screenshots show 3.3.0 as they were collected at the time when that was the highest version available).
Step #4: Create your Python virtual environment and install NumPy
We’ll be using Python virtual environments, a best practice when working with Python.
You can install pip, virtualenv, and virtualenvwrapper using the following commands:
$ wget https://bootstrap.pypa.io/get-pip.py $ sudo python get-pip.py $ sudo python3 get-pip.py $ sudo pip install virtualenv virtualenvwrapper $ sudo rm -rf ~/.cache/pip
Once both virtualenv
and virtualenvwrapper
have been installed, open up your ~/.bashrc
and append the following lines to the bottom of the file, using your favorite terminal-based text editor such as vim
, emacs
, or nano
:
# virtualenv and virtualenvwrapper export WORKON_HOME=$HOME/.virtualenvs export VIRTUALENVWRAPPER_PYTHON=/usr/bin/python3 source /usr/local/bin/virtualenvwrapper.sh
From there, reload your ~/.bashrc
file to apply the changes to your current bash session:
$ source ~/.bashrc
You’ll need to run source ~/.bashrc
each time you open a new terminal/SSH into your Pi to ensure your system variables have been set properly (it also loads this file on boot).
Next, create your Python 3 virtual environment:
$ mkvirtualenv cv -p python3
Here I am creating a Python virtual environment named cv
using Python 3 (alternatively, you may also use Python 2.7 by changing the -p
switch to python2
).
You can name the virtual environment whatever you want, but I use cv
as the standard naming convention here on PyImageSearch.
Finally, install NumPy into the Python virtual environment:
$ pip install numpy
Step #5: Compile and install the optimized OpenCV library for Raspberry Pi
We’re now ready to compile and install the optimized version of Raspberry Pi.
Ensure you are in the cv
virtual environment using the workon
command:
$ workon cv
And from there configure your build:
$ cd ~/opencv-3.4.7/ $ mkdir build $ cd build $ cmake -D CMAKE_BUILD_TYPE=RELEASE \ -D CMAKE_INSTALL_PREFIX=/usr/local \ -D OPENCV_EXTRA_MODULES_PATH=~/opencv_contrib-3.4.7/modules \ -D ENABLE_NEON=ON \ -D ENABLE_VFPV3=ON \ -D BUILD_TESTS=OFF \ -D INSTALL_PYTHON_EXAMPLES=OFF \ -D OPENCV_ENABLE_NONFREE=ON \ -D CMAKE_SHARED_LINKER_FLAGS='-latomic' \ -D BUILD_EXAMPLES=OFF ..
Notice how the NEON and VFPV3 flags have been enabled. These lines are highlighted.
Additionally, I’ve highlighted the NonFree algorithms flag (giving you the full install) as well as a special linker flag you need for OpenCV 3.4.7.
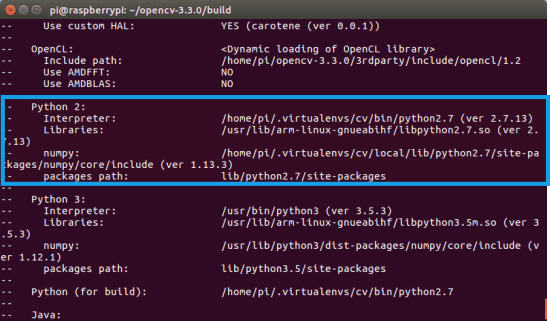
If you’re using Python 2.7, your “Python 2” section should look like this:
Otherwise, if you’re compiling OpenCV for Python 3, check the “Python 3” output of CMake:
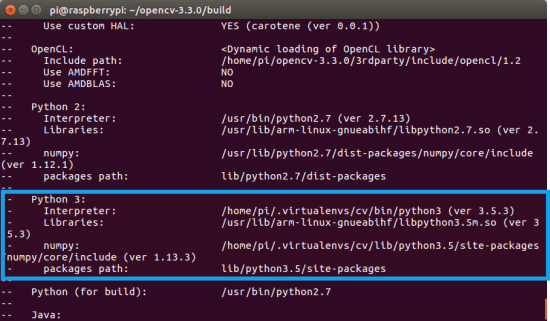
Notice how the Interpreter
, Libraries
, numpy
, and packages path
variables have been properly set.
Before you start the compile I would suggest increasing your swap space. This will enable you to compile OpenCV with all four cores of the Raspberry Pi without the compile hanging due to memory exhausting.
Open up your /etc/dphys-swapfile
file and then edit the CONF_SWAPSIZE
variable:
# set size to absolute value, leaving empty (default) then uses computed value # you most likely don't want this, unless you have an special disk situation # CONF_SWAPSIZE=100 CONF_SWAPSIZE=1024
Notice that I’m increasing the swap from 100MB to 1024MB. This is the secret sauce to compiling OpenCV with multiple cores on the Raspbian Stretch.
If you do not perform this step it’s very likely that your Pi will hang.
From there, restart the swap service:
$ sudo /etc/init.d/dphys-swapfile stop $ sudo /etc/init.d/dphys-swapfile start
Note: Increasing swap size is a great way to burn out your Raspberry Pi microSD card. Flash-based storage have limited number of writes you can perform until the card is essentially unable to hold the 1’s and 0’s anymore. We’ll only be enabling large swap for a short period of time, so it’s not a big deal. Regardless, be sure to backup your .img
file after installing OpenCV + Python just in case your card dies unexpectedly early. You can read more about large swap sizes corrupting memory cards on this page.
Now that we’ve updated the swap size, kick off the optimized OpenCV compile using all four cores:
$ make -j4
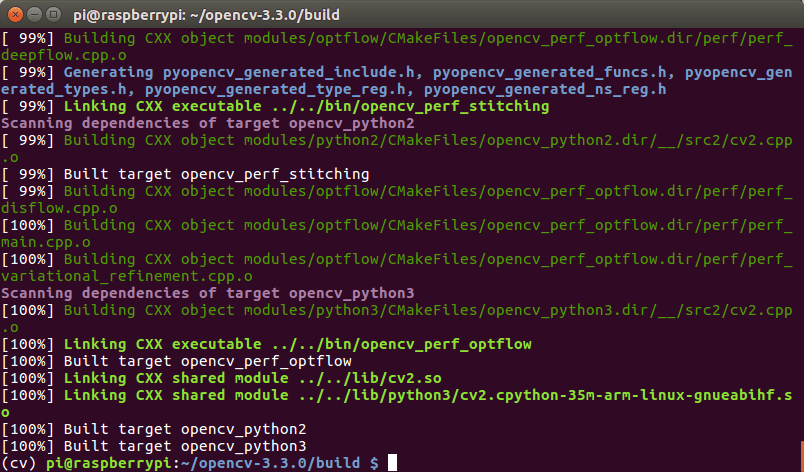
Assuming OpenCV compiled without error (as in my screenshot above), you can install your optimized version of OpenCV on your Raspberry Pi:
$ sudo make install $ sudo ldconfig
Don’t forget to go back to your /etc/dphys-swapfile
file and:
- Reset
CONF_SWAPSIZE
to 100MB. - Restart the swap service.
Step #6: Finish installing your optimized OpenCV on the Raspberry Pi
If you compiled OpenCV for Python 3, you need to issue the following commands to sym-link the cv2.so
bindings into your cv
virtual environment:
$ cd /usr/local/lib/python3.5/site-packages/ $ sudo mv cv2.cpython-35m-arm-linux-gnueabihf.so cv2.so $ cd ~/.virtualenvs/cv/lib/python3.5/site-packages/ $ ln -s /usr/local/lib/python3.5/site-packages/cv2.so cv2.so
Keep in mind that the exact paths will need to be updated depending if you are using Python 3.4, Python 3.5, Python 3.6, etc.
If you instead compiled OpenCV for Python 2.7, you can use these commands to sym-link your cv2.so
file into the cv
virtual environment:
$ cd ~/.virtualenvs/cv/lib/python2.7/site-packages/ $ ln -s /usr/local/lib/python2.7/site-packages/cv2.so cv2.so
Step 7: Testing your optimized OpenCV + Raspberry Pi install
As a quick sanity check, access the cv
virtual environment, fire up a Python shell and try to import the OpenCV library:
$ source ~/.profile $ workon cv $ python >>> import cv2 >>> cv2.__version__ '3.4.7' >>>
Congratulations! You’ve just installed an optimized OpenCV 3.3 on your Raspberry Pi 3.
So, how good are these optimizations?
After working through this tutorial you’re probably curious how good these OpenCV + Raspberry Pi optimizations are.
Given that we just optimized for floating point operations a great test would be to run a pre-trained deep neural network on the Raspberry Pi, similar to what we did last week.
Go ahead and use the “Downloads” section of this blog post to download our pre-trained Convolutional Neural Networks + example images + classification script.
From there, fire up a shell and execute the following command:
$ python pi_deep_learning.py --prototxt models/bvlc_googlenet.prototxt \ --model models/bvlc_googlenet.caffemodel --labels synset_words.txt \ --image images/barbershop.png [INFO] loading model... [INFO] classification took 0.87173 seconds [INFO] 1. label: barbershop, probability: 0.78055 [INFO] 2. label: barber chair, probability: 0.2194 [INFO] 3. label: rocking chair, probability: 3.4663e-05 [INFO] 4. label: restaurant, probability: 3.7258e-06 [INFO] 5. label: hair spray, probability: 1.4715e-06
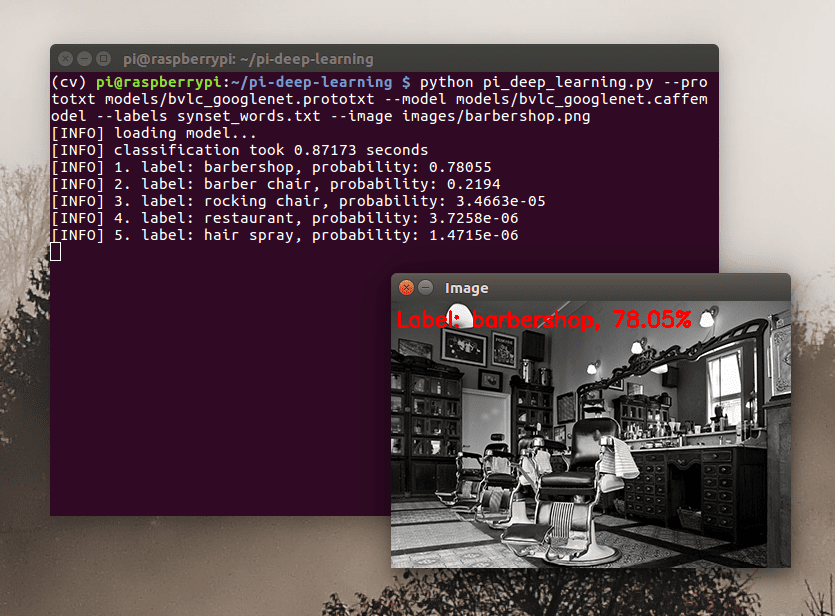
Here you can see that GoogLeNet classified our image in 0.87 seconds, which is a massive 48.82% improvement from last week’s 1.7 seconds.
Let’s give SqueezeNet a try:
$ python pi_deep_learning.py --prototxt models/squeezenet_v1.0.prototxt \ --model models/squeezenet_v1.0.caffemodel --labels synset_words.txt \ --image images/barbershop.png [INFO] loading model... [INFO] classification took 0.4777 seconds [INFO] 1. label: barbershop, probability: 0.80578 [INFO] 2. label: barber chair, probability: 0.15124 [INFO] 3. label: half track, probability: 0.0052872 [INFO] 4. label: restaurant, probability: 0.0040124 [INFO] 5. label: desktop computer, probability: 0.0033352
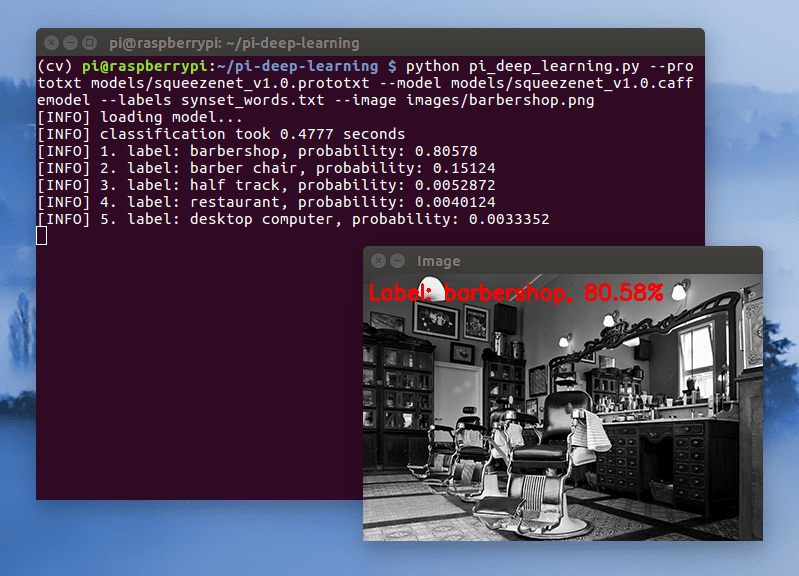
Here we can see that SqueezeNet correctly classified the input image in 0.47 seconds, another huge improvement from the 0.9 seconds from last week (47.78%).
Based on our results, it’s very clear that our OpenCV optimizations have made a significant impact.
What's next? We recommend PyImageSearch University.
86+ total classes • 115+ hours hours of on-demand code walkthrough videos • Last updated: May 2025
★★★★★ 4.84 (128 Ratings) • 16,000+ Students Enrolled
I strongly believe that if you had the right teacher you could master computer vision and deep learning.
Do you think learning computer vision and deep learning has to be time-consuming, overwhelming, and complicated? Or has to involve complex mathematics and equations? Or requires a degree in computer science?
That’s not the case.
All you need to master computer vision and deep learning is for someone to explain things to you in simple, intuitive terms. And that’s exactly what I do. My mission is to change education and how complex Artificial Intelligence topics are taught.
If you're serious about learning computer vision, your next stop should be PyImageSearch University, the most comprehensive computer vision, deep learning, and OpenCV course online today. Here you’ll learn how to successfully and confidently apply computer vision to your work, research, and projects. Join me in computer vision mastery.
Inside PyImageSearch University you'll find:
- ✓ 86+ courses on essential computer vision, deep learning, and OpenCV topics
- ✓ 86 Certificates of Completion
- ✓ 115+ hours hours of on-demand video
- ✓ Brand new courses released regularly, ensuring you can keep up with state-of-the-art techniques
- ✓ Pre-configured Jupyter Notebooks in Google Colab
- ✓ Run all code examples in your web browser — works on Windows, macOS, and Linux (no dev environment configuration required!)
- ✓ Access to centralized code repos for all 540+ tutorials on PyImageSearch
- ✓ Easy one-click downloads for code, datasets, pre-trained models, etc.
- ✓ Access on mobile, laptop, desktop, etc.
Summary
In today’s blog post, you learned how to optimize your OpenCV install on the Raspberry Pi.
These optimizations came from updating our CMake command to include NEON and VFPV3. When benchmarking OpenCV this leads to an approximate 30% increase in speed. However, when applied strictly to the new dnn
module in OpenCV 3, we are seeing an increase of over 48%!
I hope you enjoyed this tutorial and enjoy your optimized OpenCV + Raspberry Pi!
But before you go…
Be sure to check out other Raspberry Pi posts on my blog, and consider entering your email address in the form below to be notified when future deep learning/Raspberry Pi posts are published here on PyImageSearch.
Download the Source Code and FREE 17-page Resource Guide
Enter your email address below to get a .zip of the code and a FREE 17-page Resource Guide on Computer Vision, OpenCV, and Deep Learning. Inside you'll find my hand-picked tutorials, books, courses, and libraries to help you master CV and DL!
Thanks for this great article!
One question: Does this also work on a Raspberry Pi 2?
I haven’t benchmarked or tested this procedure on the Raspberry Pi 2, but I imagine it will work there as well.
This doesn’t work on the Pi 2. It doesn’t have NEON instructions. I don’t know about VFPV3 though
I believe OpenCV since 3.2 will auto detect neon and vfpv for ARM, so there’s no need to explicitly set it.
The last time I compiled OpenCV on the Raspberry Pi it did not auto-detect NEON and VFPV. This was confirmed my manually inspecting my old OpenCV install and the benchmarks.
When for lastest version 4.0.0, still don’t auto-detect NEON and VFPV. Your blog is really greate ^_^
Thanks Chandler 🙂
Well, if swap partition is too small (cannot compile huge codes) and too large (eats SD space) and too fragile (wears out SD) , may be best solution (I did it with PCs) would be to :
(a) desactivate it “sudo swapoff -a” is likely to work (cannot check on a RPi fefore Friday), for the compiling session
(b) build another , bigger swap **file** on an external disk, (which should not be wearable)
Let us call $EXTDISK a path to an external disk:
dd if=/dev/zero of=${EXTDISK}/mySwap bs=1024 count=1000000
creates a huge , zero filled file on an external disk
sudo mkswap ${EXTDISK}/mySwap # format this file (it is not a partition)
sudo swapon ${EXTDISK}/mySwap # uses it as swap for the compiling session
it would be very unwise to put a swap file on a SD root , therefore $EXTFILE should be a path to a portion of a removable, infinite write disk
Great point regarding the external disk. Thank you for sharing, Denis 🙂
When you said in last week’s post that you are going to show us optimization of opencv, I halted all operations and told all my students to wait for Adrian to show us how. And now i can gladly say that you are one of the best teacher we’ll ever have! Thank you for everything! (Truly!)
Thank you for the comment, Mansoor! Comments like these really put a smile on my face 🙂
Fantastic! Do you think this build will work on a Pi Zero? Obviously, the Pi Z won’t be as fast, but my current project needs the smaller footprint for a wearable. Thanks for all you do!
I haven’t tried on the Raspberry Pi Zero. If your goal is to work with real-time video I would not recommend the Pi Zero. With only a single core/processor thread it’s just not fast enough.
I tried it on pi zero Ww, althouhg it works(bearly) it slowness could drive you to pull all your hair out! 🙂
Did it really work?? How much swap space did you keep? Am also doing a wearable with Pi zero w. I got stuck in opencv installation at 99%, then now I saw this optimization technique. Please let me know if it really worked.
Just chiming in here: in general I do not recommend the Pi Zero or Pi Zero W for OpenCV or computer vision. With one thread of execution it’s far too slow. I would recommend the Pi 3 if at all possible.
Dear Adrian, Raspberry pi 3 is quad core , but that means the code i write on processed by the four cores even without making a multiple threads in my code????
OpenCL support is not provided by default. You would need to manually configure/install it.
It doesn’t work with Pi zero w, i have tried it and when i import cv2 it says Illegal instruction, but the normal compile without the optimization worked for me great.
Just saying to save anyone trying to do it on pi zero from wasting the 10 or more ours of the compiling process.
Is it possible to use this with live video ?
Yes, you just need to access your camera, whether that’s a USB camera or Raspberry Pi camera module.
“You can read more about large swap sizes corrupting memory cards on this page.”
Better solution to avoid SD card corruption is to remove the swap file on the SD and use a swap file on an external disk – some cannot be corrupted …. – (for the compiling session, or for huge images…)
This is fully discussed in https://raspberrypi.stackexchange.com/questions/70/how-to-set-up-swap-space (and the traditional solution of dd + mkswap + swapon has been used for years in the PC world)
Great point, thanks for sharing Denis!
You can manually edit the cmake scripts and replace the VFPV3 CFC flags with VFPV4, as rpi supports it. Might give you a bit of an extra speed..
Thanks for sharing! I’ll have to give this a try.
Hi, Dr. Adrian. There is also a SqueezeNet v1.1 pre-trained model (2.4x less computation than v1.0, without sacrificing accuracy – https://github.com/DeepScale/SqueezeNet). I haven’t tested it yet, but maybe it should also be worth a trial.
Hi Flávio — indeed, there is SqueezeNet v1.1; however, there is not a “deploy.prototxt” included in the repo for SqueezeNet v1.1 but there is one included for SqueezeNet v1.0. I decided to use SqueezeNet v1.0 to keep the explanation simple.
Dear Adrian,
There is one point in your instructions/screenshots I didn’t quite understand.
The difference between building OpenCV for Python 2 or 3.
In the two screenshots from cmake, they show the path to your virtualenv python environment and to the ‘system’-installed-python and vice versa.
But the line below “Python (for build)” shows python 2.7 in both screenshots.
So in the end, what is used during the build process?
Is there a way to point to python 3.x – and does it make any difference?
Hope you can shed some light on this.
regards,
Thomas
The “Python (for build)” statement in CMake is buggy. It will almost always report “Python 2.7” for the build. Instead, check the “Modules to be built” section of CMake and ensure either “python2” or “python3” appears in the output.
Thank you for your quick answer!
Thomas
Thanks for this great tutorial and everything is work perfectly, I have a small question. is there a way to track the object after classify it , for example by draw a borders around it
Are you referring to drawing the bounding box? If so, you can use the “cv2.rectangle” function. An example can be seen here.
This is exactly what I want. 🙂 Thanks, Dr.Rosebrock
Thanks Adrian, very nice article.
My Pi 3 reports armv7 instead of armv8 (reports 32 bit instead of 64 bit). This has been discussed at various forums online and looks like the support for 64 bit is not yet available officially. openSUSE seems to have made an unofficial 64 bit images for the Pi 3. I’ve not tried it yet.
I’m not aware of the internals of OpenCV, its algorithms etc.
Are there any 64 bit arithmetic being used internally in OpenCV?
Is it possible to get better performance using the 64 bit capabilities of the Pi 3?
What is the best way to make use of the 64 bit capabilities (apart from the openSUSE version)?
Thank you.
OpenCV 64-bit bindings are used on most platforms where 64-bit is supported. While the Raspberry Pi 3 supports 64-bit the problem is actually with the operating system. There is no Raspbian-based operating system that currently supports 64-bit. Raspbian Stretch is still 32-bit.
There are various hacks that I’ve seen with people who use NOOBS who are able to flash a 64-bit version, but I’ll admit that this is not my area of expertise.
Have you tried using additional cflags such as -mneon-for-64bits and -munaligned-access? This would only be good to use on the RPI3 as the older 32-bit ARMs are slower at using the FPU for 64-bit since it takes two CPU register transfers to get 64-bit numbers in and out of the FPU. On the RPI3 those two options should enable two 32-bit memory spaces to be loaded in a single 64-bit register and transferred to the FPU.
I’m compiling right now using those settings to see if it helps any.
hey joshua i know its been a long time since you wrote that , but did it help?
Adrian, I also see the following from cmake/OpenCVCompilerOptions.cmake
if(ENABLE_VFPV3 AND NOT ENABLE_NEON)
add_extra_compiler_option(“-mfpu=vfpv3”)
endif()
Looks like if NEON is enabled vfpv3 is not enabled. Not sure why.
you can manually add in the cmake file “-mfpu=neon-vfpv4” instead of neon, and you get best optimization for rpi3.
Hi memeka, which cmake file do we add that line for rpi3? Please advice.
There is something which puzzles me, and I was surprised one could do some training with a RPi (it was a pleasant surprise, thanks for your great explanations) :
can one build opencv3 “only” for C++?
can one , in this option, compile and lik, either for ocv2 or for ocv3 (I hav some working programs written for opencv2; it is more comfortable, if one wants to port them to cv3, to have the old version still working, and compare it with the new version)
I am aware python is more comfortable and easier to read than plain c++ (and IMO space/time consumption differences can be neglected when one has to deal with arrays and images) , but I cannot learn at the same time c++ ( coming from the Arduino world, I decided to begin with it) and python….
Yes, you can compile OpenCV 3 with only the C++ bindings and no Python, Java, etc. bindings. Simply turn off the Python bindings in your CMake configuration:
Hi Adrian, thanks for another great tutorial!
I’ve been following your posts since long and I have a question
Will using NEON and VFPV3 for optimization cause any kind of side effects or decreased performance for the Raspberrypi in the long run, due to the extra load exerted on the processor for optimization?
That depends. If your system is always under heavy load of course it will lower than lifetime of the machine. But if your machine was under heavy load before the optimizations you would still be decreasing the lifetime of it. In short, I wouldn’t worry about it.
Nice tutorial Adrian, very clear. Interesting to see your conclusions. I have spend way too much time over the last months trying to optimize opencv on the Pi 3.
To really squeeze everything out of opencv on the Pi, maybe it’s time to go to the 64bit version, distributed by OpenSuse ? [https://en.opensuse.org/HCL:Raspberry_Pi3]
Can I interest you in your next adventure, indoor location using ArCodes.
Have you looked into the new aruco library in OpenCV 3 ?
There is a stand-alone version based on opencv 2 (http://www.uco.es/investiga/grupos/ava/node/26) with python wrappers (https://github.com/fehlfarbe/python-aruco). But I think the new opencv aruco support is faster.
Either way, thanks and keep the tutorials coming.
Thanks for the comment, Morgan. I haven’t used or tried ArUco yet, but I’ll keep it in mind for a future tutorial.
Thanks Adrian
I am wondering if I can use GoogLeNet instead of MobileNet for – Object detection with deep learning and OpenCV –
You can’t swap in arbitrary deep neural networks to perform object detection. The neural network needs to be trained specifically to perform object detection using an object detection framework such as SSD, R-CNN, YOLO, etc.
Do you know any pre-trained neural network with one of those OD frameworks that can detect more than those 20 classes [person, dog, cat …etc]?
Take a look at the Caffe model zoo for pre-trained networks in Caffe format.
Hi Adrian,
I got the following message while running both pi_deep_learning.py:
WARNING **: Error retrieving accessibility bus address: org.freedesktop.DBus.Error.ServiceUnknown: The name org.a11y.Bus was not provided by any .service files
But fixed by:
sudo apt install at-spi2-core
as per instructions here:
https://github.com/NixOS/nixpkgs/issues/16327
Thanks for the great tutorials!
Thanks for sharing!
Hi, great posts!
Unfortunately I have not been able to reproduce your results on the Raspberry PI3 🙁 Running your example code the best I got was just above 0.7 seconds using squeezenet. Maybe something went wrong with my compilation of OpenCV, I don`t know.
However I have also followed your recipe for the PI3 but using an Asus Tinkerpad (kind of a Raspberry PI3 clone with more RAM and higher clock frequency but almost non existing support 🙁 ), there I was far more successful! With the googlenet I achieved classification times around 0.41 seconds and with squeezenet around 0.25 seconds.
So future is looking good for my hobby project robot head now planning to use 3 fisheye cams for 360 degrees coverage plus two HD cams for stereo vision and distributed processing among multiple PI3s and Tinkerpads.
Looking forward to your future posts.
Congrats on the success with the Asus Tinkerpad! That’s great. As for the Raspberry Pi, I’m not sure what may have happened. I would examine the CMake log and ensure that the NEON and VFPV3 optimizations were included in the compile.
Hi,
Could you please describe the process that you followed to install optimised OpenCV on Thinker board ?.I pretty much followed the same process mentioned here and do see similar classification time to yours, but I see the examples crashing on thinker board. what is the version of your Debian OS ?
Regards,
DGS
Hi Adrian,
I saw your great tutorial and then tried to cross compile opencv3 on my pc.After several attempts, I managed to build it with python2 and 3 support. Check out the gist if you are interested.
https://gist.github.com/hrshovon/70612b719bfda0becde46f0b9d2dfa36
Hi Hasanur,
I used your gist to cross-compile on Ubuntu 16.04, worked great, but it looks like highgui didn’t build so imshow() fails, but I did get the speed up! I installed it on a “fresh” Pi after installing all the listed dependencies and copying over the install directory tar.gz file.
Any idea as to what went wrong? Its a lot faster than compiling on the Pi3 and then I’d have a simple install for all my other Pi if I can get this fixed.
Hi Adrian
I followed your steps and finally success squeezenet model on virtual environment.
But, I didn’t make any improvement compared with no virtual env.(Same processing time)
And I finally realized reason that NEON & VFPV3 were not enabled.
Here is Error message
CMAKE ERROR at cmake/OpenCVCompilerOptimizations.cmake:399(message):
Required baseline optimization is not supported : VFPV3, NEON
How can I fix this?
Thanks
Hi Bruno — which model Raspberry Pi are you using?
Getting exactly the same. Pi 3
Fixed. Needed to clean out the build directory from a previous build without NEON and VFPV, then do a clean build.
Thank you very much Adrian, after nth times and numerous hours of trying, I finally get opencv compiled and installed on my py! Yippy. 🙂 Also this latest article is much better organized, the section about dependencies is much clearer, reduced a lot of human errors such as missing a line
and the swap file allows the make -j4 to use all 4 cores to compile, much faster then just 1 core.
Thank you again for spending the time writing such a detailed guild!
Congrats on getting OpenCV compiled on your system, nice job!
Hi, thanks for the great article. I get a lot of “compiler internal error” with “make -j4”, however there were no errors with “make -j1” but took 2 hours. Anything I am missing?
It’s hard to say without seeing your log, but I would suggest proceeding with your
make -j1
command if OpenCV compiled without error for you.Hi Adrian,
I installed OpenCV 3.3 according to your guide here:
https://pyimagesearch.com/2017/09/04/raspbian-stretch-install-opencv-3-python-on-your-raspberry-pi/
Now I would like to install OpenCV using the NEON and FVPV3 optimizations mentioned here How would I first uninstall my current OpenCV install?
RPi 3 Model B
Raspbian Stretch
I unfortunately did not use a virtual env
That’s okay. Re-compile OpenCV and then run
sudo make install
. This will overwrite your previous OpenCV install.Hi Adrian, thanks for the tut, the install was a breeze. However, running my code I can’t seem to get my cpu usage above 25%. Is this what is suppose to happen with this setup? My code is very slow. I am just using gaussian blur on a video, grayscale, and look for intensity higher than a threshold, and bitwise mask. I have a raspberry pi 3. Thanks.
Hi Benjamin — OpenCV on the Raspberry Pi will only use one of the four cores for a given algorithm (hence the 25% usage since the Raspberry Pi 3 has four cores). OpenCL support would help with this; however, OpenCL support is not yet available on the Raspberry Pi. If your algorithm is running too slow you should consider (1) reducing the frame size of your input images to achieve faster throughput or (2) utilizing faster hardware.
Thanks for the reply Adrian.
Looks like it may not be long before OpenCL will run (correctly) on an RPi3.
https://github.com/doe300/VC4CL
25.10.2017
Well done, Adrian, as usual, excellent work! I really like the solution to a successful make -j4.
To save even more space may I suggest purging scratch and scratch2. I doubt if OpenCV users will need it.
NT
Hi Nigel — Good suggestion. Removing scratch and scratch2 (MIT project for young and inexperienced coders) is appropriate.
sudo apt-get remove scratch scratch2
Excellent work! i just put a script for helpsbuild opencv using cross-compilation: https://github.com/lhelontra/build_opencv
Thanks Leonardo!
Hi Adrian
thanks for your post. one question really quick. when I edit dphys-swapfile, it is read-only file. And I tried to save as or rename but in vain. How could I do?
Hi Reed — you need super user privileges, so use sudo:
sudo vim /etc/dphys-swapfile
Thanks Adrian
But after building the opencv which is good, I can’t find any directory called”site-packages” in my python3.5 file. it is also not allowed to mkdir site-packages. why and how could I do
Thanks Adrian
but after building up opencv which is all set, I couldn’t find the “site-packages” in my python3.5 directory. and no use to mkdir site-packages.
any help?
Sorry I missed one step. problem solved
Hi Reed — I’m glad you were able to resolve your issue! Congrats on getting OpenCV installed on your Raspberry Pi.
hi,
can this installation be done on raspbian jessie?
Yes, you should be able to achieve the same results.
Don’t find the model to test. There are only your books in the download section.
Can you put a link to where it applies (“So, how good are these optimizations?”)?
Thx, Ivan
Hi Ivan — it sounds like you may have used the Resource Guide section, not the “Downloads” section. Please use the “Downloads” section and you’ll be able to grab the code + pre-trained model.
Hi Adrian, I managed to run your example on Squezeenet V1.1 and it sure is twice faster than Squezeenet V1.0. 🙂
For folks wondering how to do it, get these two files into the models folder: https://github.com/DeepScale/SqueezeNet/blob/master/SqueezeNet_v1.1/deploy.prototxt
https://github.com/DeepScale/SqueezeNet/blob/master/SqueezeNet_v1.1/squeezenet_v1.1.caffemodel
I renamed the .prototxt file to squeezenet_v1.1.prototxt to have the same naming convention as you 🙂 .
Than in the .prototxt file replace:
layer {
name: “data”
type: “Input”
top: “data”
input_param { shape: { dim: 10 dim: 3 dim: 227 dim: 227 } }
}
with
input: “data”
input_shape {
dim: 10
dim: 3
dim: 227
dim: 227
}
And than just make a call:
python pi_deep_learning.py –prototxt models/squeezenet_v1.1.prototxt \
–model models/squeezenet_v1.1.caffemodel –labels synset_words.txt \
–image images/barbershop.png
I hope I helped someone! 🙂
I wonder if using Halide backend for a even betters speedup could be achieved on RaspberryPi3. Halide targets ARMv7/NEON, and RbPi3 has a ARMv8 CPU.
Awesome, thanks for sharing Emanuel! 🙂
Hi,
I’m wondering how can I use the NEON architecture to accelerate other image processing program, for example the KCF tracker in OpenCV? Do I need to modify the source code of KCF tracker to utilise the NEON or the raspberry pi will automatically make use of the NEON architecture?
Thanks in advance.
You’ll want to check with the OpenCV developers or take a look at the GitHub repo for the KCF tracker, but if the KCF tracker is properly implemented it should automatically make use for the NEON architecture.
Hi Adrian,
I use opencv & your imutils lib in my project. The goal is to record a video from picam with gps, gyro informations overlayed.
I used videowriter to make my video. I noticed that fps parameter is not to synchronize recorded frames to the correct tempo, but only used in video file property.
For example :
I defined fps to 20
When I execute the code with my laptop, I record frame to 33fps instead of 20. With my raspberry, I record to 12fps. But in the final video file parameter, the fps is set to 20.
So the lenght of the video is not correct (faster with the pi, slower with the laptop).
If I set fps to 12 on the raspberry, video is not even created. 20fps is the minimum.
Have you ever noticed this phenomenon ?
Thx, Cyb
Recording video with OpenCV can be a bit of the pain. I document some of the process here, but in general, I’m not sure why this is occurring on your system. Sorry I couldn’t be of more help here!
I just tried raspberrypi 2 and it works very well, 0.97918 seconds ___ 80.58%
Gracias Adrian
How does this affect power consumption?
I have not directly measured power consumption before and after the optimizations. If someone wants to measure and contribute that would be great!
I have built openCV on a Pi3 with virtual environments, I made both python3 and python environments and they worked well, but of course I wantedd the speed-up offered in this tutorial blog.
I followed the instructions here except I didn’t activate either of the virtual environments, I just deleted my build directory and did the cmake command. When I did the make -j4 I didn’t get very far before a compiler segfault (same as happened a few days ago). I then did make clean and a single thread make. which completed fine (as it did a few days ago). The opencv installed to dist-packages instead of site-packages. I renamed the python3 binding in python3.5/dist-packages. Running the sample code in both python and python3 I got the speed-up — ~0.9 seconds insteasd of ~1.8 seconds.
Next I tried my python3 virtual envrionment with workon and rerunning the sample code again, expecting the ~1.8 second timing I was surprised to get the ~0.9 second timing! Same result after switching to the python 2.7 environment.
I’m not complaining, 🙂 but its clear that I don’t understand what is going on with the the virtual environments and would like to know.
The /usr/local python site-packages contain the cv2.so files I’d built a few days ago while the dist-packages contain the cv2.so files that I built today (from the modified dates). How is the virtual environment using the “new one” when it was supposed to be “stand alone” and use “local” versions?
In my .virtualenvs the .virtualenvs/cv//lib/python2.7/site-packages/cv2.so links to the /usr/local site-packages so why am I getting the “optimized” opencv when I run in the virtual environment?
I’ve no idea why the make -j4 crashes. Only thing I can think of is I’ve installed the 2017-09-07 Raspbian image to a 64GB sd card — nothing special, wrote it with etcher, booted and installed all current updates and started with these PyImagesSearch openCV building tutorials. Pre-Stretch versions of Raspbian needed some extra work to use a >32GB card as I understand it so I never tried. This is my first Pi with a 64GB card, perhaps there are bugs with a large swapfile on a >32GB card.
Thanks again for another great and helpful tutorial!
I’m sure I’m not the only one with multiple Raspberry Pi who would like to be able to zip up the installation files and move them to other machines. The build directory is like 2.9GB whereas the entire opencv-3.3.0 directory is only like 3.1GB, are there any “packaging” options in the Makefile?
I’ve tired cross-compiling using Hasanur Rashid’s gist, it creates a build/install directory you tgz, transfer, extract and install with sudo rsync. Worked great except for some reason highgui doesn’t seem to build right and cv2.imshow() dies, although the prior code runs and prints the correct [INFO] as show in these tutorials.
I’ve discussed Python virtual environments (and why we use them) before on the PyImageSearch blog so this post probably isn’t the best for a super lengthy discussion. With that said, I would recommend reading this great tutorial on Python virtual environments. It will help you understand why we use them and why they are a best practice for Python development.
Hello Adrian ,
Today i successfully self-compiled Latest TBB (2018-Update 2) for my Raspberry pi 3 and I’m also able to compile latest OpenCV (3.3.1- dev) along with (TBB+VFPV3+NEON) and there has been 30% increase in performance in comparison to (VFPV3+NEON) only when i benchmarked it.It took 10-15 days for debugging and compiling but i achieved this finally with no whatsoever errors.
Thanks so much for all of your post and specially this post, helped me to understand how to optimize for openCV to reach max performance in my Rpi 3. 🙂
Anyone who like to get precompiled deb files for Latest OpenCV with (TBB+VFPV3+NEON) for Raspberry pi 3 along with instructions ,Can email me at ( ) .
Do you have any blog that talk about how to use TBB in raspberry pi3?
hi Adrian, I followed exact instructions & build went successful. However I dont see any change in performance & later noticed: cpu_neon.cpp:20:2: error: #error “NEON is not supported”.
Hi Amit — which OS version are you running? These instructions were tested on Stretch.
hi Adrian – i am running Jessie on Pi3. I have shared some more details of OS, compiler version & make info. Anything specific shall I report to diagnose this?
Thanks Adrian for the pointer, I took stretch lite image & it worked. Though there are still similar build errors after running make file but I am able to complete compilation & get the desired performance.
When I am running a python application for object detection. But after installing it was first saying
WARNING **: Error retrieving accessibility bus address: org.freedesktop.DBus.Error.ServiceUnknown: The name org.a11y.Bus was not provided by any .service files
and after fixing it by
sudo apt install at-spi2-core
it is not drawing rectangle around a object when a condition becomes true. Also previously when condition became true, the rectangle was drawing.
Hi Ahmed — that’s a peculiar problem. Generally, when I see that exact warning, I just ignore it since it is a warning. Try uninstalling `at-spi2-core` and see if you achieve the same results.
Hi Adrian – I am able to successfully achieve the optimised performance using this article & hats off to you for this. However when I use it with webcam like logitec, I am facing this problem while reading from : Corrupt JPEG data: 1 extraneous bytes before marker 0xd2
Do i need to build opencv with jpeg header or something I am missing?
Hey Amit, thanks for the comment. Unfortunately I’m not sure what the error is here. I would suggest researching your webcam model and perhaps even opening an issue on the OpenCV GitHub page.
Hello, i manage to install opencv 3.3.0 follow this tutorial, but when i try to run the example <>
it gives me that error :
[INFO] loading model…
Traceback (most recent call last):
File “real_time_object_detection.py”, line 33, in
net = cv2.dnn.readNetFromCaffe(args[“prototxt”], args[“model”])
AttributeError: ‘module’ object has no attribute ‘dnn’
any ideas ?
Thanks in advance !
I would double-check that you are indeed using OpenCV 3.3 as it sounds you are using an earlier version:
Perhaps you had a previous version of OpenCV installed on your Pi that is accidentally being used?
The CMAKE in these instructions were what worked for me after multiple attempts at compiling.
Thanks!
Hello Adrian and thanks for your beautiful recipe. I have a very strange behavior on my PI(raspberry pi 3 b). I compile opencv 3.4.0 with tbb(I have compiled it easily) and with all NEON and VFPV3 (and even opencl is on)… and it works!!! the rrridddiculous part is that I can produce your optimizations exactly BUT when I went through getting backup of my SD card (with acronis true image) [which exactly does not add or reduce anything from card] when i bootup back to my PI and want to rerun the scripts I get non-optimized numbers!!!!!!!!! I am getting madddd. if you want I can send you my debian created with checkinstall….
Hey Ehsan — that is indeed strange behavior, I’m not sure what could be causing it. So if I understand correctly, you followed these instructions to install an optimized OpenCV on your Raspberry Pi. You then backed up the Raspbian .img file. Flashed it to a new SD card. And now the speed is lower?
Was this a different SD card? It sounds like your SD card may me old or dying (it may be time to replace it), but again, I’m not sure.
Do you how to use opencv opencl with the raspberry pi ?
Is it required to be in the (cv) environment when executing the build itself? After having installed all the dependencies, setup my virtualenv, and just before `make -j4`, I did a reboot. I forgot to go back to the (cv) environment and did `make -j4`. All went well, I did the remaining of the installation, `workon (cv)` and I could import cv2 in my python 3.5 environment all right. Which seems to indicate it isn’t necessary to be in (cv) when compiling, is it?
Once you have executed “cmake” you do not have to execute “make” in the “cv” virtual environment. You do need to be in the “cv” environment when importing though.
Why install virtualenv and virtualenvwrapper? If I don’t do it on my raspberry, what happen?
Python virtual environments are a best practice for Python development. You can read more about them and why you should use them here.
Hi Adrian thanks for the hard work.
Do you know why I have this Warning at the end of the run?
[INFO] loading model…
[INFO] classification took 0.97347 seconds
[INFO] 1. label: barbershop, probability: 0.78055
[INFO] 2. label: barber chair, probability: 0.2194
[INFO] 3. label: rocking chair, probability: 3.4663e-05
[INFO] 4. label: restaurant, probability: 3.7258e-06
[INFO] 5. label: hair spray, probability: 1.4715e-06
** (Image:17907): WARNING **: Error retrieving accessibility bus address: org.freedesktop.DBus.Error.ServiceUnknown: The name org.a11y.Bus was not provided by any .service files
Thank for all.
Can I optimize Opencv after already having it installed on Strech? for example following both tutorials one after the other?
If so, I did it and still see no visible improvement on Speed, if not a tiny bit slower. Is there a way to check if 1.NEON and 2.VFPV3 were properly installed?
Thanks in advance!
If you did not compile OpenCV with the following flags:
Then the optimized version was not installed. Unfortunately you will need to re-compile and re-install OpenCV.
Thank you for this precious tutorial!
Openalpr with Opencv now run in half time! 🙂
Awesome, I’m glad to hear it Fabio! 🙂
Thank you. These series tutorials are so helpful for me.
Thank you for the kind words 🙂
Hi Adrian,
Why not add -D CPACK_BINARY_DEB=ON to your cmake and do a make package after your make install. This will create all the different opencv packages you can copy to thumbdrive for re-deployment !
You could do that. I also recommend making a copy of your Raspbian .img file so you always have one ready to deploy.
Hi, Adrian. This tutorial is greatly helpful.
When I installed opencv3 for python2 following this guild, everything was the same as you said.
BUT the cv2.so is not in “/local/lib/python2.7/site-packages/”, however, it was in the path “/local/lib/python2.7/dite-packages/”.
I don’t know whether you met this case?
Moreover, this cv2.so also can be normally imported in python2.
Thank you.
I’m not sure why the “dist-packages” was used instead of “site-packages”. I’ve heard it happen to a few users but I’ve never been able to diagnose exactly why it happens. To be honest, you could move the “cv2.so” file to “site-packages” if you want or you can just leave it. It will work just the same.
Thank you for your reply and your help. I had moved the cv2.so to the correct path. Everything works well! Thank you.
Awesome, I’m glad that worked! 🙂
@Tenngre Z, I compiled opencv 3.4.0 locally on a Pi 3B+ with Raspbian Stretch, with NEON and VFP flags on
I was compiling in a Python 3.5.3 virtualenv but for some reason cmake ignored python 3 (no python 3 information appears in the summary at all) and builds for python 2.7. Make also produces a python 2 cv2.so only which it places in /usr/local/lib/python2.7/dist-packages.
I tried opencv 3.3.0 and turning off these 2 flags with the same results. I even tried eliminating all traces of python 2 from the pi, but installing the required libraries forced a reinstall of python 2 anyway.
Strange! But you are not alone
Hi Adrian,
I have step 7 working and I confirm python 3.5.3 and opencv 3.4.1 with the source ~/.profile then workon cv then python returns correct versions. If i launch python 2 import cv2 works but python 3 does not. I always have to specify the source ~/.profile
command as it does not apply at boot. How do I fix the path so it will work without the specific path or how do I fix python 3 shell so it works with cv?
I’m not sure what you mean “work without the specific path” but if you want to use OpenCV 3 + Python 3 you’ll need to re-compile OpenCV again, this time with Python 3 support. The generated binaries are not cross-Python version compatible.
Thank you for a clear and functional set of instructions. FYI, openCV 3.4.0 and its extras also work with these same instructions. I did notice though that some packages were not used in compilation-openBLAS, etc. Still that little Pi 3B+ got mighty hot compiling w 4 cores!
In step 4, you are installing pyhon2 pip and phthon3 pip right after each other (overwriting).. causing virtualenv and virtualenvwrapper not to be installed in the python2 env.. and thus source is failing..
I need to issue commands to the GPIO and these require a ‘sudo python’ command. However, even tho I installed Python 3.5.3 and configured the virtual environment properly, and have entered the virtual environment with ‘workon cv’, ‘sudo python’ brings up python 2.7. How can I run the virtual environment under sudo?
You supply the full path to the Python virtual environment binary:
$ sudo /home/pi/.virtualenvs/cv/bin/python your_script.py
Thanks for your article. I am wondering if it works on Rock64 debian
I successfully compiled opencv 3.4.1 for python 2.7 with NEON, VFP and GTK but I ran into lots of issues trying to compile 3.3.0, 3.4.0, and 3.4.1 for python 3.5.
For example, even in a python 3.5 virtualenv the cmake couldn’t find the python 3 interpreter and couldn’t find python 3’s numpy (I can start the python 3.5 interpreter manually on the command line and import numpy no problem). Turning off the NEON and VFP flags didn’t help. Running cmake outside of a virtual environment didn’t help either.
I compiled for python 3 many times, looking at forums for various cmake flags that would help the system find python 3 resources but kind of gave up since I had opencv for python 2 working.
Did anyone else successfully compile opencv for python 2 but unsuccessfully compile for python 3? I wonder if there is something wrong with my python path.
Thanks for any thoughts.
When you created your Python 3 virtual environment I assume you ran:
$ mkvirtualenv your_env_name -p python3
It sounds like you may have accidentally created a Python 2.7 virtual environment.
If someone is interested, I obtained a much shorter compile time disabling the compilation of performance test of OpenCV issuing the following CMake command (I enabled non-free algorithms too):
cmake -D CMAKE_BUILD_TYPE=RELEASE -D OPENCV_EXTRA_MODULES_PATH=~/opencv_contrib-3.4.2/modules -D ENABLE_NEON=ON -D ENABLE_VFPV3=ON -D BUILD_TESTS=OFF -D BUILD_PERF_TESTS=OFF -D OPENCV_ENABLE_NONFREE=ON ..
I already changed the swapsize to 1024
But after i stop and start and when i do free -h the swap remain 0 even if i changed it to 1024
But it is okay now i just continue the build using “make” thanks btw. The results of the test in rp3 b+ is more faster.
Awesome, I’m glad it worked for you!
my result is below, is VFPV3 supported?
— CPU/HW features:
— Baseline: NEON
— required: NEON VFPV3
— disabled: VFPV3
BIG TIP for people following this guide – I would recommend NOT using a python virtual environment or you may find yourself recompiling and reinstalling. Many python libraries on the Pi only install via “apt” and these WILL NOT install to the virtual environment.(virtualenv only works with pip)
Sorry Nick, that’s entirely false. The vast majority of Python packages are either
pip
installable or usesetup.py
.Hi Adrian,
I am fairly new to using the raspberry pi and these tutorials have given great insight.
I’m currently working on a project where I want to use two pi cameras and compute module 3 to calculate depth and am currently figuring out how to install opencv libraries and get to coding.
Optimization seems necessary for this project but I’m not working with much space (4GB eMMC on the compute module)
I have Rasbian Stretch Lite and was wondering how much space would your steps above take up. Do you have any recommendations as far as setting up an environment to work on stereo depth especially when dealing with minimal amounts of space?
Thanks for these tutorials, any wisdom would be extremely appreciated!
I would suggest you use a 16GB SD card. As long as you are using a 16GB card you should be all set 🙂 As far as stereo vision on the Pi, I do not have any tutorials on that topic but will consider it for the future. Thank you for the suggestion.
Love your guides and as I’m new at this they’ve been a great learning experience.
I still have no idea what I’m doing but at least you’ve given me a great head start on the OpenCV and Tensorflow combo.
I was just wondering if compiling with FPFV4 instead of FPFV3 would make any significant difference, seeing as the Pi 3B+ I have is using Cortex-A53 cores?
Thanks again.
I’m hoping my tensorflow compile is done by morning
I have not tried with FPFV4 versus FPFV3 so I’m not sure. If you try please do come back and let us know how it went!
This guide is really awesome Adrian! I am new to opencv and your blog was really very helpful in setting up of the environment and build system fast.
However, I had 2 issues.
First one was small: My cv2.cpython-35m-arm-linux-gnueabihf.so is always created in /usr/local/python/cv2/python-3.5 and not in the /usr/local/lib/python3.5/site-packages/ folder after installation. I did a find at root just to reconfirm.
2nd issue is a bit major: After following all the optimization steps and running the pi_deep_learning.py test, I am still stuck with a ~1.7 secs classification run. Any hints would help. I have used the cmake with NEON and FVPV3 on a pi 3.
Which version of OpenCV were you trying to install?
OpenCV 4 – Sorry did not see your response earlier.
great tutorial Adrian. easy to follow stuff. thanks
keep it up. but I have one suggestion.
I noticed u have a lot of tutorials. I think it would be neater if u kind of arrange them. sometimes u get confused jumping from one tutorial to another (cause of the link they have or updated versions). my suggestion is that, u kind of put them in form of a tree structure on ur site or a more organised way.
You mean like organizing tutorials based on their category? If so, each post has one or two categories associated with it (right underneath the post title). Is there additional organization you are looking for?
Hello Adrian I made the sd card with img file “Raspbian.img.gz” then I installed sudo apt-get python-opencv.
test_image.py and test_video.py are ok. But when I run load_display_save.py it gives me error “ImportError: No module named ‘cv2’.
If I run Python2.7 and I do “Import cv2” ok if Python3.5 gives me an error. I’m wrong.
Thanks, help me
You’re not inside the Python virtual environment. You need to use either the
workon
orsource
commands first. Refer to the Raspbian .img file documentation for details on how to use those commands.hey adrian saw your email… the thing i was saying is that with this config i wasnt able to install opencv and having a .pc file , but there is an option in the cmake file for that , i would turn it ON since many packages uses it, it doesnt install the .pc on the pkg path but it does create it.
jus that
Also with opencv4 and optimizations on the pi, i still have quite a bit of false positives. Is this a training issue or because of the camera res?
Without seeing your input images it’s hard to say but it’s most likely that your input data is not similar to what the model was trained on. Computer vision and machine learning algorithms are not magic — for best performance your input data should be similar to what the model was trained on. If it’s not you may want to consider training a custom model on your own data.
Hey Adrian,
awesome tutorial, as always!
However, like other comments hinted at before, when using opencv-4.0.0 there was no speed increase, so it might be that the version you get using `pip install opencv-python` was already compiled with NEON and VFPV3. Do you have any info on that?
I tested a YOLO object detection using the RPi camera module and went from roughly 0.93 fps to 0.92 fps (average out of 5 measurements, change within standard deviation).
For anyone else interested in installing opencv-4.0.0 anyway, here are a few things that are different:
I was running out of swapspace compiling version 4.0.0, I had to increase it to 2047 (I found online that seems to be the limit on the RPi). It takes a long time though, about 3-4 hours, but if you don’t increase the swap space you might end up waiting 3 hours anyway and then getting the error message: “internal compiler error: Killed (program cc1plus)”.
Also,the cv2.cpython-35m-arm-linux-gnueabihf.so / cv2.so file isn’t in the site-packages folder, but in /usr/local/python/cv2/python-3.5
Make sure to also modify the OPENCV_EXTRA_MODULES_PATH in the cmake… seems obvious but I’m embarrassed to admit how long it took me to trace the weird errors I got to that mistake.
Yes, I believe the latest version of opencv-python and opencv-contrib-python for the Raspberry Pi does come with NEON and VFPV3 support.
Maybe you could update the article to mention this, as most people will be working with OpenCV 4.0 now and will be going through all the “trouble” for nothing.
Hello adrian i have installed opencv 4.0 optimized version
CPU/HW features:
Baseline: VFPV3 NEON
requested: DETECT
required: VFPV3 NEON
NOW , im getting the same results you get with the no optimized version!
–model models/bvlc_googlenet.caffemodel –labels synset_words.txt \
> –image images/barbershop.png
[INFO] loading model…
[INFO] classification took 1.7161 seconds
i have tried the tutorial on the 3.3.0 aswell and its the same… im lost
also, the tests fails in 3 Raspberrys pi 3b that i have checked
Performing Test HAVE_CPU_NEON_SUPPORT – Failed
can you confirm that your codes of the download section works faster in opencv 4.0.0 optimized? like getting the 0.46s of squeezenet?
in this tutorial https://pyimagesearch.com/2018/09/26/install-opencv-4-on-your-raspberry-pi/ you didnt test them
also , which version of gcc did you use? the last raspbian comes with 6.3 , maybe is that?
Hey could you give download link of the image of sd card on which you have installed TensorFlow and opencv. We could directly flash that image on a sd card and boot from it.
I have a pre-configured Raspbian .img file with OpenCV, Keras, TensorFlow, etc. pre-installed inside the Quickstart Bundle and Hardcopy Bundle of my book, Practical Python and OpenCV. Make sure you pick up a copy to have access to the SD card.
Hey good tutorial Adrian , i want to ask you i have installed openCV 4.0.0 from another tutorial for you and now i want to optimize my openCV, so i need to uninstall my openCV and install this one or it’s just i need to use your script without uninstalling anything,and thanks brother for your tutorial.
I would suggest using a fresh Raspbiasn .img file just to make sure you don’t run into any issues.
compiled opencv 3 for puthon 3.5. but when i execute iport cv2 in python it says illegal instruction, how to fix? any help
Great article! I successfully compiled opencv on my raspberry over night 🙂
Maybe add a hint to “make -j4” like: “It can take a really long time to compile (hours, even if it says 99%). Be patient!” or so.
My question is:
What part of the downloaded and created data needs to remain on the disk after running “sudo make install”?
What can I delete and what should I store on a external disk, in order to be able to use opencv on other pi’s without compiling it again?
You can delete the “opencv” and “opencv_contrib” directories after installing, they are not needed anymore.
I utilised 32 Gb class 10 memory card and had error while compilation of open cv with make j4 function. I tried many times to remove it but there were still internal compilation error : segemantation fault . Is there any solution available for this apart from use another j flag or close multiple running application.
What is causing the segfault? Is the RPi running out of memory? Go through the “make -j4” output to see where the problem arises. Secondly, try compiling with just single core via “make”
Thanks for the article.
From my reading, what makes 30% increase is enabling these two flags.
-D ENABLE_NEON=ON
-D ENABLE_VFPV3=ON
And then increase SWAPSIZE to avoid hang.
Other than this, it seems everything else is same to general build. Did I miss anything about the optimization?
I have the same question, looks like there aren’t differences in Cmake flags compared to described in that article: https://pyimagesearch.com/2018/09/26/install-opencv-4-on-your-raspberry-pi/.
I’ve compiled OpenCV 4 under newer Raspbian Buster but looks like there is an issue with a neon support. I’ve got the error “NEON is not supported” in cmakeerror.log
Does anyone have a similar configuration of OS and OpenCV? My hardware is PI 3B+
Hi Adrian,
Thank you so much for your detailed and practical tutorial!
Is there any way for OpenCV to use GPU for image processing?
As an example, I have been reading on the possibility of running OpenCV over OpenCL.
Do you think if this or any alternative solution might work?
Thanks alot!
Shahab
The short answer is that it’s possible to use OpenCL on the RPi 3 but not the RPi 4. The gains are meager though and not worth the effort. I discuss it more inside Raspberry Pi for Computer Vision.
Adrian, hi!
Thank you for your reply!
Its great that you split it into bundles and of course the pre-configed image file.
Do you think it’ll be soon for Pi4 to enjoy this as well (VideoCore VI)?
Thanks alot!
Shahab
We’re covering the RPi 4 in the book as well!
Thank you Adrian!
That is such a great effort.
Best, Shahab
Hi Adrian,
Thank you for the article.
My question is:
What is the frame rate after the optimizing? Does it change a lot?
Thank you again.
Jiayan
Hi Adrian, thanks for share.
I have a question. Is it necessary to use virtual environments to optimize opencv?.. I mean, If I decide to skip the virtual environment configuration steps but I install opencv from source and following all the other steps you mention, can I get opencv optimized anyways?
You can skip the Python virtual environment if you want, but they are a best practice in the Python community.