The Ubuntu VirtualBox virtual machine that comes with my book, Deep Learning for Computer Vision with Python, includes all the necessary deep learning and computer vision libraries you need (such as Keras, TensorFlow, scikit-learn, scikit-image, OpenCV, etc.) pre-installed.
However, while the deep learning virtual machine is easy to use, it also has a number of drawbacks, including:
- Being significantly slower than executing instructions on your native machine.
- Unable to access your GPU (and other peripherals attached to your host).
What the virtual machine has in convenience you end up paying for in performance — this makes it a great for readers who are getting their feet wet, but if you want to be able to dramatically boost speed while still maintaining the pre-configured environment, you should consider using Amazon Web Services (AWS) and my pre-built deep learning Amazon Machine Image (AMI).
Using the steps outlined in this tutorial you’ll learn how to login (or create) your AWS account, spin up a new instance (with or without a GPU), and install my pre-configured deep learning image. This will enable you to enjoy the pre-built deep learning environment without sacrificing speed.
(2019-01-07) Release v2.1 of DL4CV: AMI version 2.1 is released with more environments to accompany bonus chapters of my deep learning book.
To learn how to use my deep learning AMI, just keep reading.
Pre-configured Amazon AWS deep learning AMI with Python
In this tutorial I will show you how to:
- Login/create your AWS account.
- Launch my pre-configured deep learning AMI.
- Login to the server and execute your code.
- Stop the machine when you are done.
However, before we get too far I want to mention that:
- The deep learning AMI is Linux-based so I would recommend having some basic knowledge of Unix environments, especially the command line.
- AWS is not free and costs an hourly rate. Exactly how much the hourly rate depends is on which machine you choose to spin up (no GPU, one GPU, eight GPUs, etc.). For less than $1/hour you can use a machine with a GPU which will dramatically speedup the training of deep neural networks. You pay for only the time the machine is running. You can then shut down your machine when you are done.
Step #1: Setup Amazon Web Services (AWS) account
In order to launch my pre-configured deep learning you first need an Amazon Web Services account.
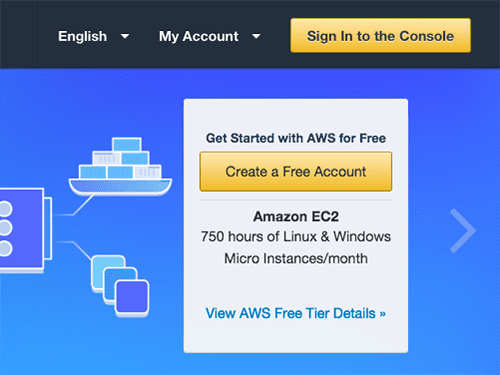
To start, head to the Amazon Web Services homepage and click the “Sign In to the Console” link:
If you already have an account you can login using your email address and password. Otherwise you will need to click the “Create a new AWS account” button and create your account:
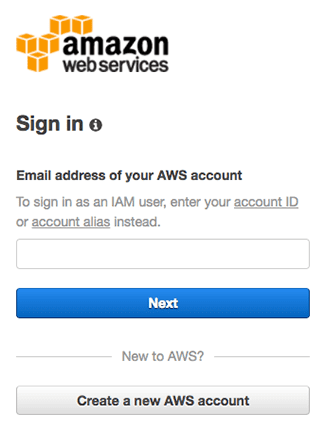
I would encourage you to use an existing Amazon.com login as this will expedite the process.
Step #2: Select and launch your deep learning AWS instance
You are now ready to launch your pre-configured deep learning AWS instance.
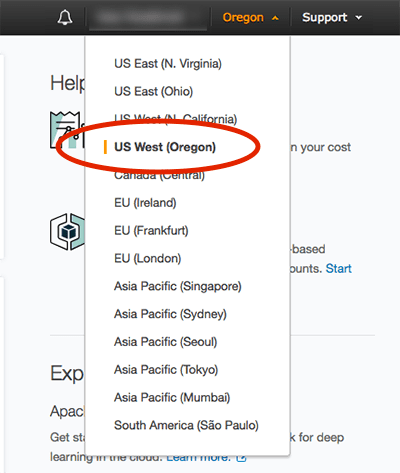
First, you should set your region/zone to “US West (Oregon)”. I created the deep learning AMI in the Oregon region so you’ll need to be in this region to find it, launch it, and access it:
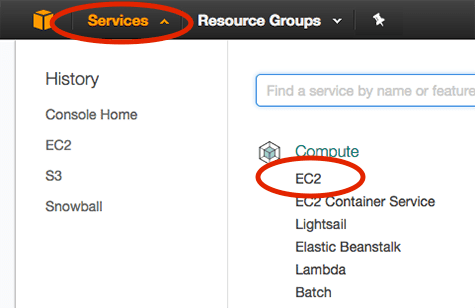
After you have set your region to Oregon, click the “Services” tab and then select “EC2” (Elastic Cloud Compute):
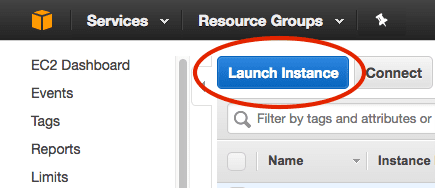
From there you should click the “Launch Instance” button:
Then select the “Community AMIs” and search for either “deep-learning-for-computer-vision-with-python-v2.1 – ami-089c8796ad90c7807”:
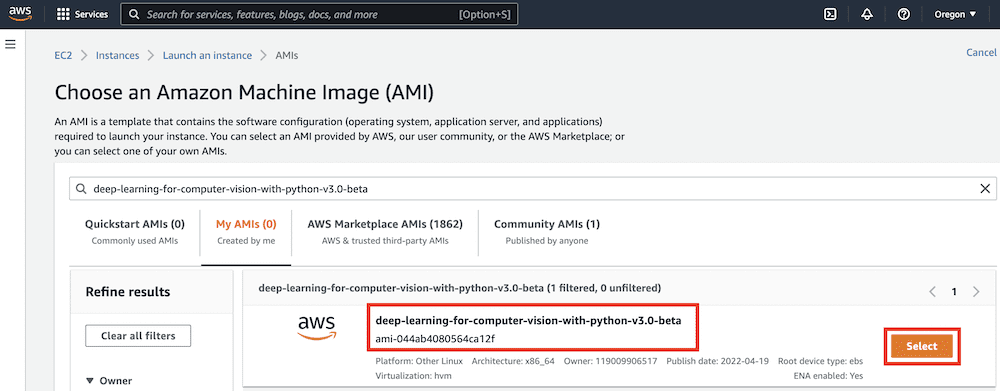
Click “Select” next to the AMI.
You are now ready to select your instance type. Amazon provides a huge number of virtual servers that are designed to run a wide array of applications. These instances have varying amount of CPU power, storage, network capacity, or GPUs, so you should consider:
- What type of machine you would like to launch.
- Your particular budget.
GPU instances tend to cost much more than standard CPU instances. However, they can train deep neural networks in a fraction of the time. When you average out the amount of time it takes to train a network on a CPU versus on a GPU you may realize that using the GPU instance will save you money.
For CPU instances I recommend you use the “Compute optimized” c4.* instances. In particular, the c4.xlarge instance is a good option to get your feet wet.
If you would like to use a GPU, I would highly recommend the “GPU compute” instances. The p2.xlarge instance has a single NVIDIA K80 (12GB of memory).
The p2.8xlarge sports 8 GPUs. While the p2.16xlarge has 16 GPUs.
I have included the pricing (at the time of this writing) for each of the instances below:
- c4.xlarge: $0.199/hour
- p2.xlarge: $0.90/hour
- p2.8xlarge: $7.20/hour
- p2.16xlarge: $14.40/hour
As you can see, the GPU instances are much more expensive; however, you are able to train networks in a fraction of the cost, making them a more economically viable option. Because of this I recommend using the p2.xlarge instance if this is your first time using a GPU for deep learning.
In the example screenshot below you can see that I have chosen the p2.xlarge instance:
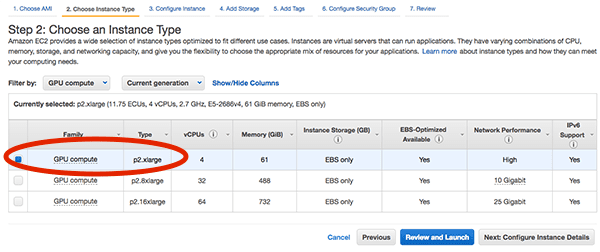
(2019-01-07) Release v2.1 of DL4CV: AWS currently has their p2 instances under “GPU instances” rather than “GPU compute”.
Next, I can click “Review and Launch” followed by “Launch” to boot my instance.
After clicking “Launch” you’ll be prompted to select your key pair or create a new key pair:
If you have an existing key pair you can select “Choose an existing key pair” from the drop down. Otherwise you’ll need to select the “Create a new key pair” and then download the pair. The key pair is used to login to your AWS instance.
After acknowledging and accepting login note from Amazon your instance will start to boot. Scroll down to the bottom of the page and click “View Instances”. It will take a minute or so for your instance to boot.
Once the instance is online you’ll see the “Instance State” column be changed to “running” for the instance.
Select it and you’ll be able to view information on the instance, including the IP address:
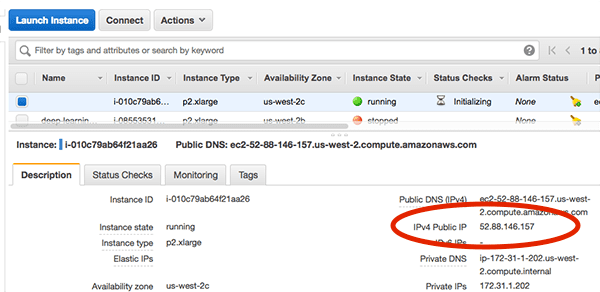
Here you can see that my IP address is 52.88.146.157
. Your IP address will be different.
Fire up a terminal and you can SSH into your AWS instance:
$ ssh -i EC2KeyPair.pem ubuntu@52.88.146.157
You’ll want to update the command above to:
- Use the filename you created for the key pair.
- Use the IP address of your instance.
Step #3: (GPU only & only for AMI version 1.0 and 1.2) Re-install NVIDIA deep learning driver
(2019-01-07) Release v2.1 of DL4CV: This step is not required for AMI version 2.1. Neither a driver update nor a reboot is required. Just launch and go. However, take note of the nvidia-smi
command below as it is useful to verify driver operation.
If you selected a GPU instance you will need to:
- Reboot your AMI via the command line
- Reinstall the NVIDIA driver
The reason for these two steps is because instances launched from a pre-configured AMI can potentially restart with a slightly different kernel, therefore causing the Nouveau (default) driver to be loaded instead of the NVIDIA driver.
To avoid this situation you can either:
- Reboot your system now, essentially “locking in” the current kernel and then reinstalling the NVIDA driver once.
- Reinstall the NVIDIA driver each time you launch/reboot your instance from the AWS admin.
Both methods have their pros and cons, but I would recommend the first one.
To start, reboot your instance via the command line:
$ sudo reboot
Your SSH connection will terminate during the reboot process.
Once the instance has rebooted, re-SSH into the instance, and reinstall the NVIDIA kernel drivers. Luckily this is easy as I have included the driver file in the home directory of the instance.
If you list the contents of the installers
directory you’ll see three files:
$ ls -l installers/ total 1435300 -rwxr-xr-x 1 root root 1292835953 Sep 6 14:03 cuda-linux64-rel-8.0.61-21551265.run -rwxr-xr-x 1 root root 101033340 Sep 6 14:03 cuda-samples-linux-8.0.61-21551265.run -rwxr-xr-x 1 root root 75869960 Sep 6 14:03 NVIDIA-Linux-x86_64-375.26.run
Change directory into installers
and then execute the following command:
$ cd installers $ sudo ./NVIDIA-Linux-x86_64-375.26.run --silent
Follow the prompts on screen (including overwriting any existing NVIDIA driver files) and your NVIDIA deep learning driver will be installed.
You can validate the NVIDIA driver installed successfully by running the nvidia-smi
command:
$ nvidia-smi Wed Sep 13 12:51:43 2017 +-----------------------------------------------------------------------------+ | NVIDIA-SMI 375.26 Driver Version: 375.26 | |-------------------------------+----------------------+----------------------+ | GPU Name Persistence-M| Bus-Id Disp.A | Volatile Uncorr. ECC | | Fan Temp Perf Pwr:Usage/Cap| Memory-Usage | GPU-Util Compute M. | |===============================+======================+======================| | 0 Tesla K80 Off | 0000:00:1E.0 Off | 0 | | N/A 43C P0 59W / 149W | 0MiB / 11439MiB | 97% Default | +-------------------------------+----------------------+----------------------+ +-----------------------------------------------------------------------------+ | Processes: GPU Memory | | GPU PID Type Process name Usage | |=============================================================================| | No running processes found | +-----------------------------------------------------------------------------+
Step #4: Access deep learning Python virtual environments on AWS
(2019-01-07) Release v2.1 of DL4CV: Version 2.1 of the AMI has the following environments: dl4cv
, mxnet
, tfod_api
, retinanet
, mask_rcnn
. Ensure that you’re working in the correct environment that corresponds to the DL4CV book chapter you’re studying. Additionally, be sure to refer to the DL4CV companion website for more information on these virtual environments.
You can access our deep learning and computer vision libraries by using the workon dl4cv
command to access the Python virtual virtual environment:
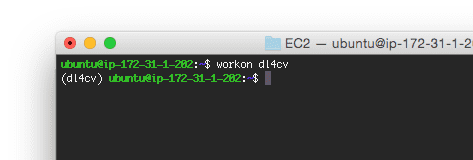
Notice that my prompt now has the text (dl4cv)
preceding it, implying that I am inside the dl4cv
Python virtual environment.
You can run pip freeze
to see all the Python libraries installed.
I have included a screenshot below demonstrating how to import Keras, TensorFlow, mxnet, and OpenCV from a Python shell:
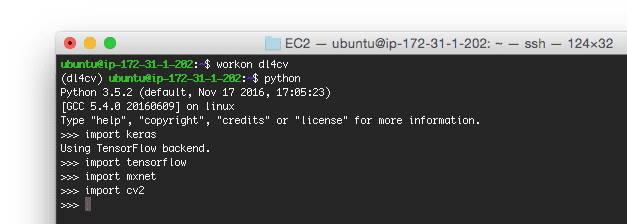
If you run into an error importing mxnet, simply recompile it:
$ cd ~/mxnet $ make -j4 USE_OPENCV=1 USE_BLAS=openblas USE_CUDA=1 \ USE_CUDA_PATH=/usr/local/cuda USE_CUDNN=1
This due to the NVIDIA kernel driver issue I mentioned in Step #3. You only need to recompile mxnet once and only if you receive an error at import.
The code + datasets to Deep Learning for Computer Vision with Python are not included on the pre-configured AMI by default (as the AMI is publicly available and can be used for tasks other than reading through Deep Learning for Computer Vision with Python).
To upload the code from the book on your local system to the AMI I would recommend using the scp
command:
$ scp -i EC2KeyPair.pem ~/Desktop/sb_code.zip ubuntu@52.88.146.157:~
Here I am specifying:
- The path to the
.zip
file of the Deep Learning for Computer Vision with Python code + datasets. - The IP address of my Amazon instance.
From there the .zip
file is uploaded to my home directory.
You can then unzip the archive and execute the code:
$ unzip sb_code.zip $ cd sb_code/chapter12-first_cnn/ $ workon dl4cv $ python shallownet_animals.py --dataset ../datasets/animals Using TensorFlow backend. [INFO] loading images... ... Epoch 100/100 2250/2250 [==============================] - 0s - loss: 0.3429 - acc: 0.8800 - val_loss: 0.7278 - val_acc: 0.6720 [INFO] evaluating network... precision recall f1-score support cat 0.67 0.52 0.58 262 dog 0.59 0.64 0.62 249 panda 0.75 0.87 0.81 239 avg / total 0.67 0.67 0.67 750
Step #5: Stop your deep learning AWS instance
Once you are finished working with your AMI head back to the “Instances” menu item on your EC2 dashboard and select your instance.
With your instance selected click “Actions => Instance State => Stop”:
This process will shutdown your deep learning instance (and you will no longer be billed hourly for it).
If you wanted to instead delete the instance you would select “Terminate”. Deleting an instance destroys all of your data, so be sure you’ve put your trained models back on your laptop if needed. Terminating an instance also stops you from incurring any further charges for the instance.
Troubleshooting and FAQ
In this section I detail answers to frequently asked questions and problems regarding the pre-configured deep learning AMI.
How do I execute code from Deep Learning for Computer Vision with Python from the deep learning AMI?
Please see the “Access deep learning Python virtual environment on AWS” section above. The gist is that you will upload a .zip
of the code to your AMI via the scp
command. An example command can be seen below:
$ scp -i EC2KeyPair.pem path/to/code.zip ubuntu@your_aws_ip_address:~
Can I use a GUI/window manager with my deep learning AMI?
No, the AMI is terminal only. I would suggest using the deep learning AMI if you are:
- Comfortable with Unix environments.
- Have experience using the terminal.
Otherwise I would recommend the deep learning virtual machine part of Deep Learning for Computer Vision with Python instead.
It is possible to use X11 forwarding with the AMI. when you SSH to the machine, just provide the -X
flag like this:
$ ssh -X -i EC2KeyPair.pem ubuntu@52.88.146.157
How can I use a GPU instance for deep learning?
Please see the “Step #2: Select and launch your deep learning AWS instance” section above. When selecting your Amazon EC2 instance choose a p2.* (i.e., “GPU compute” or “GPU instances”) instance. These instances have one, eight, and sixteen GPUs, respectively.
What's next? We recommend PyImageSearch University.
86 total classes • 115+ hours of on-demand code walkthrough videos • Last updated: October 2024
★★★★★ 4.84 (128 Ratings) • 16,000+ Students Enrolled
I strongly believe that if you had the right teacher you could master computer vision and deep learning.
Do you think learning computer vision and deep learning has to be time-consuming, overwhelming, and complicated? Or has to involve complex mathematics and equations? Or requires a degree in computer science?
That’s not the case.
All you need to master computer vision and deep learning is for someone to explain things to you in simple, intuitive terms. And that’s exactly what I do. My mission is to change education and how complex Artificial Intelligence topics are taught.
If you're serious about learning computer vision, your next stop should be PyImageSearch University, the most comprehensive computer vision, deep learning, and OpenCV course online today. Here you’ll learn how to successfully and confidently apply computer vision to your work, research, and projects. Join me in computer vision mastery.
Inside PyImageSearch University you'll find:
- ✓ 86 courses on essential computer vision, deep learning, and OpenCV topics
- ✓ 86 Certificates of Completion
- ✓ 115+ hours of on-demand video
- ✓ Brand new courses released regularly, ensuring you can keep up with state-of-the-art techniques
- ✓ Pre-configured Jupyter Notebooks in Google Colab
- ✓ Run all code examples in your web browser — works on Windows, macOS, and Linux (no dev environment configuration required!)
- ✓ Access to centralized code repos for all 540+ tutorials on PyImageSearch
- ✓ Easy one-click downloads for code, datasets, pre-trained models, etc.
- ✓ Access on mobile, laptop, desktop, etc.
Summary
In today’s blog post you learned how to use my pre-configured AMI for deep learning in the Amazon Web Services ecosystem.
The benefit of using my AMI over the pre-configured virtual machine is that:
- Amazon Web Services and the Elastic Cloud Compute ecosystem give you a huge range of systems to choose from, including CPU-only, single GPU, and multi-GPU.
- You can scale your deep learning environment to multiple machines.
- You retain the ability to use pre-configured deep learning environments but still get the benefit of added speed via dedicated hardware.
The downside is that AWS:
- Costs money (typically an hourly rate).
- Can be daunting for those who are new to Unix environments.
After you have gotten your feet wet with deep learning using my virtual machine I would highly recommend that you try AWS out as well — you’ll find that the added speed improvements are worth the extra cost.
To learn more, take a look at my new book, Deep Learning for Computer Vision with Python.
Join the PyImageSearch Newsletter and Grab My FREE 17-page Resource Guide PDF
Enter your email address below to join the PyImageSearch Newsletter and download my FREE 17-page Resource Guide PDF on Computer Vision, OpenCV, and Deep Learning.
Sayan
Thank you for this article, as it was very informative. I was initially planning to build a desktop PC for deep learning. But you convinced me to try out AWS first. If I calculate the initial cost of building a PC In India, then it would roughly translate to running an AWS p2.xlarge instance 3 hrs. daily for around 2.5-3 yrs. On top of that I don’t have to worry about the maintenance, and the electricity bills.
Adrian Rosebrock
Not having to worry about maintenance is a big reason why I like cloud-based solutions for deep learning. Even if you botch your instance you can always start fresh with a new one. And when new hardware becomes available you can simply move your code/data to a new instance. It’s great to hear that you decided to go with the AMI!
Neku
Hi Sayan, How you have calculated cost ??
Adrian Rosebrock
Amazon charges based on usage of the instance (the amount of time the machine is booted and running) along with a very small amount for storage. Exactly how much an instance would cost is dependent on which instance you are using.
Anthony The Koala
Dear Dr Adrian,
Thank you for your information regarding the use of the Amazon “cloud service”. Please excuse my naivety but wish to ask a practical question on implementing deep learning locally.
Could I achieve the same thing if I had a very large disk drive dedicated to deep learning say 1TB drive or say a 250GB solid state drive and do my deep learning ‘locally’. Perhaps having another RPi acting as a server to the very large storage device?
Thank you,
Anthony of Sydney Australia
Adrian Rosebrock
Your hard drive space isn’t the only concern. The issue here is your CPU and/or GPU. The Amazon cloud allows you to use GPUs for deep learning. If your local system has a GPU, yes, I would recommend using it. If it doesn’t, then the Amazon cloud would be an option.
Again, you do not have to use GPUs for deep learning but they will tremendously speed up the training process. Some very deep networks that are trained on large datasets can only be accomplished by using the GPU.
Matias Figueroa
Adrian Rosebroc, what kind of video card do you recommend to create this type of project, would a GTX1080 11gb suffice ??,
or some more economical model like gtx980 . thank’s a lot for sharing your knowledge
Matias Figueroa
sorry for writed wrong your last name
Adrian Rosebrock
The GTX1080 is perfectly acceptable. I also recommend the Titan X 12GB. As long as you have more than 6GB (ideally 8GB or more) you’ll be able to run the vast majority of examples inside Deep Learning for Computer Vision with Python.
santa
I imagine combining Aws with OpenCV and a Rest Web API for an MVC model. You had another tutorial on web interfaces (https://pyimagesearch.com/2015/05/11/creating-a-face-detection-api-with-python-and-opencv-in-just-5-minutes/). In that tutorial you have processed images.
I am now wondering if this combination would work with a video stream (say a RTSP video stream), instead of posting pictures.
Adrian Rosebrock
I don’t have any tutorials on working with RTSP streams, but it’s a bit more complicated to setup the client/server relationship. I’ll try to cover this in a future blog post.
Rob Jones
I’ve started running the examples from the DL4CV book on a p2.xlarge instance – works great – getting 6s per epoch on a p2.xlarge which has a Tesla K80.
Some of the examples produce a training loss graph – in order to view these you need to use X forwarding.
That’s easily done – just add -X when you ssh
$ ssh -X -i ubuntu@
Rob Jones
That last comment had some text removed – should have read
$ ssh -X -i your_key ubuntu@your_ip
In fact the -X flag allows X forwarding but with a timeout – 10 mins maybe
Instead you want to use -Y which does the same but without a timeout
$ ssh -Y -i your_key ubuntu@your_ip
Adrian Rosebrock
Thanks for sharing, Rob!
If you’re using the AMI I would also suggest using
plt.save
rather thanplt.imshow
. This will allow the figure to be saved to disk, then you can download it and view it.kaisar khatak
How does your AMI (deep-learning-for-computer-vision-with-python) compare to Amazon Deep Learning AMI CUDA 8 Ubuntu Version AMI and NVIDIA CUDA Toolkit 7.5 on Amazon Linux AMI?
Thanks.
Adrian Rosebrock
My AMI focuses on deep learning for computer vision. Additional image processing/computer vision libraries are installed such as scikit-image, scikit-learn, etc. General purpose deep learning libraries (such as ones for NLP, audio processing, text processing, etc.) are not installed. This AMI is also geared towards readers who are working through Deep Learning for Computer Vision with Python.
kaisar khatak
Who owns the deep-learning-for-computer-vision-with-python AMI in the East (N. Virginia) region?
Adrian Rosebrock
I have not created an AMI in the N. Virginia region, only the Oregon region. I assume a PyImageSearch reader replicated the AMI; however, I would suggest you use the OFFICIAL release only.
Rob Jones
I have an instance of this AMI that has been working fine – stop it, start it with no problem – but every once in a while it seems to lose the nvidia driver when I start it.
tensorflow/stream_executor/cuda/cuda_diagnostics.cc:145] kernel driver does not appear to be running on this host (ip-172-31-34-37): /proc/driver/nvidia/version does not exist
I can get it back with ‘cd installers; sudo ./NVIDIA-Linux-x86_64-375.26.run –silent’ as you showed above.
Not a big deal…just odd…
Adrian Rosebrock
It happens eery now due to how Amazon handles the kernels on the AMIs. I’m not sure entirely how it works to be totally honest. I discuss it in more detail over in this blog post.
David Bonn
Hi, sorry for the late arrival..,
From my interpretation of the prices, a multi-gpu solution will save you time but not money? Given that an 8-gpu host is 8 time as expensive as a single gpu, and a 16-gpu host is 16 times as expensive.
My other thought: does it make more sense to do the preprocessing on another system and just upload the preprocessed training images? I am thinking in terms of several thousand images for a sample set, largely curated from Google.
Adrian Rosebrock
Correct, the more GPUs you have, the faster you can train networks, but the more expensive it will be.
As for your second question, what type of preprocessing are you applying to your images? Several thousand images is actually a small dataset in terms of deep learning. ImageNet, one of the most well known deep learning datasets, is approximately 1.2 million images.
David Bonn
I agree several thousand images is a very small dataset. Right now I am largely in the exploratory phase and am trying to determine if (1) deep learning will actually help solve my problem, and (2) can I make the solution run reasonably well on a Raspberry Pi. If those things look good
For the preprocessing I was thinking just about scaling or cropping the images for the size appropriate to the network I wanted to train. So rather than throw around megapixel images transferring much smaller images would seem to save me quite a bit of wall clock time. Of course, I live in the middle of nowhere with a relatively slow internet connection so that also is relevant to the discussion.
The problem I am trying to solve is fire/flame detection. Right now I have a pretty good system that uses flicker detection and an infrared camera. I am hoping to apply machine learning to evaluating candidate regions identified by flicker detection and the infrared camera.
Your blogs have been immensely helpful teaching this old C programmer new tricks.
Adrian Rosebrock
If your images are large (in terms of width and height) while your CNN only accepts images that are 200-300px then resizing your images prior to training can save you some time, but not much. Most deep learning libraries perform preprocessing in a separate thread than the one used for training. This enables training to continue without having to be blocked waiting for new images.
Fire and flame detection is a great project. You will certainly need a good amount of training data for this. A CNN should perform well here once you have enough data.
Reed
Will you have a similar tutorial post for google cloud platform. The initial pension is more than AWS!! I’m looking forward to it
Adrian Rosebrock
I’ll consider doing a tutorial for Google’s cloud, but I played around with Microsoft’s deep learning instance and really liked it. This might be a better alternative for you in this situation.
Carmen
Thanks for this article. I just started using the AMI. I’ve been trying to install openCV for almost a month on other instances until I found this. Can I ask if there’s a way to load an online kaggle dataset to the instance using url? I’m currently using FileZilla to upload the dataset and my python script under the folder ~/ubuntu on EC2, but I got stuck under the (dl4cv) environment, I couldn’t cd out.
Many thanks in advance.
Adrian Rosebrock
Hey Carmen — you can use “wget” to download a file via the command line, otherwise you should FTP/SFTP your file to the AMI.
I think you may have some confusion regarding the “dl4cv” Python virtual environment. It’s not a directory. It’s just telling you that you are using the virtual environment. You can change directory around your system as you normally would.
falah
hello Adrian
my OS is Windows 7 how can I work on AWS
Adrian Rosebrock
You can still work with AWS from Windows. You just need a web browser to launch AMI and a SSH connection to access it.
Tao Tao
Hi Adrian, you are my real hero, and I am working on a project to get the trained model on premise, but not very sure whether this training result can be moved to the local environment as web service hosted on local IIS server or apache, do you have more idea about this.
Thanks a lot.
Tao
Adrian Rosebrock
Hey Tao, thank you for the kind words. I’m not sure what you mean by your question. Are you asking whether IIS or Apache can be used? Are you asking if you can train the model in the cloud before deploying it to the web service? If you can elaborate I’d be happy to provide some suggestions.
scott
For anybody on Windows 10 struggling to connect with SSH:
You might need to use something like Git Bash or something similar. I couldn’t get it to work with windows cmd or powershell even after installing the optional SSH Client for built-in to Windows 10. You also might need to change permissions on the .pem file if you get an error about that – remove all other users by disabling inheritance and give your user full control.
Also, the example script shallownet_animals.py is the one that has the fit_transform issue (ticket # 301) so you’ll get an error message if you run that.
Adrian Rosebrock
Thanks for sharing, Scott. Additionally, I have a fix ready for the shallownet_animals.py example that I’ll be releasing in the next 48-72 hours.
scott
Instructions for anyone who wants to setup jupyter notebook to have an easier graphic interface to run code:
1) ssh into your instance
2) workon dl4cv
3) pip install jupyter
4) exit
5) ssh back into your instance but this time add this:
-L 8000:localhost:8888
This will forward any commands from your machine’s port 8000 to your ec2 port 8888, which jupyter will run on by default.
so full command looks like:
ssh -i [yourprivatekey].pem -L 8000:localhost:8888 ubuntu@[youripaddress]
(probably could just add this to #1 and skip exit/ssh reconnect – I didn’t verify)
6) once you have reconnected, run:
workon dl4cv
jupyter notebook –no-browser
this should startup jupyter notebook server on port 8888. Copy the token in the url listed in the terminal
7) open a browser and go to localhost:8000. It should forward to jupyter if everything was setup correctly. Paste the token where it asks.
8) Open up SB_code directory and pick a chapter to test. Create a notebook in the chapter directory
9) add “%matplotlib inline” to the top so plots show up inline
10) remove any command line argument code and set variables manually or you’ll get an error
11) run your scripts!
Adrian Rosebrock
Awesome! Thanks for sharing this Scott. It will be a big help to the community.
Jan
hi,
I don’t see any SB_code directory, where should I be able to find it?
kind regards
Adrian Rosebrock
The “SB_Code” directory is included with your purchase of Deep Learning for Computer Vision with Python.
Christoph Viehoff
Has this error been addressed yet. It appears while running the shallownet_animals.py script from chapter 12
Call ‘fit’ with appropriate arguments before using this method
Adrian Rosebrock
Yep! That was addressed in the v1.2.1 release (see the DL4CV companion website). The gist is that you can change
.fit
to.fit_transform
and it will work.Lenni
I solved the issue:
> git checkout fad6075359b852b9c0a4c6f1b068790d44a6441a
> protoc object_detection/protos/*.proto –python_out=.
Then everything was working fine.
Adrian Rosebrock
Congrats on resolving the issue Lenni and thank you for sharing the solution 🙂
Nish
Hi Adrian,
Just wanted to drop a note of thanks for the Amazon AWS AMI you have created. It works like a charm and I would recommend everyone to use it.
I encountered countless issues with other AMIs from software companies such as Bitfusion, etc. Something as basic as what they promise is not delivered like a working CUDA installation etc. And when you contact them, they really dont care if you are a free customer (which is ideally fine cause as a customer we are not paying them). Their turnaround time reflects 4 weeks – OMG! and a big haha!
But really – after two months of going through these weakly designed AMIs, I finally got renewed interest that computer vision on GPUs can be less complicated if someone just sat down and figure it out.
For this – a big thanks.
Adrian Rosebrock
Thank you Nish, I really appreciate your kind words 🙂
MiguelXim
I just wanted to say thank you very much for this good tutorial and for the offering the instance, I’ll buy your book:)
Regards.
Adrian Rosebrock
Thank you for the kind words, I really appreciate that 🙂 Enjoy the book and if you have any questions just let me know.
Anirban Ghosh
Sir,
Thanks for the tutorial on setting up of aws account. I am using a windows pc , making it difficult to ssh into the aws account. Finally, figured that I need git-bash. Now I am able to ssh into my account and have also checked that all Deep learning libraries as per your book dl4cv are available in the instance.
My question is when I try to upload the SB code to the instance by using the following command $ scp -i key.pem: \Users\Anirban\Desktop\DL4CV\DL4CV\SB_Code.zip ubuntu@ from the git terminal I get an error port 22: connection refused. The key.pem is on my desktop and the PWD is my desktop.
What could be the error on my part as I tried to copy the file after logging into aws account it says key.pem not available.
Regards,
Anirban Ghosh
Anirban Ghosh
Figured it out, needed WinSCP to transfer the files, thanks anyways. Anirban Ghosh
Adrian Rosebrock
Congrats on resolving the issue, Anirban!
Wim Valcke
I tried it and it works perfectly, thanks Adrian for setting this up. Does someone know how the 16 Gig disk capacity is charged? Do we pay only for the storage if the instance is running or is this not the case ?
Adrian Rosebrock
1. Are you trying to increase or decrease the size of the disk?
2. Yes, you will pay for the storage if the machine is powered down. The storage costs though are incredibly cheap. The exact pricing would be based on the volume type that you are using.
Amazon’s pricing can be a bit confusing if you are new to it so if you find yourself confused about your bill or what you are being charged for make sure you contact Amazon. Their support is normally quite good.
Wim Valcke
Hi Adrian,
Thanks for your reply, i could increase the storage size to 20GB, i did not even needed to resize the Linux ext4 fs, it was already done when i booted the instance after the resize of the volume.
Nice work from aws. Thanks again for setting this aws instance up for your deep learning book readers!
Adrian Rosebrock
The VM can only be executed locally on your machine. The VM can also not access your GPU and is slow, comparatively. Using the AMI you can spin up an instance with access to 1-8 GPUs.
Anirban
Dear Sir,
I started using the amazon web services last week to run my experiments from the dl4cv course. To understand the way aws work, I started with the free tier service.
I uploaded my Starter bundle codes to the cloud. I worked on the experiment from chap 8 of SB bundle “Parameterised Learning”. It ran perfectly. But I am facing two issues :
1. once I close the instance and come out of it and later when I re-ssh into it I do not find the folder SB_code anymore. Do you upload your files each time you do your projects? I find uploading 400 MB -500 MB files(from practitioner bundle) each time I run an instance is very cumbersome given the slow internet speed.
2. I ran the experiment given in chapter 8 parameterized learning and am getting the following error :
ubuntu@ip-172-31-16-220:~/chapter08-parameterized_learning$ workon dl4cv
(dl4cv) ubuntu@ip-172-31-16-220:~/chapter08-parameterized_learning$ python linear_example.py
>>>
[INFO] dog: 7963.93
[INFO] cat: -2930.99
[INFO] panda: 3362.47
——————————
(Image 2827) Gtk-WARNING **: cannot open display:
Failed to connect to Mir: Failed to connect to server socket: No such file or directory
Unable to init server: Could not connect: Connection refused.
Why is the Virtual machine in the cloud not showing the image as it normally shows on my desktop? Is it that I cannot see how my program run on cloud and for that I need to use my desktop only.
Sorry for the long question , would really appreciate your answer on this.
Regards,
Anirban Ghosh
Adrian Rosebrock
1. Did you shutdown the instance? Or terminate it? If you simply shut it down your data should kept but if you terminate it your data and the instance will be destroyed. You may have uploaded your data to the ephemeral storage drive which is NOT persistent across reboots. If you are running out of room on your main drive you should resize it.
2. Make sure you enable X11 forwarding:
$ ssh -X user@ip_address
But keep in mind that the latency is going to be quite high. I would suggest replacing all
cv2.imshow
calls withcv2.imwrite
and then downloading the output images from the server to investigate them locally.Vikas
Hi Adrian,
Thanks for great article.
Is there a way for you to share the steps you took to build AWS AMI from scratch for your book?
I.e. what all libraries(and versions), you installed and how?
I have a situation where I have access to AWS but not your preconfigured machine so I would have to build it from scratch to practice things you mentioned in your book.
Thanks,
Vik
Adrian Rosebrock
Totally. I documented the process and instructions this post.
Hugo FLICK
Hello Adrian,
Quick question : is openCV installed with CUDA support on the instance ?
Thanks a lot
Hugo
Adrian Rosebrock
No, I did not compile OpenCV with CUDA support in this instance as it depending on which instance you were using you would need to re-compile OpenCV if the drivers needed to be re-installed.
Hugo
Roger that, thank you Adrian 🙂
alex
how can we save this environment to re-use after terminating the instance?
Adrian Rosebrock
Just power off the instance and it will be saved. If you “terminate” it then the instance will be deleted. But if you simply power it off it will persist.
George
Hi Adrian,
First, thanks for sharing your work with us. I have purchased your book and ran shallownet_animals.py and it was remarkably fast. In comparison to about two minutes here, the Jurassic Park demo, with fewer images, took about two hours using dlib and a cnn on my macbook pro.
Thanks again for your great work.
George
Adrian Rosebrock
Thank you George for picking up a copy of DL4CV, George! I’m happy to hear you’re enjoying the book and Python scripts thus far. Always feel free to reach out if you have any questions 🙂
Steff Kelsey
This is pretty cool! I have found it useful for training with Tensorflow. I wish OpenCV was built with TBB support! If I have time, I’ll create an updated AMI.
David Jung
Thank you Adrian for your great work. I got a lot of help from this article. I’ve successfully made my instance of my own. And I found that using AWS app with an ssh client app is extremely useful.
Adrian Rosebrock
Thanks David 🙂
David Fraser
Hi Adrian,
I’m trying to follow these instructions for a p2.xlarge instance but seem to have a problem at step 3. When I list the contents of the installers directory I only have one file: cuda_9.0.176_384.81_linux-run.
So when I cd into “installers” and run “sudo ./NVIDIA-Linux-x86_64-375.26.run –silent” I get a command not found error.
Any ideas why this might be?
Adrian Rosebrock
See my reply to Gabe.
Gabe
I have just launched the v2.1 AMI on a GPU instance (p2.xlarge), and I’m trying to follow the directions in this article to get setup. I’m looking at Step #3 (re-installing NVIDIA deep learning driver), and wondering if this section is still relevant for AMI 2.1? The contents of the installers directory don’t match the article (directory only contains CUDA 9.0 installer), and running nvidia-smi tells me it’s running NVIDIA driver 396.54. Do we still need to re-install the NVIDIA driver on AMI v2.1?
Adrian Rosebrock
Thanks for catching that Gabe. You no longer need to reinstall the drivers each time. They will work correctly on first book. I’ll get that section updated.
Bob O'Donnell
Adrian,
Working my way through the SB and PB versions, and ran into a couple of nits, then hit a wall.
When I got the instance spun up, importing keras just turned the screen blank, and returned an error about not being able to load “Layers”.
When transferring the zip files, I missed the instructions to swap back to my own command line and struggled with it for a while. A screenshot like the other commands would be most helpful.
You instructions use lower case for the zip file names, but mine came with upper, so you cannot copy and paste the commands.
Finally, I ran the commands from the virtual environment for animals, and got
File “/home/ubuntu/.virtualenvs/dl4cv/lib/python3.6/site-packages/sklearn/preprocessing/label.py”, line 410, in fit
raise ValueError(‘y has 0 samples: %r’ % y)
ValueError: y has 0 samples: array([], dtype=float64)
Otherwise LOVIN’ IT. It is clear, the vast majority of the times it does not work, it has been my fat-fingering rather than your code or instructions, and when I find an actual issue, the response is fast and helpful!
Adrian Rosebrock
Hi Bob — I would be happy to address any questions or errors but I would need to see the exact errors. From what you’ve told me most of the time it sounds like it’s an issue with your file paths.
For example, the “ValueError” is 99.9% likely that you did not supply the correct path to the input dataset (implying that no image paths were found in the input directory). Since there are no input images there is nothing for Keras to train on (hence the error).
I’m honestly not sure about the uppercase versus lowercase filenames — I always name my scripts with lowercase characters. If you could share a screenshot I could take a look at that is well.
I’m glad to hear you are enjoying DL4CV 🙂
Vijayalakshmi
Awesome tutorial ! Do you have a similar tutorial for google cloud ?
Adrian Rosebrock
Sorry, no, I do not.
Jan
Dear Adrian,
I can not find your AMI in the list of community AMIs of AWS.
Are you sure it is still available?
kind regards
Jan
Adrian Rosebrock
It’s under the “US Oregon” region.
endifahrizal
hi @adrian,
I also can not find the AMI in the list of community AMI under US Oregon region
please help
thanks
endi
Adrian Rosebrock
I’ve confirmed that the instance is available in the US Oregon region. Definitely double-check your zone, and once you do, select the “Community AMIs” tab.
Juan J. Palacio
Dr. Adrian,
Until this tutorial, working with GPUs on the cloud was something I could only dream of!
Thank you so much for bringing academia level tutorials to lay programmers and people who are just getting started with deep learning and computer vision.
My only suggestion/request is that an additional article or tutorial going into a bit more detail for the “nvidia-smi” command, what the numbers mean, and the Nvidia driver.
Thanks in advance,
Juan
Adrian Rosebrock
hanks for the suggestion Juan!