Two weeks ago OpenCV 3.3 was officially released, bringing with it a highly improved deep learning (dnn ) module. This module now supports a number of deep learning frameworks, including Caffe, TensorFlow, and Torch/PyTorch.
Furthermore, this API for using pre-trained deep learning models is compatible with both the C++ API and the Python bindings, making it dead simple to:
- Load a model from disk.
- Pre-process an input image.
- Pass the image through the network and obtain the output classifications.
While we cannot train deep learning models using OpenCV (nor should we), this does allow us to take our models trained using dedicated deep learning libraries/tools and then efficiently use them directly inside our OpenCV scripts.
In the remainder of this blog post I’ll demonstrate the fundamentals of how to take a pre-trained deep learning network on the ImageNet dataset and apply it to input images.
To learn more about deep learning with OpenCV, just keep reading.
Deep Learning with OpenCV
In the first part of this post, we’ll discuss the OpenCV 3.3 release and the overhauled dnn module.
We’ll then write a Python script that will use OpenCV and GoogleLeNet (pre-trained on ImageNet) to classify images.
Finally, we’ll explore the results of our classifications.
Deep Learning inside OpenCV 3.3
The dnn module of OpenCV has been part of the opencv_contrib repository since version v3.1. Now in OpenCV 3.3 it is included in the main repository.
Why should you care?
Deep Learning is a fast growing domain of Machine Learning and if you’re working in the field of computer vision/image processing already (or getting up to speed), it’s a crucial area to explore.
With OpenCV 3.3, we can utilize pre-trained networks with popular deep learning frameworks. The fact that they are pre-trained implies that we don’t need to spend many hours training the network — rather we can complete a forward pass and utilize the output to make a decision within our application.
OpenCV does not (and does not intend to be) to be a tool for training networks — there are already great frameworks available for that purpose. Since a network (such as a CNN) can be used as a classifier, it makes logical sense that OpenCV has a Deep Learning module that we can leverage easily within the OpenCV ecosystem.
Popular network architectures compatible with OpenCV 3.3 include:
- GoogleLeNet (used in this blog post)
- AlexNet
- SqueezeNet
- VGGNet (and associated flavors)
- ResNet
The release notes for this module are available on the OpenCV repository page.
Aleksandr Rybnikov, the main contributor for this module, has ambitious plans for this module so be sure to stay on the lookout and read his release notes (in Russian, so make sure you have Google Translation enabled in your browser if Russian is not your native language).
It’s my opinion that the dnn module will have a big impact on the OpenCV community, so let’s get the word out.
Configure your machine with OpenCV 3.3
Installing OpenCV 3.3 is on par with installing other versions. The same install tutorials can be utilized — just make sure you download and use the correct release.
Simply follow these instructions for MacOS or Ubuntu while making sure to use the opencv and opencv_contrib releases for OpenCV 3.3. If you opt for the MacOS + homebrew install instructions, be sure to use the --HEAD switch (among the others mentioned) to get the bleeding edge version of OpenCV.
If you’re using virtual environments (highly recommended), you can easily install OpenCV 3.3 alongside a previous version. Just create a brand new virtual environment (and name it appropriately) as you follow the tutorial corresponding to your system.
OpenCV deep learning functions and frameworks
OpenCV 3.3 supports the Caffe, TensorFlow, and Torch/PyTorch frameworks.
Keras is currently not supported (since Keras is actually a wrapper around backends such as TensorFlow and Theano), although I imagine it’s only a matter of time until Keras is directly supported given the popularity of the deep learning library.
Using OpenCV 3.3 we can load images from disk using the following functions inside dnn :
cv2.dnn.blobFromImagecv2.dnn.blobFromImages
We can directly import models from various frameworks via the “create” methods:
cv2.dnn.createCaffeImportercv2.dnn.createTensorFlowImportercv2.dnn.createTorchImporter
Although I think it’s easier to simply use the “read” methods and load a serialized model from disk directly:
cv2.dnn.readNetFromCaffecv2.dnn.readNetFromTensorFlowcv2.dnn.readNetFromTorchcv2.dnn.readhTorchBlob
Once we have loaded a model from disk, the `.forward` method is used to forward-propagate our image and obtain the actual classification.
To learn how all these OpenCV deep learning pieces fit together, let’s move on to the next section.
Classifying images using deep learning and OpenCV
In this section, we’ll be creating a Python script that can be used to classify input images using OpenCV and GoogLeNet (pre-trained on ImageNet) using the Caffe framework.
The GoogLeNet architecture (now known as “Inception” after the novel micro-architecture) was introduced by Szegedy et al. in their 2014 paper, Going deeper with convolutions.
Other architectures are also supported with OpenCV 3.3 including AlexNet, ResNet, and SqueezeNet — we’ll be examining these architectures for deep learning with OpenCV in a future blog post.
In the meantime, let’s learn how we can load a pre-trained Caffe model and use it to classify an image using OpenCV.
To begin, open up a new file, name it deep_learning_with_opencv.py , and insert the following code:
# import the necessary packages
import numpy as np
import argparse
import time
import cv2
On Lines 2-5 we import our necessary packages.
Then we parse command line arguments:
# construct the argument parse and parse the arguments
ap = argparse.ArgumentParser()
ap.add_argument("-i", "--image", required=True,
	help="path to input image")
ap.add_argument("-p", "--prototxt", required=True,
	help="path to Caffe 'deploy' prototxt file")
ap.add_argument("-m", "--model", required=True,
	help="path to Caffe pre-trained model")
ap.add_argument("-l", "--labels", required=True,
	help="path to ImageNet labels (i.e., syn-sets)")
args = vars(ap.parse_args())
On Line 8 we create an argument parser followed by establishing four required command line arguments (Lines 9-16):
--image: The path to the input image.--prototxt: The path to the Caffe “deploy” prototxt file.--model: The pre-trained Caffe model (i.e,. the network weights themselves).--labels: The path to ImageNet labels (i.e., “syn-sets”).
Now that we’ve established our arguments, we parse them and store them in a variable, args , for easy access later.
Let’s load the input image and class labels:
# load the input image from disk
image = cv2.imread(args["image"])

# load the class labels from disk
rows = open(args["labels"]).read().strip().split("\n")
classes = [r[r.find(" ") + 1:].split(",")[0] for r in rows]
On Line 20, we load the image from disk via cv2.imread .
Let’s take a closer look at the class label data which we load on Lines 23 and 24:
n01440764 tench, Tinca tinca
n01443537 goldfish, Carassius auratus
n01484850 great white shark, white shark, man-eater, man-eating shark, Carcharodon carcharias
n01491361 tiger shark, Galeocerdo cuvieri
n01494475 hammerhead, hammerhead shark
n01496331 electric ray, crampfish, numbfish, torpedo
n01498041 stingray
...
As you can see, we have a unique identifier followed by a space, some class labels, and a new-line. Parsing this file line-by-line is straightforward and efficient using Python.
First, we load the class label rows from disk into a list. To do this we strip whitespace from the beginning and end of each line while using the new-line (‘\n ‘) as the row delimiter (Line 23). The result is a list of IDs and labels:
['n01440764 tench, Tinca tinca', 'n01443537 goldfish, Carassius auratus',
'n01484850 great white shark, white shark, man-eater, man-eating shark, Carcharodon carcharias',
'n01491361 tiger shark, Galeocerdo cuvieri',
'n01494475 hammerhead, hammerhead shark',
'n01496331 electric ray, crampfish, numbfish, torpedo',
'n01498041 stingray', ...]
Second, we use list comprehension to extract the relevant class labels from rows by looking for the space (‘ ‘) after the ID, followed by delimiting class labels with a comma (‘, ‘). The result is simply a list of class labels:
['tench', 'goldfish', 'great white shark', 'tiger shark',
'hammerhead', 'electric ray', 'stingray', ...]
Now that we’ve taken care of the labels, let’s dig into the dnn module of OpenCV 3.3:
# our CNN requires fixed spatial dimensions for our input image(s)
# so we need to ensure it is resized to 224x224 pixels while
# performing mean subtraction (104, 117, 123) to normalize the input;
# after executing this command our "blob" now has the shape:
# (1, 3, 224, 224)
blob = cv2.dnn.blobFromImage(image, 1, (224, 224), (104, 117, 123))
Taking note of the comment in the block above, we use cv2.dnn.blobFromImage to perform mean subtraction to normalize the input image which results in a known blob shape (Line 31).
We then load our model from disk:
# load our serialized model from disk
print("[INFO] loading model...")
net = cv2.dnn.readNetFromCaffe(args["prototxt"], args["model"])
Since we’ve opted to use Caffe, we utilize cv2.dnn.readNetFromCaffe to load our Caffe model definition prototxt and pre-trained model from disk (Line 35).
If you are familiar with Caffe, you’ll recognize the prototxt file as a plain text configuration which follows a JSON-like structure — I recommend that you open bvlc_googlenet.prototxt from the “Downloads” section in a text editor to inspect it.
Note: If you are unfamiliar with configuring Caffe CNNs, then this is a great time to consider the PyImageSearch Gurus course — inside the course you’ll get an in depth look at using deep nets for computer vision and image classification.
Now let’s complete a forward pass through the network with blob as the input:
# set the blob as input to the network and perform a forward-pass to
# obtain our output classification
net.setInput(blob)
start = time.time()
preds = net.forward()
end = time.time()
print("[INFO] classification took {:.5} seconds".format(end - start))
It is important to note at this step that we aren’t training a CNN — rather, we are making use of a pre-trained network. Therefore we are just passing the blob through the network (i.e., forward propagation) to obtain the result (no back-propagation).
First, we specify blob as our input (Line 39). Second, we make a start timestamp (Line 40), followed by passing our input image through the network and storing the predictions. Finally, we set an end timestamp (Line 42) so we can calculate the difference and print the elapsed time (Line 43).
Let’s finish up by determining the top five predictions for our input image:
# sort the indexes of the probabilities in descending order (higher
# probabilitiy first) and grab the top-5 predictions
idxs = np.argsort(preds[0])[::-1][:5]
Using NumPy, we can easily sort and extract the top five predictions on Line 47.
Next, we will display the top five class predictions:
# loop over the top-5 predictions and display them
for (i, idx) in enumerate(idxs):
	# draw the top prediction on the input image
	if i == 0:
		text = "Label: {}, {:.2f}%".format(classes[idx],
			preds[0][idx] * 100)
		cv2.putText(image, text, (5, 25),  cv2.FONT_HERSHEY_SIMPLEX,
			0.7, (0, 0, 255), 2)

	# display the predicted label + associated probability to the
	# console
	print("[INFO] {}. label: {}, probability: {:.5}".format(i + 1,
		classes[idx], preds[0][idx]))

# display the output image
cv2.imshow("Image", image)
cv2.waitKey(0)
The idea for this loop is to (1) draw the top prediction label on the image itself and (2) print the associated class label probabilities to the terminal.
Lastly, we display the image to the screen (Line 64) and wait for the user to press a key before exiting (Line 65).
Deep learning and OpenCV classification results
Now that we have implemented our Python script to utilize deep learning with OpenCV, let’s go ahead and apply it to a few example images.
Make sure you use the “Downloads” section of this blog post to download the source code + pre-trained GoogLeNet architecture + example images.
From there, open up a terminal and execute the following command:
$ python deep_learning_with_opencv.py --image images/jemma.png
	--prototxt bvlc_googlenet.prototxt \
	--model bvlc_googlenet.caffemodel --labels synset_words.txt
[INFO] loading model...
[INFO] classification took 0.075035 seconds
[INFO] 1. label: beagle, probability: 0.81137
[INFO] 2. label: Labrador retriever, probability: 0.031416
[INFO] 3. label: bluetick, probability: 0.023929
[INFO] 4. label: EntleBucher, probability: 0.017507
[INFO] 5. label: Greater Swiss Mountain dog, probability: 0.01444
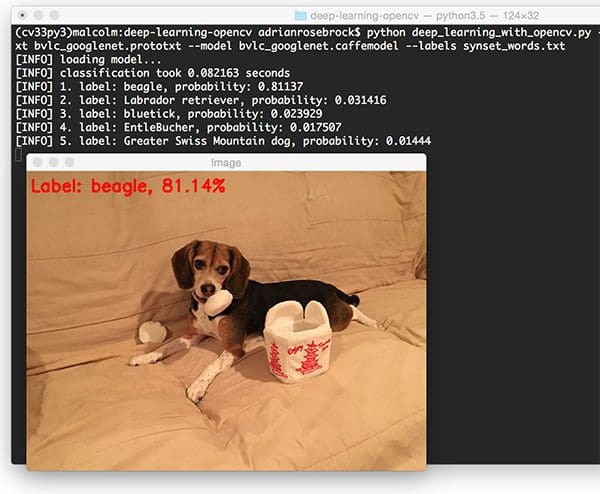
In the above example, we have Jemma, the family beagle. Using OpenCV and GoogLeNet we have correctly classified this image as “beagle”.
Furthermore, inspecting the top-5 results we can see that the other top predictions are also relevant, all of them of which are dogs that have similar physical appearances as beagles.
Taking a look at the timing we also see that the forward pass took < 1 second, even though we are using our CPU.
Keep in mind that the forward pass is substantially faster than the backward pass as we do not need to compute the gradient and backpropagate through the network.
Let’s classify another image using OpenCV and deep learning:
$ python deep_learning_with_opencv.py --image images/traffic_light.png
	--prototxt bvlc_googlenet.prototxt \
	--model bvlc_googlenet.caffemodel --labels synset_words.txt
[INFO] loading model...
[INFO] classification took 0.080521 seconds
[INFO] 1. label: traffic light, probability: 1.0
[INFO] 2. label: pole, probability: 4.9961e-07
[INFO] 3. label: spotlight, probability: 3.4974e-08
[INFO] 4. label: street sign, probability: 3.3623e-08
[INFO] 5. label: loudspeaker, probability: 2.0235e-08
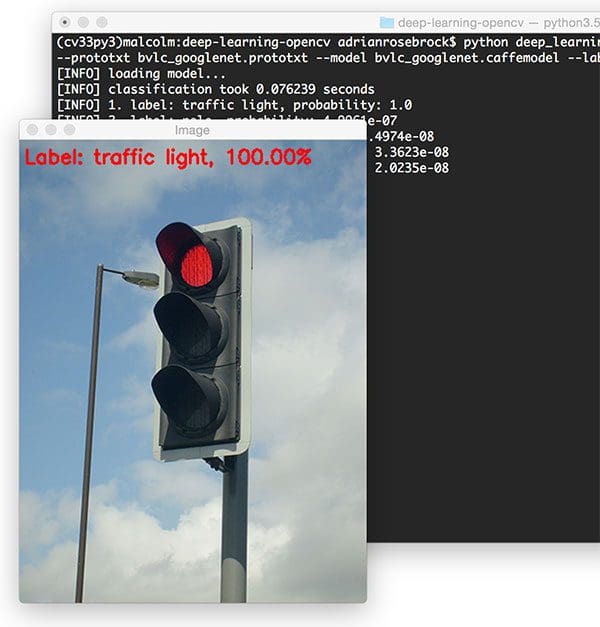
OpenCV and GoogLeNet correctly label this image as “traffic light” with 100% certainty.
In this example we have a “bald eagle”:
$ python deep_learning_with_opencv.py --image images/eagle.png
	--prototxt bvlc_googlenet.prototxt \
	--model bvlc_googlenet.caffemodel --labels synset_words.txt
[INFO] loading model...
[INFO] classification took 0.087207 seconds
[INFO] 1. label: bald eagle, probability: 0.96768
[INFO] 2. label: kite, probability: 0.031964
[INFO] 3. label: vulture, probability: 0.00023595
[INFO] 4. label: albatross, probability: 6.3653e-05
[INFO] 5. label: black grouse, probability: 1.6147e-05
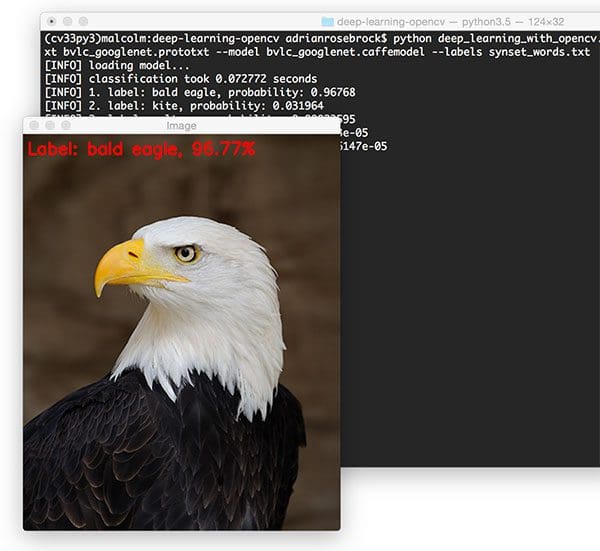
We are once again able to correctly classify the input image.
Our final example is a “vending machine”:
$ python deep_learning_with_opencv.py --image images/vending_machine.png
	--prototxt bvlc_googlenet.prototxt \
	--model bvlc_googlenet.caffemodel --labels synset_words.txt
[INFO] loading model...
[INFO] classification took 0.099602 seconds
[INFO] 1. label: vending machine, probability: 0.99269
[INFO] 2. label: cash machine, probability: 0.0023691
[INFO] 3. label: pay-phone, probability: 0.00097005
[INFO] 4. label: ashcan, probability: 0.00092097
[INFO] 5. label: mailbox, probability: 0.00061188
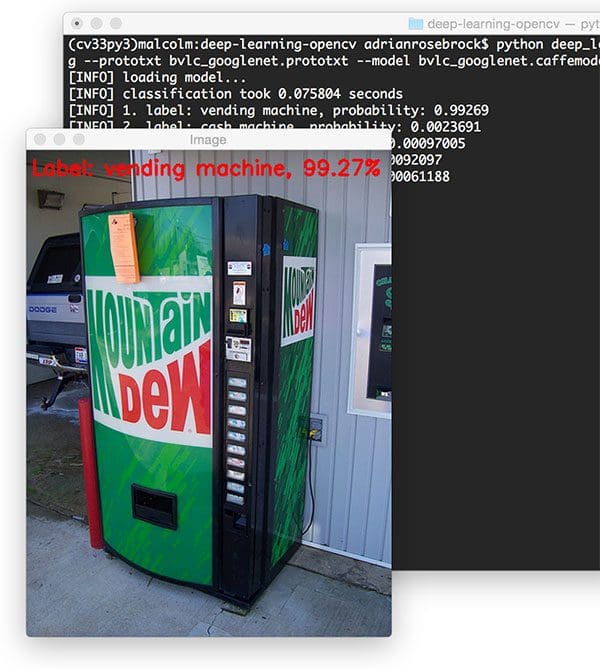
OpenCV + deep learning once again correctly classifes the image.
What's next? We recommend PyImageSearch University.
86+ total classes • 115+ hours hours of on-demand code walkthrough videos • Last updated: February 2026
★★★★★ 4.84 (128 Ratings) • 16,000+ Students Enrolled
I strongly believe that if you had the right teacher you could master computer vision and deep learning.
Do you think learning computer vision and deep learning has to be time-consuming, overwhelming, and complicated? Or has to involve complex mathematics and equations? Or requires a degree in computer science?
That’s not the case.
All you need to master computer vision and deep learning is for someone to explain things to you in simple, intuitive terms. And that’s exactly what I do. My mission is to change education and how complex Artificial Intelligence topics are taught.
If you're serious about learning computer vision, your next stop should be PyImageSearch University, the most comprehensive computer vision, deep learning, and OpenCV course online today. Here you’ll learn how to successfully and confidently apply computer vision to your work, research, and projects. Join me in computer vision mastery.
Inside PyImageSearch University you'll find:
- ✓ 86+ courses on essential computer vision, deep learning, and OpenCV topics
- ✓ 86 Certificates of Completion
- ✓ 115+ hours hours of on-demand video
- ✓ Brand new courses released regularly, ensuring you can keep up with state-of-the-art techniques
- ✓ Pre-configured Jupyter Notebooks in Google Colab
- ✓ Run all code examples in your web browser — works on Windows, macOS, and Linux (no dev environment configuration required!)
- ✓ Access to centralized code repos for all 540+ tutorials on PyImageSearch
- ✓ Easy one-click downloads for code, datasets, pre-trained models, etc.
- ✓ Access on mobile, laptop, desktop, etc.
Summary
In today’s blog post we learned how to use OpenCV for deep learning.
With the release of OpenCV 3.3 the deep neural network (dnn ) library has been substantially overhauled, allowing us to load pre-trained networks via the Caffe, TensorFlow, and Torch/PyTorch frameworks and then use them to classify input images.
I imagine Keras support will also be coming soon, given how popular the framework is. This will likely take be a non-trivial implementation as Keras itself can support multiple numeric computation backends.
Over the next few weeks we’ll:
- Take a deeper dive into the
dnnmodule and how it can be used inside our Python + OpenCV scripts. - Learn how to modify Caffe
.prototxtfiles to be compatible with OpenCV. - Discover how we can apply deep learning using OpenCV to the Raspberry Pi.
This is a can’t-miss series of blog posts, so be before you go, make sure you enter your email address in the form below to be notified when these posts go live!

Download the Source Code and FREE 17-page Resource Guide
Enter your email address below to get a .zip of the code and a FREE 17-page Resource Guide on Computer Vision, OpenCV, and Deep Learning. Inside you'll find my hand-picked tutorials, books, courses, and libraries to help you master CV and DL!
