Today’s blog post is part one in a two part series on installing and using the Tesseract library for Optical Character Recognition (OCR).
OCR is the automatic process of converting typed, handwritten, or printed text to machine-encoded text that we can access and manipulate via a string variable.
Part one of this series will focus on installing and configuring Tesseract on your machine, followed by utilizing the tesseract command to apply OCR to input images.
In next week’s blog post we’ll discover how to use the Python “bindings” to the Tesseract library to call Tesseract directly from your Python script.
To learn more about Tesseract and how it can be used for OCR, just keep reading.
Installing Tesseract for OCR
Tesseract, originally developed by Hewlett Packard in the 1980s, was open-sourced in 2005. Later, in 2006, Google adopted the project and has been a sponsor ever since.
The Tesseract software works with many natural languages from English (initially) to Punjabi to Yiddish. Since the updates in 2015, it now supports over 100 written languages and has code in place so that it can easily be trained on other languages as well.
Originally a C program, it was ported to C++ in 1998. The software is headless and can be executed via the command line. It does not come with a GUI but there are several other software packages that wrap around Tesseract to provide a GUI interface.
To read more about Tesseract visit the project page and read the Wikipedia article.
In this blog post we will:
- Install Tesseract on our systems.
- Validate that the Tesseract install is working correctly.
- Try Tesseract OCR on some sample input images.
After going through this tutorial you will have the knowledge to run Tesseract on your own images.
Step #1: Install Tesseract
In order to use the Tesseract library, we first need to install it on our system.
For macOS users, we’ll be using Homebrew to install Tesseract:
$ brew install tesseract
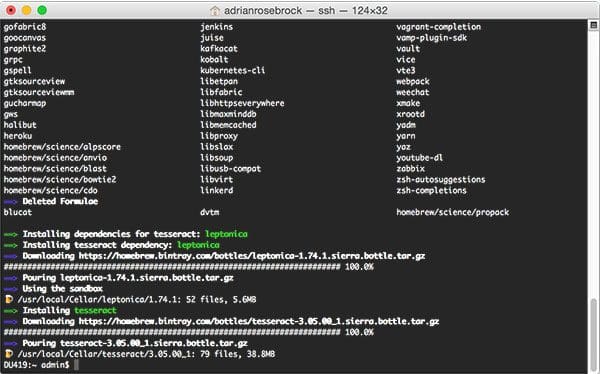
If you’re using the Ubuntu operating system, simply use apt-get to install Tesseract OCR:
$ sudo apt-get install tesseract-ocr
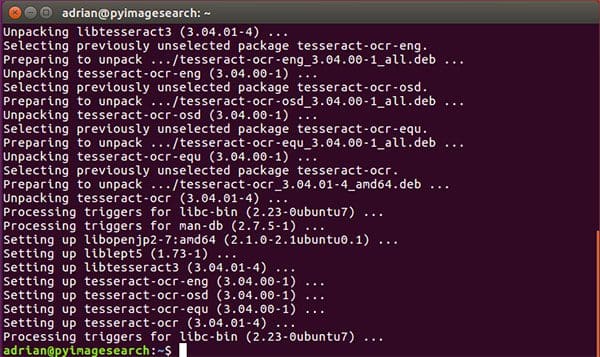
For Windows, please consult Tesseract documentation as PyImageSearch does not support or recommend Windows for computer vision development.
Step #2: Validate that Tesseract has been installed
To validate that Tesseract has been successfully installed on your machine, execute the following command:
$ tesseract -v
tesseract 3.05.00
 leptonica-1.74.1
  libjpeg 8d : libpng 1.6.29 : libtiff 4.0.7 : zlib 1.2.8
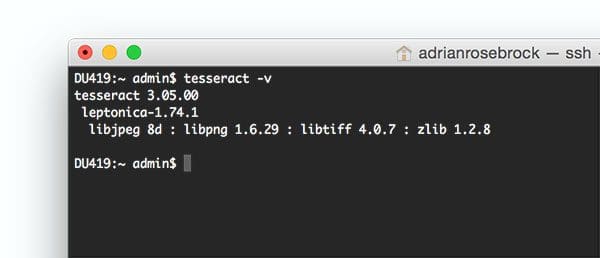
You should see the Tesseract version printed to your screen, along with a list of image file format libraries Tesseract is compatible with.
If you instead get the error:
-bash: tesseract: command not found
Then Tesseract was not properly installed on your system. Go back to Step #1 and check for errors. Additionally, you may need to update your PATH variable (for advanced users only).
Step #3: Test out Tesseract OCR
For Tesseract OCR to obtain reasonable results, you’ll want to supply images that are cleanly pre-processed.
When utilizing Tesseract, I recommend:
- Using as an input image with as high resolution and DPI as possible.
- Applying thresholding to segment the text from the background.
- Ensuring the foreground is as clearly segmented from the background as possible (i.e., no pixelations or character deformations).
- Applying text skew correction to the input image to ensure the text is properly aligned.
Deviations from these recommendations can lead to incorrect OCR results as we’ll find out later in this tutorial.
Now, let’s apply OCR to the following image:
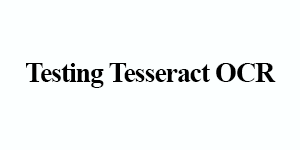
Simply enter the following command in your terminal:
$ tesseract tesseract_inputs/example_01.png stdout
Warning in pixReadMemPng: work-around: writing to a temp file
Testing Tesseract OCR
Correct! Tesseract correctly identified, “Testing Tesseract OCR”, and printed it in the terminal.
Next, let’s try this image:

Enter the following in your terminal, noting the changed input filename:
$ tesseract tesseract_inputs/example_02.png stdout
Warning in pixReadMemPng: work-around: writing to a temp file
PyImageSearch
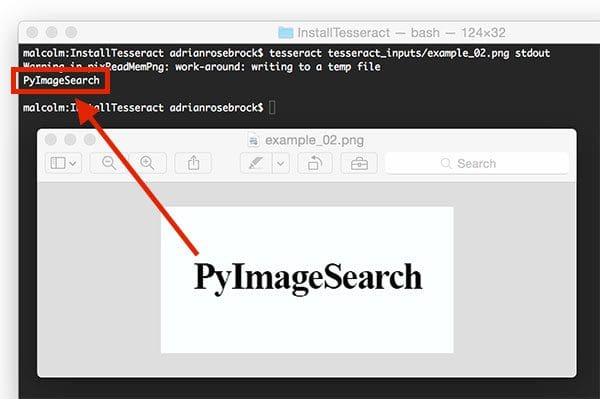
Success! Tesseract correctly identified the text, “PyImageSearch”, in the image.
Now, let’s try OCR’ing digits as opposed to alphabetic characters:
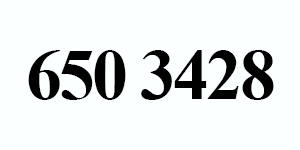
This example uses the command line digits switch to only report digits:
$ tesseract tesseract_inputs/example_03.png stdout digits
Warning in pixReadMemPng: work-around: writing to a temp file
650 3428
Once again, Tesseract correctly identified our string of characters (in this case digits only).
In each of these three situations Tesseract was able to correctly OCR all of our images — and you may even be thinking that Tesseract is the right tool for all OCR uses cases.
However, as we’ll find out in the next section, Tesseract has a number of limitations.
Limitations of Tesseract for OCR
A few weeks ago I was working on a project to recognize the 16-digit numbers on credit cards.
I was easily able to write Python code to localize each of the four groups of 4-digits.
Here is an example 4-digit region of interest:

However, when I tried to apply Tesseract to the following image, the results were dissatisfying:

$ tesseract tesseract_inputs/example_04.png stdout digits
Warning in pixReadMemPng: work-around: writing to a temp file
5513
Notice how Tesseract reported 5513 , but the image clearly shows 5678 .
Unfortunately, this is a great example of a limitation of Tesseract. While we have segmented the foreground text from background, the pixelated nature of the text “confuses” Tesseract. It’s also likely that Tesseract was not trained on a credit card-like font.
Tesseract is best suited when building document processing pipelines where images are scanned in, pre-processed, and then Optical Character Recognition needs to be applied.
We should note that Tesseract is not an off-the-shelf solution to OCR that will work in all (or even most) image processing and computer vision applications.
In order to accomplish that, you’ll need to apply feature extraction techniques, machine learning, and deep learning.
What's next? We recommend PyImageSearch University.
86+ total classes • 115+ hours hours of on-demand code walkthrough videos • Last updated: February 2026
★★★★★ 4.84 (128 Ratings) • 16,000+ Students Enrolled
I strongly believe that if you had the right teacher you could master computer vision and deep learning.
Do you think learning computer vision and deep learning has to be time-consuming, overwhelming, and complicated? Or has to involve complex mathematics and equations? Or requires a degree in computer science?
That’s not the case.
All you need to master computer vision and deep learning is for someone to explain things to you in simple, intuitive terms. And that’s exactly what I do. My mission is to change education and how complex Artificial Intelligence topics are taught.
If you're serious about learning computer vision, your next stop should be PyImageSearch University, the most comprehensive computer vision, deep learning, and OpenCV course online today. Here you’ll learn how to successfully and confidently apply computer vision to your work, research, and projects. Join me in computer vision mastery.
Inside PyImageSearch University you'll find:
- ✓ 86+ courses on essential computer vision, deep learning, and OpenCV topics
- ✓ 86 Certificates of Completion
- ✓ 115+ hours hours of on-demand video
- ✓ Brand new courses released regularly, ensuring you can keep up with state-of-the-art techniques
- ✓ Pre-configured Jupyter Notebooks in Google Colab
- ✓ Run all code examples in your web browser — works on Windows, macOS, and Linux (no dev environment configuration required!)
- ✓ Access to centralized code repos for all 540+ tutorials on PyImageSearch
- ✓ Easy one-click downloads for code, datasets, pre-trained models, etc.
- ✓ Access on mobile, laptop, desktop, etc.
Summary
Today we learned how to install and configure Tesseract on our machines, the first part in a two part series on using Tesseract for OCR. We then used the tesseract binary to apply OCR to input images.
However, we found out that unless our images are cleanly segmented Tesseract will give poor results. In the case of “noisy” input images, we’ll likely obtain better accuracy by training a custom machine learning model to recognize characters in our specific use case.
Tesseract is best suited for situations with high resolution inputs where the foreground text is cleanly segmented from the background.
Next week we’ll learn how to access Tesseract via Python code, so stay tuned.
To be notified when the next blog post on Tesseract goes live, be sure to enter your email address in the form below!

Download the Source Code and FREE 17-page Resource Guide
Enter your email address below to get a .zip of the code and a FREE 17-page Resource Guide on Computer Vision, OpenCV, and Deep Learning. Inside you'll find my hand-picked tutorials, books, courses, and libraries to help you master CV and DL!

