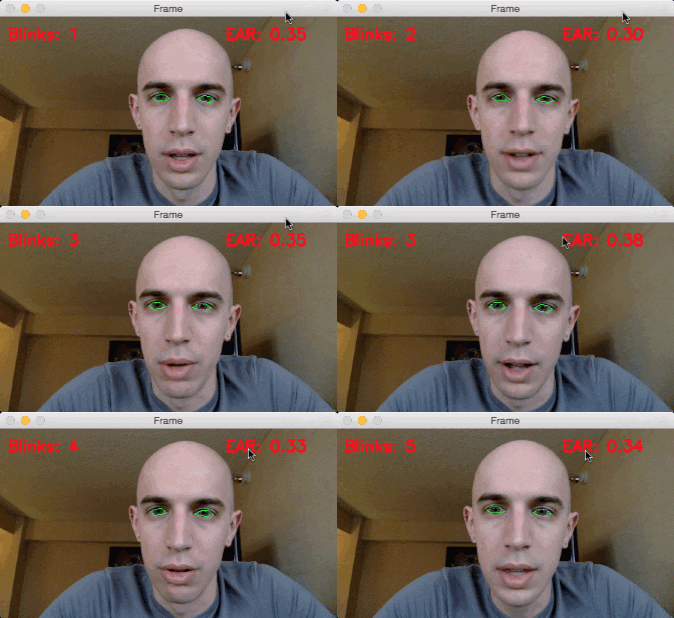
In last week’s blog post, I demonstrated how to perform facial landmark detection in real-time in video streams.
Today, we are going to build upon this knowledge and develop a computer vision application that is capable of detecting and counting blinks in video streams using facial landmarks and OpenCV.
To build our blink detector, we’ll be computing a metric called the eye aspect ratio (EAR), introduced by Soukupová and Čech in their 2016 paper, Real-Time Eye Blink Detection Using Facial Landmarks.
Unlike traditional image processing methods for computing blinks which typically involve some combination of:
- Eye localization.
- Thresholding to find the whites of the eyes.
- Determining if the “white” region of the eyes disappears for a period of time (indicating a blink).
The eye aspect ratio is instead a much more elegant solution that involves a very simple calculation based on the ratio of distances between facial landmarks of the eyes.
This method for eye blink detection is fast, efficient, and easy to implement.
To learn more about building a computer vision system to detect blinks in video streams using OpenCV, Python, and dlib, just keep reading.
Eye blink detection with OpenCV, Python, and dlib
Our blink detection blog post is divided into four parts.
In the first part we’ll discuss the eye aspect ratio and how it can be used to determine if a person is blinking or not in a given video frame.
From there, we’ll write Python, OpenCV, and dlib code to (1) perform facial landmark detection and (2) detect blinks in video streams.
Based on this implementation we’ll apply our method to detecting blinks in example webcam streams along with video files.
Finally, I’ll wrap up today’s blog post by discussing methods to improve our blink detector.
Understanding the “eye aspect ratio” (EAR)
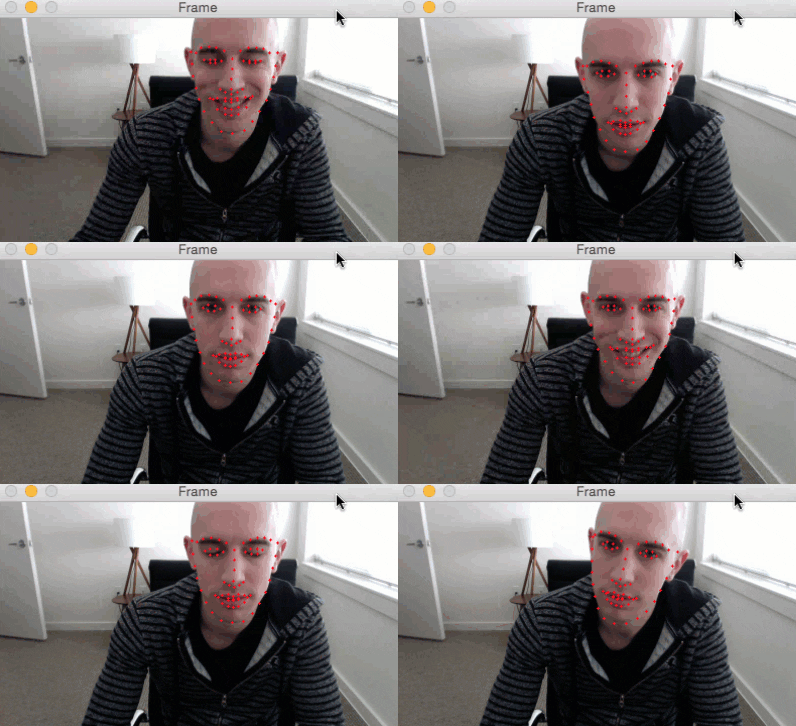
As we learned from our previous tutorial, we can apply facial landmark detection to localize important regions of the face, including eyes, eyebrows, nose, ears, and mouth:
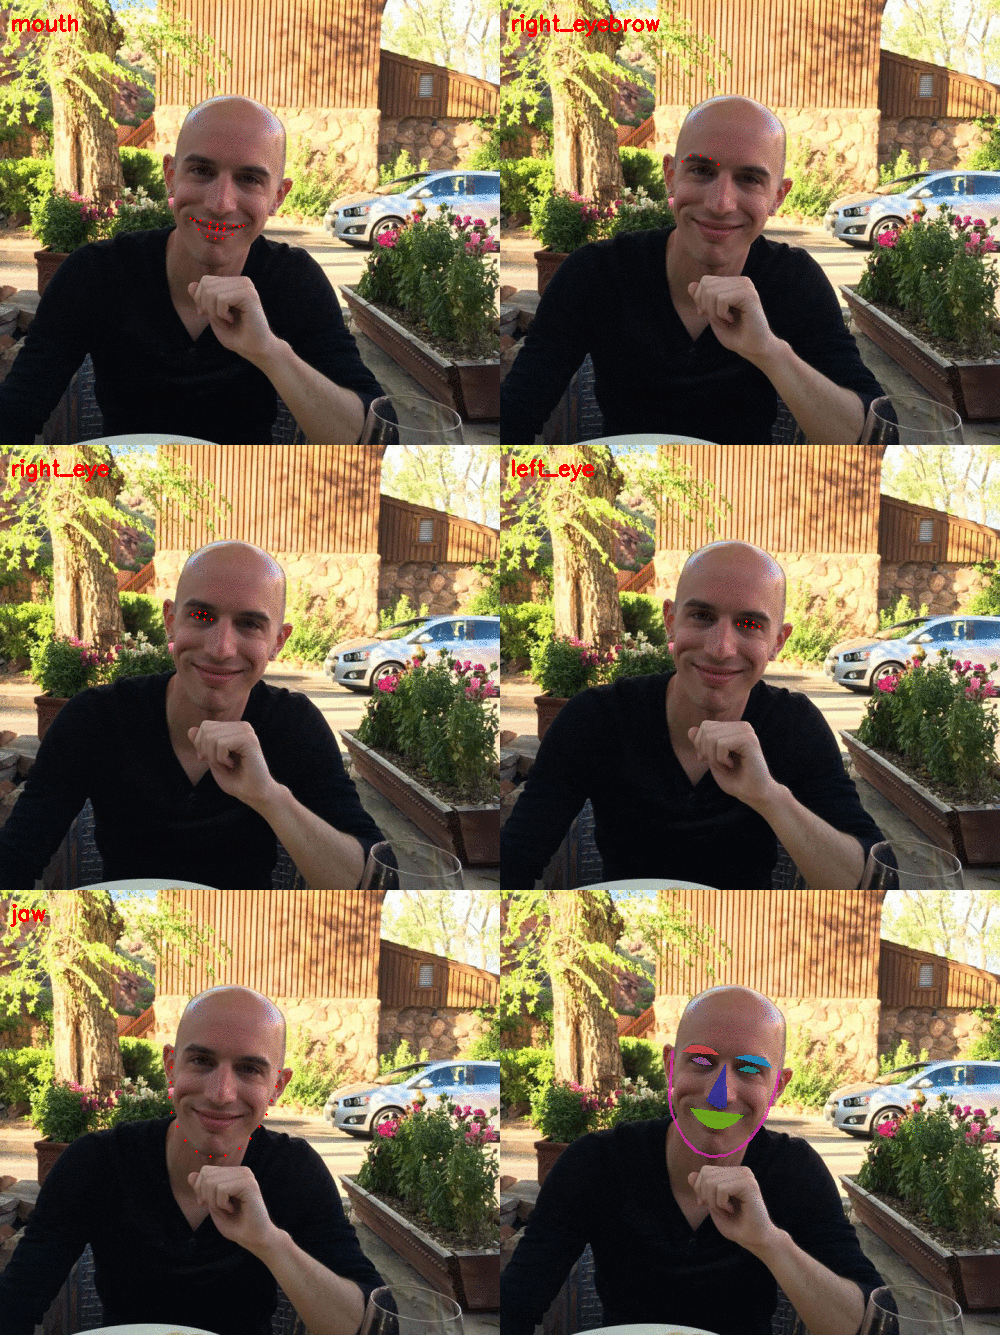
This also implies that we can extract specific facial structures by knowing the indexes of the particular face parts:
In terms of blink detection, we are only interested in two sets of facial structures — the eyes.
Each eye is represented by 6 (x, y)-coordinates, starting at the left-corner of the eye (as if you were looking at the person), and then working clockwise around the remainder of the region:
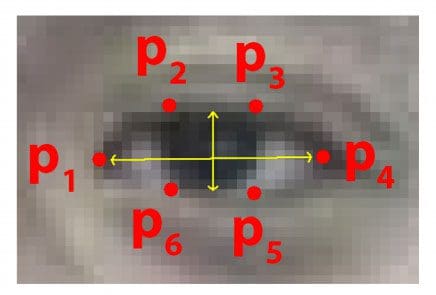
Based on this image, we should take away on key point:
There is a relation between the width and the height of these coordinates.
Based on the work by Soukupová and Čech in their 2016 paper, Real-Time Eye Blink Detection using Facial Landmarks, we can then derive an equation that reflects this relation called the eye aspect ratio (EAR):

Where p1, …, p6 are 2D facial landmark locations.
The numerator of this equation computes the distance between the vertical eye landmarks while the denominator computes the distance between horizontal eye landmarks, weighting the denominator appropriately since there is only one set of horizontal points but two sets of vertical points.
Why is this equation so interesting?
Well, as we’ll find out, the eye aspect ratio is approximately constant while the eye is open, but will rapidly fall to zero when a blink is taking place.
Using this simple equation, we can avoid image processing techniques and simply rely on the ratio of eye landmark distances to determine if a person is blinking.
To make this more clear, consider the following figure from Soukupová and Čech:

On the top-left we have an eye that is fully open — the eye aspect ratio here would be large(r) and relatively constant over time.
However, once the person blinks (top-right) the eye aspect ratio decreases dramatically, approaching zero.
The bottom figure plots a graph of the eye aspect ratio over time for a video clip. As we can see, the eye aspect ratio is constant, then rapidly drops close to zero, then increases again, indicating a single blink has taken place.
In our next section, we’ll learn how to implement the eye aspect ratio for blink detection using facial landmarks, OpenCV, Python, and dlib.
Detecting blinks with facial landmarks and OpenCV
To get started, open up a new file and name it detect_blinks.py . From there, insert the following code:
# import the necessary packages
from scipy.spatial import distance as dist
from imutils.video import FileVideoStream
from imutils.video import VideoStream
from imutils import face_utils
import numpy as np
import argparse
import imutils
import time
import dlib
import cv2
To access either our video file on disk (FileVideoStream ) or built-in webcam/USB camera/Raspberry Pi camera module (VideoStream ), we’ll need to use my imutils library, a set of convenience functions to make working with OpenCV easier.
If you do not have imutils installed on your system (or if you’re using an older version), make sure you install/upgrade using the following command:
$ pip install --upgrade imutils
Note: If you are using Python virtual environments (as all of my OpenCV install tutorials do), make sure you use the workon command to access your virtual environment first and then install/upgrade imutils .
Otherwise, most of our imports are fairly standard — the exception is dlib, which contains our implementation of facial landmark detection.
If you haven’t installed dlib on your system, please follow my dlib install tutorial to configure your machine.
Next, we’ll define our eye_aspect_ratio function:
def eye_aspect_ratio(eye):
	# compute the euclidean distances between the two sets of
	# vertical eye landmarks (x, y)-coordinates
	A = dist.euclidean(eye[1], eye[5])
	B = dist.euclidean(eye[2], eye[4])

	# compute the euclidean distance between the horizontal
	# eye landmark (x, y)-coordinates
	C = dist.euclidean(eye[0], eye[3])

	# compute the eye aspect ratio
	ear = (A + B) / (2.0 * C)

	# return the eye aspect ratio
	return ear
This function accepts a single required parameter, the (x, y)-coordinates of the facial landmarks for a given eye .
Lines 16 and 17 compute the distance between the two sets of vertical eye landmarks while Line 21 computes the distance between horizontal eye landmarks.
Finally, Line 24 combines both the numerator and denominator to arrive at the final eye aspect ratio, as described in Figure 4 above.
Line 27 then returns the eye aspect ratio to the calling function.
Let’s go ahead and parse our command line arguments:
# construct the argument parse and parse the arguments
ap = argparse.ArgumentParser()
ap.add_argument("-p", "--shape-predictor", required=True,
	help="path to facial landmark predictor")
ap.add_argument("-v", "--video", type=str, default="",
	help="path to input video file")
args = vars(ap.parse_args())
Our detect_blinks.py script requires a single command line argument, followed by a second optional one:
--shape-predictor: This is the path to dlib’s pre-trained facial landmark detector. You can download the detector along with the source code + example videos to this tutorial using the “Downloads” section of the bottom of this blog post.--video: This optional switch controls the path to an input video file residing on disk. If you instead want to work with a live video stream, simply omit this switch when executing the script.
We now need to set two important constants that you may need to tune for your own implementation, along with initialize two other important variables, so be sure to pay attention to this explantation:
# define two constants, one for the eye aspect ratio to indicate
# blink and then a second constant for the number of consecutive
# frames the eye must be below the threshold
EYE_AR_THRESH = 0.3
EYE_AR_CONSEC_FRAMES = 3

# initialize the frame counters and the total number of blinks
COUNTER = 0
TOTAL = 0
When determining if a blink is taking place in a video stream, we need to calculate the eye aspect ratio.
If the eye aspect ratio falls below a certain threshold and then rises above the threshold, then we’ll register a “blink” — the EYE_AR_THRESH is this threshold value. We default it to a value of 0.3 as this is what has worked best for my applications, but you may need to tune it for your own application.
We then have an important constant, EYE_AR_CONSEC_FRAME — this value is set to 3 to indicate that three successive frames with an eye aspect ratio less than EYE_AR_THRESH must happen in order for a blink to be registered.
Again, depending on the frame processing throughput rate of your pipeline, you may need to raise or lower this number for your own implementation.
Lines 44 and 45 initialize two counters. COUNTER is the total number of successive frames that have an eye aspect ratio less than EYE_AR_THRESH while TOTAL is the total number of blinks that have taken place while the script has been running.
Now that our imports, command line arguments, and constants have been taken care of, we can initialize dlib’s face detector and facial landmark detector:
# initialize dlib's face detector (HOG-based) and then create
# the facial landmark predictor
print("[INFO] loading facial landmark predictor...")
detector = dlib.get_frontal_face_detector()
predictor = dlib.shape_predictor(args["shape_predictor"])
The dlib library uses a pre-trained face detector which is based on a modification to the Histogram of Oriented Gradients + Linear SVM method for object detection.
We then initialize the actual facial landmark predictor on Line 51.
You can learn more about dlib’s facial landmark detector (i.e., how it works, what dataset it was trained on, etc., in this blog post).
The facial landmarks produced by dlib follow an indexable list, as I describe in this tutorial:
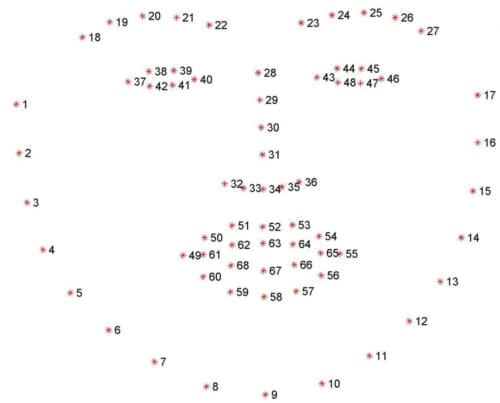
We can therefore determine the starting and ending array slice index values for extracting (x, y)-coordinates for both the left and right eye below:
# grab the indexes of the facial landmarks for the left and
# right eye, respectively
(lStart, lEnd) = face_utils.FACIAL_LANDMARKS_IDXS["left_eye"]
(rStart, rEnd) = face_utils.FACIAL_LANDMARKS_IDXS["right_eye"]
Using these indexes we’ll be able to extract eye regions effortlessly.
Next, we need to decide if we are working with a file-based video stream or a live USB/webcam/Raspberry Pi camera video stream:
# start the video stream thread
print("[INFO] starting video stream thread...")
vs = FileVideoStream(args["video"]).start()
fileStream = True
# vs = VideoStream(src=0).start()
# vs = VideoStream(usePiCamera=True).start()
# fileStream = False
time.sleep(1.0)
If you’re using a file video stream, then leave the code as is.
Otherwise, if you want to use a built-in webcam or USB camera, uncomment Line 62.
For a Raspberry Pi camera module, uncomment Line 63.
If you have uncommented either Line 62 or Line 63, then uncomment Line 64 as well to indicate that you are not reading a video file from disk.
Finally, we have reached the main loop of our script:
# loop over frames from the video stream
while True:
	# if this is a file video stream, then we need to check if
	# there any more frames left in the buffer to process
	if fileStream and not vs.more():
		break

	# grab the frame from the threaded video file stream, resize
	# it, and convert it to grayscale
	# channels)
	frame = vs.read()
	frame = imutils.resize(frame, width=450)
	gray = cv2.cvtColor(frame, cv2.COLOR_BGR2GRAY)

	# detect faces in the grayscale frame
	rects = detector(gray, 0)
On Line 68 we start looping over frames from our video stream.
If we are accessing a video file stream and there are no more frames left in the video, we break from the loop (Lines 71 and 72).
Line 77 reads the next frame from our video stream, followed by resizing it and converting it to grayscale (Lines 78 and 79).
We then detect faces in the grayscale frame on Line 82 via dlib’s built-in face detector.
We now need to loop over each of the faces in the frame and then apply facial landmark detection to each of them:
	# loop over the face detections
	for rect in rects:
		# determine the facial landmarks for the face region, then
		# convert the facial landmark (x, y)-coordinates to a NumPy
		# array
		shape = predictor(gray, rect)
		shape = face_utils.shape_to_np(shape)

		# extract the left and right eye coordinates, then use the
		# coordinates to compute the eye aspect ratio for both eyes
		leftEye = shape[lStart:lEnd]
		rightEye = shape[rStart:rEnd]
		leftEAR = eye_aspect_ratio(leftEye)
		rightEAR = eye_aspect_ratio(rightEye)

		# average the eye aspect ratio together for both eyes
		ear = (leftEAR + rightEAR) / 2.0
Line 89 determines the facial landmarks for the face region, while Line 90 converts these (x, y)-coordinates to a NumPy array.
Using our array slicing techniques from earlier in this script, we can extract the (x, y)-coordinates for both the left and right eye, respectively (Lines 94 and 95).
From there, we compute the eye aspect ratio for each eye on Lines 96 and 97.
Following the suggestion of Soukupová and Čech, we average the two eye aspect ratios together to obtain a better blink estimate (making the assumption that a person blinks both eyes at the same time, of course).
Our next code block simply handles visualizing the facial landmarks for the eye regions themselves:
		# compute the convex hull for the left and right eye, then
		# visualize each of the eyes
		leftEyeHull = cv2.convexHull(leftEye)
		rightEyeHull = cv2.convexHull(rightEye)
		cv2.drawContours(frame, [leftEyeHull], -1, (0, 255, 0), 1)
		cv2.drawContours(frame, [rightEyeHull], -1, (0, 255, 0), 1)
You can read more about extracting and visualizing individual facial landmark regions in this post.
At this point we have computed our (averaged) eye aspect ratio, but we haven’t actually determined if a blink has taken place — this is taken care of in the next section:
		# check to see if the eye aspect ratio is below the blink
		# threshold, and if so, increment the blink frame counter
		if ear < EYE_AR_THRESH:
			COUNTER += 1

		# otherwise, the eye aspect ratio is not below the blink
		# threshold
		else:
			# if the eyes were closed for a sufficient number of
			# then increment the total number of blinks
			if COUNTER >= EYE_AR_CONSEC_FRAMES:
				TOTAL += 1

			# reset the eye frame counter
			COUNTER = 0
Line 111 makes a check to see if the eye aspect ratio is below our blink threshold — if it is, we increment the number of consecutive frames that indicate a blink is taking place (Line 112).
Otherwise, Line 116 handles the case where the eye aspect ratio is not below the blink threshold.
In this case, we make another check on Line 119 to see if a sufficient number of consecutive frames contained an eye blink ratio below our pre-defined threshold.
If the check passes, we increment the TOTAL number of blinks (Line 120).
We then reset the number of consecutive blinks COUNTER (Line 123).
Our final code block simply handles drawing the number of blinks on our output frame, as well as displaying the current eye aspect ratio:
		# draw the total number of blinks on the frame along with
		# the computed eye aspect ratio for the frame
		cv2.putText(frame, "Blinks: {}".format(TOTAL), (10, 30),
			cv2.FONT_HERSHEY_SIMPLEX, 0.7, (0, 0, 255), 2)
		cv2.putText(frame, "EAR: {:.2f}".format(ear), (300, 30),
			cv2.FONT_HERSHEY_SIMPLEX, 0.7, (0, 0, 255), 2)

	# show the frame
	cv2.imshow("Frame", frame)
	key = cv2.waitKey(1) & 0xFF

	# if the `q` key was pressed, break from the loop
	if key == ord("q"):
		break

# do a bit of cleanup
cv2.destroyAllWindows()
vs.stop()
To see our eye blink detector in action, proceed to the next section.
Blink detection results
Before executing any of these examples, be sure to use the “Downloads” section of this guide to download the source code + example videos + pre-trained dlib facial landmark predictor. From there, you can unpack the archive and start playing with the code.
Over this past weekend I was traveling out to Las Vegas for a conference. While I was waiting for my plane to board, I sat at the gate and put together the code for this blog post — this involved recording a simple video of myself that I could use to evaluate the blink detection software.
To apply our blink detector to the example video, just execute the following command:
$ python detect_blinks.py \
	--shape-predictor shape_predictor_68_face_landmarks.dat \
	--video blink_detection_demo.mp4
And as you’ll see, we can successfully count the number of blinks in the video using OpenCV and facial landmarks:
Later, at my hotel, I recorded a live stream of the blink detector in action and turned it into a screencast.
To access my built-in webcam I executed the following command (taking care to uncomment the correct VideoStream class, as detailed above):
$ python detect_blinks.py \
	--shape-predictor shape_predictor_68_face_landmarks.dat
Here is the output of the live blink detector along with my commentary:
Improving our blink detector
This blog post focused solely on using the eye aspect ratio as a quantitative metric to determine if a person has blinked in a video stream.
However, due to noise in a video stream, subpar facial landmark detections, or fast changes in viewing angle, a simple threshold on the eye aspect ratio could produce a false-positive detection, reporting that a blink had taken place when in reality the person had not blinked.
To make our blink detector more robust to these challenges, Soukupová and Čech recommend:
- Computing the eye aspect ratio for the N-th frame, along with the eye aspect ratios for N – 6 and N + 6 frames, then concatenating these eye aspect ratios to form a 13 dimensional feature vector.
- Training a Support Vector Machine (SVM) on these feature vectors.
Soukupová and Čech report that the combination of the temporal-based feature vector and SVM classifier helps reduce false-positive blink detections and improves the overall accuracy of the blink detector.
What's next? We recommend PyImageSearch University.
86+ total classes • 115+ hours hours of on-demand code walkthrough videos • Last updated: March 2025
★★★★★ 4.84 (128 Ratings) • 16,000+ Students Enrolled
I strongly believe that if you had the right teacher you could master computer vision and deep learning.
Do you think learning computer vision and deep learning has to be time-consuming, overwhelming, and complicated? Or has to involve complex mathematics and equations? Or requires a degree in computer science?
That’s not the case.
All you need to master computer vision and deep learning is for someone to explain things to you in simple, intuitive terms. And that’s exactly what I do. My mission is to change education and how complex Artificial Intelligence topics are taught.
If you're serious about learning computer vision, your next stop should be PyImageSearch University, the most comprehensive computer vision, deep learning, and OpenCV course online today. Here you’ll learn how to successfully and confidently apply computer vision to your work, research, and projects. Join me in computer vision mastery.
Inside PyImageSearch University you'll find:
- ✓ 86+ courses on essential computer vision, deep learning, and OpenCV topics
- ✓ 86 Certificates of Completion
- ✓ 115+ hours hours of on-demand video
- ✓ Brand new courses released regularly, ensuring you can keep up with state-of-the-art techniques
- ✓ Pre-configured Jupyter Notebooks in Google Colab
- ✓ Run all code examples in your web browser — works on Windows, macOS, and Linux (no dev environment configuration required!)
- ✓ Access to centralized code repos for all 540+ tutorials on PyImageSearch
- ✓ Easy one-click downloads for code, datasets, pre-trained models, etc.
- ✓ Access on mobile, laptop, desktop, etc.
Summary
In this blog post I demonstrated how to build a blink detector using OpenCV, Python, and dlib.
The first step in building a blink detector is to perform facial landmark detection to localize the eyes in a given frame from a video stream.
Once we have the facial landmarks for both eyes, we compute the eye aspect ratio for each eye, which gives us a singular value, relating the distances between the vertical eye landmark points to the distances between the horizontal landmark points.
Once we have the eye aspect ratio, we can threshold it to determine if a person is blinking — the eye aspect ratio will remain approximately constant when the eyes are open and then will rapidly approach zero during a blink, then increase again as the eye opens.
To improve our blink detector, Soukupová and Čech recommend constructing a 13-dim feature vector of eye aspect ratios (N-th frame, N – 6 frames, and N + 6 frames), followed by feeding this feature vector into a Linear SVM for classification.
Of course, a natural extension of blink detection is drowsiness detection which we’ll be covering in the next two weeks here on the PyImageSearch blog.
To be notified when the drowsiness detection tutorial is published, be sure to enter your email address in the form below!

Download the Source Code and FREE 17-page Resource Guide
Enter your email address below to get a .zip of the code and a FREE 17-page Resource Guide on Computer Vision, OpenCV, and Deep Learning. Inside you'll find my hand-picked tutorials, books, courses, and libraries to help you master CV and DL!
