Last updated on July 3, 2021.
Last week we learned how to install and configure dlib on our system with Python bindings.
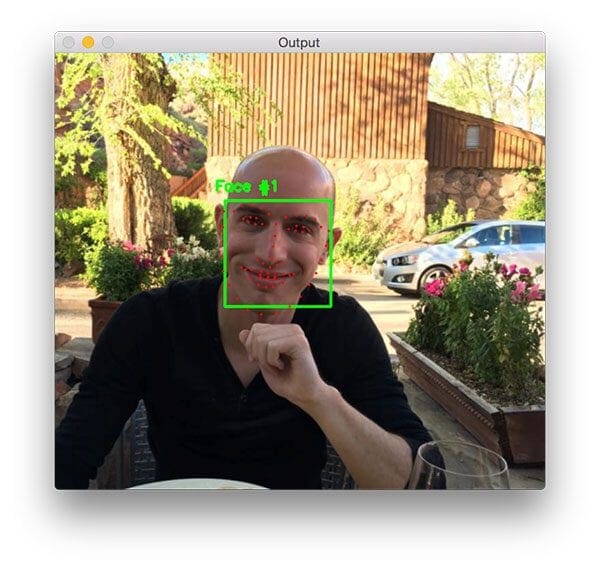
Today we are going to use dlib and OpenCV to detect facial landmarks in an image.
Facial landmarks are used to localize and represent salient regions of the face, such as:
- Eyes
- Eyebrows
- Nose
- Mouth
- Jawline
Facial landmarks have been successfully applied to face alignment, head pose estimation, face swapping, blink detection and much more.
In today’s blog post we’ll be focusing on the basics of facial landmarks, including:
- Exactly what facial landmarks are and how they work.
- How to detect and extract facial landmarks from an image using dlib, OpenCV, and Python.
In the next blog post in this series we’ll take a deeper dive into facial landmarks and learn how to extract specific facial regions based on these facial landmarks.
To learn more about facial landmarks, just keep reading.
- Update July 2021: Added section on alternative facial landmark detectors, including dlib’s 5-point facial landmark detector, OpenCV’s built-in facial landmark detector, and MediaPipe’s face mesh detector.
Facial landmarks with dlib, OpenCV, and Python
The first part of this blog post will discuss facial landmarks and why they are used in computer vision applications.
From there, I’ll demonstrate how to detect and extract facial landmarks using dlib, OpenCV, and Python.
Finally, we’ll look at some results of applying facial landmark detection to images.
What are facial landmarks?
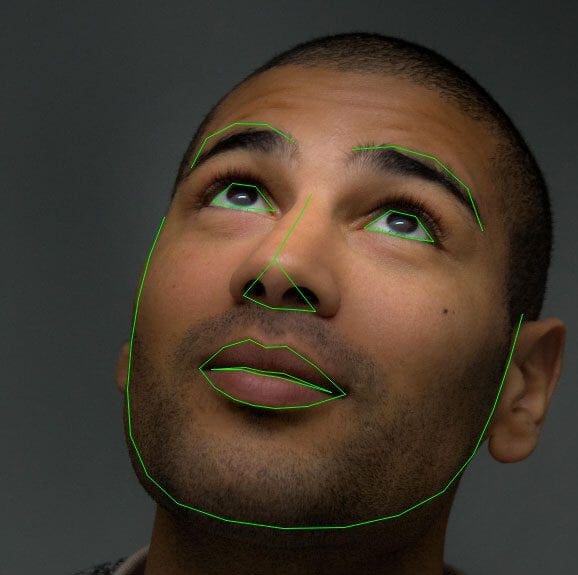
Detecting facial landmarks is a subset of the shape prediction problem. Given an input image (and normally an ROI that specifies the object of interest), a shape predictor attempts to localize key points of interest along the shape.
In the context of facial landmarks, our goal is detect important facial structures on the face using shape prediction methods.
Detecting facial landmarks is therefore a two step process:
- Step #1: Localize the face in the image.
- Step #2: Detect the key facial structures on the face ROI.
Face detection (Step #1) can be achieved in a number of ways.
We could use OpenCV’s built-in Haar cascades.
We might apply a pre-trained HOG + Linear SVM object detector specifically for the task of face detection.
Or we might even use deep learning-based algorithms for face localization.
In either case, the actual algorithm used to detect the face in the image doesn’t matter. Instead, what’s important is that through some method we obtain the face bounding box (i.e., the (x, y)-coordinates of the face in the image).
Given the face region we can then apply Step #2: detecting key facial structures in the face region.
There are a variety of facial landmark detectors, but all methods essentially try to localize and label the following facial regions:
- Mouth
- Right eyebrow
- Left eyebrow
- Right eye
- Left eye
- Nose
- Jaw
The facial landmark detector included in the dlib library is an implementation of the One Millisecond Face Alignment with an Ensemble of Regression Trees paper by Kazemi and Sullivan (2014).
This method starts by using:
- A training set of labeled facial landmarks on an image. These images are manually labeled, specifying specific (x, y)-coordinates of regions surrounding each facial structure.
- Priors, of more specifically, the probability on distance between pairs of input pixels.
Given this training data, an ensemble of regression trees are trained to estimate the facial landmark positions directly from the pixel intensities themselves (i.e., no “feature extraction” is taking place).
The end result is a facial landmark detector that can be used to detect facial landmarks in real-time with high quality predictions.
For more information and details on this specific technique, be sure to read the paper by Kazemi and Sullivan linked to above, along with the official dlib announcement.
Understanding dlib’s facial landmark detector
The pre-trained facial landmark detector inside the dlib library is used to estimate the location of 68 (x, y)-coordinates that map to facial structures on the face.
The indexes of the 68 coordinates can be visualized on the image below:
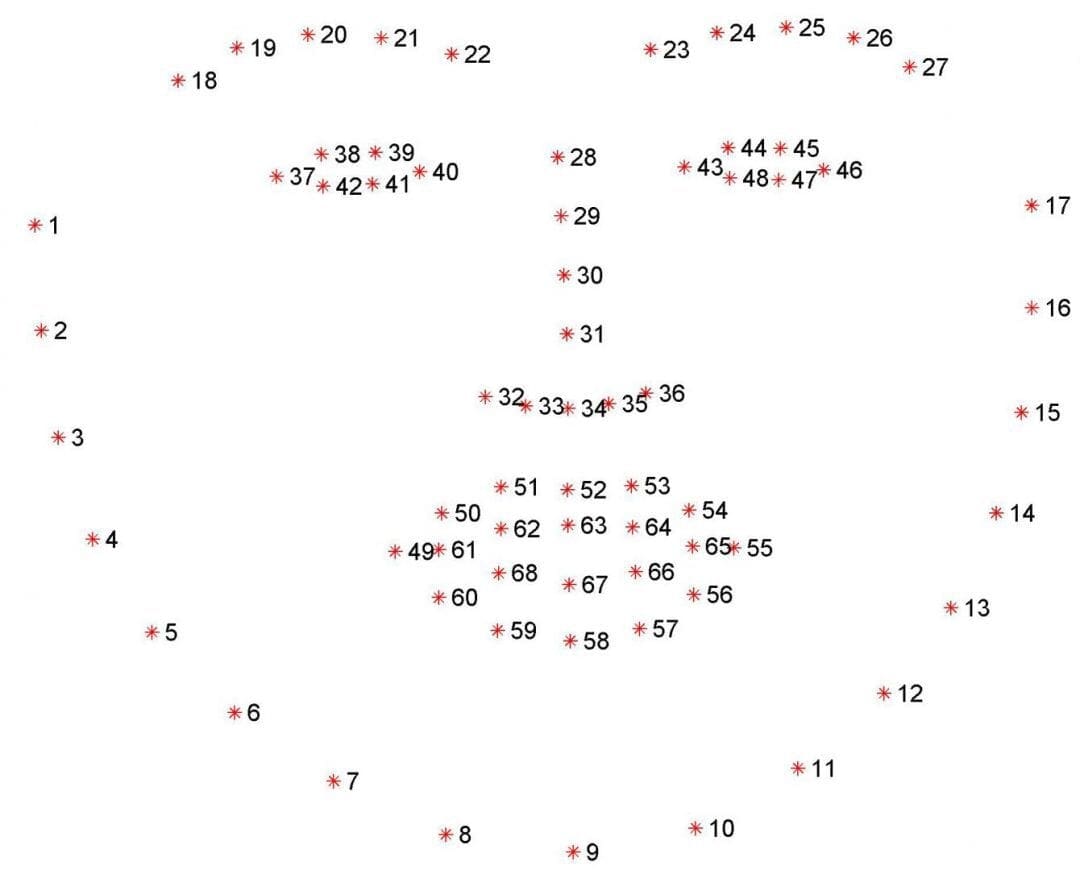
These annotations are part of the 68 point iBUG 300-W dataset which the dlib facial landmark predictor was trained on.
It’s important to note that other flavors of facial landmark detectors exist, including the 194 point model that can be trained on the HELEN dataset.
Regardless of which dataset is used, the same dlib framework can be leveraged to train a shape predictor on the input training data — this is useful if you would like to train facial landmark detectors or custom shape predictors of your own.
In the remaining of this blog post I’ll demonstrate how to detect these facial landmarks in images.
Future blog posts in this series will use these facial landmarks to extract specific regions of the face, apply face alignment, and even build a blink detection system.
Detecting facial landmarks with dlib, OpenCV, and Python
In order to prepare for this series of blog posts on facial landmarks, I’ve added a few convenience functions to my imutils library, specifically inside face_utils.py.
We’ll be reviewing two of these functions inside face_utils.py now and the remaining ones next week.
The first utility function is rect_to_bb , short for “rectangle to bounding box”:
def rect_to_bb(rect):
	# take a bounding predicted by dlib and convert it
	# to the format (x, y, w, h) as we would normally do
	# with OpenCV
	x = rect.left()
	y = rect.top()
	w = rect.right() - x
	h = rect.bottom() - y

	# return a tuple of (x, y, w, h)
	return (x, y, w, h)
This function accepts a single argument, rect, which is assumed to be a bounding box rectangle produced by a dlib detector (i.e., the face detector).
The rect object includes the (x, y)-coordinates of the detection.
However, in OpenCV, we normally think of a bounding box in terms of “(x, y, width, height)” so as a matter of convenience, the rect_to_bb function takes this rect object and transforms it into a 4-tuple of coordinates.
Again, this is simply a matter of conveinence and taste.
Secondly, we have the shape_to_np function:
def shape_to_np(shape, dtype="int"):
	# initialize the list of (x, y)-coordinates
	coords = np.zeros((68, 2), dtype=dtype)

	# loop over the 68 facial landmarks and convert them
	# to a 2-tuple of (x, y)-coordinates
	for i in range(0, 68):
		coords[i] = (shape.part(i).x, shape.part(i).y)

	# return the list of (x, y)-coordinates
	return coords
The dlib face landmark detector will return a shape object containing the 68 (x, y)-coordinates of the facial landmark regions.
Using the shape_to_np function, we cam convert this object to a NumPy array, allowing it to “play nicer” with our Python code.
Given these two helper functions, we are now ready to detect facial landmarks in images.
Open up a new file, name it facial_landmarks.py , and insert the following code:
# import the necessary packages
from imutils import face_utils
import numpy as np
import argparse
import imutils
import dlib
import cv2

# construct the argument parser and parse the arguments
ap = argparse.ArgumentParser()
ap.add_argument("-p", "--shape-predictor", required=True,
	help="path to facial landmark predictor")
ap.add_argument("-i", "--image", required=True,
	help="path to input image")
args = vars(ap.parse_args())
Lines 2-7 import our required Python packages.
We’ll be using the face_utils submodule of imutils to access our helper functions detailed above.
We’ll then import dlib . If you don’t already have dlib installed on your system, please follow the instructions in my previous blog post to get your system properly configured.
Lines 10-15 parse our command line arguments:
--shape-predictor: This is the path to dlib’s pre-trained facial landmark detector. You can download the detector model here or you can use the “Downloads” section of this post to grab the code + example images + pre-trained detector as well.--image: The path to the input image that we want to detect facial landmarks on.
Now that our imports and command line arguments are taken care of, let’s initialize dlib’s face detector and facial landmark predictor:
# initialize dlib's face detector (HOG-based) and then create
# the facial landmark predictor
detector = dlib.get_frontal_face_detector()
predictor = dlib.shape_predictor(args["shape_predictor"])
Line 19 initializes dlib’s pre-trained face detector based on a modification to the standard Histogram of Oriented Gradients + Linear SVM method for object detection.
Line 20 then loads the facial landmark predictor using the path to the supplied --shape-predictor.
But before we can actually detect facial landmarks, we first need to detect the face in our input image:
# load the input image, resize it, and convert it to grayscale
image = cv2.imread(args["image"])
image = imutils.resize(image, width=500)
gray = cv2.cvtColor(image, cv2.COLOR_BGR2GRAY)

# detect faces in the grayscale image
rects = detector(gray, 1)
Line 23 loads our input image from disk via OpenCV, then pre-processes the image by resizing to have a width of 500 pixels and converting it to grayscale (Lines 24 and 25).
Line 28 handles detecting the bounding box of faces in our image.
The first parameter to the detector is our grayscale image (although this method can work with color images as well).
The second parameter is the number of image pyramid layers to apply when upscaling the image prior to applying the detector (this it the equivalent of computing cv2.pyrUp N number of times on the image).
The benefit of increasing the resolution of the input image prior to face detection is that it may allow us to detect more faces in the image — the downside is that the larger the input image, the more computaitonally expensive the detection process is.
Given the (x, y)-coordinates of the faces in the image, we can now apply facial landmark detection to each of the face regions:
# loop over the face detections
for (i, rect) in enumerate(rects):
	# determine the facial landmarks for the face region, then
	# convert the facial landmark (x, y)-coordinates to a NumPy
	# array
	shape = predictor(gray, rect)
	shape = face_utils.shape_to_np(shape)

	# convert dlib's rectangle to a OpenCV-style bounding box
	# [i.e., (x, y, w, h)], then draw the face bounding box
	(x, y, w, h) = face_utils.rect_to_bb(rect)
	cv2.rectangle(image, (x, y), (x + w, y + h), (0, 255, 0), 2)

	# show the face number
	cv2.putText(image, "Face #{}".format(i + 1), (x - 10, y - 10),
		cv2.FONT_HERSHEY_SIMPLEX, 0.5, (0, 255, 0), 2)

	# loop over the (x, y)-coordinates for the facial landmarks
	# and draw them on the image
	for (x, y) in shape:
		cv2.circle(image, (x, y), 1, (0, 0, 255), -1)

# show the output image with the face detections + facial landmarks
cv2.imshow("Output", image)
cv2.waitKey(0)
We start looping over each of the face detections on Line 31.
For each of the face detections, we apply facial landmark detection on Line 35, giving us the 68 (x, y)-coordinates that map to the specific facial features in the image.
Line 36 then converts the dlib shape object to a NumPy array with shape (68, 2).
Lines 40 and 41 draw the bounding box surrounding the detected face on the image while Lines 44 and 45 draw the index of the face.
Finally, Lines 49 and 50 loop over the detected facial landmarks and draw each of them individually.
Lines 53 and 54 simply display the output image to our screen.
Facial landmark visualizations
Before we test our facial landmark detector, make sure you have upgraded to the latest version of imutils which includes the face_utils.py file:
$ pip install --upgrade imutils
Note: If you are using Python virtual environments, make sure you upgrade the imutils inside the virtual environment.
From there, use the “Downloads” section of this guide to download the source code, example images, and pre-trained dlib facial landmark detector.
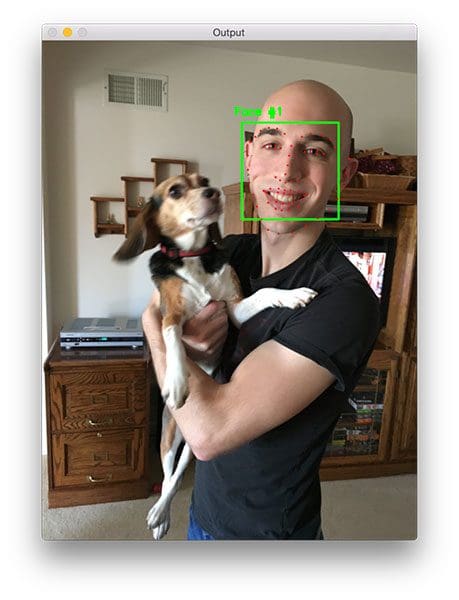
Once you’ve downloaded the .zip archive, unzip it, change directory to facial-landmarks , and execute the following command:
$ python facial_landmarks.py --shape-predictor shape_predictor_68_face_landmarks.dat \
	--image images/example_01.jpg
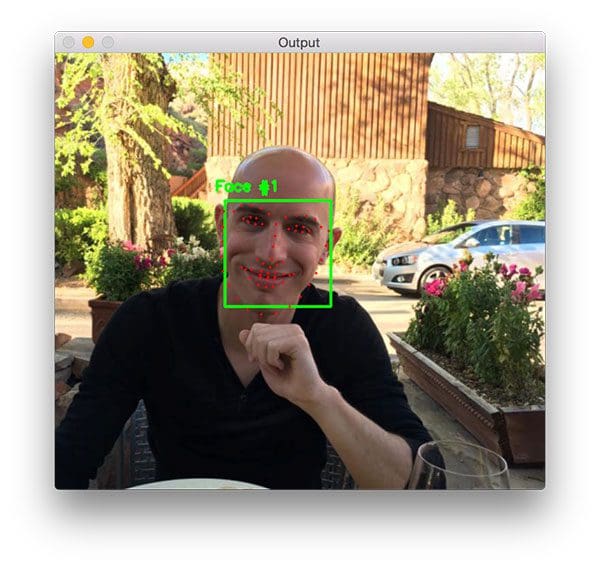
Notice how the bounding box of my face is drawn in green while each of the individual facial landmarks are drawn in red.
The same is true for this second example image:
$ python facial_landmarks.py --shape-predictor shape_predictor_68_face_landmarks.dat \
	--image images/example_02.jpg
Here we can clearly see that the red circles map to specific facial features, including my jawline, mouth, nose, eyes, and eyebrows.
Let’s take a look at one final example, this time with multiple people in the image:
$ python facial_landmarks.py --shape-predictor shape_predictor_68_face_landmarks.dat \
	--image images/example_03.jpg
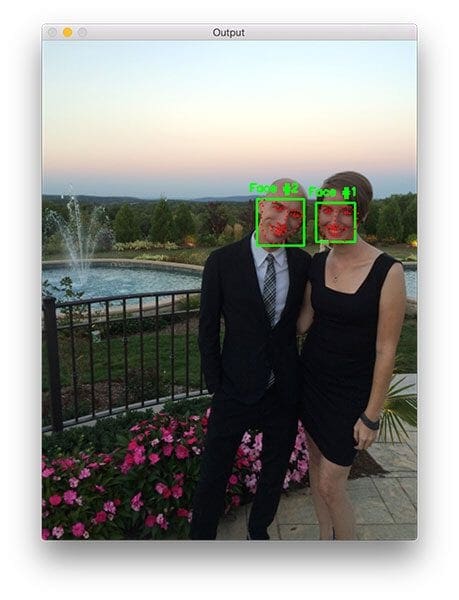
For both people in the image (myself and Trisha, my fiancée), our faces are not only detected but also annotated via facial landmarks as well.
Alternative facial landmark detectors
Dlib’s 68-point facial landmark detector tends to be the most popular facial landmark detector in the computer vision field due to the speed and reliability of the dlib library.
However, other facial landmark detection models exist.
To start, dlib provides an alternative 5-point facial landmark detector that is faster than the 68-point variant. This model works great if all you need are the locations of the eyes and the nose.
One of the most popular new facial landmark detectors comes from the MediaPipe library which is capable of computing a 3D face mesh:
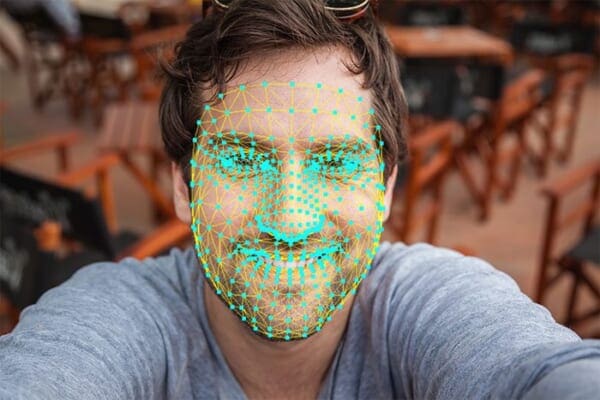
I’ll be doing tutorials on the PyImageSearch blog using MediaPipe and face mesh in the near future.
If you want to avoid using libraries other than OpenCV entirely (i.e., no dlib, MediaPipe, etc.), then it’s worth noting that OpenCV does support a built-in facial landmark detector; however, I have not used it before and I cannot comment on its accuracy, ease of use, etc.
What's next? We recommend PyImageSearch University.
86+ total classes • 115+ hours hours of on-demand code walkthrough videos • Last updated: July 2025
★★★★★ 4.84 (128 Ratings) • 16,000+ Students Enrolled
I strongly believe that if you had the right teacher you could master computer vision and deep learning.
Do you think learning computer vision and deep learning has to be time-consuming, overwhelming, and complicated? Or has to involve complex mathematics and equations? Or requires a degree in computer science?
That’s not the case.
All you need to master computer vision and deep learning is for someone to explain things to you in simple, intuitive terms. And that’s exactly what I do. My mission is to change education and how complex Artificial Intelligence topics are taught.
If you're serious about learning computer vision, your next stop should be PyImageSearch University, the most comprehensive computer vision, deep learning, and OpenCV course online today. Here you’ll learn how to successfully and confidently apply computer vision to your work, research, and projects. Join me in computer vision mastery.
Inside PyImageSearch University you'll find:
- ✓ 86+ courses on essential computer vision, deep learning, and OpenCV topics
- ✓ 86 Certificates of Completion
- ✓ 115+ hours hours of on-demand video
- ✓ Brand new courses released regularly, ensuring you can keep up with state-of-the-art techniques
- ✓ Pre-configured Jupyter Notebooks in Google Colab
- ✓ Run all code examples in your web browser — works on Windows, macOS, and Linux (no dev environment configuration required!)
- ✓ Access to centralized code repos for all 540+ tutorials on PyImageSearch
- ✓ Easy one-click downloads for code, datasets, pre-trained models, etc.
- ✓ Access on mobile, laptop, desktop, etc.
Summary
In today’s blog post we learned what facial landmarks are and how to detect them using dlib, OpenCV, and Python.
Detecting facial landmarks in an image is a two step process:
- First we must localize a face(s) in an image. This can be accomplished using a number of different techniques, but normally involve either Haar cascades or HOG + Linear SVM detectors (but any approach that produces a bounding box around the face will suffice).
- Apply the shape predictor, specifically a facial landmark detector, to obtain the (x, y)-coordinates of the face regions in the face ROI.
Given these facial landmarks we can apply a number of computer vision techniques, including:
- Face part extraction (i.e., nose, eyes, mouth, jawline, etc.)
- Facial alignment
- Head pose estimation
- Face swapping
- Blink detection
- …and much more!
In next week’s blog post I’ll be demonstrating how to access each of the face parts individually and extract the eyes, eyebrows, nose, mouth, and jawline features simply by using a bit of NumPy array slicing magic.
To be notified when this next blog post goes live, be sure to enter your email address in the form below!

Download the Source Code and FREE 17-page Resource Guide
Enter your email address below to get a .zip of the code and a FREE 17-page Resource Guide on Computer Vision, OpenCV, and Deep Learning. Inside you'll find my hand-picked tutorials, books, courses, and libraries to help you master CV and DL!

