Today’s tutorial is a Python implementation of my favorite blog post by Félix Abecassis on the process of text skew correction (i.e., “deskewing text”) using OpenCV and image processing functions.
Given an image containing a rotated block of text at an unknown angle, we need to correct the text skew by:
- Detecting the block of text in the image.
- Computing the angle of the rotated text.
- Rotating the image to correct for the skew.
We typically apply text skew correction algorithms in the field of automatic document analysis, but the process itself can be applied to other domains as well.
To learn more about text skew correction, just keep reading.
Text skew correction with OpenCV and Python
The remainder of this blog post will demonstrate how to deskew text using basic image processing operations with Python and OpenCV.
We’ll start by creating a simple dataset that we can use to evaluate our text skew corrector.
We’ll then write Python and OpenCV code to automatically detect and correct the text skew angle in our images.
Creating a simple dataset
Similar to Félix’s example, I have prepared a small dataset of four images that have been rotated by a given number of degrees:
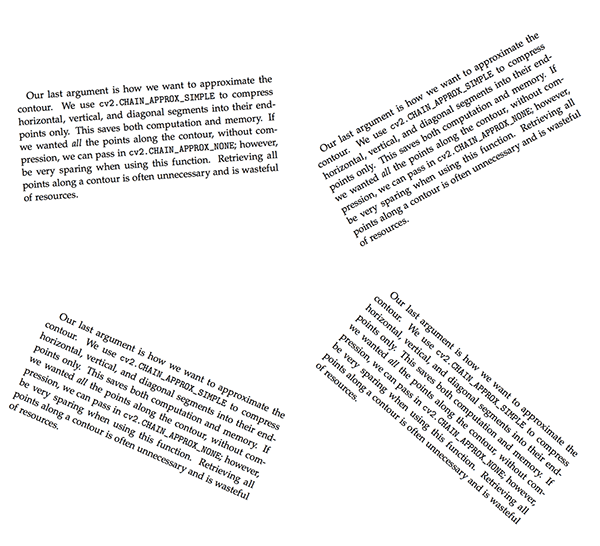
The text block itself is from Chapter 11 of my book, Practical Python and OpenCV, where I’m discussing contours and how to utilize them for image processing and computer vision.
The filenames of the four files follow:
$ ls images/
neg_28.png	neg_4.png	pos_24.png	pos_41.png
The first part of the filename specifies whether our image has been rotated counter-clockwise (negative) or clockwise (positive).
The second component of the filename is the actual number of degrees the image has been rotated by.
The goal our text skew correction algorithm will be to correctly determine the direction and angle of the rotation, then correct for it.
To see how our text skew correction algorithm is implemented with OpenCV and Python, be sure to read the next section.
Deskewing text with OpenCV and Python
To get started, open up a new file and name it correct_skew.py .
From there, insert the following code:
# import the necessary packages
import numpy as np
import argparse
import cv2

# construct the argument parse and parse the arguments
ap = argparse.ArgumentParser()
ap.add_argument("-i", "--image", required=True,
	help="path to input image file")
args = vars(ap.parse_args())

# load the image from disk
image = cv2.imread(args["image"])
Lines 2-4 import our required Python packages. We’ll be using OpenCV via our cv2 bindings, so if you don’t already have OpenCV installed on your system, please refer to my list of OpenCV install tutorials to help you get your system setup and configured.
We then parse our command line arguments on Lines 7-10. We only need a single argument here, --image , which is the path to our input image.
The image is then loaded from disk on Line 13.
Our next step is to isolate the text in the image:
# convert the image to grayscale and flip the foreground
# and background to ensure foreground is now "white" and
# the background is "black"
gray = cv2.cvtColor(image, cv2.COLOR_BGR2GRAY)
gray = cv2.bitwise_not(gray)

# threshold the image, setting all foreground pixels to
# 255 and all background pixels to 0
thresh = cv2.threshold(gray, 0, 255,
	cv2.THRESH_BINARY | cv2.THRESH_OTSU)[1]
Our input images contain text that is dark on a light background; however, to apply our text skew correction process, we first need to invert the image (i.e., the text is now light on a dark background — we need the inverse).
When applying computer vision and image processing operations, it’s common for the foreground to be represented as light while the background (the part of the image we are not interested in) is dark.
A thresholding operation (Lines 23 and 24) is then applied to binarize the image:
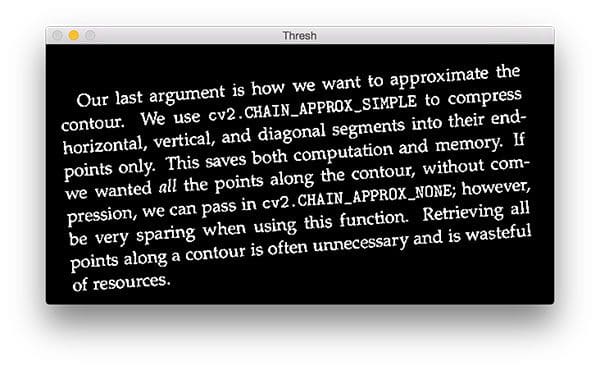
Given this thresholded image, we can now compute the minimum rotated bounding box that contains the text regions:
# grab the (x, y) coordinates of all pixel values that
# are greater than zero, then use these coordinates to
# compute a rotated bounding box that contains all
# coordinates
coords = np.column_stack(np.where(thresh > 0))
angle = cv2.minAreaRect(coords)[-1]

# the `cv2.minAreaRect` function returns values in the
# range [-90, 0); as the rectangle rotates clockwise the
# returned angle trends to 0 -- in this special case we
# need to add 90 degrees to the angle
if angle < -45:
	angle = -(90 + angle)

# otherwise, just take the inverse of the angle to make
# it positive
else:
	angle = -angle
Line 30 finds all (x, y)-coordinates in the thresh image that are part of the foreground.
We pass these coordinates into cv2.minAreaRect which then computes the minimum rotated rectangle that contains the entire text region.
The cv2.minAreaRect function returns angle values in the range [-90, 0). As the rectangle is rotated clockwise the angle value increases towards zero. When zero is reached, the angle is set back to -90 degrees again and the process continues.
Note: For more information on cv2.minAreaRect , please see this excellent explanation by Adam Goodwin.
Lines 37 and 38 handle if the angle is less than -45 degrees, in which case we need to add 90 degrees to the angle and take the inverse.
Otherwise, Lines 42 and 43 simply take the inverse of the angle.
Now that we have determined the text skew angle, we need to apply an affine transformation to correct for the skew:
# rotate the image to deskew it
(h, w) = image.shape[:2]
center = (w // 2, h // 2)
M = cv2.getRotationMatrix2D(center, angle, 1.0)
rotated = cv2.warpAffine(image, M, (w, h),
	flags=cv2.INTER_CUBIC, borderMode=cv2.BORDER_REPLICATE)
Lines 46 and 47 determine the center (x, y)-coordinate of the image. We pass the center coordinates and rotation angle into the cv2.getRotationMatrix2D (Line 48). This rotation matrix M is then used to perform the actual transformation on Lines 49 and 50.
Finally, we display the results to our screen:
# draw the correction angle on the image so we can validate it
cv2.putText(rotated, "Angle: {:.2f} degrees".format(angle),
	(10, 30), cv2.FONT_HERSHEY_SIMPLEX, 0.7, (0, 0, 255), 2)

# show the output image
print("[INFO] angle: {:.3f}".format(angle))
cv2.imshow("Input", image)
cv2.imshow("Rotated", rotated)
cv2.waitKey(0)
Line 53 draws the angle on our image so we can verify that the output image matches the rotation angle (you would obviously want to remove this line in a document processing pipeline).
Lines 57-60 handle displaying the output image.
Skew correction results
To grab the code + example images used inside this blog post, be sure to use the “Downloads” section at the bottom of this post.
From there, execute the following command to correct the skew for our neg_4.png image:
$ python correct_skew.py --image images/neg_4.png
[INFO] angle: -4.086

Here we can see that that input image has a counter-clockwise skew of 4 degrees. Applying our skew correction with OpenCV detects this 4 degree skew and corrects for it.
Here is another example, this time with a counter-clockwise skew of 28 degrees:
$ python correct_skew.py --image images/neg_28.png
[INFO] angle: -28.009
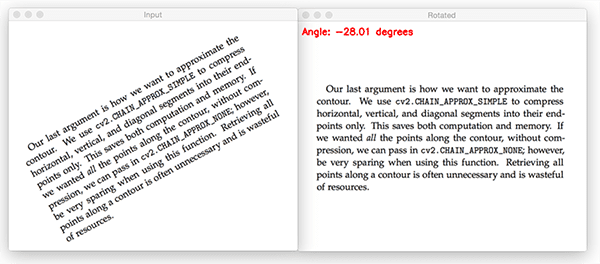
Again, our skew correction algorithm is able to correct the input image.
This time, let’s try a clockwise skew:
$ python correct_skew.py --image images/pos_24.png
[INFO] angle: 23.974
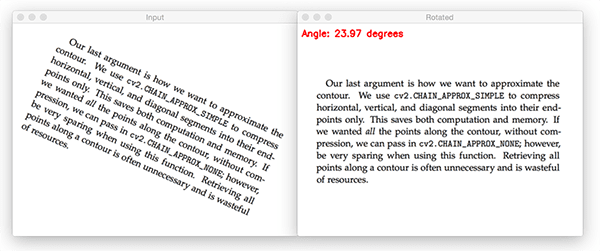
And finally a more extreme clockwise skew of 41 degrees:
$ python correct_skew.py --image images/pos_41.png
[INFO] angle: 41.037
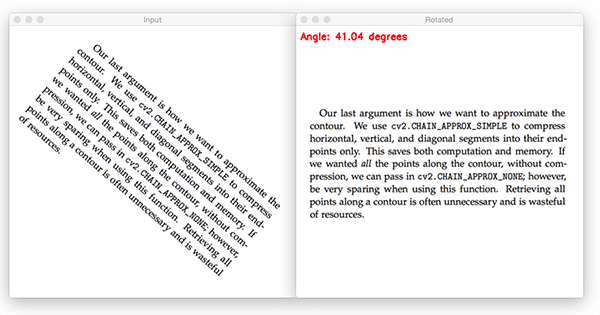
Regardless of skew angle, our algorithm is able to correct for skew in images using OpenCV and Python.
What's next? We recommend PyImageSearch University.
86+ total classes • 115+ hours hours of on-demand code walkthrough videos • Last updated: February 2026
★★★★★ 4.84 (128 Ratings) • 16,000+ Students Enrolled
I strongly believe that if you had the right teacher you could master computer vision and deep learning.
Do you think learning computer vision and deep learning has to be time-consuming, overwhelming, and complicated? Or has to involve complex mathematics and equations? Or requires a degree in computer science?
That’s not the case.
All you need to master computer vision and deep learning is for someone to explain things to you in simple, intuitive terms. And that’s exactly what I do. My mission is to change education and how complex Artificial Intelligence topics are taught.
If you're serious about learning computer vision, your next stop should be PyImageSearch University, the most comprehensive computer vision, deep learning, and OpenCV course online today. Here you’ll learn how to successfully and confidently apply computer vision to your work, research, and projects. Join me in computer vision mastery.
Inside PyImageSearch University you'll find:
- ✓ 86+ courses on essential computer vision, deep learning, and OpenCV topics
- ✓ 86 Certificates of Completion
- ✓ 115+ hours hours of on-demand video
- ✓ Brand new courses released regularly, ensuring you can keep up with state-of-the-art techniques
- ✓ Pre-configured Jupyter Notebooks in Google Colab
- ✓ Run all code examples in your web browser — works on Windows, macOS, and Linux (no dev environment configuration required!)
- ✓ Access to centralized code repos for all 540+ tutorials on PyImageSearch
- ✓ Easy one-click downloads for code, datasets, pre-trained models, etc.
- ✓ Access on mobile, laptop, desktop, etc.
Summary
In today’s blog post I provided a Python implementation of Félix Abecassis’ approach to skew correction.
The algorithm itself is quite straightforward, relying on only basic image processing techniques such as thresholding, computing the minimum area rotated rectangle, and then applying an affine transformation to correct the skew.
We would commonly use this type of text skew correction in an automatic document analysis pipeline where our goal is to digitize a set of documents, correct for text skew, and then apply OCR to convert the text in the image to machine-encoded text.
I hope you enjoyed today’s tutorial!
To be notified when future blog posts are published, be sure to enter your email address in the form below!

Download the Source Code and FREE 17-page Resource Guide
Enter your email address below to get a .zip of the code and a FREE 17-page Resource Guide on Computer Vision, OpenCV, and Deep Learning. Inside you'll find my hand-picked tutorials, books, courses, and libraries to help you master CV and DL!

