
I can’t believe this is the first time I am writing a blog post on GPIO and the Raspberry Pi. It’s a pretty big mistake on my part. I should have written this post much earlier.
You see, on average, I receive 1-3 emails per week along the lines of:
When I use the ‘cv’ virtual environment, I can access my OpenCV bindings. But then I can’t import RPi.GPIO. When I switch out of the virtual environment (and use the system Python), I can use RPi.GPIO, but I can’t import OpenCV. What gives?
The reason for this problem is that RPi.GPIO/GPIO Zero were not installed into your Python virtual environment! To fix this issue, all you need to do is use pip to install them into your virtual environment — from there, you’ll be good to go.
But to be honest with you, I don’t think that’s the real issue here!
The real problem is not having a sufficient understanding of what Python virtual environments are and why we use them. Utilizing Python virtual environments is a best practice that you need to become comfortable with.
In the remainder of this blog post, I’ll gently introduce the concept of Python virtual environments. And from there, we’ll learn how to install RPi.GPIO and GPIO Zero into the same Python virtual environment as our OpenCV bindings, allowing us to access both OpenCV and RPi.GPIO/GPIO Zero at the same time!
Keep reading to find out how…
Accessing RPi.GPIO and GPIO Zero with OpenCV + Python
Before we learn how to (correctly) install RPi.GPIO and GPIO Zero on our Raspberry Pi, we first need to review the concept of Python virtual environments.
If you’ve ever followed one of the Raspberry Pi + OpenCV install tutorials on the PyImageSearch blog, you’ll know that I’m a huge fan of Python virtual environments and recommend them for nearly every project.
However, it seems that I haven’t done a good enough job explaining what Python virtual environments are and why we use them. The following section should help clear up any questions.
What are Python virtual environments?
At the very core, Python virtual environments allow us to create isolated, independent environments for each of our Python projects. This implies that each project can have its own set of dependencies, regardless of which dependencies another project has.
So why in the world would we want to create a virtual environment for each of our projects?
Consider this: Suppose we are software contractors and are hired by a company to develop ProjectA. But before we have completed ProjectA, a second company hires us to develop ProjectB. We notice that both ProjectA and ProjectB have a dependency on LibraryA…but the problem is that ProjectA requires v1.0.0 of LibraryA while ProjectB requires v2.0.0!
This is a real issue for Python because we cannot install two different versions of the same library into the same site-packages directory (i.e., where Python stores 3rd party libraries, such as the ones you download and install from pip , GitHub, etc.).
So, what do we do?
Do we run out to the nearest Apple Store and buy a new MacBook Pro so we can use one laptop to develop ProjectA and the other to develop ProjectB? I really hope not. That would get expensive quick.
Do use a web host like Linode, Digital Ocean, or Amazon EC2 and spin-up a new instance for each project? This is a better solution, and is highly applicable in some cases, but in our specific instance, it’s overkill.
Or do we use Python virtual environments?
You guessed it — we go with Python virtual environments.
In this case, all we need to do is create a virtual environment for each project, that way there is a separate, isolated, and independent environment for all projects:
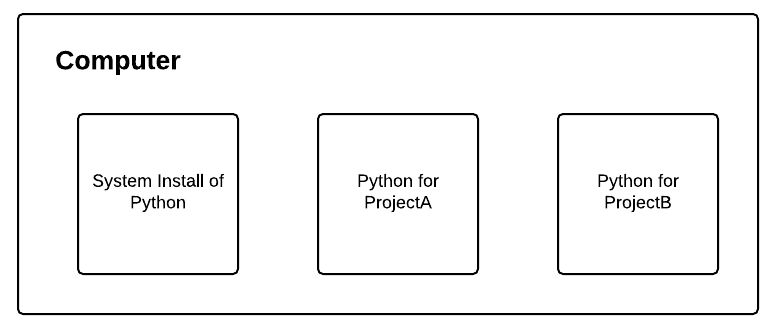
This allows us to install completely different dependencies for ProjectA and ProjectB, ensuring we can finish development of both projects on the same computer.
Pretty neat, right?
Of course, there are many more benefits to using Python virtual environments, but instead of listing them all out, please refer to this excellent Python virtual environments primer on the RealPython blog.
But Adrian, I’m already using Python virtual environments!
If you followed any of the OpenCV install tutorials on the PyImageSearch blog, then you’re already using Python virtual environments.
So how can you find out for sure?
If you need to execute workon <virtual environment name> before executing your Python script to import OpenCV, then guess what, you’re using Python virtual environments.
But here is the real problem…
You probably installed RPi.GPIO and GPIO Zero incorrectly
“Incorrect” is the wrong word to use here — but I needed to get your attention. When you went to install RPi.GPIO or GPIO Zero, I’m willing to bet you used apt-get . Your command probably looked (something) like this:
$ sudo apt-get install python-rpi.gpio python-gpiozero
This command will download RPi.GPIO and GPIO Zero from the official Raspbian package repository and install them on your system.
The problem is that apt-get will install packages into the system install of Python and not your Python virtual environments.
And this is exactly why you run into problems like:
I can import OpenCV in the ‘cv’ virtual environment, but I can’t import RPi.GPIO. On the other hand, I can import RPi.GPIO outside of the ‘cv’ environment, but then I can’t import cv2.
How do you resolve this issue?
You just need to install your libraries into your virtual environment rather than the system version of Python, which can easily be accomplished by workon and pip .
This brings me to my next point:
I do not recommend using apt-get to install Python libraries.
You’re probably thinking, “But Adrian, using apt-get is so easy! It’s just one command and then I’m done!”
I’ve got news for you — using pip is also one command. And it’s just as easy.
To get back to my point, not only will apt-get install these libraries into the system Python (rather than your virtual environment), there is also the issue that apt-get packages are normally a bit out of date.
And guess what happens when you want to install the newest version of a given library?
Hint: You run into the exact problem detailed above — you’ll be trying to install two different versions of the same library into the same site-packages directory, which simply cannot happen (due to how Python works).
Instead, you should be using the Python package manager, pip, to install your Python packages into virtual environments. For more information on pip , how it works, and why we use it, please refer to this article.
Installing RPi.GPIO and GPIO Zero “correctly”
Let’s go ahead and get RPi.GPIO and GPIO zero installed into our Python virtual environment. To start, first use the workon command to enter your Python virtual environment:
$ workon <virtual environment name>
Note: You may need to execute source ~/.profile prior to running the workon command so that the virtual environment startup scripts are loaded.
You can tell you are in a Python virtual environment if the name of the environment appears in parenthesis before your prompt:

In this case, I have entered the cv virtual environment and I can verify this because I see the text “(cv)” before my prompt.
From there, we can let pip install RPi.GPIO and GPIO Zero for us:
$ pip install RPi.GPIO
$ pip install gpiozero
Lastly, let’s test the install and ensure we can import RPi.GPIO, GPIO Zero, and OpenCV together:
$ python
>>> import RPi.GPIO
>>> import gpiozero
>>> import cv2
>>>
Note: I’ve made the assumption that the virtual environment you are using already has OpenCV installed in it. My cv virtual environment has OpenCV already installed, so by using pip to install the RPi.GPIO and gpiozero to install the respective GPIO packages, I’m able to access all three libraries from within the same environment.
Once you can import these libraries in the same environment, we’re ready to move on.
Hardware
For this blog post, I used my Raspberry Pi 3 and the TrafficHAT board, a really cool module for the Raspberry Pi that allows you to get started quickly and easily with GPIO programming:
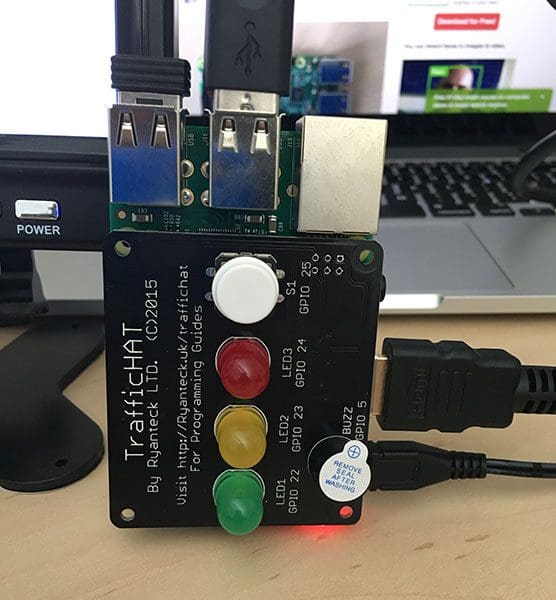
As you can see, the TrafficHAT includes 3 big LED lights, a push-button, and a buzzer.
Note: It’s called a “hat” because we simply need to set it on top of the GPIO pins — no breakout board, extra cables, or soldering is required.
Once we have the TrafficHAT installed on the Raspberry Pi, we can program it using nearly any programming language (provided the language can access the GPIO pins), but for the purposes of this blog post, we’ll be using Python + RPi.GPIO and GPIO Zero.
Using RPi.GPIO + OpenCV
Let’s go ahead and write some code to access the TrafficHAT board using the RPi.GPIO library. We’ll also utilize OpenCV to load an image from file and display it to our screen.
Open up a new file, name it gpio_demo.py , and insert the following code:
# import the necessary packages
import RPi.GPIO as GPIO
import time
import cv2

# load the input image and display it to our screen
print("click on the image and press any key to continue...")
image = cv2.imread("hoover_dam.jpg")
cv2.imshow("Image", image)
cv2.waitKey(0)
print("moving on...")

# set the GPIO mode
GPIO.setmode(GPIO.BCM)

# loop over the LEDs on the TrafficHat and light each one
# individually
for i in (22, 23, 24):
	GPIO.setup(i, GPIO.OUT)
	GPIO.output(i, GPIO.HIGH)
	time.sleep(3.0)
	GPIO.output(i, GPIO.LOW)

# perform a bit of cleanup
GPIO.cleanup()
Lines 2-4 handle importing our required Python packages. We then load the input image from disk and display it to our screen on Lines 8-10. Our script will pause execution until we click on the active image window and press any key on our keyboard.
From there, we loop over each of the LEDs on the TrafficHAT (Line 18). For each of these lights, we:
- Turn the LED light on.
- Wait 3 seconds.
- Turn the light off and continue looping.
To execute gpio_demo.py , make sure you are in the cv virtual environment (or whatever virtual environment you are using to store your OpenCV bindings + GPIO libraries) by using the workon command:
$ workon cv
We can then run the gpio_demo.py script:
$ python gpio_demo.py
As the output image demonstrates, we can see that our hoover_dam.jpg image is displayed to the screen and the green LED lights is shining brightly on the TrafficHAT:

What about root?
But what if we wanted to execute gpio_demo.py as the root user? What do we do then?
We have two options here.
The first option is to use the sudo command inside our Python virtual environment, like this:
$ sudo python gpio_demo.py
Note: Make sure you are in your Python virtual environment before executing your script with sudo ; otherwise, you will not have access to the libraries installed in your virtual environment.
The second option is to launch a root shell, access our Python virtual environment, and then execute the script:
$ sudo /bin/bash
$ source /home/pi/.profile
$ workon cv
$ python gpio_demo.py
Which one is best?
To be honest, it doesn’t really matter.
There are some cases where using sudo is easier. And there are others where it’s nice to simply have a root shell pulled up. Use whichever option you’re more comfortable with — just be careful when executing commands as root!
Using RPI Zero + OpenCV
Now that we’ve explored RPi.GPIO, let’s re-create the same Python script, but this time using the GPIO Zero library. Open up a different file, name it gpiozero_demo.py , and insert the following code:
# import the necessary packages
from gpiozero import TrafficHat
import time
import cv2

# load the input image and display it to our screen
print("click on the image and press any key to continue...")
image = cv2.imread("hoover_dam.jpg")
cv2.imshow("Image", image)
cv2.waitKey(0)
print("moving on...")

# initialize the TrafficHAT, then create the list of lights
th = TrafficHat()
lights = (th.lights.green, th.lights.amber, th.lights.red)

# loop over the lights and turn them on one-by-one
for light in lights:
	light.on()
	time.sleep(3.0)
	light.off()
Lines 2-4 again handle importing our required packages. What’s really interesting here is that the gpiozero library has a TrafficHat class, which enables us to easily interface with the TrafficHAT module.
Lines 8-10 handle loading and displaying our input image to sour screen.
We can then initialize the TrafficHat object and construct the list of lights on Lines 14 and 15.
Finally, Lines 18-21 handle looping over each of the lights , turning each on individually, waiting 3 seconds, and then turning the light off before moving to the next one.
Just like the RPi.GPIO example, we first need to access our Python virtual environment and then execute our script:
$ workon cv
$ python gpiozero_demo.py
As the script executes, we can see an image displayed to our screen and the LEDs lighting up:

Note: To execute this script as root, follow the instructions detailed in the previous section.
What's next? We recommend PyImageSearch University.

86+ total classes • 115+ hours hours of on-demand code walkthrough videos • Last updated: March 2026
★★★★★ 4.84 (128 Ratings) • 16,000+ Students Enrolled
I strongly believe that if you had the right teacher you could master computer vision and deep learning.
Do you think learning computer vision and deep learning has to be time-consuming, overwhelming, and complicated? Or has to involve complex mathematics and equations? Or requires a degree in computer science?
That’s not the case.
All you need to master computer vision and deep learning is for someone to explain things to you in simple, intuitive terms. And that’s exactly what I do. My mission is to change education and how complex Artificial Intelligence topics are taught.
If you're serious about learning computer vision, your next stop should be PyImageSearch University, the most comprehensive computer vision, deep learning, and OpenCV course online today. Here you’ll learn how to successfully and confidently apply computer vision to your work, research, and projects. Join me in computer vision mastery.
Inside PyImageSearch University you'll find:
- ✓ 86+ courses on essential computer vision, deep learning, and OpenCV topics
- ✓ 86 Certificates of Completion
- ✓ 115+ hours hours of on-demand video
- ✓ Brand new courses released regularly, ensuring you can keep up with state-of-the-art techniques
- ✓ Pre-configured Jupyter Notebooks in Google Colab
- ✓ Run all code examples in your web browser — works on Windows, macOS, and Linux (no dev environment configuration required!)
- ✓ Access to centralized code repos for all 540+ tutorials on PyImageSearch
- ✓ Easy one-click downloads for code, datasets, pre-trained models, etc.
- ✓ Access on mobile, laptop, desktop, etc.
Summary
In this blog post, I started by reviewing what Python virtual environments are and why we use them. Simply put, Python virtual environments allow us to create independent, isolated development environments for each project we work on, ensuring we don’t run into version dependency issues. Furthermore, virtual environments allow us to keep our system install of Python clean and tidy.
Once we understood the basics of Python virtual environments, I detailed how to (correctly) install RPi.GPIO and GPIO Zero such that we can access both GPIO libraries and OpenCV at the same time.
We then developed a simple Python script that loads an image from disk using OpenCV, displays it to our screen, and then lights up various LEDs on the TrafficHAT.
In the next blog post, we’ll create a more advanced GPIO + OpenCV script, this time lighting up LEDs and buzzing the buzzer whenever a pre-defined visual action takes place.
Be sure to enter your email address in the form below to be notified when the next blog post goes live, you won’t want to miss it!

Download the Source Code and FREE 17-page Resource Guide
Enter your email address below to get a .zip of the code and a FREE 17-page Resource Guide on Computer Vision, OpenCV, and Deep Learning. Inside you'll find my hand-picked tutorials, books, courses, and libraries to help you master CV and DL!

