# import the necessary packages
from __future__ import print_function
import numpy as np
import cv2

# load the image
image = cv2.imread("mexico.jpg")
Lines 2-4 handle importing our required Python packages.
Line 7 loads our image from disk using the cv2.imread function.
The next step is to loop over various values of alpha transparency between the range [0, 1.0], allowing us to visualize and understand how the alpha value can influence our output image:
# loop over the alpha transparency values
for alpha in np.arange(0, 1.1, 0.1)[::-1]:
	# create two copies of the original image -- one for
	# the overlay and one for the final output image
	overlay = image.copy()
	output = image.copy()

	# draw a red rectangle surrounding Adrian in the image
	# along with the text "PyImageSearch" at the top-left
	# corner
	cv2.rectangle(overlay, (420, 205), (595, 385),
		(0, 0, 255), -1)
	cv2.putText(overlay, "PyImageSearch: alpha={}".format(alpha),
		(10, 30), cv2.FONT_HERSHEY_SIMPLEX, 1.0, (0, 0, 255), 3)
In order to apply the transparent overlay, we need to make two copies of the input image:
- One for the final
outputimage. - And another for the
overlaywe are about to construct.
Using the cv2.rectangle function, we draw a rectangle surrounding myself in the bottom-right corner of the image. We then apply cv2.putText to draw the text PyImageSearch in the top-left corner.
We are now ready to apply the transparent overlay using the cv2.addWeighted function:
	# apply the overlay
	cv2.addWeighted(overlay, alpha, output, 1 - alpha,
		0, output)
The cv2.addWeighted method requires six arguments.
The first is our overlay , the image that we want to “overlay” on top of the original image using a supplied level of alpha transparency.
The second parameter is the actual alpha transparency of the overlay. The closer alpha is to 1.0, the more opaque the overlay will be. Similarly, the closer alpha is to 0.0, the more transparent the overlay will appear.
The third argument to cv2.addWeighted is the source image — in this case, the original image loaded from disk.
We supply the beta value as the fourth argument. Beta is defined as 1 - alpha . We need to define both alpha and beta such that alpha + beta = 1.0 .
The fifth parameter is the gamma value — a scalar added to the weighted sum. You can think of gamma as a constant added to the output image after applying the weighted addition. In this case, we set it to zero since we do not need to apply an addition of a constant value.
Finally, we have the last argument, output , which is the output destination after applying the weighted sum operation — this value is our final output image.
Our last code block handles displaying the final output image to our screen, as well as displaying the relevant alpha and beta values:
	# show the output image
	print("alpha={}, beta={}".format(alpha, 1 - alpha))
	cv2.imshow("Output", output)
	cv2.waitKey(0)
To execute our Python script, download the source code + example image to this post (using the “Downloads” form found at the bottom of this lesson) and execute the following command:
$ python overlay.py
You should see the following image displayed to your screen:
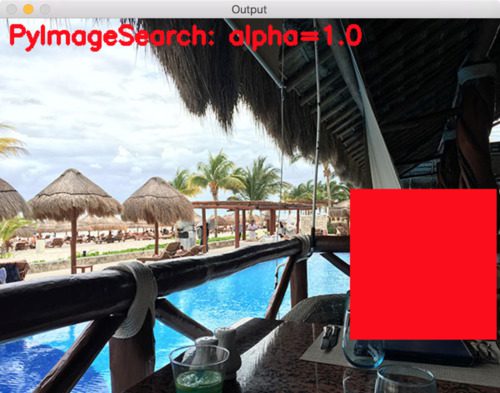
However, once we reach alpha=0.5 , both the “PyImageSearch” text and rectangle are substantially more transparent:

At alpha=0.1 , the text and rectangle are barely visible:
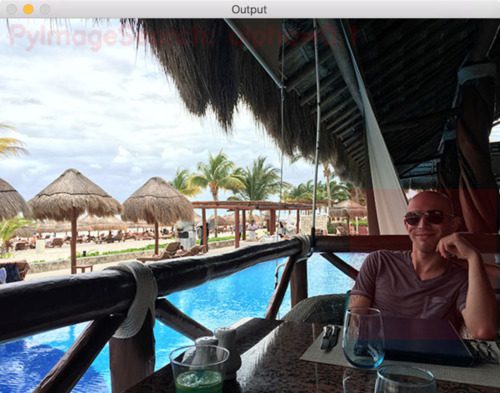
Below you can see a GIF animation that visualizes each of the transparency levels:
What's next? We recommend PyImageSearch University.

86+ total classes • 115+ hours hours of on-demand code walkthrough videos • Last updated: April 2026
★★★★★ 4.84 (128 Ratings) • 16,000+ Students Enrolled
I strongly believe that if you had the right teacher you could master computer vision and deep learning.
Do you think learning computer vision and deep learning has to be time-consuming, overwhelming, and complicated? Or has to involve complex mathematics and equations? Or requires a degree in computer science?
That’s not the case.
All you need to master computer vision and deep learning is for someone to explain things to you in simple, intuitive terms. And that’s exactly what I do. My mission is to change education and how complex Artificial Intelligence topics are taught.
If you're serious about learning computer vision, your next stop should be PyImageSearch University, the most comprehensive computer vision, deep learning, and OpenCV course online today. Here you’ll learn how to successfully and confidently apply computer vision to your work, research, and projects. Join me in computer vision mastery.
Inside PyImageSearch University you'll find:
- ✓ 86+ courses on essential computer vision, deep learning, and OpenCV topics
- ✓ 86 Certificates of Completion
- ✓ 115+ hours hours of on-demand video
- ✓ Brand new courses released regularly, ensuring you can keep up with state-of-the-art techniques
- ✓ Pre-configured Jupyter Notebooks in Google Colab
- ✓ Run all code examples in your web browser — works on Windows, macOS, and Linux (no dev environment configuration required!)
- ✓ Access to centralized code repos for all 540+ tutorials on PyImageSearch
- ✓ Easy one-click downloads for code, datasets, pre-trained models, etc.
- ✓ Access on mobile, laptop, desktop, etc.
Summary
In this blog post, we learned how to construct transparent overlays using Python, OpenCV, and the cv2.addWeighted function.
Future blog posts will use this transparent overlay functionality to draw Heads-up Displays (HUDs) on output images, and to make outputs more aesthetically appealing.

Download the Source Code and FREE 17-page Resource Guide
Enter your email address below to get a .zip of the code and a FREE 17-page Resource Guide on Computer Vision, OpenCV, and Deep Learning. Inside you'll find my hand-picked tutorials, books, courses, and libraries to help you master CV and DL!

