So in last week’s blog post we discovered how to construct an image pyramid.
And in today’s article, we are going to extend that example and introduce the concept of a sliding window. Sliding windows play an integral role in object classification, as they allow us to localize exactly “where” in an image an object resides.
Utilizing both a sliding window and an image pyramid we are able to detect objects in images at various scales and locations.
In fact, both sliding windows and image pyramids are both used in my 6-step HOG + Linear SVM object classification framework!
To learn more about the role sliding windows play in object classification and image classification, read on. By the time you are done reading this blog post, you’ll have an excellent understanding on how image pyramids and sliding windows are used for classification.
What is a sliding window?
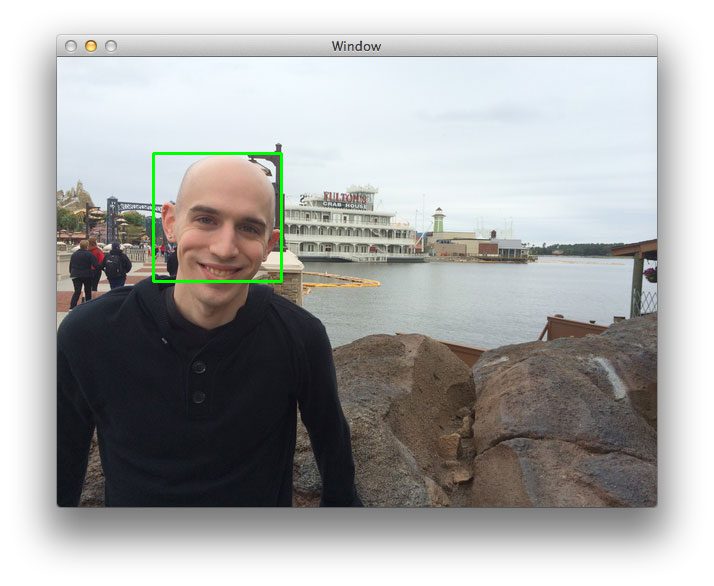
In the context of computer vision (and as the name suggests), a sliding window is a rectangular region of fixed width and height that “slides” across an image, such as in the following figure:
For each of these windows, we would normally take the window region and apply an image classifier to determine if the window has an object that interests us — in this case, a face.
Combined with image pyramids we can create image classifiers that can recognize objects at varying scales and locations in the image.
These techniques, while simple, play an absolutely critical role in object detection and image classification.
Sliding Windows for Object Detection with Python and OpenCV
Let’s go ahead and build on your image pyramid example from last week.
But first ensure that you have OpenCV and imutils installed:
- Install OpenCV with one of my guides
- To install
imutils, use pip:pip install --upgrade imutils
Remember the helpers.py file? Open it back up and insert the sliding_window function:
# import the necessary packages
import imutils

def pyramid(image, scale=1.5, minSize=(30, 30)):
	# yield the original image
	yield image

	# keep looping over the pyramid
	while True:
		# compute the new dimensions of the image and resize it
		w = int(image.shape[1] / scale)
		image = imutils.resize(image, width=w)

		# if the resized image does not meet the supplied minimum
		# size, then stop constructing the pyramid
		if image.shape[0] < minSize[1] or image.shape[1] < minSize[0]:
			break

		# yield the next image in the pyramid
		yield image

def sliding_window(image, stepSize, windowSize):
	# slide a window across the image
	for y in range(0, image.shape[0], stepSize):
		for x in range(0, image.shape[1], stepSize):
			# yield the current window
			yield (x, y, image[y:y + windowSize[1], x:x + windowSize[0]])
The sliding_window function requires three arguments. The first is the image that we are going to loop over. The second argument is the stepSize .
The stepSize indicates how many pixels we are going to “skip” in both the (x, y) direction. Normally, we would not want to loop over each and every pixel of the image (i.e. stepSize=1 ) as this would be computationally prohibitive if we were applying an image classifier at each window.
Instead, the stepSize is determined on a per-dataset basis and is tuned to give optimal performance based on your dataset of images. In practice, it’s common to use a stepSize of 4 to 8 pixels. Remember, the smaller your step size is, the more windows you’ll need to examine.
The last argument windowSize defines the width and height (in terms of pixels) of the window we are going to extract from our image .
Lines 24-27 are fairly straightforward and handle the actual “sliding” of the window.
Lines 24-26 define two for loops that loop over the (x, y) coordinates of the image, incrementing their respective x and y counters by the provided step size.
Then, Line 27 returns a tuple containing the x and y coordinates of the sliding window, along with the window itself.
To see the sliding window in action, we’ll have to write a driver script for it. Create a new file, name it sliding_window.py , and we’ll finish up this example:
# import the necessary packages
from pyimagesearch.helpers import pyramid
from pyimagesearch.helpers import sliding_window
import argparse
import time
import cv2

# construct the argument parser and parse the arguments
ap = argparse.ArgumentParser()
ap.add_argument("-i", "--image", required=True, help="Path to the image")
args = vars(ap.parse_args())

# load the image and define the window width and height
image = cv2.imread(args["image"])
(winW, winH) = (128, 128)
On Lines 2-6 we import our necessary packages. We’ll use our pyramid function from last week to construct our image pyramid. We’ll also use the sliding_window function we just defined. Finally we import argparse for parsing command line arguments and cv2 for our OpenCV bindings.
Lines 9-12 handle parsing our command line arguments. We only need a single switch here, the --image that we want to process.
From there, Line 14 loads our image off disk and Line 15 defines our window width and height to be 128 pixels, respectfully.
Now, let’s go ahead and combine our image pyramid and sliding window:
# loop over the image pyramid
for resized in pyramid(image, scale=1.5):
	# loop over the sliding window for each layer of the pyramid
	for (x, y, window) in sliding_window(resized, stepSize=32, windowSize=(winW, winH)):
		# if the window does not meet our desired window size, ignore it
		if window.shape[0] != winH or window.shape[1] != winW:
			continue

		# THIS IS WHERE YOU WOULD PROCESS YOUR WINDOW, SUCH AS APPLYING A
		# MACHINE LEARNING CLASSIFIER TO CLASSIFY THE CONTENTS OF THE
		# WINDOW

		# since we do not have a classifier, we'll just draw the window
		clone = resized.copy()
		cv2.rectangle(clone, (x, y), (x + winW, y + winH), (0, 255, 0), 2)
		cv2.imshow("Window", clone)
		cv2.waitKey(1)
		time.sleep(0.025)
We start by looping over each layer of the image pyramid on Line 18.
For each layer of the image pyramid, we’ll also loop over each window in the sliding_window on Line 20. We also make a check on Lines 22-23 to ensure that our sliding window has met the minimum size requirements.
If we were applying an image classifier to detect objects, we would do this on Lines 25-27 by extracting features from the window and passing them on to our classifier (which is done in our 6-step HOG + Linear SVM object detection framework).
But since we do not have an image classifier, we’ll just visualize the sliding window results instead by drawing a rectangle on the image indicating where the sliding window is on Lines 30-34.
Results
To see our image pyramid and sliding window in action, open up a terminal and execute the following command:
$ python sliding_window.py --image images/adrian_florida.jpg
If all goes well you should see the following results:
Here you can see that for each of the layers in the pyramid a window is “slid” across it. And again, if we had an image classifier ready to go, we could take each of these windows and classify the contents of the window. An example could be “does this window contain a face or not?”
Here’s another example with a different image:
$ python sliding_window.py --image images/stick_of_truth.jpg.jpg
Once again, we can see that the sliding window is slid across the image at each level of the pyramid. High levels of the pyramid (and thus smaller layers) have fewer windows that need to be examined.
What's next? We recommend PyImageSearch University.

86+ total classes • 115+ hours hours of on-demand code walkthrough videos • Last updated: April 2026
★★★★★ 4.84 (128 Ratings) • 16,000+ Students Enrolled
I strongly believe that if you had the right teacher you could master computer vision and deep learning.
Do you think learning computer vision and deep learning has to be time-consuming, overwhelming, and complicated? Or has to involve complex mathematics and equations? Or requires a degree in computer science?
That’s not the case.
All you need to master computer vision and deep learning is for someone to explain things to you in simple, intuitive terms. And that’s exactly what I do. My mission is to change education and how complex Artificial Intelligence topics are taught.
If you're serious about learning computer vision, your next stop should be PyImageSearch University, the most comprehensive computer vision, deep learning, and OpenCV course online today. Here you’ll learn how to successfully and confidently apply computer vision to your work, research, and projects. Join me in computer vision mastery.
Inside PyImageSearch University you'll find:
- ✓ 86+ courses on essential computer vision, deep learning, and OpenCV topics
- ✓ 86 Certificates of Completion
- ✓ 115+ hours hours of on-demand video
- ✓ Brand new courses released regularly, ensuring you can keep up with state-of-the-art techniques
- ✓ Pre-configured Jupyter Notebooks in Google Colab
- ✓ Run all code examples in your web browser — works on Windows, macOS, and Linux (no dev environment configuration required!)
- ✓ Access to centralized code repos for all 540+ tutorials on PyImageSearch
- ✓ Easy one-click downloads for code, datasets, pre-trained models, etc.
- ✓ Access on mobile, laptop, desktop, etc.
Summary
In this blog post, we learned all about sliding windows and their application to object detection and image classification.
By combining a sliding window with an image pyramid we are able to localize and detect objects in images at multiple scales and locations.
While both sliding windows and image pyramids are very simple techniques, they are absolutely critical in object detection.
You can learn more about the more global role they play in this blog post, where I detail my framework on how to use the Histogram of Oriented Gradients image descriptor and a Linear SVM classifier to build a custom object detector.

Download the Source Code and FREE 17-page Resource Guide
Enter your email address below to get a .zip of the code and a FREE 17-page Resource Guide on Computer Vision, OpenCV, and Deep Learning. Inside you'll find my hand-picked tutorials, books, courses, and libraries to help you master CV and DL!

hey Adrian, wonderful article. Just wondering about when you say “Remember, the larger your step size is, the more windows you’ll need to examine.” . Shouldn’t this be “the smaller the stepsize, the more windows”?
Maybe i misunderstood something, but it looks to me as if each sliding window would move of pixels, so – as you say a few lines above that comment – having a stepSize=1 makes it prohibitive.
Thanks for the article
Hey Joe, you’re absolutely right. Thanks for catching that typo. I have updated it now. Thanks again!
hey adrian you have provided step by step guide to install opencv in linux and mac os can you provide it for windows
Sorry, no. I only officially support Linux and macOS here on the PyImageSearch blog. If you intend on following along with my tutorials I highly suggest you use Linux or macOS.
Hi Adrian,
I have had some discussions with you in other topic threads. Your tutorials has helped me create a object detector though in C++ with ease.
I am new to this object recognition field. I was wondering other than sliding window for object search in the image space, what other methods are there. One of the biggest issue for me in Sliding Window is that incrementing the sliding window by small pixel margin gives the best results (say about 50 – 75% overlap to the previous window). In a normal image frame this is quite exhaustive search.
I am just curious if there are other better or faster method for object search?
There are indeed other methods to using sliding windows, but the sliding window is pretty much the “default”. Take a look at the comments of this post to see a discussion of some faster variants of the standard sliding window.
However, I will say that the exhaustive image search is actually a good thing. If our classifier is working correctly, then it will provide positive classifications for regions surrounding our object. We can then apply non-maxima suppression to select only the most probable bounding box.
hi Adrian
i am working on HOG descriptor i train svm on 64*128 positive negative images output is good but i have a problem in large image human detection so u can help me because i start research in computer vission
If the human you are trying to detect is substantially larger than your 64×128 window, then you should apply an image pyramid. This way the image becomes smaller at each layer of the pyramid, while your 64×128 window remains fixed, allowing you to detect larger objects (in this case, humans).
Thanks for the wonderful article!
I am wondering that I should change each of the step size when the resolution of the image changes because of image pyramid.
Thanks in advance.
No, the step size of the sliding window normally stays constant across levels of the image pyramid.
Thank you!
Can I ask one more?
Should I calculate the entire hog features for each image of different resolution?
I am assuming the following steps.
1) calculate HOG features of the original image
2) collect regions that have high similarities (ROI) into a list or something
3) resize the original image (down-size)
4) calculate HOG features again
…
..
n) Draw rectangles by referring to the list.
And plus, how do I extract original location of ROI in down-sized images?
Thank you very much!
I think reading this post on using HOG and Linear SVM for object detection should really help you out and answer all your questions 🙂
Wow, what great examples. Thanks. I have a question. Let’s say you have a classifier with K classes and you call the classifier for each of the N sliding windows on the current image. You essentially have a matrix with N rows and K columns. How do you process that matrix in some sensible way to report which windows have a meaningful object in them?
You would simply maintain a list of bounding boxes for each of the unique classes reported by the SVM. From there, you would apply non-maxima suppression for each set of bounding boxes.
Adrian, I have a question about your NMS logic. I applied a classifier to each of N sliding windows. I then extracted the subset of windows associated with class = 1 and passed them through the NMS. There was only 2 instances of object 1 in the FOV. Their dimension is approximately 280×200. The sliding window was 140×100. This is also the size of patches that I trained with. I was expecting the NMS to “merge” the 140×100 windows into a bounding box that more closely approximated the 280×200 of the actual objects. The NMS reported 5 objects and not 2.
Am I using the NMS wrong? I can’t train on images that are 280×200 because I want to be able to identify the object when it is sliding out of the FOV. That is why I extracted a bunch of random 140×100 patches from the 280×200 object and trained that way.
NMS is meant to merge overlapping bounding boxes, either based on their spatial dimensions, or the probability returned by your SVM (where higher probabilities are preferred over the lower ones). If your bounding boxes are not overlapping, then NMS will not suppress them. From your comment, it’s not clear if bounding boxes were overlapping?
Yes, the boxes were overlapping. (I wish there was a way to embed a graphic in these comments, it would be easier to describe the situation.)
Let me ask the question a different way. If you train your classifier with images that are 140×100 (these are random subsets of the 280×200 target image), how do you get a bounding box around the target image with the NMS?
If you want like to include an image, I would suggest uploading the image to Imgur and then posting the link in the comment.
As for the bounding boxes, please see my previous comment. You would take the entire set of bounding boxes and apply NMS based on either (1) the bounding box coordinates (such as the bottom-right corner) or (2) the probability associated with the bounding box.
Again, NMS isn’t used to actually generate the bounding box surrounding an object, it’s used to suppress bounding boxes that have heavy overlap.
Hmmm .. ok. The distinction seems subtle. Is it fair to say that the bounding box (with a target size of 280×200) is just the union of the 140×100 boxes in physical proximity to each other that overlap some small amount?
I’m not sure I understand your question. If you can provide visual examples, I can try to answer further.
Hey Adrian,
I have been reading your blogs recently and they are very helpful for my work. However I am still not able to figure out, how I am going to train the SVM for the classification.
I got to detect humans in image so I am using INRIA dataset for training but i can’t figure out one issue that in one image I can see many persons. Right now I am just taking the hog features of the whole image once its resized to certain dimensions and then send it to train svm. But the data contains multiple human images not only single one. So can you please help me out here. Also it would be great if you can make a small post on training svm too for this object detection part.
Thanks in advance
You mentioned resizing your image to a fixed size, extracting HOG features, and then passing it to your SVM — this is partly correct, but you’re missing a few critical steps. To start, I would suggest reading through a description of the entire HOG + Linear SVM pipeline.
Instead, you need to utilize a sliding window (detailed in this post). This window is a fixed size that “slides” across your input image. At each stop along the window, you extract HOG features, and then pass them to your SVM for classification. In this way, you can detect not only a single person but multiple people at various locations in image. Combined with an image pyramid, you can recognize objects both multiple scales AND multiple locations.
As for a source code implementation of such an object detector, please see the PyImageSearch Gurus course, where I detail how to code an object detector in detail.
Hey Adrian,
Excellent post. This is really helpful and straightforward. Thanks!
I’m glad you found it helpful Mohamed! 🙂
Hi Adran,
I have encountered one issue during my project concerning the object detection. What if there are rotated versions of the object we would like to detect ?
What would be the best approach ta tackle this ? Would you use rotated versions of the sliding windows ? Or would you define rotated versions of the image containing the object (And probably rotated version of the object) as the image pyramids for scaling ?
Thanks !
Rotated objects can be a real pain in the ass to detect, depending on your problem. I would suggest training a detector for each rotated version of your image. Or better yet, try to utilize algorithms that are more invariant to changes in rotation. Keypoint detection and local invariant descriptors tend to work well here as well.
Thanks for your response Adrian 🙂
Yes, I think using algorithms that are invariant to changes in rotation is a good approach.
Concerning my problem, here is a link to a screen shot to the image where I have my rotated objects: https://drive.google.com/file/d/0B9xjuFiZNvo4RHg1RnEyNjlSUlU/view?usp=sharing. The goal is to detect the footprints in the image.
Thanks!
Why not just apply a dilation or closing morphological operation to close the gaps in between the footprints? From there, thresholding and contour detection will give you the footprint regions.
When we run our classifier on sliding windows then it will fetch many bounding boxes.I want to show these bounding boxes on the original image. How to change the coordinates of the bounding boxes from the different sized windows to the original scale to be shown on the original window.
Hey Farah — I assume you’re also talking about using image pyramids as well? As the image pyramid code demonstrates, you can keep track of the current scale of the pyramid and use that to give you the location of the
Sir to get to the original scale should I multiply the coordinates by the respective scaling factor used in resizing the window i.e if I am downscaling by 1.5 in both x and y direction then I just multiply the bounding boxes coordinates at this layer by 1.5.
Hey Farah — please see my previous comment. If you’re using sliding windows in conjunction with image pyramids, you need to keep track of ratio of the original image height to the current pyramid height. You can use this scale to multiply the bounding box coordinates and obtain them for the original image size. I cover this in more detail PyImageSearch Gurus.
In this case, if you resize your image to be 1.5x smaller than the original, then yes, you would multiply your bounding boxes (obtained by the new, resized image) by this 1.5 factor to obtain the coordinates relative to the original image.
Thanks Adrian for resolving my query
Hi Adrian,
Nice post !
I was wondering if the sliding window could be parallelised ? With a classifier which has a really low false positive rate and if the search need to be exhaustive, I feel sliding window is the best option. But say for a very large image it will be very slow. So if the sliding can be parallelised so that a list will have all the detections ( the order in which they get appended does not matter for NMS) , won’t it help speed up the detection process ?
What do you think ? Do you know of such an implementation ?
Yes, you can absolutely make the sliding window run in parallel. However, I instead recommend making the image pyramid run in parallel such that you have one process running for each of the layers of the pyramid. If you are only processing a small set of pyramid layers (or just one layer), then yes, absolutely make the sliding window run in parallel.
I don’t have any implementations of this, but I do review how to build your own custom object detector inside the PyImageSearch Gurus course.
Hi
The code executed without errors for 2 images
but nothing was shown
any advice?
Can you elaborate on what you mean by “executed without error but nothing was shown”? I’m not sure I understand what you mean.
Hi, Adrian.
I am wondering why the sliding window function does not give an “out of bound” error when “(x + winW) > image.shape[1]”?
Thanks for the sharing, your website is very inspiring and helpful.
NumPy automatically prevents the out of bound error by treating the index as an array slice. If you try to slice an array past the actual bounds of the array, it simply returns all the elements along that dimension.
Hi Adrian,
One doubt when i have an image pyramid i get the same image in different scales. Now from each of these images i get using the sliding window classifier say 3 images. Now how to choose between these images that i get in different levels of the pyramid.
Example: Pyramid i have 400X400(original size);200X200;100X100
From each i run a sliding window of 40X40
I get 40X40 from first one
80X80 from the second one(after scaling back to original size)
160X160 from the third one
Your sliding window should always be the same fixed size — the sliding window size does not change. It’s the image pyramid itself that allows you to detect objects at different scales of the image. The sliding window simply allows you to detect objects at different locations.
But how do i select between images of different scales was my question. If my sliding window gives 1 image in every level of the pyramid. How do i choose between these images?
I’m not sure what you mean by “select”. At each pyramid scale, and at each position of the sliding window you would extract your features and pass them on to your model for classification. You then apply non-maxima suppression across all levels to obtain your final detection. I detail the entire HOG + Linear SVM pipeline here. You then review the code in detail inside the PyImageSearch Gurus course.
Dont you apply non maximal suppression on each level separately?
Because if you apply across all levels then you are comparing between bounding boxes of different sizes.
No, NMS is only applied after all bounding boxes are applied across all layers of the image pyramid. You resize each of your detected bounding boxes based on the ratio of the original image size to the current image size. This ensures that all bounding boxes are recorded at the same scale even though you are working with multiple scales of the image.
Hey,
Have been working on object detection, I was wondering why can’t we vary the window size instead of varying the image size(image pyramid).
Any drawbacks with that?
Thanks in advance!!!
Consider the HOG image descriptor which is commonly used for sliding windows and image pyramid. The size of the image/ROI passed into the HOG descriptor is influenced by the input image size. If you change the sliding window size, you change the output dimensionality of the descriptor. If all descriptors do not have the same dimensionality then you can’t apply a machine learning model to them.
Because of this, the sliding window tends to be a fixed parameter in the model.
Hey,
My object detector (based on hog+svm) takes around 40-50 seconds to give the final result for a 1360×800 input image, with a 40×40 window size and step size 3×3-this is when i’ve done the computation for different scales parallely,creating threads. Is there any other way to speed up the process? Can we run this code on a GPU instead of using the CPU?
You can push the computation to the GPU, but you would need to recode using C++. The Python + OpenCV bindings do not have access to the GPU.
Nice article! But, can you tell me how to parse my camera? i want to try it with my camera frame by frame. Thanks!
Hey Levy — can you elaborate more on what you mean by “parse” your camera?
Hey, Can you suggest me some packages to implement the same using R.
Hello Adrian, This article was very useful to me, good job.
I applied texture analysis (GLCM) on satellite image using a sliding window (wnize=32) with a step size (step=32). I set a window size in order to make my scrip bit faster. The dimensions of the image is 250 x 200. After running the script, The final image was 8 x 6 (250/32, 200/32) due to the step size. I do not want to have a subset of the image though,
By applying a step size, Is it possible to get the initial image back instead of a subset of it?
I would appreciate any help
thank you
Hi Ioannis — thanks for the comment, although I’m not sure I understand your question. Can you elaborate on what you mean by the “initial image back”?
HI Adrian, I am trying to build HOG based detector small confusion I have regarding scale factor say if I have scale factor = 1.03 that means at every step i have to reduce it by 3% percent . So If I have 648 * 460 image and min size I am putting 32 * 32 so I have to reduce the image by 3 percent every time until width (480) reduces to 32 or less. but it is creating a pyramid of approx 25 images. or more and each image from the bottom has more than 40000 patches is stride = 2 ; and over all time is coming to extract all the features is approx 1 second.
WHAT WRONG I AM DOING ?
Hi,Adrian!
you are such amazing!!! you tutorial helped me a lot and I now I come across a problem…..I trained a ‘XML’ classfier by myself and wanted to load it by setSVMDetector( )’, It failed, I searched the internet and was told this function, setSVMDetector( ), only accepts a np.array as input…May I ask How can I transfer my XML file to a Numpy.array?
Thanks so much..SO SO SO SO MUCH!
It’s been a long time since I’ve used OpenCV to train a custom detector by scratch so I’m not sure what the solution is. Normally I recommend using a combination of OpenCV + scikit-learn to build your own detector, as detailed in the PyImageSearch Gurus course.
can sliding window be used for detecting multiple objects in a single image?
Yes, that is the intended usage of sliding windows and image pyramids. At each step you extract features and pass them through your classifier. The classifier will report if there is an object there with a certain probability. This works with multiple objects as well. I detail the HOG + Linear SVM object detection framework in more detail inside the PyImageSearch Gurus.
Hi Adrian.
I’m a new user in python.
I run the code but it doesnt work.
How to solve that? Thanks
usage: sliding_window.py [-h] -i IMAGE
sliding_window.py: error: the following arguments are required: -i/–image
Please read up on command line arguments and how to use them.
What should be the modification in the code if I want to detect multiple shapes like circle and rectangle ?
That really depends on your input image. I actually have an entire blog post on shape detection here.
Thank you for the article, it helped me a lot to understand and visualize sliding windows!
I’m glad it helped you, Robert! 🙂
Thank you for this article!
I would like to save the window images as a tiff image. So i would be abble to insert it in a PPT presentation for my Master thesis. Could somebody explain me how to do this
thanks in advance for your help!
gif image (sorry)
Hi, Adrian.
I have an issue that using this sliding window, I detect 1 object as 3 objects.
For example:
I want to detect back view of a car.
But what I detect is the side of car (left light), the middle of car (car license plate), and the other side of car (right light).
So It detects a car as 3 objects.
How to merge that 3 objects into 1 object?
Thanks.
You need to apply non-maxima suppression. It’s entirely normal for an object detector to report multiple bounding boxes around a single object. This is why we apply NMS.
Hello Adrian! Thanks for your lovely post. when I run “args = vars(ap.parse_args())” . I got the following error.
usage: [-h] -i IMAGE
: error: the following arguments are required: -i/–image
Any idea why am i getting this? I am using Anaconda 3, python 3.6
Please read on on command line arguments. Thank you!
Is this code applicable on .tif raster image? I need to read pixel values in moving slide of 5 by 5 window and analyze abnormal distribution of pixel value within neighbourhood pixels.
OpenCV can load .tif files provided you have the TIFF library installed when you compiled + installed OpenCV.
Thank you for replying. I don’t understand “from pyimagesearch.helpers import pyramid”. what is pyimagesarch.helpers? what should i use on that place if i want to use the same code? i tried it with “import pyramid” but it is giving an error “module object is not callable” when i called it in a loop.
pyimagesearch.helpersis a module. Make sure you use the “Downloads” section of this blog post to download the code associated with the tutorial.Getting up and running with this code requires a bit of Python and programming knowledge. If you’re new to Python, no worries, I put together some resources to help learn Python, but you’ll definitely want to get up to speed with Python before trying to run this code.
Hi Adrian,
Suppose I have an image with many people in it I would like to detect the people not for identifying their personality but only detect the people. So I was wondering how to draw windows of variable sizes on the picture just to identify humans.
It sounds like you need a face detector.
Hi Adrian,
Thanks for the great post! I am just confused about why you choose to vary the image scale to build a image pyramid rather than vary the windowsize to scale the origin-sized image?
sorry, vary the windowsize to scan the orign-sized image:)
Typically sliding windows and image pyramids are used with the HOG + Linear SVM detector. The output dimensionality of a HOG feature vector is a function of its parameters and the size of the input ROI. If you change the size of the ROI, you get a different size feature vector. For this reason you typically keep the same size window. If you’re interested in how object detectors work, be sure to take a look at the PyImageSearch Gurus course where I discuss them in more detail.
Hi adrian
I an just a new intersed man:)
But i cant run this code in pycharm because of this two line:
from pyimagesearch.helpers import pyramid
from pyimagesearch.helpers import sliding_windows
************
Make sure you use the “Downloads” section of this blog post to download the code. Then add the files to your PyCharm project and ensure PyCharm can find them.
please provide a tutorial on the object detection part also.I am one of your audience who watches most of your tutorial over and over again and try to implement most of it currently i am at the sliding window part and dont have that much knowledge to implement the detection parat on my own.i am not able to affort your book or course also so please provide the detection part also
HI. Thanks For the Article. It is very helpful.
Can you please tell me how to apply machine learning classifier to it.
Thank You
Hey Jaiden, I discuss the fundamentals of HOG + Linear SVM detectors in this post. I then discuss how to code, implement, and train your own detectors in the PyImageSearch Gurus course.
how can i use this sliding window in case of ECG image, to recognize a period of heartbeat ?
Sorry, I don’t have much experience with ECG images — I would need to see an example.
Hi Adrian, Thank you for the nice tutorial. How can I implement this into a video? Instead of giving the path to an image I might have to direct it to a frame,but then how can I make sure the window slides over the whole frame before it take the next frame, Wouldn’t that be a faster process and window would miss covering the whole frame?
thank you!
I would suggest you take a look at the PyImageSearch Gurus course where I show you how to properly use sliding windows for object detection in both images and video.
That’s great, thanks!
Thanks Felipe, I’m glad you liked it!
Hello Adrian, I’ve been thinking, can this be applied to trading charts through a brokers website?
PS
Thank you so much for the article
That depends, what exactly are you trying to detect? Are you trying to detect the actual charts on the brokers website? Wouldn’t it be easier to just scrape the values of the stocks instead?
Hi! Your article was super helpful. I am new to Python though, and I am wondering if you could create a sliding window across two images that are the same size at once? I need to compare the two images through a window at the same location and I am not sure how to iterate through both of them using this sliding window tutorial.Thanks!
If it’s any help at all for understanding’s sake, I am trying to implement my own version of scikit image’s compare_ssim. Any advice would be appreciated!
Yes, but you would need to modify the code a bit. Having the sliding window accept two images, then have your “for” loops loop over the images. At each iteration extract the ROIs for each image and then compare them.
Hello Adrian ,
Can sliding window be used with convolutional neural netwok. I want to detect objects in an image, but i have trained the network with images of size (128, 128) and if i want to want to use the sliding window in a larger image, it gives me errors of dimensions. Do you think it is a good idea to do object detection using CNN+ sliding window?
Hi Ken — I teach you how to use CNNs originally trained for classification and instead use them for object detection inside Deep Learning for Computer Vision with Python. The short answer is yes, you can, but again, refer to the book for more details.
Hello Ken,
Have you tried implementing Sliding Window with CNN?
Please help me, to implement the same.
Implementing a Sliding Window with a CNN is covered inside the Practitioner Bundle of Deep Learning for Computer Vision with Python.
This one Amazing Post. Thanks so much.. PYIMAGESEARCH THE BEST OF THE WORLD.
Thanks, I’m glad you enjoyed it! 🙂
Hi, Adrian Great post!
I would need to know which mathematical expression translates the sliding window used in this tutorial?
I’m not sure what you mean by “mathematical expression” — could you elaborate on your question here?
Hi, I am just starting with machine learning/ object detection
Do you have any guide where you use sliding window and crop out portions of images of the image the sliding window is being used in and saves all those cropped images?
Thanks
Yes. That is covered inside the PyImageSearch Gurus course.