
Table of Contents
- Building Multimodal AI Applications with Gemma 4 and Transformers
- Configuring Your Development Environment
- Installing Python Dependencies and Importing Gemma 4 Multimodal Libraries
- Loading the Gemma 4 Multimodal Model with Hugging Face Transformers
- Screenshot-to-Code Generation with Gemma 4 Vision-Language AI
- Video Understanding and Multimodal Reasoning with Gemma 4
- Multimodal Function Calling with Gemma 4
- Object Detection and Visual Grounding with Gemma 4
- Image Captioning with Gemma 4 Vision-Language Models
- Audio Understanding with Gemma 4
- Summary
Building Multimodal AI Applications with Gemma 4 and Transformers
In the first part of this series, we explored the architecture behind Gemma 4: the interleaved attention design, Mixture-of-Experts routing, multimodal encoders, Per-Layer Embeddings, and the engineering decisions that allow the model family to scale from smartphones to large GPU servers. We also looked at the different variants, hardware requirements, benchmarks, and the reasoning capabilities that make Gemma 4 one of the most compelling open-weight model releases today.
But architecture alone does not tell the full story.
The real question for most developers is simple: how do we actually use Gemma 4 in practice?
That is what this second part focuses on. Instead of discussing theory, we will build directly with the model using Hugging Face Transformers. We will see how Gemma 4 handles images, videos, audio, structured tool calling, object detection, screenshot-to-code generation, and multimodal reasoning, all from a single unified interface.
One of the most interesting things about Gemma 4 is that the workflow stays surprisingly consistent across tasks. Whether we are passing a webpage screenshot, an audio clip, or a video file, the overall pipeline barely changes:
- Define the multimodal message.
- Process it using the Gemma processor.
- Generate outputs from the model.
- Decode and parse the response.
Once this pattern becomes familiar, building multimodal applications starts feeling much more approachable.
In this lesson, we will go section by section through the notebook and explain not just what the code is doing, but why each step matters. Along the way, we will also connect the implementation back to the architectural ideas from Part 1, showing how concepts (e.g., multimodal encoders, thinking mode, and structured outputs) appear in real inference pipelines.
This lesson is the 2nd in a 5-part series on Google DeepMind’s Gemma 4:
- Google DeepMind’s Gemma 4: MoE, Efficiency Tricks, and Benchmarks
- Building Multimodal AI Applications with Gemma 4 and Transformers (this tutorial)
- Lesson 3
- Lesson 4
- Lesson 5
To learn how to build multimodal applications with Gemma 4, just keep reading.

Would you like immediate access to 3,457 images curated and labeled with hand gestures to train, explore, and experiment with … for free? Head over to Roboflow and get a free account to grab these hand gesture images.
Configuring Your Development Environment
To follow this guide, you need to have the following libraries installed on your system.
!pip install -q -U transformers
This command installs the latest version of the transformers library.
Here:
-Uupgrades the package to the newest available version-qenables quiet mode to reduce unnecessary installation logs
Using the latest version is important because Gemma 4 support, multimodal processors, and newer generation features are included in recent releases of the library.
The transformers package gives us access to:
- Pretrained Gemma 4 checkpoints
- Multimodal processors
- Tokenization utilities
- Chat templates
- Text generation APIs
Need Help Configuring Your Development Environment?
All that said, are you:
- Short on time?
- Learning on your employer’s administratively locked system?
- Wanting to skip the hassle of fighting with the command line, package managers, and virtual environments?
- Ready to run the code immediately on your Windows, macOS, or Linux system?
Then join PyImageSearch University today!
Gain access to Jupyter Notebooks for this tutorial and other PyImageSearch guides pre-configured to run on Google Colab’s ecosystem right in your web browser! No installation required.
And best of all, these Jupyter Notebooks will run on Windows, macOS, and Linux!
Installing Python Dependencies and Importing Gemma 4 Multimodal Libraries
After configuring the environment, the next step is importing all the required libraries. These imports provide everything needed for loading Gemma 4, processing multimodal inputs, generating outputs, and visualizing results.
import re
import json
import torch
import matplotlib.pyplot as plt
import matplotlib.patches as patches

from PIL import Image
from transformers.image_utils import load_image
from transformers import AutoModelForMultimodalLM, AutoProcessor
We first import Python’s built-in re and json libraries. The re library is used for regular expression operations. Later in the lesson, we use it while parsing structured outputs such as bounding box predictions returned by the model.
The json library helps us work with JSON responses generated by Gemma 4. This becomes especially useful for tasks (e.g., object detection and function calling), where the model produces structured outputs instead of plain text.
Next, we import PyTorch. PyTorch is the deep learning framework powering the model inference pipeline. Hugging Face Transformers internally relies on PyTorch tensors for:
- Token representations
- Model weights
- GPU computation
- Generation operations
Almost every operation inside Gemma 4 inference eventually runs through PyTorch.
We then import Matplotlib utilities. These libraries are used for visualization. In the object detection section later in the lesson, we will draw predicted bounding boxes on images using rectangle patches.
Next, we import PIL. PIL (Python Imaging Library) is widely used for image loading and manipulation in Python applications. It helps us work with image files before sending them into the model.
We also import load_image. This utility simplifies image loading directly from URLs or local paths. Instead of manually downloading and preprocessing images, we can load them with a single function call.
Finally, we import the 2 most important components from Transformers.
AutoModelForMultimodalLM loads the Gemma 4 multimodal model itself. Since Gemma 4 can process text, images, video, and audio, we use the multimodal model interface instead of a text-only causal language model.
AutoProcessor handles preprocessing for all supported modalities. It prepares:
- Text tokens
- Image embeddings
- Audio features
- Video inputs
- Chat templates
into the format expected by Gemma 4.
Together, these imports form the foundation for the rest of the lesson. Once these libraries are loaded, we are ready to initialize the model and begin multimodal inference.
Loading the Gemma 4 Multimodal Model with Hugging Face Transformers
Now that the environment and dependencies are ready, we can load the Gemma 4 model and its processor.
model_id = "google/gemma-4-E2B-it"
model = AutoModelForMultimodalLM.from_pretrained(model_id, device_map="auto")
processor = AutoProcessor.from_pretrained(model_id)
We first define the model checkpoint: google/gemma-4-E2B-it.
Here, we are using the instruction-tuned Gemma-4-E2B-it variant. The it suffix stands for instruction tuned, meaning the model has been optimized for conversational and task-following behavior.
The Gemma 4 E2B model is also one of the smaller Gemma 4 variants, making it practical for experimentation and multimodal inference without requiring extremely large GPU memory. As discussed in the first part of this series, the E-series models are specifically designed for efficient deployment while still supporting text, image, video, and audio understanding.
Next, we load the model itself. The from_pretrained() method downloads the pretrained weights directly from Hugging Face and initializes the model architecture automatically.
The important argument here is: device_map="auto". This tells Transformers to automatically decide where the model should be loaded:
- GPU if CUDA is available
- CPU otherwise
For larger models, this can also distribute layers across multiple GPUs automatically. In our case, it simplifies deployment because we do not need to manually move tensors or model weights between devices.
Finally, we load the processor. The processor is responsible for preparing multimodal inputs before they are passed into Gemma 4.
This includes:
- Tokenizing text
- Processing images
- Handling audio inputs
- Formatting video data
- Applying the correct chat template
One of the biggest advantages of the processor API is consistency. Whether we send text, images, video, or audio into the model, the processor converts everything into the exact format expected by Gemma 4 internally.
At this point, both the model and processor are fully initialized, and we are ready to begin multimodal inference tasks.
Screenshot-to-Code Generation with Gemma 4 Vision-Language AI
One of the most impressive capabilities of Gemma 4 is multimodal code generation. Instead of giving the model only text prompts, we can provide an image of a webpage and ask it to generate the corresponding HTML code.

We begin by defining the multimodal conversation input:
messages = [
   {
       "role": "user",
       "content": [
           {
               "type": "image",
               "image": "https://github.com/PyImageSearch/assets/blob/main/images/landing-page-1.png?raw=true",
           },
           {"type": "text", "text": "Write HTML code for this page."},
       ],
   }
]
Here, the input follows a chat-style structure. Each message contains:
- A
role - A
contentfield
The content itself is a list because Gemma 4 supports multiple modalities within the same conversation turn.
The first content item is the webpage screenshot. This tells the processor that the input modality is an image. Instead of manually downloading and preprocessing the image ourselves, we simply provide the URL.
The second content item is the text instruction. This prompt guides the model toward the task we want it to perform.
Together, the image and text become a unified multimodal input. Gemma 4 processes both inputs simultaneously, allowing it to reason about the webpage layout visually while generating HTML code as output.
inputs = processor.apply_chat_template(
   messages,
   tokenize=True,
   return_dict=True,
   return_tensors="pt",
   add_generation_prompt=True,
   enable_thinking=True,
).to(model.device)
Next, we prepare the inputs using the processor. This is one of the most important steps in the entire workflow.
The apply_chat_template() function converts the multimodal conversation into the exact format expected by Gemma 4 internally.
Let us break down the major arguments.
tokenize=True: converts the processed input into tokens that the model can understandreturn_tensors="pt": tells the processor to return PyTorch tensors instead of Python listsreturn_dict=True: returns a structured dictionary containing all required tensors instead of returning only token IDsadd_generation_prompt=True: appends the assistant generation marker so the model knows it should begin generating a responseenable_thinking=True: activates Gemma 4’s thinking mode. As discussed in Part 1, thinking mode encourages the model to internally reason through the problem before producing the final answer.
Finally, we move all tensors onto the same device as the model. This ensures inference runs correctly on either CPU or GPU.
output = model.generate(**inputs, max_new_tokens=4000)
Once the inputs are ready, we generate the output. The generate() function performs autoregressive decoding and produces the model response token by token. max_new_tokens=4000 sets the maximum generation length. Since HTML generation can produce large outputs, we allow a relatively high token budget.
input_len = inputs.input_ids.shape[-1]
generated_text_ids = output[0][input_len:]
generated_text = processor.decode(generated_text_ids, skip_special_tokens=True)
Next, we extract only the generated portion of the response. This step is necessary because the generated output contains:
- The original input tokens
- The newly generated tokens
We remove the input portion and keep only the generated response. We then decode the generated token IDs back into readable text. The skip_special_tokens=True argument removes internal formatting tokens that are not useful for display.
result = processor.parse_response(generated_text)

print(result["content"])
Next, we parse the model response. This converts the raw generated text into a cleaner structured format. Finally, we print the generated HTML output.
Output
At this stage, Gemma 4 produces HTML code that attempts to recreate the webpage shown in the screenshot.
This example demonstrates one of the most exciting aspects of multimodal language models: the ability to translate visual layouts directly into working code. Instead of treating images and programming as separate domains, Gemma 4 combines visual understanding and code generation into a single inference pipeline.
thought
Here's a thinking process that leads to the suggested HTML code:
1.  **Analyze the Request:** The user wants HTML code for the provided image (a website screenshot/design).
2.  **Deconstruct the Image (Identify Key Components & Structure):**
    *   **Header/Navigation Bar:**
        *   Logo: "YOURLOGO" (Top left).
        *   Navigation Links: "Home," "Company," "Services," "Contact."
        *   Icon: Search/Magnifying glass (Top right).
    *   **Hero Section/Main Content Area:**
        *   *Visual Element (Left/Center):* A stylized illustration of a woman celebrating, surrounded by stars, planets, and dots.
        *   *Text/Headline (Right):*
            *   Headline: "Creative Ideas" (Large, orange/bold).
            *   Subheadline/Tagline: "A Studio based in New York, US."
            *   Body Text: "Solutions of design in modern era, consectetur adipiscing elit, sed diam nonummy nibh euismod tincidunt ut laoreet dolore magna aliquam erat volutpat." (Placeholder text).
        *   *Call to Action (CTA):* A button labeled "SUBSCRIBE" (Dark/Maroon).
        *   *Social Media Icons:* Facebook, Instagram, Twitter (Small icons below the CTA).
...
...
We can see that Gemma 4 not only understands the webpage visually, but also reasons through its structure before generating the final code. The model identifies components such as the navigation bar, hero section, buttons, and social icons, and then converts them into structured HTML and CSS.
Interestingly, the output also includes responsive styling, layout organization, practical implementation notes, and even a dedicated section explaining how to use the generated code. We followed the same instructions provided by Gemma 4 to run the generated HTML and CSS files, and the resulting webpage closely matched the original design shown in the input image.

Video Understanding and Multimodal Reasoning with Gemma 4
After testing image understanding and code generation, we can move one step further and evaluate Gemma 4 on video reasoning tasks.
messages = [
   {
       "role": "user",
       "content": [
           {"type": "video", "url": "https://huggingface.co/datasets/merve/vlm_test_images/resolve/main/concert.mp4"},
           {"type": "text", "text": "What is happening in the video? What is the song about?"},
       ],
   },
]
Here, instead of providing an image, we provide a video file as input.
The first content block defines the video source. This tells the processor that the input modality is a video rather than an image or audio clip.
The second content block contains the text instruction. This prompt asks the model to reason about:
- The visual scene
- The event taking place
- The semantic meaning of the song
This is important because the model is not simply captioning individual frames. It is performing multimodal reasoning across both temporal and audio information.
inputs = processor.apply_chat_template(
   messages,
   tokenize=True,
   return_dict=True,
   return_tensors="pt",
   add_generation_prompt=True,
   load_audio_from_video=True,
).to(model.device)
Next, we process the multimodal input. Most of the arguments are similar to the previous example, but there is one important addition here:
load_audio_from_video=Trueflag tells the processor to extract the audio stream from the video alongside the visual frames.
As discussed in the first part of this series, the smaller Gemma 4 E-series models support audio understanding in addition to image and text reasoning.
This means the model can jointly analyze:
- Video frames
- Speech
- Music
- Ambient sounds
instead of relying only on visual information.
In practice, this allows Gemma 4 to answer richer questions about videos, such as:
- Understanding spoken dialogue
- Identifying music genres
- Inferring emotional tone
- Explaining events happening in the scene
output = model.generate(**inputs, max_new_tokens=200)
Once the inputs are prepared, we generate the output. Here, max_new_tokens=200 limits the response length. Since video descriptions are usually shorter than HTML generation tasks, a smaller token budget is sufficient.
input_len = inputs.input_ids.shape[-1]
generated_text_ids = output[0][input_len:]
generated_text = processor.decode(generated_text_ids, skip_special_tokens=True)
result = processor.parse_response(generated_text)
After generation, we extract only the generated portion of the sequence. Just as before, this removes the original input tokens and keeps only the newly generated response.
Next, we decode the generated tokens back into readable text. We then parse the response into a cleaner structure.
print(result["content"])
Finally, we print the generated output.
Output
At this stage, Gemma 4 analyzes the concert video and produces a multimodal interpretation of the scene.
This example highlights an important capability of Gemma 4: unified video understanding. Instead of requiring separate models for:
- Video captioning
- Audio transcription
- Scene understanding
- Semantic reasoning
Gemma 4 performs these tasks inside a single multimodal inference pipeline.
Based on the video, here is what is happening:
**What is happening in the video?**
The video captures a live concert performance on a large stage. We see a band performing, with musicians playing instruments (guitars, drums, etc.) under bright stage lights and dramatic blue and white lighting, including significant smoke/fog effects. In the foreground, there is a crowd of people watching the show, with several audience members visible from behind. The energy of the performance seems high, as suggested by the lighting and the engagement of the audience.
**What is the song about?**
The provided lyrics are:
> "I'm falling on the street
> From neck to chest
> Could it be that moments
> Another one I want to be is
> In the storm alone
> I've been all alone
> I never want to see
> Oh this nice sad place you was given fate
> I don't want it
Multimodal Function Calling with Gemma 4
One of the most powerful capabilities introduced in modern language models is function calling. Instead of generating only plain text responses, the model can decide when to invoke external tools and generate structured arguments for them.
In this example, we combine:
- Vision understanding
- Reasoning
- Tool usage
inside a single multimodal workflow.
WEATHER_TOOL = {
   "type": "function",
   "function": {
       "name": "get_weather",
       "description": "Gets the current weather for a specific location.",
       "parameters": {
           "type": "object",
           "properties": {
               "city": {"type": "string", "description": "The city name"},
           },
           "required": ["city"],
       },
   },
}
tools = [WEATHER_TOOL]
We first define a weather tool schema. This structure describes the external tool available to the model. The tool definition contains several important components.
First, we specify the tool type: "type": "function" tells Gemma 4 that the tool represents a callable function.
Next, we define the actual function metadata. "name": "get_weather" is the function name the model will reference when generating tool calls. We also provide a natural language description. This helps the model understand what the tool does and when it should be used.
Next comes the parameter schema. This follows a JSON-style schema format. Here, the function expects a single required argument:
city
The model will later generate this parameter automatically based on the image and user request. We then place the tool into a list. This allows multiple tools to be passed into the model if needed.
messages = [
   {"role": "user", "content": [
       {"type": "image", "image": "https://huggingface.co/datasets/merve/vlm_test_images/resolve/main/venice.jpg"},
       {"type": "text", "text": "What is the city in this image? Check the weather there right now."},
   ]},
]
Next, we define the multimodal user input.
This input combines:
- An image
- A reasoning instruction
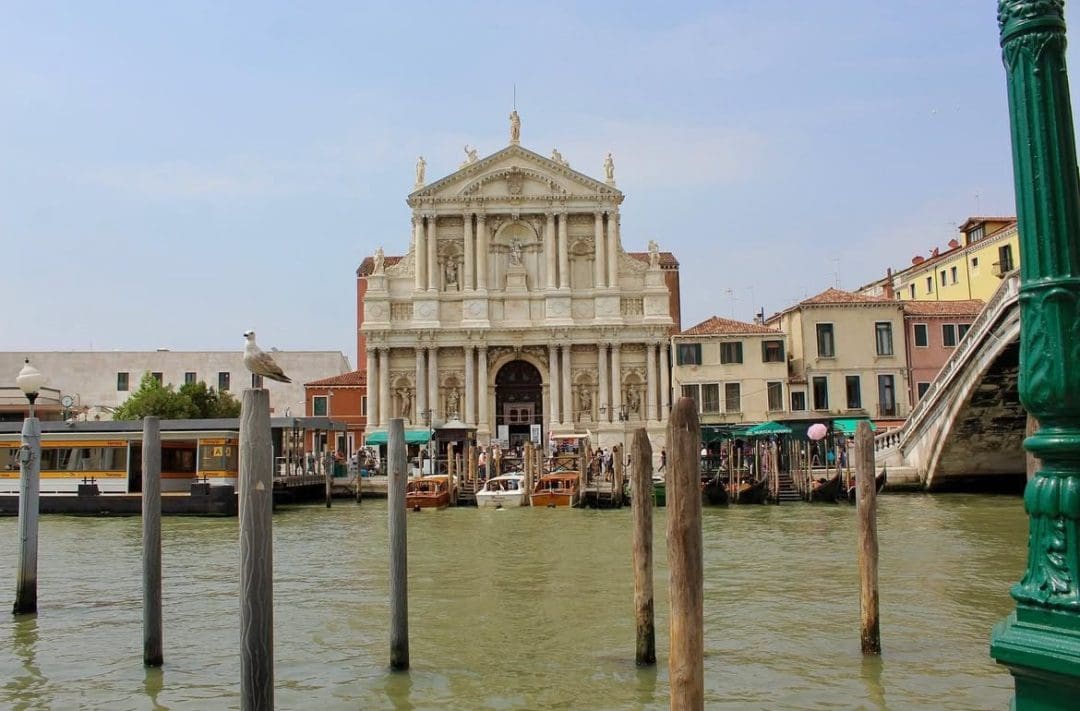
The image contains a photograph of Venice, while the text prompt asks the model to:
- Identify the city
- Use the weather tool for that location
This is important because the model must first perform visual reasoning before it can invoke the function correctly.
inputs = processor.apply_chat_template(
   messages,
   tools=[WEATHER_TOOL],
   tokenize=True,
   return_dict=True,
   return_tensors="pt",
   add_generation_prompt=True,
   enable_thinking=True,
).to(model.device)
Next, we prepare the inputs.
The major addition here is: tools=[WEATHER_TOOL]
This injects the available tool schema directly into the prompt context. Gemma 4 now knows:
- Which tools exist
- What each tool does
- Which parameters are required
We also enable reasoning mode again: enable_thinking=True
This helps the model reason through the sequence:
- Analyze image
- Infer city
- Decide tool usage
- Generate function arguments
output = model.generate(**inputs, max_new_tokens=1000)
After processing the inputs, we generate the output. Since function-calling outputs can include reasoning traces and structured responses, we allow a larger token budget.
input_len = inputs.input_ids.shape[-1]
generated_text_ids = output[0][input_len:]
generated_text = processor.decode(generated_text_ids, skip_special_tokens=True)
result = processor.parse_response(generated_text)
Next, we extract only the generated tokens. We then decode the generated response. After decoding, we parse the structured response.
print(result["content"])
Finally, we print the generated output.
Output
At this stage, Gemma 4 identifies the city from the image and generates a structured tool call for retrieving the weather.
This is the input image:
This is the generated output:
thought
Here's a thinking process to arrive at the desired response:
1.  **Analyze the Request:** The user has provided an image and asked two questions:
    *   "What is the city in this image?"
    *   "Check the weather there right now."
2.  **Analyze the Image:**
    *   The image shows a large, ornate building situated on the water, with boats and other buildings in the background.
    *   The architecture strongly resembles famous Italian landmarks, specifically those found in Venice (bridges, canals, specific facade styles).
    *   The presence of a canal setting is a huge clue.
3.  **Identify the Location (Inference/Knowledge Retrieval):**
    *   The architecture points strongly toward Venice, Italy.
    *   The specific building looks like a prominent structure in Venice (e.g., a church or palace facade).
4.  **Determine the Necessary Tool Call:**
    *   The user wants the weather for the identified city.
    *   The available tool is `get_weather(city: STRING)`.
5.  **Formulate the Plan:**
    *   **Step 1:** State the identified city.
    *   **Step 2:** Call the `get_weather` tool with the identified city.

6.  **Execute Step 1 (Internal Check):** The city is Venice.
7.  **Execute Step 2 (Tool Call Generation):**
    *   Call: `get_weather(city="Venice")`
8.  **Final Output Generation:** Since I need to call a tool, I must output the tool call first. (Self-Correction: I cannot give the weather *yet*; I must request the tool execution.)call:get_weather{city:Venice}
This example demonstrates why multimodal function calling is so powerful. The model is no longer limited to passive question answering. Instead, it can:
- Observe visual information
- Reason about the task
- Select external tools
- Generate structured arguments
This forms the foundation for agentic AI systems where multimodal models interact with application programming interfaces (APIs), databases, and external applications dynamically.
Object Detection and Visual Grounding with Gemma 4
Beyond captioning and reasoning, Gemma 4 can also perform structured visual localization tasks such as object detection and pointing. Instead of generating only natural language descriptions, the model can return bounding box coordinates for objects inside an image.
image_url = "https://huggingface.co/datasets/merve/vlm_test_images/resolve/main/bird.png"
image = load_image(image_url)
We begin by loading the image. Here, load_image() downloads the image directly from the URL and converts it into a format suitable for further processing.
def resize_to_48_multiple(image):
   w, h = image.size
   new_w = (w // 48) * 48
   new_h = (h // 48) * 48
   return image.crop((0, 0, new_w, new_h))
Next, we define a preprocessing helper function. This function adjusts the image dimensions so both height and width become multiples of 48.
We first extract the original image dimensions. Next, we compute the nearest lower multiples of 48. The // operator performs integer division. This effectively rounds the dimensions downward to the nearest valid multiple.
Finally, we crop the image. This preprocessing step helps ensure compatibility with the vision encoder and patch processing pipeline used internally by Gemma 4. Since transformer-based vision models often process images in fixed patch sizes, maintaining aligned dimensions simplifies inference.
def inputs_for_object_detection(image, what_object):
   messages = [
       {
           "role": "user", "content": [
               {"type": "image", "image": image},
               {"type": "text", "text": f"What's the bounding box for the {what_object} in the image?"}
           ]
       }
   ]

   inputs = processor.apply_chat_template(
       messages,
       tokenize=True,
       add_generation_prompt=True,
       return_dict=True,
       return_tensors="pt",
       enable_thinking=False,
   )

   return inputs.to(model.device)
Next, we define the function that prepares the object detection prompt. This function takes:
- The input image
- The target object name
and constructs the multimodal request.
Inside the function, we first define the chat-style message. The image is passed directly as part of the multimodal input.
The text prompt dynamically inserts the target object name using an f-string. For example, if:
what_object = "bird"
the final prompt becomes:
"What's the bounding box for the bird in the image?"
This allows the same pipeline to work for many different object categories without changing the core logic.
Next, we process the multimodal request. Most of the arguments are familiar from earlier examples, but one important detail here is: enable_thinking=False
Unlike reasoning-heavy tasks (e.g., code generation or function calling), object detection is primarily a localization task. Disabling thinking mode helps keep the output concise and focused on structured bounding box predictions instead of extended reasoning traces.
The processor then:
- Tokenizes the text prompt
- Encodes the image
- Applies the correct chat template
- Converts everything into PyTorch tensors
Finally, we move the tensors onto the same device as the model.
def extract_json(text: str):
   text = text.strip()

   text = re.sub(r"^```(?:json)?\s*", "", text)
   text = re.sub(r"\s*```$", "", text)

   # Try direct parse first
   try:
       return json.loads(text)
   except json.JSONDecodeError:
       pass

   # Fallback: extract first JSON object or array
   match = re.search(r'(\{.*\}|\[.*\])', text, re.DOTALL)
   if match:
       candidate = match.group(1)
       return json.loads(candidate)

   raise ValueError("No valid JSON found")
After preparing the object detection inputs, the next step is running inference, extracting the structured bounding box predictions, and visualizing the detected object on the image.
We first define a helper function for parsing the model response.
The generated output from Gemma 4 is usually returned as text, even when it contains structured JSON. This function cleans and extracts the JSON portion safely.
We first remove unnecessary whitespace. Next, we remove markdown-style code fences if they exist.
Sometimes models return outputs such as:
[
 {
   "box_2d": [...]
 }
]
These regular expressions remove the surrounding Markdown formatting so the remaining content becomes valid JSON.
Next, we attempt direct JSON parsing. If the response is already valid JSON, this step succeeds immediately.
However, model outputs are not always perfectly formatted. Sometimes, additional explanation text appears before or after the JSON block. To handle that, we add a fallback mechanism. This searches for the first JSON object {} or JSON array [] inside the generated response.
If a match is found: we extract and parse only the JSON portion.
Finally, if no valid JSON is detected, the function raises an error.
This helper function is important because structured outputs from multimodal models can sometimes contain extra formatting or reasoning traces. Robust parsing makes downstream processing much more reliable.
def detect_object(image_url, what_object):
   image = load_image(image_url)
   image = resize_to_48_multiple(image)
   inputs = inputs_for_object_detection(image, what_object)
   input_len = inputs["input_ids"].shape[-1]
   generated_outputs = model.generate(**inputs, max_new_tokens=1000, do_sample=False)
   generated = processor.decode(generated_outputs[0, input_len:])
   parsed_json = extract_json(generated)[0]
   return parsed_json
Next, we define the main object detection function. This function performs the complete detection pipeline.
We first load and preprocess the image. Next, we prepare the detection inputs. We then compute the input sequence length. This helps us later separate the generated response from the original prompt tokens.
Next comes inference. Here:
max_new_tokens=1000: sets the generation limitdo_sample=False: enables deterministic decoding
Deterministic decoding is useful here because object detection requires stable structured outputs rather than creative variations.
Next, we decode only the generated portion. We then extract the structured JSON response.
The model typically returns a list of detections, so [0] selects the first detection result.
Finally, we return the structured detection dictionary.
def draw_pascal_voc_boxes(i, image, box, label, resize_shape=(1000,1000)):
   dpi = 72
   width, height = image.size
   fig, ax = plt.subplots(1, figsize=[width/dpi, height/dpi], tight_layout={'pad':0})

   ax.imshow(image)

   ymin, xmin, ymax, xmax = box
   re_h, re_w = resize_shape if resize_shape is not None else (height, width)
   xmin = (xmin / re_w) * width
   ymin = (ymin/ re_h) * height
   xmax = (xmax / re_w) * width
   ymax = (ymax/ re_h) * height

   w = xmax - xmin
   h = ymax - ymin

   rect = patches.Rectangle(
       (xmin, ymin),
       w,
       h,
       linewidth=10,
       edgecolor="green",
       facecolor="none"
   )
   ax.add_patch(rect)

   if label is not None:
       ax.text(xmin, ymin-25, label, fontsize=24, bbox=dict(facecolor="yellow", alpha=0.5))

   plt.axis("off")
   plt.savefig(f"boxes_{i}.png")
   plt.close(fig)
   display(fig)
Next, we define the visualization function. This function draws the predicted bounding box on top of the image.
We first create a Matplotlib figure. Then we display the image. Next, we unpack the bounding box coordinates.
Gemma 4 returns normalized coordinates relative to a 1000 × 1000 coordinate grid. We therefore rescale them back to the original image dimensions.
We then compute the bounding box width and height. Next, we create the rectangle overlay. This draws a green bounding box around the detected object. The rectangle is then added onto the image. If a label exists, we also display the object name.
Finally, we save and display the result.
def display_detected_object(image_url, what_object):
   image = load_image(image_url)
   image = resize_to_48_multiple(image)
   detection = detect_object(image_url, what_object)
   box = detection["box_2d"]
   label = detection.get("label", f"{what_object}")
   draw_pascal_voc_boxes("1000", image, box, label)
Next, we define a helper wrapper function. This combines:
- Image loading
- Detection
- Visualization
into one simple pipeline.
We first run object detection. Then extract the returned bounding box and label.
Finally, we visualize the prediction.
display_detected_object("https://huggingface.co/datasets/merve/vlm_test_images/resolve/main/bird.png", "bird")
We can now run the complete pipeline.
Output
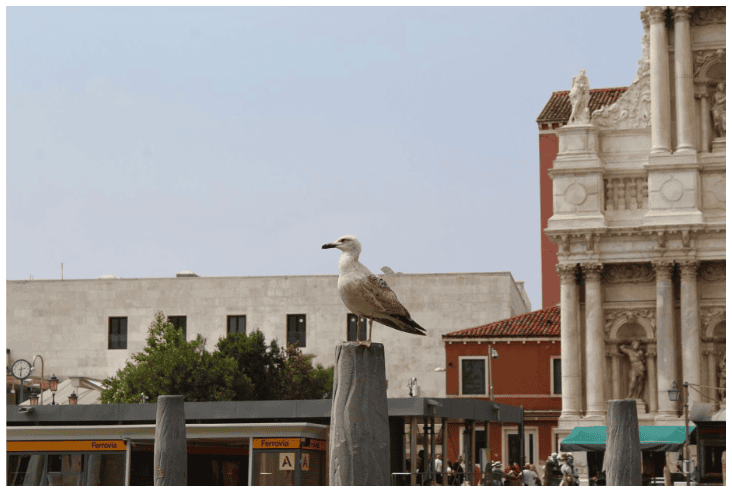
At this stage, Gemma 4 identifies the bird in the image, predicts the bounding box coordinates, and overlays the detection visually.
This is the input image:
This is the output image:
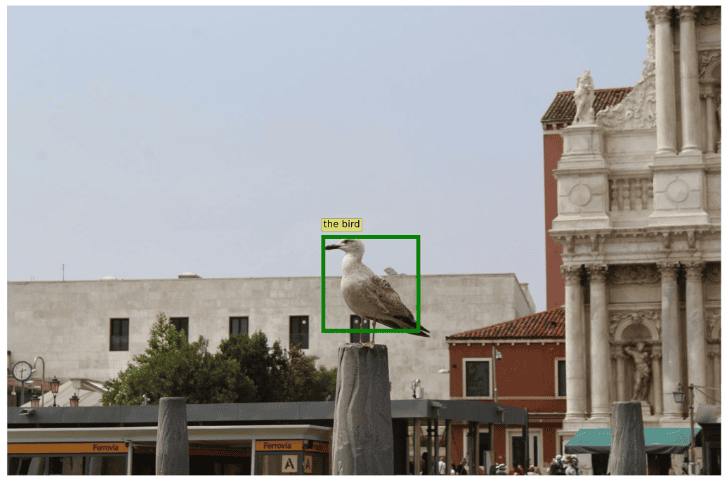
This example demonstrates that Gemma 4 is not limited to text generation or captioning. It can also produce structured spatial predictions, enabling workflows such as:
- Object localization
- Visual grounding
- UI element detection
- Document understanding
- Interactive visual reasoning
Image Captioning with Gemma 4 Vision-Language Models
Image captioning is one of the most fundamental multimodal tasks for vision-language models. In this example, we ask Gemma 4 to observe an image and generate a detailed natural language description of the scene.
messages = [
   {
       "role": "user",
       "content": [
           {"type": "image", "url": "https://huggingface.co/datasets/merve/vlm_test_images/resolve/main/mosque.jpg"},
           {"type": "text", "text": "Write single detailed caption for this image."},
       ],
   },
]
We first define the multimodal input message. The input contains 2 parts:
- An image
- A text instruction
The image block specifies the image URL. This tells the processor to load the image and prepare it for the vision encoder inside Gemma 4.
Next, we provide the captioning instruction. The wording of the prompt matters here. Since we request a single detailed caption, the model focuses on generating one coherent descriptive sentence instead of multiple fragmented observations.
inputs = processor.apply_chat_template(
   messages,
   tokenize=True,
   return_dict=True,
   return_tensors="pt",
   add_generation_prompt=True,
).to(model.device)
Next, we process the multimodal input.
This step converts the image and text into the structured format expected by Gemma 4.
The processor internally handles:
- Image preprocessing
- Tokenization
- Prompt formatting
- Tensor creation
output = model.generate(**inputs, max_new_tokens=512)
After preprocessing, we generate the caption. Here, max_new_tokens=512 sets the maximum response length. Captioning tasks generally require fewer tokens than HTML generation or reasoning-heavy workflows, but we still allow enough space for detailed descriptions.
input_len = inputs.input_ids.shape[-1]
generated_text_ids = output[0][input_len:]
generated_text = processor.decode(generated_text_ids, skip_special_tokens=True)
result = processor.parse_response(generated_text)
Next, we isolate the generated response. This removes the original prompt tokens and keeps only the newly generated caption. We then decode the generated tokens into readable text. The response is then parsed into a cleaner structure.
print(result["content"])
Finally, we print the generated caption.
Output
At this stage, Gemma 4 analyzes the image and generates a detailed description of the mosque scene.
This is the input image:

This is the generated output:
A bustling outdoor scene features a grand, domed building, likely a historical or religious structure, surrounded by lush greenery, palm trees, and pedestrians walking along a paved walkway. The sky is bright blue with some white clouds, suggesting pleasant weather. In the background, taller minarets are visible, adding to the architectural grandeur of the location. The foreground shows a metal railing and a crowd of people, indicating a popular public space.
Although captioning appears simpler than function calling or video understanding, it is still a strong test of multimodal reasoning. The model must:
- Identify objects
- Understand spatial relationships
- Infer scene context
- Convert visual information into fluent language
This example also highlights the consistency of the Gemma 4 workflow. Whether we perform:
- Screenshot-to-code generation
- Video reasoning
- Function calling
- Captioning
the overall inference pipeline remains nearly identical. Only the input modality and prompt change.
Audio Understanding with Gemma 4
One of the most interesting capabilities of the Gemma 4 E-series models is native audio understanding. Instead of relying on a separate speech recognition model, Gemma 4 can directly process audio inputs and reason about them inside the same multimodal pipeline.
messages = [
   {
       "role": "user",
       "content": [
           {"type": "audio", "url": "https://huggingface.co/datasets/hf-internal-testing/dummy-audio-samples/resolve/main/winning_call.mp3"},
           {"type": "text", "text": "Can you describe this audio in detail?"},
       ],
   },
]
We begin by defining the multimodal input.
The first content block provides the audio input. This tells the processor that the modality is audio rather than image or video.
The second content block contains the text instruction. This prompt asks the model to analyze and explain the audio content in natural language.
inputs = processor.apply_chat_template(
   messages,
   tokenize=True,
   return_dict=True,
   return_tensors="pt",
   add_generation_prompt=True,
).to(model.device)
Next, we process the multimodal input. This step converts the audio and text into tensors that Gemma 4 can process internally.
As discussed in the first part of this series, the E2B and E4B variants include a dedicated audio encoder. The processor handles the conversion of raw audio into the representation expected by this encoder automatically.
output = model.generate(
   **inputs,
   max_new_tokens=1000,
   do_sample=False,
)
After preprocessing, we generate the response.
Here, max_new_tokens=1000 defines the maximum output length for the generated response.
We also use do_sample=False. This disables sampling and makes generation deterministic. Instead of producing varied outputs each time, the model selects the most likely token at every step. For descriptive tasks (e.g., audio understanding), deterministic decoding often produces more stable and reproducible results.
print(processor.decode(output[0], skip_special_tokens=True))
Finally, we decode and print the generated response.
The decode() function converts token IDs back into readable text, while skip_special_tokens=True removes internal formatting tokens.
Output
At this stage, Gemma 4 analyzes the audio clip and generates a detailed natural language description of what it hears.
This is the generated output:
user
Can you describe this audio in detail?
model
Okay, here's a detailed description of the audio you provided:
**Overall Impression:**
The audio is a lively, energetic, and enthusiastic sports commentary, likely from a baseball game. The tone is excited, building anticipation and celebrating a significant moment.
**Specific Details:**
* **Soundscape:** The audio features the sounds of a live sports broadcast. This includes the voice of a commentator, likely with some background noise of a stadium or crowd, though the focus is clearly on the commentary.
* **Commentary Style:** The commentary is fast-paced, dynamic, and uses typical sports jargon and exclamations. The delivery is high-energy and passionate, reflecting the excitement of the game.
* **Key Phrases and Content:**
    * **"And the O1 pitcher on the way to Edgar Martinez swung on the line."**: This sets the scene, indicating a specific play involving a pitcher and a batter.
    * **"Here comes Joey! Here's Ginger in third base!"**: These are calls to action, identifying players and their positions.
    * **"They've got a way to win!"**: This conveys a sense of hope and determination.
    * **"The problem of plate will be late the manner is glaring the fans for the American League championship!"**: This is a more complex sentence, likely referring to a strategic situation and the importance of the championship.
    * **"I don't believe it!"**: An expression of surprise or disbelief, adding to the excitement.
    * **"And just continues my old time!"**: This suggests a continuation of a successful or exciting sequence of events.
* **Emotional Tone:** The tone is overwhelmingly positive, excited, and celebratory. There's a palpable sense of anticipation and triumph.
**In Summary:**
The audio is a segment of a high-energy baseball game broadcast. It captures a moment of intense action, featuring dynamic commentary that builds excitement and highlights the stakes of a championship game. The commentator's enthusiasm is infectious and effectively conveys the thrill of the moment.
This example highlights an important direction in multimodal AI systems. Traditionally, tasks such as the following:
- Speech recognition
- Audio captioning
- Sound event detection
- Spoken question answering
often required separate specialized models.
Gemma 4 instead handles these tasks within a unified multimodal framework, allowing text, images, video, and audio to all flow through the same inference pipeline.
What's next? We recommend PyImageSearch University.
86+ total classes • 115+ hours hours of on-demand code walkthrough videos • Last updated: July 2026
★★★★★ 4.84 (128 Ratings) • 16,000+ Students Enrolled
I strongly believe that if you had the right teacher you could master computer vision and deep learning.
Do you think learning computer vision and deep learning has to be time-consuming, overwhelming, and complicated? Or has to involve complex mathematics and equations? Or requires a degree in computer science?
That’s not the case.
All you need to master computer vision and deep learning is for someone to explain things to you in simple, intuitive terms. And that’s exactly what I do. My mission is to change education and how complex Artificial Intelligence topics are taught.
If you're serious about learning computer vision, your next stop should be PyImageSearch University, the most comprehensive computer vision, deep learning, and OpenCV course online today. Here you’ll learn how to successfully and confidently apply computer vision to your work, research, and projects. Join me in computer vision mastery.
Inside PyImageSearch University you'll find:
- ✓ 86+ courses on essential computer vision, deep learning, and OpenCV topics
- ✓ 86 Certificates of Completion
- ✓ 115+ hours hours of on-demand video
- ✓ Brand new courses released regularly, ensuring you can keep up with state-of-the-art techniques
- ✓ Pre-configured Jupyter Notebooks in Google Colab
- ✓ Run all code examples in your web browser — works on Windows, macOS, and Linux (no dev environment configuration required!)
- ✓ Access to centralized code repos for all 540+ tutorials on PyImageSearch
- ✓ Easy one-click downloads for code, datasets, pre-trained models, etc.
- ✓ Access on mobile, laptop, desktop, etc.
Summary
In this lesson, we explored how to build multimodal applications using Gemma 4 and Hugging Face Transformers. Starting from environment setup and model loading, we walked through several real-world multimodal workflows (e.g., including screenshot-to-code generation, video understanding, multimodal function calling, image captioning, audio understanding, and object detection).
One of the biggest takeaways from Gemma 4 is the consistency of its inference pipeline. Whether the input is text, images, video, or audio, the overall workflow remains nearly identical:
- Define the multimodal conversation
- Process the inputs using the processor
- Run generation
- Decode and parse the outputs
This unified design makes multimodal development significantly simpler.
We also saw that Gemma 4 is not limited to conversational AI. It can generate HTML from screenshots, reason over videos, invoke external tools, localize objects with bounding boxes, and understand audio, all inside a single multimodal framework. Together, these capabilities make Gemma 4 a powerful foundation for building next-generation agentic and multimodal AI systems.
Citation Information
Thakur, P. “Building Multimodal AI Applications with Gemma 4 and Transformers,” PyImageSearch, S. Huot, G. Kudriavtsev, and A. Sharma, eds., 2026, https://pyimg.co/09dks
@incollection{Thakur_2026_build-multimodal-ai-apps-w-gemma-4-transformers,
  author = {Piyush Thakur},
  title = {{Building Multimodal AI Applications with Gemma 4 and Transformers}},
  booktitle = {PyImageSearch},
  editor = {Susan Huot and Georgii Kudriavtsev and Aditya Sharma},
  year = {2026},
  url = {https://pyimg.co/09dks},
}
To download the source code to this post (and be notified when future tutorials are published here on PyImageSearch), simply enter your email address in the form below!
Download the Source Code and FREE 17-page Resource Guide
Enter your email address below to get a .zip of the code and a FREE 17-page Resource Guide on Computer Vision, OpenCV, and Deep Learning. Inside you'll find my hand-picked tutorials, books, courses, and libraries to help you master CV and DL!


Comment section
Hey, Adrian Rosebrock here, author and creator of PyImageSearch. While I love hearing from readers, a couple years ago I made the tough decision to no longer offer 1:1 help over blog post comments.
At the time I was receiving 200+ emails per day and another 100+ blog post comments. I simply did not have the time to moderate and respond to them all, and the sheer volume of requests was taking a toll on me.
Instead, my goal is to do the most good for the computer vision, deep learning, and OpenCV community at large by focusing my time on authoring high-quality blog posts, tutorials, and books/courses.
If you need help learning computer vision and deep learning, I suggest you refer to my full catalog of books and courses — they have helped tens of thousands of developers, students, and researchers just like yourself learn Computer Vision, Deep Learning, and OpenCV.
Click here to browse my full catalog.