Table of Contents
Converting a PyTorch Model to ONNX for FastAPI (Docker) Deployment
In this lesson, you will learn how to convert a pre-trained ResNetV2-50 model using PyTorch Image Models (TIMM) to ONNX, analyze its structure, and test inference using ONNX Runtime. We’ll also compare inference speed and model size against standard PyTorch execution to highlight why ONNX is better suited for lightweight AI inference. This prepares the model for integration with FastAPI and Docker, ensuring environment consistency before deploying to AWS Lambda.
This lesson is the 2nd in a 4-part series on AWS Lambda:
- Introduction to Serverless Model Deployment with AWS Lambda and ONNX
- Converting a PyTorch Model to ONNX for FastAPI (Docker) Deployment (this tutorial)
- Lesson 3
- Lesson 4
To learn how to convert a ResNetV2-50 model to ONNX, compare it with PyTorch, and prepare it for FastAPI and Docker before AWS Lambda deployment, just keep reading.
Introduction
Deploying AI models in production requires fast, scalable, and efficient inference. However, when moving to cloud environments like AWS Lambda, there are several constraints to consider:
- Limited Memory: AWS Lambda supports up to 10GB of memory, which may not be enough for large models.
- Execution Time Limits: A single Lambda function execution cannot exceed 15 minutes.
- Cold Starts: If a Lambda function is inactive for a while, it takes longer to start up, slowing inference speed.
- Storage Restrictions: Lambda packages have a 250MB limit (including dependencies), making it crucial to optimize model size.
To ensure smooth deployment and efficient inference, we must first test and optimize our AI model locally before integrating it into a FastAPI API. This means:
- Converting the model to a lightweight, optimized format (ONNX).
- Comparing ONNX vs. PyTorch to analyze differences in speed, performance, and file size.
- Serving the model via an API (FastAPI) for easy inference requests.
- Containerizing the setup using Docker for consistent execution across environments.
By the end of this tutorial, you’ll not only understand how to convert a PyTorch model to ONNX, but you’ll also see how ONNX compares to PyTorch in terms of inference speed and efficiency. This prepares the model for integration with FastAPI and Docker, ensuring that it works exactly as expected before deploying to AWS Lambda.
Recap of the Previous Lesson
In Lesson 1: Introduction to Serverless AI Deployment, we explored:
- The fundamentals of serverless AI inference using AWS Lambda, API Gateway, and ONNX Runtime.
- Why ONNX is an ideal choice for AI inference in resource-constrained environments.
- How AWS Lambda processes inference requests in a serverless setup.
- Setting up the development environment to work with ONNX and FastAPI.
We also introduced our end-to-end AI inference flow diagram, showcasing how API Gateway, AWS Lambda, and ONNX Runtime work together for seamless inference.
Now, in this lesson, we will take the next step by:
- Converting our PyTorch model to ONNX.
- Comparing ONNX and PyTorch in terms of inference speed and model size.
- Serving the model with FastAPI and running it in Docker (in the next lesson).
Why This Step Matters
Many developers struggle to deploy AI models directly to AWS Lambda without properly testing them in a controlled environment. This often leads to:
- Errors in model execution due to compatibility issues.
- High inference latency in cloud environments.
- Inefficient memory usage leading to function failures.
Instead of deploying prematurely, we first build, test, and refine our inference server locally using ONNX Runtime and FastAPI. This allows us to:
- Optimize our model for deployment by reducing size and improving inference speed.
- Compare ONNX vs. PyTorch to determine the best format for AWS Lambda.
- Catch and debug errors locally rather than dealing with deployment failures on AWS.
- Maintain a consistent environment with Docker so that what works locally also works in production.
AWS Lambda runs inside a containerized environment, so by testing our API inside a Docker container first, we ensure that it behaves consistently when deployed.
What You’ll Learn in This Lesson
In this lesson, we’ll start by:
- Converting a PyTorch ResNetV2-50 (TIMM) model to ONNX format for efficient inference.
- Analyzing the ONNX model structure to understand how it differs from PyTorch.
- Comparing ONNX vs. PyTorch inference performance, including execution time and model size.
- Validating inference results using ONNX Runtime to ensure accuracy.
Once this is done, in the next lesson, we’ll:
- Build a FastAPI-based inference API to handle image classification requests.
- Test the API locally before deployment.
- Containerize the FastAPI server using Docker for a consistent runtime.
Technologies Used
ONNX Runtime
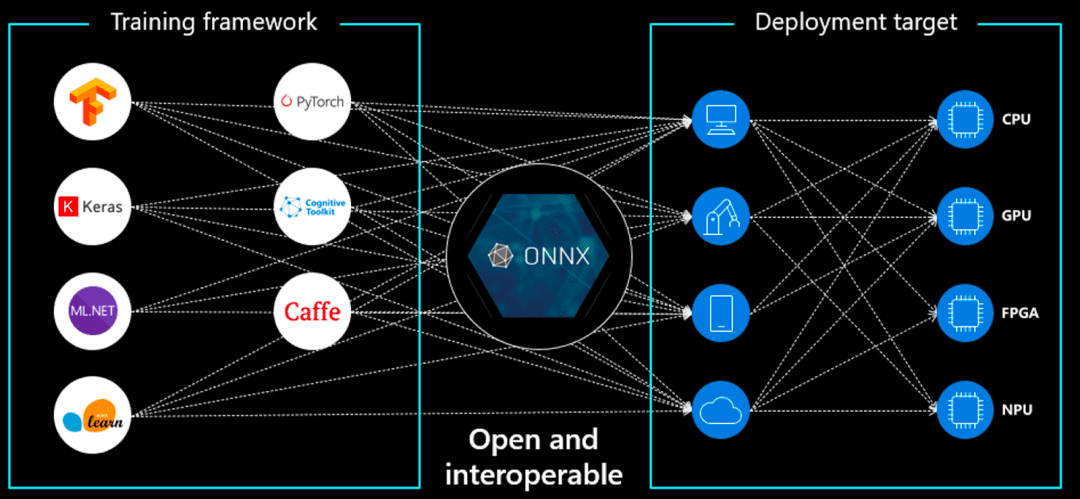
ONNX (Open Neural Network Exchange) is an open standard for machine learning models that allows us to:
- Optimize model execution across different hardware architectures.
- Reduce inference latency compared to native PyTorch or TensorFlow models.
- Make models more portable across different cloud and edge environments.
PyTorch Image Models (TIMM)
Instead of using raw PyTorch, we’ll leverage TIMM (Torch Image Models) — a powerful library that provides pre-trained models with efficient implementations. TIMM makes it easier to:
- Load and fine-tune state-of-the-art image classification models.
- Convert models to ONNX format with minimal effort.
- Ensure compatibility with ONNX Runtime for optimized inference.
FastAPI (Covered in Next Lesson)
FastAPI is a high-performance web framework that allows us to:
- Expose our ONNX model as an API for inference.
- Handle real-time requests efficiently with minimal overhead.
- Ensure a seamless transition to AWS Lambda later by keeping the API lightweight.
Docker (Covered in Next Lesson)
Containerizing our FastAPI inference server ensures:
- Consistent execution across different environments (local, AWS Lambda, cloud, edge).
- Dependency isolation prevents conflicts between system packages.
- Simplified deployment, since AWS Lambda supports containerized applications.
Configuring Your Development Environment
To ensure a smooth development process, we first need to set up our environment with the required dependencies. This includes installing FastAPI, ONNX Runtime, PyTorch Image Models (TIMM), and Docker to run the inference API inside a container before deploying to AWS Lambda.
Luckily, all required Python packages are pip-installable. Run the following command to install them:
$ pip install fastapi[all]==0.98.0 numpy==1.25.2 onnxruntime==1.15.1 mangum==0.17.0 Pillow==9.5.0 timm==0.9.5 onnx==1.14.0
Now that our environment is set up, let’s convert the PyTorch model to ONNX!
Need Help Configuring Your Development Environment?

All that said, are you:
- Short on time?
- Learning on your employer’s administratively locked system?
- Wanting to skip the hassle of fighting with the command line, package managers, and virtual environments?
- Ready to run the code immediately on your Windows, macOS, or Linux system?
Then join PyImageSearch University today!
Gain access to Jupyter Notebooks for this tutorial and other PyImageSearch guides pre-configured to run on Google Colab’s ecosystem right in your web browser! No installation required.
And best of all, these Jupyter Notebooks will run on Windows, macOS, and Linux!
Project Structure
We first need to review our project directory structure.
Start by accessing this tutorial’s “Downloads” section to retrieve the source code and example images.
From there, take a look at the directory structure:
$ tree . -L 1
resnet-aws-serverless-classifier/
├── src/
│   ├── convert.py           # Used here – converts PyTorch model to ONNX
│   ├── onnxt.py             # For later – ONNX Runtime inference
│   ├── onnx_local.py        # For later – local ONNX inference testing
│   ├── server.py            # Will be used in Lesson 3 (FastAPI backend)
│   └── __init__.py
├── models/
│   ├── resnetv2_50.onnx     # Generated ONNX model saved after conversion
│   └── imagenet_classes.txt # Maps numeric predictions to class labels
├── data/
│   ├── cat.jpg / dog.jpg    # Sample images for verifying ONNX inference
│   ├── cat_base64.txt       # Used later for Lambda input payloads
│   ├── event.json / payload.json / response.json  # For Lambda testing (future)
├── tests/
│   ├── prepare_event.py     # Prepares Lambda test events (future)
│   ├── test_boto3_lambda.py # Tests AWS Lambda invocation (future)
│   └── test_lam.py          # Local Lambda function tests (future)
├── frontend/                # For Lessons 7–8 (Next.js frontend)
├── Dockerfile               # For AWS Lambda deployment (future)
├── Dockerfile.local         # For local FastAPI testing (Lesson 3)
├── docker-compose.local.yml # Used later for multi-container setup
├── dev.sh                   # Helper script for development tasks
├── requirements.txt         # Python dependencies for deployment
├── requirements-local.txt   # Dependencies for local development
├── .dockerignore
├── .gitignore
└── README.md
Let’s quickly review the components we use in this lesson:
convert.py: Converts the pre-trained ResNetV2-50 model from PyTorch to ONNX format, defines the input tensor, and saves the exported file.resnetv2_50.onnx: The ONNX model file generated from conversion, ready for deployment across multiple frameworks and hardware targets.imagenet_classes.txt: A simple text file containing ImageNet class labels used to interpret the model’s numeric outputs.cat.jpg/dog.jpg: Sample test images for verifying that the exported ONNX model performs correct image classification before moving on to deployment.
Converting ResNetV2-50 (TIMM) to ONNX
Now that our development environment is set up, we’ll convert a pre-trained ResNetV2-50 model from PyTorch Image Models (TIMM) to ONNX format. ONNX (Open Neural Network Exchange) is an optimized format for inference across different platforms, ensuring fast execution in environments such as AWS Lambda.
Why Convert to ONNX?
- Cross-Platform Compatibility: ONNX models can be used across PyTorch, TensorFlow, and other frameworks.
- Optimized for Inference: ONNX models run faster than traditional PyTorch models in production.
- Lightweight and Efficient: ONNX models have smaller memory footprints, making them ideal for cloud deployments.
AWS Lambda has execution constraints, such as limited memory and storage, so using ONNX Runtime ensures that inference is optimized and efficient.
Exporting ResNetV2-50 (TIMM) to ONNX
We’ll now create a script (convert.py) to:
- Load the pre-trained ResNetV2-50 model from TIMM.
- Define a dummy input tensor (matching the model’s input size).
- Convert and export the model to ONNX format.
Creating convert.py
Create a new file named convert.py and add the following code:
import torch
import torch.onnx
import timm
import onnxruntime as ort
import numpy as np
import requests
from PIL import Image
from io import BytesIO

model = timm.create_model('resnetv2_50', pretrained=True)
model = model.eval()
model_script = torch.jit.script(model)

import os

print("exporting onnx...")
# Use environment variable to determine output path, default to models directory
output_dir = os.getenv("MODEL_PATH", "../models")
output_path = os.path.join(output_dir, "resnetv2_50.onnx")

torch.onnx.export(model_script, torch.randn(1, 3, 224, 224), output_path, verbose=True, input_names=[
                  'input'], output_names=['output'], dynamic_axes={'input': {0: 'batch'}})
We convert a pre-trained ResNetV2-50 model from PyTorch (via TIMM) to ONNX format for optimized inference. We first
- Load the ResNetV2-50 model and set it to evaluation mode.
- Then, apply TorchScript (
torch.jit) to trace the model, ensuring compatibility before exporting it to ONNX. - The
torch.onnx.export()function is used to convert the scripted model to ONNX, specifying a dummy input tensor of shape (1, 3, 224, 224) to define the input structure. Theverbose=Trueflag logs the export process, whiledynamic_axesallows flexible batch sizes. - The final ONNX model (
resnetv2_50.onnx) is saved, making it ready for inference with ONNX Runtime.
Understanding the ONNX Model Structure
Once the model is converted, we can inspect its structure using onnx:
import onnx

# Load ONNX model
onnx_model = onnx.load("resnetv2_50.onnx")

# Check model structure
print(onnx.helper.printable_graph(onnx_model.graph))
This printable graph represents the ONNX computational graph of the ResNetV2-50 model, showing how input tensors, weights, and layers are connected. It starts with the input tensor %input, followed by initializers for convolution weights, batch normalization parameters, and biases across layers. The graph defines the model’s stages and blocks, including convolutional layers (conv), downsampling operations (downsample.conv), and normalization layers (norm1). The final part of the graph applies a global average pooling layer, followed by a fully connected (fc) layer, and flattens the output to produce the final model predictions.
graph main_graph ( %input[FLOAT, batchx3x224x224] ) initializers ( %stem.conv.weight[FLOAT, 64x3x7x7] %stages.0.blocks.0.norm1.running_mean[FLOAT, 64] %stages.0.blocks.0.norm1.running_var[FLOAT, 64] %stages.0.blocks.0.norm1.weight[FLOAT, 64] %stages.0.blocks.0.norm1.bias[FLOAT, 64] %stages.0.blocks.0.downsample.conv.weight[FLOAT, 256x64x1x1] %stages.0.blocks.0.conv3.weight[FLOAT, 256x64x1x1] %stages.0.blocks.1.norm1.running_mean[FLOAT, 256] %stages.0.blocks.1.norm1.running_var[FLOAT, 256] %stages.0.blocks.1.norm1.weight[FLOAT, 256] %stages.1.blocks.0.conv3.weight[FLOAT, 512x128x1x1] %stages.1.blocks.1.norm1.running_mean[FLOAT, 512] %stages.1.blocks.1.norm1.running_var[FLOAT, 512] %stages.1.blocks.1.norm1.weight[FLOAT, 512] %stages.1.blocks.1.norm1.bias[FLOAT, 512] %stages.1.blocks.1.conv3.weight[FLOAT, 512x128x1x1] %stages.1.blocks.2.norm1.running_mean[FLOAT, 512] %stages.1.blocks.2.norm1.running_var[FLOAT, 512]
 ..... ......
 ..... ......
GlobalAveragePool(%/norm/Relu_output_0) %/head/fc/Conv_output_0 = Conv[dilations = [1, 1], group = 1, kernel_shape = [1, 1], pads = [0, 0, 0, 0], strides = [1, 1]](%/head/global_pool/pool/GlobalAveragePool_output_0, %head.fc.weight, %head.fc.bias) %output = Flatten[axis = 1](%/head/fc/Conv_output_0) return %output }
Comparing ONNX vs. PyTorch for AI Inference
Now that we have converted our ResNetv2-50 model to ONNX, it’s important to understand how ONNX compares to PyTorch in terms of inference performance. We’ll compare the two in the following areas:
- Model File Size: Is ONNX more lightweight than PyTorch?
- Inference Speed: Which format runs inference faster?
- Performance Trade-Offs: What are the advantages and limitations of each?
By the end of this section, you’ll clearly see why ONNX is a better choice for optimized AI inference in resource-constrained environments like AWS Lambda.
Comparing Model File Sizes
One of the biggest expectations for ONNX is that it reduces model size, making it easier to deploy in environments (e.g., AWS Lambda), where storage constraints are common.
Let’s compare the file sizes of the original PyTorch model vs. the converted ONNX model:
import os

# Paths to saved models
pytorch_model_path = "resnetv2_50.pth"
onnx_model_path = "resnetv2_50.onnx"

# Check file sizes (Convert bytes to MB)
pytorch_size = os.path.getsize(pytorch_model_path) / (1024 * 1024)
onnx_size = os.path.getsize(onnx_model_path) / (1024 * 1024)

print(f"PyTorch Model Size: {pytorch_size:.2f} MB")
print(f"ONNX Model Size: {onnx_size:.2f} MB")
Here, we compare the file sizes of the PyTorch (.pth) and ONNX (.onnx) models to assess the size reduction ONNX provides.
We use os.path.getsize() to get the file size in bytes, then convert it to megabytes (MB) for easier readability.
Finally, print the sizes of both models to determine whether ONNX is more lightweight, which is important for deployment in serverless environments like AWS Lambda, where storage is limited.
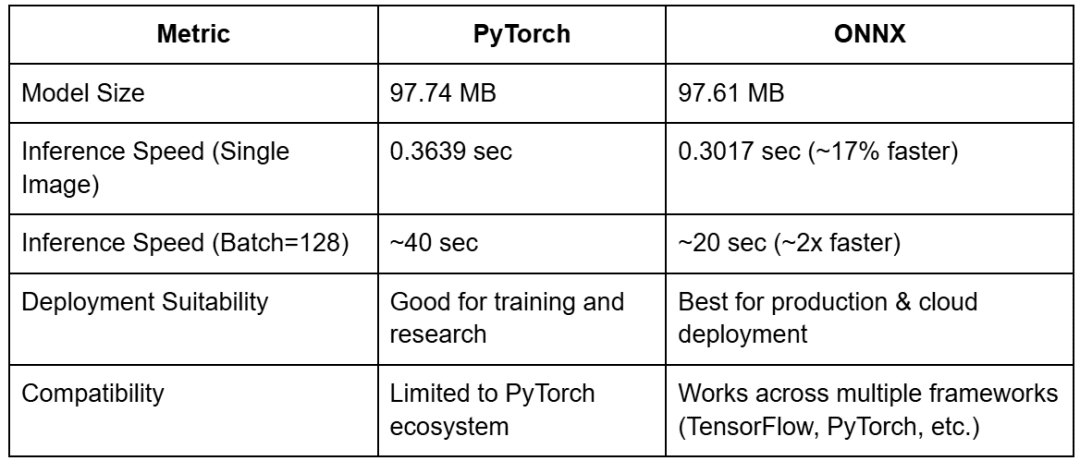
PyTorch Model Size: 97.74 MB
ONNX Model Size: 97.61 MB
ONNX should ideally be smaller than PyTorch, but as we observed, both were nearly the same ( 97MB).
Comparing Inference Speed: PyTorch vs. ONNX
While model size is important, inference speed is even more critical, especially in real-time AI applications where latency impacts user experience.
Let’s compare how long it takes to run inference using PyTorch and ONNX Runtime.
PyTorch Inference Speed
import torch
import timm
import time

# Load PyTorch model
pytorch_model = timm.create_model("resnetv2_50", pretrained=True)
pytorch_model.eval()

# Generate a dummy input tensor (Batch Size: 1, Channels: 3, Height: 224, Width: 224)
dummy_input = torch.randn(1, 3, 224, 224)

# Measure inference time
start_time = time.time()
with torch.no_grad():
    _ = pytorch_model()
pytorch_inference_time = time.time() - start_time

print(f"PyTorch Inference Time: {pytorch_inference_time:.4f} seconds")
Next, we measure how long it takes for the PyTorch model to process an input tensor and return an output.
First, we load the ResNetV2-50 model from TIMM and set it to evaluation mode (eval()), disabling gradient updates since we’re only running inference.
Generate a random dummy input tensor with the shape (1, 3, 224, 224), representing a single RGB image of size 224×224 pixels. The model is then timed using time.time() to measure inference time.
Be sure to turn off Gradient tracking (torch.no_grad()) to speed up execution, since we’re not training the model.
PyTorch Inference Time: 0.3639 seconds
The PyTorch model takes 0.36 seconds for a single image inference in our tests.
ONNX Inference Speed
import numpy as np
import time

# Load ONNX model
ort_session = ort.InferenceSession("resnetv2_50.onnx")

# Convert PyTorch tensor to NumPy array
onnx_input = dummy_input.numpy()

# Measure ONNX inference time
start_time = time.time()
_ = ort_session.run({"input": onnx_input})
onnx_inference_time = time.time()

print(f"ONNX Inference Time: {onnx_inference_time:.4f} seconds")
Then we run inference with ONNX Runtime and measure how quickly it processes the same input used in PyTorch.
- It loads the ONNX model (
resnetv2_50.onnx) usingonnxruntime.InferenceSession(). - Since ONNX requires inputs in NumPy format, the PyTorch tensor is converted to a NumPy array (
dummy_input.numpy()) before inference. - The script measures the inference time taken using
time.time(), similar to the PyTorch version. - Finally, print the ONNX inference time for comparison.
ONNX Inference Time: 0.3017 seconds
ONNX inference is 17% faster than PyTorch for single-image inference.
Batch Inference: Where ONNX Shines Even More
While single-image inference was only 17% faster, we also tested batch inference (batch=128 images), where ONNX’s optimizations really show improvements.
Batch Size = 128
PyTorch Inference Time: ~40 seconds
ONNX Inference Time: ~20 seconds
ONNX is  2x faster than PyTorch when processing larger batches, making it a superior choice for AI inference workloads.
Why Is ONNX Faster for Larger Batches?
- ONNX Runtime optimizes batch execution more efficiently than PyTorch.
- Lower overhead → PyTorch dynamically constructs the computation graph per batch, whereas ONNX uses a static graph.
- ONNX avoids Python’s Global Interpreter Lock (GIL), allowing parallel execution of multiple inputs.
For large-scale AI deployments, ONNX provides significant speed improvements over PyTorch.
Performance Trade-Offs and Analysis
Key Takeaways
- ONNX inference is
 17% faster for single-image inference and 2x faster for batch inference (128 images).
 - Model size remains nearly identical (97MB), but minor optimizations can reduce it slightly.
- ONNX is cross-platform, meaning it can be used in different AI ecosystems.
- ONNX Runtime is better suited for large-scale AI inference, while PyTorch is still better for training and research.
However, ONNX is best suited for inference only. If you need to train or fine-tune a model, PyTorch remains the better choice.
Now that we’ve confirmed ONNX is the better choice for optimized inference, let’s move to testing the ONNX model with ONNX Runtime.
Testing the ONNX Model with ONNX Runtime
Now that we’ve confirmed that ONNX is faster than PyTorch for AI inference, it’s essential to validate our ONNX model’s correctness using ONNX Runtime.
We will test the model by:
- Running inference on ONNX Runtime to ensure correct execution.
- Comparing ONNX predictions with PyTorch to confirm that the conversion did not affect accuracy.
- Handling potential ONNX model errors and debugging any inconsistencies.
Running Inference on ONNX Runtime
We will now run inference with ONNX Runtime and verify that the model correctly processes an image.
Load the ONNX Model and Run a Sample Inference
import numpy as np
from PIL import Image
import onnxruntime as ort
import torch
import timm
import torchvision.transforms as transforms

# Load the ONNX model
ort_session = ort.InferenceSession("resnetv2_50.onnx")

# Load an example image
image_path = "cat.jpg"  # Change this to any test image
image = Image.open(image_path)

# Define image preprocessing
transform = transforms.Compose([
    transforms.Resize((224,224)),
    transforms.ToTensor(),
    transforms.Normalize(mean=[0.485, 0.456, 0.406],               std=[0.229, 0.224, 0.225])
])

# Preprocess image and convert to numpy array
input_tensor = transform(image).unsqueeze(0).numpy()

# Get input and output names from the model
input_name = ort_session.get_inputs()[0].name
output_name = ort_session.get_outputs()[0].name

# Run inference using ONNX Runtime
outputs = ort_session.run([output_name], {input_name: input_tensor})

# Get the predicted class index
predicted_class_idx = np.argmax(outputs[0])
print(f"ONNX Model Prediction: Class Index {predicted_class_idx}")
We run inference with ONNX Runtime to ensure the converted ONNX model functions correctly. We start by
- Loading the ResNetV2-50 ONNX model and a test image (e.g.,
"cat.jpg"). - The image is then preprocessed using Torchvision transforms, resized to (224, 224), converted to a tensor, and normalized using ImageNet’s mean and standard deviation.
- Since ONNX requires inputs in NumPy format, the processed tensor is converted to NumPy format before inference.
- The model then runs a forward pass, and the predicted class index is extracted using
argmax(), determining the most likely classification.
The ONNX model should successfully process the image and output a valid class index.
Comparing ONNX Predictions with PyTorch
To ensure the ONNX model is functionally identical to the original PyTorch model, let’s run the same image through the PyTorch version of the model and compare predictions.
# Load PyTorch model
pytorch_model = timm.create_model("resnetv2_50", pretrained=True)
pytorch_model.eval

# Convert image to PyTorch tensor
input_tensor_torch = transform(image).unsqueeze(0)

# Run PyTorch inference
with torch.no_grad():
    output_torch = pytorch_model()

# Get the predicted class index
predicted_class_torch = torch.argmax(output, dim=-1).item()
print(f"PyTorch Model Prediction: Class Index {predicted_class_torch}")

# Compare ONNX and PyTorch predictions
if predicted_class_idx == predicted_torch:
    print("Success! ONNX and PyTorch predictions match.")
else:
    print("Warning: ONNX and PyTorch predictions do not match. Further debugging required.")
We then perform the same inference but using PyTorch.
- We load the original ResNetV2-50 model from TIMM and set it to evaluation mode (
eval()) for inference. - The same image undergoes identical preprocessing and is passed through the PyTorch model.
- The output is a probability distribution over classes, from which the class with the highest probability is selected.
- Finally, the PyTorch prediction is compared with the ONNX model’s output.
If ONNX and PyTorch predictions match, the model conversion was successful. If they don’t match, we may need to debug the ONNX model conversion.
Now that our ONNX model is fully tested, we are ready to integrate it into a FastAPI AI inference server (in the next lesson).
What's next? We recommend PyImageSearch University.

86+ total classes • 115+ hours hours of on-demand code walkthrough videos • Last updated: June 2026
★★★★★ 4.84 (128 Ratings) • 16,000+ Students Enrolled
I strongly believe that if you had the right teacher you could master computer vision and deep learning.
Do you think learning computer vision and deep learning has to be time-consuming, overwhelming, and complicated? Or has to involve complex mathematics and equations? Or requires a degree in computer science?
That’s not the case.
All you need to master computer vision and deep learning is for someone to explain things to you in simple, intuitive terms. And that’s exactly what I do. My mission is to change education and how complex Artificial Intelligence topics are taught.
If you're serious about learning computer vision, your next stop should be PyImageSearch University, the most comprehensive computer vision, deep learning, and OpenCV course online today. Here you’ll learn how to successfully and confidently apply computer vision to your work, research, and projects. Join me in computer vision mastery.
Inside PyImageSearch University you'll find:
- ✓ 86+ courses on essential computer vision, deep learning, and OpenCV topics
- ✓ 86 Certificates of Completion
- ✓ 115+ hours hours of on-demand video
- ✓ Brand new courses released regularly, ensuring you can keep up with state-of-the-art techniques
- ✓ Pre-configured Jupyter Notebooks in Google Colab
- ✓ Run all code examples in your web browser — works on Windows, macOS, and Linux (no dev environment configuration required!)
- ✓ Access to centralized code repos for all 540+ tutorials on PyImageSearch
- ✓ Easy one-click downloads for code, datasets, pre-trained models, etc.
- ✓ Access on mobile, laptop, desktop, etc.
Summary
In this lesson, we successfully converted a PyTorch ResNetV2-50 model to ONNX, tested its performance, and validated its correctness using ONNX Runtime. By analyzing both model size and inference speed, we confirmed that ONNX offers significant advantages for AI inference in serverless environments like AWS Lambda.
We found that ONNX retains nearly the same size as PyTorch (97MB), but we optimized it by stripping unnecessary metadata. ONNX was 17% faster for single-image inference and 2x faster for batch inference (128 images). We validated that ONNX predictions matched PyTorch, confirming a successful conversion.
With the ONNX model fully tested and optimized, we are now ready to serve it via an API and containerize it for deployment. In the next lesson, we will build a FastAPI-based AI inference server that exposes our ONNX model via an API. We’ll also containerize it using Docker, ensuring a consistent runtime environment before deployment to AWS Lambda.
Citation Information
Singh, V. “Converting a PyTorch Model to ONNX for FastAPI (Docker) Deployment,” PyImageSearch, P. Chugh, S. Huot, A. Sharma, and P. Thakur, eds., 2025, https://pyimg.co/muf0c
@incollection{Singh_2025_converting-pytorch-model-to-onnx-for-fastapi-docker-deployment,
  author = {Vikram Singh},
  title = {{Converting a PyTorch Model to ONNX for FastAPI (Docker) Deployment}},
  booktitle = {PyImageSearch},
  editor = {Puneet Chugh and Susan Huot and Aditya Sharma and Piyush Thakur},
  year = {2025},
  url = {https://pyimg.co/muf0c},
}
To download the source code to this post (and be notified when future tutorials are published here on PyImageSearch), simply enter your email address in the form below!

Download the Source Code and FREE 17-page Resource Guide
Enter your email address below to get a .zip of the code and a FREE 17-page Resource Guide on Computer Vision, OpenCV, and Deep Learning. Inside you'll find my hand-picked tutorials, books, courses, and libraries to help you master CV and DL!

Comment section
Hey, Adrian Rosebrock here, author and creator of PyImageSearch. While I love hearing from readers, a couple years ago I made the tough decision to no longer offer 1:1 help over blog post comments.
At the time I was receiving 200+ emails per day and another 100+ blog post comments. I simply did not have the time to moderate and respond to them all, and the sheer volume of requests was taking a toll on me.
Instead, my goal is to do the most good for the computer vision, deep learning, and OpenCV community at large by focusing my time on authoring high-quality blog posts, tutorials, and books/courses.
If you need help learning computer vision and deep learning, I suggest you refer to my full catalog of books and courses — they have helped tens of thousands of developers, students, and researchers just like yourself learn Computer Vision, Deep Learning, and OpenCV.
Click here to browse my full catalog.