
Table of Contents
- Build a Search Engine: Setting Up AWS OpenSearch
- Introduction
- What Is AWS OpenSearch?
- What AWS OpenSearch Is Commonly Used For
- Key Features of AWS OpenSearch
- How Does AWS OpenSearch Work?
- Why Use AWS OpenSearch for Semantic Search?
- Overview of the Setup Process
- What This Guide Covers (Minimal Setup for Indexing and Querying)
- Configuring Your Development Environment
- Creating an AWS OpenSearch Domain
- Step 1: Selecting the Right AWS Region for OpenSearch
- Step 2: Choosing an Instance Type and Storage Options
- 1 Selecting the Right Instance Type
- 2 Configuring the Number of Data Nodes and Master Nodes
- 3 Choosing Storage Type and IOPS Settings
- Step 3: Setting Up a Domain with Minimal Configurations
- Verifying OpenSearch Accessibility and Health
- Accessing OpenSearch Dashboards
- Checking OpenSearch Domain Health
- Testing API Access via cURL/Postman
- Indexing and Querying Data in OpenSearch
- 1 Creating a Sample Index
- 2 Inserting Sample Data into OpenSearch
- 3 Searching for Data in OpenSearch
- What’s Next?
- Summary
Build a Search Engine: Setting Up AWS OpenSearch
We’re launching an exciting new series, and this time, we’re venturing into something new — experimenting with cloud infrastructure for the first time! In this series, we will set up AWS OpenSearch, which will serve as a vector database for a semantic search application that we’ll develop step by step.
This is our first deep dive into a cloud-based infrastructure, where we will use Amazon Web Services (AWS) to build a scalable solution. Along the way, we’ll integrate Docker for running OpenSearch locally and use the Wikipedia movie plots dataset as the foundation for creating and querying the semantic search index, making this an exciting hands-on learning experience.
In this first post, we’ll start with setting up AWS OpenSearch Service, ensuring we have the foundation ready for our semantic search application. Let’s get started! 🚀
This lesson is the 1st of a 3-part series on Building a Semantic Search System with AWS OpenSearch:
- Build a Search Engine: Setting Up AWS OpenSearch (this tutorial)
- Build a Search Engine: Deploy Models and Index Data in AWS OpenSearch
- Build a Search Engine: Semantic Search System Using OpenSearch
To learn how to set up AWS OpenSearch for scalable search applications, just keep reading. 🚀
Introduction
What Is AWS OpenSearch?
Amazon OpenSearch Service is a fully managed solution that simplifies the deployment, operation, and scaling of OpenSearch clusters in the AWS Cloud. It is built on the open-source OpenSearch project, which was forked from Elasticsearch 7.10 following Elastic’s licensing changes. Designed for real-time search, analysis, and visualization, AWS OpenSearch is widely used for log analytics, full-text search, structured search, geospatial queries, and machine learning-powered vector search. It is a versatile solution for various data retrieval needs.
As an evolution of Elasticsearch, OpenSearch serves as a powerful search and analytics engine. AWS OpenSearch Service includes built-in OpenSearch Dashboards and supports Kibana versions 1.5 to 7.10, enabling users to create dynamic visualizations and gain deeper insights from their data.
What AWS OpenSearch Is Commonly Used For
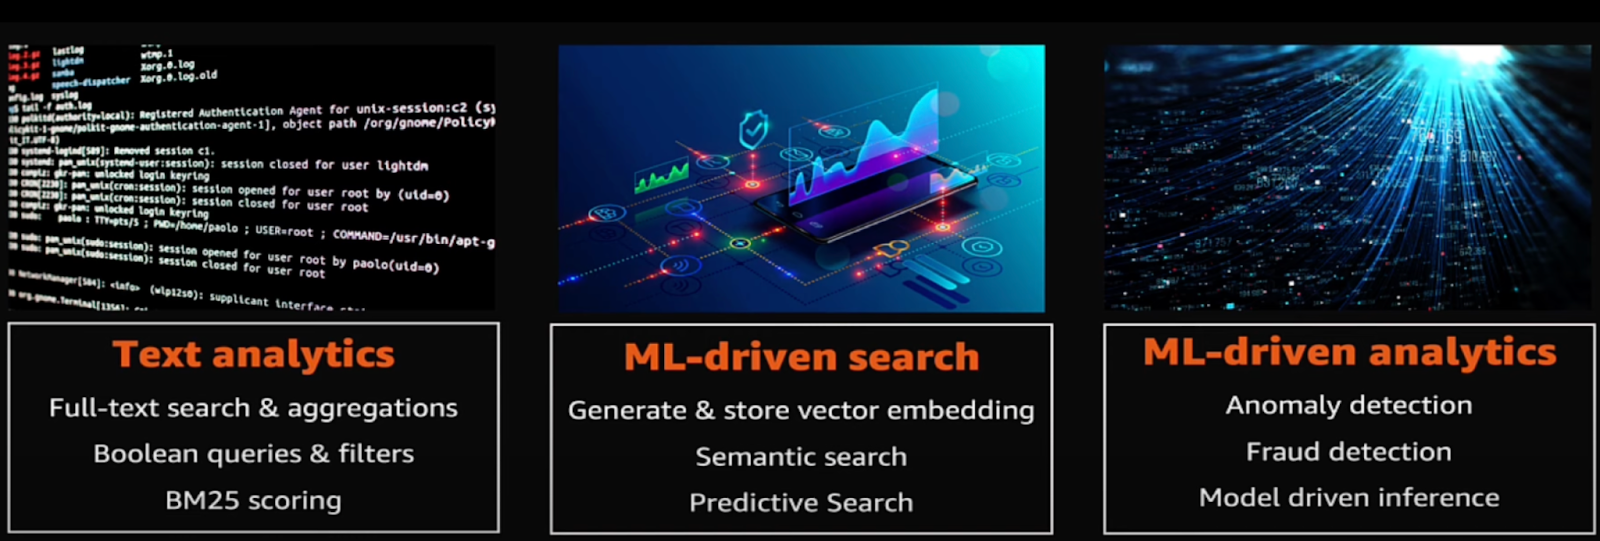
AWS OpenSearch supports a wide range of search and analytics capabilities, from traditional text-based search to machine learning-driven insights, as illustrated below.
- Full-Text and Structured Search: Powers fast, scalable, and accurate search for e-commerce, enterprise search, and document retrieval systems.
- Log and Event Analytics: Index, store, and analyze logs from cloud applications, security monitoring tools, and observability platforms to detect trends and troubleshoot issues.
- Observability and Monitoring: Tracks system health, application performance, and security incidents with integrations for APM (Application Performance Monitoring) and SIEM (Security Information and Event Management) solutions.
- Business Intelligence and Data Visualization: Uses OpenSearch Dashboards to explore, analyze, and visualize structured and unstructured data in real time.
- Vector and Semantic Search: Leverages machine learning-powered search techniques, including k-NN (k-nearest neighbors) and dense vector embeddings, for applications like AI-driven search, recommendation systems, and similarity search.
Key Features of AWS OpenSearch
✔ Scalability: Easily scale clusters up or down based on workload demands.
✔ Managed Service: AWS handles operational overhead, including updates, patching, and maintenance.
✔ Security and Access Control: Provides encryption, fine-grained access control, and VPC-based network isolation.
✔ Multi-Modal Search: Supports traditional keyword search, vector-based semantic search, and hybrid retrieval techniques.
✔ Integration with AWS Services: Works seamlessly with S3, Lambda, Kinesis, DynamoDB, SageMaker, and more.
How Does AWS OpenSearch Work?
AWS OpenSearch Service ingests structured and unstructured data from various sources (e.g., log files, system messages, metrics, and configuration data). It then processes, indexes, and stores this data, making it available for real-time search, analytics, and monitoring.
The processed data can be used for:
- Application and Infrastructure Monitoring: Track system health, application performance, and resource utilization to detect performance issues in real time.
- Security Information and Event Management (SIEM): Identify security threats, detect anomalies, and respond to incidents through log and event analysis.
- Advanced Search Capabilities: Perform fast, scalable, and intelligent searches across large datasets, including full-text, structured, and machine-learning-powered searches.
Figure 3 illustrates how AWS OpenSearch Service captures and processes data, transforming raw logs and metrics into actionable insights:
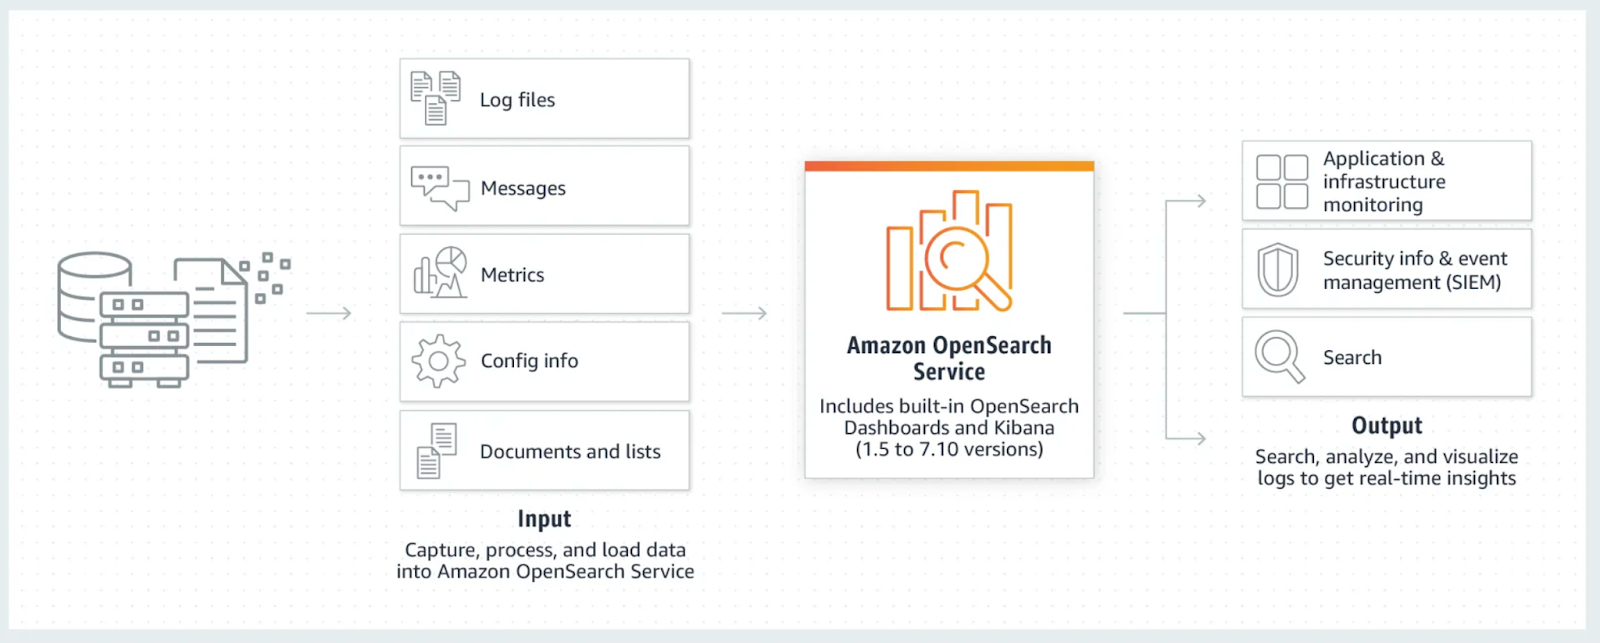
AWS OpenSearch Service ingests data from multiple sources (e.g., log files, messages, metrics, and configuration data), processes it in real-time, and provides actionable insights for search, monitoring, and security analytics.
Why Use AWS OpenSearch for Semantic Search?
Traditional keyword-based search relies on exact matches but often fails to understand user intent and contextual meaning. Semantic search improves accuracy by leveraging machine learning (ML), natural language processing (NLP), and vector search techniques to deliver more relevant, intent-driven results.
How AWS OpenSearch Powers Semantic Search
- Vector Search with k-NN and ANN (Approximate Nearest Neighbors): Uses vector embeddings and k-NN to find conceptually similar results, enhancing semantic search, recommendations, and intelligent retrieval.
- Neural Search and Language-Agnostic Queries: Leverages neural plugins for multilingual semantic search, improving accuracy for synonyms and paraphrased queries.
- Hybrid Search: Combines BM25 (Best Match 25) keyword search with vector embeddings, balancing traditional and AI-powered search for precise, relevant results.
- Learning to Rank (LTR) and Re-Ranking: Uses ML models (e.g., LambdaMART and XGBoost) to dynamically refine search rankings based on user intent.
- AI-Driven Recommendations and Predictive Search: Integrates with ML Commons to support logistic regression, clustering (K-means), and anomaly detection for personalized search and recommendations.
Figure 4 illustrates how AWS OpenSearch leverages vector search, ranking models, and ML-driven techniques to enhance semantic search.
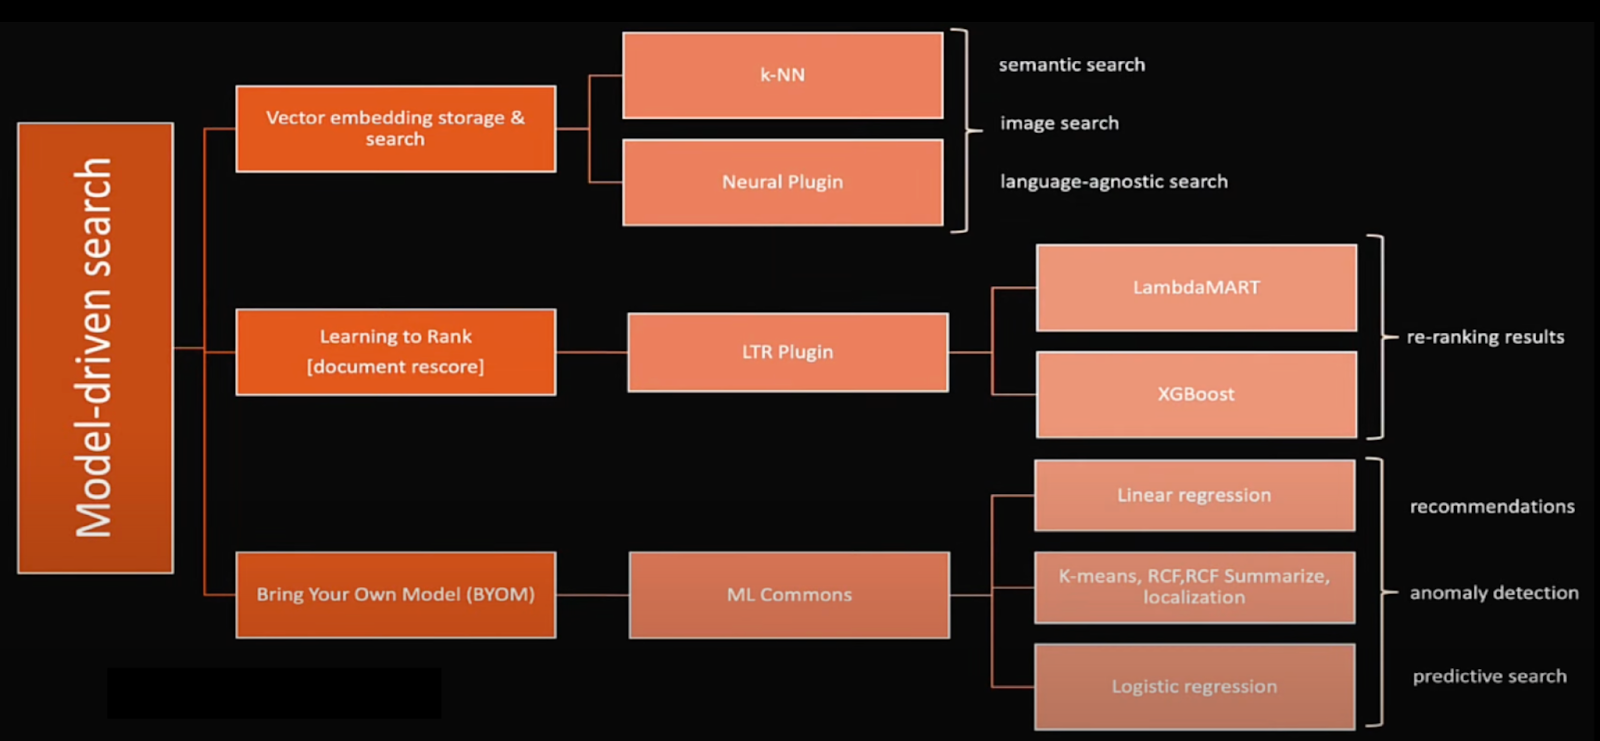
AWS OpenSearch enables model-driven search by combining vector embeddings, neural search, learning-to-rank techniques, and AI-powered recommendations, making semantic search more intelligent and efficient.
Overview of the Setup Process
Setting up AWS OpenSearch Service involves configuring a domain, ensuring secure access, verifying its operational status, and indexing data for querying. This guide provides a step-by-step approach to getting OpenSearch up and running with a minimal yet functional setup, allowing you to test and validate search capabilities quickly.
The setup process includes the following:
- Creating an OpenSearch Domain: Selecting an AWS region, choosing instance types, and enabling OpenSearch Dashboards.
- Configuring Access and Permissions: Setting up basic security using IAM (Identity and Access Management) roles or public access (for testing only).
- Ensuring OpenSearch is Operational: Verifying the domain status and testing connectivity via API calls.
- Indexing and Querying Data: Creating a sample index, uploading text embeddings, and running basic search queries.
This streamlined setup is ideal for developers, engineers, and researchers who want to experiment with OpenSearch without deep configurations quickly.
What This Guide Covers (Minimal Setup for Indexing and Querying)
This guide focuses on getting AWS OpenSearch up and running with minimal configurations, ensuring you can index data and perform search queries quickly.
✔ Basic Domain Setup: Creating an OpenSearch domain with minimal configurations.
✔ Simple Access Control: Setting up IAM-based permissions or public access (for testing).
✔ Connectivity Verification: Testing OpenSearch availability using cURL, Postman, or OpenSearch Dashboards.
✔ Basic Indexing and Querying: Uploading sample text embeddings and running a search query.
By the end of this guide, you will have a working AWS OpenSearch setup that allows you to ingest, store, and search data efficiently, providing a solid foundation for further exploration.
Configuring Your Development Environment
Before we begin indexing and storing data in OpenSearch, we need to set up our development environment with the required dependencies.
Installing Docker (Required for This Lesson)
Since we will be running OpenSearch locally using Docker, please ensure Docker is installed on your system. If you haven’t installed it yet, follow this step-by-step guide: Getting Started with Docker for Machine Learning.
Installing Required Libraries
Below are the libraries we need for this tutorial. You can install them using pip:
$ pip install opensearch-py==2.4.2 pandas==2.0.3 tqdm==4.66.1 pyarrow==14.0.2
Once the installations are complete and Docker is set up, you’re ready to proceed with indexing movie data in OpenSearch. 🚀
Need Help Configuring Your Development Environment?

All that said, are you:
- Short on time?
- Learning on your employer’s administratively locked system?
- Wanting to skip the hassle of fighting with the command line, package managers, and virtual environments?
- Ready to run the code immediately on your Windows, macOS, or Linux system?
Then join PyImageSearch University today!
Gain access to Jupyter Notebooks for this tutorial and other PyImageSearch guides pre-configured to run on Google Colab’s ecosystem right in your web browser! No installation required.
And best of all, these Jupyter Notebooks will run on Windows, macOS, and Linux!
Creating an AWS OpenSearch Domain
In this section, we will walk through the process of setting up an AWS OpenSearch Domain from scratch. OpenSearch is a powerful search and analytics engine, and setting it up correctly ensures optimal performance, security, and cost efficiency.
We will go step by step, covering essential configurations such as the following:
- Choosing the right AWS region based on performance and cost considerations
- Selecting an appropriate instance type and storage options
- Configuring the OpenSearch domain with minimal settings to get started quickly
- Enabling OpenSearch Dashboards for visualization and management
By the end of this section, you will have a fully functional OpenSearch domain ready for indexing and querying data. Let’s dive in! 🚀
Step 1: Selecting the Right AWS Region for OpenSearch
Choosing the correct AWS region is crucial for performance, cost, and compliance. Here’s how you can decide:
- Proximity to Users or Applications
- Pick a region closer to your application servers or users to reduce latency.
- If your application runs on AWS (e.g., EC2 (Elastic Compute Cloud), Lambda), choose the same region for OpenSearch to minimize cross-region data transfer costs.
- Availability of OpenSearch Service
- Not all AWS regions support OpenSearch. Check the AWS Regional Services List to confirm.
- Compliance and Data Residency Requirements
- If you have regulatory requirements (GDPR (General Data Protection Regulation), HIPAA (Health Insurance Portability and Accountability Act of 1996), etc.), ensure your chosen region complies with them.
- Some industries require data to stay within a specific country or region.
- Cost Considerations
- AWS pricing varies by region. Some regions (e.g., US-East-1) are generally cheaper than others.
- Check the AWS OpenSearch Pricing Page to compare costs before making a decision.
Selecting the AWS Region in the Console
When setting up your OpenSearch Service domain, follow these steps to ensure the correct region is selected:
- Log in to the AWS Management Console
- Navigate to the OpenSearch Service (you can find it by searching in the AWS search bar)
- Check the AWS Region
- The selected region appears in the top-right corner of the console.
- If you need to change it, click on the region name and choose the preferred region from the dropdown list.
- Create a New OpenSearch Domain
- Click “Create domain” to start the OpenSearch setup process.
- Ensure the region is correct before proceeding.
- As shown in Figure 5, the selected region in this example is
Asia Pacific(Mumbai) —ap-south-1.
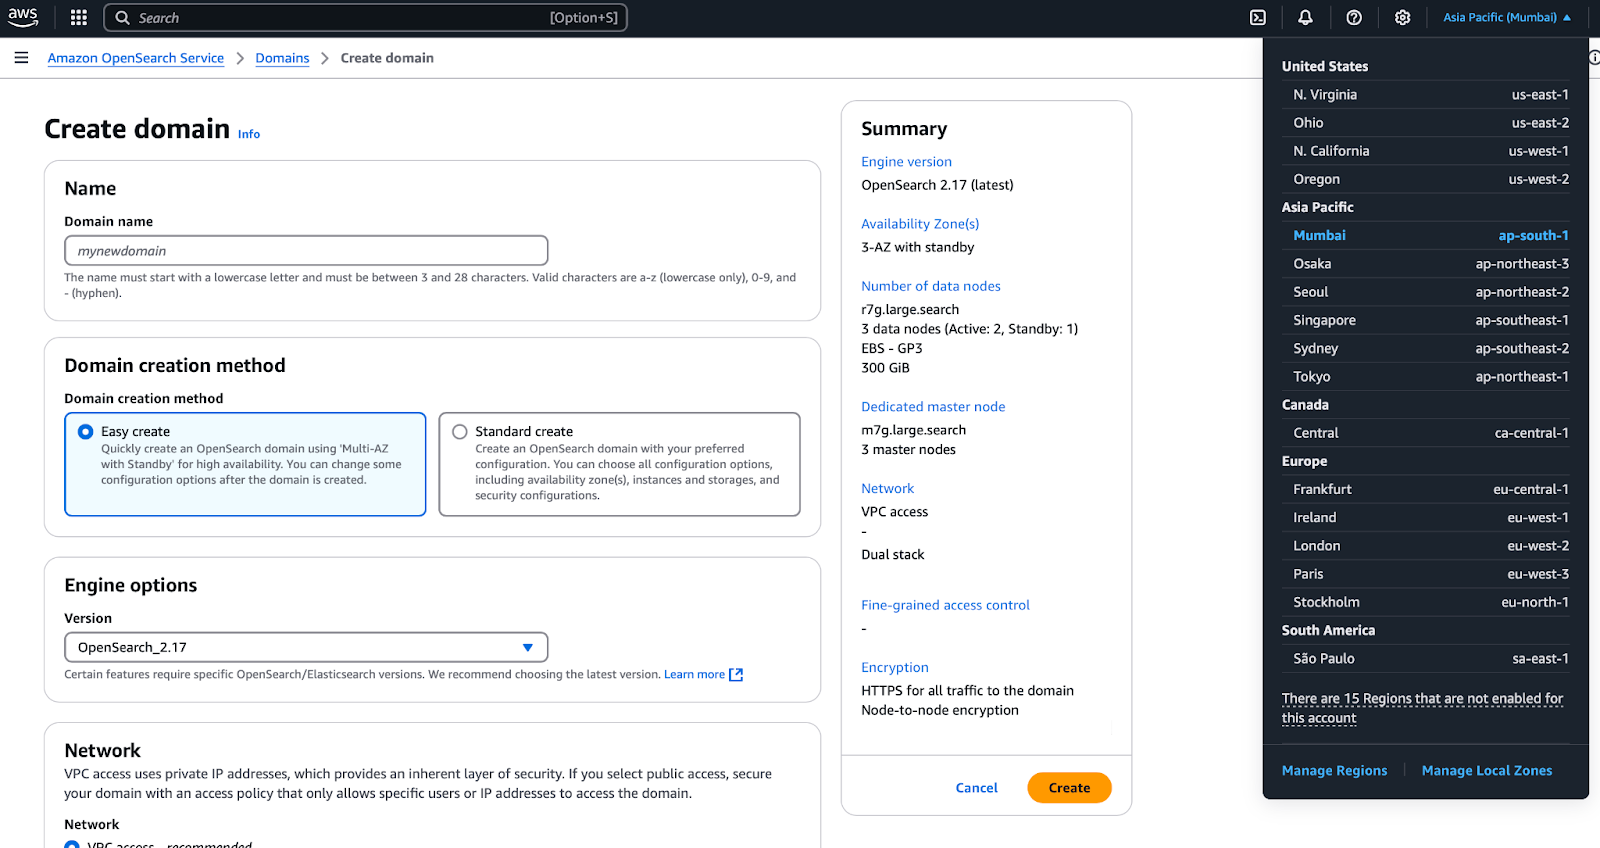
By verifying the region at this stage, you prevent unnecessary reconfigurations later. Once the region is selected correctly, you can proceed with choosing an instance type and storage options.
Step 2: Choosing an Instance Type and Storage Options
Now that we have selected the AWS region, the next step is to configure the instance type, number of data nodes, and storage options for our OpenSearch domain. These settings directly impact performance, scalability, and cost, so it’s important to make the right choices based on your use case.
Since this guide is for development and testing, we will use the Standard Create option and select the Dev/Test template, which provides a minimal setup but still allows customization. By default, AWS enables “Domain with Standby” (multi-AZ (Availability Zone) deployment), but to keep costs low, we will switch to “Domain Without Standby” (single AZ deployment).
1️⃣ Selecting the Right Instance Type
AWS OpenSearch Service offers different instance families optimized for specific workloads. Under General Purpose, you will see:
- T3 General Purpose (Budget-Friendly)
t3.small.search: The cheapest option, suitable for minimal workloads.t3.medium.search: Slightly better performance while still keeping costs low.
- M5 General Purpose (Previous Generation)
- M7G General Purpose (AWS Graviton-Based, Cost-Effective, and Energy-Efficient)
- M7I General Purpose (Latest Intel-Based, Performance-Oriented)
For this setup:
- If cost is the main concern: Choose
t3.medium.search - If you want better performance at a reasonable price: Choose
m7g.large.search
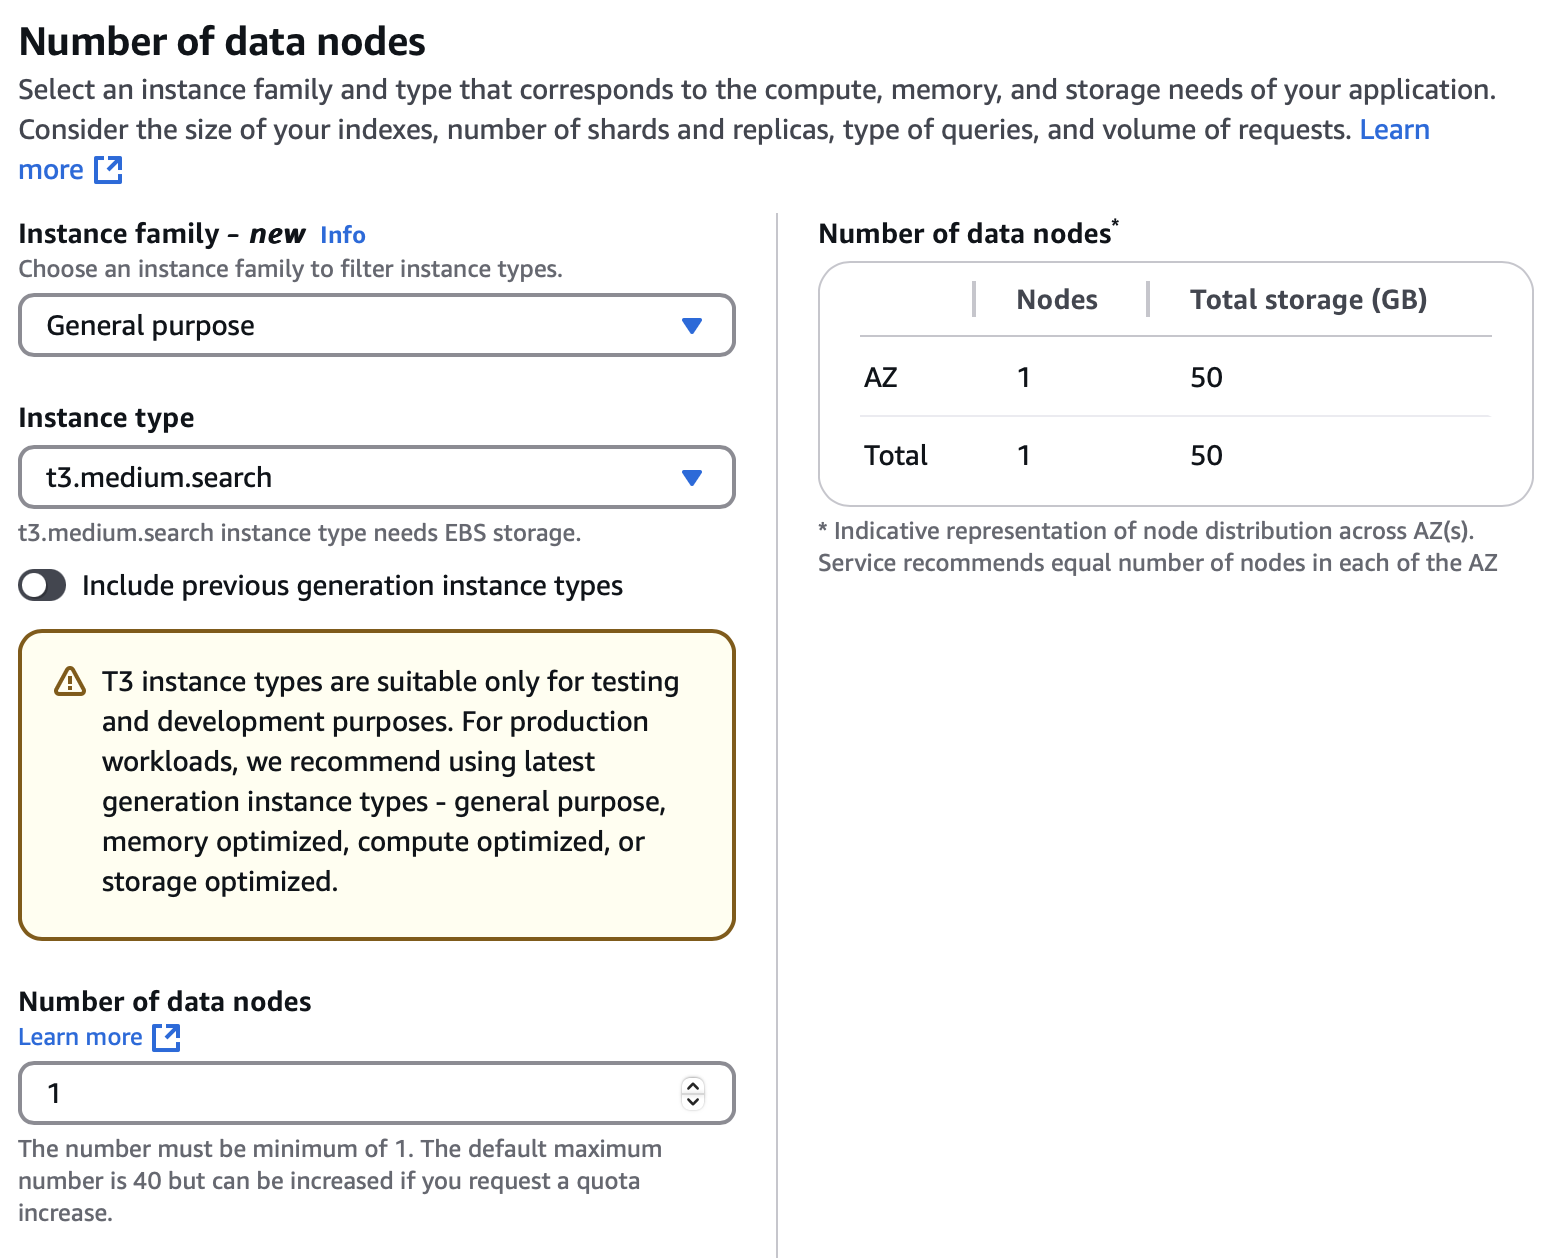
2️⃣ Configuring the Number of Data Nodes and Master Nodes
- Data Nodes: These store and process data, handling search queries and indexing.
- For development: Start with
1data node, which will also act as the master node. - For production: AWS recommends at least 3 data nodes for redundancy and performance.
- For development: Start with
- Master Node Role
- Since we are not enabling dedicated master nodes, the single data node will also handle cluster management.
- This is fine for development or testing, but in production, AWS recommends 3 dedicated master nodes for stability.
For this setup: Choose 1 data node and let it handle both data processing and cluster management. This keeps costs minimal while ensuring OpenSearch functions properly in a test environment.
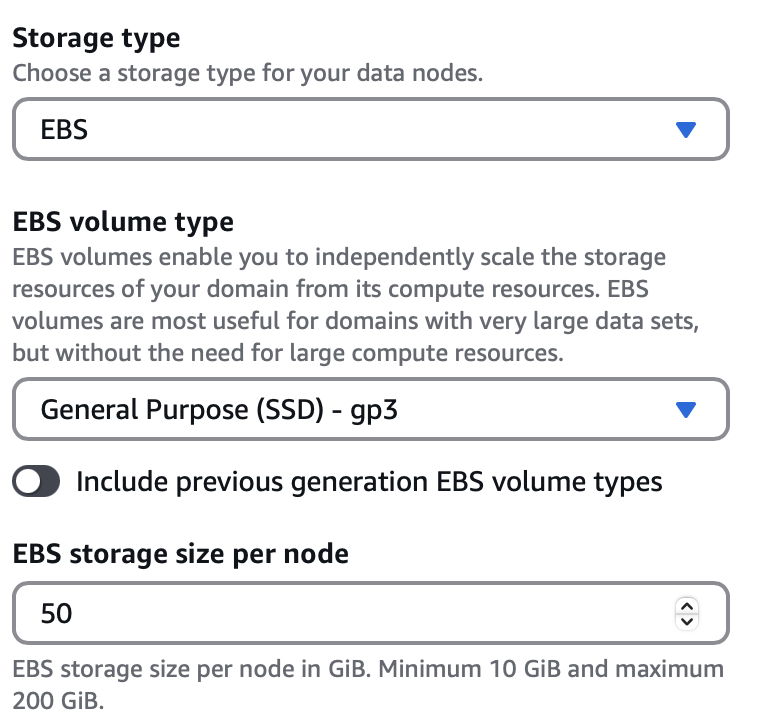
3️⃣ Choosing Storage Type and IOPS Settings
AWS OpenSearch supports multiple EBS (Elastic Block Store) volume types for storage:
- General Purpose SSD (Solid State Drive) (gp3): Recommended
- Provides a good balance between performance and cost.
- Suitable for most workloads.
- Provisioned IOPS (Input/Output Operations Per Second) SSD (io1): High Performance
- Magnetic (standard): Legacy Option
For this setup: Choose General Purpose (SSD) - gp3 with at least 50 GiB of storage.
Once you’ve selected your instance type, data nodes, and storage settings, the next step is to set up the domain with minimal configurations (e.g., networking, access control, encryption, etc.).
Step 3: Setting Up a Domain with Minimal Configurations
Now that we have selected the AWS region, instance type, data nodes, and storage options, we will complete the minimal configurations needed to launch the OpenSearch domain. These configurations include:
✅ Choosing the OpenSearch Engine Version
✅ Configuring Network and Access Settings
✅ Setting Up Basic Access Control
✅ Defining Encryption Settings (Minimal for Dev/Test)
✅ Enabling OpenSearch Dashboards
Since this setup is for development and testing, we will keep things simple while ensuring basic functionality.
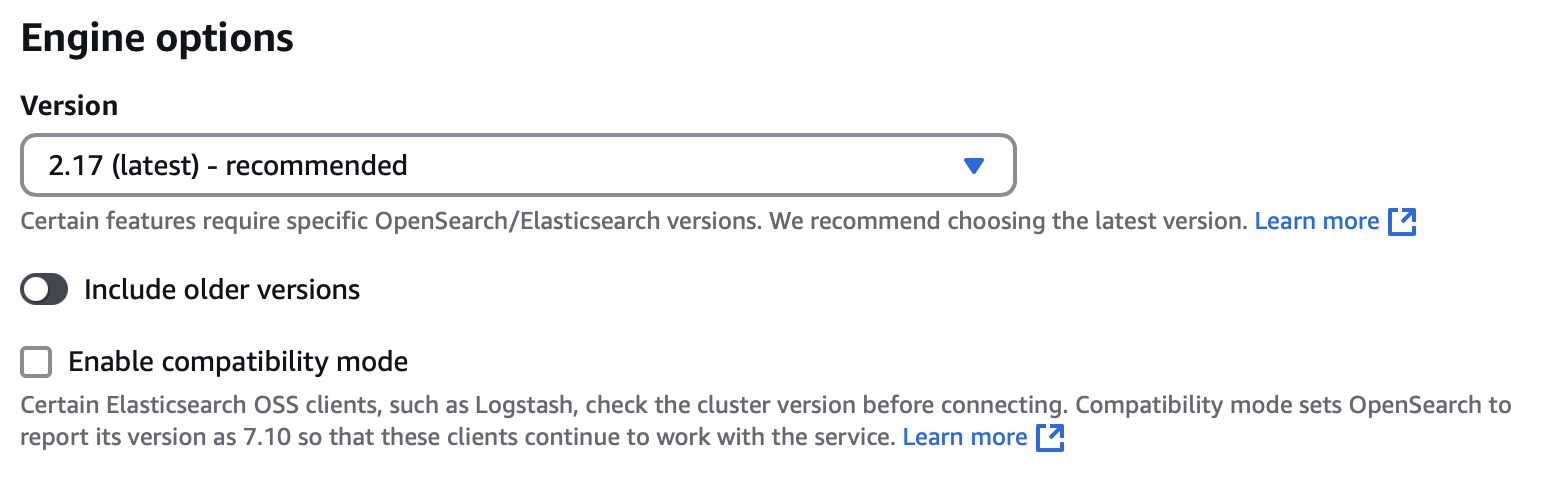
1️⃣ Choosing the OpenSearch Engine Version
AWS OpenSearch Service allows selecting from multiple versions of OpenSearch. The latest version usually includes:
- Performance improvements
- Security patches
- New features for search and analytics
For this setup:
- Select OpenSearch
2.17(or the latest available version). - Avoid older versions unless required for compatibility.
2️⃣ Configuring Network and Access Settings
AWS OpenSearch provides two network access options:
Option 1: VPC Access (Recommended for Production)
- Deploys OpenSearch inside your AWS Virtual Private Cloud (VPC).
- More secure but requires setting up IAM roles, security groups, and routing.
Option 2: Public Access (For Testing Only)
- Allows OpenSearch to be accessed over the internet.
- By default, all requests will be denied unless a domain-level access policy is set.
- If an open access policy is applied, anyone with the URL can connect.
For this setup:
- Select
Public access(for easy testing). - For production,
VPC accessis recommended.

3️⃣ Setting Up Basic Access Control
Option 1: IAM Access Policy (When FGAC is Disabled)
- If FGAC is disabled, OpenSearch access is managed using a domain-level IAM access policy.
- However, if “Do not set domain-level policy” is selected, all requests will be denied.
- IAM users and roles will NOT be able to log in or access OpenSearch.
Option 2: Fine-Grained Access Control (FGAC) (Recommended for User-Level Control)
- Enables user-level authentication using IAM ARN (Amazon Resource Name).
- Provides role-based permissions for different OpenSearch users.
- Requires setting a master user (either IAM ARN or manual username/password).
For this setup:
- Disable FGAC (since this is a dev setup, we won’t need user-level controls).
- If Public Access is enabled, please ensure to configure a domain-level access policy (otherwise, all access will be blocked).
- If “Do not set domain-level access policy” is selected, IAM authentication will not work, and OpenSearch will be completely inaccessible.
4️⃣ Defining Encryption Settings (Minimal for Dev/Test)
AWS OpenSearch supports encryption for securing data at rest and in transit.
- Encryption at Rest: Protects stored data from unauthorized access.
- Node-to-Node Encryption: Encrypts data traveling between cluster nodes.
For this setup:
- Disable both encryption options since this is a test environment.
- For production, enable both for security.

Verifying OpenSearch Accessibility and Health
Now that we have set up OpenSearch, the next step is to verify that it is accessible and operational. This includes:
- Accessing OpenSearch Dashboards (Ensuring UI is available).
- Checking OpenSearch domain health in AWS Console.
- Testing API access via cURL/Postman.
- Running a basic OpenSearch API query to confirm functionality.
Accessing OpenSearch Dashboards
OpenSearch Dashboards is a UI tool for managing and visualizing OpenSearch data.
Steps to Access OpenSearch Dashboards:
- Go to AWS OpenSearch Console: Your Domain.
- Locate the OpenSearch Dashboards URL and click on it.
- If OpenSearch Dashboards opens successfully, the setup is correct.
- If you encounter an error:
- Ensure Public Access is enabled.
- Verify that the OpenSearch domain is in “Active” state.
Figure 11 confirms that OpenSearch Dashboards is accessible and fully set up. From this interface, you can:
- Visualize and analyze data using
OpenSearch Dashboards. - Interact with OpenSearch API without needing cURL or Postman.
- Ingest sample data to test search functionalities.
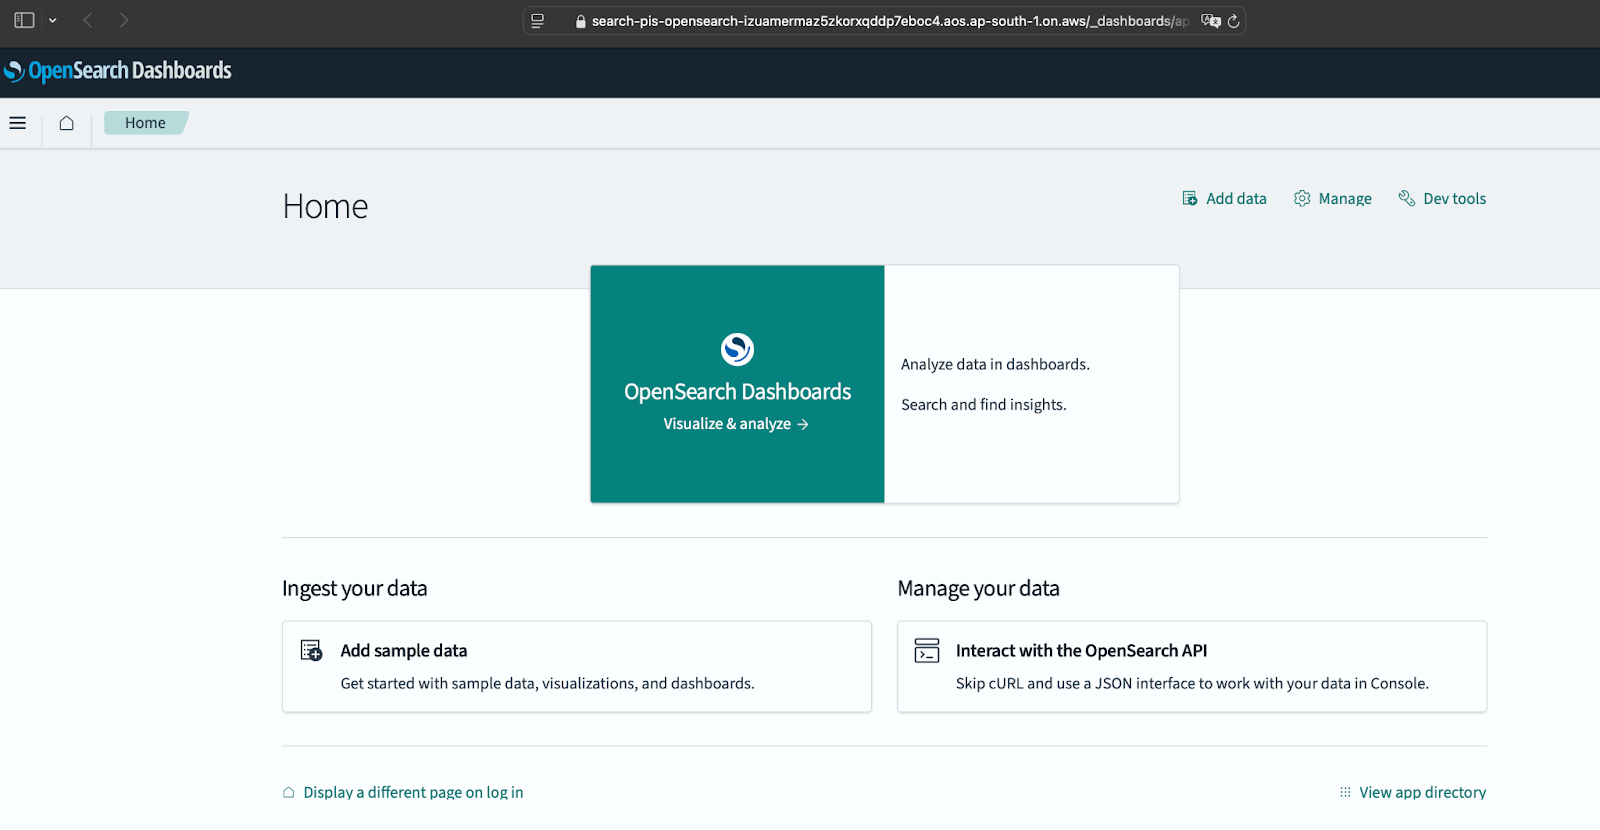
If you see this screen, your OpenSearch domain is successfully connected to OpenSearch Dashboards.
Checking OpenSearch Domain Health
Before we start storing or querying data, we need to ensure that the OpenSearch cluster is running properly.
To check the status in AWS Console:
- Navigate to AWS OpenSearch Service: Your Domain.
- Under Cluster Health: check if the status is “Active”.
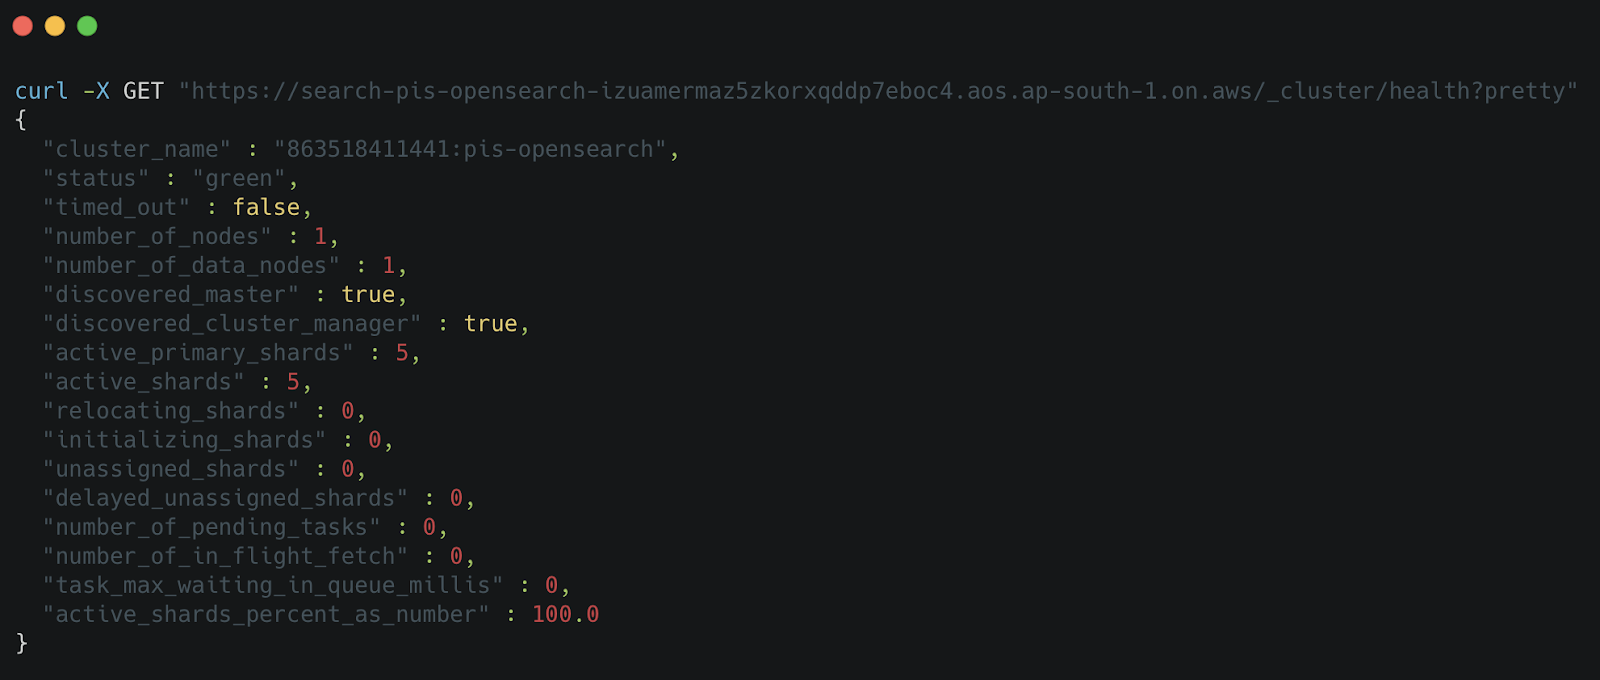
To check via API (cURL/Postman):
Run the following command:
curl -X GET "https://your-opensearch-domain-endpoint/_cluster/health?pretty"
✅ Expected Response Example:
- “Green” status: Everything is working fine.
- “Yellow” status: Some replicas are unassigned, but the cluster is operational.
- “Red” status: There are cluster issues that need attention.
And from Figure 12, it’s evident that our OpenSearch cluster is working fine.
Testing API Access via cURL/Postman
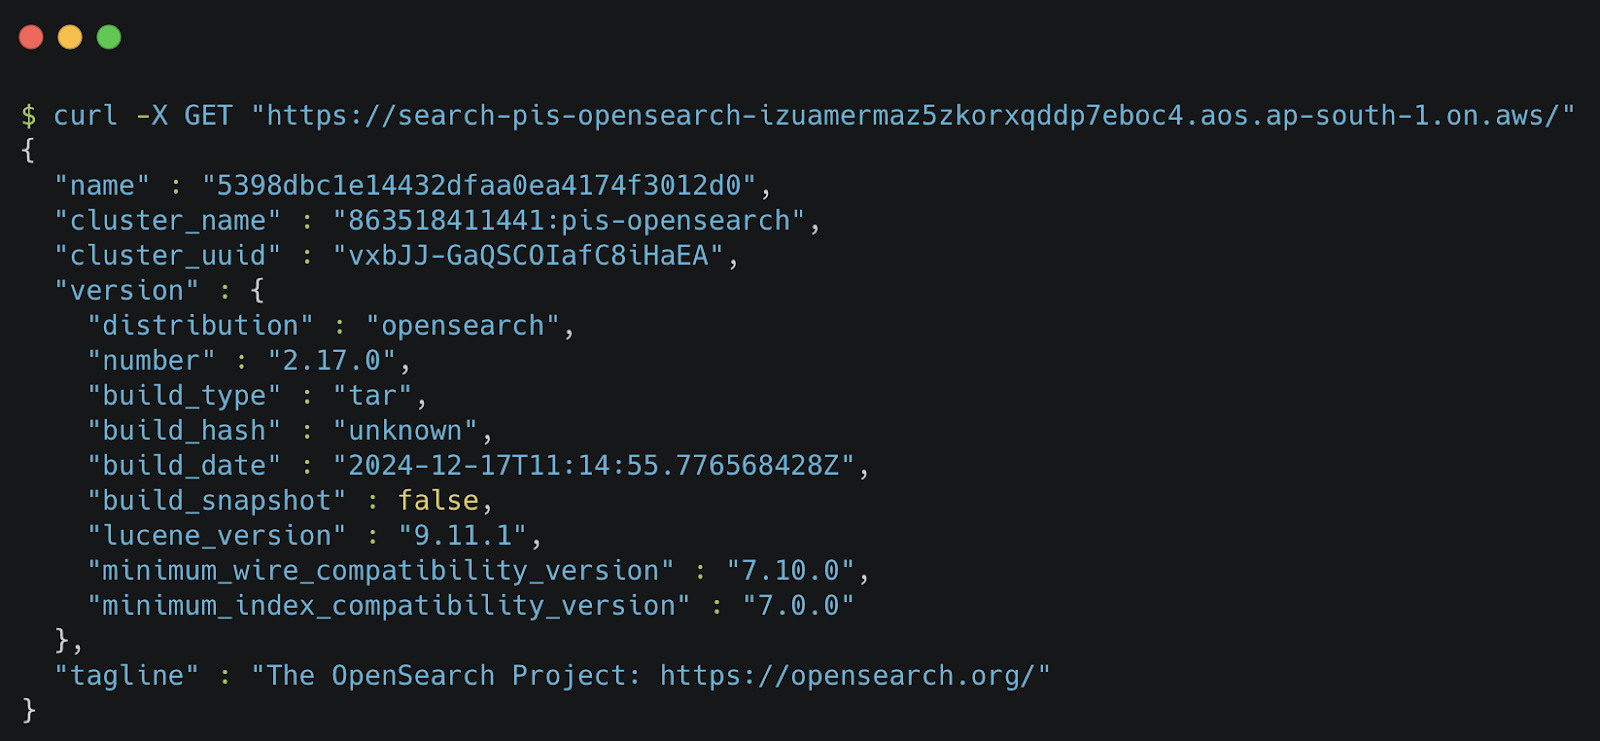
To ensure OpenSearch is reachable via API, we will send a basic request.
Try a Basic API Request:
curl -X GET "https://your-opensearch-domain-endpoint/"
✅ Expected Response Example:
Indexing and Querying Data in OpenSearch
Now that we have confirmed OpenSearch is running, we can move on to storing and retrieving data. This includes:
✅ Creating a sample index.
✅ Uploading sample text embeddings or documents.
✅ Running a basic search query to retrieve data.
1️⃣ Creating a Sample Index
An index in OpenSearch is like a database table where data is stored.
Create an index via API:
curl -X PUT "https://your-opensearch-domain-endpoint/test-index"
✅ Expected Response:
{ "acknowledged": true }
Figure 14 confirms that we have successfully created a test-index in our OpenSearch cluster.

2️⃣ Inserting Sample Data into OpenSearch
Now, we will insert some sample data into our newly created index.
Add a test document:
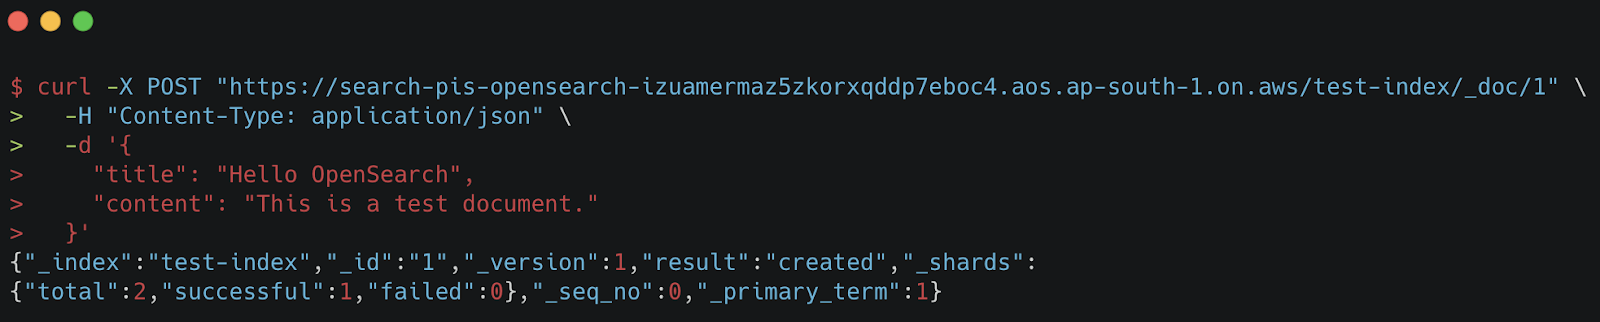
curl -X POST "https://your-opensearch-domain-endpoint/test-index/_doc/1" -H "Content-Type: application/json" -d '
{
  "title": "Hello OpenSearch",
  "content": "This is a test document."
}'
✅ Expected Response:
{ "_index": "test-index", "_id": "1", "result": "created" }
Figure 15 confirms that we have successfully inserted test data into our test-index of the pis-opensearch cluster. The response shows "result": "created", indicating that the document was indexed correctly. This verifies that our OpenSearch setup is functional and ready for further querying. 🚀
3️⃣ Searching for Data in OpenSearch
Now that we have data stored in OpenSearch, let’s try searching for it.
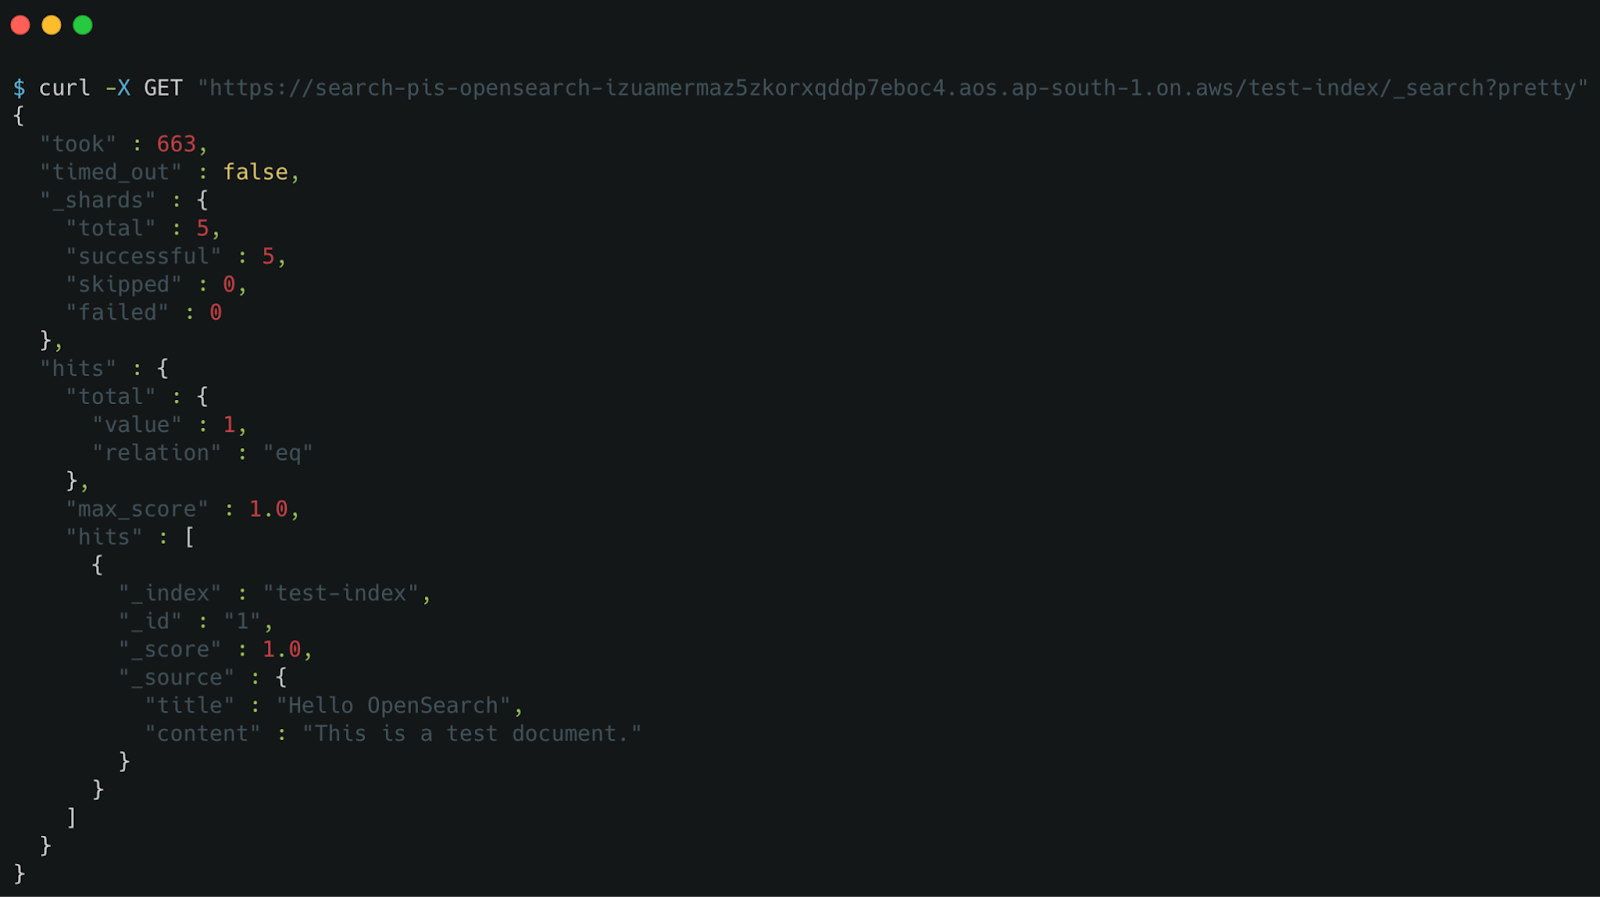
Run a search query:
curl -X GET "https://your-opensearch-domain-endpoint/test-index/_search?pretty"
✅ Expected Response:
{
  "hits": {
    "total": { "value": 1 },
    "hits": [
      {
        "_source": {
          "title": "Hello OpenSearch",
          "content": "This is a test document."
        }
      }
    ]
  }
}
Figure 16 confirms that we have successfully retrieved the test document from the test-index in the pis-opensearch cluster. The response shows "hits.total.value": 1, indicating that one matching document was found. This verifies that our OpenSearch setup is functional and can return stored data through search queries. 🚀
What’s Next?
Now that OpenSearch is set up and tested, the next step is to implement semantic search using vector embeddings. In the next blog, we’ll focus on storing and querying text embeddings to perform similarity-based searches in OpenSearch.
🚀 “Building a Semantic Search System with OpenSearch and Vector Embeddings”
- How to generate vector embeddings from movie plot descriptions (using models like BERT or OpenAI embeddings).
- How to store embeddings in OpenSearch for efficient retrieval.
- How to perform a semantic search using OpenSearch’s
neuralquery for high-quality results.
Stay tuned for the next post! 🚀
What's next? We recommend PyImageSearch University.
120+ total classes • 115+ hours hours of on-demand code walkthrough videos • Last updated: July 2026
★★★★★ 4.84 (128 Ratings) • 16,000+ Students Enrolled
I strongly believe that if you had the right teacher you could master computer vision and deep learning.
Do you think learning computer vision and deep learning has to be time-consuming, overwhelming, and complicated? Or has to involve complex mathematics and equations? Or requires a degree in computer science?
That’s not the case.
All you need to master computer vision and deep learning is for someone to explain things to you in simple, intuitive terms. And that’s exactly what I do. My mission is to change education and how complex Artificial Intelligence topics are taught.
If you're serious about learning computer vision, your next stop should be PyImageSearch University, the most comprehensive computer vision, deep learning, and OpenCV course online today. Here you’ll learn how to successfully and confidently apply computer vision to your work, research, and projects. Join me in computer vision mastery.
Inside PyImageSearch University you'll find:
- ✓ 120+ courses on essential computer vision, deep learning, and OpenCV topics
- ✓ 94+ Certificates of Completion
- ✓ 115+ hours hours of on-demand video
- ✓ Brand new courses released regularly, ensuring you can keep up with state-of-the-art techniques
- ✓ Pre-configured Jupyter Notebooks in Google Colab
- ✓ Run all code examples in your web browser — works on Windows, macOS, and Linux (no dev environment configuration required!)
- ✓ Access to centralized code repos for all 540+ tutorials on PyImageSearch
- ✓ Easy one-click downloads for code, datasets, pre-trained models, etc.
- ✓ Access on mobile, laptop, desktop, etc.
Summary
In this guide, we walked through the step-by-step process of creating an AWS OpenSearch domain, from selecting the right region to verifying OpenSearch functionality. The goal was to set up a minimal, development-friendly OpenSearch environment while keeping costs low and configurations simple.
Key Takeaways
- Selected the appropriate AWS region based on performance, cost, and compliance needs.
- Configured instance type, number of data nodes, and storage options to match a dev/test setup.
- Set up the OpenSearch domain with minimal configurations, including network settings, access control, and OpenSearch Dashboards.
- Verified that OpenSearch was accessible and operational by testing cluster health and API access and fixing any access issues.
- Indexed and queried test data in OpenSearch to ensure everything was working correctly.
By the end of this setup, we successfully launched an AWS OpenSearch domain, enabled Dashboards, tested API access, and ran queries to confirm that OpenSearch was running smoothly.
Citation Information
Singh, V. “Build a Search Engine: Setting Up AWS OpenSearch,” PyImageSearch, P. Chugh, S. Huot, G. Kudriavtsev, A. Sharma, and P. Thakur, eds., 2025, https://pyimg.co/ysf4q
@incollection{Singh_2025_Build-Search-Engine-Setting-Up-AWS-OpenSearch,
  author = {Vikram Singh},
  title = {{Build a Search Engine: Setting Up AWS OpenSearch}},
  booktitle = {PyImageSearch},
  editor = {Puneet Chugh and Susan Huot and Georgii Kudriavtsev and Aditya Sharma and Piyush Thakur},
  year = {2025},
  url = {https://pyimg.co/ysf4q},
}
To download the source code to this post (and be notified when future tutorials are published here on PyImageSearch), simply enter your email address in the form below!

Download the Source Code and FREE 17-page Resource Guide
Enter your email address below to get a .zip of the code and a FREE 17-page Resource Guide on Computer Vision, OpenCV, and Deep Learning. Inside you'll find my hand-picked tutorials, books, courses, and libraries to help you master CV and DL!

Comment section
Hey, Adrian Rosebrock here, author and creator of PyImageSearch. While I love hearing from readers, a couple years ago I made the tough decision to no longer offer 1:1 help over blog post comments.
At the time I was receiving 200+ emails per day and another 100+ blog post comments. I simply did not have the time to moderate and respond to them all, and the sheer volume of requests was taking a toll on me.
Instead, my goal is to do the most good for the computer vision, deep learning, and OpenCV community at large by focusing my time on authoring high-quality blog posts, tutorials, and books/courses.
If you need help learning computer vision and deep learning, I suggest you refer to my full catalog of books and courses — they have helped tens of thousands of developers, students, and researchers just like yourself learn Computer Vision, Deep Learning, and OpenCV.
Click here to browse my full catalog.