
Table of Contents
Chat with Graphic PDFs: Building an AI PDF Summarizer
Welcome to the 2nd part of our series on creating a Vision-Language Retrieval-Augmented Generation (RAG) pipeline! In our previous tutorial, “Chat with Graphic PDFs: Understand How AI PDF Summarizers Work,” we explored the theoretical foundations and architecture of this system. Now, we’ll transition from theory to practice, guiding you through the step-by-step implementation of a multimodal, chat-based RAG pipeline for complex portable document format (PDF) analysis using advanced models like ColPali and LLaVA-Gemma-2B.
This lesson is the last of a 2-part series on Vision-Language RAG Pipeline:
- Chat with Graphic PDFs: Understand How AI PDF Summarizers Work
- Chat with Graphic PDFs: Building an AI PDF Summarizer (this tutorial)
To learn how to implement a Vision-Language RAG pipeline for analyzing complex PDFs, just keep reading.
Configuring Your Development Environment
To follow this guide, we need to prepare our environment by installing the necessary libraries and tools.
!pip install --upgrade -qq byaldi
First, we need to install the byaldi library to enable easy integration with multimodal RAG models. Byaldi serves as a lightweight wrapper around the ColPali repository, offering a simplified application programming interface (API) for working with late-interaction multimodal models.
!sudo apt-get install -y poppler-utils
Since we are working with PDFs, we need to install poppler-utils for manipulating PDF files and converting them to different formats.
!pip install -q pdf2image transformers
We will also install pdf2image for converting PDF pages into images. This library requires poppler-utils to be installed in our system. Finally, we install transformers to load the Hugging Face models (e.g., ColPali and LLaVA).
Need Help Configuring Your Development Environment?

All that said, are you:
- Short on time?
- Learning on your employer’s administratively locked system?
- Wanting to skip the hassle of fighting with the command line, package managers, and virtual environments?
- Ready to run the code immediately on your Windows, macOS, or Linux system?
Then join PyImageSearch University today!
Gain access to Jupyter Notebooks for this tutorial and other PyImageSearch guides pre-configured to run on Google Colab’s ecosystem right in your web browser! No installation required.
And best of all, these Jupyter Notebooks will run on Windows, macOS, and Linux!
Setup and Imports
import torch

from byaldi import RAGMultiModalModel
from pdf2image import convert_from_path
from transformers import LlavaForConditionalGeneration, AutoProcessor
We now import the required libraries for our workflow. We import torch to handle tensor computations. Next, we import RAGMultiModalModel from the byaldi library, which provides a user-friendly wrapper for working with pre-trained multimodal RAG models (e.g., ColPali). We also import convert_from_path from the pdf2image library to extract images from the PDF file. Finally, we import LlavaForConditionalGeneration and AutoProcessor from the transformers library to load and process the LLaVA (Large Language and Vision Assistant) model.
Upload the PDF
pdf_path = "/content/kids.pdf"
images = convert_from_path(pdf_path)
Once the setup is done, we upload the PDF in the Colab and define the path in the variable pdf_path.
Then, we call convert_from_path on the pdf_path to convert the uploaded PDF into a list of images, where each image represents a page in the PDF.
NOTE: If we have not installed poppler-utils, we will get the following error:
PDFInfoNotInstalledError: Unable to get page count. Is poppler installed in PATH?
Load the ColPali Model
The ColPali model excels at multimodal retrieval tasks, as discussed in our previous tutorial. Let’s see it in action.
RAG = RAGMultiModalModel.from_pretrained("vidore/colpali")
We first download and initialize the pre-trained ColPali model using the from_pretrained method of the RAGMultiModalModel class.
Index the Document
Then, we use RAG.index to convert the PDF into an indexed format for efficient search operations.
RAG.index(
   input_path="/content/kids.pdf",
   index_name="image_index",
   store_collection_with_index=False,
   overwrite=True
)
We provide the following parameters:
input_path: Specifies the file path to the PDF document, in this case,/content/kids.pdf.index_name: Defines the name of the index, here set as"image_index". This identifier is used to manage and query the index.store_collection_with_index: If set toFalse, the document collection is not stored alongside the index, reducing storage overhead.overwrite: Ensures that if an index with the same name already exists, it will be replaced with a new one.
Once indexed, the PDF content is structured and optimized for quick and accurate retrieval of information. This makes the pipeline highly efficient for search tasks, especially when working with large or complex documents.
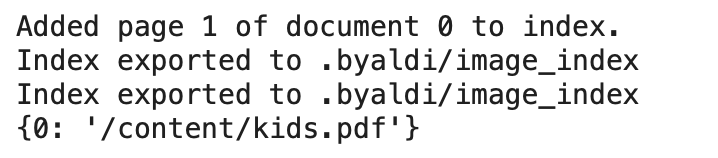
Figure 1 displays the output generated after running the indexing code.
In this example, we’re working with a single-page PDF for simplicity and demonstration purposes. The output confirms that page 1 of the document has been successfully indexed and stored at .byaldi/image_index.
Query the Document
text_query = "What is needed for Healthy diet?"
results = RAG.search(text_query, k=1)
results
After indexing the PDF, we are ready to query it for specific information. Let’s start with a simple question.
Here, we define text_query as "What is needed for Healthy diet?" — this represents the question we want to ask. Then, we use the RAG.search method to retrieve the most relevant answer from the indexed content. The parameter k=1 tells the model to return only the top result.
The output (Figure 2), stored in the results variable, includes detailed information such as the document ID (doc_id), page number (page_num), relevance score (score), and any associated metadata. For example, in our case, the top result indicates that the answer is found on page 1 ('page_num': 1) of the document ('doc_id': 0) with a relevance score of 18.5.

Retrieved Result
images[results[0]["page_num"] - 1]
Next, we extract the specific page (Figure 3) from the PDF that corresponds to the top search result.
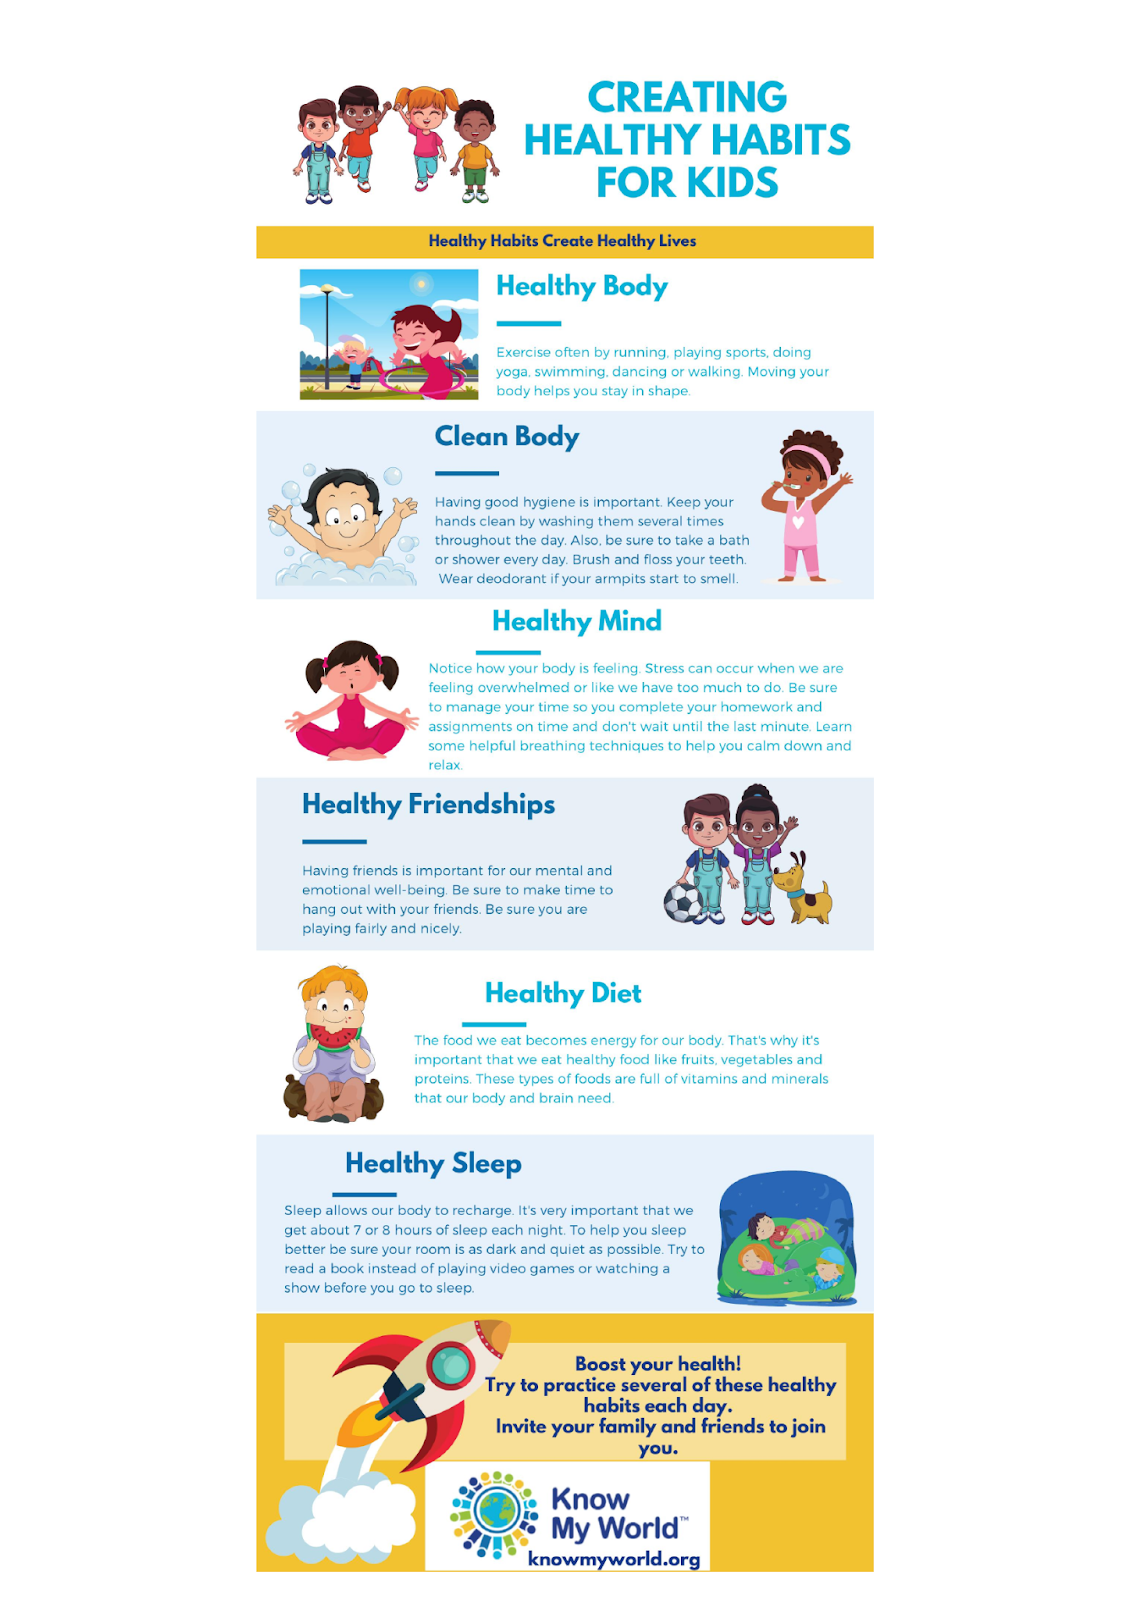
We use page_num from the results variable to locate the desired page in the images list. Since list indexing in Python starts from 0, we subtract 1 from the page_num to align it correctly with the list index.
This extracts the image of the page where the answer to our query is located. For instance, if the result indicates 'page_num': 1, this code fetches the first page of the PDF as an image. This image will be used as input for the vision-language model in the next step to generate our chat-based responses.
Load the LLaVA Model
Now, we load the LLaVA-Gemma-2B model, which will process multimodal inputs to generate coherent text responses.
checkpoint = "Intel/llava-gemma-2b"
model = LlavaForConditionalGeneration.from_pretrained(checkpoint)
processor = AutoProcessor.from_pretrained(checkpoint)
We start by defining the model checkpoint.
Next, we use the from_pretrained method to load both the model and its processor.
- Model Loading:
LlavaForConditionalGeneration.from_pretrained(checkpoint)loads the pre-trained LLaVA model, which specializes in generating text based on both visual and textual inputs. - Processor Initialization:
AutoProcessor.from_pretrained(checkpoint)initializes the processor, which handles the preprocessing of inputs for the model.
This step ensures that the model and processor are ready to process multimodal data, such as combining images and text to generate meaningful answers to user queries.
Preprocess the Inputs
prompt = processor.tokenizer.apply_chat_template(
   [{'role': 'user', 'content': "<image>\nWhat is written about Healthy Diet?"}],
   tokenize=False,
   add_generation_prompt=True
)

image_index = results[0]["page_num"] - 1
image = images[image_index]
inputs = processor(text=prompt, images=image, return_tensors="pt")
Next, we prepare the input for the LLaVA-Gemma-2B model to generate a response. This involves creating a query prompt and processing the corresponding page image.
We use the processor’s tokenizer to structure our query in a way the model can understand.
- The
apply_chat_templatemethod structures the query as a chat-like conversation. - The
<image>token tells the model that the input includes an image, followed by the user’s question. - The
add_generation_prompt=Trueparameter signals the model to prepare for generating a response.
Then, we extract the image corresponding to the indexed search result:
results[0]["page_num"] - 1identifies the page number from the search results (adjusted for zero-based indexing).- We retrieve the image using this index from the
imageslist.
The extracted image and the query prompt are passed to the processor to create model-ready inputs:
text=promptandimages=image: specifies the multimodal input.return_tensors="pt": ensures the inputs are returned as PyTorch tensors, ready for the model.
With these steps, we’ve successfully prepared the multimodal input, combining the query and the relevant page image, for the LLaVA-Gemma-2B model to generate a response.
Generate the Response
generate_ids = model.generate(**inputs, max_length=200)
output = processor.batch_decode(generate_ids, skip_special_tokens=True, clean_up_tokenization_spaces=False)[0]
print(output)
Finally, we generate a response using the LLaVA-Gemma-2B model. This step involves passing the prepared inputs to the model and decoding its output into human-readable text.
We use the model’s generate method to produce the token IDs for the response:
- The
**inputsparameter feeds the multimodal inputs (query and image) to the model. - The
max_length=200parameter ensures the generated response doesn’t exceed 200 tokens.
Next, we decode the generated token IDs into a readable format:
- The
batch_decodemethod translates the token IDs back into text. - Setting
skip_special_tokens=Trueremoves unnecessary model-specific tokens from the output. - The
clean_up_tokenization_spaces=Falseparameter retains the original spacing and punctuation for clarity.
Finally, we print the generated response.
user

What is written about Healthy Diet?
model
The image features a colorful chart with various health-related topics, including a healthy diet. The chart is divided into sections, each containing a different health-related concept. The topics covered in the chart include healthy eating, healthy sleep, healthy body, and healthy habits. The chart is designed to help individuals understand and maintain a healthy lifestyle.
The chart is accompanied by a motivational message, encouraging people to make healthy choices and maintain a balanced diet.
The chart is colorful and visually appealing, making it an engaging and informative resource for those looking to improve their health and well-being.
The chart is likely intended for use in schools, health centers, or other educational settings to help individuals make healthier choices and maintain a balanced lifestyle.
The chart is designed to be visually appealing and easy to understand, making it an effective tool for promoting healthy habits and making positive lifestyle choices.
The model processes the image and query to generate a concise and relevant response.
What's next? We recommend PyImageSearch University.
120+ total classes • 115+ hours hours of on-demand code walkthrough videos • Last updated: July 2026
★★★★★ 4.84 (128 Ratings) • 16,000+ Students Enrolled
I strongly believe that if you had the right teacher you could master computer vision and deep learning.
Do you think learning computer vision and deep learning has to be time-consuming, overwhelming, and complicated? Or has to involve complex mathematics and equations? Or requires a degree in computer science?
That’s not the case.
All you need to master computer vision and deep learning is for someone to explain things to you in simple, intuitive terms. And that’s exactly what I do. My mission is to change education and how complex Artificial Intelligence topics are taught.
If you're serious about learning computer vision, your next stop should be PyImageSearch University, the most comprehensive computer vision, deep learning, and OpenCV course online today. Here you’ll learn how to successfully and confidently apply computer vision to your work, research, and projects. Join me in computer vision mastery.
Inside PyImageSearch University you'll find:
- ✓ 120+ courses on essential computer vision, deep learning, and OpenCV topics
- ✓ 94+ Certificates of Completion
- ✓ 115+ hours hours of on-demand video
- ✓ Brand new courses released regularly, ensuring you can keep up with state-of-the-art techniques
- ✓ Pre-configured Jupyter Notebooks in Google Colab
- ✓ Run all code examples in your web browser — works on Windows, macOS, and Linux (no dev environment configuration required!)
- ✓ Access to centralized code repos for all 540+ tutorials on PyImageSearch
- ✓ Easy one-click downloads for code, datasets, pre-trained models, etc.
- ✓ Access on mobile, laptop, desktop, etc.
Summary
In this tutorial, we took a hands-on approach to building a Vision-Language Retrieval-Augmented Generation (RAG) pipeline for analyzing PDFs using the ColPali and LLaVA models.
This concludes our 2-part series on leveraging multimodal models to analyze complex documents and generate meaningful responses. By combining these powerful models, we’ve unlocked the potential for a wide range of applications in fields like education, healthcare, research, and beyond.
Citation Information
Thakur, P. “Chat with Graphic PDFs: Building an AI PDF Summarizer,” PyImageSearch, P. Chugh, S. Huot, and G. Kudriavtsev, eds., 2025, https://pyimg.co/u65dw
@incollection{Thakur_2025_chat-w-graphic-pdfs-building-ai-pdf-summarizer,
  author = {Piyush Thakur},
  title = {{Chat with Graphic PDFs: Building an AI PDF Summarizer}},
  booktitle = {PyImageSearch},
  editor = {Puneet Chugh and Susan Huot and Georgii Kudriavtsev},
  year = {2025},
  url = {https://pyimg.co/u65dw},
}
To download the source code to this post (and be notified when future tutorials are published here on PyImageSearch), simply enter your email address in the form below!

Download the Source Code and FREE 17-page Resource Guide
Enter your email address below to get a .zip of the code and a FREE 17-page Resource Guide on Computer Vision, OpenCV, and Deep Learning. Inside you'll find my hand-picked tutorials, books, courses, and libraries to help you master CV and DL!

Comment section
Hey, Adrian Rosebrock here, author and creator of PyImageSearch. While I love hearing from readers, a couple years ago I made the tough decision to no longer offer 1:1 help over blog post comments.
At the time I was receiving 200+ emails per day and another 100+ blog post comments. I simply did not have the time to moderate and respond to them all, and the sheer volume of requests was taking a toll on me.
Instead, my goal is to do the most good for the computer vision, deep learning, and OpenCV community at large by focusing my time on authoring high-quality blog posts, tutorials, and books/courses.
If you need help learning computer vision and deep learning, I suggest you refer to my full catalog of books and courses — they have helped tens of thousands of developers, students, and researchers just like yourself learn Computer Vision, Deep Learning, and OpenCV.
Click here to browse my full catalog.