In this tutorial, you will learn about OpenCV Haar Cascades and how to apply them to real-time video streams.
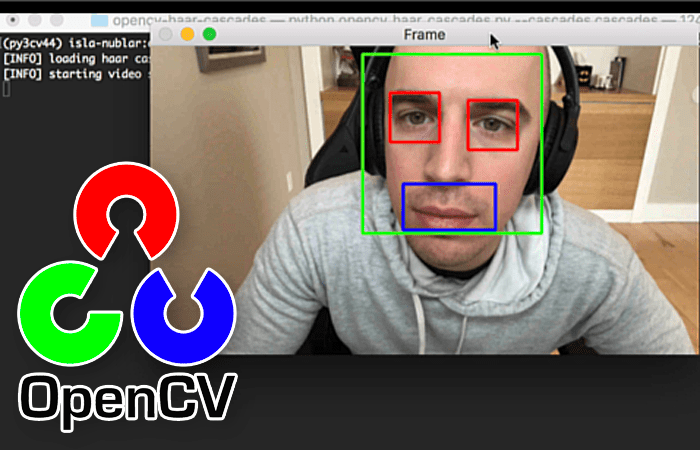
Haar cascades, first introduced by Viola and Jones in their seminal 2001 publication, Rapid Object Detection using a Boosted Cascade of Simple Features, are arguably OpenCV’s most popular object detection algorithm.
Sure, many algorithms are more accurate than Haar cascades (HOG + Linear SVM, SSDs, Faster R-CNN, YOLO, to name a few), but they are still relevant and useful today.
One of the primary benefits of Haar cascades is that they are just so fast — it’s hard to beat their speed.
The downside to Haar cascades is that they tend to be prone to false-positive detections, require parameter tuning when being applied for inference/detection, and just, in general, are not as accurate as the more “modern” algorithms we have today.
That said, Haar cascades are:
- An important part of the computer vision and image processing literature
- Still used with OpenCV
- Still useful, particularly when working in resource-constrained devices when we cannot afford to use more computationally expensive object detectors
In the remainder of this tutorial, you’ll learn about Haar cascades, including how to use them with OpenCV.
To learn how to use OpenCV Haar cascades, just keep reading.
OpenCV Haar Cascades
In the first part of this tutorial, we’ll review what Haar cascades are and how to use Haar cascades with the OpenCV library.
From there, we’ll configure our development environment and then review our project structure.
With our project directory structure reviewed, we’ll move on to apply our Haar cascades in real-time with OpenCV.
We’ll wrap up this guide with a discussion of our results.
What are Haar cascades?
First published by Paul Viola and Michael Jones in their 2001 paper, Rapid Object Detection using a Boosted Cascade of Simple Features, this original work has become one of the most cited papers in computer vision literature.
In their paper, Viola and Jones propose an algorithm that is capable of detecting objects in images, regardless of their location and scale in an image. Furthermore, this algorithm can run in real-time, making it possible to detect objects in video streams.
Specifically, Viola and Jones focus on detecting faces in images. Still, the framework can be used to train detectors for arbitrary “objects,” such as cars, buildings, kitchen utensils, and even bananas.
While the Viola-Jones framework certainly opened the door to object detection, it is now far surpassed by other methods, such as using Histogram of Oriented Gradients (HOG) + Linear SVM and deep learning. We need to respect this algorithm and at least have a high-level understanding of what’s going on underneath the hood.
Recall when we discussed image and convolutions and how we slid a small matrix across our image from left-to-right and top-to-bottom, computing an output value for each center pixel of the kernel? Well, it turns out that this sliding window approach is also extremely useful in the context of detecting objects in an image:
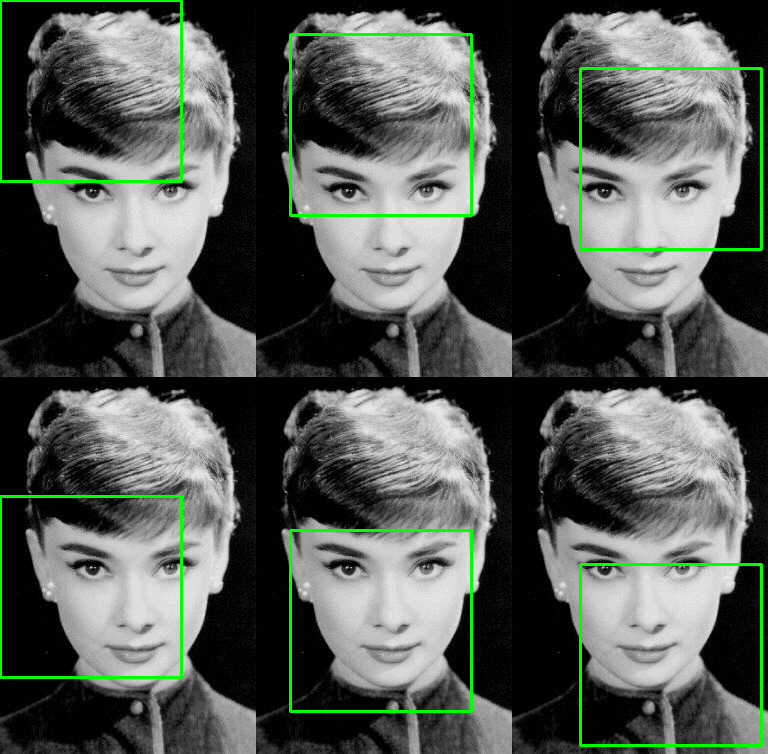
In Figure 2, we can see that we are sliding a fixed size window across our image at multiple scales. At each of these phases, our window stops, computes some features, and then classifies the region as Yes, this region does contain a face, or No, this region does not contain a face.
This requires a bit of machine learning. We need a classifier that is trained in using positive and negative samples of a face:
- Positive data points are examples of regions containing a face
- Negative data points are examples of regions that do not contain a face
Given these positive and negative data points, we can “train” a classifier to recognize whether a given region of an image contains a face.
Luckily for us, OpenCV can perform face detection out-of-the-box using a pre-trained Haar cascade:
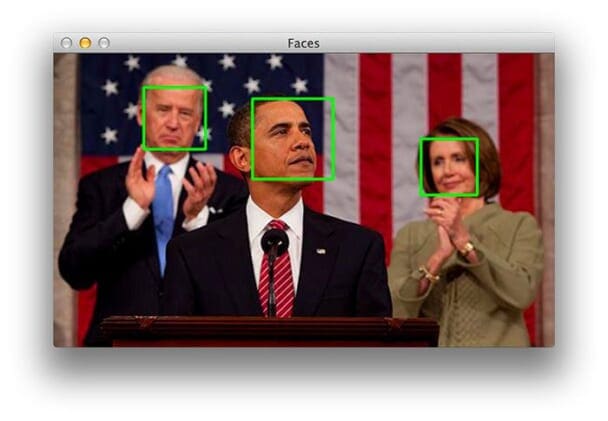
This ensures that we do not need to provide our own positive and negative samples, train our own classifier, or worry about getting the parameters tuned exactly right. Instead, we simply load the pre-trained classifier and detect faces in images.
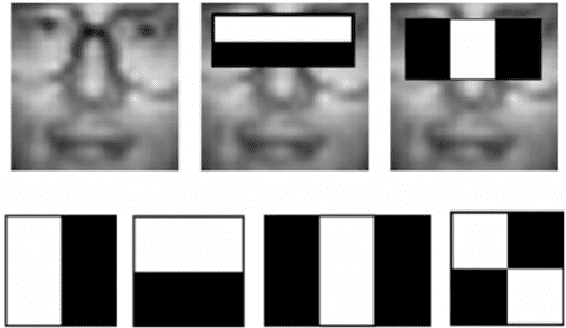
However, under the hood, OpenCV is doing something quite interesting. For each of the stops along the sliding window path, five rectangular features are computed:
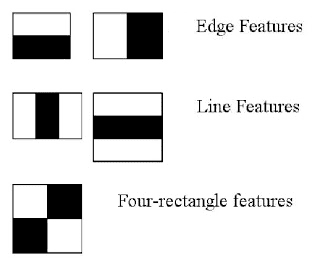
If you are familiar with wavelets, you may see that they bear some resemblance to Haar basis functions and Haar wavelets (where Haar cascades get their name).
To obtain features for each of these five rectangular areas, we simply subtract the sum of pixels under the white region from the sum of pixels under the black region. Interestingly enough, these features have actual real importance in the context of face detection:
- Eye regions tend to be darker than cheek regions.
- The nose region is brighter than the eye region.
Therefore, given these five rectangular regions and their corresponding difference of sums, we can form features that can classify parts of a face.
Then, for an entire dataset of features, we use the AdaBoost algorithm to select which ones correspond to facial regions of an image.
However, as you can imagine, using a fixed sliding window and sliding it across every (x, y)-coordinate of an image, followed by computing these Haar-like features, and finally performing the actual classification can be computationally expensive.
To combat this, Viola and Jones introduced the concept of cascades or stages. At each stop along the sliding window path, the window must pass a series of tests where each subsequent test is more computationally expensive than the previous one. If any one test fails, the window is automatically discarded.
Some Haar cascade benefits are that they’re very fast at computing Haar-like features due to the use of integral images (also called summed area tables). They are also very efficient for feature selection through the use of the AdaBoost algorithm.
Perhaps most importantly, they can detect faces in images regardless of the location or scale of the face.
Finally, the Viola-Jones algorithm for object detection is capable of running in real-time.
Problems and limitations of Haar cascades
However, it’s not all good news. The detector tends to be the most effective for frontal images of the face.
Haar cascades are notoriously prone to false-positives — the Viola-Jones algorithm can easily report a face in an image when no face is present.
Finally, as we’ll see in the rest of this lesson, it can be quite tedious to tune the OpenCV detection parameters. There will be times when we can detect all the faces in an image. There will be other times when (1) regions of an image are falsely classified as faces, and/or (2) faces are missed entirely.
If the Viola-Jones algorithm interests you, take a look at the official Wikipedia page and the original paper. The Wikipedia page does an excellent job of breaking the algorithm down into easy to digest pieces.
How do you use Haar cascades with OpenCV?

The OpenCV library maintains a repository of pre-trained Haar cascades. Most of these Haar cascades are used for either:
- Face detection
- Eye detection
- Mouth detection
- Full/partial body detection
Other pre-trained Haar cascades are provided, including one for Russian license plates and another for cat face detection.
We can load a pre-trained Haar cascade from disk using the cv2.CascadeClassifer function:
detector = cv2.CascadeClassifier(path)
Once the Haar cascade is loaded into memory, we can make predictions with it using the detectMultiScale function:
results = detector.detectMultiScale(
		gray, scaleFactor=1.05, minNeighbors=5,
		minSize=(30, 30), flags=cv2.CASCADE_SCALE_IMAGE)
The result is a list of bounding boxes that contain the starting x and y coordinates of the bounding box, along with their width (w) and height (h).
You will gain hands-on experience with both cv2.CascadeClassifier and detectMultiScale later in this tutorial.
Configuring your development environment
To follow this guide, you need to have the OpenCV library installed on your system.
Luckily, OpenCV is pip-installable:
$ pip install opencv-contrib-python
If you need help configuring your development environment for OpenCV, I highly recommend that you read my pip install OpenCV guide — it will have you up and running in a matter of minutes.
Having problems configuring your development environment?

All that said, are you:
- Short on time?
- Learning on your employer’s administratively locked system?
- Wanting to skip the hassle of fighting with the command line, package managers, and virtual environments?
- Ready to run the code right now on your Windows, macOS, or Linux systems?
Then join PyImageSearch University today!
Gain access to Jupyter Notebooks for this tutorial and other PyImageSearch guides that are pre-configured to run on Google Colab’s ecosystem right in your web browser! No installation required.
And best of all, these Jupyter Notebooks will run on Windows, macOS, and Linux!
Project structure
Before we can learn about OpenCV’s Haar cascade functionality, we first need to review our project directory structure.
Start by accessing the “Downloads” section of this tutorial to retrieve the source code and pre-trained Haar cascades:
$ tree . --dirsfirst
.
├── cascades
│   ├── haarcascade_eye.xml
│   ├── haarcascade_frontalface_default.xml
│   └── haarcascade_smile.xml
└── opencv_haar_cascades.py

1 directory, 4 files
We will apply three Haar cascades to a real-time video stream. These Haar cascades reside in the cascades directory and include:
haarcascade_frontalface_default.xml: Detects faceshaarcascade_eye.xml: Detects the left and right eyes on the facehaarcascade_smile.xml: While the filename suggests that this model is a “smile detector,” it actually detects the presence of the “mouth” on a face
Our opencv_haar_cascades.py script will load these three Haar cascades from disk and apply them to a video stream, all in real-time.
Implementing OpenCV Haar Cascade object detection (face, eyes, and mouth)
With our project directory structure reviewed, we can implement our OpenCV Haar cascade detection script.
Open the opencv_haar_cascades.py file in your project directory structure, and we can get to work:
# import the necessary packages
from imutils.video import VideoStream
import argparse
import imutils
import time
import cv2
import os
Lines 2-7 import our required Python packages. We need VideoStream to access our webcam, argparse for command line arguments, imutils for our OpenCV convenience functions, time to insert a small sleep statement, cv2 for our OpenCV bindings, and os to build file paths, agnostic of which operating system you are on (Windows uses different path separators than Unix machines, such as macOS and Linux).
We have only a single command line argument to parse:
# construct the argument parser and parse the arguments
ap = argparse.ArgumentParser()
ap.add_argument("-c", "--cascades", type=str, default="cascades",
	help="path to input directory containing haar cascades")
args = vars(ap.parse_args())
The --cascades command line arguments point to the directory containing our pre-trained face, eye, and mouth Haar cascades.
We proceed to load each of these Haar cascades from disk:
# initialize a dictionary that maps the name of the haar cascades to
# their filenames
detectorPaths = {
	"face": "haarcascade_frontalface_default.xml",
	"eyes": "haarcascade_eye.xml",
	"smile": "haarcascade_smile.xml",
}

# initialize a dictionary to store our haar cascade detectors
print("[INFO] loading haar cascades...")
detectors = {}

# loop over our detector paths
for (name, path) in detectorPaths.items():
	# load the haar cascade from disk and store it in the detectors
	# dictionary
	path = os.path.sep.join([args["cascades"], path])
	detectors[name] = cv2.CascadeClassifier(path)
Lines 17-21 define a dictionary that maps the name of the detector (key) to its corresponding file path (value).
Line 25 initializes our detectors dictionary. It will have the same key as detectorPaths, but the value will be the Haar cascade once it’s been loaded from disk via cv2.CascadeClassifier.
On Line 28, we loop over each of the Haar cascade names and paths, respectively.
For each detector, we build the full file path, load it from disk, and store it in our detectors dictionary.
With each of our three Haar cascades loaded from disk, we can move on to accessing our video stream:
# initialize the video stream and allow the camera sensor to warm up
print("[INFO] starting video stream...")
vs = VideoStream(src=0).start()
time.sleep(2.0)

# loop over the frames from the video stream
while True:
	# grab the frame from the video stream, resize it, and convert it
	# to grayscale
	frame = vs.read()
	frame = imutils.resize(frame, width=500)
	gray = cv2.cvtColor(frame, cv2.COLOR_BGR2GRAY)

	# perform face detection using the appropriate haar cascade
	faceRects = detectors["face"].detectMultiScale(
		gray, scaleFactor=1.05, minNeighbors=5, minSize=(30, 30),
		flags=cv2.CASCADE_SCALE_IMAGE)
Lines 36-37 initialize our VideoStream, inserting a small time.sleep statement to allow our camera sensor to warm up.
From there, we proceed to:
- Loop over frames from our video stream
- Read the next
frame - Resize it
- Convert it to grayscale
Once the frame has been converted to grayscale, we apply the face detector Haar cascade to locate any faces in the input frame.
The next step is to loop over each of the face locations and apply our eye and mouth Haar cascades:
	# loop over the face bounding boxes
	for (fX, fY, fW, fH) in faceRects:
		# extract the face ROI
		faceROI = gray[fY:fY+ fH, fX:fX + fW]

		# apply eyes detection to the face ROI
		eyeRects = detectors["eyes"].detectMultiScale(
			faceROI, scaleFactor=1.1, minNeighbors=10,
			minSize=(15, 15), flags=cv2.CASCADE_SCALE_IMAGE)

		# apply smile detection to the face ROI
		smileRects = detectors["smile"].detectMultiScale(
			faceROI, scaleFactor=1.1, minNeighbors=10,
			minSize=(15, 15), flags=cv2.CASCADE_SCALE_IMAGE)
Line 53 loops over all face bounding boxes. We then extract the face ROI on Line 55 using the bounding box information.
The next step is to apply our eye and mouth detectors to the face region.
Eye detection is applied to the face ROI on Lines 58-60, while mouth detection is performed on Lines 63-65.
And just like we looped over all face detections, we need to do the same for our eye and mouth detections:
		# loop over the eye bounding boxes
		for (eX, eY, eW, eH) in eyeRects:
			# draw the eye bounding box
			ptA = (fX + eX, fY + eY)
			ptB = (fX + eX + eW, fY + eY + eH)
			cv2.rectangle(frame, ptA, ptB, (0, 0, 255), 2)

		# loop over the smile bounding boxes
		for (sX, sY, sW, sH) in smileRects:
			# draw the smile bounding box
			ptA = (fX + sX, fY + sY)
			ptB = (fX + sX + sW, fY + sY + sH)
			cv2.rectangle(frame, ptA, ptB, (255, 0, 0), 2)

		# draw the face bounding box on the frame
		cv2.rectangle(frame, (fX, fY), (fX + fW, fY + fH),
			(0, 255, 0), 2)
Lines 68-72 loop over all detected eye bounding boxes. However, notice how Lines 70 and 71 derive the eye bounding boxes relative to the original frame image dimensions.
If we used the raw eX, eY, eW, and eH values, they would be in terms of the faceROI, not the original frame, hence why we add the face bounding box coordinates to the eye coordinates.
We perform the same series of operations on Lines 75-79, this time for the mouth bounding boxes.
Finally, we can wrap up by displaying our output frame on the screen:
	# show the output frame
	cv2.imshow("Frame", frame)
	key = cv2.waitKey(1) & 0xFF

	# if the `q` key was pressed, break from the loop
	if key == ord("q"):
		break

# do a bit of cleanup
cv2.destroyAllWindows()
vs.stop()
We then clean up by closing any windows opened by OpenCV and stopping our video stream.
Haar cascade results
We are now ready to apply Haar cascades with OpenCV!
Be sure to access the “Downloads” section of this tutorial to retrieve the source code and example images.
From there, pop open a terminal and execute the following command:
$ python opencv_haar_cascades.py --cascades cascades
[INFO] loading haar cascades...
[INFO] starting video stream...
The video above shows the results of applying our three OpenCV Haar cascades for face detection, eye detection, and mouth detection.
Our results run in real-time without a problem, but as you can see, the detection themselves are not the most accurate:
- We have no problem detecting my face, but the mouth and eye cascades fire several false-positives.
- When I blink, one of two things happen: (1) the eye regions is no longer detected, or (2) it is incorrectly marked as a mouth
- There tend to be multiple mouth detections in many frames
OpenCV’s face detection Haar cascades tend to be the most accurate. You should feel free to use them in your own applications where you can tolerate some false-positive detections and a bit of parameter tuning.
That said, for facial structure detection, I strongly recommend you use facial landmarks instead — they are more stable and even faster than the eye and mouth Haar cascades themselves.
What's next? We recommend PyImageSearch University.
86+ total classes • 115+ hours hours of on-demand code walkthrough videos • Last updated: February 2026
★★★★★ 4.84 (128 Ratings) • 16,000+ Students Enrolled
I strongly believe that if you had the right teacher you could master computer vision and deep learning.
Do you think learning computer vision and deep learning has to be time-consuming, overwhelming, and complicated? Or has to involve complex mathematics and equations? Or requires a degree in computer science?
That’s not the case.
All you need to master computer vision and deep learning is for someone to explain things to you in simple, intuitive terms. And that’s exactly what I do. My mission is to change education and how complex Artificial Intelligence topics are taught.
If you're serious about learning computer vision, your next stop should be PyImageSearch University, the most comprehensive computer vision, deep learning, and OpenCV course online today. Here you’ll learn how to successfully and confidently apply computer vision to your work, research, and projects. Join me in computer vision mastery.
Inside PyImageSearch University you'll find:
- ✓ 86+ courses on essential computer vision, deep learning, and OpenCV topics
- ✓ 86 Certificates of Completion
- ✓ 115+ hours hours of on-demand video
- ✓ Brand new courses released regularly, ensuring you can keep up with state-of-the-art techniques
- ✓ Pre-configured Jupyter Notebooks in Google Colab
- ✓ Run all code examples in your web browser — works on Windows, macOS, and Linux (no dev environment configuration required!)
- ✓ Access to centralized code repos for all 540+ tutorials on PyImageSearch
- ✓ Easy one-click downloads for code, datasets, pre-trained models, etc.
- ✓ Access on mobile, laptop, desktop, etc.
Summary
In this tutorial, you learned how to apply Haar cascades with OpenCV.
Specifically, you learned how to apply Haar cascades for:
- Face detection
- Eye detection
- Mouth detection
Our face detection results were the most stable and accurate. Unfortunately, in many cases, the eye detection and mouth detection results were unusable — for facial feature/part extraction, I instead suggest you use facial landmarks.
I’ll wrap up by saying that there are many more accurate face detection methods, including HOG + Linear SVM and deep learning-based object detectors, including SSDs, Faster R-CNN, YOLO, etc. Still, if you need pure speed, you just can’t beat OpenCV’s Haar cascades.
To download the source code to this post (and be notified when future tutorials are published here on PyImageSearch), simply enter your email address in the form below!

Download the Source Code and FREE 17-page Resource Guide
Enter your email address below to get a .zip of the code and a FREE 17-page Resource Guide on Computer Vision, OpenCV, and Deep Learning. Inside you'll find my hand-picked tutorials, books, courses, and libraries to help you master CV and DL!


Comment section
Hey, Adrian Rosebrock here, author and creator of PyImageSearch. While I love hearing from readers, a couple years ago I made the tough decision to no longer offer 1:1 help over blog post comments.
At the time I was receiving 200+ emails per day and another 100+ blog post comments. I simply did not have the time to moderate and respond to them all, and the sheer volume of requests was taking a toll on me.
Instead, my goal is to do the most good for the computer vision, deep learning, and OpenCV community at large by focusing my time on authoring high-quality blog posts, tutorials, and books/courses.
If you need help learning computer vision and deep learning, I suggest you refer to my full catalog of books and courses — they have helped tens of thousands of developers, students, and researchers just like yourself learn Computer Vision, Deep Learning, and OpenCV.
Click here to browse my full catalog.