Let’s face it. Trying to search for images based on text and tags sucks.
Whether you are tagging and categorizing your personal images, searching for stock photos for your company website, or simply trying to find the right image for your next epic blog post, trying to use text and keywords to describe something that is inherently visual is a real pain.
I faced this pain myself last Tuesday as I was going through some old family photo albums there were scanned and digitized nine years ago.
You see, I was looking for a bunch of photos that were taken along the beaches of Hawaii with my family. I opened up iPhoto, and slowly made my way through the photographs. It was a painstaking process. The meta-information for each JPEG contained incorrect dates. The photos were not organized in folders like I remembered — I simply couldn’t find the beach photos that I was desperately searching for.
Perhaps by luck, I stumbled across one of the beach photographs. It was a beautiful, almost surreal beach shot. Puffy white clouds in the sky. Crystal clear ocean water, lapping at the golden sands. You could literally feel the breeze on your skin and smell the ocean air.
After seeing this photo, I stopped my manual search and opened up a code editor.
While applications such as iPhoto let you organize your photos into collections and even detect and recognize faces, we can certainly do more.
No, I’m not talking about manually tagging your images. I’m talking about something more powerful. What if you could actually search your collection of images using an another image?
Wouldn’t that be cool? It would allow you to apply visual search to your own images, in just a single click.
And that’s exactly what I did. I spent the next half-hour coding and when I was done I had created a visual search engine for my family vacation photos.
I then took the sole beach image that I found and then submitted it to my image search engine. Within seconds I had found all of the other beach photos, all without labeling or tagging a single image.
Sound interesting? Read on.
In the rest of this blog post I’ll show you how to build an image search engine of your own.
Looking for the source code to this post?
Jump Right To The Downloads SectionWhat’s an Image Search Engine?
So you’re probably wondering, what actually is an image search engine?
I mean, we’re all familiar with text based search engines such as Google, Bing, and DuckDuckGo — you simply enter a few keywords related to the content you want to find (i.e., your “query”), and then your results are returned to you. But for image search engines, things work a little differently — you’re not using text as your query, you are instead using an image.
Sounds pretty hard to do, right? I mean, how do you quantify the contents of an image to make it search-able?
We’ll cover the answer to that question in a bit. But to start, let’s learn a little more about image search engines.
In general, there tend to be three types of image search engines: search by meta-data, search by example, and a hybrid approach of the two.
Search by Meta-Data
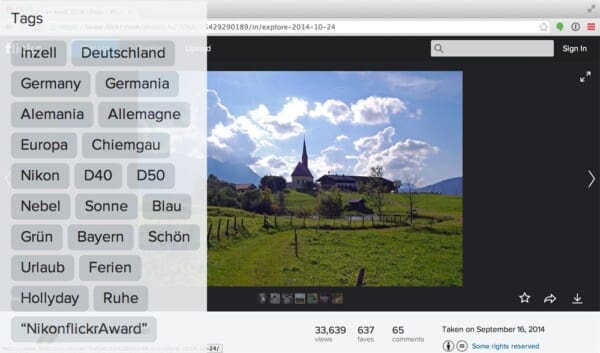
Searching by meta-data is only marginally different than your standard keyword-based search engines mentioned above. Search by meta-data systems rarely examine the contents of the image itself. Instead, they rely on textual clues such as (1) manual annotations and tagging performed by humans along with (2) automated contextual hints, such as the text that appears near the image on a webpage.
When a user performs a search on a search by meta-data system they provide a query, just like in a traditional text search engine, and then images that have similar tags or annotations are returned.
Again, when utilizing a search by meta-data system the actual image itself is rarely examined.
A great example of a Search by Meta-Data image search engine is Flickr. After uploading an image to Flickr you are presented with a text field to enter tags describing the contents of images you have uploaded. Flickr then takes these keywords, indexes them, and utilizes them to find and recommend other relevant images.
Search by Example
Search by example systems, on the other hand, rely solely on the contents of the image — no keywords are assumed to be provided. The image is analyzed, quantified, and stored so that similar images are returned by the system during a search.
Image search engines that quantify the contents of an image are called Content-Based Image Retrieval (CBIR) systems. The term CBIR is commonly used in the academic literature, but in reality, it’s simply a fancier way of saying “image search engine”, with the added poignancy that the search engine is relying strictly on the contents of the image and not any textual annotations associated with the image.
A great example of a Search by Example system is TinEye. TinEye is actually a reverse image search engine where you provide a query image, and then TinEye returns near-identical matches of the same image, along with the webpage that the original image appeared on.
Take a look at the example image at the top of this section. Here I have uploaded an image of the Google logo. TinEye has examined the contents of the image and returned to me the 13,000+ webpages that the Google logo appears on after searching through an index of over 6 billion images.
So consider this: Are you going to manually label each of these 6 billion images in TinEye? Of course not. That would take an army of employees and would be extremely costly.
Instead, you utilize some sort of algorithm to extract “features” (i.e., a list of numbers to quantify and abstractly represent the image) from the image itself. Then, when a user submits a query image, you extract features from the query image and compare them to your database of features and try to find similar images.
Again, it’s important to reinforce the point that Search by Example systems rely strictly on the contents of the image. These types of systems tend to be extremely hard to build and scale, but allow for a fully automated algorithm to govern the search — no human intervention is required.
Hybrid Approach
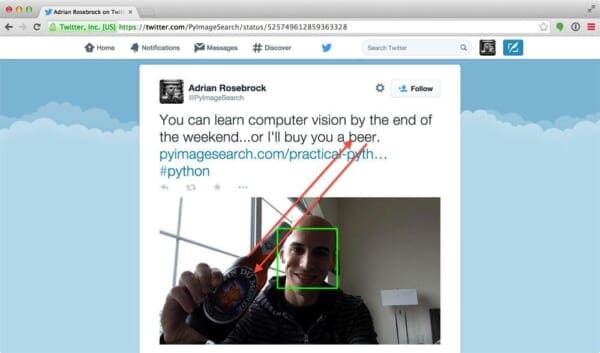
Of course, there is a middle ground between the two – consider Twitter, for instance.
On Twitter you can upload photos to accompany your tweets. A hybrid approach would be to correlate the features extracted from the image with the text of the tweet. Using this approach you could build an image search engine that could take both contextual hints along with a Search by Example strategy.
Note: Interested in reading more about the different types of image search engines? I have an entire blog post dedicated to comparing and contrasting them, available here.
Let’s move on to defining some important terms that we’ll use regularly when describing and building image search engines.
Some Important Terms
Before we get too in-depth, let’s take a little bit of time to define a few important terms.
When building an image search engine we will first have to index our dataset. Indexing a dataset is the process of quantifying our dataset by utilizing an image descriptor to extract features from each image.
An image descriptor defines the algorithm that we are utilizing to describe our image.
For example:
- The mean and standard deviation of each Red, Green, and Blue channel, respectively,
- The statistical moments of the image to characterize shape.
- The gradient magnitude and orientation to describe both shape and texture.
The important takeaway here is that the image descriptor governs how the image is quantified.
Features, on the other hand, are the output of an image descriptor. When you put an image into an image descriptor, you will get features out the other end.
In the most basic terms, features (or feature vectors) are just a list of numbers used to abstractly represent and quantify images.
Take a look at the example figure below:
Here we are presented with an input image, we apply our image descriptor, and then our output is a list of features used to quantify the image.
Feature vectors can then be compared for similarity by using a distance metric or similarity function. Distance metrics and similarity functions take two feature vectors as inputs and then output a number that represents how “similar” the two feature vectors are.
The figure below visualizes the process of comparing two images:
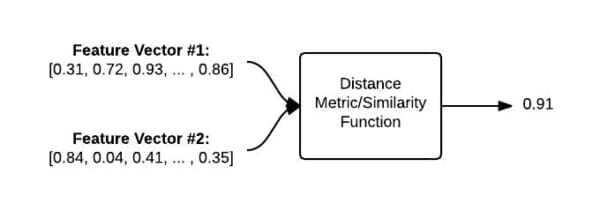
Given two feature vectors, a distance function is used to determine how similar the two feature vectors are. The output of the distance function is a single floating point value used to represent the similarity between the two images.
The 4 Steps of Any CBIR System
No matter what Content-Based Image Retrieval System you are building, they all can be boiled down into 4 distinct steps:
- Defining your image descriptor: At this phase you need to decide what aspect of the image you want to describe. Are you interested in the color of the image? The shape of an object in the image? Or do you want to characterize texture?
- Indexing your dataset: Now that you have your image descriptor defined, your job is to apply this image descriptor to each image in your dataset, extract features from these images, and write the features to storage (ex. CSV file, RDBMS, Redis, etc.) so that they can be later compared for similarity.
- Defining your similarity metric: Cool, now you have a bunch of feature vectors. But how are you going to compare them? Popular choices include the Euclidean distance, Cosine distance, and chi-squared distance, but the actual choice is highly dependent on (1) your dataset and (2) the types of features you extracted.
- Searching: The final step is to perform an actual search. A user will submit a query image to your system (from an upload form or via a mobile app, for instance) and your job will be to (1) extract features from this query image and then (2) apply your similarity function to compare the query features to the features already indexed. From there, you simply return the most relevant results according to your similarity function.
Again, these are the most basic 4 steps of any CBIR system. As they become more complex and utilize different feature representations, the number of steps grow and you’ll add a substantial number of sub-steps to each step mentioned above. But for the time being, let’s keep things simple and utilize just these 4 steps.
Let’s take a look at a few graphics to make these high-level steps a little more concrete. The figure below details Steps 1 and 2:
We start by taking our dataset of images, extracting features from each image, and then storing these features in a database.
We can then move on to performing a search (Steps 3 and 4):
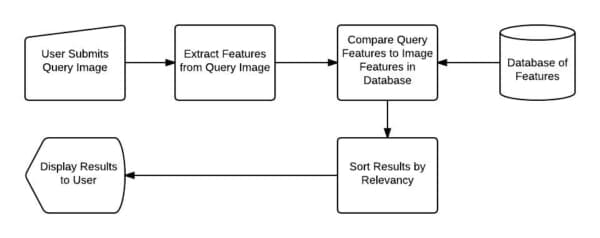
First, a user must submit a query image to our image search engine. We then take the query image and extract features from it. These “query features” are then compared to the features of the images we already indexed in our dataset. Finally, the results are then sorted by relevancy and presented to the user.
Our Dataset of Vacation Photos
We’ll be utilizing the INRIA Holidays Dataset for our dataset of images.
This dataset consists of various vacation trips from all over the world, including photos of the Egyptian pyramids, underwater diving with sea-life, forests in the mountains, wine bottles and plates of food at dinner, boating excursions, and sunsets across the ocean.
Here are a few samples from the dataset:
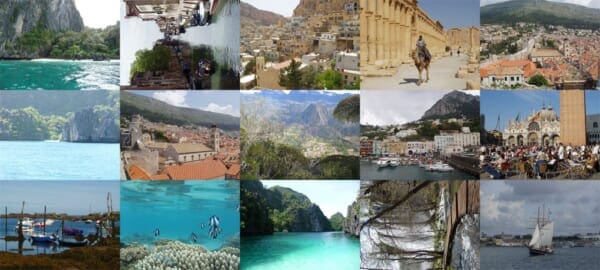
In general, this dataset does an extremely good job at modeling what we would expect a tourist to photograph on a scenic trip.
The Goal
Our goal here is to build a personal image search engine. Given our dataset of vacation photos, we want to make this dataset “search-able” by creating a “more like this” functionality — this will be a “search by example” image search engine. For instance, if I submit a photo of sail boats gliding across a river, our image search engine should be able to find and retrieve our vacation photos of when we toured the marina and docks.
Take a look at the example below where I have submitted an photo of the boats on the water and have found relevant images in our vacation photo collection:
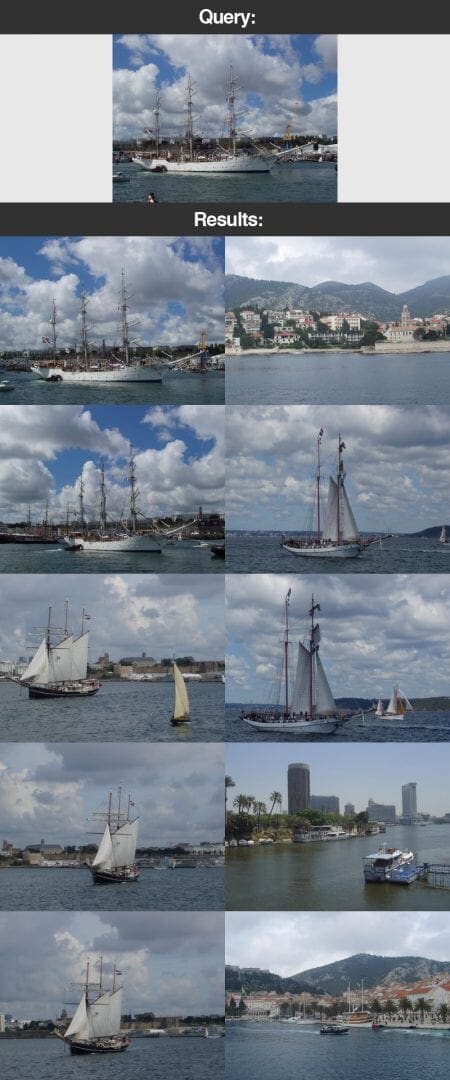
In order to build this system, we’ll be using a simple, yet effective image descriptor: the color histogram.
By utilizing a color histogram as our image descriptor, we’ll be we’ll be relying on the color distribution of the image. Because of this, we have to make an important assumption regarding our image search engine:
Assumption: Images that have similar color distributions will be considered relevant to each other. Even if images have dramatically different contents, they will still be considered “similar” provided that their color distributions are similar as well.
This is a really important assumption, but is normally a fair and reasonable assumption to make when using color histograms as image descriptors.
Step 1: Defining our Image Descriptor
Instead of using a standard color histogram, we are going to apply a few tricks and make it a little more robust and powerful.
Our image descriptor will be a 3D color histogram in the HSV color space (Hue, Saturation, Value). Typically, images are represented as a 3-tuple of Red, Green, and Blue (RGB). We often think of the RGB color space as “cube”, as shown below:
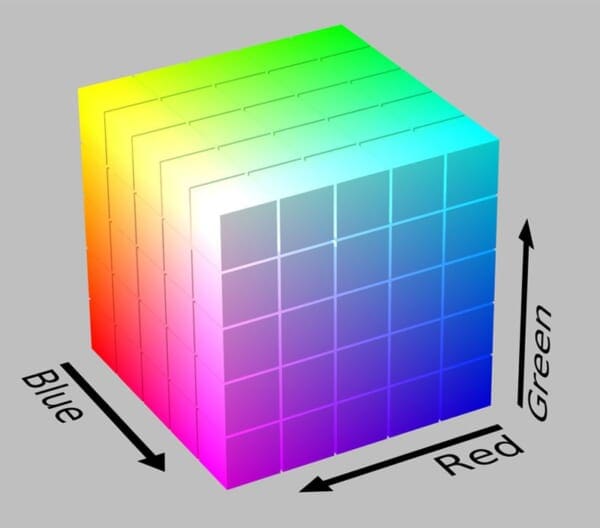
However, while RGB values are simple to understand, the RGB color space fails to mimic how humans perceive color. Instead, we are going to use the HSV color space which maps pixel intensities into a cylinder:
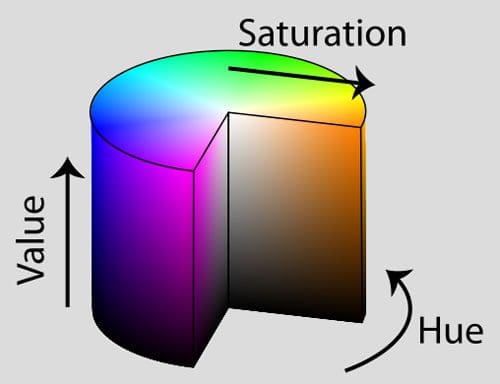
There are other color spaces that do an even better job at mimicking how humans perceive color, such as the CIE L*a*b* and CIE XYZ spaces, but let’s keep our color model relatively simple for our first image search engine implementation.
So now that we have selected a color space, we now need to define the number of bins for our histogram. Histograms are used to give a (rough) sense of the density of pixel intensities in an image. Essentially, our histogram will estimate the probability density of the underlying function, or in this case, the probability P of a pixel color C occurring in our image I.
It’s important to note that there is a trade-off with the number of bins you select for your histogram. If you select too few bins, then your histogram will have less components and unable to disambiguate between images with substantially different color distributions. Likewise, if you use too many bins your histogram will have many components and images with very similar contents may be regarded and “not similar” when in reality they are.
Here’s an example of a histogram with only a few bins:
Notice how there are very few bins that a pixel can be placed into.
And here’s an example of a histogram with lots of bins:
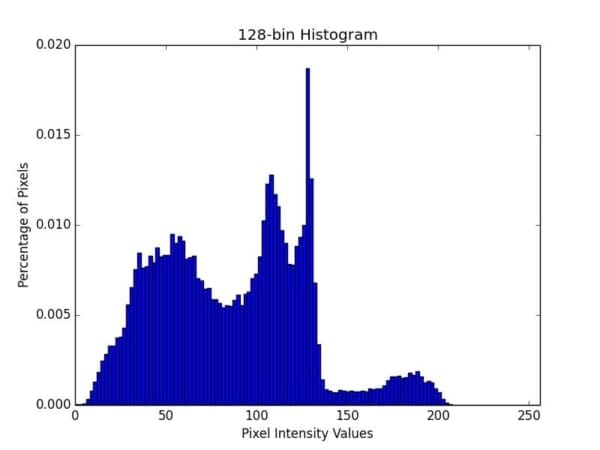
In the above example you can see that many bins are utilized, but with the larger number of bins, you lose your ability to “generalize” between images with similar perceptual content since all of the peaks and valleys of the histogram will have to match in order for two images to be considered “similar”.
Personally, I like an iterative, experimental approach to tuning the number of bins. This iterative approach is normally based on the size of my dataset. The more smaller that my dataset is, the less bins I use. And if my dataset is large, I use more bins, making my histograms larger and more discriminative.
In general, you’ll want to experiment with the number of bins for your color histogram descriptor as it is dependent on (1) the size of your dataset and (2) how similar the color distributions in your dataset are to each other.
For our vacation photo image search engine, we’ll be utilizing a 3D color histogram in the HSV color space with 8 bins for the Hue channel, 12 bins for the saturation channel, and 3 bins for the value channel, yielding a total feature vector of dimension 8 x 12 x 3 = 288.
This means that for every image in our dataset, no matter if the image is 36 x 36 pixels or 2000 x 1800 pixels, all images will be abstractly represented and quantified using only a list of 288 floating point numbers.
I think the best way to explain a 3D histogram is to use the conjunctive AND. A 3D HSV color descriptor will ask a given image how many pixels have a Hue value that fall into bin #1 AND how many pixels have a Saturation value that fall into bin #1 AND how many pixels have a Value intensity that fall into bin #1. The number of pixels that meet these requirements are then tabulated. This process is repeated for each combination of bins; however, we are able to do it in an extremely computationally efficient manner.
Pretty cool, right?
Anyway, enough talk. Let’s get into some code.
Open up a new file in your favorite code editor, name it colordescriptor.py
and let’s get started:
# import the necessary packages import numpy as np import cv2 import imutils class ColorDescriptor: def __init__(self, bins): # store the number of bins for the 3D histogram self.bins = bins def describe(self, image): # convert the image to the HSV color space and initialize # the features used to quantify the image image = cv2.cvtColor(image, cv2.COLOR_BGR2HSV) features = [] # grab the dimensions and compute the center of the image (h, w) = image.shape[:2] (cX, cY) = (int(w * 0.5), int(h * 0.5))
We’ll start by importing the Python packages we’ll need. We’ll use NumPy for numerical processing, cv2
for our OpenCV bindings, and imutils
to check OpenCV version.
We then define our ColorDescriptor
class on Line 6. This class will encapsulate all the necessary logic to extract our 3D HSV color histogram from our images.
The __init__
method of the ColorDescriptor
takes only a single argument, bins
, which is the number of bins for our color histogram.
We can then define our describe
method on Line 11. This method requires an image
, which is the image we want to describe.
Inside of our describe
method we’ll convert from the RGB color space (or rather, the BGR color space; OpenCV represents RGB images as NumPy arrays, but in reverse order) to the HSV color space, followed by initializing our list of features
to quantify and represent our image
.
Lines 18 and 19 simply grab the dimensions of the image and compute the center (x, y) coordinates.
So now the hard work starts.
Instead of computing a 3D HSV color histogram for the entire image, let’s instead compute a 3D HSV color histogram for different regions of the image.
Using regions-based histograms rather than global-histograms allows us to simulate locality in a color distribution. For example, take a look at this image below:
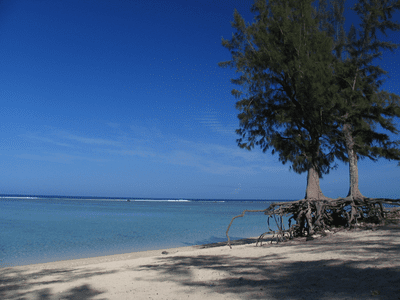
In this photo we can clearly see a blue sky at the top of the image and a sandy beach at the bottom. Using a global histogram we would be unable to determine where in the image the “blue” occurs and where the “brown” sand occurs. Instead, we would just know that there exists some percentage of blue and some percentage of brown.
To remedy this problem, we can compute color histograms in regions of the image:
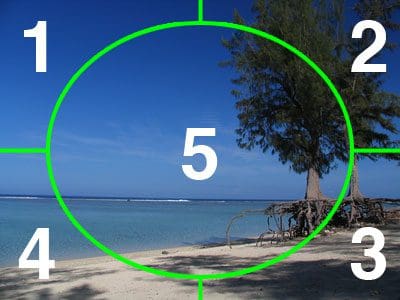
For our image descriptor, we are going to divide our image into five different regions: (1) the top-left corner, (2) the top-right corner, (3) the bottom-right corner, (4) the bottom-left corner, and finally (5) the center of the image.
By utilizing these regions we’ll be able to mimic a crude form of localization, being able to represent our above beach image as having shades of blue sky in the top-left and top-right corners, brown sand in the bottom-left and bottom-right corners, and then a combination of blue sky and brown sand in the center region.
That all said, here is the code to create our region-based color descriptor:
# divide the image into four rectangles/segments (top-left, # top-right, bottom-right, bottom-left) segments = [(0, cX, 0, cY), (cX, w, 0, cY), (cX, w, cY, h), (0, cX, cY, h)] # construct an elliptical mask representing the center of the # image (axesX, axesY) = (int(w * 0.75) // 2, int(h * 0.75) // 2) ellipMask = np.zeros(image.shape[:2], dtype = "uint8") cv2.ellipse(ellipMask, (cX, cY), (axesX, axesY), 0, 0, 360, 255, -1) # loop over the segments for (startX, endX, startY, endY) in segments: # construct a mask for each corner of the image, subtracting # the elliptical center from it cornerMask = np.zeros(image.shape[:2], dtype = "uint8") cv2.rectangle(cornerMask, (startX, startY), (endX, endY), 255, -1) cornerMask = cv2.subtract(cornerMask, ellipMask) # extract a color histogram from the image, then update the # feature vector hist = self.histogram(image, cornerMask) features.extend(hist) # extract a color histogram from the elliptical region and # update the feature vector hist = self.histogram(image, ellipMask) features.extend(hist) # return the feature vector return features
Lines 23 and 24 start by defining the indexes of our top-left, top-right, bottom-right, and bottom-left regions, respectively.
From there, we’ll need to construct an ellipse to represent the center region of the image. We’ll do this by defining an ellipse radius that is 75% of the width and height of the image on Line 28.
We then initialize a blank image (filled with zeros to represent a black background) with the same dimensions of the image we want to describe on Line 29.
Finally, let’s draw the actual ellipse on Line 30 using the cv2.ellipse
function. This function requires eight different parameters:
ellipMask
: The image we want to draw the ellipse on. We’ll be using a concept of “masks” which I’ll discuss shortly.(cX, cY)
: A 2-tuple representing the center (x, y)-coordinates of the image.(axesX, axesY)
: A 2-tuple representing the length of the axes of the ellipse. In this case, the ellipse will stretch to be 75% of the width and height of theimage
that we are describing.0
: The rotation of the ellipse. In this case, no rotation is required so we supply a value of 0 degrees.0
: The starting angle of the ellipse.360
: The ending angle of the ellipse. Looking at the previous parameter, this indicates that we’ll be drawing an ellipse from 0 to 360 degrees (a full “circle”).255
: The color of the ellipse. The value of 255 indicates “white”, meaning that our ellipse will be drawn white on a black background.-1
: The border size of the ellipse. Supplying a positive integer r will draw a border of size r pixels. Supplying a negative value for r will make the ellipse “filled in”.
We then allocate memory for each corner mask on Line 36, draw a white rectangle representing the corner of the image on Line 37, and then subtract the center ellipse from the rectangle on Line 38.
If we were to animate this process of looping over the corner segments it would look something like this:
As this animation shows, we examining each of the corner segments individually, removing the center of the ellipse from the rectangle at each iteration.
So you may be wondering, “Aren’t we supposed to be extracting color histograms from our image? Why are doing all this ‘masking’ business?”
Great question.
The reason is because we need the mask to instruct the OpenCV histogram function where to extract the color histogram from.
Remember, our goal is to describe each of these segments individually. The most efficient way of representing each of these segments is to use a mask. Only (x, y)-coordinates in the image that has a corresponding (x, y) location in the mask with a white (255) pixel value will be included in the histogram calculation. If the pixel value for an (x, y)-coordinate in the mask has a value of black (0), it will be ignored.
To reiterate this concept of only including pixels in the histogram with a corresponding mask value of white, take a look at the following animation:
As you can see, only pixels in the masked region of the image will be included in the histogram calculation.
Makes sense now, right?
So now for each of our segments we make a call to the histogram
method on Line 42, extract the color histogram by using the image
we want to extract features from as the first argument and the mask
representing the region we want to describe as the second argument.
The histogram
method then returns a color histogram representing the current region, which we append to our features
list.
Lines 47 and 48 extract a color histogram for the center (ellipse) region and updates the features
list a well.
Finally, Line 51 returns our feature vector to the calling function.
Now, let’s quickly look at our actual histogram
method:
def histogram(self, image, mask): # extract a 3D color histogram from the masked region of the # image, using the supplied number of bins per channel hist = cv2.calcHist([image], [0, 1, 2], mask, self.bins, [0, 180, 0, 256, 0, 256]) # normalize the histogram if we are using OpenCV 2.4 if imutils.is_cv2(): hist = cv2.normalize(hist).flatten() # otherwise handle for OpenCV 3+ else: hist = cv2.normalize(hist, hist).flatten() # return the histogram return hist
Our histogram
method requires two arguments: the first is the image
that we want to describe and the second is the mask
that represents the region of the image we want to describe.
Calculating the histogram of the masked region of the image is handled on Lines 56 and 57 by making a call to cv2.calcHist
using the supplied number of bins
from our constructor.
Our color histogram is normalized on Line 61 or 65 (depending on OpenCV version) to obtain scale invariance. This means that if we computed a color histogram for two identical images, except that one was 50% larger than the other, our color histograms would be (nearly) identical. It is very important that you normalize your color histograms so each histogram is represented by the relative percentage counts for a particular bin and not the integer counts for each bin. Again, performing this normalization will ensure that images with similar content but dramatically different dimensions will still be “similar” once we apply our similarity function.
Finally, the normalized, 3D HSV color histogram is returned to the calling function on Line 68.
Step 2: Extracting Features from Our Dataset
Now that we have our image descriptor defined, we can move on to Step 2, and extract features (i.e. color histograms) from each image in our dataset. The process of extracting features and storing them on persistent storage is commonly called “indexing”.
Let’s go ahead and dive into some code to index our vacation photo dataset. Open up a new file, name it index.py
and let’s get indexing:
# import the necessary packages from pyimagesearch.colordescriptor import ColorDescriptor import argparse import glob import cv2 # construct the argument parser and parse the arguments ap = argparse.ArgumentParser() ap.add_argument("-d", "--dataset", required = True, help = "Path to the directory that contains the images to be indexed") ap.add_argument("-i", "--index", required = True, help = "Path to where the computed index will be stored") args = vars(ap.parse_args()) # initialize the color descriptor cd = ColorDescriptor((8, 12, 3))
We’ll start by importing the packages we’ll need. You’ll remember the ColorDescriptor
class from Step 1 — I decided to place it in the pyimagesearch
module for organizational purposes.
We’ll also need argparse
for parsing command line arguments, glob
from grabbing the file paths to our images, and cv2
for OpenCV bindings.
Parsing our command line arguments is handled on Lines 8-13. We’ll need two switches, --dataset
, which is the path to our vacation photos directory, and --index
which is the output CSV file containing the image filename and the features associated with each image.
Finally, we initialize our ColorDescriptor
on Line 16 using 8 Hue bins, 12 Saturation bins, and 3 Value bins.
Now that everything is initialized, we can extract features from our dataset:
# open the output index file for writing output = open(args["index"], "w") # use glob to grab the image paths and loop over them for imagePath in glob.glob(args["dataset"] + "/*.png"): # extract the image ID (i.e. the unique filename) from the image # path and load the image itself imageID = imagePath[imagePath.rfind("/") + 1:] image = cv2.imread(imagePath) # describe the image features = cd.describe(image) # write the features to file features = [str(f) for f in features] output.write("%s,%s\n" % (imageID, ",".join(features))) # close the index file output.close()
Let’s open our output file for writing on Line 19, then loop over all the images in our dataset on Line 22.
For each of the images we’ll extract an imageID
, which is simply the filename of the image. For this example search engine, we’ll assume that all filenames are unique, but we could just as easily generate a UUID for each image. We’ll then load the image off disk on Line 26.
Now that the image is loaded, let’s go ahead and apply our image descriptor and extract features from the image on Line 29. The describe
method of our ColorDescriptor
returns a list of floating point values used to represent and quantify our image.
This list of numbers, or feature vector contains representations for each of the 5 image regions we described in Step 1. Each section is represented by a histogram with 8 x 12 x 3 = 288 entries. Given 5 entries, our overall feature vector is 5 x 288 = 1440 dimensionality. Thus each image is quantified and represented using 1,440 numbers.
Lines 32 and 33 simply write the filename of the image and its associated feature vector to file.
To index our vacation photo dataset, open up a shell and issue the following command:
$ python index.py --dataset dataset --index index.csv
This script shouldn’t take longer than a few seconds to run. After it is finished you will have a new file, index.csv
.
Open this file using your favorite text editor and take a look inside.
You’ll see that for each row in the .csv file, the first entry is the filename, followed by a list of numbers. These numbers are your feature vectors and are used to represent and quantify the image.
Running a wc
on the index, we can see that we have successfully indexed our dataset of 805 images:
$ wc -l index.csv 805 index.csv
Step 3: The Searcher
Now that we’ve extracted features from our dataset, we need a method to compare these features for similarity. That’s where Step 3 comes in — we are now ready to create a class that will define the actual similarity metric between two images.
Create a new file, name it searcher.py
and let’s make some magic happen:
# import the necessary packages import numpy as np import csv class Searcher: def __init__(self, indexPath): # store our index path self.indexPath = indexPath def search(self, queryFeatures, limit = 10): # initialize our dictionary of results results = {}
We’ll go ahead and import NumPy for numerical processing and csv
for convenience to make parsing our index.csv
file easier.
From there let’s define our Searcher
class on Line 5. The constructor for our Searcher
will only require a single argument, indexPath
which is the path to where our index.csv
file resides on disk.
To actually perform a search, we’ll be making a call to the search
method on Line 10. This method will take two parameters, the queryFeatures
extracted from the query image (i.e. the image we’ll be submitting to our CBIR system and asking for similar images to), and limit
which is the maximum number of results to return.
Finally, we initialize our results
dictionary on Line 12. A dictionary is a good data-type in this situation as it will allow us to use the (unique) imageID
for a given image as the key and the similarity to the query as the value.
Okay, so pay attention here. This is where the magic happens:
# open the index file for reading with open(self.indexPath) as f: # initialize the CSV reader reader = csv.reader(f) # loop over the rows in the index for row in reader: # parse out the image ID and features, then compute the # chi-squared distance between the features in our index # and our query features features = [float(x) for x in row[1:]] d = self.chi2_distance(features, queryFeatures) # now that we have the distance between the two feature # vectors, we can udpate the results dictionary -- the # key is the current image ID in the index and the # value is the distance we just computed, representing # how 'similar' the image in the index is to our query results[row[0]] = d # close the reader f.close() # sort our results, so that the smaller distances (i.e. the # more relevant images are at the front of the list) results = sorted([(v, k) for (k, v) in results.items()]) # return our (limited) results return results[:limit]
We open up our index.csv
file on Line 15, grab a handle to our CSV reader on Line 17, and then start looping over each row of the index.csv
file on Line 20.
For each row, we extract the color histograms associated with the indexed image and then compare it to the query image features using the chi2_distance
(Line 25), which I’ll define in a second.
Our results
dictionary is updated on Line 32 using the unique image filename as the key and the similarity of the query image to the indexed image as the value.
Lastly, all we have to do is sort the results dictionary according to the similarity value in ascending order.
Images that have a chi-squared similarity of 0 will be deemed to be identical to each other. As the chi-squared similarity value increases, the images are considered to be less similar to each other.
Speaking of chi-squared similarity, let’s go ahead and define that function:
def chi2_distance(self, histA, histB, eps = 1e-10): # compute the chi-squared distance d = 0.5 * np.sum([((a - b) ** 2) / (a + b + eps) for (a, b) in zip(histA, histB)]) # return the chi-squared distance return d
Our chi2_distance
function requires two arguments, which are the two histograms we want to compare for similarity. An optional eps
value is used to prevent division-by-zero errors.
The function gets its name from the Pearson’s chi-squared test statistic which is used to compare discrete probability distributions.
Since we are comparing color histograms, which are by definition probability distributions, the chi-squared function is an excellent choice.
In general, the difference between large bins vs. small bins is less important and should be weighted as such — and this is exactly what the chi-squared distance function does.
Are you still with us? We’re getting there, I promise. The last step is actually the easiest and is simply a driver that glues all the pieces together.
Step 4: Performing a Search
Would you believe it if I told you that performing the actual search is the easiest part? In reality, it’s just a driver that imports all of the packages that we have defined earlier and uses them in conjunction with each other to build a full-fledged Content-Based Image Retrieval System.
So open up one last file, name it search.py
, and we’ll bring this example home:
# import the necessary packages from pyimagesearch.colordescriptor import ColorDescriptor from pyimagesearch.searcher import Searcher import argparse import cv2 # construct the argument parser and parse the arguments ap = argparse.ArgumentParser() ap.add_argument("-i", "--index", required = True, help = "Path to where the computed index will be stored") ap.add_argument("-q", "--query", required = True, help = "Path to the query image") ap.add_argument("-r", "--result-path", required = True, help = "Path to the result path") args = vars(ap.parse_args()) # initialize the image descriptor cd = ColorDescriptor((8, 12, 3))
The first thing we’ll do is import our necessary packages. We’ll import our ColorDescriptor
from Step 1 so that we can extract features from the query image. And we’ll also import our Searcher
that we defined in Step 3 so that we can perform the actual search.
The argparse
and cv2
packages round out our imports.
We then parse command line arguments on Lines 8-15. We’ll need an --index
, which is the path to where our index.csv
file resides.
We’ll also need a --query
, which is the path to our query image. This image will be compared to each image in our index. The goal will be to find images in the index that are similar to our query image.
Think of it this way — when you go to Google and type in the term “Python OpenCV tutorials”, you would expect to find search results that contain information relevant to learning Python and OpenCV.
Similarly, if we are building an image search engine for our vacation photos and we submit an image of a sailboat on a blue ocean and white puffy clouds, we would expect to get similar ocean view images back from our image search engine.
We’ll then ask for a --result-path
, which is the path to our vacation photos dataset. We require this switch because we’ll need to display the actual result images to the user.
Finally, we initialize our image descriptor on Line 18 using the exact same parameters as we did in the indexing step. If our intention is to compare images for similarity (which it is), it wouldn’t make sense to change the number of bins in our color histograms from indexing to search.
Simply put: use the exact same number of bins for your color histogram during Step 4 as you did in Step 3.
This will ensure that your images are described in a consistent manner and are thus comparable.
Okay, time to perform the actual search:
# load the query image and describe it query = cv2.imread(args["query"]) features = cd.describe(query) # perform the search searcher = Searcher(args["index"]) results = searcher.search(features) # display the query cv2.imshow("Query", query) # loop over the results for (score, resultID) in results: # load the result image and display it result = cv2.imread(args["result_path"] + "/" + resultID) cv2.imshow("Result", result) cv2.waitKey(0)
We load our query image off disk on Line 21 and extract features from it on Line 22.
The search is then performed on Lines 25 and 26 using the features extracted from the query image, returning our list of ranked results
.
From here, all we need to do is display the results to the user.
We display the query image to the user on Line 29. And then we loop over our search results on Lines 32-36 and display them to the screen.
After all this work I’m sure you’re ready to see this system in action, aren’t you?
Well keep reading — this is where all our hard work pays off.
Our CBIR System in Action
Open up your terminal, navigate to the directory where your code lives, and issue the following command:
$ python search.py --index index.csv --query queries/108100.png --result-path dataset
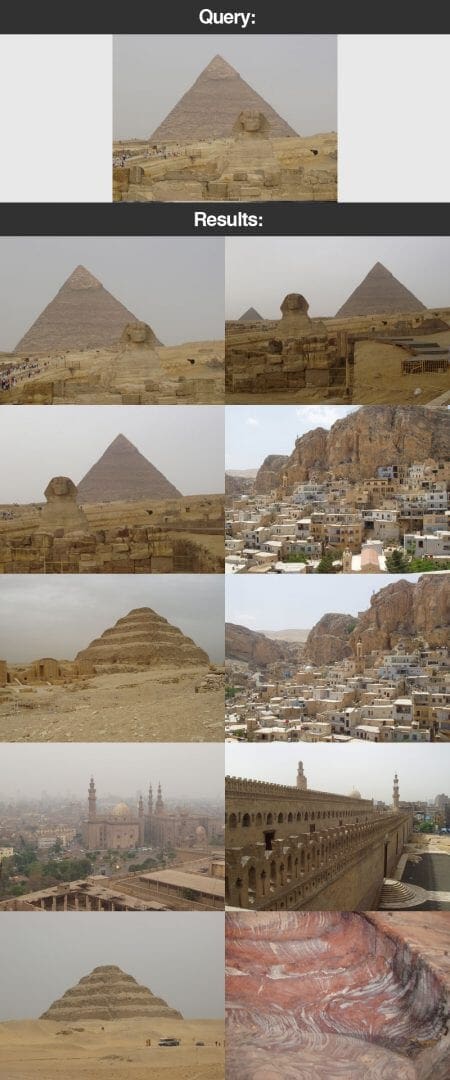
The first image you’ll see is our query image of the Egyptian pyramids. Our goal is to find similar images in our dataset. As you can see, we have clearly found the other photos of the dataset from when we visited the pyramids.
We also spent some time visiting other areas of Egypt. Let’s try another query image:
$ python search.py --index index.csv --query queries/115100.png --result-path dataset
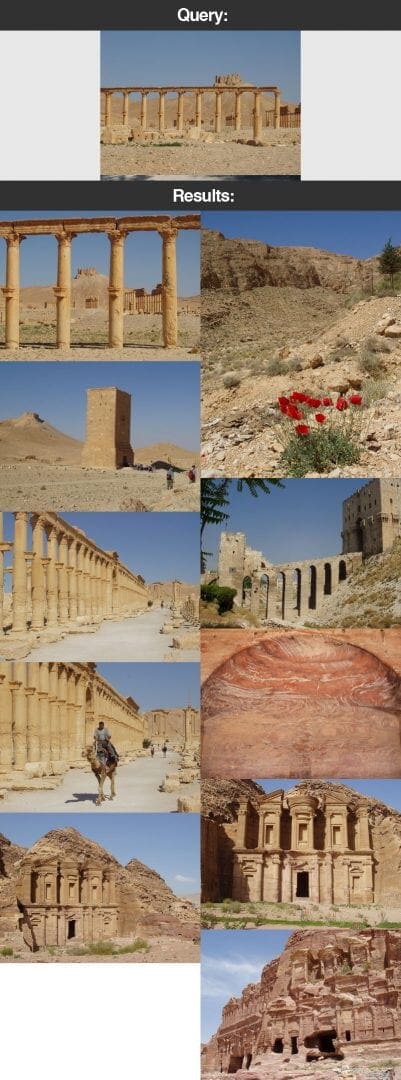
Be sure to pay close attention to our query image image. Notice how the sky is a brilliant shade of blue in the upper regions of the image. And notice how we have brown and tan desert and buildings at the bottom and center of the image.
And sure enough, in our results the images returned to us have blue sky in the upper regions and tan/brown desert and structures at the bottom.
The reason for this is because of our region-based color histogram descriptor that we detailed earlier in this post. By utilizing this image descriptor we have been able to perform a crude form of localization, providing our color histogram with hints as to “where” the pixel intensities occurred in the image.
Next up on our vacation we stopped at the beach. Execute the following command to search for beach photos:
$ python search.py --index index.csv --query queries/103300.png --result-path dataset
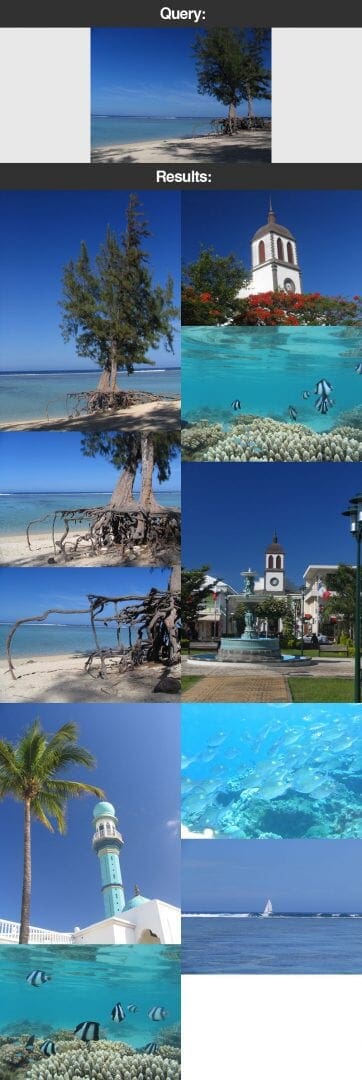
Notice how the first three results are from the exact same location on the trip to the beach. And the rest of the result images contain shades of blue.
Of course, no trip to the beach is complete without scubadiving:
$ python search.py --index index.csv --query queries/103100.png --result-path dataset
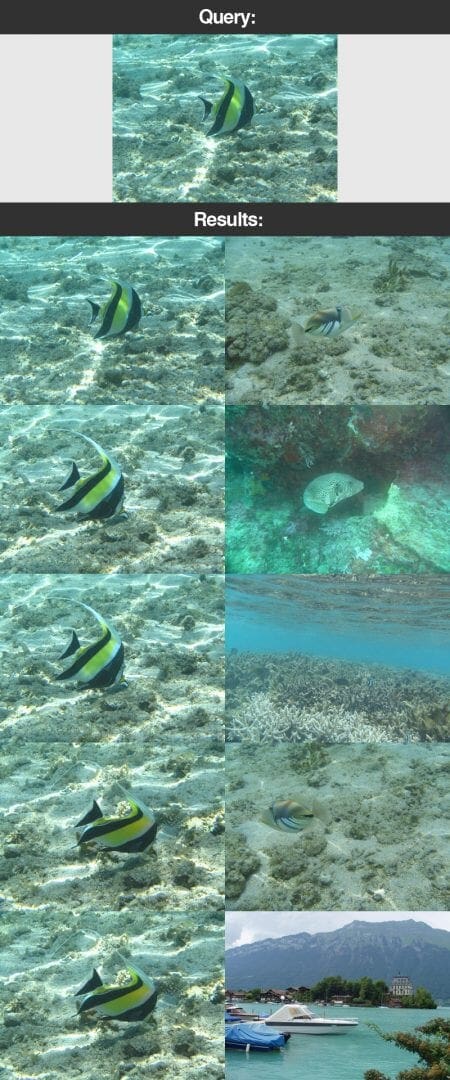
The results from this search are particularly impressive. The top 5 results are of the same fish — and all but one of the top 10 results are from the underwater excursion.
Finally, after a long day, it’s time to watch the sunset:
$ python search.py --index index.csv --query queries/127502.png --result-path dataset
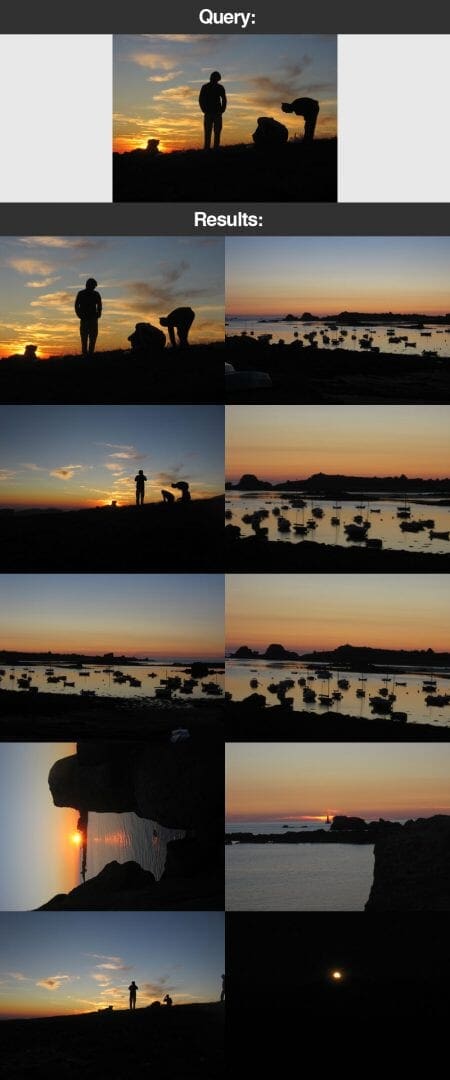
These search results are also quite good — all of the images returned are of the sunset at dusk.
So there you have it! Your first image search engine.
What's next? We recommend PyImageSearch University.
86 total classes • 115+ hours of on-demand code walkthrough videos • Last updated: October 2024
★★★★★ 4.84 (128 Ratings) • 16,000+ Students Enrolled
I strongly believe that if you had the right teacher you could master computer vision and deep learning.
Do you think learning computer vision and deep learning has to be time-consuming, overwhelming, and complicated? Or has to involve complex mathematics and equations? Or requires a degree in computer science?
That’s not the case.
All you need to master computer vision and deep learning is for someone to explain things to you in simple, intuitive terms. And that’s exactly what I do. My mission is to change education and how complex Artificial Intelligence topics are taught.
If you're serious about learning computer vision, your next stop should be PyImageSearch University, the most comprehensive computer vision, deep learning, and OpenCV course online today. Here you’ll learn how to successfully and confidently apply computer vision to your work, research, and projects. Join me in computer vision mastery.
Inside PyImageSearch University you'll find:
- ✓ 86 courses on essential computer vision, deep learning, and OpenCV topics
- ✓ 86 Certificates of Completion
- ✓ 115+ hours of on-demand video
- ✓ Brand new courses released regularly, ensuring you can keep up with state-of-the-art techniques
- ✓ Pre-configured Jupyter Notebooks in Google Colab
- ✓ Run all code examples in your web browser — works on Windows, macOS, and Linux (no dev environment configuration required!)
- ✓ Access to centralized code repos for all 540+ tutorials on PyImageSearch
- ✓ Easy one-click downloads for code, datasets, pre-trained models, etc.
- ✓ Access on mobile, laptop, desktop, etc.
Summary
In this blog post we explored how to build an image search engine to make our vacation photos search-able.
We utilized a color histogram to characterize the color distribution of our photos. Then, we indexed our dataset using our color descriptor, extracting color histograms from each of the images in the dataset.
To compare images we utilized the chi-squared distance, a popular choice when comparing discrete probability distributions.
From there, we implemented the necessary logic to accept a query image and then return relevant results.
Next Steps
So what are the next steps?
Well as you can see, the only way to interact with our image search engine is via the command line — that’s not very attractive.
In the next post we’ll explore how to wrap our image search engine in a Python web-framework to make it easier and sexier to use.
Download the Source Code and FREE 17-page Resource Guide
Enter your email address below to get a .zip of the code and a FREE 17-page Resource Guide on Computer Vision, OpenCV, and Deep Learning. Inside you'll find my hand-picked tutorials, books, courses, and libraries to help you master CV and DL!
Savita Bhabhi
Comparing the query image with all the database iteratively does not scale when we increase the number of images. Can we use some sort of hashing function to expedite this task?
Adrian Rosebrock
Locality sensitive hashing or Similarity sensitive hashing is a great start. You could also use k-means to cluster the images and only search within clusters that are similar to the query. But the most scalable method is to construct a bag of visual words which can give sub-linear search time.
David Wiser
I participated to build a large scalable image search engine API at http://www.visualsearchapi.com . We can handle over 20 millions of images with search time of 200 – 300 millSec. The key is to have a very small feature extracted from images, must be less than a few hundreds of bytes. Then by combining bag of visual words, and locality sensitive Hashing, you can build a fast, scalable image search engine.
Adrian Rosebrock
Very nice, great job David! I’ve done a ton of work with the BOVW model, inverted indexes, hashing, tf-idf weighting, spatial verification, you name it. All of these are excellent techniques to build highly scalable image search engines — but they would also occupy an entire corpus of blog posts and certainly would not fit into just one. In the future I’ll certainly be doing more CBIR posts.
Yogeetha
sir can please explain how to run this code in spyder(anacoda3) platform i am new to this python and opencv old and getting confused so i request you please help me with this.
Thư Sinh
Exactly. That is why I have to utilize diffferebt method whereby array of features must be in memory for cosine similarity do so. New images turned into new features added into array . Array persistent to disk now and then.
Tough but works.
Agniv
Nice article, it is very well written.
I wonder what is the term for text based image search. Say if I type “tree”, the system maps the word “tree” to images of tree and then queries all the images in the database (not the metadata).
I’m sure it will be easy to train some ML algorithm to map a reasonably diverse set of words to their corresponding image representation (maybe just a look-up table will suffice). And then we can search for those key images in the database/photo gallery. What is the exact term for this process?
Adrian Rosebrock
Hi Agniv, this is still called a metadata search. The term “metadata” is used pretty loosely here. The “metadata” associated with the image could include the EXIF information…but it could also included user supplied tags and keywords. This is a very well studied problem in the computer vision, machine learning, and information retrieval problems where a (very tiny) subset of photos are labeled with keywords, and then the labels are propagated to other images with similar visual content.
K.K.Achary
Very nice and informative article. Could be used as a potentil tool in medical image recognition systems such as systems to recognise skin disease ,lesions etc. Suggested this article to a friend working in relatedfield.
Dmitry
Have you tried to play with bins of non-uniform size?
I mean, for example you can have one of colour dimensions to be encoded with 5 bins, where the first bin is two times bigger than the rest.
This might decrease the dimensionality of the feature vector and help search engine to concentrate on particular parts of the spectrum.
Adrian Rosebrock
You’re absolutely Dmitry! Playing with the number of bins is absolutely critical when using color a method to describe images.
RH
Could you tell me version of these 3rd part Lib you use in this project?thanks very much
Adrian Rosebrock
The most important library is OpenCV. For this example, I am using OpenCV 2.4.9. But realistically, anything in the 2.4.X flavor will work.
Stephen
Good tutorial — it’s helping me get started as I’m new to both Python and OpenCV so thanks for publishing it.
As a suggestion, the code for the chi2_distance function can be substantially quicker if you vectorize it (and reads simpler too).
Adrian Rosebrock
Absolutely. I have a vectorized version that I use in my applications, but I wanted to write it all out and make it very explicitly to ensure other readers understood what was going on 🙂
Yong Yuan
The posts and the things you do are really interesting, and I have learned so much from your posts. Recently I alos developed a toy of image search engine (PicSearch)[search.yongyuan.name] using CNN, but I find training a CNN model is difficult compared with Bow or VLAD.
Adrian Rosebrock
Hi Yong, indeed, developing training a CNN model is extremely non-trivial! Would you mind if I sent you an email regarding PicSearch? I would love to hear more about it.
Yong Yuan
Never mind, I’m glad to share somethings about the toy with you by email. The content of your blog is really nice!
Adrian Rosebrock
Thanks, Yong! 🙂
Lucas Bandin
Hi Adrian,
One question, why do you implement your own function to calculate Chi-squared instead of using the built-in OpenCv function to compare Histograms?
Adrian Rosebrock
Hey Lucas, great question. OpenCV has many, many different methods to compare histograms. However, you might be surprised to know that there are various methods to compare histograms using the chi-squared distance, such as the additive and skewed methods. I like to implement my own method as a matter of completeness and demonstrate how it’s done.
Latifa
Hi Adrian,
This is my first visit to your website, and first of all I want to thank you for sharing your time and expertise in this area with us
Then I have a question please, if I want to reuse what you have done in this tutorial, but this time I want to do it in a Hadoop/spark cluster and also increase the number of images used (since my project revolves around big data).
is it possible? can you help me with that?
Thank you in advance for your reply
Good luck 🙂
Adrian Rosebrock
Hi Latifa! Yes, it’s absolutely possible to apply these techniques on a Hadoop/Spark cluster. I’ll actually be detailing how to leverage Hadoop and big data tools for computer vision inside the PyImageSearch Gurus course. Definitely take a look!
Jordan
I’m having trouble running the search. I get “Type error: required argument ‘dst’ not found”. What is missing?
System:
Windows 7 SP1 64 bit AMD CPU
Python 2.7.9
NumPy 1.9.2
Adrian Rosebrock
Hey Jordan, can you post your full traceback/line number that is causing the problem?
vin
hey adrian,
great tutorial, as usual. in general, when would you compare histograms via chi squared versus feeding feature vectors to a classifier?
thanks!
Adrian Rosebrock
When using a classifier, you normally have the labels associated with the images in your dataset. So given the images + labels, you can apply more advanced machine learning algorithms than simple nearest-neighbor searches using Euclidean, Manhattan, chi-squared, etc. distances. But if you have just the image labels you have to rely on their distance in some sort of n-dimensional space to determine similarity.
Adam
Very informative, can’t run it myself (Python 3.4 and CV3) and still awesome.
Adrian Rosebrock
Hey Adam, change
hist = cv2.normalize(hist).flatten()
to:cv2.normalize(hist, hist)
hist = hist.flatten()
From my brief review of the code, that should make it OpenCV 3.0 compatible. If not, let me know what lines are throwing errors.
David Axelrod
This is exactly what I was looking for. Adrian, you’re awesome
Adrian Rosebrock
No problem David! 🙂
Madhi
Thanks Adrian for this awesome tutorial..
Gonna include Visual Ranking Algorithm to retrieve most matched images from the corpus collection.. 🙂
Gereziher W.
I solved this error by changing hist = cv2.normalize(hist).flatten() to:
hist = cv2.normalize(hist,hist)
return hist.flatten()
(I use Python 3.5.2 and CV2 version 3.20)
Tushar
Hi Adrian,
Thanks for the amazing tutorial !
I am having trouble generating the csv file from the dataset. Basically, everytime I run
python index.py –dataset dataset –index index.csv
the generated index.csv has no content and is 0 bytes in size. I tried re-checking the scripts and reinstalling OpenCV but the problem persists. Do you know why this could possibly be happening ?
Tushar
Never mind, it was a silly error. The INRIA dataset images were downloaded as jpegs for me. Just had to change the extension in the index.py script
Adrian Rosebrock
Hi Tushar! Awesome, I’m glad that the code is working for you now! Did you download the INRIA dataset from the original website or from this blog post? The images included from the source code download of this post are .png files.
Rijul Paul
Thanks Adrian for this wondeful tutorial. It helped a lot in our recent project. Hope to learn more from you about image processing with opencv.
Adrian Rosebrock
Awesome, I’m glad to hear the tutorials helped so much Rijul! 😀
Rijul Paul
Hey Adrian, is there any way that we could reduce the execution time for a large dataset,say around 10K images?? It will be really helpful if you could suggest any!! Thanks in advance 🙂
Adrian Rosebrock
Absolutely! I would take a look at the bag-of-visual-words model. I haven’t written a blog post on it yet, but I will soon. I also cover how to build large-scale image search engines inside the PyImageSearch Gurus course.
RIJUL PAUL
Hey Adrian, If I don’t part the image in 5 parts for masking,can that decrease accuracy??? Please reply!
Adrian Rosebrock
It mainly depends on the dataset. For this particular dataset, creating the 5-part image mask inserts locality of color into the image — for vacation photos this does well. For other datasets, it might not. It’s something that you should test for your own dataset.
RIJUL PAUL
Okay.Thanks for the information 🙂
jasstion
thanks for your so wonderful blog!
Tushar
Hi Adrian,
Your tutorials are great and I’ve a learnt lot through them. I’m trying to expand and build on the CBIR system you’ve provided here.
To perform calculations on a set of images is it necessary for the images to be stored in a local database ? I’m trying to build a program where I extracted ~1000 image URLs but downloading and storing them would take up to much space.
What changes would you suggest I make such that instead of passing the dataset as the command line argument, I simply give the program a python list of image URLs (through another module) and it follows the same procedure of indexing, comparing and searching ?
I don’t need specific details but a general heads up in the right direction would be great ! I know the changes possibly lie in index.py but can’t figure out hoe to get the module to look at a bunch of image URLs and generate histograms
Adrian Rosebrock
Take a look at my Python script on converting a URL to an image. It’s a pretty easy process to supply a list of URLs and have them downloaded as images.
However, I don’t recommend this if you want to build a CBIR system. The latency and download time it would take to download the actual images would far exceed the amount of time it would take to search through them. You’ll often want to trade a tiny bit of disk space to facilitate faster searches.
Tushar
Okay, I’m gonna take your advice of downloading them. Since the total size of my database is going to be very large, I decided to download and store them on an s3 server space. Can I still sift through them normally without inducing too much latency or do I have to have them on my local filesystem ?
Adrian Rosebrock
I would suggest storing them on your local file system when you’re performing feature extraction.
Gökhan
It would be great have indexing and searching are done via multiprocessing library to speed up the execution. Also having a practical GUI would make this example great for searching similar images.
Adrian Rosebrock
Hey Gokhan, thanks for the suggestion on the multi-processing — that’s something I’m planning on doing in the near future. As for a GUI, take a look at the next post in the series where we create a web GUI around the image search engine.
Gökhan
I have seen the post, but not having a way to upload or select an arbitrary image highly limits the usability of that application. There is a program called visipics. It is fast and reliable for similar image detection, yet it doesn’t allow to list similar images of a particular image like in this example. It would be great have an interface similar to visipics but with the functionality of your application.
Adrian Rosebrock
Thanks for the feedback Gökhan.
Michael
Hello Adrian,
Will you please explain why you chose the range of [0, 180, 0, 256, 0, 256] for the cv2.calcHist command, as opposed to [0, 256, 0, 256, 0, 256]?
Thank you.
Update: I found my own answer: Hue is an angle, but 0-360 is mapped to 0-180 interval in order to fit in a byte of memory.
Adrian Rosebrock
I’m glad you were able to figure it out Michael! 🙂
mehrdad
Hi Adrian,
i downloaded your project and build it.can you help me to convert python to c# EMGU?
with thanks
CAlvin
i am very impressed youtube. but i have some stupid questions
using windows 7 running python 2.7 > open search.py
it shows
usage: search.py [-h] -i INDEX -q QUERY -r RESULT_PATH
search.py: error: argument -i/–index is required
how can i solved it thanks
Adrian Rosebrock
Hey Calvin — you need to open up a terminal and execute the following command, just like I do in the post:
$ python search.py --index index.csv --query queries/108100.png --result-path dataset
Jet C
Hi, how would I make it use the contours to zoom in on only the focus object? Thanks
Adrian Rosebrock
By “zoom in” do you mean extract the ROI? If so, compute the contours, followed by the bounding box, and then extract the ROI.
JetC
ik how to find the contours of a paper from the doc scanner, but what about say a circle?
Adrian Rosebrock
There are two ways to do this. You could apply contour approximation and extract contour properties or you try to use circle detection.
kampta
Current search only takes into account color histogram. What are some good ways of adding texture search? (converting texture to vectors). Are CNNs way to go?
Adrian Rosebrock
If you’re looking to characterize the texture of an image, take a look into Haralick texture, Local Binary Patterns, and Gabor filters. These are fairly standard methods to extract texture feature vector. HOG can also be used as a texture descriptor in certain situations. I’ll be covering these descriptors in more detail inside the PyImageSearch Gurus course.
JetC
is there just a code that works for finding contours of all objects?
Adrian Rosebrock
Yes, you just use the
cv2.findContours
function which returns the contours of all objects in an image. This function is used extensively throughout the PyImageSearch blog.Edwin
When I type the command:
$ python index.py --dataset dataset --index index.csv
I receive an error message as below:
TypeError: Required argument 'dst' (pos 2) not found
Can anyone tell me how to solve this?
Adrian Rosebrock
Please see my reply to Adam above.
Mario
Wonderful tutorial Adrian!
I would like let u know one thing. The project is working from command line but, when i want update the index.csv file and, after it, i want search again (for example the last success query that i did) i have a problem:
cv2.error: ..\..\..\..\opencv\modules\highgui\src\window.cpp:261: error: (-215) size.width>0 && size.height>0 in function cv::imshow
How could be fix it?
I have python 2.7, opencv 2.4.11 and I have already changed the function (with success)
hist = cv2.normalize(hist).flatten()
to:Thanks for your future answer!
Adrian Rosebrock
Hey Mario! I’m glad you enjoyed the tutorial. And are you sure you’re using OpenCV 2.4? Based on your change in the code to the
cv2.normalize
function, it looks like you’re using OpenCV 3. Also, if you ever see an error incv2.imshow
that is related to the width or height of the image, go back to thecv2.imread
function and ensure the image was properly loaded.Mario
Thanks for your answer Adrian, I founded the problem! 🙂
I have another bit and last question: your dataset is with .png images (but official INRIA that u suggested is in .jpeg). How can I do if i would like using jpeg files? Should I modify something in the descriptor like in the line: image = cv2.cvtColor(image, cv2.COLOR_BGR2HSV) or something else?
Thanks for the support!
Adrian Rosebrock
The
cv2.imread
function automatically handles loading images of various types, including PNG, JPEG, BMP, and a few others. If you would like to modify the code to use .jpeg images, just change Line 22 to be:for imagePath in glob.glob(args["dataset"] + "/*.jpeg"):
And you’ll loop over all .jpeg images rather than .png images in the supplied directory. Better yet, use the
list_images
function in the imutils package and you’ll be able to grab the paths to images in a directory regardless of file type.Tony
I have this problem and i can’t resolve it. Can you help me Please
Andan
Hey Mario.!
Can you please tell me how did you resolve this problem.?
Facing the same problem.
Thanks in advance
San
How did you resolve this issue ? I am using Openc 3.1.0.
Saatvik
Facing the same issue. Any help?
Adrian Rosebrock
What version of OpenCV are you using?
Pyt0n
Hi Adrian,
This is a great example but i tested it with 10K small images (under 320×240) and the search process was really slow (above 15mins !).
I’m currently working on making it multi thread but I don’t thing that would make a huge difference lets say it can make it in 5 mins but that’s not fast enough. Now i need some suggestions:
1. as the index file size goes beyond 100 MiB will it be any effective if I use a proper DB for it ? I think it will reduce the memory usage but what about speed ?
2. histogram descriptor is doing very well in recognition but as my database contains images with only 2D distortions (little rotates, little scales, moderate noise), do you suggest any faster (probably smaller) descriptor and comparison method ?
thanks in advance
Adrian Rosebrock
In order to speedup the search process, multi-threading is a great start. However, for a super fast search, I suggest constructing a bag of visual words model and utilizing an inverted index. I haven’t blogged about the BOVW model on PyImageSearch, but I will soon. I also cover the BOVW model and building large scale CBIR systems inside the PyImageSearch Gurus course.
ANI
Hi Adrian,
Really nice tutorial!! This is very interesting
I have an issue, I want to generate the csv file for a jpg dataset but wile executing index.py I encountered the following error:
OpenCV Error: Assertion failed ((scn == 3 || scn == 4) && (depth == CV_8U || depth == CV_32F)) in cv::cvtColor, file C:\builds\master_PackSlaveAddon-win32-vc12-static\opencv\modules\imgproc\src\color.cpp, line 7946
All my images load correctly otherwise(in a jpg format), it would be great if you could point out where I am going wrong.
Thank you
Adrian Rosebrock
Can you determine which line is throwing the error? The error message helps, but the actual line number would be more helpful. All that said, based on your error message it like OpenCV may have been compiled and installed on your system without support for JPG or PNG image support. But again, I can’t really tell without seeing the line number of the Python script.
ANI
Hi Adrian,
I think the error is thrown in colordescriptor.py line 17 ( image = cv2.cvtColor(image, cv2.COLOR_BGR2HSV). When I execute the index.py script from command prompt the traceback does not show this. I had to include print statements and try except blocks to determine this. Another observation is when I execute index.py a csv file is indeed generated but has lots of the features of the images = 0. If I run the same index.py script for the dataset provided by you it works fine and generates a csv with all features. My images set is a set of jpg images I obtained after crawling the Bing image search engine. It would be great if you could help me out.
Adrian Rosebrock
Does it happen for all .jpg images? Or just one? When you crawl lots of image data from the internet it’s common for a handful of images to get corrupted in the download process.
Otherwise, you might want to ensure that the path to your input images is correct. If it’s not, the
cv2.imread
function won’t return an error and will proceed to the next function.Finally, it’s common for most of feature vector entries to be zero. That’s common for 3D histograms.
ANI
Hi Adrian,
You were right, the images were indeed corrupted. Thanks for a great tutorial.
Cheers
Anirudh
Adrian Rosebrock
Awesome, I’m glad that was the issue 🙂
michelle
Hi, I am currently working an a project which is an Image Search Engine website. I am using window xampp. I have created php files in my htdocs to allow user to input search and post the search for a search using flickr api. i have also managed to retrieve data from flickr api including image and store in my database in phpmyadmin. I need to use opencv now to extract image feature (SIFT) so that i can cluster them and store the data in a new db. However, i am entirely new to opencv and c++. Is it possible to show me step by step in how can i install opencv in xampp. I also know that there is a php wrapper for opencv but i am lost for that too. Would you mind helping?
Thank you
Adrian Rosebrock
Very cool project. To be honest, I haven’t used Windows in a good 9+ years at this point and I’ve never used OpenCV with PHP bindings. In general, I wouldn’t recommend using PHP for this project. Instead, you can use Python with you OpenCV bindings and use a web framework such as Django/Flask for your website. You can see an example of using OpenCV + Python + Django together in this post.
Finally, if you’re just getting started with OpenCV and Python, you should definitely take a look at Practical Python and OpenCV. This book will help you get up to speed quickly and even the later chapters discuss how to extract and utilize SIFT features.
Hasyemi Rafsanjani
Hi, it’s really great tutorials and what i’m really looking for.
But i was wondering, what if i want to also using texture and shape not just color? how can we do that?
Adrian Rosebrock
There are many, many different ways to do this. You can extract shape, color, and texture independently and then concatenate them into a single feature vector. You could can extract these features, perform three independent searches, and then combine the results.
For more information on extracting various types of texture, shape, and color features (along with combining them together), be sure to take a look at the PyImageSearch Gurus course.
Ravindranath
Instead of contention based search engine how can i develop text based image search engine.
1. how to annotate keywords based on features of given trainig image from dataset
2. how to compare query text with annotated text
3. how to retrive results .
Adrian Rosebrock
Just to clarify, are you trying to build a text-based search engine? If so, you should look into Lucene, Solr, and whoosh. Simply take the tags associated with the images and pass them into the library of your choice.
Angel
Hi Adrian,
Thank you for this very very useful guide. I really searched a lot how to start.
I am new to python, I user Visual Studio and as you tell us, I create new file for index.py and another new file for colordescriptor.py and put it in a folder called pyimagesearch but I don’t know how to link between them. For example,when I wrote the command for indexing, an error is shown as follows:
ImportError: No module named pyimagesearch.colordescriptor.
Please help me
Adrian Rosebrock
You need to create a
__init__.py
file inside thepyimagesearch
directory. If you’re new to Python, I highly suggest that you download the code to this post and use it as reference point as you try to replicate it in your own editor.Angel
Hi Adrian,
I was wondering how we can improve the retrieval using a Relevance Feedback?
Can you post an example please?
Adrian Rosebrock
Relevance feedback with CBIR is a great topic. I’ll see if I can cover it in a future blog post.
Andan
Hello Adrain,
I am thankfull for the wonderful blog. I executed your code but getting the error as shown bellow.
I am using opencv3.0.0
done the changes from hist = cv2.normalize(hist).flatten() to:
cv2.normalize(hist, hist)
hist = hist.flatten()
Getting error has:
gui\src\window.cpp:271: error: (-215) size.width>0 && size.height>0 in function
cv::imshow
Kindly let me know whats the problem
Adrian Rosebrock
Please see my reply to “Mario” above — I detail how to solve this issue. The error is due to your image not being properly read via
cv2.imread
. Again, see my response to Mario above for a more detailed discussion of the error and how to resolve it.Andan
Thanks for the reply Adrian.!
I went through Mario’s reply but i am not getting the exact issue. cv2.imread is not reading the images properly means.? I checked in the index.py file. It’s fine.
And, Mario replied that He found the problem but didn’t explain how. Can you kindly elaborate on how to fix this issue.
Thanks in advance.
Adrian Rosebrock
You’ll want to double check the path to the image on disk that you supply to
cv2.imread
If the path does not point to a valid file, then the image cannot be loaded. So, “cv2.imread
is not reading images properly” simply means that you need to double-check the paths that are being supplied to it.liu
very nice!
Dave
Hi Adrian,
This is a very informative and practical post. My website (piclookup.com) does image search, looking for a match based on a part of the original. It uses OpenCV and MySQL, and stores lots of tiny pieces of every image, so a partial sample can still lead to the correct image. However, the algorithm is meant for a large collection of images. My robot, a work in progress needs much fuzzier visual capabilities. I plan to experiment with your ideas, and using your book to save a lot of time, to help the robot find its way around, visually. Now, if I can only get my wife to let me use her paypal account! Thanks for the great service you provide for all of us.
Adrian Rosebrock
Very cool Dave! And if you decide you would like to learn more about advanced image search engines, be sure to take a look at the PyImageSearch Gurus course. Inside the course I have a bunch of lessons dedicated to building scaleable image search engines.
Dave
Yes, that looks very enticing and I know I should be participating. I’ve been going through your 1stEdition and it’s pretty cool. I can see that Python is a great way to quickly experiment with the power of OpenCV. I love the contours demo with coins in the end! Now I’m going on to the heavier stuff in the other books you’ve included. This is an incredible value. Thanks so much.
Dave
PS, I found your online opencv/RPi comments helpful a few months ago when I was trying to install opencv with java on an RPi. But I think there’s an enormous time savings using Python instead, especially for experimenting.
Adrian Rosebrock
I couldn’t agree with you more — I think it’s extremely important to prototype computer vision applications in Python. In many cases, the speed will be enough. And if it isn’t, you can always re-implement in C++. Either way, by using Python you can perform a bunch of experiments much quicker.
Manik Jasrotia
Thats a great article Adrian ! Thanks for sharing these insights with us. I was actually trying to build a similar image scoring application and I was able to use this approach to success with slight modifications (Like adding a dist parameter to the NORMALIZE function). Also the imshow didn’t work for me (not sure why) so, I had the scores printed on the command line.
I just had two queries if you can help me with.
1. Is there is a way I can get scores for all the images in the dataset. Currently it shows only 10 scores (in the decreasing order of similarity).
2. How can I use the similar approach to use Correlation method to compare histograms. I know something needs to be changed in the searcher.py .
Any help would be great !..Thanks
Adrian Rosebrock
To get more than 10 results, change Line 26 to be:
results = searcher.search(features, limit=20)
This would return 20 results. You can modify it as you see fit.
As for using the correlation distance instead of the chi-squared distance, change Line 25 of
searcher.py
to use your correlation distance implementation.Bran
Hello Adrian,
Thank you for the tutorial.
I am running the script on Windows. When I run the search, I get the windows showing only part of the images not the full image. Could you please help?
Adrian Rosebrock
Hey Bran — I’m not sure what you mean by “only part of the images not the full image”. Can you please elaborate?
Bran
Thanks for the reply Adrian. I get windows each showing only a corner of the image, not the entire image.
Anyway, I don’t need the images displayed. I was looking to process the image on a local Android device and send the features to the server not the image itself. I have configured Android Studio with OpenCV but U can’t get all the options available for Python. For example, on Android, how could I determine the dimension of the image, divide the image and extract a histogram?
Adrian Rosebrock
Hey Bran — to be honest with you, I’m not an Android developer and I don’t use Android Studio. Hopefully another PyImageSearch reader can help you out with this.
Otto
Using the cv2.ellipse function on line 29 in colordescriptor.py produces for me the following error with Python 3.5 but not with Python 2.7.
TypeError: ellipse() takes at most 5 arguments (8 given)
One explanation is http://answers.opencv.org/question/30778/how-to-draw-ellipse-with-first-python-function/
i.e. also axesX and axesY should be integers.
So maybe line 27 in colordescriptor.py should be changed to
(axesX, axesY) = (int(w * 0.75 / 2), int(h * 0.75 / 2))
Adrian Rosebrock
It sounds like you’re using OpenCV 2.4 with Python 2.7 and OpenCV 3 with Python 3.5 — is that correct?
Otto
I am using OpenCV 3.1 with both Python 2 and 3. My operating system is Ubuntu 16.04.
Adrian Rosebrock
Can you try with OpenCV 2.4 or OpenCV 3 instead of OpenCV 3.1 and see if the error persists? It seems that the
cv2.ellipse
function signature may have changed in between versions.Otto
The same behavior persists with both OpenCV 2.4 and 3.0. Except I had trouble installing OpenCV 2.4 for Python 3 and could not test this configuration.
Adrian Rosebrock
OpenCV 2.4 is not compatible with Python 3, so that is why you could not install that particular configuration. As for your the
cv2.ellipse
function, I’m honestly not sure what the particular issue is. The code is working on my OpenCV 2.4 + Python 2.7 installation.praveen vijayan
(axesX, axesY) = (int(int(w * 0.75) / 2), int(int(h * 0.75) / 2))
This will help.
cv2.ellipse expects arguments to be in integer.
Arif Qodari
Hi Adrian,
That’s interesting article. Do you have any recommendation what database and indexing technique to store image features with thousands dimension and hundred thousands of images? I tried using a csv file and generate a kd-tree for fast searching, but it is not a memory efficient solution a guess.
Adrian Rosebrock
My personal favorite as of late is annoy, a super fast approximate nearest neighbor algorithm that memory-maps the structure from disk to memory. I also demonstrate how to build highly scalable image search engines Inside the PyImageSearch Gurus course.
Rohan
Hi Adrian,
I was thinking of giving as input a grayscale image and extracting the closest most resembling coloured image from my database. Any ideas on how I might proceed?
Adrian Rosebrock
Hmm, that’s possible but I’m not sure I understand exactly why you would do that?
Rohan
My idea is to extract a similar coloured image for my grayscale image and then use it to colorize my input grayscale image
Adrian Rosebrock
Colorizing grayscale images is an active area of research. The most successful methods tend to utilize deep learning. Take a look atthis article for more information.
Brent
Hi Adrian just stumbled across your website while doing a search for resources on reverse image search..This has really piqued my interest, amazon content! Since this seems to be primarily aimed at a local dataset I am curious, how could this be used for submitting an image to it and then it is queried to see if it exists on the internet? Like tineye or google reverse image search does.
Adrian Rosebrock
Hey Brent — what you are referring to is called “image hashing” or “image fingerprinting”. I actually wrote a blog post on that very topic here.
Brent
Thank you Adrian for your response to this, it never emailed me to let me know you had responded otherwise I would have thank you sooner for the prompt response. I am going to get busy doing some reading, thank you again.
Esron
Excelent post.
Adrian Rosebrock
Thanks Esron!
Linus
Hey Adrian,
great post, why don’t have I seen this before? Just awesome, I will try this for sure in holidays. But isn’t the search engine you mention in the beginning called duckduckgo?
Adrian Rosebrock
A search by meta-deta search engine? That’s not specific to DuckDuckGo. Nearly all major search engines leverage meta-data.
Linus
Ah sorry, that was badly described. I just wanted to point out a small typo in the beginning: you wrote DuckGoGo instead of DuckDuckGo. However… Merry Christmas!
Adrian Rosebrock
Thank you for pointing that out Linus. And a Merry Christmas to you as well!
Awais
Hi Andrian, its a really nice article so that the new like me can easy follow. I want a little help how resulted images can be stored in a defined folder itself by their original names as in dataset. For example when I search image x.jpg it shows matching images a.jpg, b.jpg etc. and when I save resulted image it save as screenshot and but I want the result may store in some define folder itself by name as in dataset a.jpg, b.jpg etc.
Adrian Rosebrock
Hey Awais — thanks for the comment, but I’m not sure what you are trying to accomplish. You can use the
cv2.imwrite
to write the resulting montage to file. You can use any naming convention that you want.Awais
Thanks Adrian for reply, let me tell you for example I have an image and a database containing thousands images.I am not sure whether this image, in the database, exist or not, so I made a search and found image exist but now I don’t know by which name this image is stored in database?
Now the question is how to get the names of images ( the names by which images are stored in database). In the other words you can say that I want to copy the resulted images by their original names (the names by which those are stored in a database) to a xyz folder.
Adrian Rosebrock
I’m still not understanding the problem. If you have thousands of images in a database, they must have been added to the database somehow and they therefore have a unique ID. If you query the database and find a match, you can pull out the unique ID of the image.
Awais
Yes Adrian you reached the point. let me explain my question in other words that
Matching images should be auto save to an output folder with their “unique IDs” as they have in database .
What code will be add in Search.py.
Thanks for taking your precious time.
Adrian Rosebrock
I would just use the
cv2.imwrite
function to save the image to disk.Awais
Hey Adrian, I made little changing in search.py and it solve my problem.
import os
os.chdir(“test”)
cv2.imwrite(resultID, result)
now I can save matching image in another directory “test” with the ID as it has in the database.
Thanks.
saurabh
after executing the index.py, the index.csv file is empty (size 0 byte), no error???
what may be the problem please help??
Adrian Rosebrock
If the index.csv file is empty and the script exited without error, I think the issue is likely due to image paths. You likely supplied an invalid path to your input images via the command line argment.
Harsh
I was trying to display multiple resultant images of this in one window using matplotlib but no luck. Can you help me with that?
Adrian Rosebrock
You should be able to accomplish this by creating a sub-plot for each image.
litepresence
Adrian, great tutorial. I intend to use it mostly as is, except my mask will be 2×5 columnsXrows instead of your 5 piece elliptical. I expect to have 500,000 images in my database that are about 10kb each; all the same dimensions; matplotlib generated. I’m concerned about how long it will take to image match per request? What can I expect with a modern AMD FM2+ quad core desktop w/ 16gb ram to match 50 images to my 500k database? It will take about a day to build my db w/ my algo and matplotlib, so before I set my cpus to task building the db I’m wondering if I should further compress my images to smaller size?
Adrian Rosebrock
This blog post performs a linear search which doesn’t scale well to large image datasets. To learn how to build an image search engine that can scale to millions of images, be sure to take a look at the CBIR lessons inside the PyImageSearch Gurus course.
Kysida
I’m glad to read your blog.About your algorithm,I made some change. It also can classify the image by Calculating the histogram.But it will split the image to 16 pices and Calculating its histogram.And I try to use ahash(Average Hash Method),phash(Discrete Cosine Transform) to improve the accurate rate.Oh, Since my bachelor thesis is about this area, it is very troublesome to look for a picture library.I will be very grateful to use your picture library,do you mind if I use your picture library?
Adrian Rosebrock
The image dataset I used is the INRIA Holidays Dataset. You should cite the dataset in your thesis.
Shivaraj
Hi Adrian,
I am getting only one result image.
How to configure number of result images.?
Adrian Rosebrock
The first result image displays to your screen, then you press a key on your keyboard (with the result window open) to advance to the next result. In my next blog post I’ll be demonstrating how to create image montages so you can display multiple images in a single window.
Dheerendra
Hi Adrian,
I am unable to install pyimagesearch module in my laptop. I’m using windows 10 in which I installed python 2.7 and opencv 2.4.9 . Please try to help me.
Adrian Rosebrock
Hi Dheerendra — I am sorry to hear about the issues installing OpenCV; however, I do not support Windows here on the PyImageSearch blog. I highly recommend using a Unix-based OS such as Ubuntu or macOS for computer vision development. I provide a number of OpenCV install tutorials here. I also provide a pre-configured Ubuntu VirtualBox VM that can run on Windows, Mac, and Linux inside the Quickstart Bundle and Hardcopy Bundle of Practical Python and OpenCV. I hope that helps!
Marat
Hello Adrian! Thank you so much for a great article! I have a question.
You mentioned Annoy. Is it possible to use Annoy with calculated result of chi distance?
As far as I know Annoy uses only cosine and euclidean metric.
Adrian Rosebrock
Correct, Annoy only uses cosine and Euclidean distance by default. There is no built-in chi-squared method.
Arvind
Dear Experts,
I getting this issue:
$ python search.py –index index.csv –query queries/108100.png –result-path dataset
Traceback (most recent call last):
…
File “/home/arun/Img_Proc/code/vacation-image-search-engine/pyimagesearch/colordescriptor.py”, line 59, in histogram
hist = cv2.normalize(hist).flatten()
TypeError: Required argument ‘dst’ (pos 2) not found
Can anyone help?
Greatly Appreciated.
Adrian Rosebrock
Please see my response to “Adam” above as this question has already been answered.
Gereziher W.
Hello Hello Adrian! Thank you so much for a great article, I am always inerested to read your articles, I have this problem to run this program. ” pyimagesearch/colordescriptor.py”, line 29, in describe, cv2.ellipse(ellipMask, (cX, cY), (axesX, axesY), 0, 0, 360, 255, -1)
TypeError: ellipse() takes at most 5 arguments (8 given) “. Any thing I can do? Thank you.
Gereziher W.
Oh thank you guys, I read some comment and I solved the problem with the following little changes.
change this, (axesX, axesY) = (int(w * 0.75) / 2, int(h * 0.75) / 2) to
(axesX, axesY) = (int(w * 0.75/2), int(h * 0.75/2)) and it will work.
After making this change you may face other error hist = cv2.normalize(hist).flatten() change this line of code to:
hist = cv2.normalize(hist,hist)
return hist.flatten()
(I use Python 3.5.2 and CV2 version 3.20)
Thank you Adrian Rosebrock, I really love your articles.
Gereziher W. (From Ethiopia)
Adrian Rosebrock
Congrats on resolving the issue, Gereziher! Nice job.
oleg
Gereziher W. , thank you for your post. I also had this problem. It’s seems code was made for python2 but I have python3. I made you little changes and it works now. Thank you again.
Suggestion for Adrian is to give also code for python3 because today more people use python3 than python2.
Adrian Rosebrock
Yes, I will be converting this and other blog posts on PyImageSearch to Python 3 in the coming months.
Pedro
I looked for it but I didn’t found. Do you know what is the distance range. Because if it has a specific range, I can normalise the distance between two images and pass an extra argument that is the maximal distance I’ll accept as a [0, 1] interval, where 0 is identical and 1, totally different;
Adrian Rosebrock
You would normally apply min-max scaling over the top K images returned by the image search engine. The upper bound on the distance is entirely dependent on your dataset.
veasna
First thank for your post, I’m interest in PyimageSearch and follow your toturial but i got error when i run python index.py –dataset dataset –index index.csv.
Error line 5 in module from pyimagesearch
Adrian Rosebrock
What is your exact error?
Todor Arnaudov
Hi Adrian and guys,
Py 3.6.1, CV 3.3, in order to make it run I had to adjust a few lines.
(axesX, axesY) = (int( (w * 0.75) / 2.0), int((h * 0.75) / 2.0)) #as discussed above
Also in def histogram(self, image, mask):
cv2.normalize asked for “dst” parameter.
It worked either by:
dst = hist.copy()
dst = np.zeros(hist.shape[:0], dtype = “float”)
Then:
dst = cv2.normalize(hist, dst).flatten()
return dst
Or just:
hist = cv2.normalize(hist, hist).flatten()
It seems with equal performance.
Notice that OpenCV documentation declares that the second parameter “dst” as “InputOutput”, however without an assignment hist = cv2.normalize … the search results were wrong.
The error which suggested the latter edition was:
python search.py –index index.csv –query queries/127502.png –result-path dataset
…
hist = cv2.normalize(hist).flatten()
TypeError: Required argument ‘dst’ (pos 2) not found
Todor Arnaudov
Oh, I see that was discussed already. Sorry. 🙂
Adrian Rosebrock
Thanks for sharing, Todor!
Anjali
Hi Adrian,
First of all, I thank you for this informative post.I am trying to implement it.But at the end, I am getting an error and dataset folder exists in the path.
File “search.py”, line 37, in
result = cv2.imread(args[“result-path”] + “/” + resultID)
KeyError: ‘result-path’
Adrian Rosebrock
Please make sure you are using the downloaded source code rather than trying to recode by hand. You need to replace your “-” with a “_”:
result = cv2.imread(args[“result_path”] + “/” + resultID)
Jaime
Hi, Adrian!
I have been working with both with the tutorials and your OpenCV book for a couple of weeks now and I am enjoying them a lot. Your detailed posts really help to learn.
That aside, what I do to approach the posts is trying to follow every instruction rather than downloading the code, and usually the questions section helps to solve many issues I encounter as I follow. In this case, I got everything working, but I could not really understand the reason behind the change of ‘-‘ to ‘_’. As I understood, when adding the ap.add_argument line, the tag ‘–result-path’ was what ‘args[tag]’ looked for when you wanted to use any given argument. Just as args[“image”] loads the image argument in any other situation. Why does this work this way?
I have another question. I downloaded the set of jpg from INRIA. I got it working by changing the expected extension from .png to .jpg, but when using imshow, the images seem too big to fit on screen. Any clue as to why this happens?
Cheers!
Adrian Rosebrock
1. I would still suggest you download the code as a “gold standard” to compare your code to, just in case there is an error.
2. Take a look at this blog post on command line arguments regarding the “-” and “_” question of command line arguments.
3. It sounds like the image you loaded has large dimensions. The cv2.imshow function will not scale the image to your screen. It will show the image in its original dimensions. You should resize it before calling cv2.imshow.
Jaime
Got it! I understand now. Thanks!
Andrea Solleoni
Hi Adrian I have a problem, I use your downloaded code, I launch it from terminal, and it works but give me only one image, why? I thought that issue it’s due to the dataset too large but it’s not! Could you give me an answer?? please
Adrian Rosebrock
Hey Andrea — the
cv2.waitKey
call pauses execution until you click on the active window and press a key on your keyboard. This will advance your script. I hope that helps.Alex
Hi Andrian!
Now your blogs have become more interesting, because it deals with very beneficial things. Nice blog. Thank you.
Rosa
Dear Adrian,
thank you for your post, as always your blog is my main source of information!
I’m comparing different feature detector/descriptor (SIFT, SURF, BRISK, ORB…) and I need to store my extracted feature in a database. Do you have any advice? Or post coming?
Thanks!
Rosa
Adrian Rosebrock
I would suggest storing the extracted keypoint locations and features inside a HDF5 database. I cover exactly how to do this inside the PyImageSearch Gurus course, including extracting the keypoints/features, storing them in HDF5, scaling the image search engine, and evaluating it. Be sure to take a look as your exact question is covered inside the course.
Rosa
Thank you very much! 🙂
Amir
Adrian,
I understand this issue has already been discussed, but I just wanted to clarify the exact solution. I am receiving the following error:
OpenCV Error: Assertion failed ((scn == 3 || scn == 4) && (depth == CV_8U || depth == CV_32F)) in cvtColor, file /home/pyimagesearch/opencv/modules/imgproc/src/color.cpp, line 7946
Traceback (most recent call last):
File “search.py”, line 25, in
features = cd.describe(query)
File “/home/pyimagesearch/Desktop/pyimagesearch/colordescriptor.py”, line 13, in describe
image = cv2.cvtColor(image, cv2.COLOR_BGR2HSV)
cv2.error: /home/pyimagesearch/opencv/modules/imgproc/src/color.cpp:7946: error: (-215) (scn == 3 || scn == 4) && (depth == CV_8U || depth == CV_32F) in function cvtColor
It understand that you suggest to confirm that our path to the input image is correct , but how does one ensure this in a step by step format? I apologize for the elementary inquiry.
Kind Regards
Amir
Adrian Rosebrock
It depends on your operating system. I recommend using the “ls” command if you’re on a Unix-based environment (I can’t remember what the Windows equivalent is off the top of my head; ‘dir’ maybe?) Use this and tab completion to ensure your path is correct. You should also read up on NoneType errors.
Suresh Doraiswamy
Excellent write up on nuances of image processing. Thanks very much Adrian. Great work.
It was a great Learning Experience for me, including the responses from various experts.
Adrian Rosebrock
Thank you Suresh, I really appreciate that 🙂
jj
no module named pyimagesearch.colordescriptor
Adrian Rosebrock
Make sure you use the “Downloads” section of this blog post to download the source code and “pyimagesearch” module.
Sam
please help me out. I’am using python 2.7 and opencv2.4 and after solving all the errors ,when I run the search.py on command prompt, the screen suddenly blinks and nothing happens.
please help me out. I will be highly grateful to you brother
Adrian Rosebrock
Hey Sam — which operating system are you using? Windows or Unix-based?
Rikesh Shrestha
thank you for these blogs. I read the comments too but could not find which database would be favourable to use. Can you please suggest a database which would increase efficiency in searching the images?
Adrian Rosebrock
Hey Rikesh — are you referring to the image database (the dataset itself) or a database of extracted features? If it’s the latter, take a look at the bag of visual words (BOVW) model. Inside the PyImageSearch Gurus course I demonstrate how to implement an image search engine that scales to millions of images. The code is well documented and there are over 40+ lessons on feature extraction and scaling image search engines. Take a look, I think it would really help you with the project.
Sangkwun
Thanks for well organized guide for image search engine!
Actually I try to make engine for recognize store with image from there.
I crawled instagram 20 stores and 2300 images are selected from 22000 images by my self.
I’m trying to make deep learning model with transfer learning. However your guide also good to make the engine for that. What is your recommend way between deep learning by image classification and NN(Nearest Neighborhood) with color histogram like your guide?
Adrian Rosebrock
Hey Sangkwun — I’m glad to hear you are enjoying the tutorials, that’s great! However, I’m not sure what you mean by “recommend way between deep learning and NN”? Are you asking what is the differences between the two? Or which is better suited for your project?
sangkwun
Ah! I mean which one is better suited for my project. Also pros and cons about two approachs? Your answer can help my project and someday I will show it to you!
Adrian Rosebrock
Without seeing your example images it’s hard for me to say definitively. But you may try using a mixture of both — deep learning for feature extraction using a pre-trained network followed by a k-NN model or logistic regression model for classification. You could also use k-NN for search as well. If you’re interested in learning how to build such a project, I would recommend working through Deep Learning for Computer Vision with Python.
lpy
thank you!!! I want code。thanks!!
wzhang
Thanks a lot!
ashutosh gupta
Hi Adrian.
Thanks! Great Post.
I am building a similar kind of image search application and using shape and color feature. I am getting the distance for shape feature in range(0,1) and for the color feature in range(0,20) for my image dataset. I want to combine both distances using some weight factors for shape and texture feature. so should I normalize range of distances for both feature to a common range before applying weight to them or there is some another good approach for combining both distances features to give a single distance between two images?
Adrian Rosebrock
There are a few normalization strategies you can apply. You’ll want to look into “min-max normalization” so each distance is in the range [0, 1]. From there you can define alpha and beta values to weight each distance, respectively.
For what it’s worth, I cover how to build image search engines in detail inside the PyImageSearch Gurus course. Be sure to give it a look!
ashutosh gupta
Hi Adrain
Can we compare two images based on some features other than shape, texture, color? I want to ask is there any other feature for describing images other than these to compare the similarity between images.
Adrian Rosebrock
I think it would be best to reverse this question. What exactly are you trying to compare? What types of images? What is the end goal of the project?
ashutosh gupta
Hi Adrain,
I am looking for some labeled image database for content based image retrival. Most of times Wang database has been used. I want to use some other database. I found some databases online GHIM20, database of natural and urban secenes at http://cvcl.mit.edu/database.htm. I want your advice, can I use them for my undergraduate research paper work?
Adrian Rosebrock
There are a huge number of CBIR datasets. One of the standard ones is Oxford Buildings which has been used in many CBIR papers as a benchmark. The dataset is pretty small at 5,062 images but would be suitable for an undergraduate project.
Abderrahim Khatabi
i was trying your code of cbir when i run it at spyder; it gave to me this errors, please can someone tell me how can i solve it and thank you in advance
usage: search.py [-h] -d DATASET -i INDEX
search.py: error: argument -d/–dataset is required
An exception has occurred, use %tb to see the full traceback.
SystemExit: 2
when i run it by CMD give me this errors
TypeError long argument must be a string or number not ‘nonetype’
Adrian Rosebrock
You’ll want to read up on command line arguments before continuing. Read the tutorial, it will help you resolve the issue.
Alex
Hi Adrian,
This guide is amazing!
But I have a question:how can I use the image of a person as query and have as result all the images that contain the person from the query?
Adrian Rosebrock
What you are referring to is “face identification” or “face recognition”. I’ll be covering face recognition in-depth inside next week’s blog post. I also cover face recognition inside the PyImageSearch Gurus course as well. Just wanted to mention it just in case you were interested!
Alex
Wouldn’t it be possible to use a color descriptor to do this?
For example,if i have some security footage,the person may not be facing towards the camera.
Adrian Rosebrock
You could but then you would likely run into many false positives and false identifications. The best manner to perform human identification would be via the face. The second best option would be their gate (i.e., how they walk). Facial recognition by definition requires that a face first be detected before being quantified. A color histogram doesn’t really care what it’s describing so your system may report quite a few incorrect identifications.
Kate
Hi Adrian,
How can I modify this guide to use a shape descriptor instead?
Adrian Rosebrock
Hey Kate — which shape descriptor are you trying to use?
Kate
For example HOG; i have some images with different dog species and i want to identify a certain type based on shape,for example finding all the images containing a husky.
Which type of descriptor would be best in this situation?
Adrian Rosebrock
For a task that fine-grained I would actually recommend a machine learning/deep learning approach. You can likely even leverage existing models. This post would be a good starting point.
Rin
Hi, just wondering if we’re allowed to use this code in our own applications?
Adrian Rosebrock
Yes, but I would kindly ask that you either credit the PyImageSearch blog and provide a link back.
Suman Haldar
Hi Adrian ,
Thanks for a such a great article.
I have a issue in this program ,when calculating for huge dataset (10000) it took me around 15 sec for providing desirable output and drilling down the issue I found the maximum time is been consumed in chi-square distance calculation .Can you please help me in this and in future I have to increase the dataset more.It will be great help if you can assist me in this.
Adrian Rosebrock
Hey Suman — the method detailed in this post is not meant to scale to 10,000 images. If you’re interested in building large scale image search engines that scale to millions of images you should follow my CBIR module inside the PyImageSearch Gurus course. Inside the course have I have 40+ lessons dedicated to image descriptors, feature extraction, CBIR, and how to scale to millions of images. Be sure to check it out!
Varsha george
Can you please implement the same using SIFT algorithm.can you please tell me which all packages I should download to make this code run
Adrian Rosebrock
I actually cover how to build an image search engine that scales to millions of images (using SIFT) inside the PyImageSearch Gurus course. I would suggest starting there.
Ajil
Hi Adrian,
Awesome blog, but i have question though. Here you are searching for a particular image from the,right? How can I build a Small GUI to insert the image instead of having to change the code every time i want to try it with a different image. Im fairly new to python and OpenCV.
Adrian Rosebrock
I don’t do much GUI work. I mainly teach computer vision and deep learning. If you’re interested in GUIs I would suggest looking into SimpleGUI, Kivy, TKinter, and QT.
Visharg Shah
Hey Adrian, Its a nice description for CBIR. I have one issue actually. I have a video which I have converted into images and trained index.py on that images. But when I pass query image it returns me a black image. Please guide me through this.
Visharg Shah
Hey I adrian, I implemented cbir successfully. Thanks a lot for this. I want to know how I can implemented it on greyscale images?
Adrian Rosebrock
This tutorial assumes you are using color images but you can swap in grayscale histograms as well. See this tutorial for a guide on computing different types of histograms, including grayscale histograms.
ankita wadhera
I Adrian..The code is working but it is only retrieving first image of the dataset..means i is not following complete dataset folder..
Adrian Rosebrock
Are you using the code + images from this tutorial? Or your own custom dataset? Secondly, click on the active window opened OpenCV and press any key on your keyboard — that will advance execution of the script.
sucharitha
hey adrian,
can u please send me the algorithm for this code. Thanks in advance!
Adrian Rosebrock
You can use the “Downloads” section of this blog post to download the source code and dataset.
Altine
Hi Adrian, thanks for your tutorial
once you have finished the search and the use of the descriptor … how do you proceed with the evaluation? that is to say using the f-measure and probably other formula.Thank you in advance.
Adrian Rosebrock
Thanks, I’m glad you enjoyed the post!
tommy
result window size is very small. how to i increase the size of the window and display all the results at same time.
Adrian Rosebrock
You can use the
cv2.imresize
orimutils.resize
functions to resize the image and thereby increase the size of the resulting window.Abishek Shrestha
Hello Adrian!! i am doing my FYP project on image search and i found this blog as an amazing and quite intresting. But after implementing your work, I have search the similar images succesfully but additional to that i have also found extra image. What might be the error for this? Hoping your reply
Adrian Rosebrock
I’m not sure what you mean by “found extra image” — could you clarify?
shoaib
hi adrian: i face this error: when execute index and
error: the following arguments are required: -d/–dataset, -i/–index
Adrian Rosebrock
It’s okay if you are new to command line arguments but you need to read this post first.
shoaib
i download project and now how i integrate in spyder.
Adrian Rosebrock
I recommend you execute the code via the command line. You can write the code in Spyder (or whatever IDE you choose) but execute the script via the command line.
Biasi
Hi Adrian, I was wandering about the regions-based histogram, why to choose of segmentation in 5 regions the way that was done? why not in a 3×3 or 2×2 regions? there are papers that talk about it?
Thanks of the great article.
Adrian Rosebrock
You can segment the images however you want, but typically, working with photographs, you make the assumption that the center region of the image is the most important area of the photography. As humans we normally center our photos on the subjects to make the photo as aesthetically pleasing as possible. In that case a 5-region method works well. I would suggest trying different region segmentations and exploring the results as well.
Parasa V.N.S Hanumantha rao
Adrian can you please help with the statement:
segments = [(0, cX, 0, cY), (cX, w, 0, cY), (cX, w, cY, h),(0, cX, cY, h)]
I am not able to understand how this code is going to partition the image in top-right,top-left, bottom-left, bottom-right.If it is cartesian co-ordinate system then (X,Y) should be used but here four points are use in one tuple, so I am not able to understand the division of image here. please help.
Adrian Rosebrock
Images are indexed assuming (0, 0) is the top-left corner and the (w, h) is the bottom-right corner. If you need help with the basics of pixel indexing definitely read Practical Python and OpenCV so you can learn the fundamentals.
Hanumantha rao
it is a nice tutorial thanks a lot adrian!!!!!
Adrian Rosebrock
You are welcome!
Mr. Du
Hello, what is the meaning of the circle bin in the article, how to take the value, what is the value?
Adrian Rosebrock
Are you referring to the circular mask?
Mr. Du
I am talking about the number of bins. Can you elaborate on why you should take 8, 12, 3? I don’t understand this very well. And my experiment takes 20, 10, 10, how to explain it?Thank you.
Adrian Rosebrock
For this tutorial, Hue and Saturation are more informative regarding discriminating pictures. The Value component is less useful. It’s a hyperparameter you typically tune. For more information on building image search engines, including how to tune the values, I would recommend going through the PyImageSearch Gurus course.
zoe
hi can you tell me what is the feature extraction algorithm in this code?
Adrian Rosebrock
It’s a color histogram that is extracted from 5 regions of the image (1 histogram per region).
lei
thank you so much?
Ibob
Hello Adrian, thank you for your wonderfull blog and lessons.
Meanwhile, in order to be geographically accurate, I would like to say that the photos form figure 19 are not from Egypt but from Syria – Palmyra ( almost destroyed now 🙁 ) and Aleppo ( same) , and Jordan – Petra.
Human visual search engine not dead 🙂
Adrian Rosebrock
Thanks for the clarification!
Sumit
Hey Adrian!
It’s a great tutorial. I just have one question. Will this image search engine work for other images as well? I mean if I extract the feature histogram from the dataset you have provided but while searching , upload a random image taken from the internet, will the code still be efficient enough?
Adrian Rosebrock
That’s not exactly an easy question to answer as I don’t know the requirements of your CBIR system. If you’re interested in building your own image search engines I would suggest referring to the PyImageSearch Gurus course where I cover image search engines in detail.
Manoj
Hey Adrian, Your blog really helps me boost up my career in Computer Vision.Thanks alot for posting such wonderful work of yours.
I need some help from you in my project. I am trying to build a system which uses CBIR concept for frame filtration obtained from a given video. The system works likes this, system will have multiple cameras which will shoot and store frames in a directory. After getting frames, I am trying to use CBIR or Image hashing techniques to get first frame, convert that into vector file(index.csv) and identify similar frames and delete them within the same directory.
Lets say for e.g. I have considered ‘frame0.jpg’ as my first frame and converted that into vector index.csv. Within the existing directory, I am running a loop over rest of the frames and trying to identify similar images as the first frame. But I as a result i am getting only one frame as output which is ‘frame0.jpg’. I really dont understand where the mistake is.
Adrian Rosebrock
Thanks Manoj, I’m glad you’re enjoying the PyImageSearch blog.
As far as your project goes, it sounds like your index.csv file only has one frame in it. If you’re searching a index.csv file with only ONE entry in it, of course there is only going to be one search result. Instead, save all extracted features from the video file into index.csv, then perform the search.
Finally, you mentioned image hashing — so why not use an image hashing algorithm instead?
Vince
Hey Adrian,
Can you please help me to understand the parameters for this function:
hist = cv2.calcHist([image], [0, 1, 2], mask, self.bins, [0, 180, 0, 256, 0, 256])
It is not clear in the blog.
Thanks
Adrian Rosebrock
Hey Vince — I cover calculating histograms, including the parameters, in detail inside Practical Python and OpenCV.
fedeEsteves
If you are in windows change the line 28
imageID = imagePath[imagePath.rfind(“/”) + 1:]
to:
imageID = imagePath[imagePath.rfind(“\\”) + 1:]
and reindex, because the index.csv is with a wrong path
sarah
can i save the index.csv in database to make it easy if i want to add photo ,suppose i run to output the index.csv file again and again ?
and if i have millions of photoes in the dataset it will along time to search and generate this file
any another solutions?
Adrian Rosebrock
If you want to scale an image search engine to millions of images I would suggest you go through the PyImageSearch Gurus course. That course includes 30+ lessons on building a CBIR system that can scale.
Bayu
Hi Adrian
Your tutorials are the best educational topics in computer vision i have ever seen.
I just wondering, can i replace the color descriptor with transfer learning to get image features and index them in the same way as this tutorial
Adrian Rosebrock
Thank you for the kind words, Bayu.
You may or may not be able to use transfer learning via extracted features here. The biggest issue is that the output features may not be sufficient to properly quantify the semantic meaning of the image. Typically this happens if the network you are using for feature extraction was not trained on images similar to what you’re using for CBIR.
Kudzai
This is a brilliant article! Helped me so much in understanding some aspects of the topic that I’m working on for my research. Might you have published any of this content in a research article? I would be more than happy to cite you in my work
Adrian Rosebrock
If you would like to cite my content for research purposes, just follow these instructions.
Adeel Hasan
Hello Adrian, thanks for all your work. I am building an image similarity search engine, and the feature extraction process in your deep learning practioner’s bundle has been very helpful. in my case, the content is very diverse, from artwork and photographs to architectural drawings, shoe designs, fashion design and so forth.
the results of using a VGG16 are not bad, but attempts at training have not progressed because there is no labeled data, indeed the variety of data makes it too hard to curate it. I have now produced clusters of the image vectors, and will give it a shot to use those clusters as labels for training. I also have to solve the problem of reducing the size of the image vectors which over millions of 4096 sized image vectors has its own challenges (PCA kinda works, but takes a long time in the pipeline).
so that has lead me to consider doing the whole thing differently, and here I am reading up this 6 year old blog post 🙂
which seems perhaps an approach worth trying over my data. my question (finally got to it), is how would the BOVW work over something like artwork, or sketches … basically over a very diverse dataset? Best way is to just try it out, but any pointers would be very helpful.
Adrian Rosebrock
Hey Adeel — this sounds like a pretty neat project. Would you be able to send me an email so we can discuss there? Your project seems pretty specific and I’d like to keep this blog post’s comment thread on track.
Ridhi Chawla
Hi Adrian!
Thank you for the article. There was so much to learn.
I tried your code on one of the images from INRIA Holidays dataset, ‘101200.jpg’ as the query image. This image contains a pink rose. When I run the code, the first two results are correct i.e they match the query image. However other results are completely random. What could be the reason for that? Is it because there are only few images with a pink flower in the dataset? Does the small number of similar images in the database affects the accuracy of the algorithm?
Adrian Rosebrock
It’s been a long time since I looked at the dataset, but if my memory is correct, there aren’t many images that have pink-ish tones in them.
sameeri
sir, is this project possible to detect faces
Adrian Rosebrock
Refer to this tutorial on face detection.
Pin
Nice tutorial! Could you talk a bit more about CIELab? If it is to use CIELab, what needs to be changed? How to arrange the bins?