Table of Contents
- FastAPI Meets OpenAI CLIP: Build and Deploy with Docker
- Building on FastAPI Foundations
- What Is OpenAI CLIP?
- How OpenAI CLIP Works: Understanding Text-Image Matching and Contrastive Learning
- Applications of CLIP’s Approach
- Configuring Your Development Environment
- Project Structure
- Generating Embeddings with OpenAI CLIP
- What Are Embeddings?
- Why Are Embeddings Important in CLIP?
- Step-by-Step: Generating Image Embeddings
- Building FastAPI Endpoints
- Creating the /find_image Endpoint
- Importing Required Libraries
- Initializing the FastAPI App and Loading Model Components
- Defining the FastAPI Endpoint for Text-to-Image Matching
- Normalizing Embeddings for Accurate Similarity Comparison
- Calculating Similarity Between Text and Image Embeddings
- Retrieving and Returning the Matched Image
- Adding a /health Endpoint
- Deploying the FastAPI Docker App
- Introduction to Docker for Containerizing FastAPI Applications
- Writing a FastAPI Dockerfile for Your App
- Building and Running the FastAPI Docker Container Locally
- Testing the FastAPI Application
- 🎉 Yay! We Made It! Testing the /find_image Endpoint Using FastAPI’s Swagger UI 🚀
- 🚀 Testing the /find_image Endpoint with Postman
- Testing with curl
- Summary
FastAPI Meets OpenAI CLIP: Build and Deploy with Docker
In this tutorial, you will learn how to build a FastAPI application integrated with OpenAI CLIP, a powerful model for text-to-image and image-to-text tasks. We’ll guide you through generating image and text embeddings, creating AI-powered endpoints to match images based on text queries or generate descriptions for uploaded images, testing your API using FastAPI’s interactive Swagger UI, and deploying your application with Docker. By the end, you’ll have a fully functional API ready for real-world use cases.
This lesson is the last of a 2-part series on Deploying Machine Learning using FastAPI and Docker:
- Getting Started with Python and FastAPI: A Complete Beginner’s Guide
- FastAPI Meets OpenAI CLIP: Build and Deploy with Docker (this tutorial)
To learn how to build a FastAPI application with OpenAI CLIP for text-to-image and image-to-text tasks, generate embeddings, and deploy it with Docker, just keep reading.
Building on FastAPI Foundations
In the previous lesson, we laid the groundwork for understanding and working with FastAPI. Here’s a quick recap of what you learned:
- Introduction to FastAPI: We explored what makes FastAPI a modern and efficient Python web framework, emphasizing its async capabilities, automatic API documentation, and seamless integration with Pydantic for data validation.
- Setting Up and Running FastAPI: You learned how to install FastAPI and Uvicorn, set up your project directory, and create a basic server.
- Basic Endpoints: We walked through creating a simple “Hello, World!” endpoint, handling query parameters, and working with path parameters to build dynamic routes.
- HTTP Methods and Testing: You implemented a POST endpoint to create a resource and tested it using FastAPI’s TestClient.
- Interactive Documentation: We showcased the power of FastAPI’s auto-generated Swagger UI and ReDoc for exploring and testing APIs.
Armed with these foundational skills, you’re now ready to move to the next level: integrating a real-world machine learning model into a FastAPI application.
What’s Next?
In this tutorial, we’ll build a FastAPI application powered by OpenAI CLIP (Contrastive Language-Image Pretraining), a model designed for tasks like text-to-image matching and image captioning. You’ll also learn how to containerize and deploy your application using Docker, making it portable and easy to share.
By the end of this lesson, you’ll have:
- A functional FastAPI application with endpoints for text-to-image and image-to-text tasks.
- A solid understanding of generating and managing embeddings with OpenAI CLIP.
- A containerized application ready for deployment in any environment.
What Is OpenAI CLIP?
OpenAI CLIP (Contrastive Language–Image Pretraining) is a groundbreaking multimodal AI model developed by OpenAI. It bridges the gap between text and images by leveraging a shared representation space, enabling it to associate textual descriptions with corresponding images. Unlike traditional models requiring extensive task-specific training, CLIP’s pretraining empowers it to handle a wide range of tasks without fine-tuning, making it highly versatile.
By utilizing a text encoder and an image encoder, CLIP excels in tasks such as identifying the best matching image for a text prompt or generating precise textual descriptions for an image. This makes it a highly valuable tool for zero-shot learning, where the model can perform tasks it hasn’t explicitly been trained on.
How OpenAI CLIP Works: Understanding Text-Image Matching and Contrastive Learning
CLIP uses contrastive learning to align visual and textual data in a shared embedding space. During training, paired image and text data are processed using two encoders: a text encoder and an image encoder. This method ensures that embeddings for matching image-text pairs are placed close together, while unrelated pairs are pushed farther apart.
The process is optimized with a contrastive loss function, which strengthens the alignment of genuine pairs and weakens the alignment of mismatched ones. This shared embedding space enables CLIP to perform tasks like zero-shot classification and cross-modal retrieval without additional fine-tuning.
By mapping text and images into the same vector space, CLIP can efficiently handle tasks like finding the best matching image for a text prompt or generating accurate textual descriptions of images. This mechanism is visually represented in the diagram below.
Contrastive Pre-Training: Aligning Text and Image Embeddings
The core innovation of CLIP lies in its contrastive learning approach, which jointly trains a Text Encoder and an Image Encoder to align textual descriptions with corresponding images.
- Training Dataset:
- CLIP is trained on a massive dataset of (image, text) pairs, such as “a dog running in a field” paired with an image of a dog in a field.
- Two Encoders:
- The Text Encoder processes textual data (e.g., “Pepper the Aussie pup”) to create embeddings, numerical representations of the text in a multi-dimensional space.
- The Image Encoder processes images (e.g., a photo of a dog) to generate corresponding embeddings.
- Contrastive Learning:
- During training, CLIP uses a contrastive loss function that encourages positive pairs (e.g., an image of a dog and its matching description) to have high similarity in the embedding space.
- Simultaneously, it minimizes similarity between negative pairs (e.g., an image of a cat with the description “a dog running in a field”).
- Zero-Shot Learning:
- Once trained, CLIP can classify new images or text queries without additional fine-tuning. It embeds the query and compares it to pre-computed embeddings, identifying the closest match.
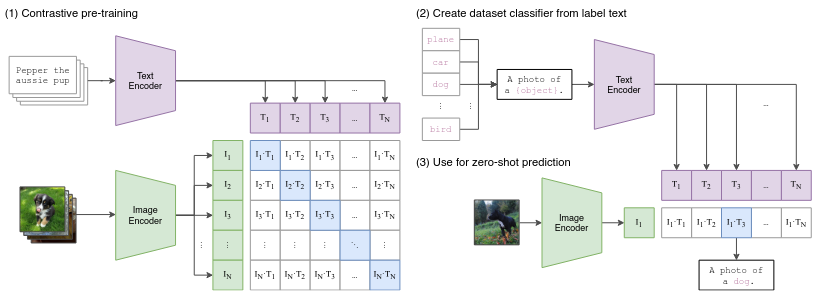
Figure 1 illustrates the contrastive pre-training process:
- Text inputs (e.g., “Pepper the Aussie pup”) are processed into embeddings (T₁, T₂, etc.) by the Text Encoder.
- Images are processed into embeddings (I₁, I₂, etc.) by the Image Encoder.
- The embeddings are aligned in a shared vector space, where genuine pairs are drawn closer, and mismatched pairs are pushed apart.
Shared Embedding Space: Enabling Text-to-Image and Image-to-Text Tasks
After contrastive pre-training, CLIP’s shared embedding space allows it to generalize across various tasks by aligning text and image embeddings.
- Text-to-Image Matching
- When given a text query, such as “two dogs running across a frosty field,” the Text Encoder generates an embedding for the query.
- This embedding is compared to all image embeddings in the dataset to find the closest match.
- Image-to-Text Matching
- Conversely, if given an image (e.g., a photo of a dog in a field), the Image Encoder creates an embedding for the image.
- This embedding is compared against text embeddings, returning the most relevant textual description.
- Zero-Shot Capabilities
- CLIP can perform tasks like image retrieval or captioning without any additional training on new datasets. It achieves this by leveraging its robust shared embedding space.
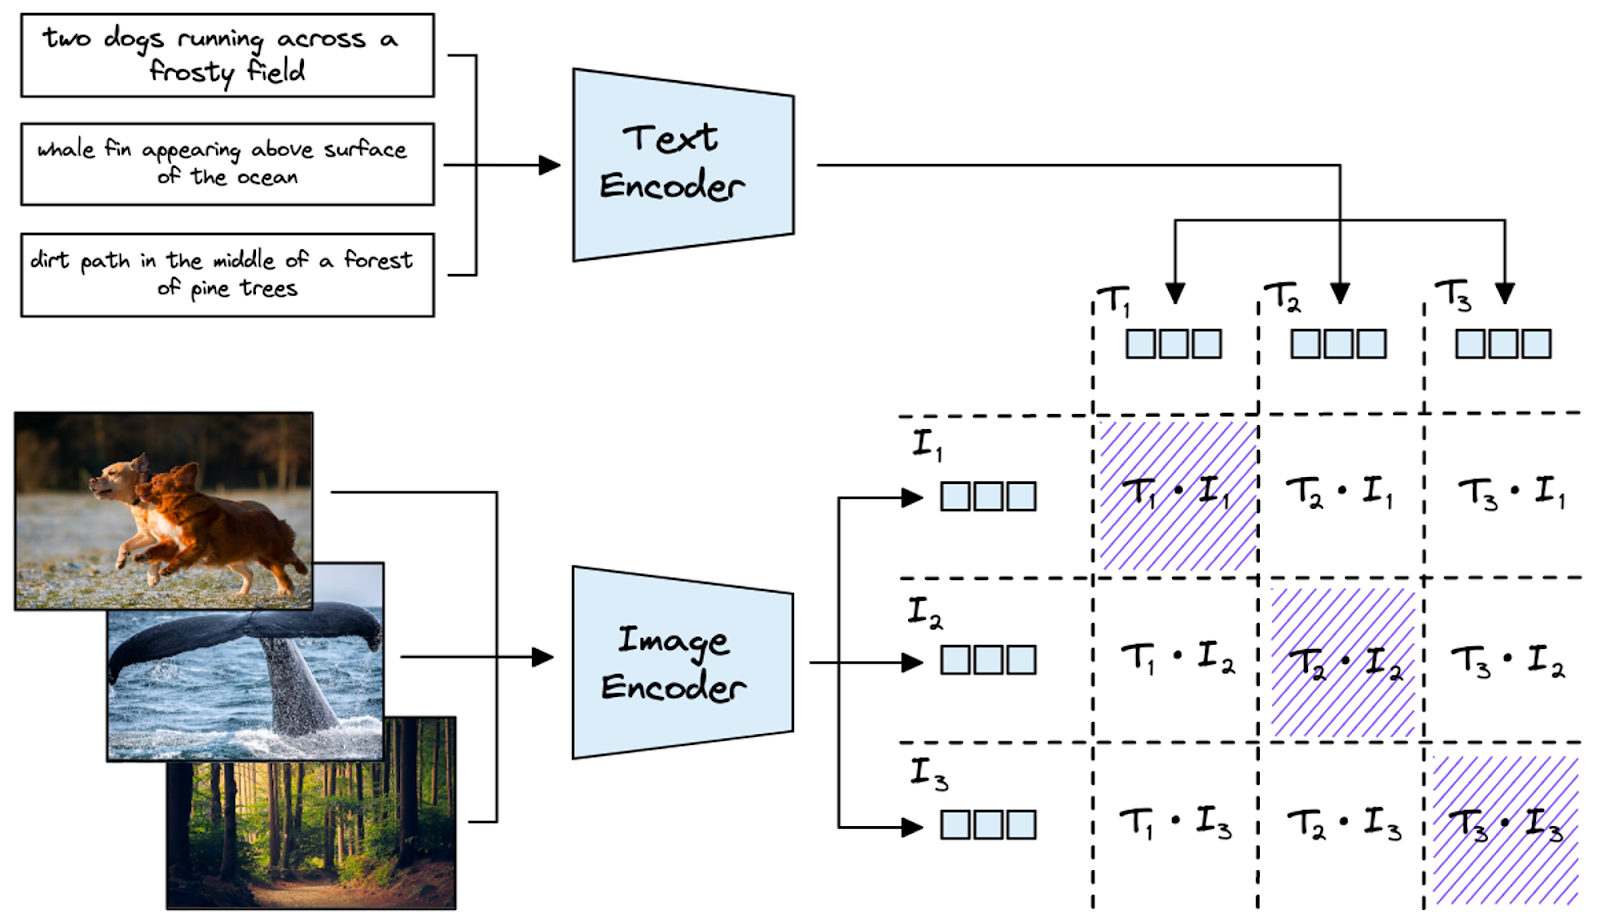
Figure 2 visualizes the batch-level matching process:
- Text descriptions (e.g., “two dogs running across a frosty field”) are processed into embeddings (T₁, T₂, etc.).
- Images are encoded into embeddings (I₁, I₂, etc.).
- A similarity score is calculated for each text-image pair, highlighting the closest matches (diagonal entries).
Applications of CLIP’s Approach
- Text-to-Image Retrieval: Given a query like “a red sports car,” CLIP can find the most relevant image from a database.
- Image Captioning: Using the reverse approach, CLIP can generate a textual description of an image.
- Zero-Shot Classification: CLIP can predict image categories it has never been explicitly trained on by matching them with category descriptions.
Through its contrastive learning mechanism and shared embedding space, CLIP enables a range of applications, making it a powerful multimodal model for real-world scenarios.
Configuring Your Development Environment
To follow this guide and build a FastAPI application integrated with OpenAI CLIP, you’ll need to ensure the required libraries are installed in your Python environment.
Install the necessary libraries using pip:
$ pip install fastapi[all]==0.98.0 transformers==4.30.2 datasets==2.13.1 Pillow==9.5.0 torch
The key libraries required for this project include fastapi, which is used to create and manage the API endpoints, and transformers, which provides the CLIP model (CLIPModel) and processor (CLIPProcessor) for handling text-to-image tasks. datasets is used to load and manage the Flickr8k dataset, enabling easy access to image-text pairs for testing. Pillow is employed for image processing, ensuring images can be served as API responses, while torch powers the computations required for the CLIP model and embedding calculations.
Together, these libraries provide the essential tools for building and deploying the application.
Need Help Configuring Your Development Environment?

All that said, are you:
- Short on time?
- Learning on your employer’s administratively locked system?
- Wanting to skip the hassle of fighting with the command line, package managers, and virtual environments?
- Ready to run the code immediately on your Windows, macOS, or Linux system?
Then join PyImageSearch University today!
Gain access to Jupyter Notebooks for this tutorial and other PyImageSearch guides pre-configured to run on Google Colab’s ecosystem right in your web browser! No installation required.
And best of all, these Jupyter Notebooks will run on Windows, macOS, and Linux!
Project Structure
Before diving into the implementation, let’s review the project directory structure. This will help you understand where each component of the FastAPI + OpenAI CLIP integration resides.
fastapi-clip-docker/
├── pyimagesearch
│   ├── __init__.py
│   ├── api.py
│   ├── config.py
│   ├── dataset_loader.py
│   ├── embeddings.py
│   ├── model.py
│   ├── helpers.py
├── server.py
└── Dockerfile
The server.py file defines the FastAPI application, processing requests and returning matching images using OpenAI CLIP. API routes are registered in pyimagesearch/api.py, while pyimagesearch/dataset_loader.py manages dataset loading and preprocessing. Image embeddings are generated and stored in pyimagesearch/embeddings.py, utilizing the pre-trained openai/clip-vit-base-patch32 model loaded in pyimagesearch/model.py.
Supporting scripts include pyimagesearch/helpers.py, which normalizes embeddings and processes images, and pyimagesearch/config.py, which stores dataset paths and model parameters.
Dockerfile configures a containerized environment with Uvicorn, ensuring seamless deployment. It defines the necessary dependencies and sets up the FastAPI application to run efficiently within a Docker container.
Generating Embeddings with OpenAI CLIP
Embeddings play a crucial role in enabling models like OpenAI CLIP to perform tasks like text-to-image matching and image-to-text description. In this section, we’ll explore how embeddings are used in contrastive language-image pretraining and guide you through generating and guide you through generating and managing embeddings for your FastAPI application using the openai/clip-vit-base-patch32 model.
What Are Embeddings?
Embeddings are numerical representations of data — whether it’s text or images — that a model can process. In the context of OpenAI CLIP, embeddings are vectors that encode semantic information about images and text in a shared representation space. This shared space allows the model to identify relationships between images and text, making it possible to find similar pairs or generate matches.
Using openai/clip-vit-base-patch32, you can generate high-quality embeddings that power advanced text-to-image tasks.
Why Are Embeddings Important in CLIP?
The power of OpenAI CLIP lies in its ability to place semantically similar text and images close to each other in this shared embedding space. For example:
- A text prompt like “a sunset over the ocean” and an image of such a sunset would have embeddings located near each other.
- This proximity in the embedding space allows CLIP to match inputs across modalities efficiently.
Step-by-Step: Generating Image Embeddings
Here’s how you can generate embeddings for a set of images using the OpenAI CLIP openai/clip-vit-base-patch32 model.
Load the CLIP Model and Processor
The CLIPModel and CLIPProcessor from the transformers library provide the tools to process images and generate embeddings.
from transformers import CLIPModel, CLIPProcessor
# Load the model and processor
model = CLIPModel.from_pretrained("openai/clip-vit-base-patch")
processor = CLIPProcessor.from_pretrained("openai/clip-vit-base-patch")
Load a Dataset
Use the datasets library to load a collection of images for which you want to generate embeddings. In this example, we use the Flickr8k dataset.
from datasets import load_dataset
# Load the dataset
dataset = load_dataset("jxie/flickr")
images = dataset['trains']
Preprocess the Images
Preprocess the images using the CLIP processor to prepare them for the model.
from PIL import Image
# Preprocess images
image_tensors = [
    processor(images[i]["image"], return_tensors="pt")[]
    for i in range(len(image))
]
Generate Embeddings
Use the CLIP model to compute embeddings for the preprocessed images.
import torch
# Generate embeddings
with torch.no_grad():
    image_embeds = torch.cat([model.get_image_features(img) for img in image_tensors])
Normalize the Embeddings
Normalize the embeddings to ensure they are unit vectors, which makes similarity calculations more efficient.
image_embeds = image_embeds / image_embeds.norm(p=2, dim=-1, keepdim=True)
Saving and Managing Embeddings
Once you’ve generated the embeddings, save them for efficient reuse in your FastAPI application.
import numpy as np
# Save embeddings to a file
np.save("image_embeds.npy", image_embeds.numpy())
Later, you can load these embeddings directly without regenerating them:
# Load embeddings
image_embeds = torch.tensor(np.load("image_embeds.npy"))
This approach minimizes runtime overhead, allowing your API to perform text-to-image matching faster.
By generating and managing embeddings in this way, you set up the foundation for a responsive and efficient FastAPI application powered by OpenAI CLIP. In the next section, we’ll implement endpoints to leverage these embeddings for tasks like finding the best matching image for a text prompt.
Building FastAPI Endpoints
In this section, we’ll create endpoints for your FastAPI application that use OpenAI CLIP to perform text-to-image matching. These endpoints will allow clients to send text queries and retrieve matching images from a preprocessed collection of embeddings. We’ll also include a simple /health endpoint to monitor the application’s status.
Creating the /find_image Endpoint
The /find_image endpoint handles text-to-image matching. It accepts a text query, processes it to generate text embeddings using the CLIP model, and compares these embeddings against precomputed image embeddings to find the most relevant image.
Importing Required Libraries
from fastapi import FastAPI
from fastapi.responses import Response
import torch
from PIL import Image
import numpy as np
We start by importing fastapi (FastAPI) to create API endpoints and Response to return image data. torch (Torch) is used for handling computations with the OpenAI CLIP model, while PIL (Pillow) processes images. Lastly, numpy (NumPy) helps manage numerical operations, especially for handling image embeddings.
Initializing the FastAPI App and Loading Model Components
app = FastAPI()

# Load pre-trained CLIP model and processor
model = CLIPModel.from_pretrained("openai/clip-vit-base-patch32")
processor = CLIPProcessor.from_pretrained("openai/clip-vit-base-patch32")
# Load dataset
dataset = load_dataset("jxie/flickr8k")
# Load precomputed image embeddings
img_embeds = torch.tensor(np.load("image_embeds.npy"))
We start by initializing the FastAPI app. Next, we load the pre-trained CLIP model and processor to handle text and image embeddings. The Flickr8k dataset is then loaded, providing a set of images for matching. Finally, we load precomputed image embeddings from "image_embeds.npy" to speed up similarity comparisons.
Defining the FastAPI Endpoint for Text-to-Image Matching
@app.get("/find_image")
async def find_image(text: str):
    # Generate text embeddings
    inputs = processor([text], padding=True, return_tensors="pt")
    with torch.no_grad():
        text_features = model.get_text_features(**inputs)
We define a GET endpoint /find_image that takes a text query as input. Inside the function, we use the CLIP processor to convert the text into a suitable format for the model. The processor([text], padding=True, return_tensors="pt") method tokenizes the input text and prepares it as a PyTorch tensor. We then pass this processed text to the CLIP model inside a torch.no_grad() block to generate text embeddings without computing gradients, optimizing memory usage and performance.
Normalizing Embeddings for Accurate Similarity Comparison
    # Normalize embeddings for comparison
    image_embeds = img_embeds / img_embeds.norm(p=2, dim=-1, keepdim=True)
    text_embeds = text_features / text_features.norm(p=2, dim=-1, keepdim=True)
To ensure accurate similarity comparisons, we normalize both the image and text embeddings. Normalization scales the vectors, so they have a unit norm, preventing differences in magnitude from affecting similarity calculations.
Calculating Similarity Between Text and Image Embeddings
    # Calculate similarity between text and image embeddings
    logit_scale = model.logit_scale
    logits_per_text = torch.matmul(text_embeds, image_embeds()) * logit_scale
    img_idx = torch.argmax(logits_per_text).item()
We calculate the similarity between text and image embeddings using cosine similarity. The logit scale (model.logit_scale) adjusts the similarity scores based on CLIP’s training. We then compute the dot product between the normalized text and image embeddings (torch.matmul(text_embeds, image_embeds())) to measure similarity. Finally, torch.argmax(logits_per_text).item() selects the image with the highest similarity score, determining the best match for the given text query.
Retrieving and Returning the Matched Image
    # Retrieve the matching image
    similar_img = dataset['train'][img_idx]
    img_byte_arr = io.BytesIO()
    similar_img.save(img_byte_arr, format="JPEG")

    return Response(img_byte_arr.getvalue(), media_type="image/jpeg")
Once the most similar image is identified using its index (img_idx), we retrieve the corresponding image from the dataset (dataset['train'][img_idx]). Since FastAPI responses require binary data for images, we use an in-memory byte stream (io.BytesIO()) to store the image.
The image is then saved in JPEG format inside this buffer, and we return it as an HTTP response with the appropriate media type (image/jpeg). This allows the API to send the matched image directly to the client.
Adding a /health Endpoint
@app.get("/health")
async def health():
    return {"message": "ok"}
The /health endpoint allows you to check if your application is running correctly. It’s a simple endpoint that returns a JSON response.
This endpoint can be useful for automated monitoring tools to check the app’s status.
By building these endpoints, you’ve created a functional API that leverages OpenAI CLIP for text-to-image matching while maintaining robustness with a health-check endpoint. In the next section, we’ll test these endpoints using Swagger UI and other tools.
Deploying the FastAPI Docker App
Introduction to Docker for Containerizing FastAPI Applications
Docker is a popular tool for containerizing applications, allowing developers to package their application along with all its dependencies into a lightweight, portable container. This ensures that the application runs consistently across different environments, eliminating issues related to dependency mismatches.
For our FastAPI app, Docker helps simplify deployment by:
- Encapsulating the FastAPI application, including dependencies like
fastapi,transformers,torch, anduvicorn. - Ensuring reproducibility so the app runs identically across local machines, staging, and production servers.
- Enabling scalability, as containers can be deployed across multiple instances using orchestration tools (e.g., Kubernetes).
Writing a FastAPI Dockerfile for Your App
A Dockerfile defines the steps to build a containerized version of your application. Below is a Dockerfile for our FastAPI + CLIP model application:
# Use an official Python image as the base
FROM python:3.9
# Set the working directory
WORKDIR /app
# Copy only the requirements file to leverage Docker caching
COPY requirements.txt …
# Install dependencies
RUN pip install requirement.txt
# Copy the entire application into the container
COPY .
# Expose the port that FastAPI runs on
EXPOSE 8000
# Command to run the application using Uvicorn
CMD ["uvicorn", "server:app", "--host"]
The Dockerfile starts by using the official Python 3.9 image as the base. It then sets /app as the working directory inside the container. To optimize Docker’s build caching, it first copies requirements.txt and installs the necessary dependencies using pip install. After that, the entire application codebase is copied into the container. The Dockerfile then exposes port 8000, which is the default port for FastAPI applications. Finally, it runs the app using Uvicorn, ensuring that the FastAPI server starts when the container is launched.
Building and Running the FastAPI Docker Container Locally
Once the Dockerfile is ready, follow these steps to build and run the container:
Step 1: Build the Docker Image
Run the following command in your FastAPI project directory (where the Dockerfile is located):
docker build -t fastapi-clip-app .
This command builds the Docker image and names it fastapi-clip-app.
Step 2: Run the Docker Container
Start a container using the image:
docker run -p 8000:8000 fastapi-clip-app
The -p 8000:8000 flag ensures that port 8000 inside the container is mapped to port 8000 on your local machine, allowing external access. Once the container is running, the FastAPI application is fully operational and can be accessed via Swagger UI at 👉 http://127.0.0.1:8000/docs, where you can test and interact with the API.
Testing the FastAPI Application
Once the FastAPI application is up and running, it’s crucial to verify its functionality. FastAPI provides built-in interactive documentation through Swagger UI, making it easy to test endpoints without needing external tools. However, for a more comprehensive testing workflow, we can also use Postman or curl to send requests manually and check the responses.
🎉 Yay! We Made It! Testing the /find_image Endpoint Using FastAPI’s Swagger UI 🚀
FastAPI provides an interactive API documentation interface via Swagger UI, making it super easy to test endpoints right from your browser. You can access it at:
To test our /find_image endpoint:
- Open Swagger UI in your browser.
- Locate the
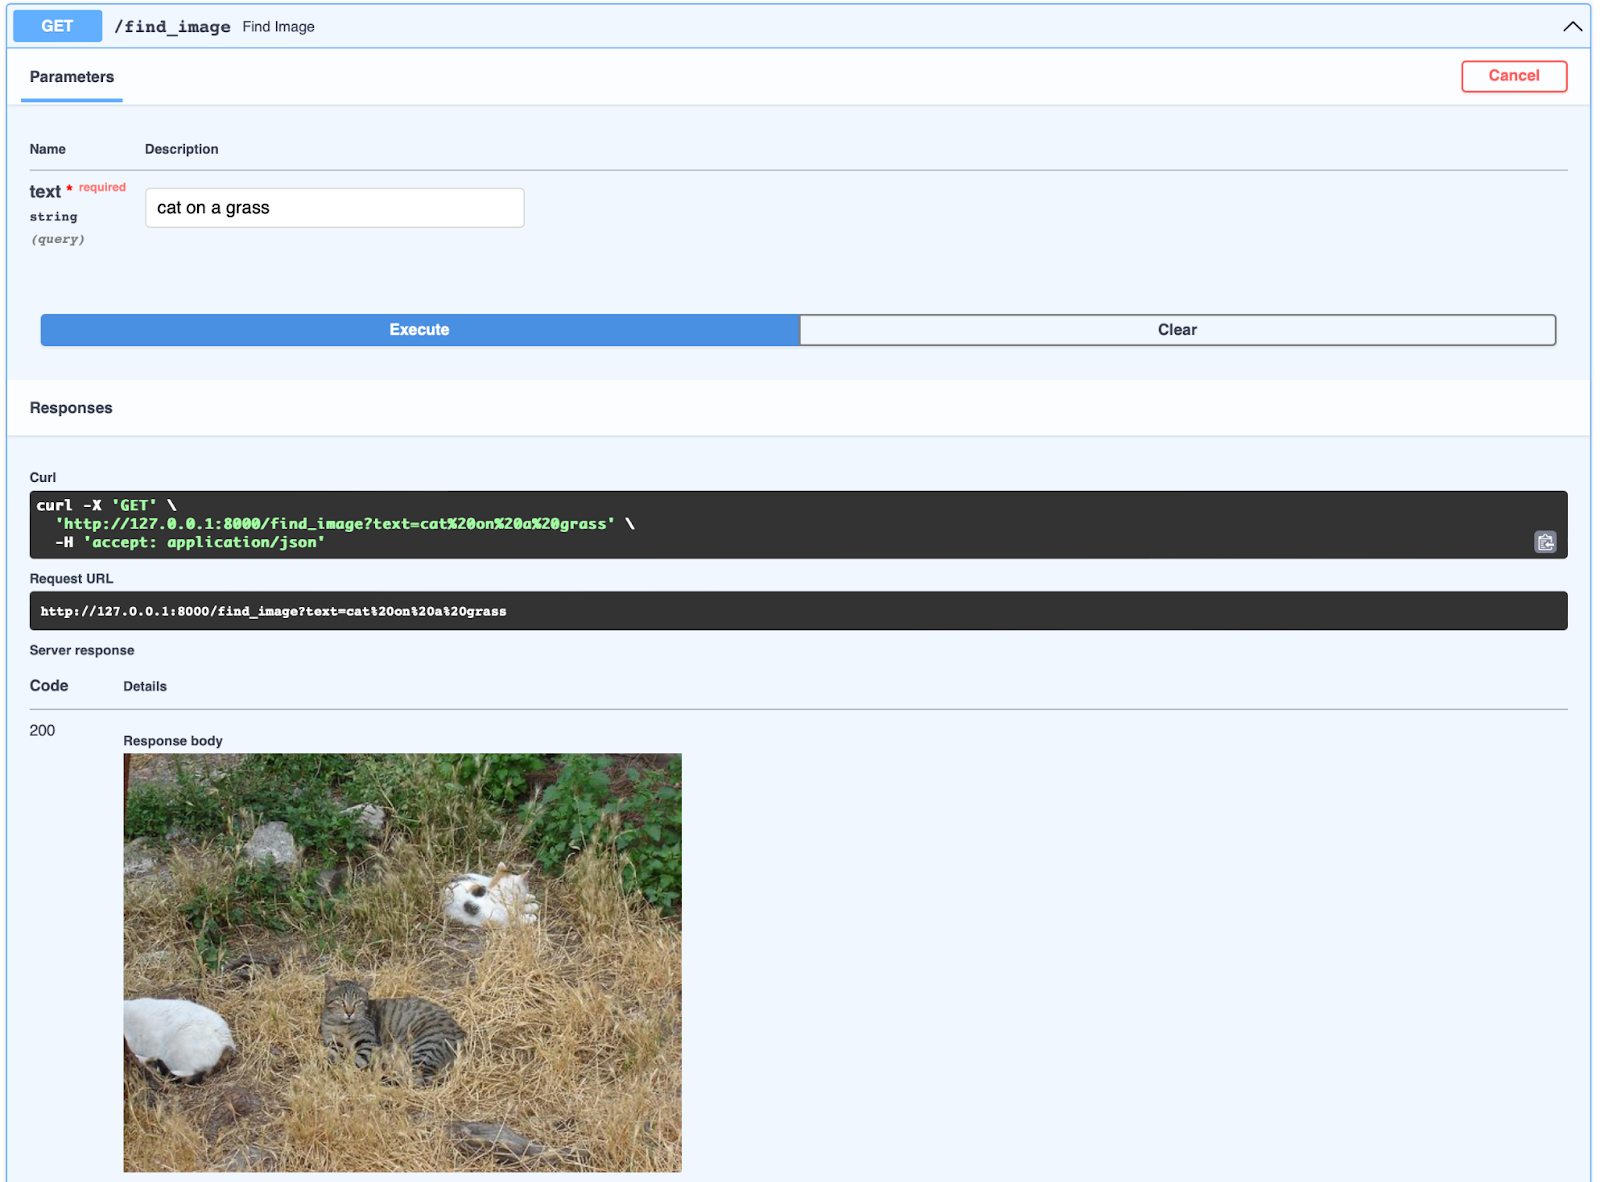
/find_imageendpoint and expand it. - Click “Try it out”, enter a text prompt like “cat on a grass”.
- Hit “Execute” to send the request.
- Boom! If everything is working, the API will return the most relevant image based on OpenAI CLIP’s powerful text-to-image matching.
🎯 Expected Output
A valid image response that accurately represents your text query! As seen in the screenshot below, when we searched for "cat on a grass", the model found an image of multiple cats chilling in a grassy area. 🐱🌿
🎉 This means our FastAPI + OpenAI CLIP setup is officially working! 🎉 Now, you have a fully functional AI-powered image search API, ready to take on real-world applications!
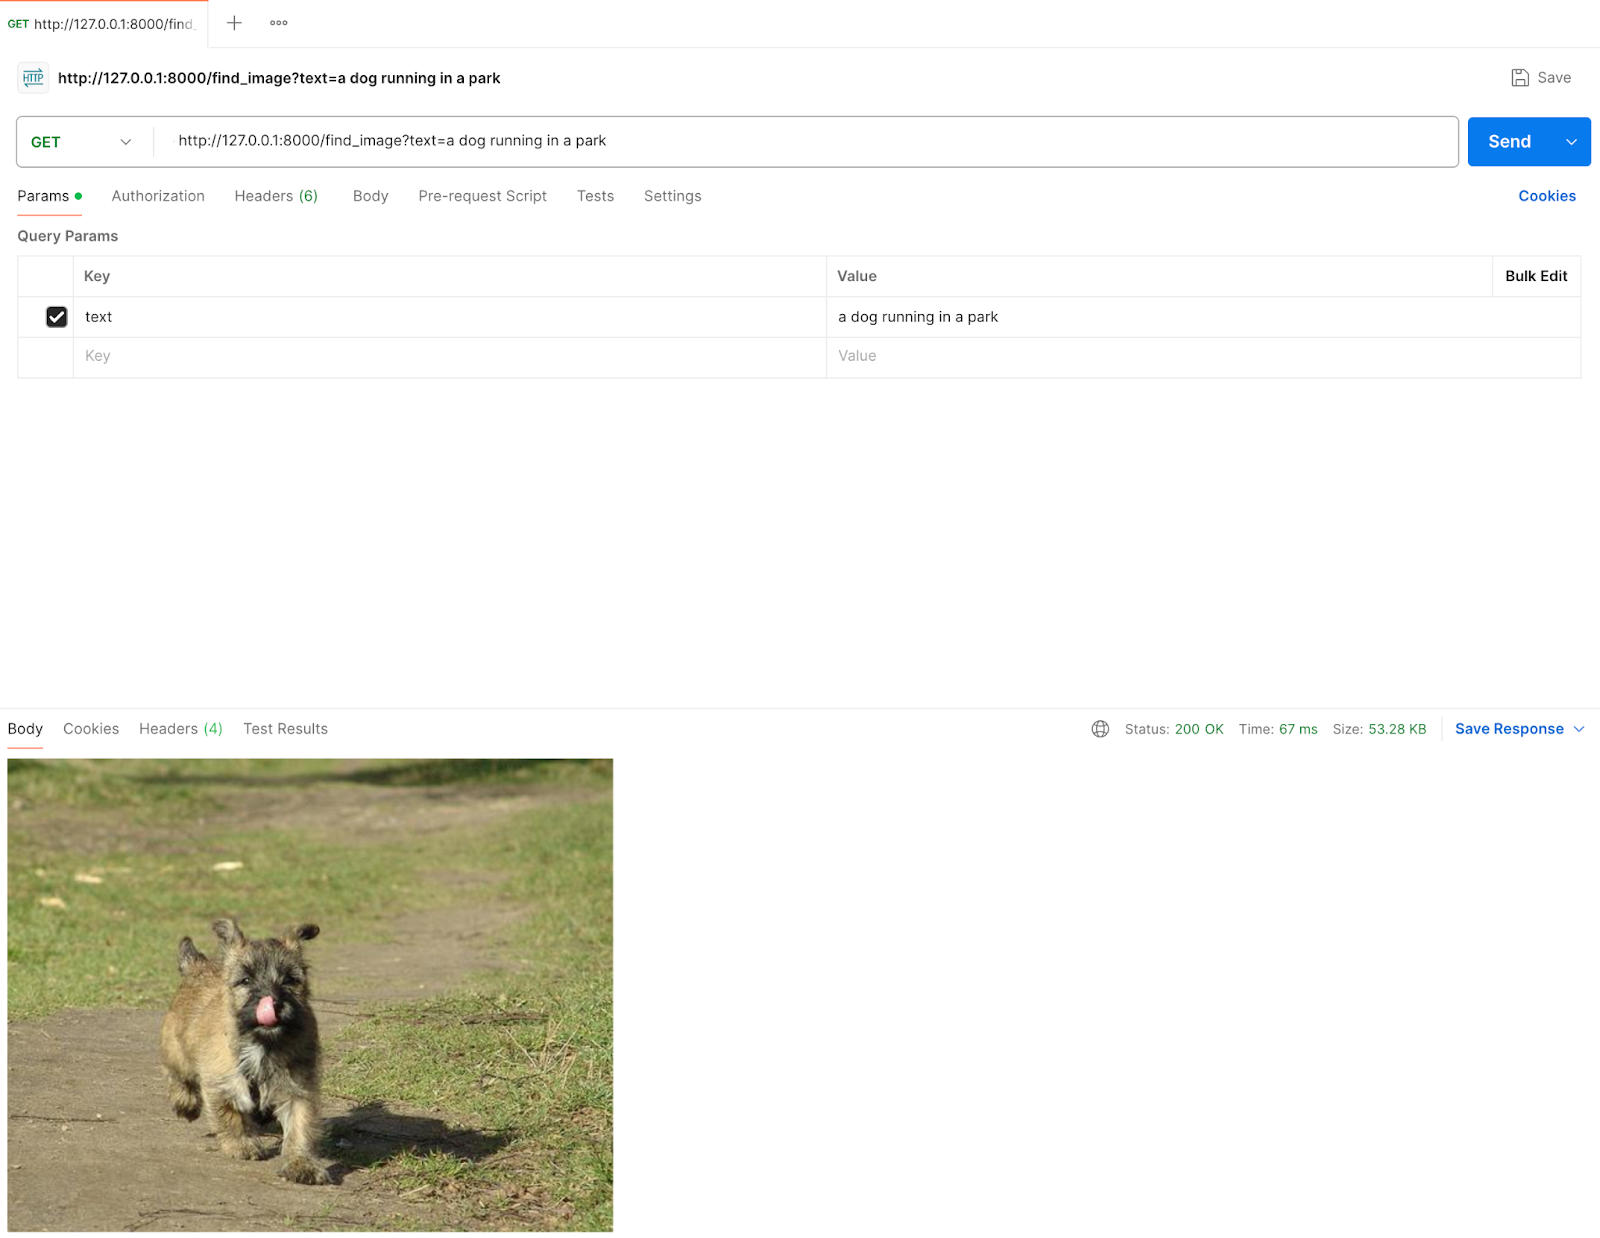
🚀 Testing the /find_image Endpoint with Postman
Postman is a powerful tool that allows us to send API requests and inspect responses effortlessly. Let’s use it to test our FastAPI + OpenAI CLIP image search!
🛠 Steps to Test
- Open Postman and create a new request.
- Set the request type to GET.
- Enter the following API URL:
http://127.0.0.1:8000/find_image?text=a dog running in a park
- Click “Send” to execute the request.
- If successful, the API will return an image that best matches the text query.
✅ Expected Output:
Postman will display the retrieved image associated with the query “a dog running in a park”, as shown in the screenshot. 🎉 The model successfully identified and returned an image of a playful dog running on a dirt path in a park!
Testing with curl
For those who prefer command-line testing, curl can be used to send requests:
curl -X 'GET' \
  'http://127.0.0.1:8000/find_image?text=a dog running in a park' \
  -H 'accept: image/jpeg' --output result.jpg
The above command sends a GET request to the /find_image endpoint with “a dog running in a park” as the query parameter. The --output result.jpg flag saves the returned image as result.jpg for viewing.
The generated image should match the text description provided in the request.
What's next? We recommend PyImageSearch University.

86+ total classes • 115+ hours hours of on-demand code walkthrough videos • Last updated: July 2026
★★★★★ 4.84 (128 Ratings) • 16,000+ Students Enrolled
I strongly believe that if you had the right teacher you could master computer vision and deep learning.
Do you think learning computer vision and deep learning has to be time-consuming, overwhelming, and complicated? Or has to involve complex mathematics and equations? Or requires a degree in computer science?
That’s not the case.
All you need to master computer vision and deep learning is for someone to explain things to you in simple, intuitive terms. And that’s exactly what I do. My mission is to change education and how complex Artificial Intelligence topics are taught.
If you're serious about learning computer vision, your next stop should be PyImageSearch University, the most comprehensive computer vision, deep learning, and OpenCV course online today. Here you’ll learn how to successfully and confidently apply computer vision to your work, research, and projects. Join me in computer vision mastery.
Inside PyImageSearch University you'll find:
- ✓ 86+ courses on essential computer vision, deep learning, and OpenCV topics
- ✓ 86 Certificates of Completion
- ✓ 115+ hours hours of on-demand video
- ✓ Brand new courses released regularly, ensuring you can keep up with state-of-the-art techniques
- ✓ Pre-configured Jupyter Notebooks in Google Colab
- ✓ Run all code examples in your web browser — works on Windows, macOS, and Linux (no dev environment configuration required!)
- ✓ Access to centralized code repos for all 540+ tutorials on PyImageSearch
- ✓ Easy one-click downloads for code, datasets, pre-trained models, etc.
- ✓ Access on mobile, laptop, desktop, etc.
Summary
In this tutorial, we learned how to integrate FastAPI with OpenAI CLIP (Contrastive Language-Image Pretraining), a model designed for text-to-image and image-to-text matching tasks. The tutorial covered everything from generating embeddings with CLIP to deploying the FastAPI application in a Docker container.
- Introduction to FastAPI and OpenAI CLIP
- FastAPI: We learned how to use FastAPI, a modern Python web framework known for its speed and simplicity. We started with creating basic endpoints and handling HTTP requests.
- OpenAI CLIP: We learned about CLIP, a machine learning model that generates shared embeddings for both text and images, enabling cross-modal tasks such as text-to-image matching.
- Generating Embeddings
- We learned how to generate image and text embeddings using the CLIP model.
- We preprocessed images, generated embeddings, and normalized them to facilitate accurate similarity comparisons.
- Building FastAPI Endpoints
- /find_image Endpoint: We built a FastAPI endpoint that uses the embeddings to match images based on text queries.
- We added additional functionality, such as a
/healthendpoint for health checks.
- Deploying the FastAPI App with Docker
- We were introduced to Docker for containerizing your FastAPI application.
- We learned how to write a Dockerfile, build the image, and run the container locally.
- Testing the Application
- We tested the API using FastAPI’s Swagger UI, Postman, and curl.
By the end of the tutorial, you’ll have a fully functional API that leverages OpenAI CLIP for advanced text-image matching tasks and is ready to be deployed in production with Docker.
Citation Information
Martinez, H. “FastAPI Meets OpenAI CLIP: Build and Deploy with Docker,” PyImageSearch, P. Chugh, S. Huot, A. Sharma, and P. Thakur, eds., 2025, https://pyimg.co/agmfs
@incollection{Martinez_2025_fastapi-meets-openai-clip-build-deploy-docker,
  author = {Hector Martinez},
  title = {{FastAPI Meets OpenAI CLIP: Build and Deploy with Docker}},
  booktitle = {PyImageSearch},
  editor = {Puneet Chugh and Susan Huot and Aditya Sharma and Piyush Thakur},
  year = {2025},
  url = {https://pyimg.co/agmfs},
}
To download the source code to this post (and be notified when future tutorials are published here on PyImageSearch), simply enter your email address in the form below!

Download the Source Code and FREE 17-page Resource Guide
Enter your email address below to get a .zip of the code and a FREE 17-page Resource Guide on Computer Vision, OpenCV, and Deep Learning. Inside you'll find my hand-picked tutorials, books, courses, and libraries to help you master CV and DL!

Comment section
Hey, Adrian Rosebrock here, author and creator of PyImageSearch. While I love hearing from readers, a couple years ago I made the tough decision to no longer offer 1:1 help over blog post comments.
At the time I was receiving 200+ emails per day and another 100+ blog post comments. I simply did not have the time to moderate and respond to them all, and the sheer volume of requests was taking a toll on me.
Instead, my goal is to do the most good for the computer vision, deep learning, and OpenCV community at large by focusing my time on authoring high-quality blog posts, tutorials, and books/courses.
If you need help learning computer vision and deep learning, I suggest you refer to my full catalog of books and courses — they have helped tens of thousands of developers, students, and researchers just like yourself learn Computer Vision, Deep Learning, and OpenCV.
Click here to browse my full catalog.