This lesson is part 4 of a 4-part series on OCR 120:
- Tesseract Page Segmentation Modes (PSMs) Explained: How to Improve Your OCR Accuracy (tutorial 2 weeks ago)
- Improving OCR Results with Basic Image Processing (last week’s tutorial)
- Using spellchecking to improve Tesseract OCR accuracy (previous tutorial)
- OCR Passports with OpenCV and Tesseract (today’s tutorial)
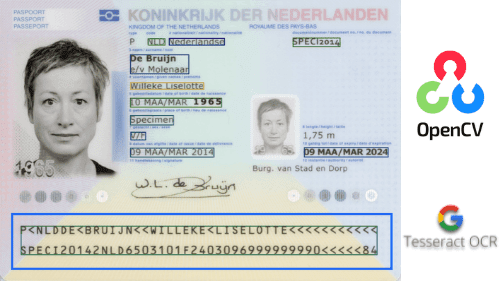
To learn how to OCR a passport using OpenCV and Tesseract, just keep reading.
OCR Passports with OpenCV and Tesseract
So far in this course, we’ve relied on the Tesseract OCR engine to detect the text in an input image. However, as we discovered in a previous tutorial, sometimes Tesseract needs a bit of help before we can actually OCR the text.
This tutorial will explore this idea more, demonstrating that computer vision and image processing techniques can localize text regions in a complex input image. Once the text is localized, we can extract the text ROI from the input image and then OCR it using Tesseract.
As a case study, we’ll be developing a computer vision system that can automatically locate the machine-readable zones (MRZs) in a scan of a passport. The MRZ contains information such as the passport holder’s name, passport number, nationality, date of birth, sex, and passport expiration date.
By automatically OCR’ing this region, we can help Transportation Security Administration (TSA) agents and immigration officials more quickly process travelers, reducing long lines (and not to mention stress and anxiety waiting in the queue).
Learning Objectives
In this tutorial, you will:
- Learn how to use image processing techniques and the OpenCV library to localize text in an input image
- Extract the localized text and OCR it with Tesseract
- Build a sample passport reader project that can automatically detect, extract, and OCR the MRZ in a passport image
Finding Text in Images with Image Processing
In the first part of this tutorial, we’ll briefly review what a passport MRZ is. From there, I’ll show you how to implement a Python script to detect and extract the MRZ from an input image. Once the MRZ is extracted, we can use Tesseract to OCR the MRZ.
What Is a Machine-Readable Zone?
A passport is a travel document that looks like a small notebook. This document is issued by your country’s government and includes information that identifies you personally, including your name, address, etc.
You typically use your passport when traveling internationally. Once you arrive in your destination country, an immigration official checks your passport, validates your identity, and stamps your passport with your arrival date.
Inside your passport, you’ll find your personal identifying information (Figure 1). If you look at the bottom of the passport, you’ll see 2-3 lines of fixed-width characters.
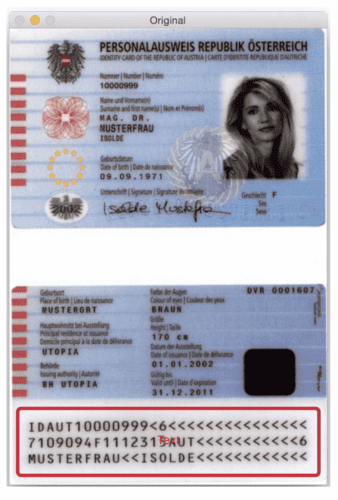
Type 1 passports have three lines, each with 30 characters, while Type 3 passports have two lines, each with 44 characters.
These lines are called the MRZ of your passport.
The MRZ encodes your personal identifying information, including:
- Name
- Passport number
- Nationality
- Date of birth/age
- Sex
- Passport expiration date
Before computers and MRZs, TSA agents and immigration officials had to review your passport and tediously validate your identity. It was a time-consuming task that was monotonous for the officials and frustrating for travelers who patiently waited for their turn in long immigration lines.
MRZs allow TSA agents to quickly scan your information, validate who you are, and enable you to pass through the queue more quickly, thereby reducing queue length (and reducing the stress on travelers and officials alike).
In the rest of this tutorial, you will learn how to implement an automatic passport MRZ scanner with OpenCV and Tesseract.
Configuring Your Development Environment
To follow this guide, you need to have the OpenCV library installed on your system.
Luckily, OpenCV is pip-installable:
$ pip install opencv-contrib-python
If you need help configuring your development environment for OpenCV, I highly recommend that you read my pip install OpenCV guide — it will have you up and running in a matter of minutes.
Having Problems Configuring Your Development Environment?

All that said, are you:
- Short on time?
- Learning on your employer’s administratively locked system?
- Wanting to skip the hassle of fighting with the command line, package managers, and virtual environments?
- Ready to run the code right now on your Windows, macOS, or Linux system?
Then join PyImageSearch University today!
Gain access to Jupyter Notebooks for this tutorial and other PyImageSearch guides that are pre-configured to run on Google Colab’s ecosystem right in your web browser! No installation required.
And best of all, these Jupyter Notebooks will run on Windows, macOS, and Linux!
Project Structure
We first need to review our project directory structure.
Start by accessing the “Downloads” section of this tutorial to retrieve the source code and example images.
Before we can build our MRZ reader and scan passport images, let’s first review the directory structure for this project:
|-- passports
|   |-- passport_01.png
|   |-- passport_02.png
|-- ocr_passport.py
We only have a single Python script here, ocr_passport.py, which, as the name suggests, is used to load passport images from disk and scan them.
Inside the passports directory, we have two images, passport_01.png and passport_02.png — these images contain sample scanned passports. Our ocr_passport.py script will load these images from disk, locate their MRZ regions, and then OCR them.
Locating MRZs in Passport Images
Let’s learn how to locate the MRZ of a passport image using OpenCV and image processing.
Open the ocr_passport.py file in your project directory structure and insert the following code:
# import the necessary packages
from imutils.contours import sort_contours
import numpy as np
import pytesseract
import argparse
import imutils
import sys
import cv2

# construct the argument parser and parse the arguments
ap = argparse.ArgumentParser()
ap.add_argument("-i", "--image", required=True,
	help="path to input image to be OCR'd")
args = vars(ap.parse_args())
We start on Lines 2-8 by importing our required Python packages. These imports should begin to feel pretty standard to you by this point in the text. The only exception is perhaps the sort_contours import on Line 2 — what does this function do?
The sort_contours function will accept an input set of contours found by using OpenCV’s cv2.findContours function. Then, sort_contours will sort these contours either horizontally (left-to-right or right-to-left) or vertically (top-to-bottom or bottom-to-top).
We perform this sorting operation because OpenCV’s cv2.findContours does not guarantee the ordering of the contours. We’ll need to sort them explicitly to access the MRZ lines at the bottom of the passport image. Performing this sorting operation will make detecting the MRZ region far easier (as we’ll see later in this implementation).
Lines 11-14 parse our command line arguments. Only a single argument is required here, the path to the input --image.
With our imports and command line arguments taken care of, we can move on loading our input image and preparing it for MRZ detection:
# load the input image, convert it to grayscale, and grab its
# dimensions
image = cv2.imread(args["image"])
gray = cv2.cvtColor(image, cv2.COLOR_BGR2GRAY)
(H, W) = gray.shape

# initialize a rectangular and square structuring kernel
rectKernel = cv2.getStructuringElement(cv2.MORPH_RECT, (25, 7))
sqKernel = cv2.getStructuringElement(cv2.MORPH_RECT, (21, 21))

# smooth the image using a 3x3 Gaussian blur and then apply a
# blackhat morpholigical operator to find dark regions on a light
# background
gray = cv2.GaussianBlur(gray, (3, 3), 0)
blackhat = cv2.morphologyEx(gray, cv2.MORPH_BLACKHAT, rectKernel)
cv2.imshow("Blackhat", blackhat)
Lines 18 and 19 load our input image from disk and then convert it to grayscale, such that we can apply basic image processing routines to it (again, keep in mind that our goal is to detect the MRZ of the passport without having to utilize machine learning). We then grab the spatial dimensions (width and height) of the input image on Line 20.
Lines 23 and 24 initialize two kernels, which we’ll later use when applying morphological operations, specifically the closing operation. For the time being, note that the first kernel is rectangular with a width approximately 3x larger than the height. The second kernel is square. These kernels will allow us to close gaps between MRZ characters and openings between MRZ lines.
Gaussian blurring is applied on Line 29 to reduce high-frequency noise. We then apply a blackhat morphological operation to the blurred, grayscale image on Line 30.
A blackhat operator is used to reveal dark regions (i.e., MRZ text) against light backgrounds (i.e., the passport’s background). Since the passport text is always black on a light background (at least in this dataset), a blackhat operation is appropriate. Figure 3 shows the output of applying the blackhat operator.
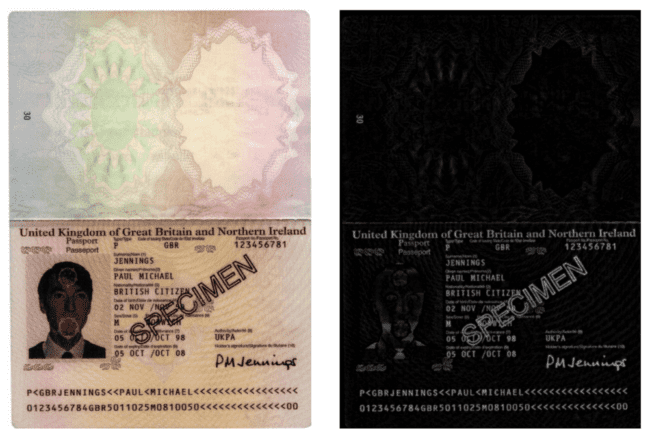
In Figure 3, the left-hand side shows our original input image, while the right-hand side displays the output of the blackhat operation. Notice that the text is visible after this operation, while much of the background noise has been removed.
The next step in MRZ detection is to compute the gradient magnitude representation of the blackhat image using the Scharr operator:
# compute the Scharr gradient of the blackhat image and scale the
# result into the range [0, 255]
grad = cv2.Sobel(blackhat, ddepth=cv2.CV_32F, dx=1, dy=0, ksize=-1)
grad = np.absolute(grad)
(minVal, maxVal) = (np.min(grad), np.max(grad))
grad = (grad - minVal) / (maxVal - minVal)
grad = (grad * 255).astype("uint8")
cv2.imshow("Gradient", grad)
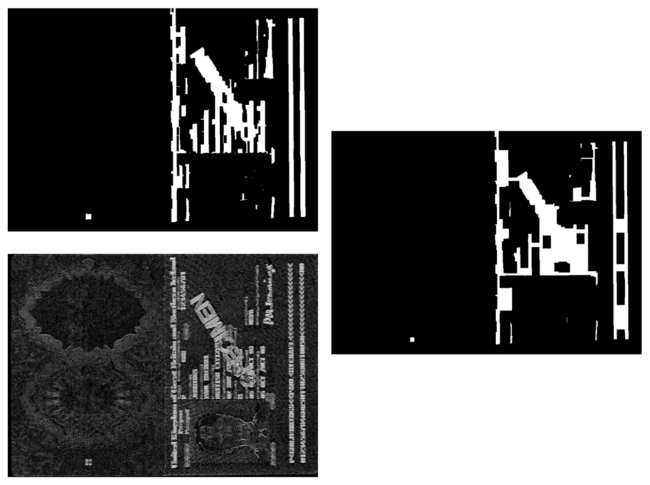
Lines 35 and 36 compute the Scharr gradient along the x-axis of the blackhat image, revealing regions of the image that are dark against a light background and contain vertical changes in the gradient, such as the MRZ text region. We then take this gradient image and scale it back into the range [0, 255] using min/max scaling (Lines 37-39). The resulting gradient image is then displayed on our screen (Figure 4).
The next step is to try to detect the actual lines of the MRZ:
# apply a closing operation using the rectangular kernel to close
# gaps in between letters -- then apply Otsu's thresholding method
grad = cv2.morphologyEx(grad, cv2.MORPH_CLOSE, rectKernel)
thresh = cv2.threshold(grad, 0, 255,
	cv2.THRESH_BINARY | cv2.THRESH_OTSU)[1]
cv2.imshow("Rect Close", thresh)

# perform another closing operation, this time using the square
# kernel to close gaps between lines of the MRZ, then perform a
# series of erosions to break apart connected components
thresh = cv2.morphologyEx(thresh, cv2.MORPH_CLOSE, sqKernel)
thresh = cv2.erode(thresh, None, iterations=2)
cv2.imshow("Square Close", thresh)
First, we apply a closing operation using our rectangular kernel (Lines 44-46). This closing operation is meant to close gaps between MRZ characters. We then apply thresholding using Otsu’s method to automatically threshold the image (Figure 4). As we can see, each of the MRZ lines is present in our threshold map.
We then close the gaps between the actual lines, using a closing operation with our square kernel (Line 52). The sqKernel is a 21 x 21 kernel that attempts to close the gaps between the lines, yielding one large rectangular region corresponding to the MRZ.
A series of erosions are then performed to break apart connected components that may have joined during the closing operation (Line 53). These erosions are also helpful in removing small blobs that are irrelevant to the MRZ.
The result of these operations can be seen in Figure 4. Notice how the MRZ region is a large rectangular blob in the bottom third of the image.
Now that our MRZ region is visible, let’s find contours in the thresh image — this process will allow us to detect and extract the MRZ region:
# find contours in the thresholded image and sort them from bottom
# to top (since the MRZ will always be at the bottom of the passport)
cnts = cv2.findContours(thresh.copy(), cv2.RETR_EXTERNAL,
	cv2.CHAIN_APPROX_SIMPLE)
cnts = imutils.grab_contours(cnts)
cnts = sort_contours(cnts, method="bottom-to-top")[0]

# initialize the bounding box associated with the MRZ
mrzBox = None
Lines 58-61 detect contours in the thresholded image. We then sort them bottom-to-top. Why bottom-to-top, you may ask?
Simple: the MRZ region is always located in the bottom third of the input passport image. We use this a priori knowledge to exploit the structure of the image. If we know we are looking for a large rectangular region that always appears at the bottom of the image, why not search the bottom first?
Whenever applying image processing operations, always see if there is a way you can exploit your knowledge of the problem. Don’t overcomplicate your image processing pipeline. Use any domain knowledge to make the problem simpler.
Line 64 then initializes mrzBox, the bounding box associated with the MRZ region.
We’ll attempt to find the mrzBox in the following code block:
# loop over the contours
for c in cnts:
	# compute the bounding box of the contour and then derive the
	# how much of the image the bounding box occupies in terms of
	# both width and height
	(x, y, w, h) = cv2.boundingRect(c)
	percentWidth = w / float(W)
	percentHeight = h / float(H)

	# if the bounding box occupies > 80% width and > 4% height of the
	# image, then assume we have found the MRZ
	if percentWidth > 0.8 and percentHeight > 0.04:
		mrzBox = (x, y, w, h)
		break
We start a loop over the detecting contours on Line 67. We compute the bounding box for each contour and then determine the percent of the image the bounding box occupies (Lines 72 and 73).
We compute how large the bounding box is (w.r.t. the original input image) to filter our contours. Remember that our MRZ is a large rectangular region that spans near the passport’s entire width.
Therefore, Line 77 takes advantage of this knowledge by making sure the detected bounding box spans at least 80% of the image’s width along with 4% of the height. Provided that the current bounding box region passes those tests, we update our mrzBox and break from the loop.
We can now move on to processing the MRZ region itself:
# if the MRZ was not found, exit the script
if mrzBox is None:
	print("[INFO] MRZ could not be found")
	sys.exit(0)

# pad the bounding box since we applied erosions and now need to
# re-grow it
(x, y, w, h) = mrzBox
pX = int((x + w) * 0.03)
pY = int((y + h) * 0.03)
(x, y) = (x - pX, y - pY)
(w, h) = (w + (pX * 2), h + (pY * 2))

# extract the padded MRZ from the image
mrz = image[y:y + h, x:x + w]
Lines 82-84 handle the case where no MRZ region was found — here, we exit the script. This could happen if the image that does not contain a passport is accidentally passed through the script or if the passport image was low quality/too noisy for our basic image processing pipeline to handle.
Provided we did indeed find the MRZ, the next step is to pad the bounding box region. We performed this padding because we applied a series of erosions (back on Line 53) when attempting to detect the MRZ itself.
However, we need to pad this region so that the MRZ characters are not touching the ROI’s borders. If the characters touch the image’s border, Tesseract’s OCR procedure may not be accurate.
Line 88 unpacks the bounding box coordinates. We then pad the MRZ region by 3% in each direction (Lines 89-92).
Once the MRZ is padded, we extract it from the image using array slicing (Line 95).
With the MRZ extracted, the final step is to apply Tesseract to OCR it:
# OCR the MRZ region of interest using Tesseract, removing any
# occurrences of spaces
mrzText = pytesseract.image_to_string(mrz)
mrzText = mrzText.replace(" ", "")
print(mrzText)

# show the MRZ image
cv2.imshow("MRZ", mrz)
cv2.waitKey(0)
Line 99 OCRs the MRZ region of the passport. We then explicitly remove any spaces from the MRZ text (Line 100) as Tesseract may have accidentally introduced spaces during the OCR process.
We then wrap up our passport OCR implementation by displaying the OCR’d mrzText on our terminal and displaying the final mrz ROI on our screen. You can see the result in Figure 5.

Text Blob Localization Results
We are now ready to put our text localization script to the test.
Open a terminal and execute the following command:
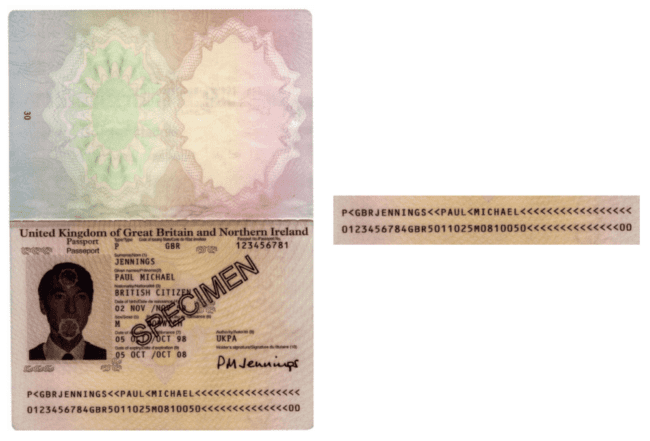
$ python ocr_passport.py --image passports/passport_01.png
P<GBRJENNINGS<<PAUL<MICHAEL<<<<<<<<<<<<<<<<<
0123456784GBR5011025M0810050<<<<<<<<<<<<<<00
Figure 6 (left) shows our original input image, while Figure 6 (right) displays the MRZ extracted via our image processing pipeline. Our terminal output shows that we’ve correctly OCR’d the MRZ area using Tesseract.
Let’s try another passport image, this one a Type-1 passport with three MRZ lines instead of two:
$ python ocr_passport.py --image passports/passport_02.png
IDBEL590335801485120100200<<<<
8512017F0901015BEL<<<<<<<<<<<7
REINARTZ<<ULRIKE<KATLIA<E<<<<<<
As Figure 7 shows, we detected the MRZ in the input image and then extracted it. The MRZ was then passed into Tesseract for OCR, of which our terminal output shows the result.
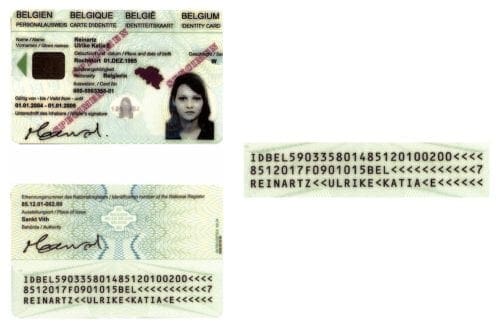
However, our MRZ OCR is not 100% accurate — notice there is an “L” between the “T” and “I” in “KATIA.”
For higher OCR accuracy, we should consider training a custom Tesseract model specifically on the fonts used in passports, making it easier for Tesseract to recognize these characters.
What's next? We recommend PyImageSearch University.
86+ total classes • 115+ hours hours of on-demand code walkthrough videos • Last updated: January 2026
★★★★★ 4.84 (128 Ratings) • 16,000+ Students Enrolled
I strongly believe that if you had the right teacher you could master computer vision and deep learning.
Do you think learning computer vision and deep learning has to be time-consuming, overwhelming, and complicated? Or has to involve complex mathematics and equations? Or requires a degree in computer science?
That’s not the case.
All you need to master computer vision and deep learning is for someone to explain things to you in simple, intuitive terms. And that’s exactly what I do. My mission is to change education and how complex Artificial Intelligence topics are taught.
If you're serious about learning computer vision, your next stop should be PyImageSearch University, the most comprehensive computer vision, deep learning, and OpenCV course online today. Here you’ll learn how to successfully and confidently apply computer vision to your work, research, and projects. Join me in computer vision mastery.
Inside PyImageSearch University you'll find:
- ✓ 86+ courses on essential computer vision, deep learning, and OpenCV topics
- ✓ 86 Certificates of Completion
- ✓ 115+ hours hours of on-demand video
- ✓ Brand new courses released regularly, ensuring you can keep up with state-of-the-art techniques
- ✓ Pre-configured Jupyter Notebooks in Google Colab
- ✓ Run all code examples in your web browser — works on Windows, macOS, and Linux (no dev environment configuration required!)
- ✓ Access to centralized code repos for all 540+ tutorials on PyImageSearch
- ✓ Easy one-click downloads for code, datasets, pre-trained models, etc.
- ✓ Access on mobile, laptop, desktop, etc.
Summary
In this tutorial, you learned how to implement an OCR system capable of localizing, extracting, and OCR’ing the text in the MRZ of a passport.
When you build your own OCR applications, don’t blindly throw Tesseract at them and see what sticks. Instead, carefully examine the problem as a computer vision practitioner.
Ask yourself:
- Can I use image processing to localize the text in an image, thereby reducing my reliance on Tesseract text localization?
- Can I use OpenCV functions to extract these regions automatically?
- What image processing steps would be required to detect the text?
The image processing pipeline presented in this tutorial is an example of a text localization pipeline you can build. It will not work in all situations. Still, computing gradients and using morphological operations to close gaps in the text will work in a surprising number of applications.
To download the source code to this post (and be notified when future tutorials are published here on PyImageSearch), simply enter your email address in the form below!

Download the Source Code and FREE 17-page Resource Guide
Enter your email address below to get a .zip of the code and a FREE 17-page Resource Guide on Computer Vision, OpenCV, and Deep Learning. Inside you'll find my hand-picked tutorials, books, courses, and libraries to help you master CV and DL!


Comment section
Hey, Adrian Rosebrock here, author and creator of PyImageSearch. While I love hearing from readers, a couple years ago I made the tough decision to no longer offer 1:1 help over blog post comments.
At the time I was receiving 200+ emails per day and another 100+ blog post comments. I simply did not have the time to moderate and respond to them all, and the sheer volume of requests was taking a toll on me.
Instead, my goal is to do the most good for the computer vision, deep learning, and OpenCV community at large by focusing my time on authoring high-quality blog posts, tutorials, and books/courses.
If you need help learning computer vision and deep learning, I suggest you refer to my full catalog of books and courses — they have helped tens of thousands of developers, students, and researchers just like yourself learn Computer Vision, Deep Learning, and OpenCV.
Click here to browse my full catalog.