Inside this tutorial, you will learn how to utilize the OpenVINO toolkit with OpenCV for faster deep learning inference on the Raspberry Pi.
Raspberry Pis are great — I love the quality hardware and the supportive community built around the device.
That said, for deep learning, the current Raspberry Pi hardware is inherently resource-constrained and you’ll be lucky to get more than a few FPS (using the RPi CPU alone) out of most state-of-the-art models (especially object detection and instance/semantic segmentation).
We know from my previous posts that Intel’s Movidius Neural Compute Stick allows for faster inference with the deep learning coprocessor that you plug into the USB socket:
- Getting started with the Intel Movidius Neural Compute Stick
- Real-time object detection on the Raspberry Pi with the Movidius NCS
Since 2017, the Movidius team has been hard at work on their Myriad processors and their consumer-grade USB deep learning sticks.
The first version of the API that came with the sticks worked well and demonstrated the power of the Myriad, but left a lot to be desired.
Then, the Movidius APIv2 was released and welcomed by the Movidius + Raspberry Pi community. It was easier/more reliable than the APIv1 but had its fair share of issues as well.
But now, it’s become easier than ever to work with the Movidius NCS, especially with OpenCV.
Meet OpenVINO, an Intel library for hardware optimized computer vision designed to replace the V1 and V2 APIs.
Intel’s shift to support the Movidius hardware with OpenVINO software makes the Movidius shine in all of its metallic blue glory.
OpenVINO is extremely simple to use — just set the target processor (a single function call) and let OpenVINO-optimized OpenCV handle the rest.
But the question remains:
How can I install OpenVINO on the Raspberry Pi?
Today we’ll learn just that, along with a practical object detection demo (spoiler alert: it is dead simple to use the Movidius coprocessor now).
Update 2020-04-06: There are a number of updates in this tutorial to ensure compatibility with OpenVINO 4.2.0.
To learn how to install OpenVINO on the Raspberry Pi (and perform object detection with the Movidius Neural Compute Stick), just follow this tutorial!
Looking for the source code to this post?
Jump Right To The Downloads SectionOpenVINO, OpenCV, and Movidius NCS on the Raspberry Pi
In this blog post, we’re going to cover three main topics.
- First, we’ll learn what OpenVINO is and how it is a very welcome paradigm shift for the Raspberry Pi.
- We’ll then cover how to install OpenCV and OpenVINO on your Raspberry Pi.
- Finally, we’ll develop a real-time object detection script using OpenVINO, OpenCV, and the Movidius NCS.
Note: There are many Raspberry Pi install guides on my blog, most unrelated to Movidius. Before you begin, be sure to check out the available install tutorials on my OpenCV installation guides page and choose the one that best fits your needs.
Let’s get started.
What is OpenVINO?
Intel’s OpenVINO is an acceleration library for optimized computing with Intel’s hardware portfolio.
OpenVINO supports Intel CPUs, GPUs, FPGAs, and VPUs.
Deep learning libraries you’ve come to rely upon such as TensorFlow, Caffe, and mxnet are supported by OpenVINO.
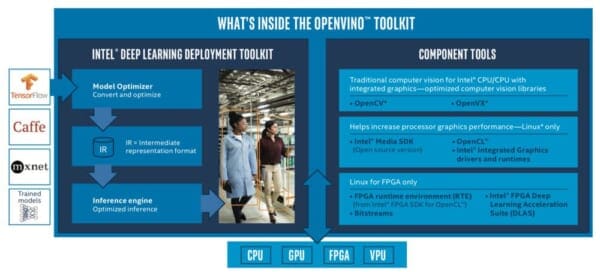
Intel has even optimized OpenCV’s DNN module to support its hardware for deep learning.
In fact, many newer smart cameras use Intel’s hardware along with the OpenVINO toolkit. OpenVINO is edge computing and IoT at its finest — it enables resource-constrained devices like the Raspberry Pi to work with the Movidius coprocessor to perform deep learning at speeds that are useful for real-world applications.
We’ll be installing OpenVINO on the Raspberry Pi so it can be used with the Movidius VPU (Vision Processing Unit) in the next section.
Be sure to read the OpenVINO product brief PDF for more information.
Installing OpenVINO’s optimized OpenCV on the Raspberry Pi
In this section, we’ll cover prerequisites and all steps required to install OpenCV and OpenVINO on your Raspberry Pi.
Be sure to read this entire section before you begin so that you are familiar with the steps required.
Let’s begin.
Hardware, assumptions, and prerequisites
In this tutorial, I am going to assume that you have the following hardware:
- Raspberry 4B or 3B+ (running Raspbian Buster)
- Movidius NCS 2 (or Movidius NCS 1)
- PiCamera V2 (or USB webcam)
- 32GB microSD card with Raspbian Stretch freshly flashed
- HDMI screen + keyboard/mouse (at least for the initial WiFi configuration)
- 5V power supply (I recommend a 2.5A supply because the Movidius NCS is a power hog)
If you don’t have a microSD with a fresh burn of Raspbian Stretch, you may download it here. I recommend the full install:
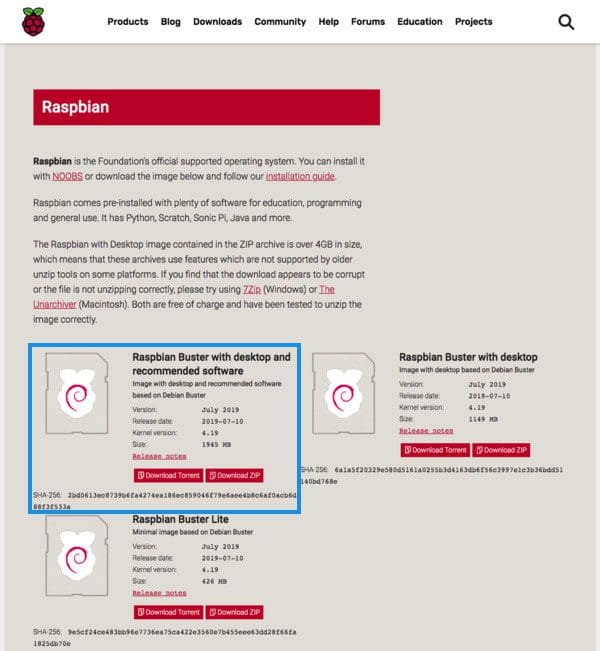
From there, use balenaEtcher (or a suitable alternative) to flash the card.
Once you’re ready, insert the microSD card into your Raspberry Pi and boot it up.
Enter your WiFi credentials and enable SSH, VNC, and the camera interface.
From here you will need one of the following:
- Physical access to your Raspberry Pi so that you can open up a terminal and execute commands
- Remote access via SSH or VNC
I’ll be doing the majority of this tutorial via SSH, but as long as you have access to a terminal, you can easily follow along.
Can’t SSH? If you see your Pi on your network, but can’t ssh to it, you may need to enable SSH. This can easily be done via the Raspberry Pi desktop preferences menu or using the raspi-config
command.
After you’ve changed the setting and rebooted, you can test SSH directly on the Pi with the localhost address.
Open a terminal and type ssh pi@127.0.0.1
to see if it is working. To SSH from another computer you’ll need the Pi’s IP address — you can determine the IP address by looking at your router’s clients page or by running ifconfig
to determine the IP on/of the Pi itself.
Is your Raspberry Pi keyboard layout giving you problems? Change your keyboard layout by going to the Raspberry Pi desktop preferences menu. I use the standard US Keyboard layout, but you’ll want to select the one appropriate for you.
Step #1: Expand filesystem on your Raspberry Pi
To get the OpenVINO party started, fire up your Raspberry Pi and open an SSH connection (alternatively use the Raspbian desktop with a keyboard + mouse and launch a terminal).
If you’ve just flashed Raspbian Stretch, I always recommend that you first check to ensure your filesystem is using all available space on the microSD card.
To check your disk space usage execute the df -h
command in your terminal and examine the output:
$ df -h Filesystem Size Used Avail Use% Mounted on /dev/root 30G 4.2G 24G 15% / devtmpfs 434M 0 434M 0% /dev tmpfs 438M 0 438M 0% /dev/shm tmpfs 438M 12M 427M 3% /run tmpfs 5.0M 4.0K 5.0M 1% /run/lock tmpfs 438M 0 438M 0% /sys/fs/cgroup /dev/mmcblk0p1 42M 21M 21M 51% /boot tmpfs 88M 0 88M 0% /run/user/1000
As you can see, my Raspbian filesystem has been automatically expanded to include all 32GB of the micro-SD card. This is denoted by the fact that the size is 30GB (nearly 32GB) and I have 24GB available (15% usage).
If you’re seeing that you aren’t using your entire memory card capacity, below you can find instructions on how to expand the filesystem.
Open up the Raspberry Pi configuration in your terminal:
$ sudo raspi-config
And then select the “Advanced Options” menu item:
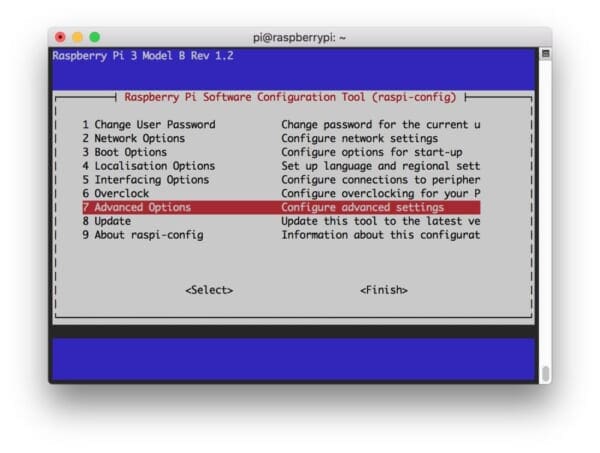
Followed by selecting “Expand filesystem”:
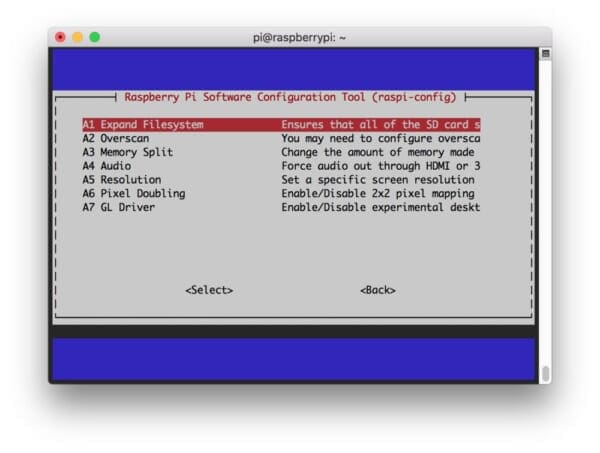
Once prompted, you should select the first option, “A1. Expand File System”, hit Enter on your keyboard, arrow down to the “<Finish>” button, and then reboot your Pi — you will be prompted to reboot. Alternatively, you can reboot from the terminal:
$ sudo reboot
Be sure to run the df -h
command again to check that your file system is expanded.
Step #2: Reclaim space on your Raspberry Pi
One simple way to gain more space on your Raspberry Pi is to delete both LibreOffice and Wolfram engine to free up some space on your Pi:
$ sudo apt-get purge wolfram-engine $ sudo apt-get purge libreoffice* $ sudo apt-get clean $ sudo apt-get autoremove
After removing the Wolfram Engine and LibreOffice, you can reclaim almost 1GB!
Step #3: Install OpenVINO + OpenCV dependencies on your Raspberry Pi
This step shows some dependencies which I install on every OpenCV system. While you’ll soon see that OpenVINO is already compiled, I recommend that you go ahead and install these packages anyway in case you end up compiling OpenCV from scratch at any time going forward.
Let’s update our system:
$ sudo apt-get update && sudo apt-get upgrade
And then install developer tools including CMake:
$ sudo apt-get install build-essential cmake unzip pkg-config
Next, it is time to install a selection of image and video libraries — these are key to being able to work with image and video files:
$ sudo apt-get install libjpeg-dev libpng-dev libtiff-dev $ sudo apt-get install libavcodec-dev libavformat-dev libswscale-dev libv4l-dev $ sudo apt-get install libxvidcore-dev libx264-dev
From there, let’s install GTK, our GUI backend:
$ sudo apt-get install libgtk-3-dev
And now let’s install a package which may help to reduce GTK warnings:
$ sudo apt-get install libcanberra-gtk*
The asterisk ensures we will grab the ARM-specific GTK. It is required.
Now we need two packages which contain numerical optimizations for OpenCV:
$ sudo apt-get install libatlas-base-dev gfortran
And finally, let’s install the Python 3 development headers:
$ sudo apt-get install python3-dev
Once you have all of these prerequisites installed you can move on to the next step.
Step #4: Download and unpack OpenVINO for your Raspberry Pi
From here forward, our install instructions are largely based upon Intel’s Raspberry Pi OpenVINO guide. There are a few “gotchas” which is why I decided to write a guide. We’ll also use virtual environments as PyImageSearch readers have come to expect.
Our next step is to download OpenVINO.
Let’s navigate to our home folder and create a new directory
$ cd ~
From there, go ahead and grab the OpenVINO Toolkit via wget
:
$ wget https://download.01.org/opencv/2020/openvinotoolkit/2020.1/l_openvino_toolkit_runtime_raspbian_p_2020.1.023.tgz
Update 2020-04-06: The Download URL has changed; the new URL is reflected.
Once you have successfully downloaded the OpenVINO toolkit, you can unarchive it using the following command:
$ tar -xf l_openvino_toolkit_runtime_raspbian_p_2020.1.023.tgz ... $ mv l_openvino_toolkit_runtime_raspbian_p_2020.1.023 openvino
Step #5: Configure OpenVINO on your Raspberry Pi
Let’s use nano
to edit our ~/.bashrc
. We will add a line to load OpenVINO’s setupvars.sh
each time you invoke a Pi terminal. Go ahead and open the file:
$ nano ~/.bashrc
Scroll to the bottom and add the following lines:
# OpenVINO source ~/openvino/bin/setupvars.sh
Save and exit from the nano text editor.
Then, go ahead and source
your ~/.bashrc
file:
$ source ~/.bashrc
Step #6: Configure USB rules for your Movidius NCS and OpenVINO on Raspberry Pi
OpenVINO requires that we set custom USB rules. It is quite straightforward, so let’s get started.
First, enter the following command to add the current user to the Raspbian “users” group:
$ sudo usermod -a -G users "$(whoami)"
Then logout and log back in. If you’re on SSH, you can type exit
and then re-establish your SSH connection. Rebooting is also an option via sudo reboot now
.
Once you’re back at your terminal, run the following script to set the USB rules:
$ cd ~ $ sh openvino/install_dependencies/install_NCS_udev_rules.sh
Step #7: Create an OpenVINO virtual environment on Raspberry Pi
Let’s grab and install pip, a Python Package Manager.
To install pip, simply enter the following in your terminal:
$ wget https://bootstrap.pypa.io/get-pip.py $ sudo python3 get-pip.py
We’ll be making use of virtual environments for Python development with OpenCV and OpenVINO.
If you aren’t familiar with virtual environments, please take a moment look at this article on RealPython or read the first half of this blog post on PyImageSearch.
Virtual environments will allow you to run independent, sequestered Python environments in isolation on your system. Today we’ll be setting up just one environment, but you could easily have an environment for each project.
Let’s go ahead and install virtualenv
and virtualenvwrapper
now — they allow for Python virtual environments:
$ sudo pip install virtualenv virtualenvwrapper $ sudo rm -rf ~/get-pip.py ~/.cache/pip
To finish the install of these tools, we need to update our ~/.bashrc
again:
$ nano ~/.bashrc
Then add the following lines:
# virtualenv and virtualenvwrapper export WORKON_HOME=$HOME/.virtualenvs export VIRTUALENVWRAPPER_PYTHON=/usr/bin/python3 source /usr/local/bin/virtualenvwrapper.sh VIRTUALENVWRAPPER_ENV_BIN_DIR=bin
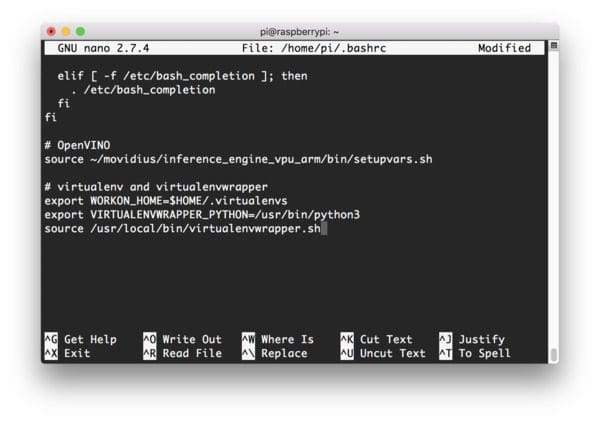
Alternatively, you can append the lines directly via bash commands:
$ echo -e "\n# virtualenv and virtualenvwrapper" >> ~/.bashrc $ echo "export WORKON_HOME=$HOME/.virtualenvs" >> ~/.bashrc $ echo "export VIRTUALENVWRAPPER_PYTHON=/usr/bin/python3" >> ~/.bashrc $ echo "source /usr/local/bin/virtualenvwrapper.sh" >> ~/.bashrc $ echo "VIRTUALENVWRAPPER_ENV_BIN_DIR=bin" >> ~/.bashrc
Next, source the ~/.bashrc
profile:
$ source ~/.bashrc
Let’s now create a virtual environment to hold OpenVINO, OpenCV and related packages:
$ mkvirtualenv openvino -p python3
This command simply creates a Python 3 virtual environment named openvino
.
You can (and should) name your environment(s) whatever you’d like — I like to keep them short and sweet while also providing enough information so I’ll remember what they are for.
Step #8: Install packages into your OpenVINO environment
Let’s install a handful of packages required for today’s demo script
$ workon openvino $ pip install numpy $ pip install "picamera[array]" $ pip install imutils
Now that we’ve installed these packages in the openvino
virtual environment, they are only available in the openvino
environment. This is your sequestered area to work on OpenVINO projects (we use Python virtual environments here so we don’t risk ruining your system install of Python).
Additional packages for Caffe, TensorFlow, and mxnet may be installed via requirements.txt files using pip. You can read more about it at this Intel documentation link. This is not required for today’s tutorial.
Step #9: Test your OpenVINO install on your Raspberry Pi
Let’s do a quick sanity test to see if OpenCV is ready to go before we try an OpenVINO example.
Open a terminal and perform the following:
$ workon openvino $ source ~/openvino/bin/setupvars.sh $ python >>> import cv2 >>> cv2.__version__ '4.2.0-openvino' >>> exit()
The first command activates our OpenVINO virtual environment. The second command sets up the Movidius NCS with OpenVINO and is very important. From there we fire up the Python 3 binary in the environment and import OpenCV.
The version of OpenCV indicates that it is an OpenVINO optimized install!
Recommended: Create a shell script for starting your OpenVINO environment
In this section, we’ll create a shell script just like the ones that come on my Pre-configured and Pre-installed Raspbian .img.
Open a new file named start_openvino.sh
and place it in your ~/
directory. Insert the following lines:
#!/bin/bash echo "Starting Python 3.7 with OpenCV-OpenVINO 4.2.0 bindings..." source ~/openvino/bin/setupvars.sh workon openvino
Save and close the file.
From here on, you can activate your OpenVINO environment with one simple command (as opposed to two commands like in the previous step:
$ source ~/start_openvino.sh Starting Python 3.7 with OpenCV-OpenVINO 4.2.0 bindings...
Real-time object detection with Raspberry Pi and OpenVINO
Installing OpenVINO was pretty easy and didn’t even require a compile of OpenCV. The Intel team did a great job!
Now let’s put the Movidius Neural Compute Stick to work using OpenVINO.
For comparison’s sake, we’ll run the MobileNet SSD object detector with and without the Movidius to benchmark our FPS. We’ll compare the values to previous results of using Movidius NCS APIv1 (the non-OpenVINO method that I wrote about in early 2018).
Let’s get started!
Project structure
Go ahead and grab the “Downloads” for today’s blog post.
Once you’ve extracted the zip, you can use the tree
command to inspect the project directory:
$ tree . ├── MobileNetSSD_deploy.caffemodel ├── MobileNetSSD_deploy.prototxt ├── openvino_real_time_object_detection.py └── real_time_object_detection.py 0 directories, 3 files
Our MobileNet SSD object detector files include the .caffemodel and .prototxt.txt files. These are pretrained (we will not be training MobileNet SSD today).
We’re going to review the openvino_real_time_object_detection.py
script and compare it to the original real-time object detection script (real_time_object_detection.py
).
Real-time object detection with OpenVINO, Movidius NCS, and Raspberry Pi
To demonstrate the power of OpenVINO on the Raspberry Pi with Movidius, we’re going to perform real-time deep learning object detection.
The Movidius/Myriad coprocessor will perform the actual deep learning inference, reducing the load on the Pi’s CPU.
We’ll still use the Raspberry Pi CPU to process the results and tell the Movidius what to do, but we’re reserving deep learning inference for the Myriad as its hardware is optimized and designed for deep learning inference.
As previously discussed in the “What is OpenVINO?” section, OpenVINO with OpenCV allows us to specify the processor for inference when using the OpenCV “DNN” module.
In fact, it only requires one line of code (typically) to use the Movidius NCS Myriad processor.
From there, the rest of the code is the same!
On the PyImageSearch blog I provide a detailed walkthrough of all Python scripts.
This is one of the few posts where I’ve decided to deviate from my typical format.
This post is first and foremost an install + configuration post. Therefore I’m going to skip over the details and instead demonstrate the power of OpenVINO by highlighting new lines of code inserted into a previous blog post (where all details are provided).
Please review that post if you want to get into the weeds with Real-time object detection with deep learning and OpenCV where I demonstrated the concept of using OpenCV’s DNN module in just 100 lines of code.
Today, we’re adding just one line of code that performs computation (and a comment + blank line). This brings the new total to 103 lines of code without using the previous complex Movidius APIv1 (215 lines of code).
If this is your first foray into OpenVINO, I think you’ll be just as astounded and pleased as I was when I learned how easy it is.
Let’s learn the changes necessary to accommodate OpenVINO’s API with OpenCV and Movidius.
Go ahead and open a file named openvino_real_time_object_detection.py
and insert the following lines, paying close attention to Lines 33-35 (highlighted in yellow):
# import the necessary packages from imutils.video import VideoStream from imutils.video import FPS import numpy as np import argparse import imutils import time import cv2 # construct the argument parse and parse the arguments ap = argparse.ArgumentParser() ap.add_argument("-p", "--prototxt", required=True, help="path to Caffe 'deploy' prototxt file") ap.add_argument("-m", "--model", required=True, help="path to Caffe pre-trained model") ap.add_argument("-c", "--confidence", type=float, default=0.2, help="minimum probability to filter weak detections") ap.add_argument("-u", "--movidius", type=bool, default=0, help="boolean indicating if the Movidius should be used") args = vars(ap.parse_args()) # initialize the list of class labels MobileNet SSD was trained to # detect, then generate a set of bounding box colors for each class CLASSES = ["background", "aeroplane", "bicycle", "bird", "boat", "bottle", "bus", "car", "cat", "chair", "cow", "diningtable", "dog", "horse", "motorbike", "person", "pottedplant", "sheep", "sofa", "train", "tvmonitor"] COLORS = np.random.uniform(0, 255, size=(len(CLASSES), 3)) # load our serialized model from disk print("[INFO] loading model...") net = cv2.dnn.readNetFromCaffe(args["prototxt"], args["model"]) # specify the target device as the Myriad processor on the NCS net.setPreferableTarget(cv2.dnn.DNN_TARGET_MYRIAD) # initialize the video stream, allow the cammera sensor to warmup, # and initialize the FPS counter print("[INFO] starting video stream...") vs = VideoStream(usePiCamera=True).start() time.sleep(2.0) fps = FPS().start() # loop over the frames from the video stream while True: # grab the frame from the threaded video stream and resize it # to have a maximum width of 400 pixels frame = vs.read() frame = imutils.resize(frame, width=400) # grab the frame dimensions and convert it to a blob (h, w) = frame.shape[:2] blob = cv2.dnn.blobFromImage(frame, 0.007843, (300, 300), 127.5) # pass the blob through the network and obtain the detections and # predictions net.setInput(blob) detections = net.forward() # loop over the detections for i in np.arange(0, detections.shape[2]): # extract the confidence (i.e., probability) associated with # the prediction confidence = detections[0, 0, i, 2] # filter out weak detections by ensuring the `confidence` is # greater than the minimum confidence if confidence > args["confidence"]: # extract the index of the class label from the # `detections`, then compute the (x, y)-coordinates of # the bounding box for the object idx = int(detections[0, 0, i, 1]) box = detections[0, 0, i, 3:7] * np.array([w, h, w, h]) (startX, startY, endX, endY) = box.astype("int") # draw the prediction on the frame label = "{}: {:.2f}%".format(CLASSES[idx], confidence * 100) cv2.rectangle(frame, (startX, startY), (endX, endY), COLORS[idx], 2) y = startY - 15 if startY - 15 > 15 else startY + 15 cv2.putText(frame, label, (startX, y), cv2.FONT_HERSHEY_SIMPLEX, 0.5, COLORS[idx], 2) # show the output frame cv2.imshow("Frame", frame) key = cv2.waitKey(1) & 0xFF # if the `q` key was pressed, break from the loop if key == ord("q"): break # update the FPS counter fps.update() # stop the timer and display FPS information fps.stop() print("[INFO] elasped time: {:.2f}".format(fps.elapsed())) print("[INFO] approx. FPS: {:.2f}".format(fps.fps())) # do a bit of cleanup cv2.destroyAllWindows() vs.stop()
Lines 33-35 (highlighted in yellow) are new. But only one of those lines is interesting.
On Line 35, we tell OpenCV’s DNN module to use the Myriad coprocessor using net.setPreferableTarget(cv2.dnn.DNN_TARGET_MYRIAD)
.
The Myriad processor is built into the Movidius Neural Compute Stick. You can use this same method if you’re running OpenVINO + OpenCV on a device with an embedded Myriad chip (i.e. without the bulky USB stick).
For a detailed explanation on the code, be sure to refer to this post.
Also, be sure to refer to this Movidius APIv1 blog post from early 2018 where I demonstrated object detection using Movidius and the Raspberry Pi. It’s incredible that 215 lines of significantly more complicated code are required for the previous Movidius API, in comparison to 103 lines of much easier to follow code using OpenVINO.
I think those line number differences speak for themselves in terms of reduced complexity, time, and development cost savings, but what are the actual results? How fast is OpenVINO with Movidius?
Let’s find out in the next section.
OpenVINO object detection results
To run today’s script, first, you’ll need to grab the “Downloads” associated with this post.
From there, unpack the zip and navigate into the directory.
Activate your virtual environment using the recommended method above:
$ source ~/start_openvino.sh Starting Python 3.7 with OpenCV-OpenVINO 4.2.0 bindings...
To perform object detection with OpenVINO, just execute the following command:
$ python openvino_real_time_object_detection.py --prototxt MobileNetSSD_deploy.prototxt \ --model MobileNetSSD_deploy.caffemodel [INFO] loading model... [INFO] starting video stream... [INFO] elasped time: 55.35 [INFO] approx. FPS: 8.31
As you can see, we’re reaching 8.31FPS over approximately one minute.
I’ve gathered additional results using MobileNet SSD as shown in the table below:
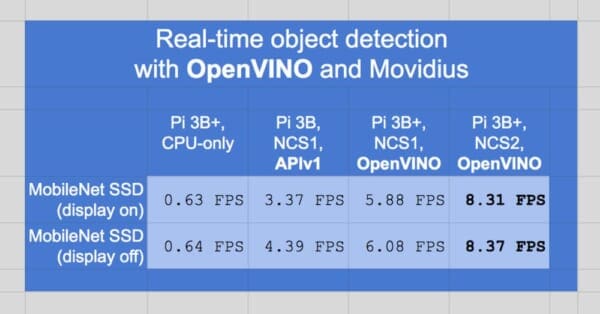
OpenVINO and the Movidius NCS 2 are very fast, a huge speedup from previous versions.
It’s amazing that the results are > 8x in comparison to using only the RPi 3B+ CPU (no Movidius coprocessor).
The two rightmost columns (light blue columns 3 and 4) show the OpenVINO comparison between the NCS1 and the NCS2.
Note that the 2nd column statistic is with the RPi 3B (not the 3B+). It was taken in February 2018 using the previous API and previous RPi hardware.
So, what’s next?
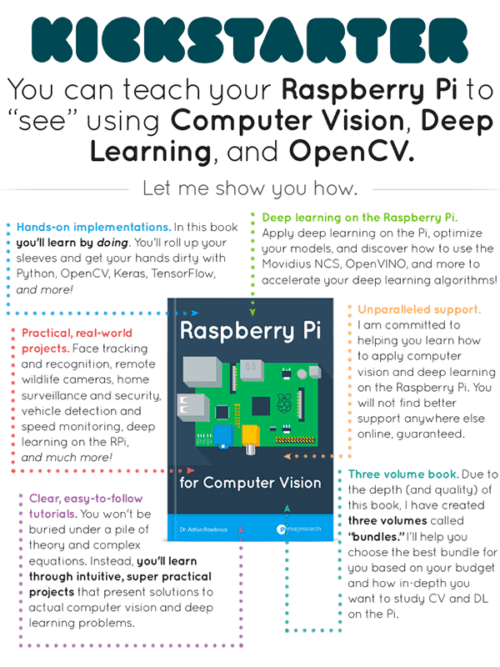
I’ve written a new book to maximize computer vision + deep learning capability on resource-constrained devices such as the Raspberry Pi single board computer (SBC).
Inside, you’ll learn and develop your skills using techniques that I’ve amassed through my years of working with computer vision on the Raspberry Pi, Intel Movidius NCS, Google Coral EdgeTPU, NVIDIA Jetson Nano, and more.
The book covers over 40 projects (including 60+ chapters) on embedded Computer Vision and Deep Learning.
A handful of the highlighted projects include:
- Traffic counting and vehicle speed detection
- Real-time face recognition
- Building a classroom attendance system
- Automatic hand gesture recognition
- Daytime and nighttime wildlife monitoring
- Security applications
- Deep Learning classification, object detection, and human pose estimation on resource-constrained devices
- … and much more!
As a bonus, included are pre-configured Raspbian .img files (for the Raspberry Pi 4B/3B+/3B and Raspberry Pi Zero W) and pre-configured Jetson Nano .img files (for the NVIDIA Jetson Nano A02/B01) so you can skip the tedious installation headaches and get to the fun part (code and deployment).
If you’re just as excited as I am, grab the free table of contents by clicking here:
Troubleshooting and Frequently Asked Questions (FAQ)
Did you encounter an error installing OpenCV and OpenVINO on your Raspberry Pi?
Don’t become frustrated.
The first time you install the software on your Raspberry Pi it can be very frustrating. The last thing I want for you to do is give up!
Here are some common question and answers — be sure to read them and see if they apply to you.
Q. How do I flash an operating system on to my Raspberry Pi memory card?
A. I recommend that you:
- Grab a 32GB memory card. The SanDisk 32GB 98MB/s microSD cards work really well and are what I recommend.
- Flash Raspbian Stretch with Etcher to the card. Etcher is supported by most major operating systems.
- Insert the card into your Raspberry Pi and begin with the “Assumptions” and “Step 1” sections in this blog post.
Q. Can I use Python 2.7?
A. Python 2.7 reached sunset on January 1st, 2020. I would not advise using it.
Q. Why can’t I just apt-get install OpenCV and have OpenVINO support?
A. Avoid this “solution” at all costs even though it might work. First, this method likely won’t install OpenVINO until it is more popular. Secondly, apt-get doesn’t play nice with virtual environments and you won’t have control over your compile and build.
Q. The mkvirtualenv
and workon
commands yield a “command not found error”. I’m not sure what to do next.
A. There a number of reasons why you would be seeing this error message, all of come from to Step #4:
- First, ensure you have installed
virtualenv
andvirtualenvwrapper
properly using thepip
package manager. Verify by runningpip freeze
and ensure that you see bothvirtualenv
andvirtualenvwrapper
are in the list of installed packages. - Your
~/.bashrc
file may have mistakes. Examine the contents of your~/.bashrc
file to see the properexport
andsource
commands are present (check Step #4 for the commands that should be appended to~/.bashrc
). - You might have forgotten to
source
your~/.bashrc
. Make sure you runsource ~/.bashrc
after editing it to ensure you have access to themkvirtualenv
andworkon
commands.
Q. When I open a new terminal, logout, or reboot my Raspberry Pi, I cannot execute the mkvirtualenv
or workon
commands.
A. If you’re on the Raspbian desktop, this will likely occur. The default profile that is loaded when you launch a terminal, for some reason, doesn’t source the ~/.bashrc
file. Please refer to #2 from the previous question. Over SSH, you probably won’t run into this.
Q. When I try to import OpenCV, I encounter this message: Import Error: No module named cv2
.
A. There are several reasons this could be happening and unfortunately, it is hard to diagnose. I recommend the following suggestions to help diagnose and resolve the error:
- Ensure your
openvino
virtual environment is active by using theworkon openvino
andsource setupvars.sh
commands. If this command gives you an error, then verify thatvirtualenv
andvirtualenvwrapper
are properly installed. - Try investigating the contents of the
site-packages
directory in youropenvino
virtual environment. You can find thesite-packages
directory in~/.virtualenvs/openvino/lib/python3.5/site-packages/
. Ensure (1) there is acv2
sym-link directory in thesite-packages
directory and (2) it’s properly sym-linked. - Be sure to
find
thecv2*.so
file as demonstrated in Step #6.
Q. What if my question isn’t listed here?
A. Please leave a comment below or send me an email. If you post a comment below, just be aware that code doesn’t format well in the comment form and I may have to respond to you via email instead.
Looking for more free OpenVINO content?
I have a number of Intel Movidius / OpenVINO blog posts for your enjoyment here on PyImageSearch.
What's next? We recommend PyImageSearch University.
86 total classes • 115+ hours of on-demand code walkthrough videos • Last updated: October 2024
★★★★★ 4.84 (128 Ratings) • 16,000+ Students Enrolled
I strongly believe that if you had the right teacher you could master computer vision and deep learning.
Do you think learning computer vision and deep learning has to be time-consuming, overwhelming, and complicated? Or has to involve complex mathematics and equations? Or requires a degree in computer science?
That’s not the case.
All you need to master computer vision and deep learning is for someone to explain things to you in simple, intuitive terms. And that’s exactly what I do. My mission is to change education and how complex Artificial Intelligence topics are taught.
If you're serious about learning computer vision, your next stop should be PyImageSearch University, the most comprehensive computer vision, deep learning, and OpenCV course online today. Here you’ll learn how to successfully and confidently apply computer vision to your work, research, and projects. Join me in computer vision mastery.
Inside PyImageSearch University you'll find:
- ✓ 86 courses on essential computer vision, deep learning, and OpenCV topics
- ✓ 86 Certificates of Completion
- ✓ 115+ hours of on-demand video
- ✓ Brand new courses released regularly, ensuring you can keep up with state-of-the-art techniques
- ✓ Pre-configured Jupyter Notebooks in Google Colab
- ✓ Run all code examples in your web browser — works on Windows, macOS, and Linux (no dev environment configuration required!)
- ✓ Access to centralized code repos for all 540+ tutorials on PyImageSearch
- ✓ Easy one-click downloads for code, datasets, pre-trained models, etc.
- ✓ Access on mobile, laptop, desktop, etc.
Summary
Today we learned about Intel’s OpenVINO toolkit and how it can be used to improve deep learning inference speed on the Raspberry Pi.
You also learned how to install the OpenVINO toolkit, including the OpenVINO-optimized version of OpenCV on the Raspberry Pi.
We then ran a simple MobileNet SSD deep learning object detection model. It only required one line of code to set the target device to the Myriad processor on the Movidius stick.
We also demonstrated that the Movidius NCS + OpenVINO is quite fast, dramatically outperforming object detection speed on the Raspberry Pi’s CPU.
And if you’re interested in learning more about how to build real-world computer vision + deep learning projects on the Raspberry Pi, be sure to check out my new book, Raspberry Pi for Computer Vision.
To download the source code to this post (and be notified when future tutorials are published here on PyImageSearch), just drop your email in the form below!
Download the Source Code and FREE 17-page Resource Guide
Enter your email address below to get a .zip of the code and a FREE 17-page Resource Guide on Computer Vision, OpenCV, and Deep Learning. Inside you'll find my hand-picked tutorials, books, courses, and libraries to help you master CV and DL!
Kenneth
Hi Adrian,
Hope you can write some articles on Jsetson nano. Thanks….
Adrian Rosebrock
I’ll absolutely doing posts on the Nano! 🙂
Alakbar
Beautiful… many-many thanks…
Adrian Rosebrock
Thanks Alakbar 🙂
Niko Gamulin
If you run asynchronous detection, it could go faster.
Adrian Rosebrock
Thanks for the suggestion, Niko!
Ulrich
I got an NCS2 two weeks ago and had lots of trouble to get it running smoothly. It is working now, but I wish I had read your tutorial 2 weeks ago … Congrats to these straight instructions! I guess this tutorial will save lotsa people lotsa work 🙂
Adrian Rosebrock
I’m sorry I couldn’t publish the tutorial earlier, Ulrich! I certainly wish I could have saved you some time. I’m glad you’re up and running now though 🙂
Igor Marques
I have movidius neural stick 1. How to procede? I can not fins Amy tutorial…
Thanks
Igor
Adrian Rosebrock
I Igor, this tutorial works with the NCS1 too. Try it out and let us know if you have questions.
Igot
Thank you, Your Tutorial was the light at the end of the tunnel, it was all I needed
Wei
Great post, love it!
Adrian Rosebrock
Thanks Wei!
anon
I am interested in using OpenVIno on a fine-tuned or custom architectures (as opposed to one of their pre-trained models) from Keras/PyTorch/Tensorflow but found the official documentation both extensive yet somewhat unclear. I would really appreciate a blog post with advice on how to do this. It seems for PyTorch/Keras a convesion to Onnx would first be needed and maybe for a tensorflow model, some config files might take careful editing in a model-specific way.
Adrian Rosebrock
Thanks for the suggestion. I might not be able to cover that in a blog post but I’ll be sure to cover it in my Raspberry Pi for Computer Vision with Python book.
anon2
OpenCV dnn module has functions to load directly from ONNX format or from ModelOptimizer IR format. PyTorch can save to ONNX, ModelOptimizer can read ONNX. I don’t know about TF.
Tseng Cheng Hsun
Thank you very much, it’s very useful…
but I want to know, if I have trained my custom yolov3 model and weights, how can I transfer it to caffe model ?
thank you.
Adrian Rosebrock
That really depends on what deep learning library/framework you used to train the model — which did you use?
Michael R
Another great article. I am glad to see that your FPS matched what I was able to get as well with Rpi. I have tried every trick in the book to get past 7-8 FPS but with a single stick and USB 2.0 I just can’t do it. So, this was great to see. Thanks again for your insight!!!
Adrian Rosebrock
There are some neat tricks that people are working on, including bypassing the Pi itself and having frames captured from the camera directly piped to the NCS. Doing so can push 30+ FPS.
Michael Robinson
That I would like to see how to do if you can point me to an example.
Adrian Rosebrock
I unfortunately don’t have an example, I just know it’s something a company is currently working on.
Adrian Rosebrock
Thanks Patrick! I was drawing a blank earlier, thanks for jumping in.
Christophe
Adrian,
Thanks a lot for all your great explanations on your website ! You are amazing !
Thus, with OpenVino, the mvNCcompile command to generate a graph for the movidius is not needed anymore ???
Can OpenVino manage multiple connected Movidius ?
Christophe
Adrian Rosebrock
Hi Christophe, with OpenVINO, mvNCompile is no-longer required. I understand you may have some projects using that previous method (APIv1/APIv2). I would recommend a separate memory card for each of the APIs to keep them separate. As far as I know, OpenVINO has a way to manage multiple connected NCS devices — I just haven’t tried it yet. Do you have a project idea in mind that I might be able to write about?
Christophe
I have not really any idea about dedicated project using multiple NCS. But I suppose it will speed up the FPS.
Otherwise, I’ve a project in mind : to estimate the speed and the direction of an object. For the direction, your post called ‘OpenCV Track Object Movement’ will probably help me. But for the object speed estimation (from a fixed camera), is it possible ?
Adrian Rosebrock
Yes, absolutely. I’ll be covering that in my Raspberry Pi for Computer Vision book as well!
Zubair Ahmed
Absolutely brilliant post
So you were writing this as I was installing Debian Stretch on my newest Raspberry Pi 3B+ along with OpenCV following your post 🙂
Now installing Dlib then OpenVINO will follow. Can’t wait for my NCS 2 to ship it can’t come soon enough
Its unbelievable to see we dont even need to compile OpenCV anymore with OpenVINO
Also unbelievably its just one line of code to instruct our script to use Movidius NCS 2
Thanks for writing this
Love it
Adrian Rosebrock
Thanks Zubair 🙂
Shaun
Hi Adrian,
Many thanks to you. An amazing article again.
Somehow, with OpenVINO, cv2.flip() command doesn’t work. Is it something broken from OpenVINO?
Shaun
Hi Adrian,
Please disregard my previous reply. I have figured out how to flip video by using cv2.flig() command. Thanks
Shaun
Adrian Rosebrock
Wow, is that actually the name of the function in OpenCV + OpenVINO? That must be a typo somewhere in the source code.
Dmitry Kurtaev
Hi, Adrian!
When we measured an efficiency of MobileNet-SSD on NCS2 last time, it was about 19.8 frames per second (net.forward() only). Maybe there is a gap in imutils’ resize? I have one PiCamera so I can check how many FPS we can achieve with both U8 input blob and OpenCV’s resize.
source: https://software.intel.com/en-us/forums/computer-vision/topic/803928#comment-1933110
Tamoghna
Hi Adrian,
I love your posts on Deep Learning and OpenCV.
I followed all the steps mentioned here and got the output.
However, I noticed that in the line 18 you mentioned the option of using Movidius stick:
“`
ap.add_argument(“-u”, “–movidius”, type=bool, default=0,
help=”boolean indicating if the Movidius should be used”)
“`
In the entire code, you haven’t used that argument at all. So when I executed the code, I got a processing time of 6 sec per image.
Is it enabled by default whenever I insert the stick or have you missed a line in the code?
Adrian Rosebrock
Hi Tamoghna — thanks for catching that. That command line argument was accidentally left in. The Movidius NCS is used by default.
srini
Thank you for your wonderful posts. A boon for newbies like me.
I guess we can connect Movidius to a laptop USB and use. Will there be a change in OpenVino installation & execution steps?
Adrian Rosebrock
Yes, the installation process will change dependent on what OS you are using. Definitely refer to the Movidius NCS docs for more info.
bd222
Hi Adrian, your tutorial works! Im very exicted but still a beginner.
Recently Im working on a project that i need to accomplish it in two weeks. Can I ask you :
When i use Openvino on my tinyyolo dataset, also the way is to change these two lines ?
net = cv2.dnn.readNetFromCaffe(args[“prototxt”], args[“model”])
net.setPreferableTarget(cv2.dnn.DNN_TARGET_MYRIAD)
or should i convert the dataset ?
Hope to hear from you soon, and very thankful to what youve done!
Adrian Rosebrock
You would want to follow my YOLO tutorial and then set call the
net.setPreferableTarget(cv2.dnn.DNN_TARGET_MYRIAD)
function.wally
This is an extremely timely post for me!
I took your two earlier tutorials and merged them into one multi-threaded Python program that uses the OpenCV dnn module, or the NCS v1 SDK, or both, to run MobileNet-SSD on images received in any combinations of three ways.
1) MQTT image buffers, especially useful with a node-red ftp server to receive motion detection “snapshots” from commercial security DVRs or systems like Motion or Zoneminder.
2) Netcams with “Onvif” http snapshots. Basically any netcam that returns a jpeg image in response to a request on a specific http URL should work.
3) Rtsp streams. Typically from commercial security DVRs (although finding the URLs can be difficult) or most netcams, basically everything I had that could be viewed in VLC with a rtsp URL should work.
It automatically adjusts for image resolution — uses what it gets from the image. I find D1 to HD works very well, 4K is too much of a good thing, recall that the AI resizes to 300×300.
My code gets ~6.5 fps on a Pi3B+ when fed from 5 Onvif snapshot netcams.
I’ve recently put it up on GitHub:
https://github.com/wb666greene/AI_enhanced_video_security
This tutorial makes it look trivial to convert my code to using OpenVINO and thus support the NCS2 as well for a very nice speed up!
Your single threaded tutorials (fantastic learning tools) hold back the NCS performance, I suspect it may be doing the same for the NCS2 and OpenVINO.
Did I mention that because of the amazing portability of Python 3 it was rather easy to make the code run on Windows (tested on 7 and 10) where on i3 4025U it gets about the same frame rate with CPU only as the Pi3B+ does with the NCS. Unfortunately there is no support for NCS v1SDK on Windows, it’d be really neat if OpenVINO for Windows works with this tutorial.
Adrian Rosebrock
Fantastic, thank you for sharing Wally!
Boss
Thank you for publishing this useful article! can you give me some suggestions to work with USB camera. How can i modify your code?
Adrian Rosebrock
Change Line 40 to the following:
vs = VideoStream(src=0).start()
Boss
Thanks Adrian, your guides in pyimagesearch.com are outstanding. btw have you plan to use yolov3 tiny model with openvino in the future.
Adrian Rosebrock
I do! It will be covered either in the Raspberry Pi for Computer Vision book or in a blog post.
wally
I had installed the Pi OpenVINO following Intel’s less that clear instructions and have ran some sample codes successfully.
I have verified that I have the openvino version of OpenCV.
CV2.__version__ is 4.0.1-openvino
but when I run your realtime sample code I get an assertion failed error in line 58 net.forward() init plugin.
I did change line 40: VideoStream(usePiCamera=False).start() as I don’t have the PiCamera module installed, but do have a decent HP USB camera.
I don’t see any OpenVINO related imports in the real-time sample code, the samples I have run have something like:
from openvino.inference_engine import IENetwork, IEPlugin
I’m not using virtual environments as this SD card is dedicated to learning OpenVINO Any ideas what has gone wrong here?
I am able to run this sample code on my Pi3B+ (after removing the code for the Intel RealSense USB camera which I don’t have):
https://qiita.com/PINTO/items/94d5557fca9911cc892d#24-fps-boost-raspberrypi3-with-four-neural-compute-stick-2-ncs2-mobilenet-ssd–yolov3-48-fps-for-core-i7
Its not the greatest example, as it locks up after running for a few minutes, but I think my Pi OpenVINO build went correctly.
Adrian Rosebrock
Regarding the “assertion failed” error, what was the message?
wally.
I posted a fairly long reply but a web glitch may have lost it, if not ignore this one.
The assertion error was for Initializing the plugin. Turned out, my source download was missing lines 34 & 35:
# specify the target device as the Myriad processor on the NCS
net.setPreferableTarget(cv2.dnn.DNN_TARGET_MYRIAD)
It also still had the ap.add_argument –movidius option as mentioned by Tamoghna. I assume my download hit your web distribution in some transition state.
Adding the DNN_TARGET_MYRIAD line got it running fine.
wally
Wow!
Thanks to this great tutorial it was trivial to change my NCS v1 SDK AI code to use OpenVINO instead
One NCS2 stick, 5 Onvif netcams gave 8.39 fps for a 3126 second run on my Pi3B+. Based on the statistics my code prints at the end the main thread “output” may be holding things back writing detection files to the SD card, displaying the frames with OpenCV, etc.
Maybe not quite as much over the ~6.5 fps I was getting with the NCS v1SDK as I might have hoped for, but still worth while for the minor cost increment and near zero software effort.
OpenVINO might be a bit less efficient when using the original NCS as swapping out the NCS2 I got 5.95 fps for a 4035 second run with the original NCS.
Using two NCS I got 9.14 fps for a 3332 second run, whereas the v1SDK got ~11 fps. Turning off the display bumped it up a bit to 10.4 fps for 2234 second run.
My next step is getting it running on an Odroid XU-4 which is a “Pi like” computer with USB3 ports.
Michael L.
Thanks for sharing this great tutorial! I managed to get my Movidius 1 up and running finally 🙂
I noticed on the OpenVINO website there’s a “Model Zoo” with lots of other pre-trained models. One thing I don’t understand is where to get the labels (chair, person, etc) for the other models? In your code you’ve got it in CLASSES=[] list but that only applies to MobileNetSSD I assume. What if I wanted to use some other model? Can the labels be extracted from the prototxt or xml file perhaps?
Adrian Rosebrock
Indeed, there are quite a bit of models available on the Model Zoo. Unfortunately, if Intel does not provide the class labels for the model then you’ll need to find the original authors website/GitHub repo which should include a text file that includes the labels. I’ll be documenting all that inside my Raspberry Pi for Computer Vision book.
Ollie Graham
Great post – thanks Dr. Adrian!
On a related note, there’s a Chrome extension called CurlWget which creates wget download text for a file automatically which I find is much easier than trying to guess the correct path to a file and has saved me much time.
Hopefully you find it useful!
Rodger
This is great! and I am definitely going to play with this. Any idea where the bottleneck is? The Google Core TPU is running at 70 fps. However, it seems to be less flexible.
Adrian Rosebrock
Hey Rodger — what “bottleneck” are you referring to here?
wally
Using this tutorial and a good bit of Google, I got OpenVINO running on the Odroid XU-4. I had to “downgrade” to Ubuntu-Mate 16.04 and hack on setupvars.sh and update to gcc-6 and g++-6 to get the required libraries, but here are some quick results running my multi-threaded code (from my GitHub linked above) modified to run on OpenVINO using the great info from this tutorial.
Using 5 Onvif snaphot netcams.
Pi3B+:
NCS v1 SDK ~6.5 fps
2 NCS v1 SDK ~11.6 fps
NCS OpenVINO ~5.9 fps
2 NCS OpenVINO ~9.9 fps
NCS2 OpenVINO ~8.3 fps
Odroid XU-4:
NCS OpenVINO ~8.5 fps
2 NCS OpenVINO ~15.9 fps
NCS2 OpenVINO ~15.5 fps
I think having USB 3 explains most of the difference, but I could be wrong 🙂
NCS2 looks to be about 2X faster than the original NCS with MobileNet-SSD.
I’ll share my notes about getting OpenVINO running on the Odroid XU-4 if anyone is interested.
My major disappointment with OpenVINO is there seems to me no way to “probe” for now many or if a Movidius is available.
Its curious that mixing NCS and NCS2 results in poor performance, ~8.9 fps on the Pi3B+, barely better than the NCS2 alone. I only have one NCS2 so I can’t test multiple instances of it.
Bd
Hi Adrian,
Im trying to add OPENVINO in my python project, however it isn’t using any petrained models, just simply using cv2 and numpy to do camera real time detection of color.
How can I use the Neural compute stick to accelerate my fps. I bought it but don’t know how to add in my python file, can you give me some suggestion?
Thank you and hope to hear from you !
Adrian Rosebrock
The NCS is used for inference using deep learning models. It will not speedup your existing OpenCV/NumPy functions.
wally
Perhaps more relevant for your readers, I ran this tutorial code on the Mate16 Odroid XU-4
Your numbers, Pi3B+, PiCamera module.
NCS ~5.9 fps
NCS2 ~8.3 fps
Odroid XU-4 Mate16, HP USB webcam:
NCS ~7.6 fps
NCS2 ~13,2 fps.
In my earlier testing I’ve found USB webcams can be either faster or slower than the PiCamera module and imutils. I have both types, sorry I don’t remember which type the webcam I used here is.
After getting OpenVINO running on Odroid/Mate16, I realized I may have messed up my hacking of the setupvars.sh script that made me give up on the Mate18 that shipped with the Odroid. I went back and was able to get the OpenVINO installed, but when I tried to run this tutorial code, it couldn’t find my webcam 🙁 In general my experience with Mate18 was that its a “regression” over Mate16, so I continue ignoring it and waiting until 20.04 LTS comes out.
One other Odroid/Mate18 potential complication, apparently new Odroids are shipping with 64-bit version of Mate18.
Why anyone would want a 64-bit OS on a system with less that 4GB of RAM is beyond me, but unless there is a very solid armv7l compatability layer (like there is for running 32-bit code on x86-64) expect lots of extra headaches. I’m hearing noises for a 64-bit Raspbian so maybe it will work out eventually.
Bob O'Donnell
Question regarding the application of this to multiple CNNs.
Am I correct that this basically sets up all the matrix math and just dumps it to the co-processor, then waits for the result?
The reason I ask is I would like to use different networks at the same time, i.e. grab an image, find and isolate the face, run a recognition on it, then apply style transfer.
It seems that each of these can be done sequentially, but I don’t want to handicap performance by dumping some significant setup every time I switch tasks.
My thought is
Run one thread with the image prep
Run one thread with MobileNet for grabbing and labeling
Run one thread with something to identify the person
Run one thread with Style transfer if needed for new “avatar”
Each of these would call the Movidius when it needed the answer, and return the answer to the Pi.
Thoughts?
Adrian Rosebrock
Hey Bob — all of those questions will be addressed in the Raspberry Pi for Computer Vision book. I’ll be showing you how to efficiently perform face detection + recognition with OpenVINO and the NCS.
In the meantime you should lookup “model quantization”, specifically quantized models compatible with OpenVINO/NCS.
Alfan
Hi Adrian,
how to change the source from camera stream to RTSP stream?
Adrian Rosebrock
Sorry, I don’t have any tutorials on RTSP streaming but you may want to try this method instead.
wally
If you can play your rtsp stream in VLC, the OpenVINO OpenCV should play it. If you can’t play it with VLC, in my experience, forget about it.
Depending on “standards” adherence of your source, you may get so many warnings that you can’t use your console screen to see print() status messages. launching as:
python yourcode.py $2>/dev/null
can help somewhat.
Basically:
Rcap=cv2.VideoCapture(“rtsp://url.that.streams.in.vlc”)
# in main loop
ret, frame = Rcap.read()
fi not ret: # process the valid frame
wally
I managed to get OpenVINO running on my Odroid XU-4 with the Mate18 that was pre-loaded on my eMMC (its the 32-bit amm7l version)
Main issue was Mate18 ships with Python3.6 which OpenVINO does not support at present.
I “side loaded” Python 3.5.2, and your virtual environment setup instructions came to my rescue. There are lots of bad instructions for installing alternate python versions on Ubuntu, this one was clear, concise, and worked: https://tecadmin.net/install-python-3-5-on-ubuntu/
This tutorial code, USB webcam, and NCS2 got 12.1 fps for a 5565 second run.
Made me a believer in the virtues of virtual environments!
Zubair Ahmed
Hi Wally
Thanks for the link however ‘PIP requires SSL/TLS’ error popped up whenever I wanted to install a packages numpy and imutils when I followed a similar tutorial
After doing a few install/remove cycles I found and followed this to enable SSL but it didnt work either
https://joshspicer.com/python37-ssl-issue
so finally I had to just use ‘sudo’ pip install numpy imutils to bypass SSL/TLS error
I noticed that everything now requires a root permission including eg sudo pip freeze
@qlinkwp
Hello Adrian
I have read and download your Example for learning in this article
I get the point that how easy to use openvino to use movidius on raspberry pi(RPi)
However,
when i would like to compare the fps when use and not use movidius on openvino on RPi
i found that
i can execute openvino_realtime_object_detection.py at fps around 6 (use movidius ver.1)
but
realtime_object_detection.py cannot execute on RPi
since just openvino cannot execute alone on ARM7
Am i right
ASHWIN K RAYAPROLU
I’ve written a simple Vagrantfile and Quick installation notes to setup Intel Neural Compute stick 2 and OpenVINO . You can attach those with this tutorial to make it more easy for users to jump on board
https://gist.github.com/ashwinrayaprolu1984/7245a37b86e5fd1920f8e4409e276132
Adrian Rosebrock
Cool, thanks for sharing Ashwin!
wally
A new release of OpenVINO is out: 2019R1 the instructions here still work, although Intel now wants to change the install directory to /opt/intel/openvino so if you want to keep the directory structure here you’ll need to modify the /opt/intel/openvino paths in the Intel instructions:
What is new?
OpenCV 4.1.0-openvino
The ability to compile C++ samples /deployment_tools/inference_engine/samples
Intel instructions:
https://docs.openvinotoolkit.org/latest/_docs_install_guides_installing_openvino_raspbian.html
I found my NCS v2SDK SD card and used it to install 2019R5 using the paths in this tutorial and successuflly compiled and executed the C++ object_detection_ssd sample program.
Unless you want to use C++ if its worthwhile to update of not will depend on what 4.1.0-openvino has over 4.0.1-openvino, if anything.
The tutorial code ran fine on 2019R1, using NCS I got ~4.95 fps on this Pi3B with USB webcam doing everything via ssh -X.
Adrian Rosebrock
Thanks Wally!
wally
I’ve since learned from the Intel OpenVINO forums
https://software.intel.com/en-us/forums/computer-vision/topic/807560#comment-1937661
that there is a bug in the 2019r1 setupvars.sh script.
It messed up their Python code samples, but not your code from this this tutorial. I think its because they used the Inference Engine module instead of the simpler dnn module method.
I only ran their cmake example and this tutorial prior to my post.
Problem:
$INTEL_CVSDK_DIR/python/python$python_version/armv7l:
is missing in the PYTHONPATH pre-pend right after:
if [ ! -z “$python_version” ]; then
Its possible it’ll be fixed for later downloads as the forum moderator has filled a bug report.
wally
A 2019 R1.01 release is out from Intel:
https://docs.openvinotoolkit.org/latest/_docs_install_guides_installing_openvino_raspbian.html
The download link still seems to be providing the same April 4 2019.1.094 version for the Pi, although the Ubuntu and Windows versions were newer.
Levi
Hello adrian,
Im currently use NCS2 with raspberry PI. Is it save to running object detection using myriad all day?
Adrian Rosebrock
I’m not sure what you mean by “it is to save object detection…all day”? Could you clarify?
Levi
Sorry for the typo. I mean, from safety aspects, is it ok to running object detection using ncs2 for 24 hours?
nadine
I just want to say thank you SO much for your install and setup guides. They are so detailed and helpful, and really useful. I’ve followed several of them, and they’re just such a great resource, and have saved me from so many potential pitfalls.
Adrian Rosebrock
Thanks Nadine, I’m just happy I could have helped 🙂
Arindam
Hi Adrian,
Really informative post.
I was just wondering if you have tried to use multiple Movidius’s to speed up the processing?
Can you share some documentation of how to do it?
Thanks
Arindam
Adrian Rosebrock
Sorry, I have not tried to use multiple NCS.
Andrey
Ок, what about many nets for one stick?
Adrian Rosebrock
That won’t work. For running multiple nets on a single device I would recommend a Jetson Nano instead.
Dan Benitah
Hi, thank you very much – super excited to try it but I was wondering if it is possible to do the same with stretch lite please?
Thanks
Dan
YuhwanPark
Hi.
I admire your post.
Before posting, it was really hard, but I got the strength of your posting and solved it.
Thanks again.
There is one thing to ask.
Can you tell me how to set up to use more than two Movidius NCS sticks efficiently?
I will wait for your response.
Adrian Rosebrock
Thanks, I’m glad the tutorial helped you! However, I do not have tutorials on using more than one NCS at a time.
trần thiên
Hi.
Thank you for all.
But I’m using tensorflow, so now what should I do to be able to use it on NCS2
I will wait for your response.
Adrian Rosebrock
I’ll be covering how to use TensorFlow with the NCS2 inside Raspberry Pi for Computer Visin.
Aakash
Hi Adrian ,
I’m new to OpenVINO , just wanted to know that can we run the inference engine on raspberry pi3 without any NCS hardware ?
Thanks and regards
Aakash
Adrian Rosebrock
Yes, the code will still work but you won’t have as fast inference without the NCS.
Brian
Hi Adrian,
Is it possible to make a tutorial for Linux Systems such as Ubuntu, using the Movidius 2?
I am having problems adapting this tutorial to my Ubuntu computer.
Thank You,
Brian
Abdul Haris
Hi Adrian…..
Thank you for your tuturial. My Raspberry Pi 3+ with NCS2 already run.
Thank You
Haris
Adrian Rosebrock
Congrats Abdul!
Simon Bunn
Hi Adrian, great tutorial and saved me a mountain of pain. A couple of questions. You and some of your readers have posted results for CPU only, NCS1 and NCS2. Where in the code did you set these changes? I saw a switch “-u”, “–movidius”, type bool, default=0 but to me this means without the -u switch the NCS is off? so if I call the python script as iin your example above, it does not use my NCS?
I also have two NCS2 sticks and would also like to see if I can get it to run faster. Looking forward to your update when you get two or more sticks running.
And finally, to use the google object identification engine instead, I assume I just change the model to point to the XML and BIN formats used by the TensorFlow google example?
Adrian Rosebrock
The
--movidius
switch actually doesn’t do anything (it was leftover in the code after testing). Line 35 where you callnet.setPreferableTarget
sets the processor.I cover working with the NCS more inside Raspberry Pi for Computer Vision, so if you’re interested in learning more about the NCS, including how to use TensorFlow/Keras models on the NCS, definitely refer to the book.
Suraj
Hi,
I was able to run successfully mobilenet ssd caffe model on openvino using ncs.
Now for performance comparison when i run the script by rmoving the target ncs there is an error saying plugin not found.
SO openvinos opencv works only for NCS or can it be used for running mobilenet ssd without ncs?
Pasteur
Hello, Adrian.
I sent you a post 2 days ago regarding the “Importerror” when iimporting opencv.Actually, the problem is in the new Rapbian version (“buster”): your tutorial does not work with this version, as well Intel´s getting started. I solved the problem installing an older version (Stretch) and everything works fine. But the version you get when you go to the downloads session of Raspbian is tjhe “buster” one, so, many other users may report the same problem.
I found some instructions on how to fix the problem in the “buster” Raspbiian, but did not try yet ( https://github.com/leswright1977/RPI4_NCS2 )..
Best regards, Pasteur Jr.
Adrian Rosebrock
Thanks Pasteur. Yes, the current version of the OpenVINO toolkit can break in Buster. We’re waiting for Intel to release a new version.
Adrian Rosebrock
Thanks Matt. I’ll be doing an updated tutorial with the RPi 4 and Debian Buster in the next couple of months.
Rhys Williams
I can confirm that this works too!
Thanks Adrian and Matt, this is super cool!
Oiseau
Hi, I wanted to use NCS2 with Mosse tracker, but I think that this version lack the opencv_contrib, so it doesn’t work. Have you any idea of how I can get it working ?
Oiseau
Well, I found that : https://software.intel.com/en-us/forums/computer-vision/topic/804917
Thisisapen
Thank you for this great article!! I spent two days to find the best and practical way to install OpenCV and OpenVino on my new Raspberry Pi 4. This article is the best one I have found so far.
Adrian Rosebrock
Thanks so much Thisisapen, I’m glad it helped you!
Alex
Hi Adrian,
how to use pb file instead of caffee?
Carlos
openvino uses python 3.5. Latest Raspbian installs 3.7. CV2 is not loading because of that. How can I get this to work? Do I have to downgrade the whole system to 3.5, or do I need to do it only in the virtual environment?
Thanks
Vincent Lau
The workaround is shown here.
https://github.com/leswright1977/RPI4_NCS2
Adrian Rosebrock
Thanks for sharing!
Santanu Dutta
Thanks Dr. Adrian for updating the blog with the latest link. It worked like a charm. Fan of your detailing and easy execution steps.
I got 14-15 fps with Raspi 4 with NCS2
Next step will be to try out vehicle speed detection.
Adrian Rosebrock
Awesome, I’m glad to hear it worked for you!
yuming
I use upboard ubuntu 16.04 64bit, when I import cv2, I encountered class: ELFCLASS32, is it caused by 64bit? What should I do?
yuming
hi i want to ask,if i use pretrain .bin and .xml,then the fps will up?
Adrian Rosebrock
The models are already pre-trained.
yuming
yes,because openvino say use IR(.bin and .xml) will faster,so i don’t know openvino provide Model Optimizer will faster than .caffe?
Adrian Rosebrock
Again, the actual filetype does not matter in terms of speed. What matters is the process of optimizing the model and how the specialized libraries work to optimize for speed.
That said, if you want to optimize for speed with OpenVINO, yes, you should do the conversion process.
Kelley
Hi Adrian – Your tutorials are amazing! For the past 5 hours I tried to get the Intel tutorials to work for the face detection and inference, but was using a newer version of Openvino and the Intel tutorials were not working past step 1 – getting the camera working. Came back to your tutorials to attempt to use the Rasp Pi Tutorial and modify the steps for the virtual environment and python detection scripts to work with the NCS2, OpenVino, and OpenCV on an Ubuntu 18.04 laptop. Success! Thanks for your straightforward instructions and helpful context along the way.
Adrian Rosebrock
Awesome, I’m glad it worked for you Kelley!
Mickey Cohen
I got it working on My Raspberry Pi 4B with 4GB and NCS2. Works at 15.6fps. But….image is very small 400pix. Can the code be changed to full video and detecting several objects?
Best,
Mickey
Prahalad
Hey Adrian, I am a frequent visitor of your blog and truly hats off to your work.
Just wanted to know whether we can the run the centroid based object tracking code in the movidius NCS.
The link for the above mentioned centroid tracker is : https://pyimagesearch.com/2018/07/23/simple-object-tracking-with-opencv/
Adrian Rosebrock
The centroid tracker itself does not run on the Movidius NCS nor would the NCS be able to improve the speed of it. It’s a simplistic calculation that can easily run in real-time on the CPU.
YuhwanPark
hi
is this post possible raspberry pi 4 having buster OS?
Paste
Hi Adrian.
Thank you for this great article.
This sentence means
Can I apply any existing python code?
For example I want to Object Detection use to My Dataset And Inception V3 Model.
I have Raspberry Pi 4 and NCS2 and file and Labels file.
So, I was run Object_Detection made with Inception V3 code.
But it’s so slow that I want to apply NCS2.
Is correct for one line you apply to NCS2?
Could you please help me?
Adrian Rosebrock
I would suggest reading Raspberry Pi for Computer Vision — that book teaches you how to train your own custom deep learning models and then run them on the RPi 4 using the Movidius NCS.
Roi Lopez Sanchez
Could I install the image of raspbian that includes that book without problems in the raspberry 4?
Thanks in advance!
Adrian Rosebrock
Yes, you absolutely can! 🙂
Jason
Thanks for the wonderful post.
I have a question though. How did you get the FPS for SSD running on Raspberry CPU only? I tried to run one of the OpenVINO samples on Raspberry CPU, and it complains about “Device with ‘CPU’ name is not registered in the InferenceEngine in function ‘initPlugin'”.
WilliamChiu
Hi Adrian.
Thank you for this great article, the instruction is clear and easy to follow step by step
I have one questions regarding external USB Webcam.
I connect the USB webcam and modify your python code from
“vs = VideoStream(usePiCamera=True).start()” to
“vs = VideoStream(src=0).start()”
But I get error code “”VIDIOC_QBUF:Invalid argument””
I check raspberry with “lsusb” make sure the webcam is found by system
Also I modify the sleep time longer to make sure webcam be activated.
Do you have any suggestion to resolve this issue
Thank you again
Yuriy
Hi Adrian.
I have Raspberry Pi 4 and NCS2. I am having issues with OpenCV acquiring the IP camera stream. If I use cv.VideoCapture(“rtsp:..”) without openvino-it work good. If i use openvino-it creates lags
David Hoffman
This post is freshly updated as of 2019-12-18. Be sure to search for “Update 2019-12-18” as you follow along.
Oskar
Hi Adrian,
thank you for providing this tutorial and even more for providing us with advice and disctraction in COVID-19 times. For me it is proving very valuable to focus on something else than only newspapers and television these days.
In Germany we are locking down social life basically since one week – nevertheless unexpectedly a famous bookstore delivered my pre-crisis-ordered “made in China” NCS2 yesterday from the US 2 weeks early. Bringing together RPi4, NCS2, openCV and your tutorial – all of that produced by a huge worldwide community of science and makers worked like a charm. Proving that sharing and collaboration will help us solve difficult problems if everybody contributes to their best.
Stay safe and once again thanks for sharing!
[running 4.2.0-openvino]
Adrian Rosebrock
Thanks as Oskar — and stay safe as well!
Caleb Hensley
Than you so much for providing this content for us! I am working on my senior project for a degree in software engineering. I have used many of your tutorials and am using YOLOv3 with a Movidius NS2 for certain object detection! It is way faster with the Movidius. I did run into an issue because the version was a year behind! There is now a 2020 version. It might be a good idea to reference the root download page so people can find the right version! (at the moment it is https://download.01.org/opencv/2020/openvinotoolkit/2020.1/l_openvino_toolkit_runtime_raspbian_p_2020.1.023.tgz)
Thank you for all of your content!
Caleb Hensley
*an issue because the openvino version listed was a year behind
Adrian Rosebrock
Thanks for sharing, Caleb!