Back in September 2017, Davis King released v19.7 of dlib — and inside the release notes you’ll find a short, inconspicuous bullet point on dlib’s new 5-point facial landmark detector:
Added a 5 point face landmarking model that is over 10x smaller than the 68 point model, runs faster, and works with both HOG and CNN generated face detections.
My goal here today is to introduce you to the new dlib facial landmark detector which is faster (by 8-10%), more efficient, and smaller (by a factor of 10x) than the original version.
Inside the rest of today’s blog post we’ll be discussing dlib’s new facial landmark detector, including:
- How the 5-point facial landmark detector works
- Considerations when choosing between the new 5-point version or the original 68-point facial landmark detector for your own applications
- How to implement the 5-point facial landmark detector in your own scripts
- A demo of the 5-point facial landmark detector in action
To learn more about facial landmark detection with dlib, just keep reading.
Looking for the source code to this post?
Jump Right To The Downloads Section(Faster) Facial landmark detector with dlib
In the first part of this blog post we’ll discuss dlib’s new, faster, smaller 5-point facial landmark detector and compare it to the original 68-point facial landmark detector that was distributed with the the library.
From there we’ll implement facial landmark detection using Python, dlib, and OpenCV, followed by running it and viewing the results.
Finally, we’ll discuss some of the limitations of using a 5-point facial landmark detector and highlight some of the scenarios in which you should be using the 68-point facial landmark detector of the 5-point version.
Dlib’s 5-point facial landmark detector
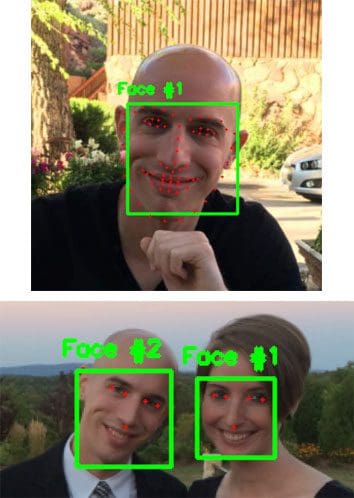
Figure 1 above visualizes the difference between dlib’s new 5-point facial landmark detector versus the original 68-point detector.
While the 68-point detector localizes regions along the eyes, eyebrows, nose, mouth, and jawline, the 5-point facial landmark detector reduces this information to:
- 2 points for the left eye
- 2 points for the right eye
- 1 point for the nose
The most appropriate use case for the 5-point facial landmark detector is face alignment.
In terms of speedup, I found the new 5-point detector to be 8-10% faster than the original version, but the real win here is model size: 9.2MB versus 99.7MB, respectively (over 10x smaller).
It’s also important to note that facial landmark detectors tend to be very fast to begin with (especially if they are implemented correctly, as they are in dlib).
The real win in terms of speedup will be to determine which face detector you should use. Some face detectors are faster (but potentially less accurate) than others. If you remember back to our drowsiness detection series:
- Drowsiness detection with OpenCV
- Raspberry Pi: Facial landmarks + drowsiness detection with OpenCV and dlib
You’ll recall that we used the more accurate HOG + Linear SVM face detector for the laptop/desktop implementation, but required a less accurate but faster Haar cascade to achieve real-time speed on the Raspberry Pi.
In general, you’ll find the following guidelines to be a good starting point when choosing a face detection model:
- Haar cascades: Fast, but less accurate. Can be a pain to tune parameters.
- HOG + Linear SVM: Typically (significantly) more accurate than Haar cascades with less false positives. Normally less parameters to tune at test time. Can be slow compared to Haar cascades.
- Deep learning-based detectors: Significantly more accurate and robust than Haar cascades and HOG + Linear SVM when trained correctly. Can be very slow depending on depth and complexity of model. Can be sped up by performing inference on GPU (you can see an OpenCV deep learning face detector in this post).
Keep these guidelines in mind when building your own applications that leverage both face detection and facial landmarks.
Implementing facial landmarks with dlib, OpenCV, and Python
Now that we have discussed dlib’s 5-point facial landmark detector, let’s write some code to demonstrate and see it in action.
Open up a new file, name it faster_facial_landmarks.py
, and insert the following code:
# import the necessary packages from imutils.video import VideoStream from imutils import face_utils import argparse import imutils import time import dlib import cv2
On Lines 2-8 we import necessary packages, notably dlib
and two modules from imutils
.
The imutils package has been updated to handle both the 68-point and 5-point facial landmark models. Ensure that you upgrade it in your environment via:
$ pip install --upgrade imutils
Again, updating imutils will allow you to work with both 68-point and 5-point facial landmarks.
From there, let’s parse command line arguments:
# construct the argument parser and parse the arguments ap = argparse.ArgumentParser() ap.add_argument("-p", "--shape-predictor", required=True, help="path to facial landmark predictor") args = vars(ap.parse_args())
We have one command line argument: --shape-predictor
. This argument allows us to change the path to the facial landmark predictor that will be loaded at runtime.
Note: Confused about command line arguments? Be sure to check out my recent post where command line arguments are covered in depth.
Next, let’s load the shape predictor and initialize our video stream:
# initialize dlib's face detector (HOG-based) and then create the # facial landmark predictor print("[INFO] loading facial landmark predictor...") detector = dlib.get_frontal_face_detector() predictor = dlib.shape_predictor(args["shape_predictor"]) # initialize the video stream and sleep for a bit, allowing the # camera sensor to warm up print("[INFO] camera sensor warming up...") vs = VideoStream(src=1).start() # vs = VideoStream(usePiCamera=True).start() # Raspberry Pi time.sleep(2.0)
On Lines 19 and 20, we initialize dlib’s pre-trained HOG + Linear SVM face detector
and load the shape_predictor
file.
In order to access the camera, we’ll be using the VideoStream
class from imutils.
You can select (via commenting/uncommenting Lines 25 and 26) whether you’ll use a:
- Built-in/USB webcam
- Or if you’ll be using a PiCamera on your Raspberry Pi
From there, let’s loop over the frames and do some work:
# loop over the frames from the video stream while True: # grab the frame from the threaded video stream, resize it to # have a maximum width of 400 pixels, and convert it to # grayscale frame = vs.read() frame = imutils.resize(frame, width=400) gray = cv2.cvtColor(frame, cv2.COLOR_BGR2GRAY) # detect faces in the grayscale frame rects = detector(gray, 0) # check to see if a face was detected, and if so, draw the total # number of faces on the frame if len(rects) > 0: text = "{} face(s) found".format(len(rects)) cv2.putText(frame, text, (10, 20), cv2.FONT_HERSHEY_SIMPLEX, 0.5, (0, 0, 255), 2)
First, we read a frame
from the video stream, resize it, and convert to grayscale (Lines 34-36).
Then let’s use our HOG + Linear SVM detector
to detect faces in the grayscale image (Line 39).
From there, we draw the total number of faces in the image on the original frame
by first making sure that at least one face was detected (Lines 43-46).
Next, let’s loop over the face detections and draw the landmarks:
# loop over the face detections for rect in rects: # compute the bounding box of the face and draw it on the # frame (bX, bY, bW, bH) = face_utils.rect_to_bb(rect) cv2.rectangle(frame, (bX, bY), (bX + bW, bY + bH), (0, 255, 0), 1) # determine the facial landmarks for the face region, then # convert the facial landmark (x, y)-coordinates to a NumPy # array shape = predictor(gray, rect) shape = face_utils.shape_to_np(shape) # loop over the (x, y)-coordinates for the facial landmarks # and draw each of them for (i, (x, y)) in enumerate(shape): cv2.circle(frame, (x, y), 1, (0, 0, 255), -1) cv2.putText(frame, str(i + 1), (x - 10, y - 10), cv2.FONT_HERSHEY_SIMPLEX, 0.35, (0, 0, 255), 1)
Beginning on Line 49, we loop over the faces in rects
.
We draw the face bounding box on the original frame (Lines 52-54), by using our face_utils
module from imutils
(which you can read more about here).
Then we pass the face to predictor
to determine the facial landmarks (Line 59) and subsequently we convert the facial landmark coordinates to a NumPy array.
Now here’s the fun part. To visualize the landmarks, we’re going to draw tiny dots using cv2.circle
and number each of the coordinates.
On Line 64, we loop over the landmark coordinates. Then we draw a small filled-in circle as well as the landmark number on the original frame
.
Let’s finish our facial landmark script out:
# show the frame cv2.imshow("Frame", frame) key = cv2.waitKey(1) & 0xFF # if the `q` key was pressed, break from the loop if key == ord("q"): break # do a bit of cleanup cv2.destroyAllWindows() vs.stop()
In this block, we display the frame (Line 70), break out of the loop if “q” is pressed (Lines 71-75), and perform cleanup (Lines 78 and 79).
Running our facial landmark detector
Now that we have implemented our facial landmark detector, let’s test it out.
Be sure to scroll down to the “Downloads” section of this blog post to download the source code and 5-point facial landmark detector.
From there, open up a shell and execute the following command:
$ python faster_facial_landmarks.py \ --shape-predictor shape_predictor_5_face_landmarks.dat
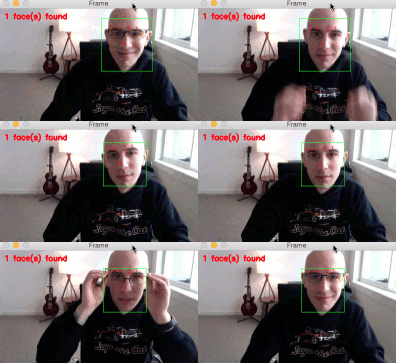
As you can see from the GIF above, we have successfully localized the 5 facial landmarks, including:
- 2 points for the left eye
- 2 points for the right eye
- 1 point for the bottom of the nose
I have included a longer demonstration of the facial landmark detector in the video below:
Is dlib’s 5-point or 68-point facial landmark detector faster?
In my own tests I found that dlib’s 5-point facial landmark detector is 8-10% faster than the original 68-point facial landmark detector.
A 8-10% speed up is significant; however, what’s more important here is the size of the model.
The original 68-point facial landmark is nearly 100MB, weighing in at 99.7MB.
The 5-point facial landmark detector is under 10MB, at only 9.2MB — this is over a 10x smaller model!
When you’re building your own applications that utilize facial landmarks, you now have a substantially smaller model file to distribute with the rest of your app.
A smaller model size is nothing to scoff at either — just think of the reduced download time/resources for mobile app users!
Limitations of the 5-point facial landmark detector
The primary usage of the 5-point facial landmark detector will be face alignment:
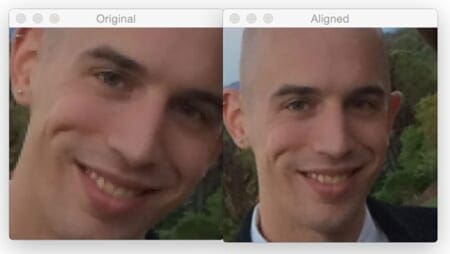
For face alignment, the 5-point facial landmark detector can be considered a drop-in replacement for the 68-point detector — the same general algorithm applies:
- Compute the 5-point facial landmarks
- Compute the center of each eye based on the two landmarks for each eye, respectively
- Compute the angle between the eye centroids by utilizing the midpoint between the eyes
- Obtain a canonical alignment of the face by applying an affine transformation
While the 68-point facial landmark detector may give us slightly better approximation to the eye centers, in practice you’ll find that the 5-point facial landmark detector works just as well.
All that said, while the 5-point facial landmark detector is certainly smaller (9.2MB versus 99.7MB, respectively), it cannot be used in all situations.
A great example of such a situation is drowsiness detection:
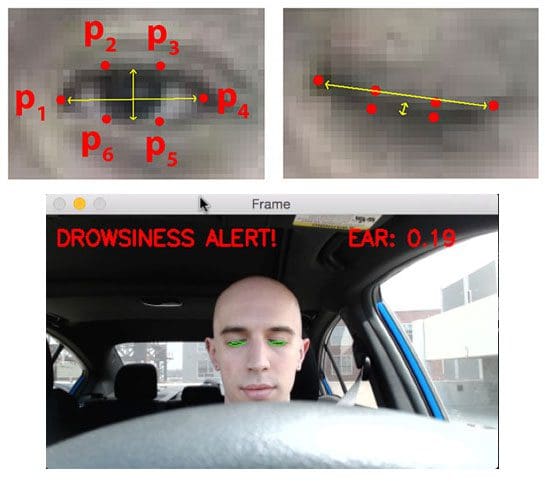
When applying drowsiness detection we need to compute the Eye Aspect Ratio (EAR) which is the ratio of the eye landmark width to the eye landmark height.
When using the 68-point facial landmark detector we have six points per eye, enabling us to perform this computation.
However, with the 5-point facial landmark detector we only have two points per eye (essentially and from Figure 4 above) — this is not enough enough to compute the eye aspect ratio.
If your plan is to build a drowsiness detector or any other application that requires more points along the face, including facial landmarks along the:
- Eyes
- Eyebrows
- Nose
- Mouth
- Jawline
…then you’ll want to use the 68-point facial landmark detector instead of the 5-point one.
What's next? We recommend PyImageSearch University.
86 total classes • 115+ hours of on-demand code walkthrough videos • Last updated: October 2024
★★★★★ 4.84 (128 Ratings) • 16,000+ Students Enrolled
I strongly believe that if you had the right teacher you could master computer vision and deep learning.
Do you think learning computer vision and deep learning has to be time-consuming, overwhelming, and complicated? Or has to involve complex mathematics and equations? Or requires a degree in computer science?
That’s not the case.
All you need to master computer vision and deep learning is for someone to explain things to you in simple, intuitive terms. And that’s exactly what I do. My mission is to change education and how complex Artificial Intelligence topics are taught.
If you're serious about learning computer vision, your next stop should be PyImageSearch University, the most comprehensive computer vision, deep learning, and OpenCV course online today. Here you’ll learn how to successfully and confidently apply computer vision to your work, research, and projects. Join me in computer vision mastery.
Inside PyImageSearch University you'll find:
- ✓ 86 courses on essential computer vision, deep learning, and OpenCV topics
- ✓ 86 Certificates of Completion
- ✓ 115+ hours of on-demand video
- ✓ Brand new courses released regularly, ensuring you can keep up with state-of-the-art techniques
- ✓ Pre-configured Jupyter Notebooks in Google Colab
- ✓ Run all code examples in your web browser — works on Windows, macOS, and Linux (no dev environment configuration required!)
- ✓ Access to centralized code repos for all 540+ tutorials on PyImageSearch
- ✓ Easy one-click downloads for code, datasets, pre-trained models, etc.
- ✓ Access on mobile, laptop, desktop, etc.
Summary
In today’s blog post we discussed dlib’s new, faster, more compact 5-point facial landmark detector.
This 5-point facial landmark detector can be considered a drop-in replacement for the 68-point landmark detector originally distributed with the dlib library.
After discussing the differences between the two facial landmark detectors, I then provided an example script of applying the 5-point version to detect the eye and nose region of my face.
In my tests, I found the 5-point facial landmark detector to be 8-10% faster than the 68-point version while being 10x smaller.
To download the source code + 5-point facial landmark detector used in this post, just enter your email address in the form below — I’ll also be sure to email you when new computer vision tutorials are published here on the PyImageSearch blog.
Download the Source Code and FREE 17-page Resource Guide
Enter your email address below to get a .zip of the code and a FREE 17-page Resource Guide on Computer Vision, OpenCV, and Deep Learning. Inside you'll find my hand-picked tutorials, books, courses, and libraries to help you master CV and DL!
Gregory D'Seas
Hi,
Is there a group or a forum to bounce ideas related to work related to Python visual detectors related to your courses?
Thanks,
Greg
Adrian Rosebrock
The PyImageSearch Gurus course includes dedicated forums. Many readers inside the course are interested in and/or actively working with visual detectors.
Additionally, the Deep Learning for Computer Vision with Python book includes a private companion site along with issue/bug trackers that readers utilize to converse.
For your particular question though, I believe the Gurus course is what you would want.
JBeale
Your last sentence says “…10x faster.” but I think you mean 10x smaller.
Adrian Rosebrock
Thanks, you’re absolutely correct. I have updated the post.
Ben
Hi, great article! I was wondering is there a way do this with kCVPixelFormatType_420YpCbCr8BiPlanarVideoRange (420v) pixel format type instead of BGRA? I want to try it in my iOS objc live video chat app, which supports only the YUV format type.
Adrian Rosebrock
Could you just convert the frame from YUV to RGB instead? Sorry, I don’t have too much experience with Obj-C and iOS for this.
Mansoor Nasir
Great post as always…
I was wondering if we could use it as head pose estimation in real-time.
Thank you.
Adrian Rosebrock
Technically sure, but it wouldn’t be as accurate. A good head pose estimation should consider the “boundary points” of the face, including outer corners of the eyes, mouth, and bottom of the chin. Keep in mind that the 5-point model gives only the eyes and nose. You would thus be estimating the pose with only 3 points (outer eye coordinates and nose).
Majid
Hi Adrian,
thanks for the interesting point. Regarding drowsiness detection, the current 68-point model is not accurate when the head is turned or using glasses or using IR camera. Do you have any suggestion on this?
I have tried other face detection algorithms using deep learning methods which resulted in a better and faster face detection. However, when it comes to facial landmark detection still, I am lacking accuracy and speed.
I have implemented your code in Raspberry pi resulting in a slow and erroneous performance.
Best,
Majid
Adrian Rosebrock
Keep in mind the following rules:
1. If you cannot detect the face, you cannot detect the facial landmarks
2. If you cannot detect the facial landmarks, you cannot use them for drowsiness detection
Computer vision and deep learning models are not magic. If a head is too far rotated or the eyes not visible, you won’t be able to detect the face and compute the facial landmarks.
Drowsiness is more than just vision-based, it can also be determined by other sensors, such as breathing, blood flow, etc. A drowsiness detector should involve multiple sensors, not just vision. Vision is one component of many that should be used.
If you want to continue to use a vision-based approach, you can, but you’ll want to train some machine learning models to detect drowsiness from movements of the head, such as head bobs, tilting, etc. However, the Raspberry Pi will likely not be fast enough for this. Again, this is where multiple sensors would be useful.
fariborz
what sensors can you guide me?
Adrian Rosebrock
As I mentioned, you could use sensors to detect blood pressure, oxygen levels, heart beats per minute, etc. Make sure you do your research on sensors to measure biological data.
adam or
Hi Adrian, thanks for the interesting material.
I would like to ask something that may be a bit out of context.
The packages involved here are pretty much complicated, in relation to versioning and installation requirements. If you can, please add a chapter on which packages to install and how to install them. I know there are multiple ways to install these packages,however if you could publish your method, then it would prove useful for many of us and shorten the time of practice.
Many thanks to your true efforts.
Adrian Rosebrock
Which packages are you referring to? OpenCV is the main one that’s a bit of a pain to install. Dlib is now pretty straightforward to install. See my latest post on installing dlib.
I don’t have any plans to add install tutorials to any of my books as I link to install instructions (on the PyImageSearch blog) from them. The main reason I do this is to ensure I can keep all install instructions up to date and release new install instructions when they change dramatically. Trying to keep install instructions in the book itself would lead to them being out of date and running into issues.
adam or
Hi Adrian,
The frame i get from the streamer is None.
Can you please assist?
Regards.
Adrian Rosebrock
It sounds like OpenCV cannot access your camera. Are you using a USB webcam or Raspberry Pi camera module? I would suggest you take a look at this post to help diagnose further.
Wisgon
Hi, Adrian,
I’m working with a great face_recognition system, and the process is face detect, 5 points alignment, then face recognition. But I find that the 5 points it wants is one point on the middle for each eye, one point for nose, and two points for the mouth on the left side and right side. So it’s different from the 5 point you demonstrated in this article, so I want to ask can this module output the 5 points I want?
Adrian Rosebrock
Traditional face alignment is done using the eye centers and the midpoint of the eyes. Calculate those values and you should be able to perform face alignment.
Girija
Hi, Adrian
Can you please tell me, what are the inputs for the Dlib’s 5-point landmark detector to the FACIAL_LANDMARKS_IDXS = OrderedDict() or the value of the 5-points
Adrian Rosebrock
I’m not sure what you mean by the “value” in this context. The model is applied to the detected face and the returned “values” are the (x, y)-coordinates for each predicted facial landmark.
Girija
I mean, I want to align face using this Dlib’s 5-point detector so how can i find the left eye center and right eye center, like you have done in 68 point using FACIAL_LANDMARKS_IDXS = OrderedDict()
Girija
I mean, I want to align face using this Dlib’s 5-point landmark detector but i want to know that what i have to pass in place of “FACIAL_LANDMARKS_IDXS = OrderedDict([
(“mouth”, (48, 68)),
(“right_eyebrow”, (17, 22)),
(“left_eyebrow”, (22, 27)),
(“right_eye”, (36, 42)),
(“left_eye”, (42, 48)),
(“nose”, (27, 36)),
(“jaw”, (0, 17))
])” (from 68 point facial landmark detection in helpers.py file ) to find the Center of right eye and left eye for facealignment using Dlib’s 5-point facial landmark detector.
Adrian Rosebrock
You can compute the center of both eyes by computing the mid-point between the two respective coordinates for each eye. Keep in mind that with the 5-point model there are only two coordinates per eye.
Girija
Thank you Adrian but i want to know that, how can i access those “two respective coordinates for each eye” from shape array to find the mid-points?
Adrian Rosebrock
Take a look at the GIF at the top of this blog post (you can see the index of each facial landmark). Additionally, Lines 64-67 demonstrate how we loop over each of the facial landmarks and extract the (x, y)-coordinates. The right eye has indexes 0 and 1 while the left eye has indexes 3 and 4 (although the GIF is a mirror so they may be reversed; you’ll want to double-check for yourself).
nidhi panda
Hello Adrian, first of all thank you for the awesome blog post. Can you please tell this dlib’s new 5-point facial landmark detector is trained on with dataset as the 68 point model was trained for iBUG 300-W dataset.
Adrian Rosebrock
The 5-point facial landmark model was trained on ~7,100 images that Davis King manually labeled. See this blog post for more details.
nidhi panda
Thank you
Den
Hello Adrian!
Thanks for interesting materials!
Can you please help me?
I want to control WS2812 addresable led, but “Make sure to run the script as root by using the sudo command. The rpi_ws281x library has to access the Pi hardware at a low level and requires running as root”.
How I can control my leds from non-admin python script?
Thanks!
Adrian Rosebrock
Which Python libraries are you using to control the LED? I assume GPIO?
Amare
Hi Adrian
this dlib tracker seems good because i am not seeing it lost the face frequently. When i use kalman trackers it lost the object frequently (it track it , again lost it , again track it…….) s thank you for your time.
Question: which tracker among others do you think that do not lost most frequently the object once it tracked (irrespective of occlusion)?
Adrian Rosebrock
It’s hard to say because each tracker has their respective use cases. It’s highly dependent on your application and what you are trying to accomplish.
Abhilash
I wonder why are we not passing cropped image instead of the full image for facial landmark extraction. We are giving image and bounding boxes for the faces but we get facial landmarks out side the bounding box in case of 68 point landmarks, I thought we only look inside the bounding box for landmarks, will you please share your thoughts ,Thank you .
Adrian Rosebrock
You should check Line 59 again. We pass the image + bounding box coordinates into the shape predictor. From there dlib uses the bounding box information to perform facial landmark localization only inside the bounding box region.
Luis
Hello Adrian,
A query, how can I do to train my own database to find points of my interest.
Adrian Rosebrock
The dlib docs can be used to train your own shape predictor.
Nitin Khurana
Hi Adrian,
Thanks for publishing such niche tutorials.
I have one question to ask:
Everywhere I can read that while going for face recognition , we convert the face features into 128D vector space.
I know about the 68 landmarks detection points as explained by you also in Facial landmarks Post.
What what are there 128D vector space features, what all calculations are done to convert a face into 128D vector space.
I want to know the list of features being used and clauclated a s apart of 128D vector space conversion.
Thanks in advance.
Adrian Rosebrock
I think you may be confusing facial landmark detection and face embeddings, typically used by deep learning algorithms for facial recognition. The 128D feature vector you are referring to was likely generated by a deep learning algorithm used for facial embeddings.
bearfish
Hi Adrian thanks for you great tutorial.
I want to ask you after dilb alignment face get 5-point facial landmark,
how does dilb get 128-D vector, can you give any ideas or reference?
Adrian Rosebrock
I think you may be confusing face detection with face recognition. The 128-D vector I believe you are referring to is a deep learning model used to generate a 128-D embedding of a face. Stay tuned, I’ll be covering face recognition here on PyImageSearch in a few weeks…
Ali
Hi. can this project be used for facial emotion detection??
Adrian Rosebrock
I would recommend training a Convolutional Neural Network for emotion recognition. You can find an emotion recognition implementation inside my book, Deep Learning for Computer Vision with Python.
Ben
Hi Adrian, I am reading your book Deep Learning for CV. Where in the book is “emotion recognition implementation” as you state directly above? I am just finishing up the starter bundle moving in the practitioner bundle 🙂 Thanks!
Adrian Rosebrock
Hey Ben! Thanks for picking up a copy of Deep Learning for Computer Vision with Python, I hope you are enjoying it so far. The emotion recognition implementation you are referring to is actually in the ImageNet Bundle. I checked the database before replying to your comment and see that you have the Practitioner Bundle. Shoot me an email if you would like to upgrade and I can get that taken care of for you.
Ben
Hi Adrian, yes great book so far… Im learning alot 🙂 Would the emotion recognition implementation you mention in the ImageNet bundle be something that could run on CPU? Would it be something similar to the smile recognition (Chapter 22 of starter bundle) case study where the algorithm can be ran in real time with using the haar_cascade to find facial ROI?
Thanks, for your response… I’m definitely interested in the upgrade..
Is the python code provided with the ImageNet bundle meant to be done all on a GPU setup?
Adrian Rosebrock
Hey Ben:
1. Yes, the implementation is similar to the smile detection case study in the Starter Bundle.
2. Yes, the network can run in real-time on a CPU. It does not require a GPU.
3. If you’re interested in upgrading please shoot me an email and I can get it taken care of 🙂
Nikola
Hey Adrian,
I recently got into python and computer vision and your website is like a dictionary to me :), I have really learned a lot. (still a huge beginner, though)
I’ve been playing with openCV and dlib on a Raspberry Pi 3 along with a USB webcam and as you may know, dlib landmark detection is quite slow on it. I’ve been thinking around making a threaded app for this in hopes of achieving a reasonable framerate (I got this idea when I tried you threaded sample for webcam with the imutils package)
For starters, I wanted to just try and insert the dlib landmark detection code into the threaded webcam example (after reading the frame, I go through the procedure of converting the frame to grayscale, detecting, etc.), but this somehow “kills” the multithreaded part of the app. When I run the threaded example without dlib code, I’m getting a reasonable framerate and CPU usage of about 45-46%. However, with landmark detection, framerate drops to probably 2 fps and CPU usage doesn’t go over 25%.
Can you maybe point me in a direction to why is this happening? Is it possible that dlib is so slow that it slows down the main thread and makes multithreading pointless? Would it help if I maybe modified the WebcamVideoStream from imutils by running another thread with dlib landmark detection from there?
Adrian Rosebrock
Which method are you using to detect faces in the video stream from the Pi? Haar cascades? HOG + Linear SVM? Are you using OpenCV or dlib to perform the actual face detection process?
Nikola
I’m using dlib’s detector via the get_frontal_face_detector() method, I’ve gotten the feeling that it detects slightly better than using haar cascades with opencv. Do you think I should try something else?
I also wanted to share some knowledge with you… Since Pi3 was slow, I thought about getting a single-board computer with slightly more CPU power, so I got an Asus Tinkerboard (1.8ghz rockchip quad core, 2gb ddr3). I installed the default TinkerOS from Asus and this seemed like a big mistake, even simple camera preview with OpenCV was extremely slow with dropped frames (3-5fps, 70% cpu usage), and I was constantly getting “select timeout” on the console. (with USB camera, logitech c270) Tried several versions of TinkerOS and webcams, no change.
However, I managed to install Armbian today along with opencv and dlib (using your guide, of course), works great. I’ll do some tests today to see just how much faster it is than the Pi3.
Adrian Rosebrock
Dlib’s HOG + Linear SVM detector is certainly more accurate than a Haar cascade but it will be slower. I believe dlib is also single threaded by default which would explain why only 25% of your processor (1 core of the Pi) is being used.
Also, thanks for sharing your experience with the Tinkerboard!
Oanh Nguyen
Hi Adrian,
I has been worked on dlib with facial landmarks, but I recognize the accuracy not good for some head pose and performance. So I have a question for you: You have a model which build on deep learning?
I looking for see your response. Thank you very much
Adrian Rosebrock
Hey Oanh — thanks for the comment but I’m not sure what you are asking here. Are you asking if I trained this model?
Petr Blahos
Hi Adrian, I was wondering what the license of your trained detectors is. Can I use it in my open-source or even commercial projects?
Adrian Rosebrock
The facial landmark predictor is part of the dlib library. Here is a direct link to their license.
Veeru
Dear Adrian,
I am trying to train a model which works to detect landmarks in open mouth scenario. I have generated data on my own and detected landmarks using DAN approach (it works quite good). Face detection ROI generated using imglab tool provided by dlib. However there are some cases where face bounding box is beyond all the facial landmarks and some cases where facial landmarks are beyond the FD ROI. Should FD ROI tighten to landmarks to get more accuracy?
can you plz share you comment on this?
Thanks,
Veeru.
Adrian Rosebrock
Once you have detected the face are you sure you’re applying your landmark predictor to that specific region? It sounds like there may be some sort of bug in your code where the predictor is applied to other areas of the image rather than that specific ROI.
Veeru
Sorry, my question is how accurate face rectangle is with respect to face landmark annotations? do we need to care about face ROI which suppose to cover all the landmarks? I drew all the landmarks and rectangle from ibug data, it looks like there are cases where face ROI is beyond the landmarks and the other way round as well.
One more thing, i trained a model with my own custom data (open mouth data with annotations), when i drew all 68 landmarks, it looks good in terms of accuracy. But when i drew only lip landmarks which are from 48 to 67, they are not accurate. I think there is some issue with indexing of landmarks, any clue how to debug this?
Thắng Nguyễn
Hi, Adrian
Thank you for the things you shared in this article and many other articles!
My question: How to dib determines (bX, bY, bW, bH), eg haarcascade use haar-like to do it.
Adrian Rosebrock
Are you referring to the underlying algorithm being used? If so, it’s a Histogram of Oriented Gradients (HOG) + Linear SVM object detector.
Thắng Nguyễn
Thanks!
Zunaira
i am getting this error:
usage: manage.py [-h] -p SHAPE_PREDICTOR -i IMAGE
manage.py: error: the following arguments are required: -p/–shape-predictor, -i/–image
Adrian Rosebrock
You need to need to supply the command line arguments to the script. If you’re new to command line arguments be sure to read this tutorial.
Shubham
Hi Adrian, Nice article as always 🙂 I really admire your technical abilities !!
Can this used for everyone from new born babies to adults ? If not for new born babies, what changes would you suggest to make it work for new born babies ?
Thanks in advance !! 🙂
Adrian Rosebrock
I don’t see why it wouldn’t work for newborns. Give it a try and see!
Hein
Hi Adrain, How can I observe the point (x, y)-coordinates in term of [x,y]
I tried to print(shape) but it present the indentation error.
Adrian Rosebrock
Make sure you are using the “Downloads” section of the post to download the source code. It sounds like you introduced an indentation error when copying and pasting.
Yinghan
Hi Adrain, nice post and thanks for sharing. I installed the dlib with GPU version (dlib.DLIB_USE_CUDA is true) and ran the 68 face landmarks detector. The problem is it works well on CPU but doesn’t use GPU. Do you know why is that? Is this because dlib just support GPU for face detection instead of landmarks detection? If that’s true, do you have any recommendation for GPU version landmarks detector?
Adrian Rosebrock
Sorry, I’m not sure. I would ask that question on dlib’s GitHub Issues page.
RC
Yinghan, it may depend on your cuda version. I think I had this issue before. I am using cuda 10 and had to use the most recent version of dlib.
Regarding the 68 landmarks, have you attempted to get face detection on a sideways facing head? if so, how many landmarks are you getting?
Ray C
Hi Adrian,
Have you had issues with dlib 68 point landmark detection showing 68 points even when the face is sideways?
Basically, gives me 68 landmarks even when face is sideways, which results in incorrect recognition. Is this an issue with dlib, or is this an issue with what I’m doing?? Thoughts?
Adrian Rosebrock
Dlib’s facial landmark predictor, when given a ROI, will attempt to fit the facial landmarks to the region. If the face is oriented incorrectly than the landmark predictor will not give proper results.
venu
Hi Adrian,
I would like to train the face landmarks myself .Could you please provide any kind of reference?
Adrian Rosebrock
I don’t have any tutorials for training your own custom face landmark predictor but it will be covered in the next release of Deep Learning for Computer Vision with Python.
Viv
Hi Adrian,
Is there any landmark detector to identify other objects i.e. different types of animal based on their body’s landmarks?
Adrian Rosebrock
There are a few pre-trained landmark detectors but in general you will need to train your own.
Viv
Can you please direct me where I can get the code for landmark detectors so that I can train it using my own data? Thanks.
Anji
Hi Adrian,
Any post available for facial expression recognition?
Adrian Rosebrock
I cover facial expression recognition inside my book, Deep Learning for Computer Vision with Python.