My Uncle John is a long haul tractor trailer truck driver.
For each new assignment, he picks his load up from a local company early in the morning and then sets off on a lengthy, enduring cross-country trek across the United States that takes him days to complete.
John is a nice, outgoing guy, who carries a smart, witty demeanor. He also fits the “cowboy of the highway” stereotype to a T, sporting a big ole’ trucker cap, red-checkered flannel shirt, and a faded pair of Levi’s that have more than one splotch of oil stain from quick and dirty roadside fixes. He also loves his country music.
I caught up with John a few weeks ago during a family dinner and asked him about his trucking job.
I was genuinely curious — before I entered high school I thought it would be fun to drive a truck or a car for a living (personally, I find driving to be a pleasurable, therapeutic experience).
But my question was also a bit self-motivated as well:
Earlier that morning I had just finished writing the code for this blog post and wanted to get his take on how computer science (and more specifically, computer vision) was affecting his trucking job.
The truth was this:
John was scared about his future employment, his livelihood, and his future.
The first five sentences out of his mouth included the words:
- Tesla
- Self-driving cars
- Artificial Intelligence (AI)
Many proponents of autonomous, self-driving vehicles argue that the first industry that will be completely and totally overhauled by self-driving cars/trucks (even before consumer vehicles) is the long haul tractor trailer business.
If self-driving tractor trailers becomes a reality in the next few years, John has good reason to be worried — he’ll be out of a job, one that he’s been doing his entire life. He’s also getting close to retirement and needs to finish out his working years strong.
This isn’t speculation either: NVIDIA recently announced a partnership with PACCAR, a leading global truck manufacturer. The goal of this partnership is to make self-driving semi-trailers a reality.
After John and I were done discussing self-driving vehicles, I asked him the critical question that this very blog post hinges on:
Have you ever fallen asleep at the wheel?
I could tell instantly that John was uncomfortable. He didn’t look me in the eye. And when he finally did answer, it wasn’t a direct one — instead he recalled a story about his friend (name left out on purpose) who fell asleep after disobeying company policy on maximum number of hours driven during a 24 hour period.
The man ran off the highway, the contents of his truck spilling all over the road, blocking the interstate almost the entire night. Luckily, no one was injured, but it gave John quite the scare as he realized that if it could happen to other drivers, it could happen to him as well.
I then explained to John my work from earlier in the day — a computer vision system that can automatically detect driver drowsiness in a real-time video stream and then play an alarm if the driver appears to be drowsy.
While John said he was uncomfortable being directly video surveyed while driving, he did admit that it the technique would be helpful in the industry and ideally reduce the number of fatigue-related accidents.
Today, I am going to show you my implementation of detecting drowsiness in a video stream — my hope is that you’ll be able to use it in your own applications.
To learn more about drowsiness detection with OpenCV, just keep reading.
Drowsiness detection with OpenCV
Two weeks ago I discussed how to detect eye blinks in video streams using facial landmarks.
Today, we are going to extend this method and use it to determine how long a given person’s eyes have been closed for. If there eyes have been closed for a certain amount of time, we’ll assume that they are starting to doze off and play an alarm to wake them up and grab their attention.
To accomplish this task, I’ve broken down today’s tutorial into three parts.
In the first part, I’ll show you how I setup my camera in my car so I could easily detect my face and apply facial landmark localization to monitor my eyes.
I’ll then demonstrate how we can implement our own drowsiness detector using OpenCV, dlib, and Python.
Finally, I’ll hop in my car and go for a drive (and pretend to be falling asleep as I do).
As we’ll see, the drowsiness detector works well and reliably alerts me each time I start to “snooze”.
Rigging my car with a drowsiness detector

The camera I used for this project was a Logitech C920. I love this camera as it:
- Is relatively affordable.
- Can shoot in full 1080p.
- Is plug-and-play compatible with nearly every device I’ve tried it with (including the Raspberry Pi).
I took this camera and mounted it to the top of my dash using some double-sided tape to keep it from moving around during the drive (Figure 1 above).
The camera was then connected to my MacBook Pro on the seat next to me:
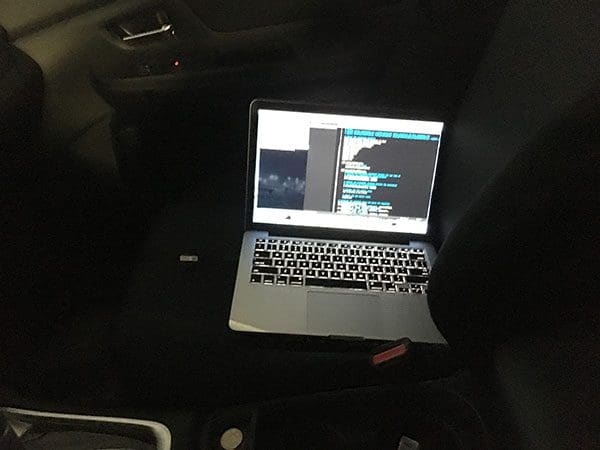
Originally, I had intended on using my Raspberry Pi 3 due to (1) form factor and (2) the real-world implications of building a driver drowsiness detector using very affordable hardware; however, as last week’s blog post discussed, the Raspberry Pi isn’t quite fast enough for real-time facial landmark detection.
In a future blog post I’ll be discussing how to optimize the Raspberry Pi along with the dlib compile to enable real-time facial landmark detection. However, for the time being, we’ll simply use a standard laptop computer.
With all my hardware setup, I was ready to move on to building the actual drowsiness detector using computer vision techniques.
The drowsiness detector algorithm
The general flow of our drowsiness detection algorithm is fairly straightforward.
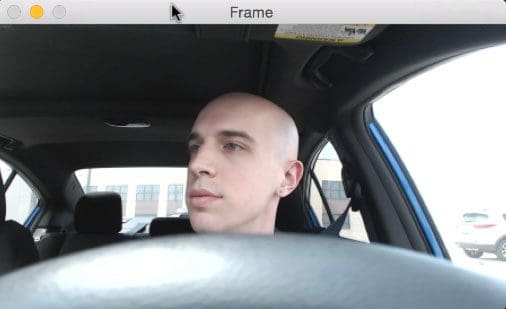
First, we’ll setup a camera that monitors a stream for faces:
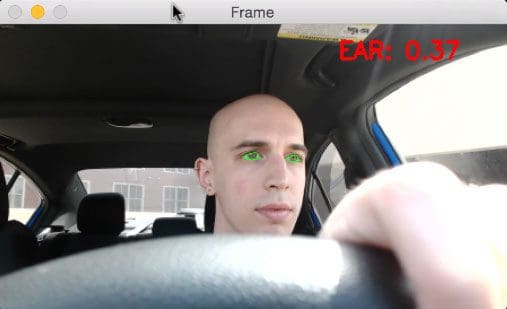
If a face is found, we apply facial landmark detection and extract the eye regions:
Now that we have the eye regions, we can compute the eye aspect ratio (detailed here) to determine if the eyes are closed:
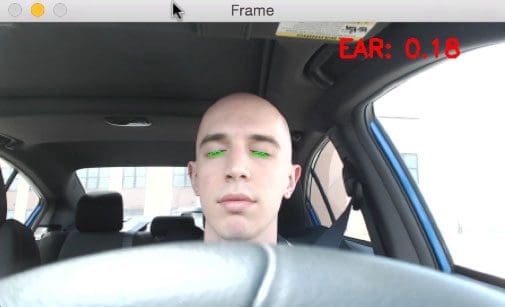
If the eye aspect ratio indicates that the eyes have been closed for a sufficiently long enough amount of time, we’ll sound an alarm to wake up the driver:
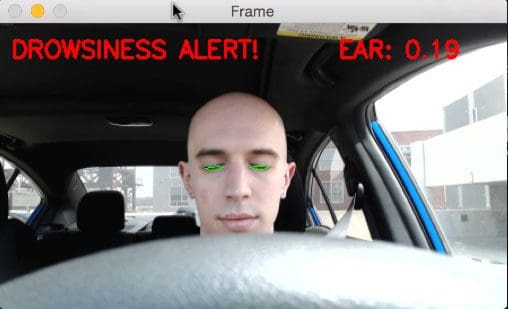
In the next section, we’ll implement the drowsiness detection algorithm detailed above using OpenCV, dlib, and Python.
Building the drowsiness detector with OpenCV
To start our implementation, open up a new file, name it detect_drowsiness.py , and insert the following code:
# import the necessary packages
from scipy.spatial import distance as dist
from imutils.video import VideoStream
from imutils import face_utils
from threading import Thread
import numpy as np
import playsound
import argparse
import imutils
import time
import dlib
import cv2
Lines 2-12 import our required Python packages.
We’ll need the SciPy package so we can compute the Euclidean distance between facial landmarks points in the eye aspect ratio calculation (not strictly a requirement, but you should have SciPy installed if you intend on doing any work in the computer vision, image processing, or machine learning space).
We’ll also need the imutils package, my series of computer vision and image processing functions to make working with OpenCV easier.
If you don’t already have imutils installed on your system, you can install/upgrade imutils via:
$ pip install --upgrade imutils
We’ll also import the Thread class so we can play our alarm in a separate thread from the main thread to ensure our script doesn’t pause execution while the alarm sounds.
In order to actually play our WAV/MP3 alarm, we need the playsound library, a pure Python, cross-platform implementation for playing simple sounds.
The playsound library is conveniently installable via pip :
$ pip install playsound
However, if you are using macOS (like I did for this project), you’ll also want to install pyobjc, otherwise you’ll get an error related to AppKit when you actually try to play the sound:
$ pip install pyobjc
I only tested playsound on macOS, but according to both the documentation and Taylor Marks (the developer and maintainer of playsound ), the library should work on Linux and Windows as well.
Note: If you are having problems with playsound , please consult their documentation as I am not an expert on audio libraries.
To detect and localize facial landmarks we’ll need the dlib library which is imported on Line 11. If you need help installing dlib on your system, please refer to this tutorial.
Next, we need to define our sound_alarm function which accepts a path to an audio file residing on disk and then plays the file:
def sound_alarm(path):
	# play an alarm sound
	playsound.playsound(path)
We also need to define the eye_aspect_ratio function which is used to compute the ratio of distances between the vertical eye landmarks and the distances between the horizontal eye landmarks:
def eye_aspect_ratio(eye):
	# compute the euclidean distances between the two sets of
	# vertical eye landmarks (x, y)-coordinates
	A = dist.euclidean(eye[1], eye[5])
	B = dist.euclidean(eye[2], eye[4])

	# compute the euclidean distance between the horizontal
	# eye landmark (x, y)-coordinates
	C = dist.euclidean(eye[0], eye[3])

	# compute the eye aspect ratio
	ear = (A + B) / (2.0 * C)

	# return the eye aspect ratio
	return ear
The return value of the eye aspect ratio will be approximately constant when the eye is open. The value will then rapid decrease towards zero during a blink.
If the eye is closed, the eye aspect ratio will again remain approximately constant, but will be much smaller than the ratio when the eye is open.
To visualize this, consider the following figure from Soukupová and Čech’s 2016 paper, Real-Time Eye Blink Detection using Facial Landmarks:

On the top-left we have an eye that is fully open with the eye facial landmarks plotted. Then on the top-right we have an eye that is closed. The bottom then plots the eye aspect ratio over time.
As we can see, the eye aspect ratio is constant (indicating the eye is open), then rapidly drops to zero, then increases again, indicating a blink has taken place.
In our drowsiness detector case, we’ll be monitoring the eye aspect ratio to see if the value falls but does not increase again, thus implying that the person has closed their eyes.
You can read more about blink detection and the eye aspect ratio in my previous post.
Next, let’s parse our command line arguments:
# construct the argument parse and parse the arguments
ap = argparse.ArgumentParser()
ap.add_argument("-p", "--shape-predictor", required=True,
	help="path to facial landmark predictor")
ap.add_argument("-a", "--alarm", type=str, default="",
	help="path alarm .WAV file")
ap.add_argument("-w", "--webcam", type=int, default=0,
	help="index of webcam on system")
args = vars(ap.parse_args())
Our drowsiness detector requires one command line argument followed by two optional ones, each of which is detailed below:
--shape-predictor: This is the path to dlib’s pre-trained facial landmark detector. You can download the detector along with the source code to this tutorial by using the “Downloads” section at the bottom of this blog post.--alarm: Here you can optionally specify the path to an input audio file to be used as an alarm.--webcam: This integer controls the index of your built-in webcam/USB camera.
Now that our command line arguments have been parsed, we need to define a few important variables:
# define two constants, one for the eye aspect ratio to indicate
# blink and then a second constant for the number of consecutive
# frames the eye must be below the threshold for to set off the
# alarm
EYE_AR_THRESH = 0.3
EYE_AR_CONSEC_FRAMES = 48

# initialize the frame counter as well as a boolean used to
# indicate if the alarm is going off
COUNTER = 0
ALARM_ON = False
Line 48 defines the EYE_AR_THRESH . If the eye aspect ratio falls below this threshold, we’ll start counting the number of frames the person has closed their eyes for.
If the number of frames the person has closed their eyes in exceeds EYE_AR_CONSEC_FRAMES (Line 49), we’ll sound an alarm.
Experimentally, I’ve found that an EYE_AR_THRESH of 0.3 works well in a variety of situations (although you may need to tune it yourself for your own applications).
I’ve also set the EYE_AR_CONSEC_FRAMES to be 48 , meaning that if a person has closed their eyes for 48 consecutive frames, we’ll play the alarm sound.
You can make the drowsiness detector more sensitive by decreasing the EYE_AR_CONSEC_FRAMES — similarly, you can make the drowsiness detector less sensitive by increasing it.
Line 53 defines COUNTER , the total number of consecutive frames where the eye aspect ratio is below EYE_AR_THRESH .
If COUNTER exceeds EYE_AR_CONSEC_FRAMES , then we’ll update the boolean ALARM_ON (Line 54).
The dlib library ships with a Histogram of Oriented Gradients-based face detector along with a facial landmark predictor — we instantiate both of these in the following code block:
# initialize dlib's face detector (HOG-based) and then create
# the facial landmark predictor
print("[INFO] loading facial landmark predictor...")
detector = dlib.get_frontal_face_detector()
predictor = dlib.shape_predictor(args["shape_predictor"])
The facial landmarks produced by dlib are an indexable list, as I describe here:
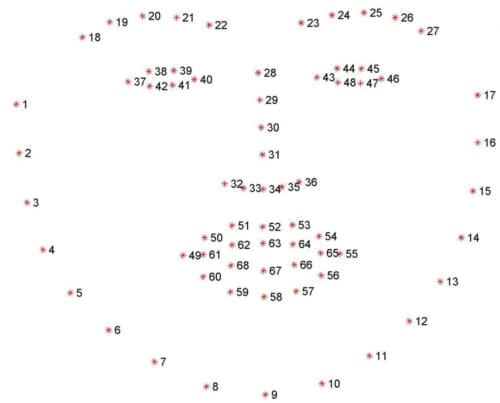
Therefore, to extract the eye regions from a set of facial landmarks, we simply need to know the correct array slice indexes:
# grab the indexes of the facial landmarks for the left and
# right eye, respectively
(lStart, lEnd) = face_utils.FACIAL_LANDMARKS_IDXS["left_eye"]
(rStart, rEnd) = face_utils.FACIAL_LANDMARKS_IDXS["right_eye"]
Using these indexes, we’ll easily be able to extract the eye regions via an array slice.
We are now ready to start the core of our drowsiness detector:
# start the video stream thread
print("[INFO] starting video stream thread...")
vs = VideoStream(src=args["webcam"]).start()
time.sleep(1.0)

# loop over frames from the video stream
while True:
	# grab the frame from the threaded video file stream, resize
	# it, and convert it to grayscale
	# channels)
	frame = vs.read()
	frame = imutils.resize(frame, width=450)
	gray = cv2.cvtColor(frame, cv2.COLOR_BGR2GRAY)

	# detect faces in the grayscale frame
	rects = detector(gray, 0)
On Line 69 we instantiate our VideoStream using the supplied --webcam index.
We then pause for a second to allow the camera sensor to warm up (Line 70).
On Line 73 we start looping over frames in our video stream.
Line 77 reads the next frame , which we then preprocess by resizing it to have a width of 450 pixels and converting it to grayscale (Lines 78 and 79).
Line 82 applies dlib’s face detector to find and locate the face(s) in the image.
The next step is to apply facial landmark detection to localize each of the important regions of the face:
	# loop over the face detections
	for rect in rects:
		# determine the facial landmarks for the face region, then
		# convert the facial landmark (x, y)-coordinates to a NumPy
		# array
		shape = predictor(gray, rect)
		shape = face_utils.shape_to_np(shape)

		# extract the left and right eye coordinates, then use the
		# coordinates to compute the eye aspect ratio for both eyes
		leftEye = shape[lStart:lEnd]
		rightEye = shape[rStart:rEnd]
		leftEAR = eye_aspect_ratio(leftEye)
		rightEAR = eye_aspect_ratio(rightEye)

		# average the eye aspect ratio together for both eyes
		ear = (leftEAR + rightEAR) / 2.0
We loop over each of the detected faces on Line 85 — in our implementation (specifically related to driver drowsiness), we assume there is only one face — the driver — but I left this for loop in here just in case you want to apply the technique to videos with more than one face.
For each of the detected faces, we apply dlib’s facial landmark detector (Line 89) and convert the result to a NumPy array (Line 90).
Using NumPy array slicing we can extract the (x, y)-coordinates of the left and right eye, respectively (Lines 94 and 95).
Given the (x, y)-coordinates for both eyes, we then compute their eye aspect ratios on Line 96 and 97.
Soukupová and Čech recommend averaging both eye aspect ratios together to obtain a better estimation (Line 100).
We can then visualize each of the eye regions on our frame by using the cv2.drawContours function below — this is often helpful when we are trying to debug our script and want to ensure that the eyes are being correctly detected and localized:
		# compute the convex hull for the left and right eye, then
		# visualize each of the eyes
		leftEyeHull = cv2.convexHull(leftEye)
		rightEyeHull = cv2.convexHull(rightEye)
		cv2.drawContours(frame, [leftEyeHull], -1, (0, 255, 0), 1)
		cv2.drawContours(frame, [rightEyeHull], -1, (0, 255, 0), 1)
Finally, we are now ready to check to see if the person in our video stream is starting to show symptoms of drowsiness:
		# check to see if the eye aspect ratio is below the blink
		# threshold, and if so, increment the blink frame counter
		if ear < EYE_AR_THRESH:
			COUNTER += 1

			# if the eyes were closed for a sufficient number of
			# then sound the alarm
			if COUNTER >= EYE_AR_CONSEC_FRAMES:
				# if the alarm is not on, turn it on
				if not ALARM_ON:
					ALARM_ON = True

					# check to see if an alarm file was supplied,
					# and if so, start a thread to have the alarm
					# sound played in the background
					if args["alarm"] != "":
						t = Thread(target=sound_alarm,
							args=(args["alarm"],))
						t.deamon = True
						t.start()

				# draw an alarm on the frame
				cv2.putText(frame, "DROWSINESS ALERT!", (10, 30),
					cv2.FONT_HERSHEY_SIMPLEX, 0.7, (0, 0, 255), 2)

		# otherwise, the eye aspect ratio is not below the blink
		# threshold, so reset the counter and alarm
		else:
			COUNTER = 0
			ALARM_ON = False
On Line 111 we make a check to see if the eye aspect ratio is below the “blink/closed” eye threshold, EYE_AR_THRESH .
If it is, we increment COUNTER , the total number of consecutive frames where the person has had their eyes closed.
If COUNTER exceeds EYE_AR_CONSEC_FRAMES (Line 116), then we assume the person is starting to doze off.
Another check is made, this time on Line 118 and 119 to see if the alarm is on — if it’s not, we turn it on.
Lines 124-128 handle playing the alarm sound, provided an --alarm path was supplied when the script was executed. We take special care to create a separate thread responsible for calling sound_alarm to ensure that our main program isn’t blocked until the sound finishes playing.
Lines 131 and 132 draw the text DROWSINESS ALERT! on our frame — again, this is often helpful for debugging, especially if you are not using the playsound library.
Finally, Lines 136-138 handle the case where the eye aspect ratio is larger than EYE_AR_THRESH , indicating the eyes are open. If the eyes are open, we reset COUNTER and ensure the alarm is off.
The final code block in our drowsiness detector handles displaying the output frame to our screen:
		# draw the computed eye aspect ratio on the frame to help
		# with debugging and setting the correct eye aspect ratio
		# thresholds and frame counters
		cv2.putText(frame, "EAR: {:.2f}".format(ear), (300, 30),
			cv2.FONT_HERSHEY_SIMPLEX, 0.7, (0, 0, 255), 2)

	# show the frame
	cv2.imshow("Frame", frame)
	key = cv2.waitKey(1) & 0xFF

	# if the `q` key was pressed, break from the loop
	if key == ord("q"):
		break

# do a bit of cleanup
cv2.destroyAllWindows()
vs.stop()
To see our drowsiness detector in action, proceed to the next section.
Testing the OpenCV drowsiness detector
To start, make sure you use the “Downloads” section below to download the source code + dlib’s pre-trained facial landmark predictor + example audio alarm file utilized in today’s blog post.
I would then suggest testing the detect_drowsiness.py script on your local system in the comfort of your home/office before you start to wire up your car for driver drowsiness detection.
In my case, once I was sufficiently happy with my implementation, I moved my laptop + webcam out to my car (as detailed in the “Rigging my car with a drowsiness detector” section above), and then executed the following command:
$ python detect_drowsiness.py \
	--shape-predictor shape_predictor_68_face_landmarks.dat \
	--alarm alarm.wav
I have recorded my entire drive session to share with you — you can find the results of the drowsiness detection implementation below:
Note: The actual alarm.wav file came from this website, credited to Matt Koenig.
As you can see from the screencast, once the video stream was up and running, I carefully started testing the drowsiness detector in the parking garage by my apartment to ensure it was indeed working properly.
After a few tests, I then moved on to some back roads and parking lots were there was very little traffic (it was a major holiday in the United States, so there were very few cars on the road) to continue testing the drowsiness detector.
Remember, driving with your eyes closed, even for a second, is dangerous, so I took extra special precautions to ensure that the only person who could be harmed during the experiment was myself.
As the results show, our drowsiness detector is able to detect when I’m at risk of dozing off and then plays a loud alarm to grab my attention.
The drowsiness detector is even able to work in a variety of conditions, including direct sunlight when driving on the road and low/artificial lighting while in the concrete parking garage.
What's next? We recommend PyImageSearch University.
86+ total classes • 115+ hours hours of on-demand code walkthrough videos • Last updated: January 2026
★★★★★ 4.84 (128 Ratings) • 16,000+ Students Enrolled
I strongly believe that if you had the right teacher you could master computer vision and deep learning.
Do you think learning computer vision and deep learning has to be time-consuming, overwhelming, and complicated? Or has to involve complex mathematics and equations? Or requires a degree in computer science?
That’s not the case.
All you need to master computer vision and deep learning is for someone to explain things to you in simple, intuitive terms. And that’s exactly what I do. My mission is to change education and how complex Artificial Intelligence topics are taught.
If you're serious about learning computer vision, your next stop should be PyImageSearch University, the most comprehensive computer vision, deep learning, and OpenCV course online today. Here you’ll learn how to successfully and confidently apply computer vision to your work, research, and projects. Join me in computer vision mastery.
Inside PyImageSearch University you'll find:
- ✓ 86+ courses on essential computer vision, deep learning, and OpenCV topics
- ✓ 86 Certificates of Completion
- ✓ 115+ hours hours of on-demand video
- ✓ Brand new courses released regularly, ensuring you can keep up with state-of-the-art techniques
- ✓ Pre-configured Jupyter Notebooks in Google Colab
- ✓ Run all code examples in your web browser — works on Windows, macOS, and Linux (no dev environment configuration required!)
- ✓ Access to centralized code repos for all 540+ tutorials on PyImageSearch
- ✓ Easy one-click downloads for code, datasets, pre-trained models, etc.
- ✓ Access on mobile, laptop, desktop, etc.
Summary
In today’s blog post I demonstrated how to build a drowsiness detector using OpenCV, dlib, and Python.
Our drowsiness detector hinged on two important computer vision techniques:
- Facial landmark detection
- Eye aspect ratio
Facial landmark prediction is the process of localizing key facial structures on a face, including the eyes, eyebrows, nose, mouth, and jawline.
Specifically, in the context of drowsiness detection, we only needed the eye regions (I provide more detail on how to extract each facial structure from a face here).
Once we have our eye regions, we can apply the eye aspect ratio to determine if the eyes are closed. If the eyes have been closed for a sufficiently long enough period of time, we can assume the user is at risk of falling asleep and sound an alarm to grab their attention. More details on the eye aspect ratio and how it was derived can be found in my previous tutorial on blink detection.
If you’ve enjoyed this blog post on drowsiness detection with OpenCV (and want to learn more about computer vision techniques applied to faces), be sure to enter your email address in the form below — I’ll be sure to notify you when new content is published here on the PyImageSearch blog.

Download the Source Code and FREE 17-page Resource Guide
Enter your email address below to get a .zip of the code and a FREE 17-page Resource Guide on Computer Vision, OpenCV, and Deep Learning. Inside you'll find my hand-picked tutorials, books, courses, and libraries to help you master CV and DL!

