Let me tell you an embarrassing story of how I wasted three weeks of research time during graduate school six years ago.
It was the end of my second semester of coursework.
I had taken all of my exams early and all my projects for the semester had been submitted.
Since my school obligations were essentially nil, I started experimenting with (automatically) identifying prescription pills in images, something I know a thing or two about (but back then I was just getting started with my research).
At the time, my research goal was to find and identify methods to reliably quantify pills in a rotation invariant manner. Regardless of how the pill was rotated, I wanted the output feature vector to be (approximately) the same (the feature vectors will never be to completely identical in a real-world application due to lighting conditions, camera sensors, floating point errors, etc.).
After the first week I was making fantastic progress.
I was able to extract features from my dataset of pills, index them, and then identify my test set of pills regardless of how they were oriented…
…however, there was a problem:
My method was only working with round, circular pills — I was getting completely nonsensical results for oblong pills.
How could that be?
I racked my brain for the explanation.
Was there a flaw in the logic of my feature extraction algorithm?
Was I not matching the features correctly?
Or was it something else entirely…like a problem with my image preprocessing.
While I might have been ashamed to admit this as a graduate student, the problem was the latter:
I goofed up.
It turns out that during the image preprocessing phase, I was rotating my images incorrectly.
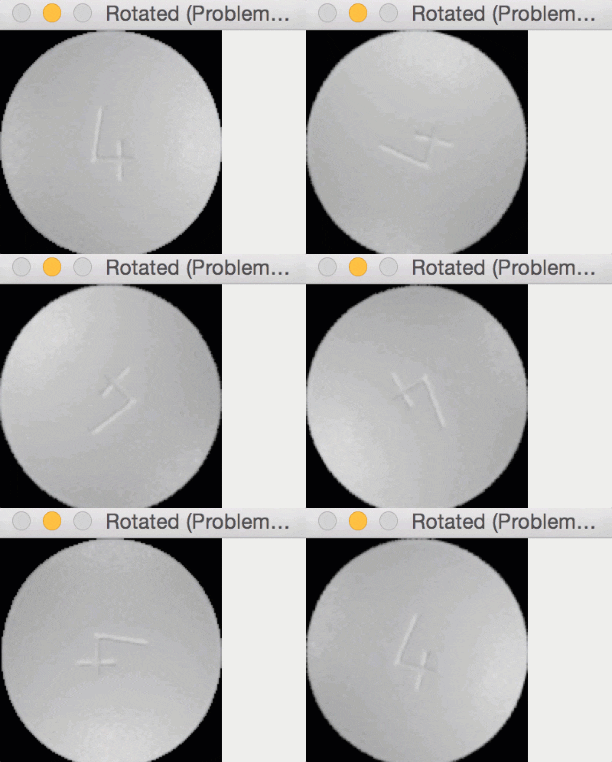
Since round pills have are approximately square in their aspect ratio, the rotation bug wasn’t a problem for them. Here you can see a round pill being rotated a full 360 degrees without an issue:
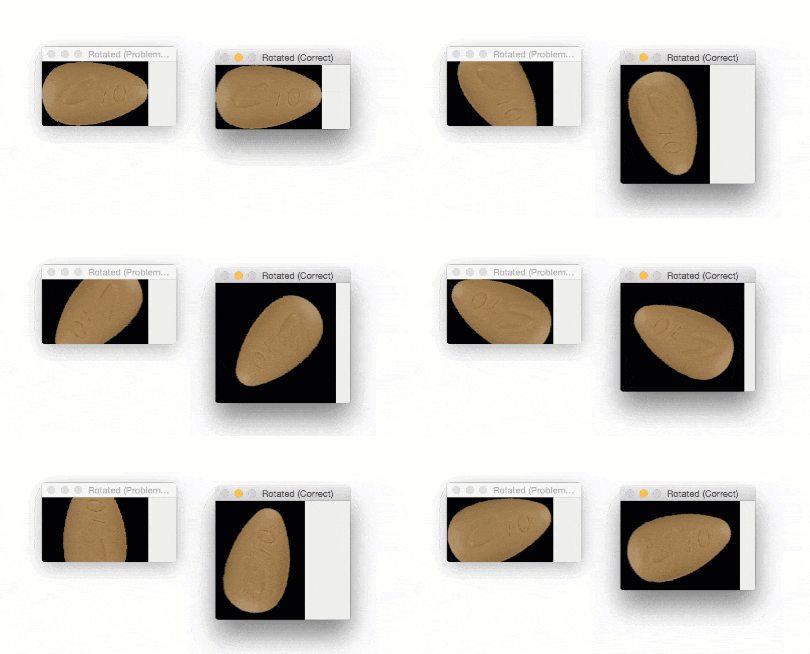
But for oblong pills, they would be “cut off” in the rotation process, like this:
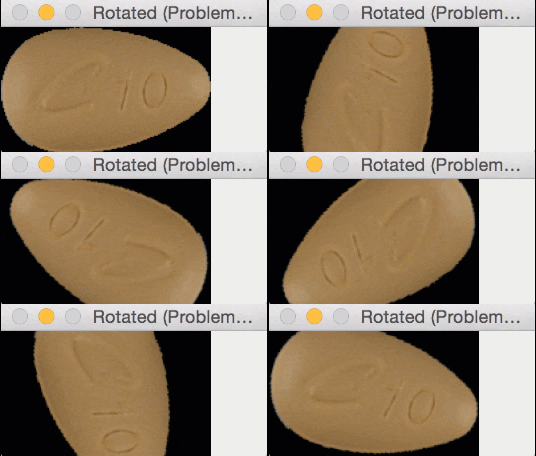
In essence, I was only quantifying part of the rotated, oblong pills; hence my strange results.
I spent three weeks and part of my Christmas vacation banging my head against the wall trying to diagnose the bug — only to feel quite embarrassed when I realized it was due to me being negligent with the cv2.rotate function.
You see, the size of the output image needs to be adjusted, otherwise, the corners of my image would be cut off.
How did I accomplish this and squash the bug for good?
To learn how to rotate images with OpenCV such that the entire image is included and none of the image is cut off, just keep reading.
Rotate images (correctly) with OpenCV and Python
In the remainder of this blog post I’ll discuss common issues that you may run into when rotating images with OpenCV and Python.
Specifically, we’ll be examining the problem of what happens when the corners of an image are “cut off” during the rotation process.
To make sure we all understand this rotation issue with OpenCV and Python I will:
- Start with a simple example demonstrating the rotation problem.
- Provide a rotation function that ensures images are not cut off in the rotation process.
- Discuss how I resolved my pill identification issue using this method.
A simple rotation problem with OpenCV
Let’s get this blog post started with an example script.
Open up a new file, name it rotate_simple.py , and insert the following code:
# import the necessary packages
import numpy as np
import argparse
import imutils
import cv2

# construct the argument parse and parse the arguments
ap = argparse.ArgumentParser()
ap.add_argument("-i", "--image", required=True,
	help="path to the image file")
args = vars(ap.parse_args())
Lines 2-5 start by importing our required Python packages.
If you don’t already have imutils, my series of OpenCV convenience functions installed, you’ll want to do that now:
$ pip install imutils
If you already have imutils installed, make sure you have upgraded to the latest version:
$ pip install --upgrade imutils
From there, Lines 8-10 parse our command line arguments. We only need a single switch here, --image , which is the path to where our image resides on disk.
Let’s move on to actually rotating our image:
# load the image from disk
image = cv2.imread(args["image"])

# loop over the rotation angles
for angle in np.arange(0, 360, 15):
	rotated = imutils.rotate(image, angle)
	cv2.imshow("Rotated (Problematic)", rotated)
	cv2.waitKey(0)

# loop over the rotation angles again, this time ensuring
# no part of the image is cut off
for angle in np.arange(0, 360, 15):
	rotated = imutils.rotate_bound(image, angle)
	cv2.imshow("Rotated (Correct)", rotated)
	cv2.waitKey(0)
Line 14 loads the image we want to rotate from disk.
We then loop over various angles in the range [0, 360] in 15 degree increments (Line 17).
For each of these angles we call imutils.rotate , which rotates our image the specified number of angle degrees about the center of the image. We then display the rotated image to our screen.
Lines 24-27 perform an identical process, but this time we call imutils.rotate_bound (I’ll provide the implementation of this function in the next section).
As the name of this method suggests, we are going to ensure the entire image is bound inside the window and none is cut off.
To see this script in action, be sure to download the source code using the “Downloads” section of this blog post, followed by executing the command below:
$ python rotate_simple.py --image images/saratoga.jpg
The output of using the imutils.rotate function on a non-square image can be seen below:

As you can see, the image is “cut off” when it’s rotated — the entire image is not kept in the field of view.
But if we use imutils.rotate_bound we can resolve this issue:

Awesome, we fixed the problem!
So does this mean that we should always use .rotate_bound over the .rotate method?
What makes it so special?
And what’s going on under the hood?
I’ll answer these questions in the next section.
Implementing a rotation function that doesn’t cut off your images
Let me start off by saying there is nothing wrong with the cv2.getRotationMatrix2D and cv2.warpAffine functions that are used to rotate images inside OpenCV.
In reality, these functions give us more freedom than perhaps we are comfortable with (sort of like comparing manual memory management with C versus automatic garbage collection with Java).
The cv2.getRotationMatrix2D function doesn’t care if we would like the entire rotated image to kept.
It doesn’t care if the image is cut off.
And it won’t help you if you shoot yourself in the foot when using this function (I found this out the hard way and it took 3 weeks to stop the bleeding).
Instead, what you need to do is understand what the rotation matrix is and how it’s constructed.
You see, when you rotate an image with OpenCV you call cv2.getRotationMatrix2D which returns a matrix M that looks something like this:

This matrix looks scary, but I promise you: it’s not.
To understand it, let’s assume we want to rotate our image degrees about some center
coordinates at some scale (i.e., smaller or larger).
We can then plug in values for and
:
and
That’s all fine and good for simple rotation — but it doesn’t take into account what happens if an image is cut off along the borders. How do we remedy this?
The answer is inside the rotate_bound function in convenience.py of imutils:
def rotate_bound(image, angle):
    # grab the dimensions of the image and then determine the
    # center
    (h, w) = image.shape[:2]
    (cX, cY) = (w // 2, h // 2)

    # grab the rotation matrix (applying the negative of the
    # angle to rotate clockwise), then grab the sine and cosine
    # (i.e., the rotation components of the matrix)
    M = cv2.getRotationMatrix2D((cX, cY), -angle, 1.0)
    cos = np.abs(M[0, 0])
    sin = np.abs(M[0, 1])

    # compute the new bounding dimensions of the image
    nW = int((h * sin) + (w * cos))
    nH = int((h * cos) + (w * sin))

    # adjust the rotation matrix to take into account translation
    M[0, 2] += (nW / 2) - cX
    M[1, 2] += (nH / 2) - cY

    # perform the actual rotation and return the image
    return cv2.warpAffine(image, M, (nW, nH))
On Line 41 we define our rotate_bound function.
This method accepts an input image and an angle to rotate it by.
We assume we’ll be rotating our image about its center (x, y)-coordinates, so we determine these values on lines 44 and 45.
Given these coordinates, we can call cv2.getRotationMatrix2D to obtain our rotation matrix M (Line 50).
However, to adjust for any image border cut off issues, we need to apply some manual calculations of our own.
We start by grabbing the cosine and sine values from our rotation matrix M (Lines 51 and 52).
This enables us to compute the new width and height of the rotated image, ensuring no part of the image is cut off.
Once we know the new width and height, we can adjust for translation on Lines 59 and 60 by modifying our rotation matrix once again.
Finally, cv2.warpAffine is called on Line 63 to rotate the actual image using OpenCV while ensuring none of the image is cut off.
For some other interesting solutions (some better than others) to the rotation cut off problem when using OpenCV, be sure to refer to this StackOverflow thread and this one too.
Fixing the rotated image “cut off” problem with OpenCV and Python
Let’s get back to my original problem of rotating oblong pills and how I used .rotate_bound to solve the issue (although back then I had not created the imutils Python package — it was simply a utility function in a helper file).
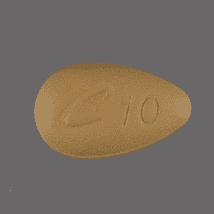
We’ll be using the following pill as our example image:
To start, open up a new file and name it rotate_pills.py . Then, insert the following code:
# import the necessary packages
import numpy as np
import argparse
import imutils
import cv2

# construct the argument parse and parse the arguments
ap = argparse.ArgumentParser()
ap.add_argument("-i", "--image", required=True,
	help="path to the image file")
args = vars(ap.parse_args())
Lines 2-5 import our required Python packages. Again, make sure you have installed and/or upgraded the imutils Python package before continuing.
We then parse our command line arguments on Lines 8-11. Just like in the example at the beginning of the blog post, we only need one switch: --image , the path to our input image.
Next, we load our pill image from disk and preprocess it by converting it to grayscale, blurring it, and detecting edges:
# load the image from disk, convert it to grayscale, blur it,
# and apply edge detection to reveal the outline of the pill
image = cv2.imread(args["image"])
gray = cv2.cvtColor(image, cv2.COLOR_BGR2GRAY)
gray = cv2.GaussianBlur(gray, (3, 3), 0)
edged = cv2.Canny(gray, 20, 100)
After executing these preprocessing functions our pill image now looks like this:
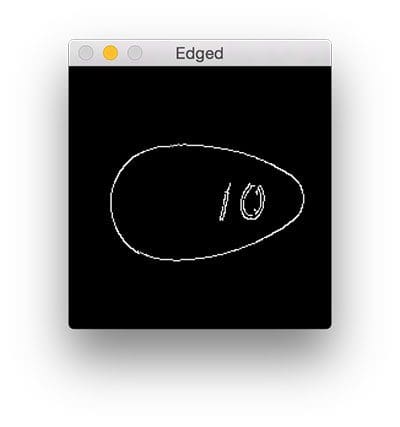
The outline of the pill is clearly visible, so let’s apply contour detection to find the outline of the pill:
# find contours in the edge map
cnts = cv2.findContours(edged.copy(), cv2.RETR_EXTERNAL,
	cv2.CHAIN_APPROX_SIMPLE)
cnts = imutils.grab_contours(cnts)
We are now ready to extract the pill ROI from the image:
# ensure at least one contour was found
if len(cnts) > 0:
	# grab the largest contour, then draw a mask for the pill
	c = max(cnts, key=cv2.contourArea)
	mask = np.zeros(gray.shape, dtype="uint8")
	cv2.drawContours(mask, [c], -1, 255, -1)

	# compute its bounding box of pill, then extract the ROI,
	# and apply the mask
	(x, y, w, h) = cv2.boundingRect(c)
	imageROI = image[y:y + h, x:x + w]
	maskROI = mask[y:y + h, x:x + w]
	imageROI = cv2.bitwise_and(imageROI, imageROI,
		mask=maskROI)
First, we ensure that at least one contour was found in the edge map (Line 26).
Provided we have at least one contour, we construct a mask for the largest contour region on Lines 29 and 30.
Our mask looks like this:
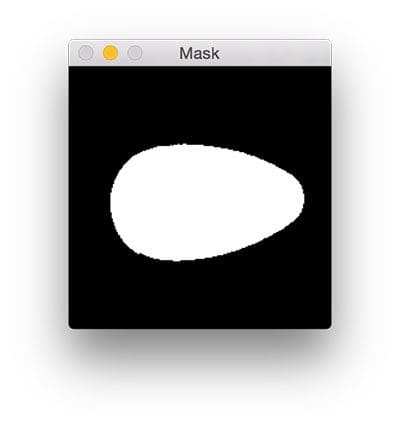
Given the contour region, we can compute the (x, y)-coordinates of the bounding box of the region (Line 34).
Using both the bounding box and mask , we can extract the actual pill region ROI (Lines 35-38).
Now, let’s go ahead and apply both the imutils.rotate and imutils.rotate_bound functions to the imageROI , just like we did in the simple examples above:
	# loop over the rotation angles
	for angle in np.arange(0, 360, 15):
		rotated = imutils.rotate(imageROI, angle)
		cv2.imshow("Rotated (Problematic)", rotated)
		cv2.waitKey(0)

	# loop over the rotation angles again, this time ensure the
	# entire pill is still within the ROI after rotation
	for angle in np.arange(0, 360, 15):
		rotated = imutils.rotate_bound(imageROI, angle)
		cv2.imshow("Rotated (Correct)", rotated)
		cv2.waitKey(0)
After downloading the source code to this tutorial using the “Downloads” section below, you can execute the following command to see the output:
$ python rotate_pills.py --image images/pill_01.png
The output of imutils.rotate will look like:

Notice how the pill is cut off during the rotation process — we need to explicitly compute the new dimensions of the rotated image to ensure the borders are not cut off.
By using imutils.rotate_bound , we can ensure that no part of the image is cut off when using OpenCV:

Using this function I was finally able to finish my research for the winter break — but not before I felt quite embarrassed about my rookie mistake.
What's next? We recommend PyImageSearch University.
86+ total classes • 115+ hours hours of on-demand code walkthrough videos • Last updated: February 2026
★★★★★ 4.84 (128 Ratings) • 16,000+ Students Enrolled
I strongly believe that if you had the right teacher you could master computer vision and deep learning.
Do you think learning computer vision and deep learning has to be time-consuming, overwhelming, and complicated? Or has to involve complex mathematics and equations? Or requires a degree in computer science?
That’s not the case.
All you need to master computer vision and deep learning is for someone to explain things to you in simple, intuitive terms. And that’s exactly what I do. My mission is to change education and how complex Artificial Intelligence topics are taught.
If you're serious about learning computer vision, your next stop should be PyImageSearch University, the most comprehensive computer vision, deep learning, and OpenCV course online today. Here you’ll learn how to successfully and confidently apply computer vision to your work, research, and projects. Join me in computer vision mastery.
Inside PyImageSearch University you'll find:
- ✓ 86+ courses on essential computer vision, deep learning, and OpenCV topics
- ✓ 86 Certificates of Completion
- ✓ 115+ hours hours of on-demand video
- ✓ Brand new courses released regularly, ensuring you can keep up with state-of-the-art techniques
- ✓ Pre-configured Jupyter Notebooks in Google Colab
- ✓ Run all code examples in your web browser — works on Windows, macOS, and Linux (no dev environment configuration required!)
- ✓ Access to centralized code repos for all 540+ tutorials on PyImageSearch
- ✓ Easy one-click downloads for code, datasets, pre-trained models, etc.
- ✓ Access on mobile, laptop, desktop, etc.
Summary
In today’s blog post I discussed how image borders can be cut off when rotating images with OpenCV and cv2.warpAffine .
The fact that image borders can be cut off is not a bug in OpenCV — in fact, it’s how cv2.getRotationMatrix2D and cv2.warpAffine are designed.
While it may seem frustrating and cumbersome to compute new image dimensions to ensure you don’t lose your borders, it’s actually a blessing in disguise.
OpenCV gives us so much control that we can modify our rotation matrix to make it do exactly what we want.
Of course, this requires us to know how our rotation matrix M is formed and what each of its components represents (discussed earlier in this tutorial). Provided we understand this, the math falls out naturally.
To learn more about image processing and computer vision, be sure to take a look at the PyImageSearch Gurus course where I discuss these topics in more detail.
Otherwise, I encourage you to enter your email address in the form below to be notified when future blog posts are published.

Download the Source Code and FREE 17-page Resource Guide
Enter your email address below to get a .zip of the code and a FREE 17-page Resource Guide on Computer Vision, OpenCV, and Deep Learning. Inside you'll find my hand-picked tutorials, books, courses, and libraries to help you master CV and DL!
