Did you know that OpenCV can detect cat faces in images…right out-of-the-box with no extras?
I didn’t either.
I had to check it out for myself…and do a little investigative work to see how this cat detector seemed to sneak its way into the OpenCV repository without me noticing (much like a cat sliding into an empty cereal box, just waiting to be discovered).
In the remainder of this blog post, I’ll demonstrate how to use OpenCV’s cat detector to detect cat faces in images. This same technique can be applied to video streams as well.
Looking for the source code to this post?
Jump Right To The Downloads SectionDetecting cats in images with OpenCV
If you take a look at the OpenCV repository, specifically within the haarcascades directory (where OpenCV stores all its pre-trained Haar classifiers to detect various objects, body parts, etc.), you’ll notice two files:
haarcascade_frontalcatface.xml
haarcascade_frontalcatface_extended.xml
Both of these Haar cascades can be used detecting “cat faces” in images. In fact, I used these very same cascades to generate the example image at the top of this blog post.
Doing a little investigative work, I found that the cascades were trained and contributed to the OpenCV repository by the legendary Joseph Howse who’s authored a good many tutorials, books, and talks on computer vision.
In the remainder of this blog post, I’ll show you how to utilize Howse’s Haar cascades to detect cats in images.
Cat detection code
Let’s get started detecting cats in images with OpenCV. Open up a new file, name it cat_detector.py
, and insert the following code:
# import the necessary packages import argparse import cv2 # construct the argument parse and parse the arguments ap = argparse.ArgumentParser() ap.add_argument("-i", "--image", required=True, help="path to the input image") ap.add_argument("-c", "--cascade", default="haarcascade_frontalcatface.xml", help="path to cat detector haar cascade") args = vars(ap.parse_args())
Lines 2 and 3 import our necessary Python packages while Lines 6-12 parse our command line arguments. We only require a single argument here, the input --image
that we want to detect cat faces in using OpenCV.
We can also (optionally) supply a path our Haar cascade via the --cascade
switch. We’ll default this path to haarcascade_frontalcatface.xml
and assume you have the haarcascade_frontalcatface.xml
file in the same directory as your cat_detector.py
script.
Note: I’ve conveniently included the code, cat detector Haar cascade, and example images used in this tutorial in the “Downloads” section of this blog post. If you’re new to working with Python + OpenCV (or Haar cascades), I would suggest downloading the provided .zip file to make it easier to follow along.
Next, let’s detect the cats in our input image:
# load the input image and convert it to grayscale image = cv2.imread(args["image"]) gray = cv2.cvtColor(image, cv2.COLOR_BGR2GRAY) # load the cat detector Haar cascade, then detect cat faces # in the input image detector = cv2.CascadeClassifier(args["cascade"]) rects = detector.detectMultiScale(gray, scaleFactor=1.3, minNeighbors=10, minSize=(75, 75))
On Lines 15 and 16 we load our input image from disk and convert it to grayscale (a normal pre-processing step before passing the image to a Haar cascade classifier, although not strictly required).
Line 20 loads our Haar cascade from disk (in this case, the cat detector) and instantiates the cv2.CascadeClassifier
object.
Detecting cat faces in images with OpenCV is accomplished on Lines 21 and 22 by calling the detectMultiScale
method of the detector
object. We pass four parameters to the detectMultiScale
method, including:
- Our image,
gray
, that we want to detect cat faces in. - A
scaleFactor
of our image pyramid used when detecting cat faces. A larger scale factor will increase the speed of the detector, but could harm our true-positive detection accuracy. Conversely, a smaller scale will slow down the detection process, but increase true-positive detections. However, this smaller scale can also increase the false-positive detection rate as well. See the “A note on Haar cascades” section of this blog post for more information. - The
minNeighbors
parameter controls the minimum number of detected bounding boxes in a given area for the region to be considered a “cat face”. This parameter is very helpful in pruning false-positive detections. - Finally, the
minSize
parameter is pretty self-explanatory. This value ensures that each detected bounding box is at least width x height pixels (in this case, 75 x 75).
The detectMultiScale
function returns rects
, a list of 4-tuples. These tuples contain the (x, y)-coordinates and width and height of each detected cat face.
Finally, let’s draw a rectangle surround each cat face in the image:
# loop over the cat faces and draw a rectangle surrounding each for (i, (x, y, w, h)) in enumerate(rects): cv2.rectangle(image, (x, y), (x + w, y + h), (0, 0, 255), 2) cv2.putText(image, "Cat #{}".format(i + 1), (x, y - 10), cv2.FONT_HERSHEY_SIMPLEX, 0.55, (0, 0, 255), 2) # show the detected cat faces cv2.imshow("Cat Faces", image) cv2.waitKey(0)
Given our bounding boxes (i.e., rects
), we loop over each of them individually on Line 25.
We then draw a rectangle surrounding each cat face on Line 26, while Lines 27 and 28 displays an integer, counting the number of cats in the image.
Finally, Lines 31 and 32 display the output image to our screen.
Cat detection results
To test our OpenCV cat detector, be sure to download the source code to this tutorial using the “Downloads” section at the bottom of this post.
Then, after you have unzipped the archive, you should have the following three files/directories:
cat_detector.py
: Our Python + OpenCV script used to detect cats in images.haarcascade_frontalcatface.xml
: The cat detector Haar cascade. Please use this Haar Cascade that is provided and not the one on OpenCV’s GitHub repository for compatibility purposes.images
: A directory of testing images that we’re going to apply the cat detector cascade to.
From there, execute the following command:
$ python cat_detector.py --image images/cat_01.jpg
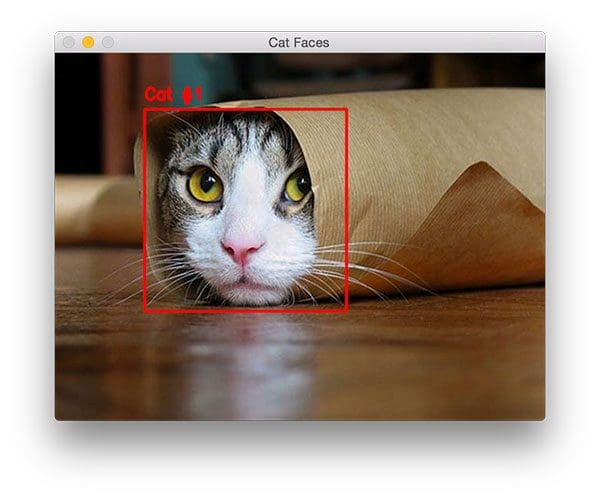
Notice that we have been able to detect the cat face in the image, even though the rest of its body is obscured.
Let’s try another image:
python cat_detector.py --image images/cat_02.jpg
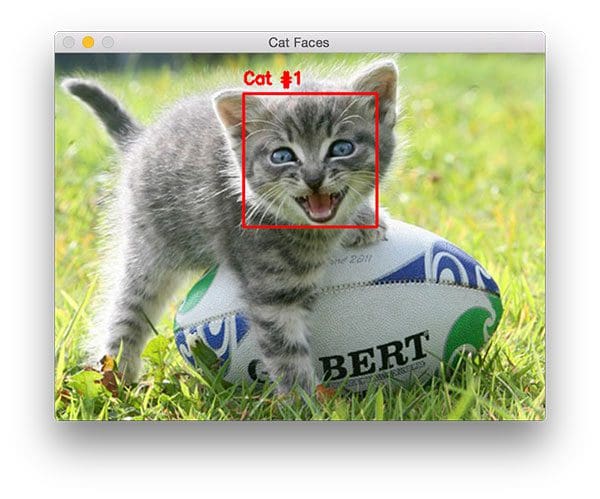
This cat’s face is clearly different from the other one, as it’s in the middle of a “meow”. In either case, the cat detector cascade is able to correctly find the cat face in the image.
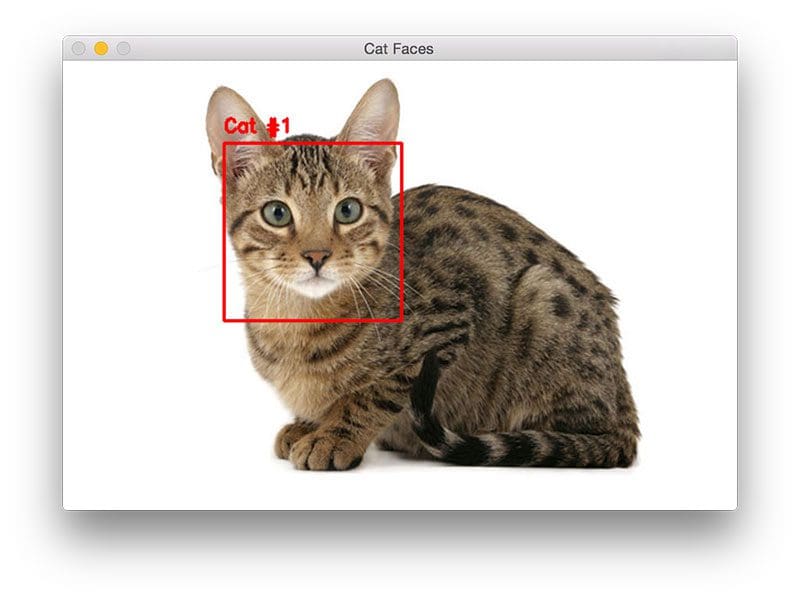
The same is true for this image as well:
$ python cat_detector.py --image images/cat_03.jpg
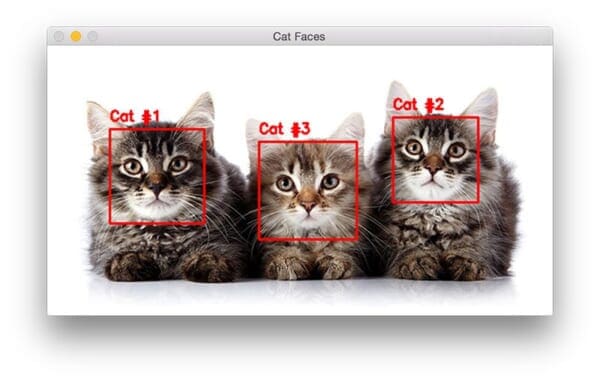
Our final example demonstrates detecting multiple cats in an image using OpenCV and Python:
$ python cat_detector.py --image images/cat_04.jpg
Note that the Haar cascade can return bounding boxes in an order that you may not like. In this case, the middle cat is actually labeled as the third cat. You can resolve this “issue” by sorting the bounding boxes according to their (x, y)-coordinates for a consistent ordering.
A quick note on accuracy
It’s important to note that in the comments section of the .xml
files, Joseph Howe details that the cat detector Haar cascades can report cat faces where there are actually human faces.
In this case, he recommends performing both face detection and cat detection, then discarding any cat bounding boxes that overlap with the face bounding boxes.
A note on Haar cascades
First published in 2001 by Paul Viola and Michael Jones, Rapid Object Detection using a Boosted Cascade of Simple Features, this original work has become one of the most cited papers in computer vision.
This algorithm is capable of detecting objects in images, regardless of their location and scale. And perhaps most intriguing, the detector can run in real-time on modern hardware.
In their paper, Viola and Jones focused on training a face detector; however, the framework can also be used to train detectors for arbitrary “objects”, such as cars, bananas, road signs, etc.
The problem?
The biggest problem with Haar cascades is getting the detectMultiScale
parameters right, specifically scaleFactor
and minNeighbors
. You can easily run into situations where you need to tune both of these parameters on an image-by-image basis, which is far from ideal when utilizing an object detector.
The scaleFactor
variable controls your image pyramid used to detect objects at various scales of an image. If your scaleFactor
is too large, then you’ll only evaluate a few layers of the image pyramid, potentially leading to you missing objects at scales that fall in between the pyramid layers.
On the other hand, if you set scaleFactor
too low, then you evaluate many pyramid layers. This will help you detect more objects in your image, but it (1) makes the detection process slower and (2) substantially increases the false-positive detection rate, something that Haar cascades are known for.
To remember this, we often apply Histogram of Oriented Gradients + Linear SVM detection instead.
The HOG + Linear SVM framework parameters are normally much easier to tune — and best of all, HOG + Linear SVM enjoys a much smaller false-positive detection rate. The only downside is that it’s harder to get HOG + Linear SVM to run in real-time.
What's next? We recommend PyImageSearch University.
86 total classes • 115+ hours of on-demand code walkthrough videos • Last updated: October 2024
★★★★★ 4.84 (128 Ratings) • 16,000+ Students Enrolled
I strongly believe that if you had the right teacher you could master computer vision and deep learning.
Do you think learning computer vision and deep learning has to be time-consuming, overwhelming, and complicated? Or has to involve complex mathematics and equations? Or requires a degree in computer science?
That’s not the case.
All you need to master computer vision and deep learning is for someone to explain things to you in simple, intuitive terms. And that’s exactly what I do. My mission is to change education and how complex Artificial Intelligence topics are taught.
If you're serious about learning computer vision, your next stop should be PyImageSearch University, the most comprehensive computer vision, deep learning, and OpenCV course online today. Here you’ll learn how to successfully and confidently apply computer vision to your work, research, and projects. Join me in computer vision mastery.
Inside PyImageSearch University you'll find:
- ✓ 86 courses on essential computer vision, deep learning, and OpenCV topics
- ✓ 86 Certificates of Completion
- ✓ 115+ hours of on-demand video
- ✓ Brand new courses released regularly, ensuring you can keep up with state-of-the-art techniques
- ✓ Pre-configured Jupyter Notebooks in Google Colab
- ✓ Run all code examples in your web browser — works on Windows, macOS, and Linux (no dev environment configuration required!)
- ✓ Access to centralized code repos for all 540+ tutorials on PyImageSearch
- ✓ Easy one-click downloads for code, datasets, pre-trained models, etc.
- ✓ Access on mobile, laptop, desktop, etc.
Summary
In this blog post, we learned how to detect cats in images using the default Haar cascades shipped with OpenCV. These Haar cascades were trained and contributed to the OpenCV project by Joseph Howse, and were originally brought to my attention in this post by Kendrick Tan.
While Haar cascades are quite useful, we often use HOG + Linear SVM instead, as it’s a bit easier to tune the detector parameters, and more importantly, we can enjoy a much lower false-positive detection rate.
I detail how to build custom HOG + Linear SVM object detectors to recognize various objects in images, including cars, road signs, and much more inside the PyImageSearch Gurus course.
Anyway, I hope you enjoyed this blog post!
Before you go, be sure to signup for the PyImageSearch Newsletter using the form below to be notified when new blog posts are published.
Download the Source Code and FREE 17-page Resource Guide
Enter your email address below to get a .zip of the code and a FREE 17-page Resource Guide on Computer Vision, OpenCV, and Deep Learning. Inside you'll find my hand-picked tutorials, books, courses, and libraries to help you master CV and DL!
Joseph Howse
Thanks so much for featuring the cat face cascades! I am delighted to see them in action here alongside your other great tutorials!
Fun facts:
The haarcascade_frontalcatface_extended.xml version uses the “extended” Haar feature set to make it sensitive to diagonal features such as ears and whiskers. >^-^<
Besides the Haar versions, you will find an LBP version, lbpcascade_frontalcatface.xml, in OpenCV's lbpcascades folder. The LBP version is less accurate but faster; you might like it for Raspberry Pi or other platforms with limited resources.
Details about the training of the cat face cascades can be found in my book, OpenCV for Secret Agents, and in free presentations on my website's OpenCV landing page (http://www.nummist.com/opencv/).
Nine lives,
Joe
Adrian Rosebrock
You’re the one we should be thanking Joe — you trained the actual cascades! 🙂
Kendrick Tan
Hi Adrian, I’m a bit stoked when I saw my name come up on the newsletter.
Anyway, I just came here to say thank you. Your tutorials really gave me a firm understanding of the basics of computer vision, and machine learning. Really appreciate your time and effort.
Adrian Rosebrock
Hey Kendrick! Thanks for doing the initial awesome post — without your post, the cat detection cascade would have totally passed me by. I should be the one thanking you 🙂
Linus
Wow.
Thanks Adrian, this is so awesome! I’ve thought about the possibitity of detecting animals some time ago, but I’ve never found a solution 😛
What about other animals (dogs etc.)? Are there also xml files available? And is using this in a live camera feed also possibe, with a moderate execution speed?
Adrian Rosebrock
As far as I know, there is only the Haar cascade for cats — there isn’t one for dogs. Although you could certainly train one. I would suggest using HOG + Linear SVM instead since it has a lower false-positive rate.
And yes, this method can be used to run in real-time. Take a look at Practical Python and OpenCV for more details on running Haar cascades in real-time.
Ranjeet Singh
But now I want to know what that xml file is ? How it has been written ?
Adrian Rosebrock
The XML file is a serialized Haar cascade. It is generated by training a machine learning algorithm to recognize various objects in images. To recognize your own objects, you’ll need to train your own custom object detector.
swight
How would I write the final image to file instead of displaying to screen?
Adrian Rosebrock
You can just use the
cv2.imwrite
function:cv2.imwrite("/path/to/my/image.jpg", image)
If you need help learning the basics of computer vision and image processing I would suggest you work through Practical Python and OpenCV.
Victor
We trained an LBP cascade with better time and accuracy performance. If anyone wants this, we can push it to our 10imaging/opencv repo on GitHub.
Ridge
@Victor – Sure, I’d like to see it.
Gismo Scha
Thanks Adrian, it works!
How can i extract / copy the rectangled area and write to file?
Adrian Rosebrock
You would use NumPy array slicing to extract the bounding box and then use
cv2.imwrite
to write the image to disk. I discuss these basic operations inside Practical Python and OpenCV. I would suggest you start there if you are new to OpenCV.Harman Singh
Thank Adrian, your tutorials are great and fun and also detects fairly good but while deploying this script on multiple images with different size, the output is not to accurate.
for example in 1st pic (cat rolled in paper) i got 2 rectangle one covering the face and other on the nose..(to get 1 rect, i adjusted scaleFactor to 1.715)
even after converting all the image to size still getting mixed result like mentioned above and sometimes none.
do i have to adjust scalefactor everytime? or is it me having this problem?
Thank You.
Adrian Rosebrock
This is a common problem with Haar cascades (they are very prone to false-positives). You can read more about the issue in this blog post on Histogram of Oriented Gradients.
Videsh Suman
Hello, Adrain! Your blogs are great!
I recently installed OpenCV on my Mac along with Python 2.7 following your other blog, and tried running this program without the virtual environment. It successfully ran. Why is that so? If my OpenCV was essentially compiled on the virtual environment, it should only be able to run on the cv environment, right?
Could you please explain?
Adrian Rosebrock
OpenCV is installed globally on your machine. A Python virtual environment is then created that is separate from the rest of the packages on the system (when we then sym-link the
cv2.so
file into). We do this just in case we need to install different versions of NumPy, SciPy, etc. than are already installed on your system.Kyle Adkins
Hey, Adrian.
I installed OpenCV on MacOS Sierra using the updated tutorial you made that solves the QTKit problem. But when I tried this code (& whenever I try to use cv2.imshow) I get a blank window.
The name of the window shows up, and so does the yellow Mac minimize button. But that’s it, no image. And I can’t exit the window unless I force quit the terminal session. I’ve searched Google & StackOverflow but haven’t found any answers. Any idea what’s going on?
Thanks in advance!
Adrian Rosebrock
Hey Kyle — that is super strange. Can you do a
print(image.dtype)
. I’d be curious to see what data type the image is.Jon Mittelbronn
Same issue. I get uint8, when I do a print(image.dtype). Thanks
Adrian Rosebrock
The uint8 data type is correct. What about
print(image.shape)
. What are the resulting dimensions?Luis
for: cat_detector.py –image images/cat_02.jpg
i got the dimensions: (375, 500, 3)
But i am too having this problem.
Luis
so what i tried:
i put “print(“random text”)” between chunks of code, and I’m not sure if its suppose to stay in the for loop of “# loop over the cat faces and draw a rectangle surrounding each”. it does not print the test code under this loop. idk if that helps 😛
Luigimon
i found the solution here 😀
https://stackoverflow.com/questions/44469973/python-opencv-3-2-imshow-no-image-content-with-waitkey0
Yichen
Hi Kyle and Adrian
I’m also getting the same error on my cv2.imshow function, it’s only showing a top border of a regular Mac window, with a yellow minimize button on it. However, I can exit the window with any keyboard input. This also happens in the example codes from your book. I posted this question on StackOverflow: https://stackoverflow.com/questions/44603844/opencv-python-cv2-imshow-only-showing-top-bar-on-mac?noredirect=1#comment76198282_44603844
And a few of us believe this might be the problem with the latest OpenCV version (Tested on 17 June 2017). I really hope you could help us through this!
Thanks in advance!
Adrian Rosebrock
Hi Yichen — thanks for picking up a copy of Practical Python and OpenCV!
And thank you for passing along the link to the StackOverflow thread. This definitely sounds like an issue with OpenCV not being able to access the GUI libraries correctly. Were you using the OpenCV 3.2 release or a development release?
Luis
yes, i believe he did install 3.2 because that is the one i installed and i too have that same problem 🙁
Danlin Zhang
Hi Adrian,
I’ve been following your posts for some time and they have been amazing! But for facial-detection, it seems that I cannot get python to display the right result (as it does not display anything, neither the original image nor the detector. I’m running similar issues in the post about facial landmarks with dlib as well. I have installed OpenCV, Homebrew, etc. just as your former posts instructed. Could you help me with that? Thank you very much!
Danlin Zhang
I just came across the former post and mine is exactly the same case. I’m also using macOS Sierra and it gives a blank window. I could not exit the window without force-quitting terminal.
Adrian Rosebrock
Take a look at the comment by “Yichen” below. The issue is that you likely installed a (currently buggy) development version of OpenCV rather than an official release. Try re-compiling and re-installing OpenCV with the official 3.2 release to see if it resolves the issue.
Shai
Thank you for the tutorial!
I’ve tried running it on both MacOS and Ubuntu 14.04 without success.
While there are no errors, no cats are identified.
The length of the tuple of rects is zero :\
I tried downloading the latest haarcascade file to the folder of the script and giving it the file as an argument, but the result is the same.
How does one begin to debug this?
Thanks,
Shai
Adrian Rosebrock
Hi Shai — which version of OpenCV are you using? Did you change any of the parameters from the ones I used in the blog post?
Kris
Hi, I see the same issue, my rects is empty as well. I did follow your installation instructions, but something might have gone wrong of course 🙂
I am using OpenCV version 3.3.1, so newer than your version.
Quan
Thank you for the tutorial!
I can run it correctly when I use your haarcascade. But I run it with my opencv haarcascade without success. The length of the tuple if rects is zero;
How can I fix it?
thanks,
Quan
Adrian Rosebrock
Haar cascades can be a real pain to tune. You’ll want to adjust the parameters to
detectMultiScale
. I cover how to tune them and play around with different values inside Practical Python and OpenCV.Fritz
Thank you for all your work, but thats not a very useful answer. Some of us would like to get couple of examples working before dropping 50-100 bucks on a book.
Adrian Rosebrock
Hi Fritz — I can totally understand wanting to get some examples working before diving into one of my books or courses, I totally respect that and feel the same way. However, please do keep in mind that I offer over 200+ free blog posts here on the PyImageSearch blog (more than any computer vision resource online) and reply to nearly every one of the comments on the blog as well (again, for free). My goal is to help others as much as I can; however, there is only a limited amount of time in the day for me to do my normal work and help others, so if I’ve already covered a specific question/topic in a blog post, course, or book, it’s important that I be able to link to it. I hope you understand.
Fritz
I played with specifically the minNeighbors param, for the picture i was playing with a number like 3 worked for me .
here for future ref;
image – Matrix of the type CV_8U containing an image where objects are detected.
objects – Vector of rectangles where each rectangle contains the detected object.
scaleFactor – Parameter specifying how much the image size is reduced at each image scale.
minNeighbors – Parameter specifying how many neighbors each candidate rectangle should have to retain it.
flags – Parameter with the same meaning for an old cascade as in the function cvHaarDetectObjects. It is not used for a new cascade.
minSize – Minimum possible object size. Objects smaller than that are ignored.
maxSize – Maximum possible object size. Objects larger than that are ignored.
manijay
Hi,
I was attempting to run the initial run through with cat_01.jpg, but I encountered a Keyerror on “cascade” as the parameter to CascadeClassifier on line 20. Any solutions?
Thanks
Adrian Rosebrock
What is the exact error message?
manijay
In [35]: ls
cat_detector.py haarcascade_frontalcatface.xml images/
In [36]: python cat_detector.py –image images/cat_02.jpg
File “”, line 1
python cat_detector.py –image images/cat_02.jpg
^
SyntaxError: invalid syntax
Adrian Rosebrock
You need to download the source code using the “Downloads” section of this post and then execute it via a command line. Do not execute it from with a Python shell/notebook.
Avi
Hi,
I installed OpenCV with Python following a previous blog using Homebrew. https://pyimagesearch.com/2016/12/19/install-opencv-3-on-macos-with-homebrew-the-easy-way/
When I run this example code on the command line, however, nothing happens. There’s no output window and the process does not terminate. I have to forcibly terminate it by quitting the terminal app.
The OpenCV version installed is 3.3.0 and the Python version is 2.7.14
My command line execution statement is:
python cat_detector.py –image /images/cat_01.jpg
I’m new to mac as well as python. There’s no error that is being shown that I can check. And I checked if I’m passing the arguments correctly. Not sure what this is about. Would really appreciate any help.
And thanks for putting together such a great tutorial!
Adrian Rosebrock
Can you confirm that both
cv2.imshow
andcv2.waitKey
are in your code? Both of these functions are required in order to see the output on your screen.Arturo
Hi, Adrian. First of all, thanks for the tutorial.When I ran my code (copying line by line the tutorial) but s¡downloading the haarcascades from the GitHub page, when I run the code, I see the cats, but no rectangles. When I downloaded your .zip and ran your code, I saw the rectangles and the cats.
Both scripts are equal, no minor differences. What is happening? I guess it has to do with the haarcascades but I don’t get why. Thank you very much.
Adrian Rosebrock
Hi Arturo — it’s hard to say what the exact error is in this case. I would suggest running a
diff
on your copy and pasted script and my script. It sounds like something is missing but again, I wouldn’t be able to tell what line may have been altered/missing.Aaron Langley
Hi there Adrian,
Thanks for your tutorial! Worked like a charm (after a few mistakes). I ran into a few of the issues others have been experiencing. Also, I initially cloned the opencv repo from GitHub (i.e. the tagged version), which definitely didn’t work for reasons I am ignorant of.
I am also running into the same problem as Arturo above, but I believe the problem arises from there being some difference in the Haarcascades (the version we downloaded was updated 5 months ago whereas your script was probably written much earlier?).
Another problem I ran into was running your cat detection script. It seemed that I could only run it from the virtualenv (i.e. I had to run:
‘workon cv’
then:
python cat_detector.py –image images/cat_03.jpg
I updated my numpy version by ignoring the original python (system) version and it worked just fine (without ‘work cv’).
One last thing: I am still unable to exit the script without using ‘command + q’ which terminates the process (just like Avi above). Any better way to do this? Everything works, I just can’t exit the process without shutting down terminal.
Thanks again Adrian, and I hope this helps anyone who might be having similar problems!
Aaron Langley
Weird, looks like updating numpy on the system (‘pip install –ignore-installed numpy’) solved my last problem: I am now able to exit the image by just quitting python (terminal stays open) which closes the cat-faces window.
Adrian Rosebrock
Hey Aaron — thanks for the comment. The code for this blog post will still work with the latest release of OpenCV. The issue may be needing to updating the call to
.detectMultiScale
. I would suggest specifically playing with theminNeighbors
parameter andscaleFactor
. Try reducing both of these values. For what it’s worth, I have a detailed explanation on these parameters inside Practical Python and OpenCV. I hope that helps!nidhi
Hi adrian
i want to detect faces of 1000 cats. what will be the script of it.
I want to create a bash file where for loop is run on each image and the detected outputs are stored in another output directory.
please help with this
Adrian Rosebrock
I would suggest using the
list_images
function inside imutils to loop over the images in your input directory, load each image, and then apply the face detection to each image.nidhi
Thanks adrian ! I have recently seen your pedestrian detection python script where the images undergo detection. But I want the detected output to save in another directory.
Adrian Rosebrock
You can use the
cv2.imwrite
function to save images to a new path or directory.If you’re just getting started with OpenCV I would recommend working through Practical Python and OpenCV where I discuss the fundamentals. The book is a quick read and I’m confident that once you work through it you’ll be able to complete your project.
nidhi
yes. I will buy it soon. thanks !! you are doing a great work!
Justice S
Hey in receiving this error after i run the code
ap.add_argument(“-c”, “–cascade”,
bash: syntax error near unexpected token `”-c”,’
Adrian Rosebrock
Please make sure you download the source code + example images used in this post via the “Downloads” section. It looks like you may have introduced an error when copying and pasting the code and/or modifying the script (you do not need to modify the script to supply the command line arguments).
lxw
Hi, Adrian. Thank you for the great articles you have posted. I have been reading several articles by you, and they are really great.
I have one question on this article, I downloaded the `haarcascade_frontalcatface.xml` file on [Github](https://github.com/opencv/opencv/blob/master/data/haarcascades/haarcascade_frontalcatface.xml). But it does NOT work. While using the `xml` file you provided, it worked. Do you have any idea whether there is something wrong with the `xml` file on github? Thank you ~
lxw
BTW, NOT working means “no errors, but no cats could be detected”
Adrian Rosebrock
Haar cascades can be very tricky to tune. You’ll want to modify the parameters to the detectMultiScale function. I cover this process more inside Practical Python and OpenCV as well as this post, although that post discusses HOG detectors, the same concept still applies.
Manu Rao
A Sillu Question. Which is the text editor you have shown above?
Adrian Rosebrock
Which text editor are you referring to?
Manu Rao
The editor you have used to show the code and explain along in this and other posts.
Adrian Rosebrock
It’s a WordPress plugin called “Crayon Syntax Highlighter”.
Alec
Adrian,
Thank you so much for these amazing lessons!
Question: You mentioned applying this to video streams. How would you do this? I can imagine how to extrapolate this to videos, but not video streams. I’m using the Raspberry Pi 3 and Pi Camera. I was able to complete your home surveillance lesson, but since they are using different methods, i’m not sure how to apply this to streaming video for cat detection live in the room.
Adrian Rosebrock
You would run the cat detector on each and every frame of the video file or video stream. A video is just a sequence of images.
Alec
Thank you for the quick response! I guess the issue is I don’t know how to do that. 🙂 I tried changing “image” to “video” in the code, argparse, and terminal command. As you can guess, that didn’t work. 🙂 Also, I don’t know how to point the code to the stream from the picamera instead of the image folder. Perhaps I just need to get better at coding!
Adrian Rosebrock
This post, and the posts it links to, will help you learn how to access video. If you’re new to OpenCV and want to learn the fundamentals, I would recommend working through Practical Python and OpenCV where I how to use OpenCV (including accessing videos and video streams). I hope that helps point you in the right direction!
Gustavo Costa
It seems that OpenCV, princiapply PutText, doesn’t support UTF-8 encoding and special characters.
I wrote a sentence in Portuguese instead:
cv2.putText(image, "É um gato # {}".format(i + 1), (x, y - 10), cv2.FONT_HERSHEY_SIMPLEX, 0.55, (0, 0, 255), 2)
“É” has an accent. On an image, it appears as “??”.
For example:
https://i.stack.imgur.com/nZMFm.png
I also tried to use imencode, for example, cv2.imencode(‘utf-8’) and it didn’t work.
Adrian Rosebrock
You are correct. OpenCV does not support drawing UTF-8 characters.
Gustavo Costa
Check the answer: OpenCV putText UTF-8 – StackOverflow. Is it worthy to apply PIL and QT for Python? Have you already tried it?
Adrian Rosebrock
Oh interesting, I did not know that Qt would allow for UTF-8 strings. I normally use GTK with OpenCV. I have not tried this with Qt.
John
Hi Adrian,
Your example works perfectly with the 3 images provided by you. It does not detect cats (no bounding box) in images downloaded from the internet. I have tried cats / cats and dogs -. various resolution images etc but no luck. In the rare instance that it detected a cat the bounding box was around the nose.
What am i doing wrong ?
Thanks,
John
Adrian Rosebrock
The model used in this tutorial is meant to detect only the frontal views of cat faces. It will not work if you are trying to detect side views of animals. Again, it only detects “cat faces”.
John
I have tried only frontal views – no side views. i have also tried cats without backgrounds and other objects in the image. i have tried different size and resolution images.
Adrian Rosebrock
That’s interesting, I’m not sure what the issue may be. You may want to try a more powerful object detector, such as a deep learning-based object detector.
kkk
Hi Adrian,
I can run the file, but I found that I didn’t recognize the characteristics of the cat. I found that Python had no problem running, but rects=(), there was nothing in it. So the output picture is only the original picture. Can you answer that?
Thanks,
kkk
Adrian Rosebrock
Are you using the same images from this tutorial? Or your own images? Keep in mind that it can be tricky to tune the parameters of “detectMultiScale” which is why we may choose to use more powerful methods such as HOG + Linear SVM or deep learning-based object detectors.
kkk
Why is the haarcascade_frontalcatface.xml file in GitHub no longer available? Is there a version problem? Or can Adrian Rosebrock provide available haarcascade libraries?
Thanks!
kkk
I found the problem! The haarcascade_frontalcatface.xml file in the program was downloaded from https://github.com/opencv/opencv/tree/master/data/haarcascades website. If you replace it with yours, the program will correctly distinguish the cat’s face. Is it because the files on this website are not feasible? Or can Adrian give a web address for a viable Haar classifier?
Adrian Rosebrock
Thanks for sharing! I will double-check this and confirm, and if necessary, update the code downloads.
David Hoffman
I tried with the cat face Haar Cascade currently in the OpenCV repo and found that it doesn’t work even with trying different parameters for
detectMultiScale
. I recommend using the original Haar Cascade in the “Downloads” on this blog post.afrizal
this article help me so much
i have a project cat detection by type
thanks
Anja
hello Adrian,
that’s a great guide – thanks for that!
I have a question:
Is it also possible to tell if a cat has a prey (mouse, bird, etc) in its mouth?
I’m just trying to realize the detection of prey for my cat flap, to prevent the cat always bringing presents into the house 😉
Adrian Rosebrock
You would need to train a detector to first detect the cat and then use a second detector to detect the mouse or bird.
Nona
Hello adrian
I want toaster deep learning in computer vision and to be researcher
How can i start and what is the learning path?
I read your free book
Deep learning computer vision woth opencv
Is this book a good start to be a researcher
Adrian Rosebrock
1000s of PyImageSearch readers have gone through Deep Learning for Computer Vision with Python. The book will absolutely help you get your start in deep learning and prepare you for a path in reserach.
Kevin
This is great. My use case is to identify a white faced cat as opposed to my own brown tabby cat. This is to lock the intruder cat out. Can someone point me in the direction of how to building on this so that it can distinguish between two cars? Or should I take a different approach. Just feeding stills from a camera of both cats to build a model of each?
Adrian Rosebrock
Hey Kevin — there are a few ways to approach this problem, but I would suggest starting with Practical Python and OpenCV. The “Case Studies” included with the text would enable you to build a basic proof of concept.
Stan
Hi Adrian, I’ve been planning on buying one of your books for a while. Originally (about 6 months ago), I couldn’t even get OpenCV to compile.. blanked my laptop and started with Debian 10… now have it running on an headless RPI and it’s working fine in virtual environs on the laptop.. have enjoyed the other examples on here.. sorry for that wordy explanation but I’m trying to figure out which book to buy..
..I have a decade’s worth of electronics/micro controller learning behind me and the obvious temptation for me is to link the two using serial or i2C for my electronics/printing/projects. For this cat one I’d like to do the same as above posters.. using video to assess, open and close a cat flap with a simple servo lock..
Below is the code I got to, it runs but doesn’t load a frame, just hangs.. so i thought I should buy the book.. and breathe 🙂
Many Thanks
Stan
luca toldo
Just tried out on Mac Book Pro running Mojave
sudo pip install opencv-python
python cat_detector.py -i images/cat_02.jpg
it works perfectly.
congratulation and thanks
Adrian Rosebrock
Congrats on getting the script to work! 🙂
Thiago Cavalini
Your tutorials are fantastic and I see that they have helped many people who want to learn computer vision.
I have a project to recognize cats using the Raspberry pi 3.
I have already created face detectors with HAAR cascade. I also created with HOG + SVM to see the performance of the Raspberry pi.
They have worked very well.
However, I am not successful in creating the cat recognition process. In your opinion what would be the best way to create a cat recognition system?
I tried with the functions of Dlib and it seems that the functions are focused only on human recognition.
Congratulations and thanks.
Adrian Rosebrock
Recognition and detection are two different things. Are you trying to recognize cats in video streams (i.e,. “Fluffy” versus “Kitten”). Or are you simply trying to detect the presence of cats in an image?
THIAGO MENDES CAVALINI
Hi Adrian.
Thanks for your response.
Sorry if I wasn’t clear.
I already detect the presence of cats in an image.
I am trying to recognize which cat was detected in an image.
Thank again.
Adrian Rosebrock
If you have previous examples of the cats you could train a classifier, likely a CNN, to recognize each cat. Deep Learning for Computer Vision with Python can teach you how to do exactly that.
Other sets of algorithms worth looking into is “reidentification” methods but they can get pretty complex. I’d start with a more simple method and work your way up from there.
Thiago Cavalini
I am seeing exactly this part of classifiers and CNN.
Thanks again for your attention.
KIMTAEWON
Thank you for your information.
I’d like to go a step further than the cat recognition system you’ve put up and implement a code that recognizes the behavior of grooming a cat’s specific behavior, so do I have to learn a new haarcasade?
Adrian Rosebrock
That actually sounds more like an activity recognition or video classification problem.