Today, we are going to start a new 3-part series of tutorials on shape detection and analysis.
Throughout this series, we’ll learn how to:
- Compute the center of a contour/shape region.
- Recognize various shapes, such as circles, squares, rectangles, triangles, and pentagons using only contour properties.
- Label the color of a shape.
While today’s post is a bit basic (at least in context of some of the more advanced concepts on the PyImageSearch blog recently), it still addresses a question that I get asked a lot:
“How do I compute the center of a contour using Python and OpenCV?
In today’s post, I’ll answer that question.
And in later posts in this series, we’ll build upon our knowledge of contours to recognize shapes in images.
OpenCV center of contour
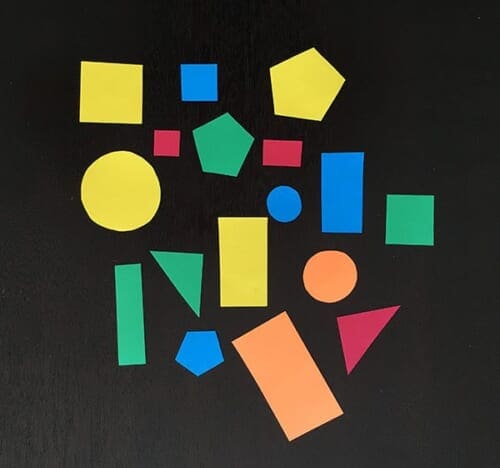
In above image, you can see a variety of shapes cut out from pieces of construction paper. Notice how these shapes are not perfect. The rectangles aren’t quite rectangular — and the circles are not entirely circular either. These are human drawn and human cut out shapes, implying there is variation in each shape type.
With this in mind, the goal of today’s tutorial is to (1) detect the outline of each shape in the image, followed by (2) computing the center of the contour — also called the centroid of the region.
In order to accomplish these goals, we’ll need to perform a bit of image pre-processing, including:
- Conversion to grayscale.
- Blurring to reduce high frequency noise to make our contour detection process more accurate.
- Binarization of the image. Typically edge detection and thresholding are used for this process. In this post, we’ll be applying thresholding.
Before we start coding, make sure you have the imutils Python package installed on your system:
$ pip install --upgrade imutils
From there, we can go ahead and get started.
Open up a new file, name it center_of_shape.py
, and we’ll get coding:
# import the necessary packages import argparse import imutils import cv2 # construct the argument parse and parse the arguments ap = argparse.ArgumentParser() ap.add_argument("-i", "--image", required=True, help="path to the input image") args = vars(ap.parse_args()) # load the image, convert it to grayscale, blur it slightly, # and threshold it image = cv2.imread(args["image"]) gray = cv2.cvtColor(image, cv2.COLOR_BGR2GRAY) blurred = cv2.GaussianBlur(gray, (5, 5), 0) thresh = cv2.threshold(blurred, 60, 255, cv2.THRESH_BINARY)[1]
We start off on Lines 2-4 by importing our necessary packages, followed by parsing our command line arguments. We only need a single switch here, --image
, which is the path to where the image we want to process resides on disk.
We then take this image, load it from disk, and pre-process it by applying grayscale conversion, Gaussian smoothing using a 5 x 5 kernel, and finally thresholding (Lines 14-17).
The output of the thresholding operation can be seen below:
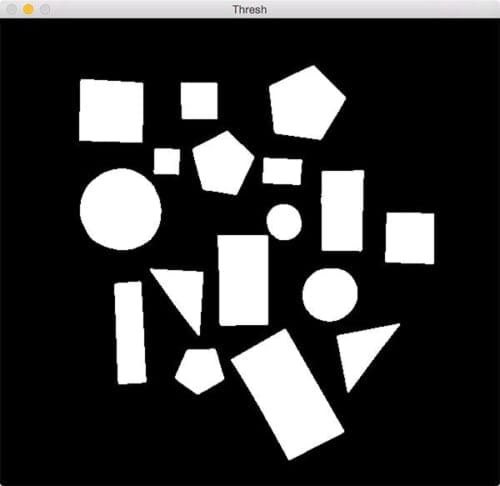
Notice how after applying thresholding the shapes are represented as a white foreground on a black background.
The next step is to find the location of these white regions using contour detection:
# find contours in the thresholded image cnts = cv2.findContours(thresh.copy(), cv2.RETR_EXTERNAL, cv2.CHAIN_APPROX_SIMPLE) cnts = imutils.grab_contours(cnts)
A call to cv2.findContours
on Lines 20 and 21 returns the set of outlines (i.e., contours) that correspond to each of the white blobs on the image. Line 22 then grabs the appropriate tuple value based on whether we are using OpenCV 2.4, 3, or 4. You can read more about how the return signature of cv2.findContours
changed between OpenCV versions in this post.
We are now ready to process each of the contours:
# loop over the contours for c in cnts: # compute the center of the contour M = cv2.moments(c) cX = int(M["m10"] / M["m00"]) cY = int(M["m01"] / M["m00"]) # draw the contour and center of the shape on the image cv2.drawContours(image, [c], -1, (0, 255, 0), 2) cv2.circle(image, (cX, cY), 7, (255, 255, 255), -1) cv2.putText(image, "center", (cX - 20, cY - 20), cv2.FONT_HERSHEY_SIMPLEX, 0.5, (255, 255, 255), 2) # show the image cv2.imshow("Image", image) cv2.waitKey(0)
On Line 25 we start looping over each of the individual contours, followed by computing image moments for the contour region on Line 27.
In computer vision and image processing, image moments are often used to characterize the shape of an object in an image. These moments capture basic statistical properties of the shape, including the area of the object, the centroid (i.e., the center (x, y)-coordinates of the object), orientation, along with other desirable properties.
Here we are only interested in the center of the contour, which we compute on Lines 28 and 29.
From there, Lines 32-34 handle:
- Drawing the outline of the contour surrounding the current shape by making a call to
cv2.drawContours
. - Placing a white circle at the center
(cX, cY)
-coordinates of the shape. - Writing the text
center
near the white circle.
To execute our script, just open up a terminal and execute the following command:
$ python center_of_shape.py --image shapes_and_colors.png
Your results should look something like this:
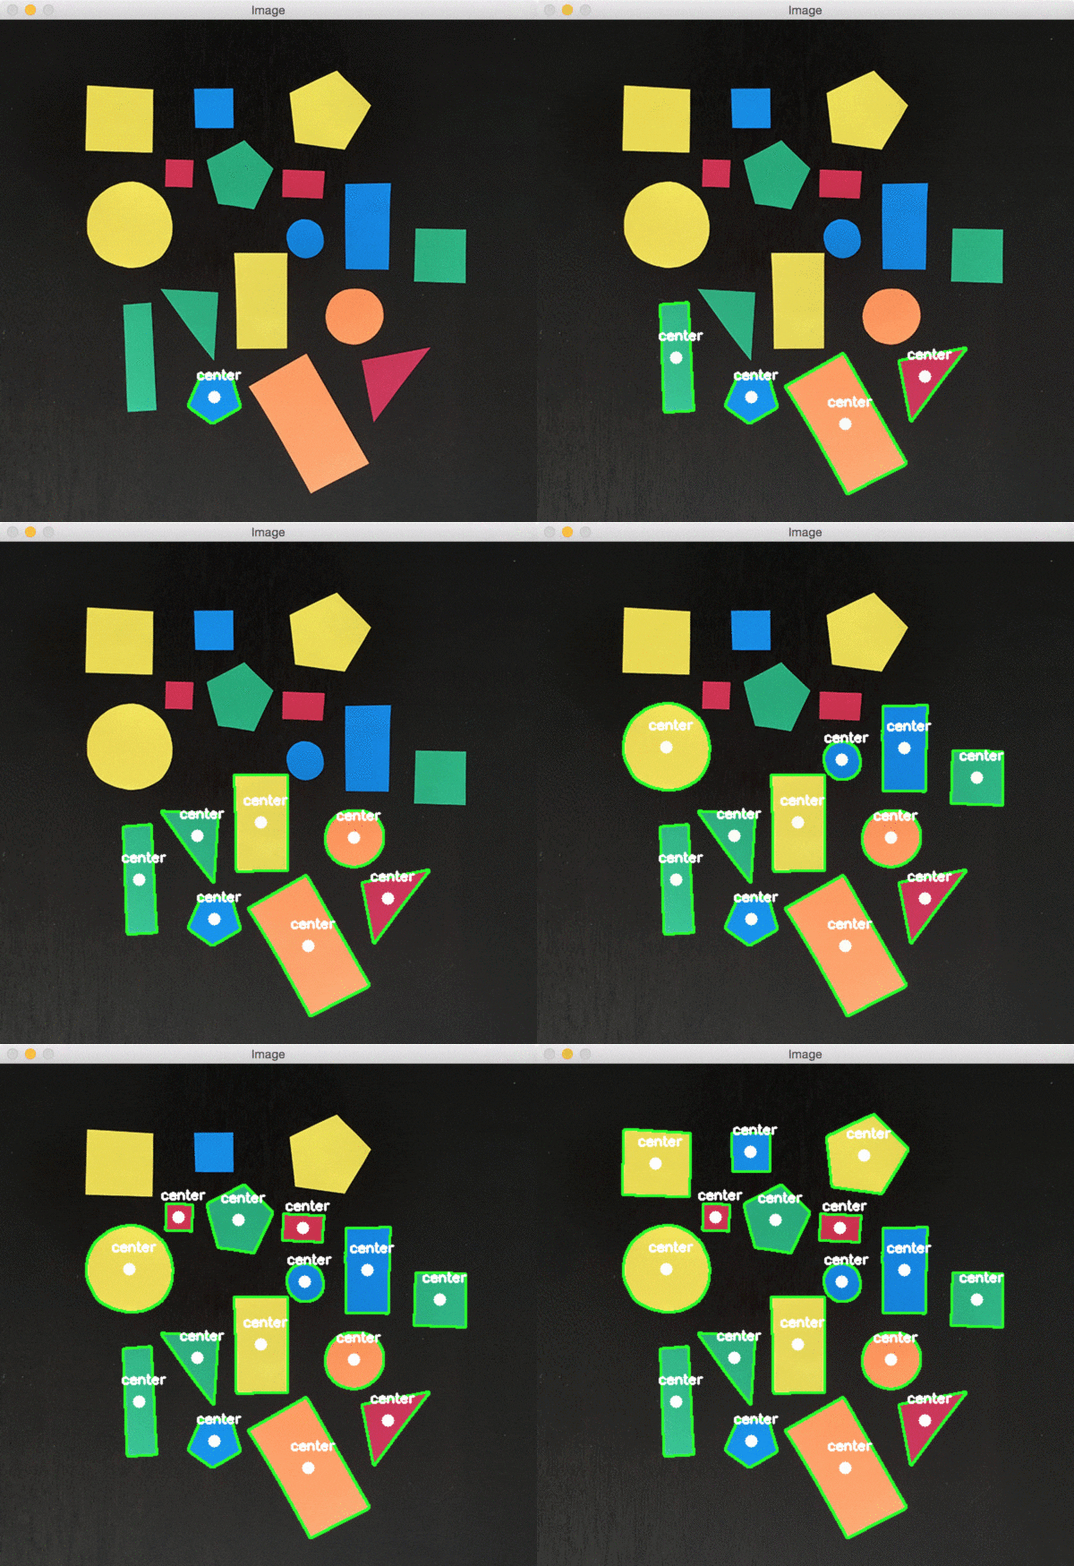
Notice how each of the shapes are successfully detected, followed by the center of the contour being computed and drawn on the image.
What's next? We recommend PyImageSearch University.
86+ total classes • 115+ hours hours of on-demand code walkthrough videos • Last updated: May 2025
★★★★★ 4.84 (128 Ratings) • 16,000+ Students Enrolled
I strongly believe that if you had the right teacher you could master computer vision and deep learning.
Do you think learning computer vision and deep learning has to be time-consuming, overwhelming, and complicated? Or has to involve complex mathematics and equations? Or requires a degree in computer science?
That’s not the case.
All you need to master computer vision and deep learning is for someone to explain things to you in simple, intuitive terms. And that’s exactly what I do. My mission is to change education and how complex Artificial Intelligence topics are taught.
If you're serious about learning computer vision, your next stop should be PyImageSearch University, the most comprehensive computer vision, deep learning, and OpenCV course online today. Here you’ll learn how to successfully and confidently apply computer vision to your work, research, and projects. Join me in computer vision mastery.
Inside PyImageSearch University you'll find:
- ✓ 86+ courses on essential computer vision, deep learning, and OpenCV topics
- ✓ 86 Certificates of Completion
- ✓ 115+ hours hours of on-demand video
- ✓ Brand new courses released regularly, ensuring you can keep up with state-of-the-art techniques
- ✓ Pre-configured Jupyter Notebooks in Google Colab
- ✓ Run all code examples in your web browser — works on Windows, macOS, and Linux (no dev environment configuration required!)
- ✓ Access to centralized code repos for all 540+ tutorials on PyImageSearch
- ✓ Easy one-click downloads for code, datasets, pre-trained models, etc.
- ✓ Access on mobile, laptop, desktop, etc.
Summary
In this lesson, we learned how to compute the center of a contour using OpenCV and Python.
This post is the first in a three part series on shape analysis.
In next week’s post, we’ll learn how to identify shapes in an image.
Then, two weeks from now, we’ll learn how to analyze the color of each shape and label the shape with a specific color (i.e., “red”, “green”, “blue”, etc.).
To be notified when these posts go live, be sure to enter your email address using the form below!
Download the Source Code and FREE 17-page Resource Guide
Enter your email address below to get a .zip of the code and a FREE 17-page Resource Guide on Computer Vision, OpenCV, and Deep Learning. Inside you'll find my hand-picked tutorials, books, courses, and libraries to help you master CV and DL!
Hi Adrian, another great Tutorial, but how to run the script into the Python Idle directly?
You would have to copy and paste each command into IDLE one-by-one. If you like using IDLE, you should also look into using IPython Notebooks as they are a bit more user friendly.
There seems to be good support for opencv for shapes and finding centroids but are there equivalent routines for line detection. I have found this to be quite challenging especially discriminating between lots of small noise lines and what I think should be dominant significant lines.
Line detection is much, much more challenging for a variety of reasons. The “standard” method to perform line detection is to use the Hough Lines transform. But for noisy images, you’ll often get mixed results.
Hello Andrian,
I got “ZeroDivisionError: float division by zero”, because all “m” values are 0. Why? Where I wrong? I trying solve it but do not have luck. I use Python 2.7 and openCV 3.1.
Thanks,
Best Regards,
Boško
It seems like both you and Ruttunenn are getting the same error message. It seems like the segmentation may not be perfect and there is some noise left over in the thresholding. A simple check would be to use:
Where you can set
MIN_THRESH
to be a suitable value to filter out small contour regions.Thanks! It’s work now
Awesome, I’m happy it worked for you! 🙂
Hi Adrian, where should i put this command? And what is the range of the MIN_THRESH?
Thanks.
You would typically define
MIN_THRESH
at the top of your file, but you can place it anywhere that you think is good from a code organization perspective. The actual range ofMIN_THRESH
will vary on your application and will have to be experimentally determined.I also got the same and resolved with following:
if (M[“m00”] == 0):
M[“m00”]=1
regards
Thanks leena, that worked
Can also resolve as following:
if(M[“m00”]!=0):
#find centroid
else:
cX,cY=0,0
Hi,
Just run to a minor glitch in the example as I was getting zeros on the M = cv2.moments(c) on the first iteration, leading to float division by zero. A simple work around was to implement a check for 0.0 results.
Cheers for awesome tutorials anyway.
Thanks Luis!
Hi, excellent post Adrian!!!
Could you please explain a bit more why on the pre-processing stage you slightly blur the image???
Thanks,
David Darias
Blurring (also called “smoothing”) is used to smooth high frequency noise in the image. Simply put, this allows us to ignore the details in the image and focus on what matters — the shapes. So by blurring, we smooth over less interesting regions of the image, allowing the thresholding and contour extraction phase to be more accurate.
Great post, Adrian!
It may be a little off topic, but I’m curious how the tool to find the center would fair against crescent-shaped features. Would the centroid be inside the shape, or in the middle possibly blank area?
Great question. It would still be inside the shape, in the center, but towards the rim. An example can be found here. Keep in mind that only non-zero pixels are included in the calculation of the centroid.
Hi Adrian,
I have a question about the value of cX and cY. As i want to know what is the pixel value at the point (cX, cY), i tried to print it by image[cX,cY]. However, I got error like:
IndexError: index 1040 is out of bounds for axis 0 with size 1024
which means that cX and cY is outside of range of the image size. Therefore, I want to ask how can i find out the pixel coordinate at point (cX, cY)?
Thanks!
When accessing pixel values in OpenCV + NumPy, you actually specify them in (y, x) order rather than (x, y) order. Thus, you need to use:
image[cY, cX]
Thanks for a great tutorial Adrian.
Could you please explain here or in another tutorial how to use image moments to characterize the other shape and statistical properties of an object?
In fact, I have already done that! Please take a look at this series of blog posts on Zernike Moments to characterize the shape of an object. I also demonstrate how to do this inside the PyImageSearch Gurus course.
After running the code it gives me the following error: –
usage: center_of_shape.py [-h] -i IMAGE
center_of_shape.py: error: argument -i/–image is required
What i simply did was that i just downloaded the code and ran it and the above error occured.
Also could you suggest me a book which i can use to learn open CV with python from scratch. I know python but i don’t have any clue about open CV.
Hey Rock — you error is coming from not supplying the image path via command line argument. You should be executing the command line this:
$ python center_of_shape.py --image shapes_and_colors.png
If you want to learn OpenCV + Python from scratch, I would highly recommend that you take a look at my book, Practical Python and OpenCV.
Thank you for your reply. i shall definitely refer that book.
Could you please elaborate i still am not able to figure out what i have to do. Where do i have to make changes in the code.
Just wanted to add that i’m running the exact same code on IDLE and tis is what it shows as error. Do i have to run it on CMD as admin?
Thank you so much for your help. I finally figured it out! :p
Kindly elaborate me, i didn’t understand what to do?
Just in case you, or anyone else is running this in a windows environment using Visual Studio, and not running directly from the command prompt, you’ll may need to add the arguments to your project.
Right click your project -> Properties -> Debug -> Script Arguments -> [add your arguments here, like –image images\shapes.bmp]
thanks Adrian! I do not use to leave comments. But you saved me! Pleasure to read you again!
I’m happy to hear it! 🙂
If I am doing this in a Jupiter notebook, and what to display the results using matplotlib, how would I do so for the very last step as you do with:
# show the image
cv2.imshow(“Image”, image)
cv2.waitKey(0)
I’ve tried placing: plt.imshow(image) inside of the for loop as I thought this would work. It will run the cell with no error but not display any image.
If you’re using Jupyter notebooks make sure you declare matplotlib to be inline:
%matplotlib inline
From there, follow this tutorial on displaying images with matplotlib.
Adrian will these help me in detecting shapes in real time images also ,or will it throw errors in them
You can use this code to detect shapes in real-time as well.
Sir can you provide me with what changes to make in shape detector program so that i can take object from webcam feed and classify it ,it will be very helpful if you can provide with the code modification
You should use this post as a starting point to access your webcam.
I can’t understand why you made this line
cnts = cnts[0] if imutils.is_cv2() else cnts[1]
The
cv2.findContours
function in OpenCV 2.4 returns a 2-tuple while in OpenCV 3 it returns a 3-tuple. You can read more about the change in this blog post.I need to find radius of the given x,y coordinates of the center of a detected region? How can find the radius of each detected image?
I would suggest computing the
cv2.minEnclosingCircle
of the contour region to obtain the radius.Suppose three boxes are kept on top of one another. Does this method apply to finding the individual centres of each box, or it will find the single centre for the entire image?
You would want to change the
cv2.findContours
function call to either return a list of contours or a hierarchy, otherwise the script would find the center of the largest outer rectangle. In particular, take a look at thecv2.RETR_LIST
flag.Hello Adrian!
I tried to run this code on my system. But if I keep the code just the way it is, it shows me lots of centres (probably because it is in the loop). But when I keep that lines 33-39 outside the loop, there comes only one circle named centre but that is not on the center point but is somewhere at the bottom left corner of the contour. Can you please help me out with this?
Hi Ambika — this code will draw the center of each shape on Line 33. It does this by looping over all contours that have been detected. If you move Line 33 outside of the for loop then the coordinates will be incorrect. What exactly are you trying to accomplish?
For your kind information, I am using OpenCV 2.4.9 and Python 2.7.
Thanks!
Thank you very much sir 🙂
Hi Adrian! Great tutorial. Any idea why when I execute the files in terminal it is only producing a still image showing the centre of only one object? Similarly with the next tutorial on shape detection, only displaying the name of one shape. How do I get it to show them all? Thanks
You need to click on the active window and press any key on your keyboard to advance the execution of the script. That is what the
cv2.waitKey
call does.Also, if I wanted to add the additional functionality of counting the number of shapes/objects in the image, what would be the best way to go about this?
thanks
You need to be more specific regarding counting the number of shapes/objects. What is your end goal? Are there multiple objects of the same shape? Or are you looking just to get the total number of objects in an image?
Yes, I would like to get the total number of objects in an image, basically counting the number of “centers” that it is detecting. Thanks for your help
In that case, simply apply
cv2.findContours
. The number of contours returned will be the total number of objects in the image. You might have to filter the contours based on width/height/aspect ratio to help protect against false-positive detections, but that’s basically the gist.Very nice,good to read and made easy to understand. But am I correct in assuming that if my basic image has a white background instead of your example black background, the contouring doesn’t work?
Image included for reference: https://pasteboard.co/GJVJpIf.bmp
Why not just flip the image via
cv2.bitwise_not
that way your white background becomes black?Hi Adrian,
Can i find the largest contour area from many contours in a frame from a video.
Eg:
If there are 3 circles: left, middle and right, if left is having more area than other 2.i want to tell its left circle,is it possible?
Iam using Rpi3 python and opencv
I would suggest sorting your contours and maintaining a list of (x, y)-coordinates for each ball. A dequeue data structure like in this post would be really helpful. From there, monitor the (x, y)-coordinates in the dequeue. If there is a lot of variation, you know the ball is moving.
Hi! We are developing a mobile application that aims to measure an object’s area, to identify the real object’s (poultry eggs) size. We are about to use the formula for ellipse to get the area of the object, and the centroid to identify the axes needed. However, we are not sure if there is an available code in java for this. Thank you!
Hey Markus — I only provide Python + OpenCV code here. You would need to port the code to Java yourself.
Hi Adrian!
i’m running the code and i get this error, could you please help?! i don’t know where i’m going wrong.
File “centre_of_shape.py”, line 14, in
image = cv2.imread(args[“shapes_and_colors.jpg”])
KeyError: ‘shapes_and_colors.jpg’
Hey Aadil — you do not need to modify the code at all if you are using command line arguments. If you want to skip command line arguments you should hardcode the path to cv2.imread, like this:
cv2.imread("shapes_and_colors.jpg")
Hi — how would you deal with having a light gray background with other colored objects (red, orange) ? currently it returns one green rectangle around the perimeter of the entire image
It sounds like the color threshold parameters need to be tuned a bit. Perhaps your environment has a bit of a “green tint” to it. You would need to define a color threshold range for each color you wished to detect.
Hi, Adrian! Your post is great! But when I run this in my computer, it didn’t work well. I don’t how to do with it. The tip is: usage: detect_shapes.py [-h] –path IMAGE PATH
detect_shapes.py: error: argument –path is required. And the code is :
ap.add_argument(“–path”, dest=’image path’, required=True,
help=”path to the input image”,default=’/home/jason/桌面/Shape Segmentation/dddd’, type=str)
Hey Jason — the issue is that you are not correctly providing the command line arguments to the script. Please take a look at this post for more details.
Hi, I am trying to find centroid for moving object in that I am facing difficulty. Can any one please help me in that ??
What object are you trying to compute the centroid of? Without seeing it’s example it’s hard to point you in the right direction.
How can i get centroid(rectangle)-centroid(circle) value in this code. Your help may be appreciated.
See this blog post on shape detection. Once you know the name of the shape you can compute the centroid for each and subtract.
Hi..I want to ask why I use a picture whose background is white and this code didn’t work. Dose it relate to the color of background?
The code assumes that white is foreground and black is background. You may want to invert your image with a “cv2.bitwise_not”.
Hi Adrian, first of all let me say the way you explain things is amazing. Congratulations for the fantastic job. I have one question for you. I took a screenshot of this website:
https://learn.letskodeit.com/p/practice. it’s background is white, hence I added cv2.bitwise_not to your code. The problem I still face though is that, even if the code captures most of the objects (shapes) it does also capture shapes that are purely words next to each other. For example the radio button labeled “BMW” is considered as a rectangle.
Is there anything I could do to avoid this behaviour? Thanks
There are a few ways to approach the problem but I would suggest inspecting the gradient magnitude representation of the image like I do in this tutorial. You can use that representation to filter out text vs. other elements.
for the autonomous quadcopter project, I need this in realtime video. but I found an error in cX = int (M [“m10”] / M [“m00”]) and the terminal written zeroDivisionError: float division by zero
how do I change it so that it doesn’t error?
Add a small epsilon value to the division:
cX = int(M["m10"] / (M["m00"] + 1e-7))
If anyone is seeing only 1 shape outline being drawn, the solution is that the following code should be OUTSIDE (not indented) of the “for” loop:
# show the image
cv2.imshow(“Image”, image)
cv2.waitKey(0)
Or you can click the active window opened by OpenCV and then hit any key on your keyboard to advance the execution of the script.
Hey, Adrian!
How can I find width and height of specific shape?
Make sure you read this tutorial.
Hey, Adrian!
Great job! How can I find height and width of each elements or for one of them?
See this tutorial.
Hi adrian, thanks a million for making this post. saved me a ton of work!!!
Thanks Sebastian, you are more than welcome.
Thank you very much, it was really useful!!!
Thanks Dan, I’m glad you enjoyed it!
Sorry! i got it. but i get this error!
centreoftheshape.py: error: the following arguments are required: -i/–image
An exception has occurred, use %tb to see the full traceback.”
what does this mean ?
You need to supply the command line arguments to the script.
Hello
We tried running dis script but got this error:
python: can’t open file ‘center_of_shape.py’: [Errno 2] No such file or directory.
We are using Spyder, launched through anaconda navigator.
Do you have a solution?
I would recommend executing the script via the command line instead.
Thanks you for sharing well documented post with us. I like the way you explain code line by line. I am following you since my college time 2013 and even today your posts are helpful to me in my company.. Keep it up
Thanks Kevin, I’m glad you’re enjoying the posts. If possible please consider supporting the blog if you can. Thank you!
Hey Adrian,
Thank you for this code! I am super new to programming but am learning image processing for school. I am having a lot of trouble getting the ‘args’ code to work – keep getting an ipykernel_launcher error with Exit Code 2. Any advice on alternate code to use?
It’s okay if you are new to programming but you need to learn command line arguments if you want to study advanced Computer Science topics like Computer Vision. Start by reading this tutorial on command line arguments.
Hi Adrian and and the community !
Thank you for providing such great contents andso much tutorial !!
I installed pyton 3 and opencv4 following your tutorial and then I started this tutorial. I did everything you wrote in this tutorial but I have an error concerning the “tresh.copy()” which says “AttributeError: ‘tuple’ object has no attribute ‘copy'”
I don’t understand why, I had a look to your findContours memo and tried with the specific code line for OpenCv4 but still get an error. Any explanations about this ?
Regards,
Alex
Thanks !!
Make sure you’re downloading the source code to this post rather than copying and pasting it. You likely forgot the “[1]” after this line:
thresh = cv2.threshold(blurred, 60, 255, cv2.THRESH_BINARY)[1]
Great post, thanks.
Any ideas on how to compute the CoG for a non-integer contour? (meaning that the contour is not a result of thresholding over some mask, but rather a result of a different algorithm). It seems that cv2.moments requires integer inputs.
Thanks!
Hi Adrian ,
First I would like to thank you about your great blog and for your unique book “Practical Python and OpenCV Book”
My question is that I’ve applied canny edge detection rather than threshold , I used auto canny like you did in one of your previous code example , the result is same except for the triangle , the circle didn’t draw in the middle.
Any idea why ?
Thanks a lot
Hey Ali — auto-canny relies on heuristics so it’s not perfect.
Hello sir,
Firstly, I would like to thank you about your great blog and for your unique book “Practical Python and OpenCV Book”.
My question is how i can find centroid of contours in a video ? I used the same codes but cannot find centroid in a video, can you help me please ?
Thanks a lot
If you have a copy of Practical Python and OpenCV, make sure you refer to the chapters where I show you how to access the video stream. From there you apply your contour detection to each frame of the video stream and then compute the center of the countour.