You know what makes for a (not so) fun weekend?
Reconfiguring and reinstalling OSX on your MacBook Pro. Apparently, the 13in MacBook Pro that I use when I’m traveling decided to shit the bed.
No worries though, I use Carbon Copy Cloner and Backblaze, so no data was lost. And to be honest, I was considering rebuilding the development environment on my travel system for awhile now. While I use my 13in MacBook Pro while I travel, I have a second MacBook Pro that I use on a daily basis as my main development system. And over the past two years the development environments between the two have become horribly out of sync and almost unusable.
As I sat down Sunday night, looking out at the anvil-shaped thunderclouds rolling in across the Long Island sound, I took a second and sipped some tea (spiked with some peppermint schnapps; it is the weekend, of course) from my mug and watched as the lighting danced haphazardly across the sky.
There is a certain calming serenity that comes with watching a thunderstorm roll in — and hopefully the rest of this guide gives you some calming serenity yourself when you go to setup PyCharm to play nice with OpenCV and virtual environments.
PyCharm, virtual environments, and OpenCV
The rest of this blog post will assume that you have already installed OpenCV and the appropriate Python bindings on your system. I’m also going to assume that you have virtualenv and virtualenvwrapper installed as well.
These installation instructions and associated screenshots were gathered on my OSX machine, but these instructions will work on both Linux and Windows (for Windows you’ll have to change the various paths to files of course, but that’s okay).
I’ll also be setting up my system with Python 2.7 and OpenCV 2.4.X; however, you can use the same instructions to setup your environment with Python 3 and OpenCV as well, you’ll just need to change the paths to the Python and OpenCV files.
Step 1: Create your virtual environment
The first thing we are going to do is setup our virtual environment. Open up a terminal and create your virtual environment. For this example, let’s name the virtual environment pyimagesearch
:
$ mkvirtualenv pyimagesearch
Now that our virtual environment has been setup, let’s install NumPy, Scipy, matplotlib, scikit-learn, and scikit-image which are all commonly used for computer vision development:
$ pip install numpy $ pip install scipy $ pip install matplotlib $ pip install scikit-learn $ pip install -U scikit-image
Step 2: Sym-link your cv2.so and cv.py files
As I’m sure you already know, OpenCV is not pip-installable. You’ll need to manually sym-link your cv2.so
and cv.py
files into the site-packages directory of the pyimagesearch
virtual environment.
On my system, OpenCV is installed in /usr/local/lib/python2.7/site-packages/
This may not be the case for your system, so be sure to find your OpenCV install path and make note of it — you’ll need this path for the following step.
Now that we have the path to our OpenCV install, we can sym-link it into our virtual environment:
$ cd ~/.virtualenvs/pyimagesearch/lib/python2.7/site-packages/ $ ln -s /usr/local/lib/python2.7/site-packages/cv.py cv.py $ ln -s /usr/local/lib/python2.7/site-packages/cv2.so cv2.so
Step 3: Configure PyCharm
If you are not already using the PyCharm IDE for editing your code, it’s definitely worth a look. They have both a free community edition and a paid version with a bunch of nice bells and whistles.
It’s hard to believe, but for years I turned the other way at PyCharm and dismissed it.
You see, back in college I was forced to use Eclipse for Java development — and since I was never fond of Java or Eclipse, I (ignorantly) turned my back on any IDE that reminded me of it. Boy, that was a huge mistake.
About six months ago I decided to give PyCharm a real chance and not let my previous experiences bias my opinion. In short, it was one of the best choices I’ve ever made in terms of development environments.
Anyway, now that our virtual environment is all setup let’s connect it to a PyCharm project.
Open up PyCharm and create a new “Pure Python” project:
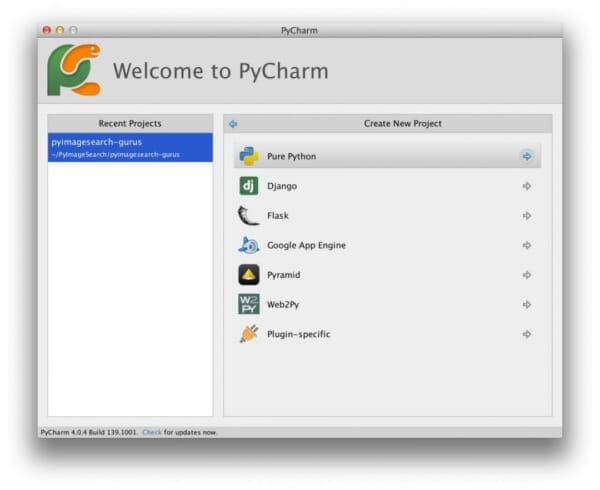
From here we need to set the location of our Python Interpreter. In most cases this location will point to your system install of Python. However, we do not want to use the system Python — we want to use the Python that is part of our pyimagesearch
virtual environment, so click the gear icon and select “Add Local”:
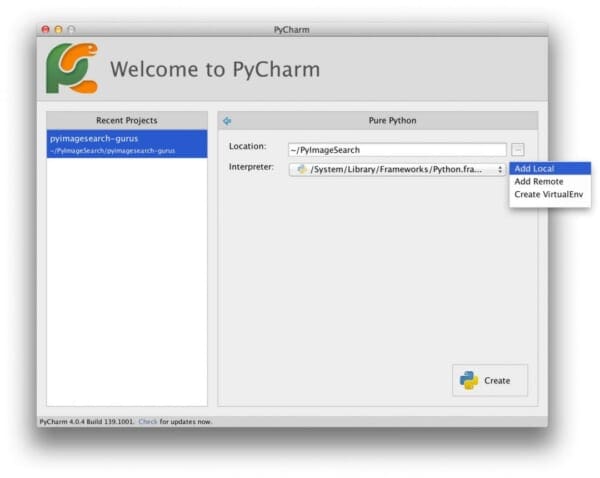
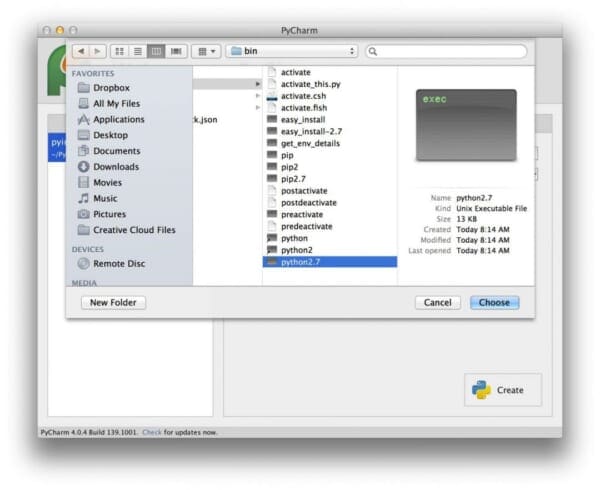
Next up, we need to specify the path to the Python binary inside our virtual environment.
In my case, the pyimagesearch
virtual environment is located in ~/.virtualenvs/pyimagesearch/
with the actual Python binary in ~/.virtualenvs/pyimagesearch/bin
.
In any case, be sure to navigate to the Python binary for your virtual environment, followed by clicking “Choose”:
After you have selected your virtual environment, PyCharm will spend a few seconds updating the project skeletons:
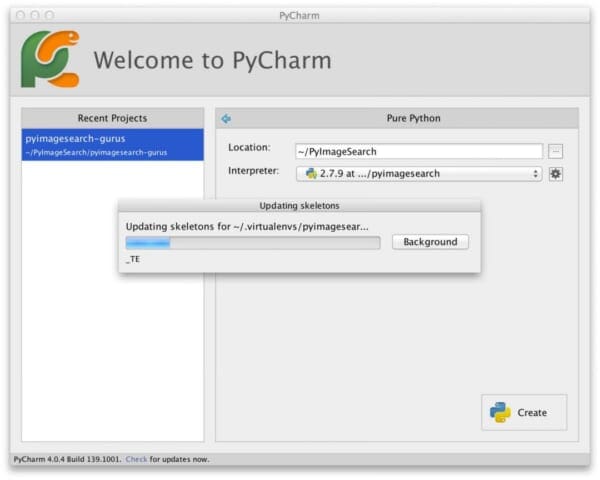
Once the skeletons are done updating, click the “Create” button to launch your project.
And that’s all there is to it!
Done!
After this, you’re all set. PyCharm will use your pyimagesearch
virtual environment and will recognize the OpenCV library.
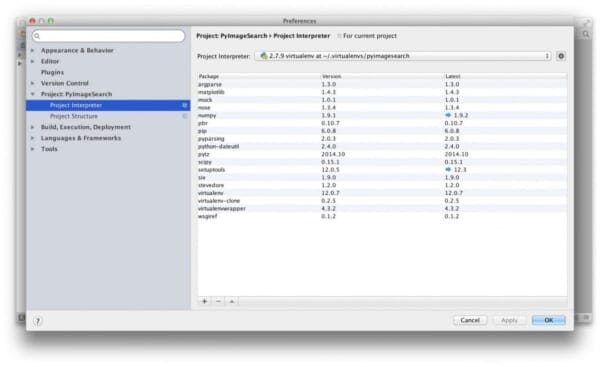
And if you ever want to update the virtual environment for a project you are using, just to the PyCharm Preferences panel, select the Project tab on the left sidebar, followed by “Project Interpreter”:
What's next? We recommend PyImageSearch University.
86 total classes • 115+ hours of on-demand code walkthrough videos • Last updated: October 2024
★★★★★ 4.84 (128 Ratings) • 16,000+ Students Enrolled
I strongly believe that if you had the right teacher you could master computer vision and deep learning.
Do you think learning computer vision and deep learning has to be time-consuming, overwhelming, and complicated? Or has to involve complex mathematics and equations? Or requires a degree in computer science?
That’s not the case.
All you need to master computer vision and deep learning is for someone to explain things to you in simple, intuitive terms. And that’s exactly what I do. My mission is to change education and how complex Artificial Intelligence topics are taught.
If you're serious about learning computer vision, your next stop should be PyImageSearch University, the most comprehensive computer vision, deep learning, and OpenCV course online today. Here you’ll learn how to successfully and confidently apply computer vision to your work, research, and projects. Join me in computer vision mastery.
Inside PyImageSearch University you'll find:
- ✓ 86 courses on essential computer vision, deep learning, and OpenCV topics
- ✓ 86 Certificates of Completion
- ✓ 115+ hours of on-demand video
- ✓ Brand new courses released regularly, ensuring you can keep up with state-of-the-art techniques
- ✓ Pre-configured Jupyter Notebooks in Google Colab
- ✓ Run all code examples in your web browser — works on Windows, macOS, and Linux (no dev environment configuration required!)
- ✓ Access to centralized code repos for all 540+ tutorials on PyImageSearch
- ✓ Easy one-click downloads for code, datasets, pre-trained models, etc.
- ✓ Access on mobile, laptop, desktop, etc.
Summary
In this blog post I showed you how to utilize virtual environments and OpenCV inside my favorite IDE, PyCharm.
I hope you find this post useful when you go to setup your next Python + OpenCV project!
And if you aren’t using PyCharm yet, it’s definitely worth a look.
Join the PyImageSearch Newsletter and Grab My FREE 17-page Resource Guide PDF
Enter your email address below to join the PyImageSearch Newsletter and download my FREE 17-page Resource Guide PDF on Computer Vision, OpenCV, and Deep Learning.
chrisq
You probably want to activate the virtualenv before installing modules with pip.
Adrian Rosebrock
Executing
mkvirtualenv pyimagesearch
will automatically dump you into thepyimagesearch
virtual environment. But yes, if you open up a new terminal, restart your system, etc., it’s very important to executeworkon pyimagesearch
to be dropped back into the virtual environment.john
Hi Adrian
I’m debugging a python app on the pi using Pycharm running on a pc. I can get it to work well, but run into trouble if stuff is installed in a virtual environment on the pi as it won’t find various modules. Is there a way around this?
regards
John
Adrian Rosebrock
You’ll want to set the remote project interpreter for the project. From there you’ll be able to find all modules installed inside the virtual environment on your Pi.
bb
You can also create your virtual environment with the –system-site-packages flag. Then Python in your virtualenv will be able to use system packages from outside the environment.
Adrian Rosebrock
Very true! But in most cases I try to keep my system packages and my virtual environment packages entirely independent from each other.
Ting-Che
Hey Adrian
I can’t seem to find cv.py in my computer, I followed your other tutorial, https://pyimagesearch.com/2015/06/15/install-opencv-3-0-and-python-2-7-on-osx/, to install OpenCV on my OSX. Can you help me out here?
Thanks
Adrian Rosebrock
There is actually not a
cv.py
for OpenCV 3, just acv2.so
. As long as you have thecv2.so
, you should be fine.Greg Peter
Hi Adrian
I ran into trouble trying to run matplotlib in pyimagesearch. I was wondering if you had advice on setting it up with python –framework to work around this issue.
Thanks
Adrian Rosebrock
Hey Greg — See if this post helps install matplotlib on your system.
UPDATE: This is a known compatability issue with matplotlib 1.5 and virtualenv. You can read more about it here where a workaround is suggested. A ticket has also been opened with virtualenv so that the problem can be further addressed and a more permanent fix created. In the meantime, I would suggest skipping the hack and just use 1.4.X of matplotlib.
R
Hey Adrian,
Happy New Year!
I’m having some trouble with importing cv2 into a python file. When I put “import cv2” into a python file, an error occurs in PyCharm saying: “No module named cv2”. Now, doing your trex example from your book (which is really good), I’m able to display the trex by ignoring the error. I also see cv2 in my project interpreter.
Why do I have the “No module named cv2” error and how could I fix it?
Adrian Rosebrock
Just to clarify — you are able to run the Python script inside a virtual environment, but when you use PyCharm, you’re receiving an error message?
R
Hey Adrian,
Import cv2 is underlined in red in the editor window and the error says “No module named cv2”. But when I hit run on PyCharm, everything goes smoothly (t-rex image shows).
I should also note that when I use import cv2 in the Python console in PyCharm, no error shows. I want the import cv2 to work in PyCharm so PyCharm can perform code completion and make life easier, like an IDE should :p
Adrian Rosebrock
Got it, I understand now. So OpenCV is 100% successfully installed on your system, PyCharm just doesn’t want to recognize it. I assume you have followed the instructions in this post to set the “Project Interpreter” inside of PyCharm and pointed it to your virtual environment? One thing I always do when after setting the project interpreter is to shut down PyCharm and restart it and that normally gets rid of the error.
R
Yeah, nothing. Still shows as an error after restarting. I got desperate and uninstalled and reinstalled PyCharm and it stills shows as an error. Also tried adding environment variables and nothing (http://stackoverflow.com/questions/10987834/importerror-no-module-named-cv2-when-running-django-project-from-pycharm-ide).
Adrian Rosebrock
Ouch, that’s really strange. To be honest, I’m not sure why PyCharm refuses to recognize the OpenCV bindings. Changing the project interpreter and then restarting has always worked for me in the past. I would suggest posting in the PyCharm Forums or opening a support ticket. Their team has always been really helpful to me in the past.
Charlie Choi
Try using the professional version of pycharm! I was having the same problems when using the community edition, then upgraded to professional and it worked.
Maurizio
I’ve just tried it on the professional edition (5.0.4) and still get the same warning OP gets
I was getting the same warning and fixed it somehow. Most likely you didn’t set up the correct interpreter.
Personally I had two different values for Python Console interpreter (Preferences > Build, Execution, Deployment > Console > Python Console) and the Project Interpreter (as shown in the tutorial). I set both to the same instance of Python and the warning message is gone.
Theo
I have the same problem. Has this been solved?
Mengjie Wang
I hate to say that I am using Eclipse, but I really need help here,I am trying to use this on Eclipse. If I import cv2 in the terminal. It is fine, but when I use it in Eclipse, ImportError: No module named cv2, do you know how to update the Eclipse?
I tried the methods online, it is not working.
Adrian Rosebrock
Sorry Mengjie, I’m not an Eclipse user. Have you tried using PyDev? Again, I’m not familiar with it, but I’m fairly sure it allows you to select your Python virtual environment interpreter.
Oscar
Hi Adrian,
i use Pycharm CE community, Why Pycharm show Broken link(Red) of the files cv2.so & cv.py??
Adrian Rosebrock
Have you updated your project interpreter to use the “cv” virtual environment? If so, try closing PyCharm and re-opening it. That normally does the trick for me.
shailendra
Hi Adrian,
How do we create virtual environment in windows? There is no terminal like you have in Macbooks
Adrian Rosebrock
You still have a terminal, it’s called the command prompt. I don’t officially support Windows on the PyImageSearch blog, but you can read more about virtualenv + Windows here.
schiroko
Hey Adrian,
many thanks for all your blog posts. I just starting with all that stuff and trying to install OpenCV, Python and PyCharm, pretty much your setup : )
Now I followed your “Install OpenCV 3.0 and Python 3.4+ on OSX” guide and now I try to follow this one. Now I have problems with your Step 2 “Sym-link your cv2.so and cv.py files”. Both files do not exist in Python 3.5. I changed python2.7 to python3.5 in the paths and also looked for the files manually. But these files exist in my 2.7 python folder, which I excedently installed before 3.5.
Any ideas?
Many thanks : )
Schi
Adrian Rosebrock
Double-check your output from CMake and make. It seems that CMake did not properly find your Python 3.5 installation (the tutorial you followed was for Python 3.4), so you’ll likely need to update the paths to point to Python 3.5 rather than Python 3.4 before running CMake. I’ll try to do a Python 3.5 and OpenCV 3 install blog post in the future.
Schi
Installing matplotlib into a virtuell env. leads to the error:
“Python is not installed as a framework. The Mac OS X backend will not be able to function correctly if Python is not installed as a framework. See the Python documentation for more information on installing Python as a framework on Mac OS X. Please either reinstall Python as a framework, or try one of the other backends. If you are Working with Matplotlib in a virtual enviroment see ‘Working with Matplotlib in Virtual environments’ in the Matplotlib FAQ”
Any tips?
Adrian Rosebrock
Matplotlib and virtualenv are having issues on OSX. It’s something the developers are aware of. In the meantime, I suggest installing an older version of matplotlib that does not give this error, such as matplotlib==1.4.3.
Jet
Hey Adrian,
What would be a good way to sync the environment across home computer and travel computer?
Thanks, Jet
Brad Johnson
Hey Adrian, I have built and am running the realtime_stitching under windows 10 with python, but the panoramic output only shows the left display and a small fraction of the right display. is there a solution for this off of the top of your head? it only displays a tiny segment of the right camera. thanks, Brad
Adrian Rosebrock
Hey Brad — without seeing your setup it’s hard to determine what the actual issue is. Other than only a small segment of the right camera being displayed, is there any distortion to the frame? If so, then the keypoint matching issue is likely the problem. Otherwise, I would suggest playing with your camera setup. It could be the case that most of the field of view is covered by the left camera.
Luca
Hi Adrian, this did not work for me as I had the same problem of “R”. Following your previous tutorial on the installation of OpenCV and Python on Mac, I set the interpreter on the “cv3” virtual environment rather than on the one created in this tutorial. It worked smoothly. Thanks for sharing this.
Adrian Rosebrock
Keep in mind that Python virtual environments can be named whatever you want to name them. This was simply an example. If you are using a Python virtual environment with a different name then you’ll need to change which Python interpreter PyCharm is using (as you already have).
carlos
I have the virtual box environment. I noticed that if I run the example code “load_display_save.py” using IDLE, it does not find the “cv2.so”. If I run it from the console/terminal as
“python load_display_save.py”
it runs with no issues.
I looked at IDLE File->Path Browset, It shows using “sys.path”.
It looks like IDLE does not find the virtual environment.
Anyone know how to fix this?
Adrian Rosebrock
I assume you are referring to the GUI version of IDLE? If so, then no, IDLE does not respect the Python virtual environment. For a GUI similar to IDLE I would suggest Jupyter Notebooks.
sebastian
I solved it by NOT linking the cv2.so but copying it into the folder.
Madhusudan
Hi Adrian,
I am stuck in step 2. I don’t seem to find the cv.py file. Can you guide me on where I should look for it ?
Adrian Rosebrock
You don’t need the
cv.py
file, it’scv2.so
. You can normally find this file in:~/.virtualenvs/name_of_your_virtual_env/lib/python2.7/site-packages/
If you followed the installation instructions I have provided on this blog.
Neha
hi
I have to develop genetic algorithm for intra-urban feature extraction can you please suggest me about python library and related codes?
Adrian Rosebrock
I don’t cover genetic algorithms on this blog. In general, I don’t recommend them if you already have features extracted. More simple, efficient machine learning algorithms will likely obtain just the same, if not better accuracy.
Emile van Bergen
Hi, have you found a way to directly view images in numpy arrays while debugging ordinary (non-ipynb) python programs with PyCharm? I’m getting desparate enough to try tricks such as http://stackoverflow.com/questions/35970222/cant-get-menpo-to-display-images-in-pycharm which creates an interactive matplotlib window.
I’ve indeed found PyCharm great to debug my vision tools, but not being able to inspect images in the debugger live as you can with e.g. Visual Studio (brr) really slows down iterative tweaking.
Adrian Rosebrock
To be honest, I rarely debug scripts using PyCharm. I end up executing all my scripts via terminal and inserting
print
andcv2.imshow
statements when appropriate. When it comes to debugging images themselves, I would suggest using visual-logging.Max
Hi Adrian,
I went through your “Ubuntu 16.04: How to install OpenCV” tutorial with python 3.5 bindings and it works great. I got confused on step 2 of this pycharm tutorial because when I went to change 2.7 to 3.5 in the path below, python2.7 directory was there but no python3.5. Shouldn’t python3.5 be appearing in the pyimagesearch virtual environment?
cd ~/.virtualenvs/pyimagesearch/lib/python2.7/site-packages/
Adrian Rosebrock
I assume you named your virtual environment “pyimagesearch”? If so, what is the output of running:
Suhas
Hi Adrian,
I saw a similar issue. When I ran these commands from Terminal,
$ workon pyimagesearch
$ python –version
The output is: Python 2.7.12
Regards,
Suhas
Adrian Rosebrock
If you are getting “Python 2.7” as the Python version inside the Python virtual environment then you created a Python 2.7 virtual environment, not a Python 3 one. To create a Python 3 virtual environment you would need to explicitly supply the “-p python3” flag:
$ mkvirtualenv your_env_name -p python3
Anthony of Sydney
Dear Dr Adrian,
I have installed PyCharm onto my Win 7 AMD64 machine.
When in the PyCharm IDE, you can ‘set’ your virtual environment by pressing ALT+CTRL+S. I have Python v3.4.4 and Python 3.6 from the Miniconda distribution.
I understand that for one project, you can set the virtual env to be Python 3.4 for one project and another virtual environment to be Python 3.6.
But you cannot have both Python 3.4 and Python 3.5 in the same environment.
All it means to me is that the virtual environment is a convenient way of switching between Python versions.
In summary, the virtual environment does not combine packages from say v3.5 with packages from v3.4. That is you can’t have an environment that combines packages that are only available from v3.5 but still use 3.4.
Thank you,
Anthony from Sydney
Adrian Rosebrock
Correct, you cannot have a virtual environment that uses both Python 3.4 and Python 3.5. You’ll need to manually create a virtual environment for each Python version you are using.
Subhaya Tuladhar
Hi, I am in python 3.6 and just installed opencv through gitclone but i couldnt find cv2.so or cv.py. What could be the probable cause for this?
Adrian Rosebrock
Did you use one of my tutorials to install OpenCV? Or one not on PyImageSearch?
Anna_Maria
Dear Adrian, could you tell me how to install contrib_modules on Anaconda-Python-PyCharm? I would be grateful for any suggestions.
Adrian Rosebrock
I haven’t used Anaconda to install OpenCV before. I would recommend using one of my tutorials to compile OpenCV from source using an Anaconda environment. From there you can create a new PyCharm project that uses the Anaconda environment.
Vicky
Thanks a lot for this tutorial! I had been desperately searching for using OpenCV with Pycharm for such a long time. You have made my day!
Adrian Rosebrock
Fantastic, I’m happy I could help Vicky! 🙂
PIYUSH GUPTA
Thanks For you tutorial , much better and documented as compared to others . Really made my Work easy
Adrian Rosebrock
I’m glad to hear it Piyush, congrats on getting OpenCV configured with PyCharm.
sebastian
Installing cv2 worked for but no I have problems using cv2.imshow(). The newly opened windows is minimized. It starts with only the window bar but without content.
Anyone an idea?
Adrian Rosebrock
How are you executing the script? Via command line? Or inside PyCharm?
John
Hi Adrian, I have this problem and it does it in both command line and PyCharm.
Adrian Rosebrock
How did you install OpenCV? Via one of my tutorials here on PyImageSearch?
Willie
Good dialog here. I’m still a little confused though.
If I want to install opencv, should I run “make install” from OUTSIDE the virtualenv?
What if I have one project that uses opencv2 with python2 bindings and another that uses python3 bindings? Or opencv3 with python2 bindings, or opencv3 with python3 bindings… You see where I’m going with this? There should be a clean way to keep this separate using virtual environments but it’s confusing what things need to be installed on the system. I’d rather not run “make” every time I spin up a new virtualenv that uses opencv. So, what is the best way to manage this type of situation?
Thoughts?
Adrian Rosebrock
Once you’ve ran
CMake
you can run all other commands outside the virtual environment. The virtual environment will have no affect on themake
command.As for running multiple versions of OpenCV + Python do what I do — create a separate virtual environment for each install. Compile OpenCV + Python for that specific combination. Then install. You only need to compile once per combination.
Willie Maddox
Hmmm…
So CMake must be run within a virtual environment?
If the virtual environment has no effect on the make command then why is it necessary to create a separate virtual environment for each install? Are we talking about the same thing here (i.e. make install)?
Adrian Rosebrock
The virtual environment DOES have an affect on the CMake command. You need to use a separate virtual environment for each version of Python you want to use. The OpenCV bindings are only compatible with the Python version you compile them for.
Zardosht
Hi Adrian,
do you know of a way of how to have OpenCV documentation as inline documentation in PyCharm?
This is specially helpful when learning OpenCV. I want to be able to press F1 and see the documentation, for example for function signatures.
Is it at all possible?
Thanks.
Adrian Rosebrock
Hi Zardosht — unfortunately I do not know of a way to include OpenCV documentation inline with PyCharm.
Brian Tremaine
Hi Adrian,
I’m wondering what is the best practice in keeping projects synchronized between office and travel computers? I use to put all projects on a memory stick but that is subject to loss or forgetting to carry it along.
What I am doing now is putting all working projects on Dropbox then running the projects right from the ‘local’ dropbox folder. I tend to think I’m paying a penalty in speed because files are always synchronizing.
PyCharm defaults to putting projects locally and I’m wondering if putting this on Dropbox is ‘best’ practice?
Thanks,
Brian
Adrian Rosebrock
I personally like keeping all my project configurations in Dropbox. I use GitHub or Bitbucket to manage my code. Then on a new machine I would just clone down my repo for the code, make any changes, then commit them. You could put the code itself on Dropbox as well but a dedicated repo in the cloud would be much better.
Sundaresh
Hi Adrian,
I recalled reading this article from a long time back when I had to re-format and install python again on my computer. I am not sure if I missed it in the comments / article, but what would you suggest is the best tree structure once a person has activated his virtual environment (say testenv) ? Should the project files (data, code etc.) be located alongside the testenv folder, or should they be inside the testenv folder?
I understand this is more a matter of individual choice, but wanted to hear what you practice so that I can take a call.
Adrian Rosebrock
I wouldn’t keep any of your project files inside your Python virtual environment directory. Store them wherever you like on your system. Then just access the Python virtual environment to execute the code.
Marco
Has anyone found a way to get PyCharm to autocomplete OpenCV functions? My code which imports cv2 runs just fine, but typing for example “cv2.” and then hitting Ctrl-Space comes up empty.
Adrian Rosebrock
Hm, that doesn’t sound right. Is PyCharm able to correctly import the “cv2” library? Or is it showing an error?
João
I had a similar issue, happened more than once and might be related to updating PyCharm through its popups. I uninstalled PyCharm and deleted all previous settings, and made a clean install of the latest version, downloaded from the website. Worked for me both times I had the issue. Hope this helps.
Paras Salunkhe
Hi Adrian,
Thank you for the awesome tutorials. I am having a problem. I have downloaded pycharm and when I get to the point of setting the interpreter I cannot the Python binaries in the bin folder. I tried creating multiple environments and repeat the instructions but of no use.
Please help.
Adrian Rosebrock
I would suggest double-checking and triple-checking the path to your Python virtual environment binary — the path issue is likely what is causing the problem.