Here we are, the final step of building a real-life Pokedex in Python and OpenCV.
This is where it all comes together.
We’ll glue all our pieces together and put together an image search engine based on shape features.
We explored what it takes to build a Pokedex using computer vision. Then we scraped the web and built up a database of Pokemon. We’ve indexed our database of Pokemon sprites using Zernike moments. We’ve analyzed query images and found our Game Boy screen using edge detection and contour finding techniques. And we’ve performed perspective warping and transformations using the cv2.warpPerspective function.
So here it is. The final step. It’s time to combine all these steps together into a working Pokedex.
Are you ready?
I am. This has been a great series of posts. And I’m ready to bring it all home.
Previous Posts
This post is part of a series of blog posts on how to build a real-like Pokedex using Python, OpenCV, and computer vision and image processing techniques. If this is the first post in the series that you are reading, definitely take the time to digest it and understand what we are doing. But after you give it a read, be sure to go back to the previous posts. There is a ton of awesome content related to computer vision, image processing, and image search engines that you won’t want to miss!
Finally, if you have any questions, please send me an email. I love chatting with readers. And I’d be glad to answer any questions about computer vision that you may have.
- Step 1: Building a Pokedex in Python: Getting Started (Step 1 of 6)
- Step 2: Building a Pokedex in Python: Scraping the Pokemon Sprites (Step 2 of 6)
- Step 3: Building a Pokedex in Python: Indexing our Sprites using Shape Descriptors (Step 3 of 6)
- Step 4: Building a Pokedex in Python: Finding the Game Boy Screen (Step 4 of 6)
- Step 5: Building a Pokedex in Python: OpenCV and Perspective Warping (Step 5 of 6)
Building a Pokedex in Python: Comparing Shape Descriptors
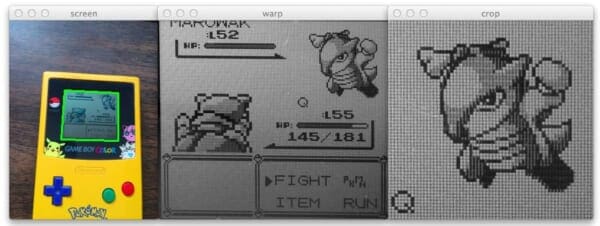
When we wrapped up our previous post, we had applied perspective warping and transformations to our Game Boy screen to obtain a top-down/birds-eye-view:

Then, we extracted the ROI (Region of Interest) that corresponded to where the Pokemon was in the screen.

From here, there are two things that need to happen.
The first is that we need to extract features from our cropped Pokemon (our “query image”) using Zernike moments.
Zernike moments are used to characterize the shape of an object in an image. You can read more about them here.
Secondly, once we have our shape features, we need to compare them to our database of shape features. In Step 2 of building a Pokedex, we extracted Zernike moments from our Pokemon sprite database. We’ll use the Euclidean distance between Zernike feature vectors to determine how “similar” two Pokemon sprites are.
Now that we have a plan, let’s define a Searcher class that will be used to compare a query image to our index of Pokemon sprites:
# import the necessary packages
from scipy.spatial import distance as dist

class Searcher:
	def __init__(self, index):
		# store the index that we will be searching over
		self.index = index

	def search(self, queryFeatures):
		# initialize our dictionary of results
		results = {}

		# loop over the images in our index
		for (k, features) in self.index.items():
			# compute the distance between the query features
			# and features in our index, then update the results
			d = dist.euclidean(queryFeatures, features)
			results[k] = d

		# sort our results, where a smaller distance indicates
		# higher similarity
		results = sorted([(v, k) for (k, v) in results.items()])

		# return the results
		return results
The first thing we do on Line 2 is import the SciPy distance package. This package contains a number of distance functions, but specifically, we’ll be using the Euclidean distance to compare feature vectors.
Line 4 defines our Searcher class, and Lines 5-7 defines the constructor. We’ll accept a single parameter, the index of our features. We’ll assume that our index is a standard Python dictionary with the name of the Pokemon as the key and the shape features (i.e. a list of numbers used to quantify the shape and outline of the Pokemon) as the value.
Line 9 then defines our search method. This method takes a single parameter — our query features. We’ll compare our query features to every value (feature vector) in the index.
We initialize our dictionary of results on Line 11. The name of the Pokemon will be the key and the distance between the feature vectors will serve as the value.
Finally, we can perform our comparison of Lines 14-18. We start by looping over our index, then we compute the Euclidean distance between the query features and the features in the index on Line 17. Finally, we update our results dictionary using the current Pokemon name as the key and the distance as the value.
We conclude our search method by sorting our results on Line 22, where smaller distances between feature vectors indicates that the images are more “similar”. We then return our results on Line 25.
In terms of actually comparing feature vectors, all the heavy lifting is down by our Searcher class. It takes an index of pre-computed features from a database and then compares the index to the query features. These results are then sorted by similarity and returned to the calling function.
Now that we have the Searcher class defined, let’s create search.py, which will glue everything together:
# import the necessary packages
from pyimagesearch.searcher import Searcher
from pyimagesearch.zernikemoments import ZernikeMoments
import numpy as np
import argparse
import pickle
import imutils
import cv2

# construct the argument parser and parse the arguments
ap = argparse.ArgumentParser()
ap.add_argument("-", "--index", required = True,
	help = "Path to where the index file will be stored")
ap.add_argument("-q", "--query", required = True,
	help = "Path to the query image")
args = vars(ap.parse_args())

# load the index
index = open(args["index"], "rb").read()
index = pickle.loads(index)
Lines 2-8 handle importing all the packages we need. I placed our Searcher class in the pyimagesearch package for organization purposes. The same goes for our ZernikeMoments shape descriptor on Line 3 and imutils on Line 7. The imutils package simply contains convenience methods that make it easy to resize images. We then import NumPy to manipulate our arrays (since OpenCV treats images as multi-dimensional NumPy arrays), argparse to parse our command line arguments, cPickle load our pre-computed index of features, and cv2 to have our bindings into the OpenCV library.
Lines 11-16 parse our command line arguments. The --index switch is the path to our pre-computed index and --query is the path to our cropped query image, which is the output of Step 5.
Lines 19 and 20 simply use pickle to load our pre-computed index of Zernike moments off of disk.
Now let’s load our query image off of disk and pre-process it:
# load the query image, convert it to grayscale, and
# resize it
image = cv2.imread(args["query"])
image = cv2.cvtColor(image, cv2.COLOR_BGR2GRAY)
image = imutils.resize(image, width = 64)
This code is pretty self-explanatory, but let’s go over it none-the-less.
Line 24 loads our query image off disk using the cv2.imread function. We then convert our query image to grayscale on Line 25. Finally, we resize our image to have a width of 64 pixels on Line 26.
We now need to prepare our query image for our shape descriptor by thresholding it and finding contours:
# threshold the image
thresh = cv2.adaptiveThreshold(image, 255, cv2.ADAPTIVE_THRESH_MEAN_C,
	cv2.THRESH_BINARY_INV, 11, 7)

# initialize the outline image, find the outermost
# contours (the outline) of the pokemon, then draw
# it
outline = np.zeros(image.shape, dtype = "uint8")
cnts = cv2.findContours(thresh.copy(), cv2.RETR_EXTERNAL,
	cv2.CHAIN_APPROX_SIMPLE)
cnts = imutils.grab_contours(cnts)
cnts = sorted(cnts, key = cv2.contourArea, reverse = True)[0]
cv2.drawContours(outline, [cnts], -1, 255, -1)
The first step is to threshold our query image on Lines 29 and 30. We’ll apply adaptive thresholding using the cv2.adaptiveThreshold function and set all pixels below the threshold to black (0) and all pixels above the threshold to white (255).
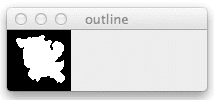
The output of our thresholding looks like this:

cv2.adaptiveThreshold.Next, we initialize a “blank” array of zeros on Lines 36-38 with the same dimensions of our query image. This image will hold the outline/silhouette of our Pokemon.
A call to cv2.findContours on Line 36 finds all contours in our thresholded image. The cv2.findContours function is destructive to the image that you pass in, so be sure to make a copy of it using the NumPy copy() method.
Then, we make an important assumption on Line 39. We’ll assume that the contour with the largest area (calculated using the cv2.contourArea function) corresponds to the outline of our Pokemon.
This assumption is a reasonable one to make. Given that we have successfully cropped the Pokemon from our original image, it is certainly reasonable that the contour with the largest area corresponds to our Pokemon.
From there, we draw our largest contour using the cv2.drawContours function on Line 40.
You can see the output of drawing our contours below:

cv2.contourArea and cv2.drawContours.The rest of our code is pretty simple:
# compute Zernike moments to characterize the shape of
# pokemon outline
desc = ZernikeMoments(21)
queryFeatures = desc.describe(outline)

# perform the search to identify the pokemon
searcher = Searcher(index)
results = searcher.search(queryFeatures)
print "That pokemon is: %s" % results[0][1].upper()

# show our images
cv2.imshow("image", image)
cv2.imshow("outline", outline)
cv2.waitKey(0)
We initialize our ZernikeMoments shape descriptor on Line 44 with a radius of 21 pixels. This is the exact same descriptor with the exact same radius that we used when indexing our database of Pokemon sprites. Since our intention is to compare our Pokemon images for similarity, it wouldn’t make sense to use one descriptor for indexing and then another descriptor for comparison. It is important to obtain consistent feature representations of your images if your intent is to compare them for similarity.
Line 45 then extracts our Zernike moments from the outline/silhouette image seen in Figure 4 above.
To perform our actually search, we first initialize our Searcher on Line 48 and perform the search on Line 49.
Since our results are sorted in terms of similarity (with smaller Euclidean distances first), the first tuple in our list will contain our identification. We print out the name of our identified Pokemon on Line 50.
Finally, we display our query image and outline and wait for a keypress on Lines 53-55.
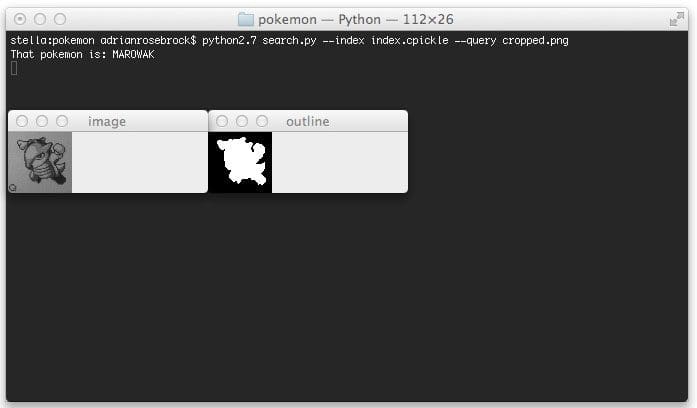
To execute our script, issue the following command:
$ python search.py --index index.cpickle --query cropped.png
When our script finishes executing you’ll see something similar to below:

Sure enough, our Pokemon is a Marowak.
Here are the results when using a Pidgey as a query image:

And a Kadabra:

You’ll notice that the Kabdra outline is not completely “filled in”. Luckily our Zernike moments shape features are robust enough to handle this. But this is likely a sign that we should take more care in pre-processing our images. I’ll leave that as future work for the reader.
Regardless, in all cases, our Pokemon image search engine is able to identify the Pokemon without an issue.
Who said a Pokedex was fiction?
Clearly by utilizing computer vision and image processing techniques we are able to build one in real-life!
What's next? We recommend PyImageSearch University.
86+ total classes • 115+ hours hours of on-demand code walkthrough videos • Last updated: January 2026
★★★★★ 4.84 (128 Ratings) • 16,000+ Students Enrolled
I strongly believe that if you had the right teacher you could master computer vision and deep learning.
Do you think learning computer vision and deep learning has to be time-consuming, overwhelming, and complicated? Or has to involve complex mathematics and equations? Or requires a degree in computer science?
That’s not the case.
All you need to master computer vision and deep learning is for someone to explain things to you in simple, intuitive terms. And that’s exactly what I do. My mission is to change education and how complex Artificial Intelligence topics are taught.
If you're serious about learning computer vision, your next stop should be PyImageSearch University, the most comprehensive computer vision, deep learning, and OpenCV course online today. Here you’ll learn how to successfully and confidently apply computer vision to your work, research, and projects. Join me in computer vision mastery.
Inside PyImageSearch University you'll find:
- ✓ 86+ courses on essential computer vision, deep learning, and OpenCV topics
- ✓ 86 Certificates of Completion
- ✓ 115+ hours hours of on-demand video
- ✓ Brand new courses released regularly, ensuring you can keep up with state-of-the-art techniques
- ✓ Pre-configured Jupyter Notebooks in Google Colab
- ✓ Run all code examples in your web browser — works on Windows, macOS, and Linux (no dev environment configuration required!)
- ✓ Access to centralized code repos for all 540+ tutorials on PyImageSearch
- ✓ Easy one-click downloads for code, datasets, pre-trained models, etc.
- ✓ Access on mobile, laptop, desktop, etc.
Summary
In this post we wrapped up our series on building a Pokedex in Python and OpenCV.
We made use of a lot of important computer vision and image processing techniques such as grayscale conversion, thresholding, and finding contours.
We then used Zernike moments to describe the shape of our Pokemon.
In order to build an actual image search engine, we required a query image. We captured raw photos of our Game Boy screen and then applied perspective warping and transformations to obtain a top-down/birds-eye-view of our screen.
Finally, this post compared our shape descriptors using OpenCV and Python.
The end result is a real-life working Pokedex!
Simply point your smartphone at a Game Boy screen, snap a photo, and the Python scripts I have given you will take care of the rest!
Wrapping Up
I hope you enjoyed this series of blog posts as much as I have!
It takes a lot of my time to write up posts like this and I would really appreciate it if you took a moment to enter your email address in the form below so that I can keep in contact with you as I write more articles.

Download the Source Code and FREE 17-page Resource Guide
Enter your email address below to get a .zip of the code and a FREE 17-page Resource Guide on Computer Vision, OpenCV, and Deep Learning. Inside you'll find my hand-picked tutorials, books, courses, and libraries to help you master CV and DL!


