Table of Contents
- Getting Started with Docker for Machine Learning and MLOps
- Why Use Docker for MLOps? Reproducible Machine Learning Environments
- Configuring Your Development Environment
- Project Structure
- Docker Architecture Explained: Images, Containers, and Virtual Machines
- Essential Docker Commands for Beginners
- How to Write a Dockerfile for a PyTorch Lightning Project
- Dockerfile Best Practices for Machine Learning Images
- Docker for ML: Dataset Mounts, Environment Variables, and GPU Support
- Docker Alternatives for MLOps: Podman, Buildah, and Apptainer
- Summary
Getting Started with Docker for Machine Learning and MLOps
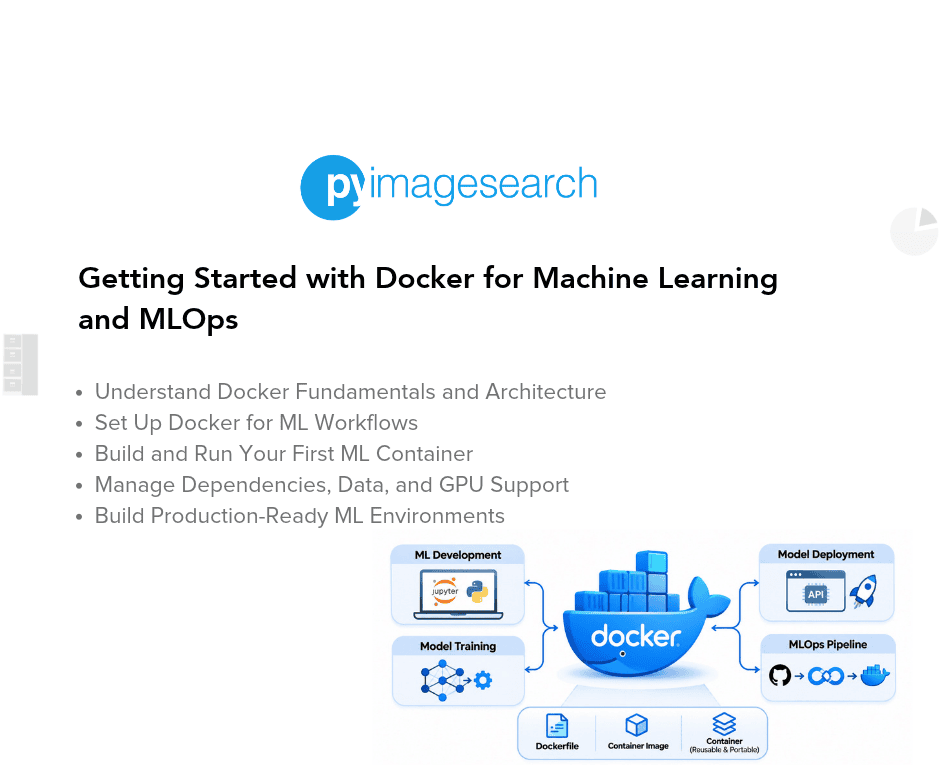
In this lesson, we will learn how to use Docker for MLOps, starting with why Docker matters in machine learning (ML), then exploring Docker fundamentals and architecture, running basic Docker commands, building reproducible ML environments, and containerizing an ML project. We will also cover best practices for ML images, finish with a hands-on exercise, and briefly look at some popular Docker alternatives.
This lesson is the 2nd in a 3-part series on Machine Learning Operations (MLOps):
- What Is MLOps? Architecture, MLOps vs DevOps, and LLMOps
- Getting Started with Docker for Machine Learning and MLOps (this tutorial)
- Production-Ready Docker for MLOps
To learn how to use Docker for MLOps, from fundamentals and commands to best practices and containerizing your first ML project, just keep reading.

Why Use Docker for MLOps? Reproducible Machine Learning Environments
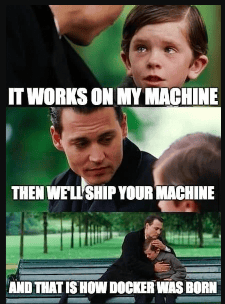
A common phrase in machine learning is “It works on my machine.” That is because ML projects are uniquely fragile. A model that runs fine on a laptop may fail completely on a production server.
Why does this happen? Machine learning brings extra challenges:
- Dependencies: You might have PyTorch 2.2 with Compute Unified Device Architecture (CUDA) 12.1 locally, but the server only supports CUDA 11.8.
- Operating Systems: The project was built on macOS, but the production cluster runs Ubuntu.
- Data Paths: The dataset lives in
./datalocally but in/mnt/datain production. - Conflicting Packages: TensorFlow requires one version of
protobuf, while another package needs a newer one.
For traditional software, these mismatches are frustrating. For ML, they are crippling. Reproducibility requires consistency in both research and production.
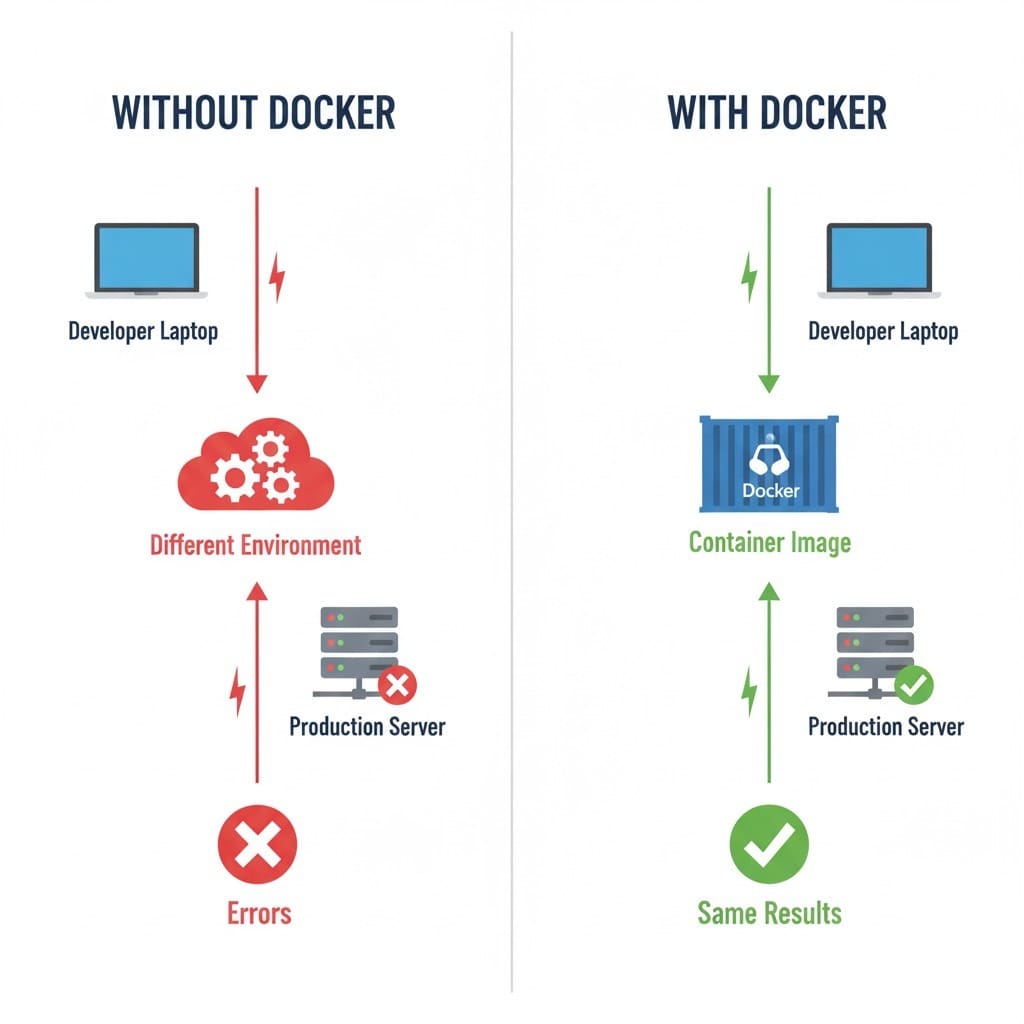
Docker solves this by letting you package code, dependencies, drivers, and configuration into a container image. That image runs the same way everywhere: on a laptop, on a teammate’s machine, or inside a Kubernetes cluster.
A Real Example: Imagine a PyTorch model is trained locally with PyTorch 2.2 + CUDA 12.1. The production server, however, has PyTorch 2.1 + CUDA 11.8. When you try to deploy, your code fails because the CUDA kernels do not match. The result? Debugging hell, wasted hours, and frustrated teammates.
Now enter Docker. With Docker, we package our code, dependencies, and runtime into a container image. This image provides a consistent software environment across compatible hosts in development and production. The CUDA runtime travels with the code. The server still needs a compatible NVIDIA driver.
In the context of MLOps, Docker is not just a convenience. It is the foundation. MLOps requires reproducibility, scalability, and collaboration. If experiments cannot be reproduced, deployment cannot be trusted, and monitoring and retraining are meaningless. Docker makes reproducibility and portability non-negotiable, which is why every modern ML pipeline starts here.
Configuring Your Development Environment
To follow this guide, you only need Docker installed on your system. That is it!
The beauty of containerization is that all Python dependencies (e.g., PyTorch and Lightning) are installed inside the container, so the host machine does not need them.
macOS and Windows
Download and install Docker Desktop
Linux (Ubuntu/Debian)
curl -fsSL https://get.docker.com -o get-docker.sh
sudo sh get-docker.sh
Verify installation
docker --version
docker run hello-world
That is all you need! The container handles everything else. Python, PyTorch, datasets, and dependencies are all managed inside the isolated environment.
Need Help Configuring Your Development Environment?

All that said, are you:
- Short on time?
- Learning on your employer’s administratively locked system?
- Wanting to skip the hassle of fighting with the command line, package managers, and virtual environments?
- Ready to run the code immediately on your Windows, macOS, or Linux system?
Then join PyImageSearch University today!
Gain access to Jupyter Notebooks for this tutorial and other PyImageSearch guides pre-configured to run on Google Colab’s ecosystem right in your web browser! No installation required.
And best of all, these Jupyter Notebooks will run on Windows, macOS, and Linux!
Project Structure
We first need to review our project directory structure.
Start by accessing this lesson’s “Downloads” section to retrieve the source code and example images.
From there, take a look at the directory structure:
docker-mlops-starter/
├── train.py                    # PyTorch Lightning MNIST training script
├── requirements.txt            # Pinned Python dependencies for reproducibility
├── Dockerfile                 # Production-ready Docker configuration
├── .dockerignore              # Build optimization - excludes unnecessary files
└── README.md                  # Complete tutorial and setup guide
This simple structure contains everything needed for containerizing a machine learning project.
train.py: implements a PyTorch Lightning model for MNIST digit classificationrequirements.txt: pins our dependencies (e.g.,torch,torchvision, andpytorch-lightning) for reproducible buildsDockerfile: defines our container blueprint with proper security and optimization practices.dockerignore: excludes unnecessary files to keep our image size small and build times fast
Docker Architecture Explained: Images, Containers, and Virtual Machines
Before we start running commands, it is important to understand what Docker actually is and how it works under the hood. Many new ML engineers use Docker without really grasping its fundamentals, but in MLOps, a clear mental model will save countless hours of debugging later.
Containers vs Virtual Machines
At a glance, containers and virtual machines (VMs) may look similar. Both isolate applications so they can run in their own environments. But there is a crucial difference:
- VMs: simulate an entire operating system, which makes them heavy and resource-intensive.
- Containers: share the host operating system’s kernel and only package the application, its dependencies, and a minimal environment.
Analogy: Think of a VM as a full house with its own foundation, walls, plumbing, and electricity. A container is more like a furnished apartment in a building. It is lighter, starts faster, and is easier to move.
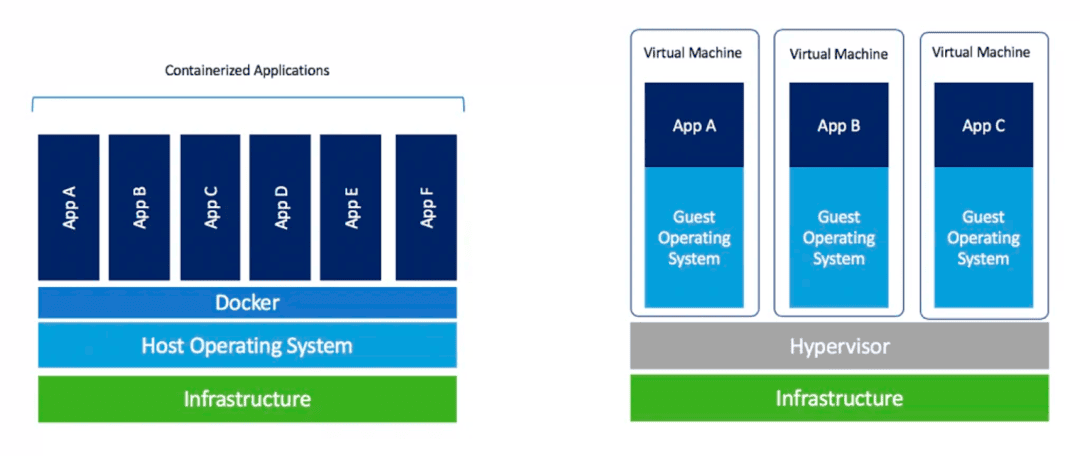
This efficiency is one reason Docker became so popular in machine learning. We can spin up lightweight, isolated environments quickly without waiting minutes for a VM to boot.
Docker Architecture
Docker follows a client–server architecture. When we type commands (e.g., docker run or docker build), we interact with the Docker client, which communicates with the Docker daemon.
- Docker Client: The command-line tool (
docker) we use to run commands such asdocker build,docker pull, anddocker run. - Docker Daemon (
dockerd): A background service that listens for requests from the client and does the heavy lifting (e.g., building images, pulling them from registries, and running containers). - Docker Engine API: The client communicates with the daemon through a representational state transfer (REST) application programming interface (API). On a standard Docker Engine installation on Linux, the default endpoint is the Unix socket at
/var/run/docker.sock. - Docker Registry: A store (e.g., Docker Hub, GitHub Container Registry (GHCR), and Amazon Elastic Container Registry (Amazon ECR)) where images are stored and fetched. The daemon pulls images from registries or pushes images to them.
- Images and Containers: Inside the Docker host, the daemon manages images (blueprints) and runs them as containers (isolated instances).
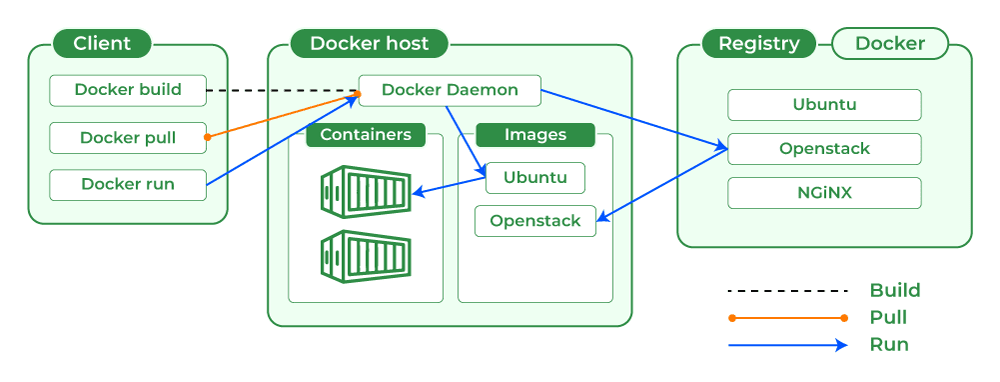
Workflow Example: When we run docker run hello-world, the client sends the request to the daemon. The daemon checks whether the image exists locally and pulls it from a registry if needed. It then creates and runs a container from the image.
⚠️ Common error: If we see
Cannot connect to the Docker daemon at unix:///var/run/docker.sock. Is the docker daemon running?, it means the client cannot talk to the daemon. This usually happens if Docker Desktop (on macOS or Windows) is not running or the Docker service (on Linux) has not started.
Key Terms We Need to Know
- Image: A blueprint for our container. Think of it as a snapshot of the environment (e.g., Python, libraries, and code).
- Container: An instance created from an image. We can start, stop, and remove containers.
- Registry: A place where images are stored and shared. Public registries such as Docker Hub and GitHub Container Registry (GHCR) are widely used. Cloud providers also offer registries such as Amazon Elastic Container Registry (Amazon ECR) and Google Cloud Artifact Registry.
A Note on Podman
While Docker remains one of the most widely adopted container platforms, alternatives are gaining traction. Podman, backed by Red Hat, offers a daemonless architecture and supports running containers without root privileges. It is also compatible with Docker-built images that follow the Open Container Initiative (OCI) image standard. We will stick with Docker throughout this course, but it is useful to be aware of the broader container ecosystem.
With these fundamentals in mind, we can see how Docker uses a client–server architecture to run lightweight, portable containers from images that can be distributed through registries.
Essential Docker Commands for Beginners
Now that we understand the fundamentals, let us get hands-on. Docker is a command-line tool at its core, and learning a few key commands will give you immediate confidence. We will start with the basics: running containers, listing them, inspecting them, and jumping inside.
Running Our First Container
Run the following command to test Docker.
docker run hello-world
If the image is missing locally, Docker pulls it from Docker Hub by default. Docker then runs a container from the image and displays Hello from Docker!
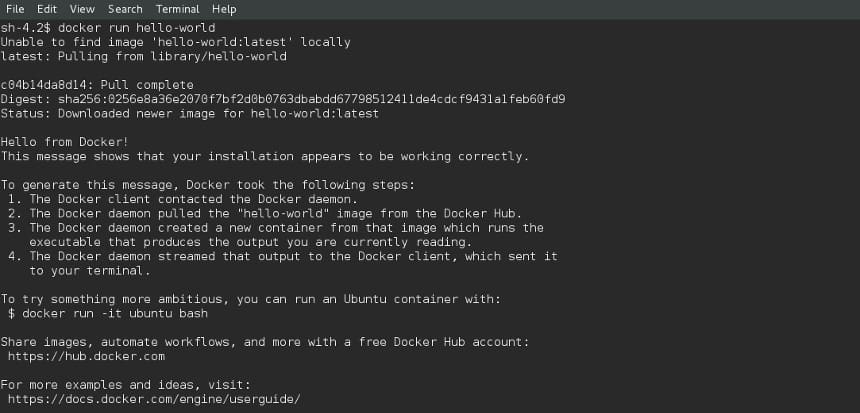
docker run hello-world displays a success message, confirming that Docker can run a container (source: image by the author).Running an Interactive Container
Let us take it further with Ubuntu:
docker run -it ubuntu bash
-it: keeps standard input open (-i) and allocates a pseudo-terminal (-t)ubuntu: is the image used to create the containerbash: is the command we want to run inside the container
An interactive Bash shell opens inside the Ubuntu container.
Listing and Managing Containers
Docker keeps track of all containers we run:
docker ps        # shows running containers
docker ps -a     # shows all containers, including stopped ones
We will see container identifiers (IDs), names, and status.
Run the following command to stop a container.
docker stop <container_id>
Run the following command to remove a stopped container.
docker rm <container_id>
Inspecting Containers and Images
Sometimes we need details:
docker images          # list available images
docker inspect <id>    # view detailed JSON info about a container
docker images lists locally stored images. By default, docker inspect returns details about a container or image in JavaScript Object Notation (JSON).
inspect is especially useful for debugging environment variables, volumes, and networking.
Jumping into a Running Container
If a running container includes Bash, we can open a shell inside it.
docker exec -it <container_id> bash
This is handy for debugging ML jobs, checking logs, or verifying that our dependencies are installed correctly inside the container.
Common Docker Daemon Connection Error
The following error means the Docker client could not connect to the daemon.
Cannot connect to the Docker daemon at unix:///var/run/docker.sock. Is the docker daemon running?
- On Linux systems that use
systemd, we may need to start Docker withsudo systemctl start docker. - On macOS and Windows, ensure the Docker Desktop app is running.
With the Docker commands covered so far, we can:
- pull images and run containers
- work interactively inside containers
- manage and inspect containers
- debug common errors
This is the muscle memory every ML engineer needs before moving into Dockerfiles.
How to Write a Dockerfile for a PyTorch Lightning Project
Now that we can run and inspect containers, let us package an actual ML project. We will containerize a small PyTorch Lightning script that trains on MNIST. The goal is a reproducible CPU image that runs the same on any machine.
Project Layout
docker-mlops-starter/
├─ train.py
├─ requirements.txt
└─ Dockerfile
requirements.txt
torch==2.3.1
torchvision==0.18.1
pytorch-lightning==2.3.0
numpy==1.26.4
Tip: pin versions to keep results stable across machines.
Minimal Training Script
train.py
import torch, torchvision
from torch.utils.data import DataLoader
from torchvision import transforms
import pytorch_lightning as pl
from pytorch_lightning import LightningModule
from torch import nn
from torch.nn import functional as F

class MNISTModel(LightningModule):
    def __init__(self):
        super().__init__()
        self.net = nn.Sequential(
            nn.Flatten(),
            nn.Linear(28*28, 256), nn.ReLU(),
            nn.Linear(256, 10)
        )
    def forward(self, x):
        return self.net(x)

    def training_step(self, batch, _):
        x, y = batch
        logits = self(x)
        loss = F.cross_entropy(logits, y)
        self.log("train_loss", loss, prog_bar=True)
        return loss

    def configure_optimizers(self):
        return torch.optim.Adam(self.parameters(), lr=1e-3)

def make_loaders(batch_size=128):
    tfm = transforms.Compose([transforms.ToTensor()])
    train = torchvision.datasets.MNIST(root="./data", train=True, download=True, transform=tfm)
    return DataLoader(train, batch_size=batch_size, shuffle=True, num_workers=2)

if __name__ == "__main__":
    loader = make_loaders()
    model = MNISTModel()
    trainer = pl.Trainer(max_epochs=1, accelerator="cpu", log_every_n_steps=10)
    trainer.fit(model, loader)
This script downloads the MNIST training dataset to ./data if needed and trains for 1 epoch.
Dockerfile (CPU, slim base)
Dockerfile
# 1) Base image (small, secure)
FROM python:3.11-slim

# 2) System deps: git and build tools if wheels are missing
RUN apt-get update && apt-get install -y --no-install-recommends \
    git build-essential && \
    rm -rf /var/lib/apt/lists/*

# 3) Workdir
WORKDIR /app

# 4) Copy only dependency files first for better layer caching
COPY requirements.txt .

# 5) Install Python deps (no cache to reduce image size)
RUN pip install --no-cache-dir -r requirements.txt

# 6) Now copy the source code
COPY train.py .

# 7) Create a non-root user (good hygiene)
RUN useradd -m runner
USER runner

# 8) Default command
CMD ["python", "train.py"]
Why this works well for ML:
- Slim base: keeps the image lean
- Layer order: speeds up rebuilds when only the source code changes
- Non-root user: is a safer default
- The default
CMDruns the training script and can be overridden at runtime.
Once we have written the Dockerfile, it is useful to understand how it becomes something we can actually run. Docker does not execute the Dockerfile directly. Instead, it uses the instructions in the Dockerfile to build a Docker image. When we run that image, Docker creates and starts a container from it.
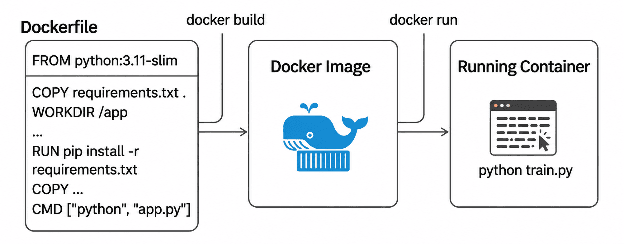
Dockerfile to produce an image. Running the image starts a container that executes the ML code (source: image by the author).Optional: .dockerignore
Keep images small and builds fast by excluding junk.
.dockerignore
__pycache__/
*.pyc
*.pyo
*.pyd
.data/
data/
.venv/
.env
.git
Build and Run
From the project root:
# Build the image
docker build -t ml-docker-demo:cpu .

# Run training (downloads MNIST into a container-local /app/data)
docker run -it ml-docker-demo:cpu
We should see the dataset download and training logs. If we prefer to persist data on the host, we can try:
# Save MNIST to a host folder so future runs reuse it
mkdir -p $(pwd)/data
docker run -it -v $(pwd)/data:/app/data ml-docker-demo:cpu
Overriding the Command
We can specify the command at runtime without changing the Dockerfile.
docker run -it ml-docker-demo:cpu python train.py
Quick Troubleshooting
- Build Fails on Dependencies: ensure
build-essentialis installed in the image and that versions inrequirements.txtare compatible. - Cannot Connect to the Docker Daemon: start Docker Desktop or run
sudo systemctl start dockeron Linux systems that usesystemd. - Slow Rebuilds: keep
requirements.txtstable so Docker can cache that layer; only copy code after installing deps.
What We Achieved
- a portable CPU training container that runs the same everywhere
- pinned dependencies and a sensible
Dockerfilestructure - reproducible results that our teammates can verify
Next, we will discuss best practices for ML images and then move to handling data and environments before jumping into multi-stage builds and Compose in the next lesson.
Dockerfile Best Practices for Machine Learning Images
Now that we can build and run a basic ML Dockerfile, it is time to refine it. A naïve Dockerfile works, but in production MLOps we will quickly hit problems: bloated images, long build times, security vulnerabilities, or containers that fail when we stop them abruptly. These best practices will help us build leaner, faster, and safer images that scale into production.
Use Slim or Distroless Images
Whenever possible, start with lightweight base images such as python:3.11-slim. They strip away unnecessary OS components, reducing size and attack surface.
For serving-only workloads, Google Distroless images are even better. They contain only what we explicitly install. This matters in MLOps because smaller images:
- push and pull faster in CI/CD
- deploy quicker on Amazon ECS, Lambda, or Kubernetes
- reduce the risk of hidden vulnerabilities
Pin Dependencies
Reproducibility in ML depends on consistent versions. Always pin package versions in requirements.txt:
torch==2.3.1
pytorch-lightning==2.3.0
Unpinned dependencies can break silently when a library updates. Tools such as pip-tools or Poetry help generate locked dependency files for long-term stability.
Use .dockerignore
A .dockerignore file is like .gitignore for Docker. It prevents unnecessary files and directories (e.g., datasets, notebooks, checkpoints, and .git) from bloating the image.
Example
__pycache__/
*.ipynb
data/
checkpoints/
This is crucial in ML where stray files can easily add gigabytes to an image.
Separate Dev and Prod Images
Development images often include Jupyter, debuggers, and extra tools. Production images should only have what is needed to run inference.
Example Workflow
- Dev image: includes Jupyter and extra debugging libraries
- Prod image: minimal runtime with just the trained model and inference code
This separation reduces attack surface and avoids dragging unnecessary dependencies into production.
Optimize Layering in Dockerfiles
Each RUN, COPY, or ADD instruction creates a new cached layer. Ordering them well improves caching and speeds rebuilds.
Example
# Good practice: copy requirements first
COPY requirements.txt .
RUN pip install -r requirements.txt

# Then copy code
COPY . .
This way, Docker reuses the dependency layer if code changes but requirements.txt stays the same. It can save minutes in CI/CD rebuilds.
Every instruction adds a cached layer, which means Docker only rebuilds the parts of the image that changed plus the layers stacked on top. For example, if we change our training script, Docker will not reinstall dependencies. It will reuse the cached dependency layer and just rebuild from the COPY train.py step onward.
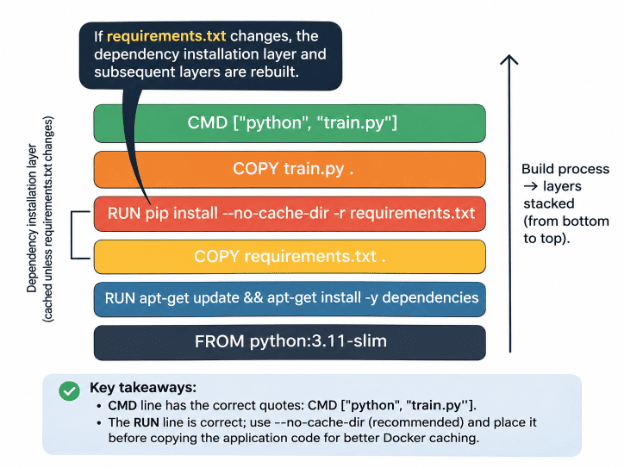
Dockerfile layer caching by installing dependencies before copying application code, ensuring that changes to train.py do not trigger unnecessary dependency reinstallation (source: image by the author).This is why the order of instructions matters. Place stable instructions (e.g., installing dependencies) near the top and volatile instructions (e.g., copying code) lower down.
CMD vs ENTRYPOINT, ADD vs COPY
CMD: provides a default command but can be overridden (e.g.,docker run myapp echo "hi").ENTRYPOINT: is harder to override. It is better suited to containers that should always start the same way (e.g., an inference server).
For ML, use CMD ["python", "train.py"] during experimentation, but prefer ENTRYPOINT in production serving images.
Similarly:
COPY: is preferred for code and data.ADD: should only be used for special cases (e.g., extracting tarballs or downloading from URLs).
Handle Shutdown Gracefully with STOPSIGNAL
Training and inference jobs need to exit cleanly so they do not corrupt checkpoints or leave GPUs in a bad state.
We can specify how a container reacts when it is stopped:
STOPSIGNAL SIGTERM
And in our ML code, catch termination signals to save model state before exit.
By following these practices, we can avoid common Docker pitfalls in MLOps (e.g., slow builds, bloated images, brittle containers, and irreproducible results). Think of this section as setting the “hygiene baseline” for everything that comes later. FastAPI, Amazon Elastic Container Service (Amazon ECS), Lambda, and Kubernetes all benefit when our images are lean and predictable.
Next, we will move into Handling Data and Environments, where we will learn how to properly mount datasets, pass environment variables, and handle GPU workloads without baking them into our images.
Docker for ML: Dataset Mounts, Environment Variables, and GPU Support
One of the most common mistakes ML engineers make when starting with Docker is trying to bake everything into the image (e.g., datasets, model weights, and secrets). Bundling datasets and model weights can make images large and hard to maintain. Baking secrets into an image can expose them to anyone with access to it. Docker provides ways to supply data, configuration, and secrets at runtime.
Mounting Volumes for Datasets
Instead of copying datasets into the image, mount them at runtime:
docker run -it -v $(pwd)/data:/app/data ml-docker-demo:cpu
-v $(pwd)/data:/app/datamaps our local./datafolder to/app/datainside the container.- This way, our training script can load data from
/app/data, and we avoid bloating the image. - We can swap datasets without rebuilding images.
Example
docker run -it -v $(pwd)/data:/app/data ml-docker-demo:cpu python train.py --data /app/data/mnist.csv
Passing Environment Variables
For configuration and secrets (e.g., API keys, training parameters, and S3 paths), use --env flags.
docker run -it --env EPOCHS=20 --env API_KEY=12345 ml-docker-demo:cpu
Inside the container, these variables are accessible like normal environment variables in Python:
import os
epochs = int(os.getenv("EPOCHS", 10))
api_key = os.getenv("API_KEY")
This is safer and more flexible than hardcoding.
Why You Should Not Bake Datasets into Images
Imagine we copy a 10 GB dataset into our Docker image. Every time we rebuild, push, or deploy that image, we are moving 10 GB around. This:
- slows down CI/CD pipelines
- wastes cloud storage and bandwidth
- makes collaboration painful (teammates must pull giant images)
Best practice: keep data outside images, mount it at runtime, and version it separately with tools (e.g., Data Version Control (DVC)).
GPU Support with Docker
Most ML workloads need GPUs. Docker integrates cleanly with NVIDIA hardware using the NVIDIA Container Toolkit.
Check GPU availability in a container:
docker run -it --gpus all nvidia/cuda:12.1-base nvidia-smi
--gpus allexposes all available GPUs to the container- we can restrict GPU access by index with
--gpus '"device=0"'
Note: In production, GPU scheduling is usually managed by Kubernetes. But Docker GPU support is the stepping stone.
With these practices, we now know how to handle datasets, configs, and GPUs the right way in Docker. No more bloated images or brittle setups.
In the next section, we will cover alternatives to Docker (Podman, Buildah, and Apptainer) before finishing the lesson with a hands-on reproducibility demo.
Docker Alternatives for MLOps: Podman, Buildah, and Apptainer
Docker may be the most popular container tool, but it is not the only option. MLOps engineers should be familiar with major alternatives (e.g., Podman, Buildah, and Apptainer).
Podman
Podman is often called the “drop-in replacement” for Docker. It runs containers without a central daemon and without requiring root privileges, which makes it more secure for enterprise setups. Podman is fully compatible with OCI (Open Container Initiative) images, so anything we build with Docker will run with Podman.
Where it shines: high-security environments, Red Hat/OpenShift ecosystems.
Buildah
Buildah focuses on building OCI images without a daemon. It is frequently used together with Podman in CI/CD pipelines. Unlike Docker, Buildah allows us to build images as non-root, which can reduce security risks in multi-user environments.
Where it shines: lightweight image building in automated pipelines.
Apptainer (Formerly Singularity)
Apptainer (formerly known as Singularity) is popular in high-performance computing (HPC) and research labs. It is designed to run containers on shared systems without requiring root access.
Where it shines: research, HPC clusters, academic ML projects.
Should We Switch?
For most ML engineers, Docker remains the default choice. It is supported everywhere (e.g., from our laptop to Amazon ECS, Lambda, and Kubernetes). Alternatives (e.g., Podman and Apptainer) matter if we work in specialized environments, but 95% of the time Docker is the most practical option.
Knowing about alternatives provides context: Docker is not the only container solution, but it is the one we will almost always start with in MLOps.
Next, we will finish this lesson with a hands-on wrap-up: containerizing and running a simple ML project to demonstrate reproducibility in action.
Train a PyTorch Model in Docker and Share the Image on Docker Hub
Let us bring together everything we have learned in this lesson. We will containerize and run the small PyTorch Lightning MNIST trainer from earlier, then prove that the results are reproducible across environments.
Step 1: Build the Image
From our project folder (with Dockerfile, requirements.txt, and train.py):
docker build -t ml-docker-demo:cpu .
This creates a portable image with our ML training code and dependencies pinned.
Step 2: Run the Training
Run the container:
docker run -it ml-docker-demo:cpu
We see the MNIST dataset download (into /app/data inside the container) and 1 epoch of training logs.
Step 3: Prove Reproducibility
Now, share our image with a teammate or push it to a registry:
docker tag ml-docker-demo:cpu <your-dockerhub-username>/ml-docker-demo:cpu
docker push <your-dockerhub-username>/ml-docker-demo:cpu
Our teammate (or a cloud server) can now pull and run the exact same environment:
docker pull <your-dockerhub-username>/ml-docker-demo:cpu
docker run -it <your-dockerhub-username>/ml-docker-demo:cpu
The results (e.g., dataset download, logs, and training behavior) will match ours, regardless of what OS or CUDA drivers are on their machine. That is reproducibility in action.
Step 4: Extend the Experiment
Try overriding defaults:
# Run training with a custom number of epochs
docker run -it --env EPOCHS=5 ml-docker-demo:cpu python train.py
Or mount datasets from our host:
docker run -it -v $(pwd)/data:/app/data ml-docker-demo:cpu
Step 5: Reflection
With this demo, we have proven the value of Docker in MLOps:
- Our ML project is now portable and reproducible.
- Collaborators can run our code without setup headaches.
- The same container can later be deployed to Amazon ECS, Lambda, or Kubernetes.
This completes the 2nd lesson in our MLOps series: Getting Started with Docker for Machine Learning and MLOps.
In the next and final lesson of this series (Lesson 3: Production-Ready Docker for MLOps), we will cover multi-stage builds, Docker Compose, GPU-enabled images, and best practices for CI/CD pipelines.
What's next? We recommend PyImageSearch University.

120+ total classes • 115+ hours of on-demand code walkthrough videos • Last updated: November 2026
★★★★★ 4.84 (128 Ratings) • 16,000+ Students Enrolled
I strongly believe that if you had the right teacher you could master computer vision and deep learning.
Do you think learning computer vision and deep learning has to be time-consuming, overwhelming, and complicated? Or has to involve complex mathematics and equations? Or requires a degree in computer science?
That’s not the case.
All you need to master computer vision and deep learning is for someone to explain things to you in simple, intuitive terms. And that’s exactly what I do. My mission is to change education and how complex Artificial Intelligence topics are taught.
If you're serious about learning computer vision, your next stop should be PyImageSearch University, the most comprehensive computer vision, deep learning, and OpenCV course online today. Here you’ll learn how to successfully and confidently apply computer vision to your work, research, and projects. Join me in computer vision mastery.
Inside PyImageSearch University you'll find:
- ✓ 120+ courses on essential computer vision, deep learning, and OpenCV topics
- ✓ 94+ Certificates of Completion
- ✓ 115+ hours of on-demand video
- ✓ Brand new courses released regularly, ensuring you can keep up with state-of-the-art techniques
- ✓ Pre-configured Jupyter Notebooks in Google Colab
- ✓ Run all code examples in your web browser — works on Windows, macOS, and Linux (no dev environment configuration required!)
- ✓ Access to centralized code repos for all 540+ tutorials on PyImageSearch
- ✓ Easy one-click downloads for code, datasets, pre-trained models, etc.
- ✓ Access on mobile, laptop, desktop, etc.
Summary
In this lesson, we learned why Docker is the foundation of modern MLOps. We started with the “it works on my machine” problem and saw how Docker solves reproducibility issues that plague machine learning projects. We explored Docker fundamentals and architecture, got hands-on with essential commands, and built our first ML Dockerfile for a PyTorch Lightning MNIST trainer.
Along the way, we covered best practices for creating lean and secure images, how to handle data and environment variables properly, and why we should avoid baking datasets into containers. We also looked at GPU support, graceful shutdowns, and alternatives (e.g., Podman and Apptainer).
Finally, we put it all together in a hands-on demo that proved our ML project runs consistently across environments. With these skills, we now have the foundation to containerize machine learning workflows reliably: a crucial first step before moving on to deployment, orchestration, and scaling in the next lessons.
Citation Information
Singh, V. “Getting Started with Docker for Machine Learning and MLOps,” PyImageSearch, S. Huot, A. Sharma, and P. Thakur, eds., 2026, https://pyimg.co/flyvj
@incollection{Singh_2026_getting-started-docker-machine-learning-mlops,
  author = {Vikram Singh},
  title = {{Getting Started with Docker for Machine Learning and MLOps}},
  booktitle = {PyImageSearch},
  editor = {Susan Huot and Aditya Sharma and Piyush Thakur},
  year = {2026},
  url = {https://pyimg.co/flyvj},
}
To download the source code to this post (and be notified when future tutorials are published here on PyImageSearch), simply enter your email address in the form below!

Download the Source Code and FREE 17-page Resource Guide
Enter your email address below to get a .zip of the code and a FREE 17-page Resource Guide on Computer Vision, OpenCV, and Deep Learning. Inside you'll find my hand-picked tutorials, books, courses, and libraries to help you master CV and DL!


Comment section
Hey, Adrian Rosebrock here, author and creator of PyImageSearch. While I love hearing from readers, a couple years ago I made the tough decision to no longer offer 1:1 help over blog post comments.
At the time I was receiving 200+ emails per day and another 100+ blog post comments. I simply did not have the time to moderate and respond to them all, and the sheer volume of requests was taking a toll on me.
Instead, my goal is to do the most good for the computer vision, deep learning, and OpenCV community at large by focusing my time on authoring high-quality blog posts, tutorials, and books/courses.
If you need help learning computer vision and deep learning, I suggest you refer to my full catalog of books and courses — they have helped tens of thousands of developers, students, and researchers just like yourself learn Computer Vision, Deep Learning, and OpenCV.
Click here to browse my full catalog.